


We may receive a commission when you use our affiliate links. However, this does not impact our recommendations.

A master’s bench that anyone can build.
Building a serious workbench is a rite of passage for many woodworkers. It’s usually an ambitious project requiring a lot of skill, lumber, time, money, and tools—but it doesn’t have to be that hard. Here’s an alternative.
This bench is every bit as good as one that costs thousands of dollars. It’s rigid, heavy and dead flat. Its vises offer all the holding power you need. But you can build it on a budget in a short time. You don’t have to make complicated joints or use big equipment. It’s a bench for everyone.
Key Budget Bench Features

Inexpensive materials A bunch of 2x4s, a little 3/4″ poplar, one sheet each of 3/4″ MDF and 1/4″ birch—that’s all you’ll need.
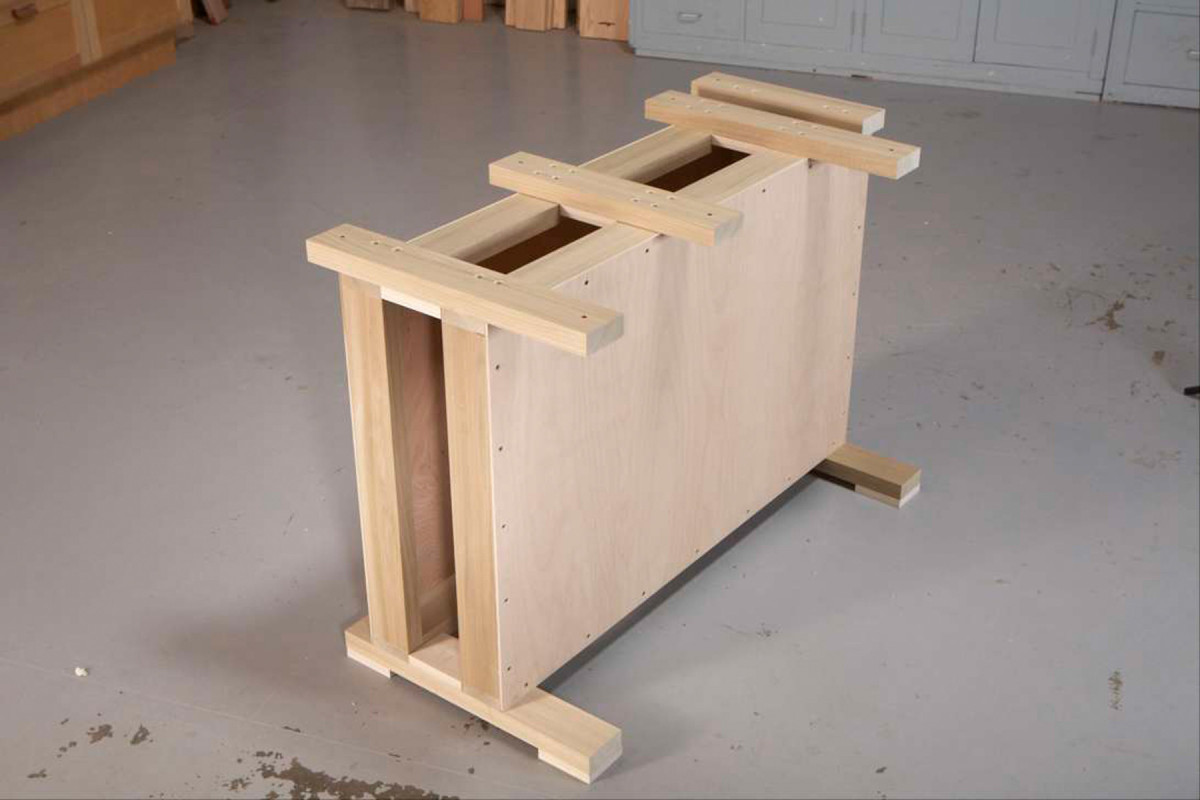
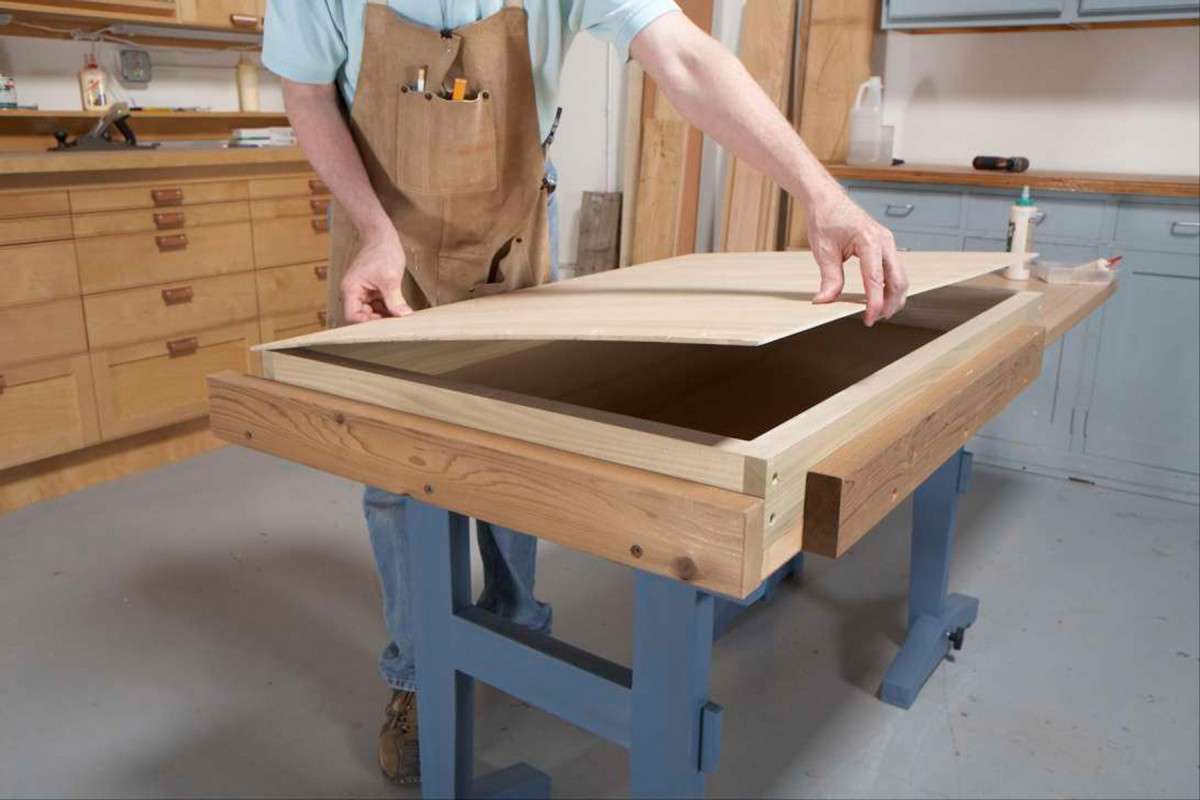
Rigid construction The base is a box that’s skinned with plywood. (The ends and top are removed here). It won’t rack, bend or twist.

Absolutely flat top This is critical for a good bench, but not hard to make. The base is designed to keep the top from sagging.
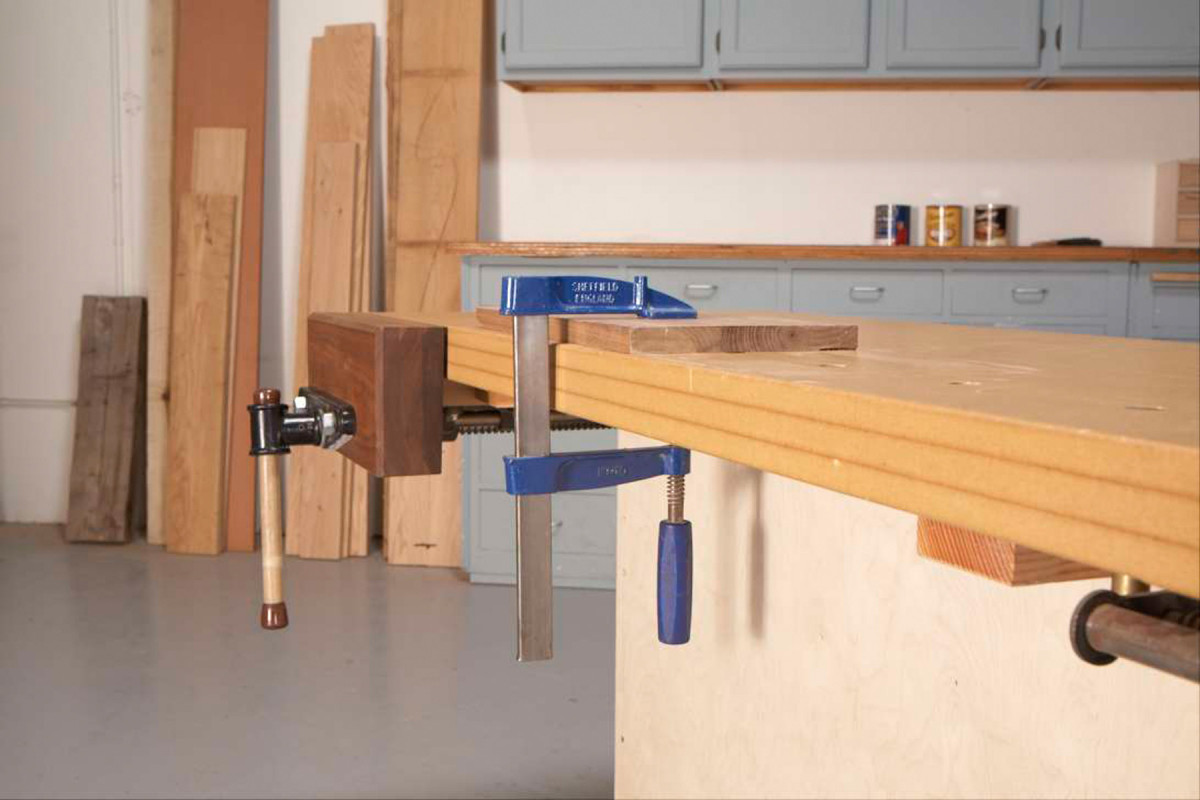
Clamping room The top has a big overhang so there’s plenty of room for clamping. Its underside is flat, too—there’s no annoying lip.
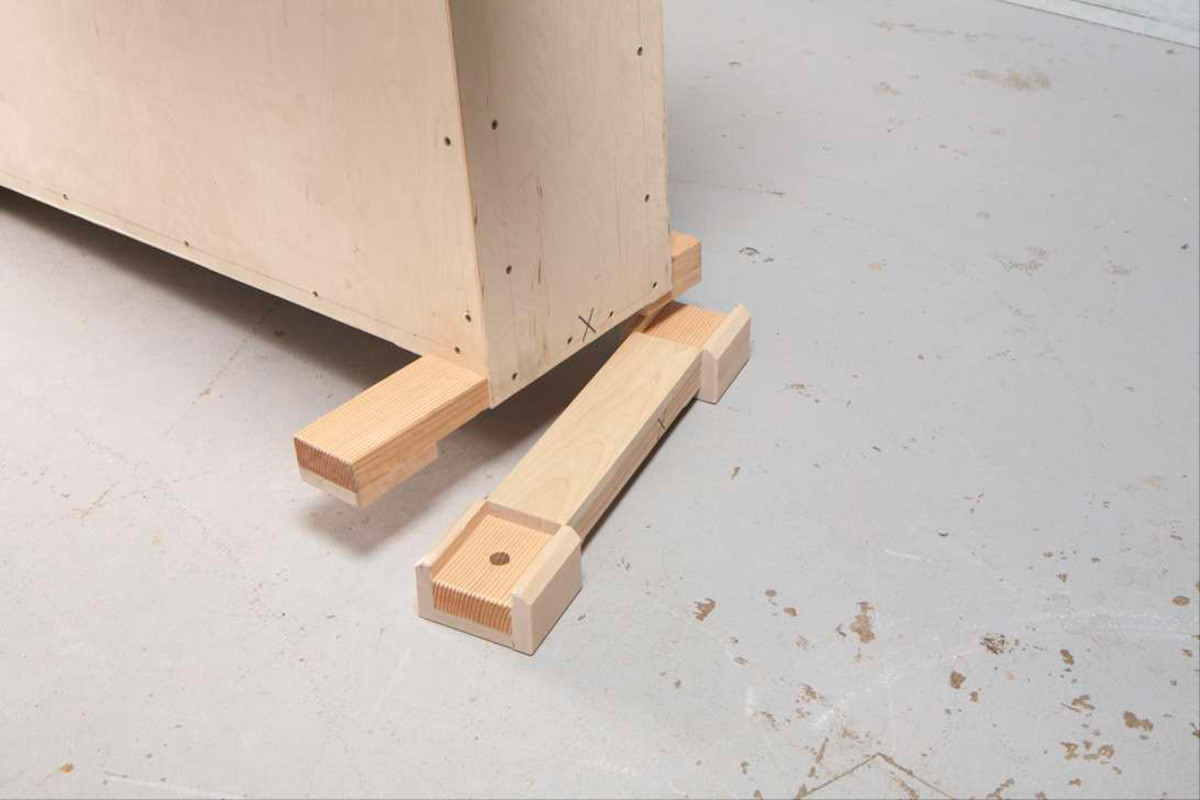
Adjustable height To raise the bench for use with power tools, just lift each end and scoot an additional foot underneath.
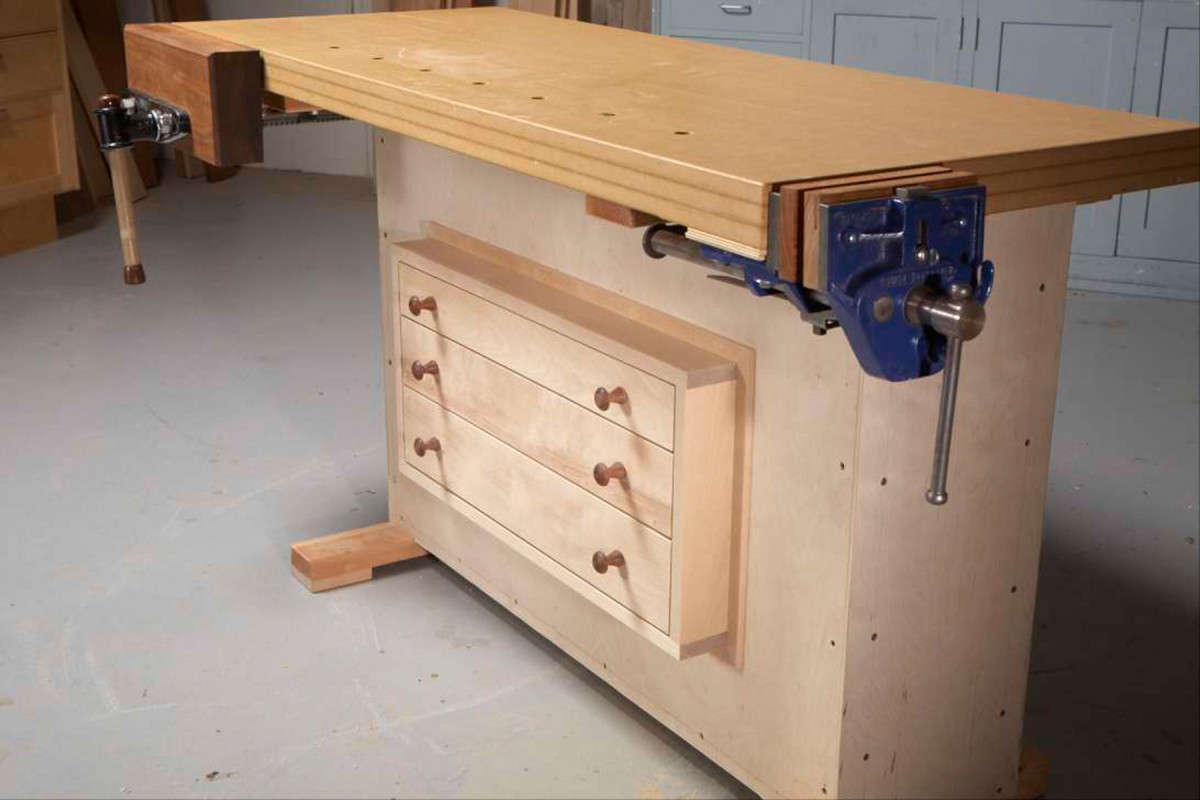
Storage option You can add a drawer unit later on, if you wish. It passes right through the hollow center of the base.
How tall should a workbench be?
When you use a plane, a bench should be about wrist height. When you use a router or a sander, it should be about two to three inches taller.
This bench works for both hand tools and power tools: You can easily raise or lower it with two removable riser blocks. It’s equally sturdy at both heights.
As designed, the bench is quite low—about right for a hand-tool user who is 5′ 8″ tall. If you’re taller, or if you don’t need a low, hand-tool-friendly bench, just make the feet twice as thick or add tall blocks underneath them. (The bench’s base is made from a single sheet of plywood, and is about as tall as it can be without cutting into a second sheet.)
Box-Beam Bench Cut List and Diagrams
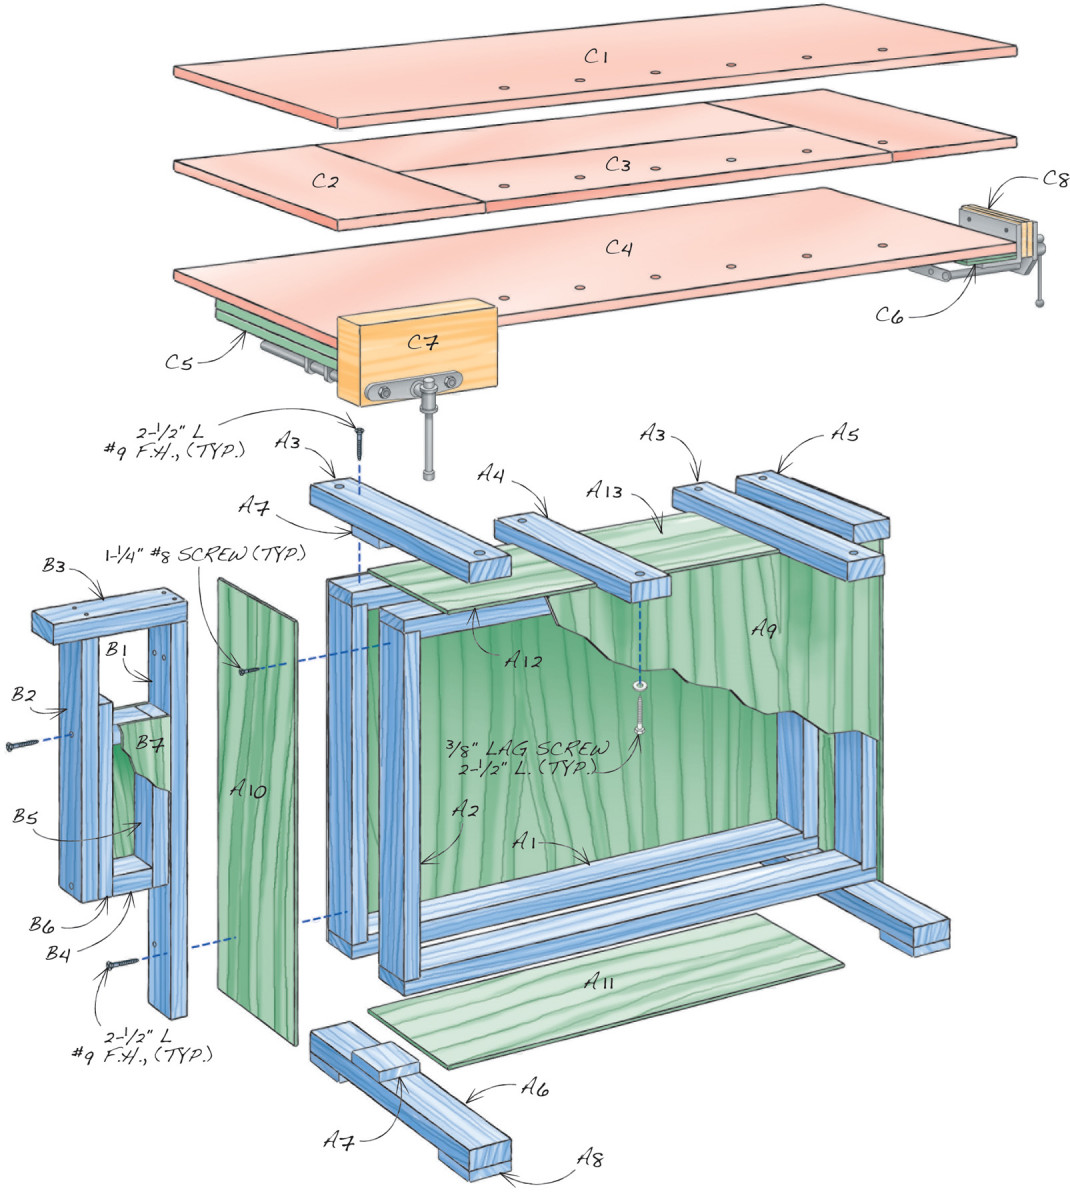
Fig. A) Exploded View
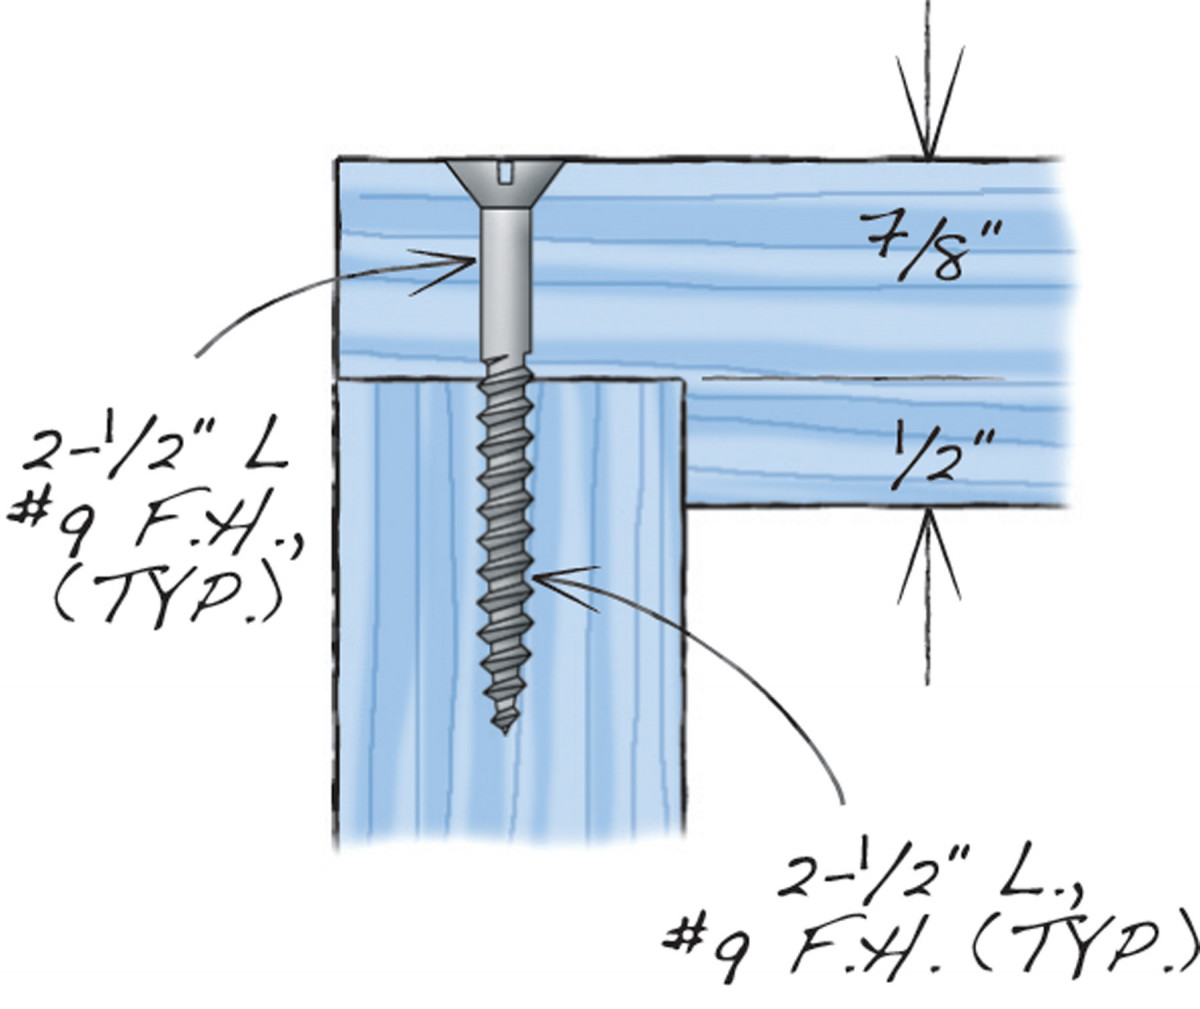
Fig. B) Frame Detail
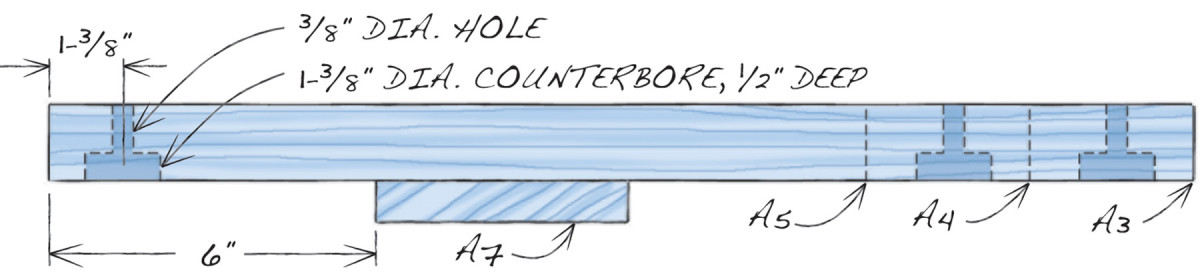
Fig. C) Cleat Detail
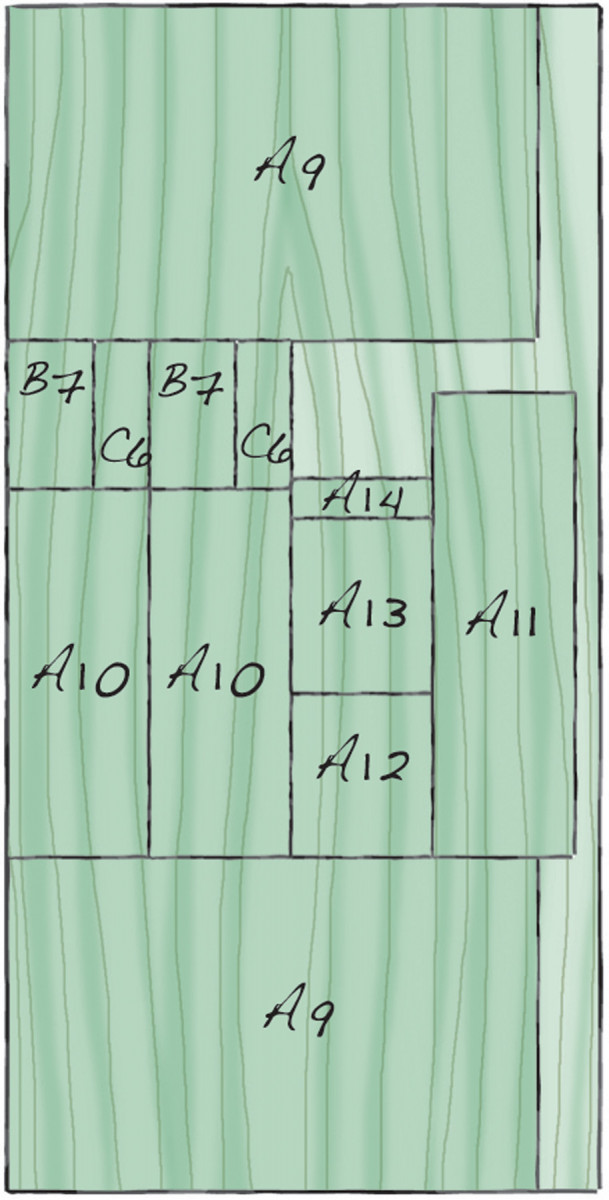
Fig. D) 1/4″ Plywood Cutting Diagram
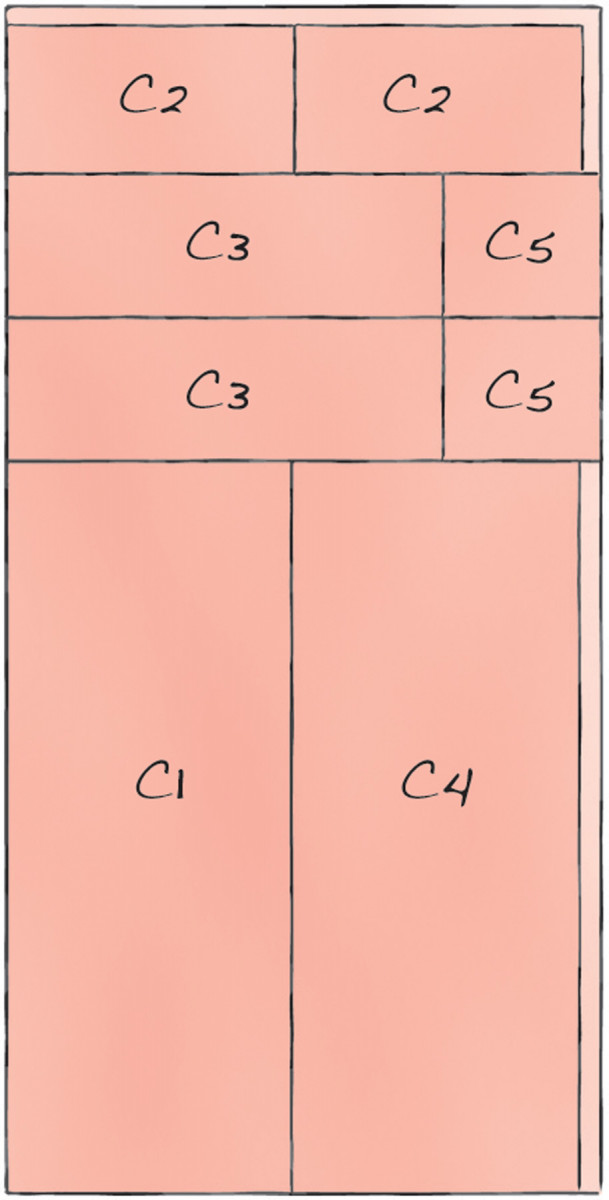
Fig. E) 3/4″ MDF Cutting Diagram
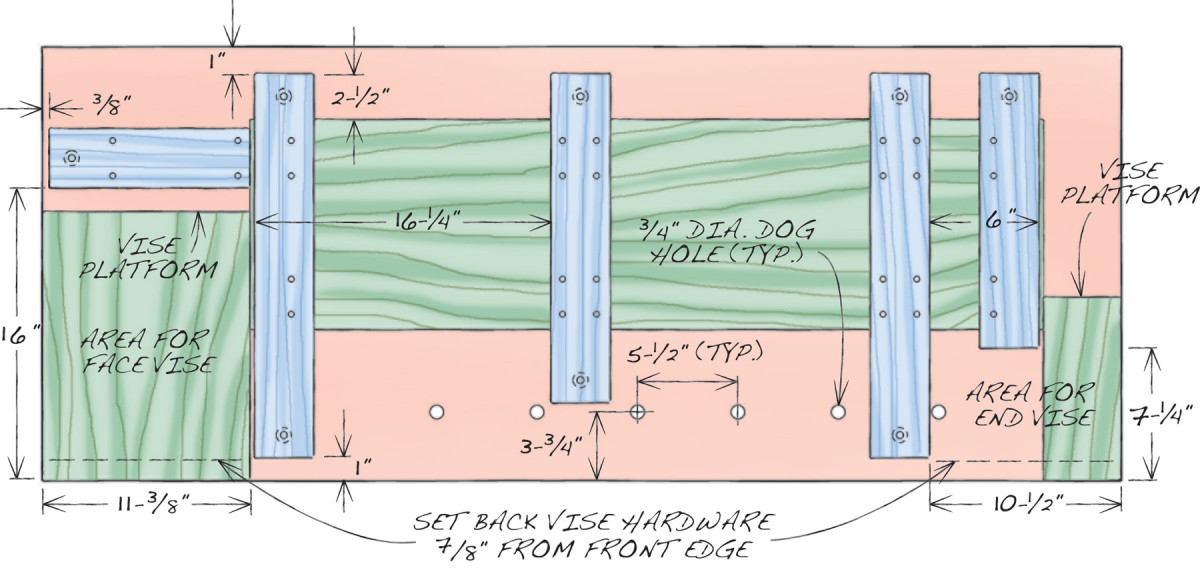
Fig. F) Top View of Base
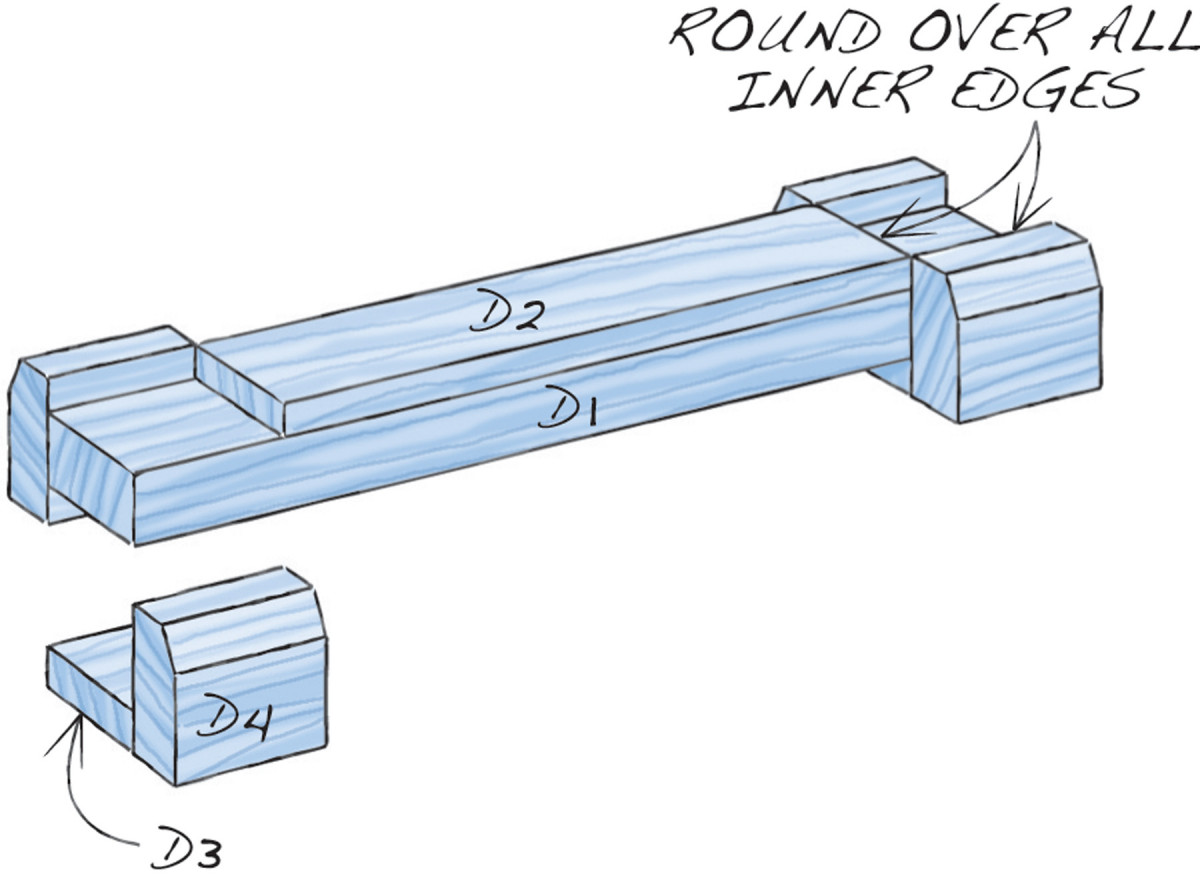
Fig. G) Riser
Materials
I’ve designed this bench to keep the cost way down—so you can afford two very nice vises. All of the materials are available at a home center. I’ve squeezed the sheetstock pieces out of one sheet of 1/4″ birch plywood and one sheet of 3/4″ MDF. Most of the solid-wood pieces can be made from fir 2x4s; the others are poplar 1x4s.
The 2x4s must be dry (6% to 8% MC). Dimensional lumber doesn’t come that dry, however; you’ll have to plan ahead and wait at least six months for the wood to dry out before using it. In addition, the 2x4s must be flat and straight. You’ll have to joint or plane the wood after it’s dry—the cutting list dimensions allow for this.
If you’d like to get started right away, there are two alternatives to 2x4s. First, you could glue poplar 1x4s together to make the 2×4 material; they’re dry enough straight from the store. (You wouldn’t have to joint or plane them, either.) Second, you could buy 6/4 (1-1/2″) kiln-dried yellow poplar and have a lumberyard joint and plane it for you. Milling the lumber yourself usually yields the best results, though.
If you have the budget and a jointer and a planer, roughsawn poplar would be the best choice for building this bench. That’s what I used in all the construction photos.
Build the base
Before you begin, buy the vises (see Source). Make sure they’ll fit in the space allotted (Fig. F). Many different vises will work, but some may require more room. If that’s the case, reposition a few bench parts to free up more space.

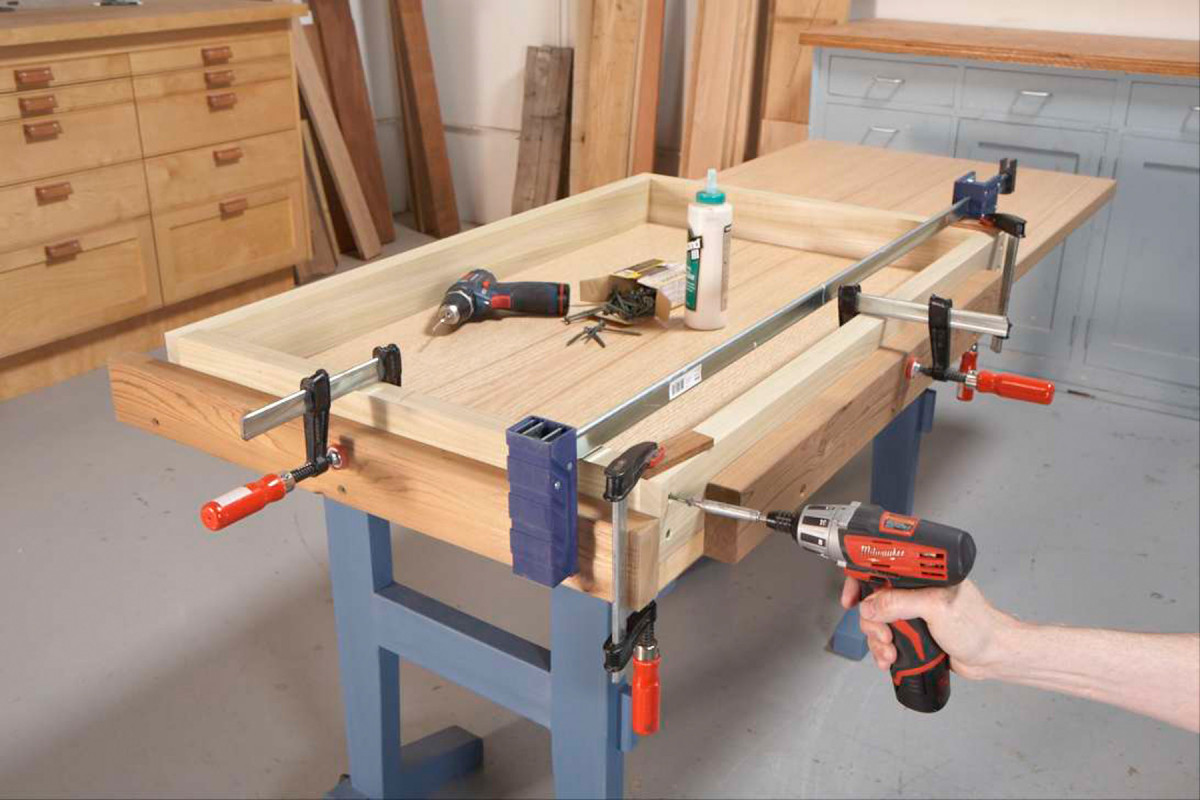
1. Make a flat assembly table—it’s essential for building this bench. A hollow-core door placed on a pair of sawhorses works well. Screw some boards to one corner to help keep your work square.
The key to successfully building this bench is to work on a large surface that is truly flat. I recommend using a 30″ hollow-core door (Photo 1). It’s inexpensive, easy to move and store, and will come in handy for building many other projects. Fasten two boards to the sides of the door to form a square corner.
2. Build a pair of frames on the assembly table. Clamp their sides to the corner pieces to make sure each frame is square.
Start by milling all the solid-wood parts for the base (A1–A8). Cut them to final length. Using a dado set in your tablesaw, cut rabbets on the ends of the rails (A1, Fig. B). Glue and screw the rails to the stiles (A2), one corner at a time (Photo 2). Make sure their faces are flush. Build two of these frames.
3. Stiffen each frame with an oversize skin of 1/4″ plywood. Glue and screw the plywood to the frame, then rout the plywood flush all around.
Cut the plywood panels (A9) for the frames (Photo 3, Fig. D). Note that they’re slightly oversize. Place the panels on the frames and drill pilot holes for the screws, spacing them about 5″ to 6″ apart. Glue and screw the panels to the frames. After the glue dries, use a router and a flush-trim bit to make the panels even with the frames.
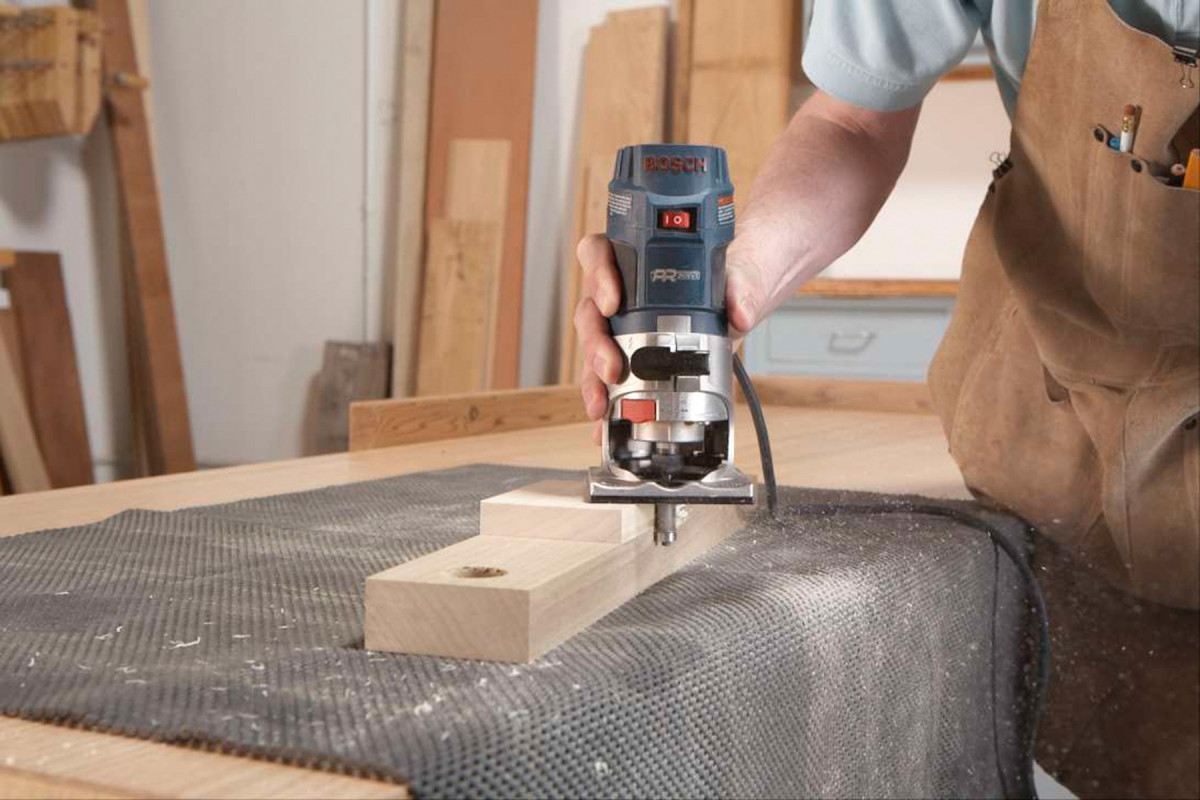
4. Make the cleats that will tie the frames together. Glue an extra-wide spacer onto each piece, then rout its sides flush with a laminate trimmer.
Make the cleats (A3, A4 and A5) and feet (A6) by gluing spacers (A7) to each piece (Fig. C). Be sure that the spacers are positioned square to the piece underneath. Trim the spacers flush (Photo 4). Drill holes in the cleats for fastening them to the top with lag screws.
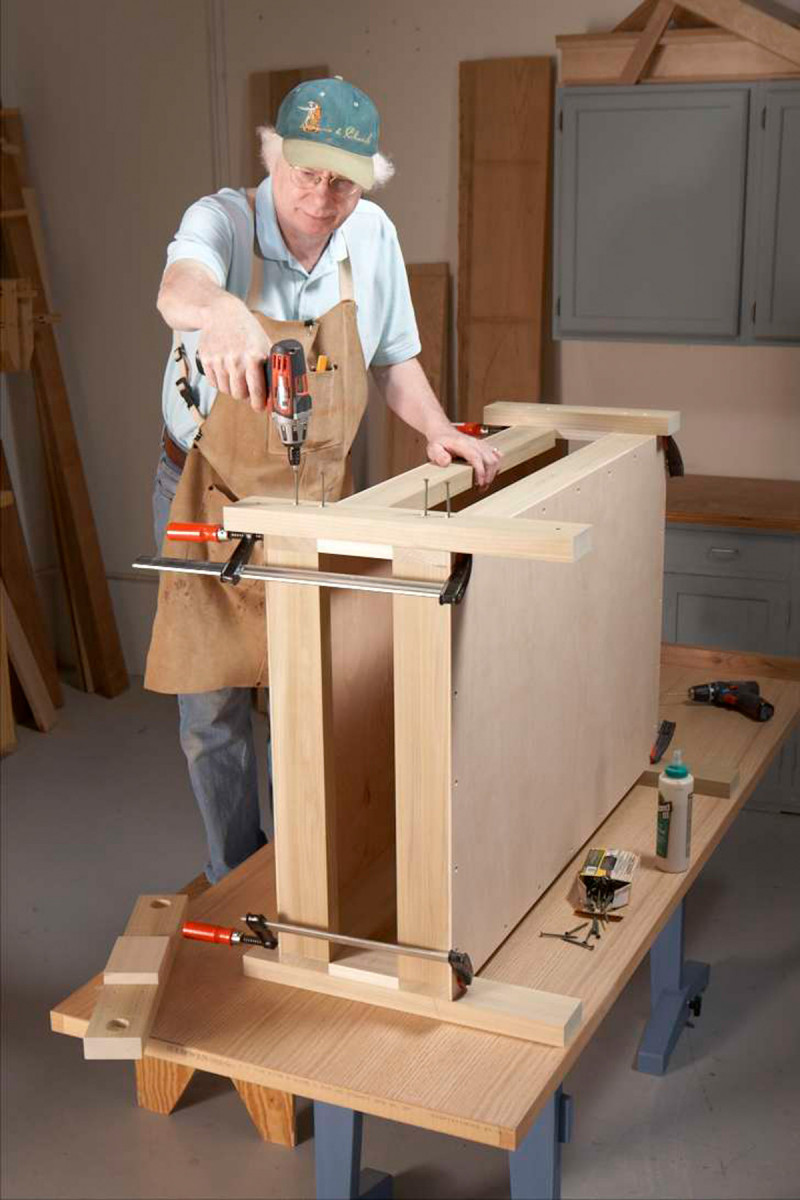
5. Assemble the box beam by gluing and screwing the cleats to the frames. Again, it’s essential to do this on the assembly table, so the base stays flat.
Drill and countersink pilot holes in the cleats and feet (see Fig. F for hole locations). Clamp up the base without glue, making sure that the ends of the frames are flush with the sides of the outer cleats and feet. Continue drilling the pilot holes into the frames. Remove all four cleats, then glue and screw the outer ones only (Photo 5).
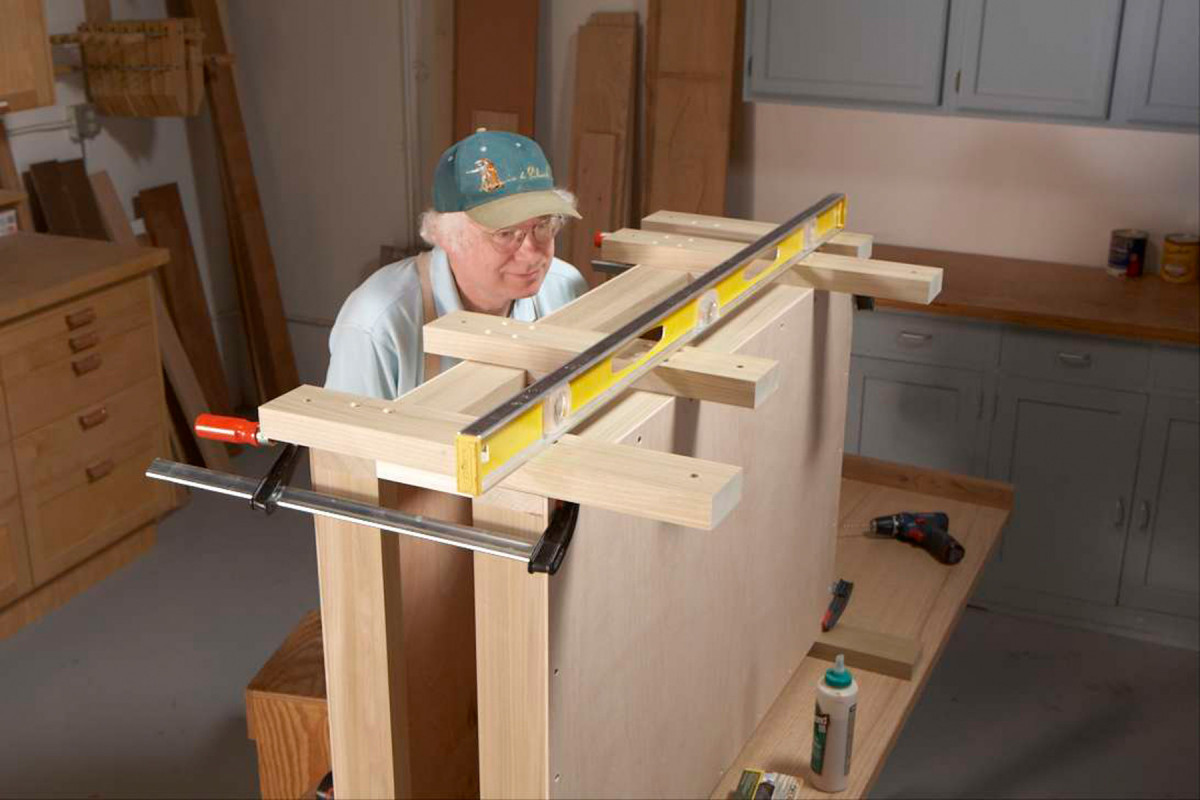
6. Sight across the top of the box beam with the middle cleats in place—before gluing them on. Everything must be level.
All of the pieces that support the top of this bench must be level with each other. If they’re not, the top will eventually sag. (It’s made from MDF, which isn’t as stiff as solid wood.) Place the two middle cleats in position and make sure they’re level with the outer cleats (Photo 6). If your frame members are straight, everything should be fine. If the middle cleats are low, shim them with paper; if they’re high, sand or plane them thinner. Glue the cleats in place.
Turn over the base and glue and screw the feet. Glue and screw pads (A8) under the feet, then trim them flush. Cut the end panels (A10), glue and screw them to the base, then trim their sides flush. Cut the bottom panel (A11). Glue and screw it to the base, then trim flush. Turn the base over and add the top panels (A12, A13 and A14).
Add the brace on the left end of the base. Cut all the solid wood parts (B1–B6). Glue the box parts (B4, B5 and B6). Cut the plywood faces (B7) and glue them to the box. Trim flush. Glue and screw the box to the inner stile (B1). Screw the inner stile and box to the base; note that the top of this part sits below the base by the thickness of the arm (B3, Fig. A). Clamp the outer stile (B2) to the box’s long side (B6). Place the arm in position and adjust the outer stile until the arm is level. Screw the outer stile and arm in place.
Make the riser blocks (D1–D4, Fig. G). You can make these any height you wish. They should fit tight, so the bench won’t wiggle.
Build the top
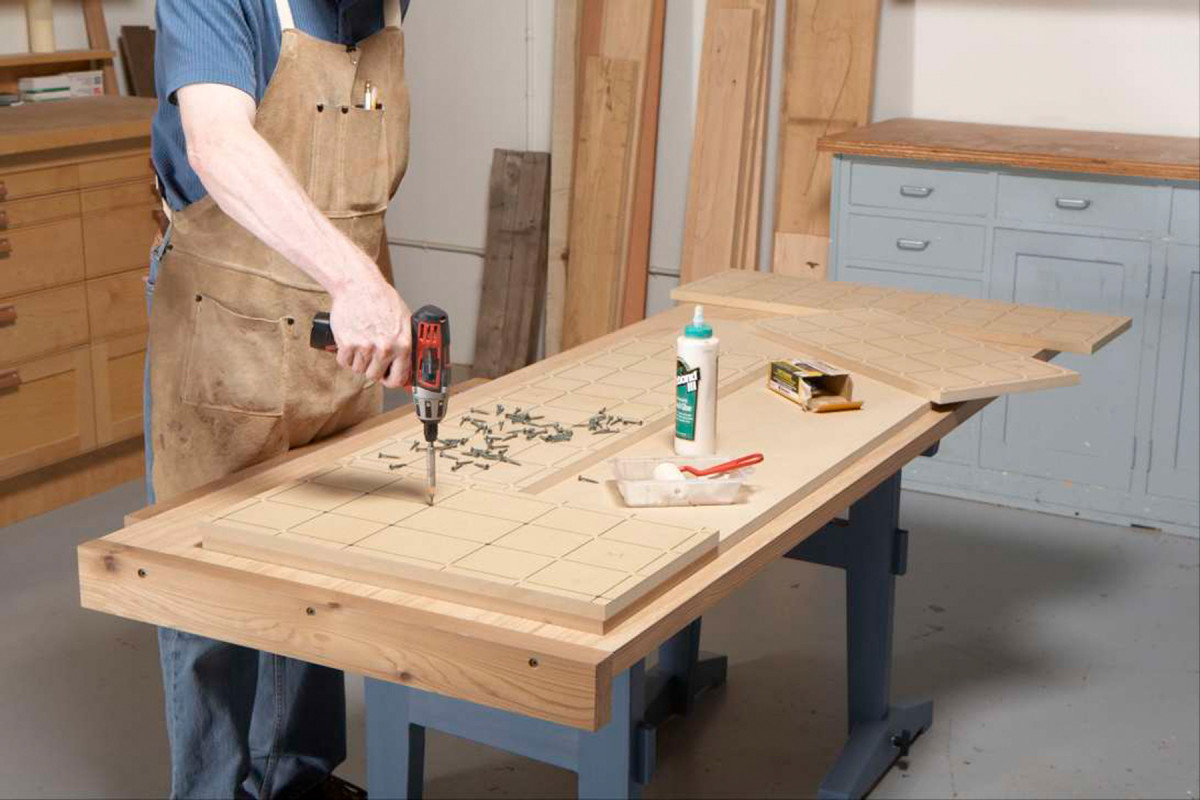
7. Assemble the top in stages. It’s composed of three layers of MDF. Use lots of screws as miniature clamps to apply even pressure when you glue the pieces together.
Cut all of the top pieces (C1–C6, Fig. E) to size. You’ll be building the top in stages, upside down. Each layer is glued to the piece below using 1-1/4″ screws as clamps (Photo 7). To begin, place the top (C1) on the assembly table, then place the center pieces (C2 and C3) in position and make sure they fit snug.
Draw grids on these pieces to locate the screws; the lines should be 3/4″ in from each edge and spaced about 4″ to 5″ apart. Clamp the four pieces to the top and pre-drill 1-1/4″ deep holes for all the screws. Countersink the holes. Remove the center pieces and lightly countersink the opposite side of the holes, plus the holes in the top piece. This guarantees that the pieces will lie flat when you screw them together.
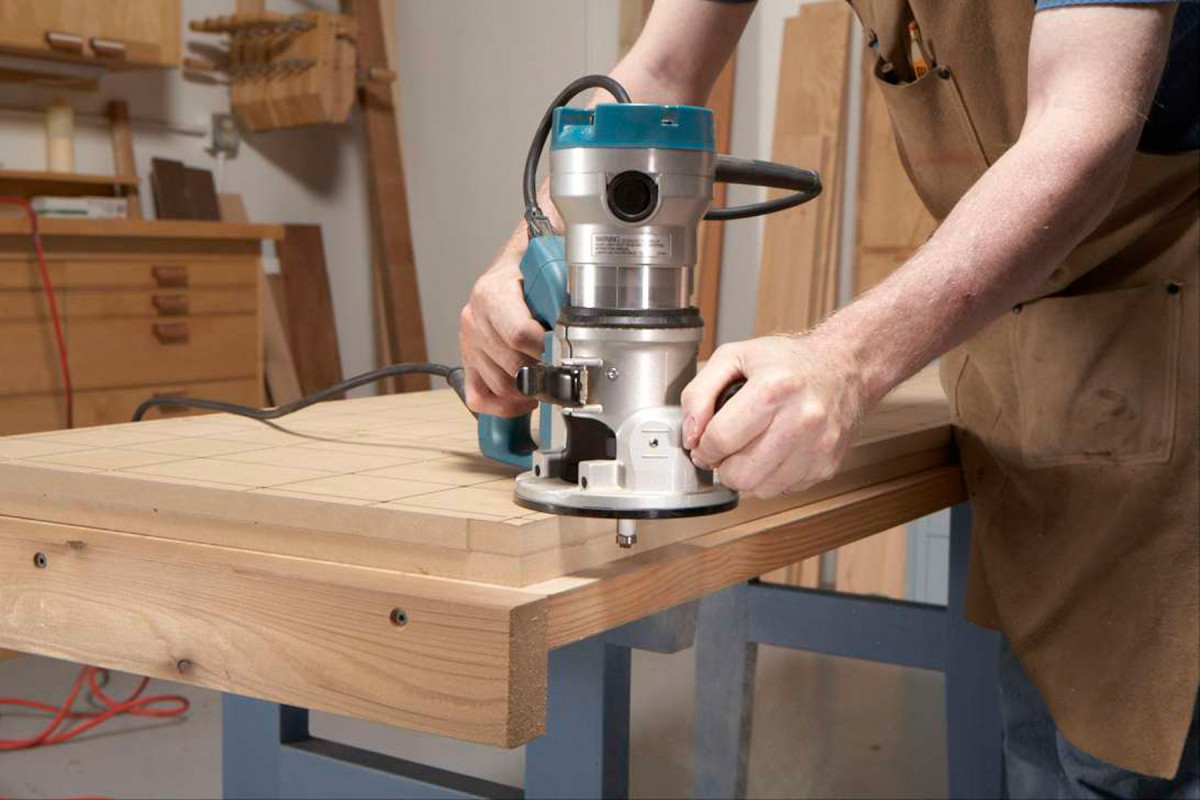
8. Rout the pieces flush. Remove the screws, then add the next layer. The result is a top that’s dead flat—and the box-beam base will keep it that way.
Glue and screw the center pieces, one at a time. Apply the glue with a small paint roller. After the glue dries, trim the edges flush (Photo 8). Remove the screws and repeat the same process for the bottom piece (C4) and the platforms for the face vise (C5) and end vise (C6).
Add the vises while the top is upside down. One note on the face vise: The front (C7) must be tapered, top to bottom (Fig. H). This ensures that the top of the vise pinches first as it closes. Make the taper by taping a 1/8″ shim under one side of the face, then run the block through a planer.
The top of the face vise should be flush with the top of the bench. Drill the mounting holes in the vise face so it sits about 1/16″ above the benchtop, then level the vise’s top after it is installed. Follow the same procedure with the end vise faces (C8).
Fasten the top to the base. Drill pilot holes 1/8″ deeper than the full length of the lag screws. Drill holes for the bench dog, making sure they don’t hit any of the cleats. (These holes must be plumb; make a 1-3/8″ thick guide block and use a drill press to drill a 3/4″ hole through it.) Finish the top with three coats of oil-based poly.
Shopping List
Lumber
• 50 linear feet 2×4
• 1 sheet 3/4″ MDF
• 1 sheet 1/4″ birch plywood
• 8 linear feet of 3/4″ x 4″ hardwood,
not including vise faces
Hardware
• 2 boxes of 1-3/8″ deck screws
• 1 box of 2-1/2″ deck screws
• 8 lag screws, 3/8″ x 2″
• 8 washers, 3/8″ i.d.
• 4 lag screws, 5/16″ x 3″ (for face vise)
• 4 lag screws, 5/16” x 2-1/2” (for end vise)
• 16 washers, 5/16″ i.d. (double them up)
• 5 #14 x 2″ FH screws (for face vise)
SOURCE
Woodcraft Supply, woodcraft.com, 800-225-1153, Large Front Vise, #144805, $76.99; Handle, 17E52, $6.99; 7″ Quick Release Bench Vise, #152633, $99.99; Pinnacle Brass Bench Dogs, 3/4″ dia., #151101, $29.99.


