


We may receive a commission when you use our affiliate links. However, this does not impact our recommendations.
 This reproduction is a fun build and a great gift for a budding woodworker.
Project #1922 • Skill Level: Intermediate • Time: 3 days • Cost: $200
“Hand and heart lead to life.” was an early motto of the North Bennet Street Industrial School (NBIS), now called the North Bennet Street School (NBSS). Founded in 1885 by Pauline Agassiz Shaw, a progressive Boston philanthropist, the school was established to “train students for careers in traditional trades that use hand skills in concert with evolving technology, to preserve and advance craft traditions and promote greater appreciation of craftsmanship.” The school started off as a social and educational experiment designed to help residents in the North End of Boston, many of whom were immigrants, acclimate to America, learn a trade, socialize and become better citizens. In pursuit of this goal Shaw learned of Otto Salomon’s work at the Sloyd School in Naas Sweden and was instrumental in bringing Swedish Educational Sloyd to America. Under the direction of Gustaf Larsson, a graduate of Naas, he helped adapt Educational Sloyd to American needs at NBIS as a training lab and also went on to direct the Sloyd Training School in Boston for training teachers in manual arts instruction. Moving beyond traditional apprenticeships Educational Sloyd was a structured program wherein hand skills are taught by building a series of model projects, deliberately chosen to result in useful household objects prescribed in a specific sequence that helped bolster hand skills, mental skills, confidence and prepare for the next exercise. The goal was to train the “whole person”-the body and the mind working in concert to produce better work, an appreciation for hand work and improve overall well-being.
As a graduate of NBSS I can say that the core principles of Sloyd are still alive and well at the school even if the term ‘Sloyd’ is not often explicitly used. We started with the fundamentals, taught in a hands on manner and built upon those skills until we reached our culminating projects which involved demonstrating the hand and design skills learned. It served me well as a student and continues to be a part of my own teaching efforts. In the years since I graduated I’ve done some research on Sloyd in general and specifically in relation to NBSS and have found it to be a fascinating rabbit hole of discovery.
In teaching students and teachers alike Larsson designed a novel workbench which went on the be called the “Larsson Improved Sloyd Bench” which was manufactured en masse by Chandler & Barber which was a large tool supplier in Boston that specialized in manual training supplies that were shipped around the world.
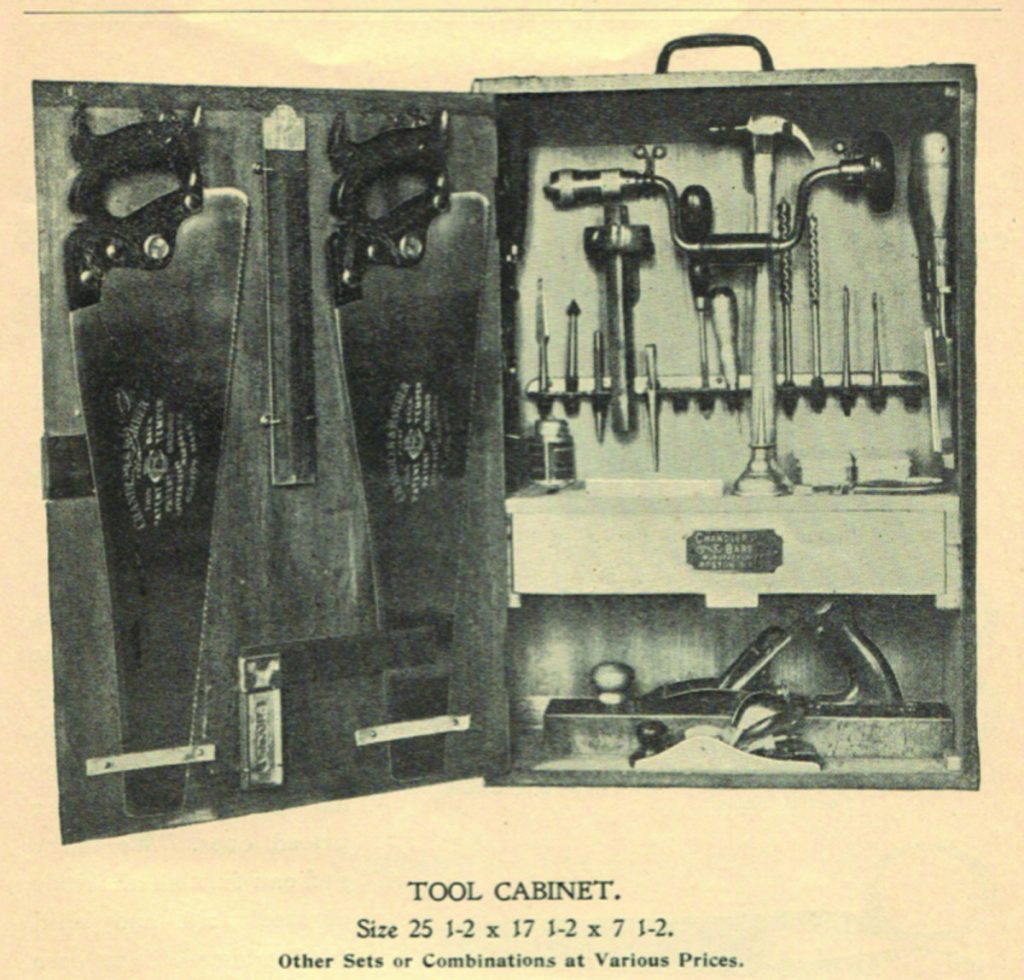
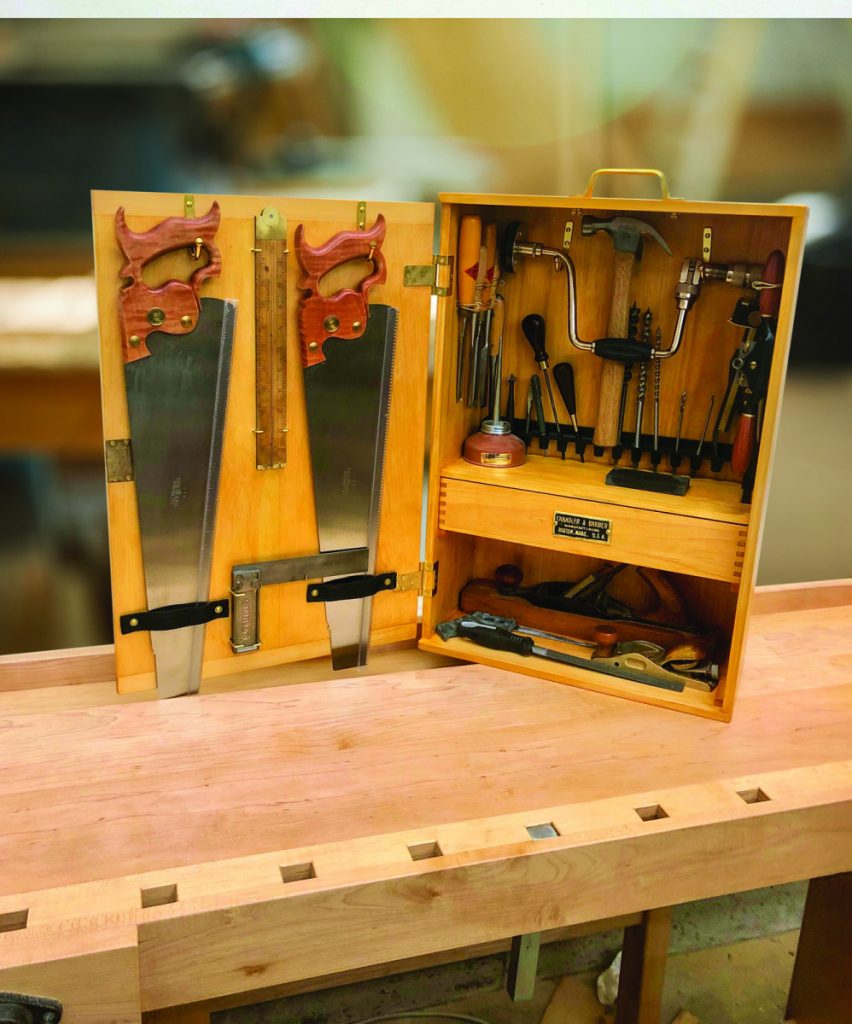
As a companion to that workbench Chandler & Barber also offered ‘Good Quality’ tool sets of varying sizes and combinations including a handsome set that came in a hand tool cabinet. The cabinet was even advertised in the NBIS Alumni newsletter as a ‘practical holiday gift’ for the Sloyder in your life. After learning of the existence of this cabinet when researching Larsson’s workbench I serendipitously stumbled on the only extant example of one of these cabinets I’ve found to date. We’ll walk through how I built my replica of the cabinet and its hardware in this article.
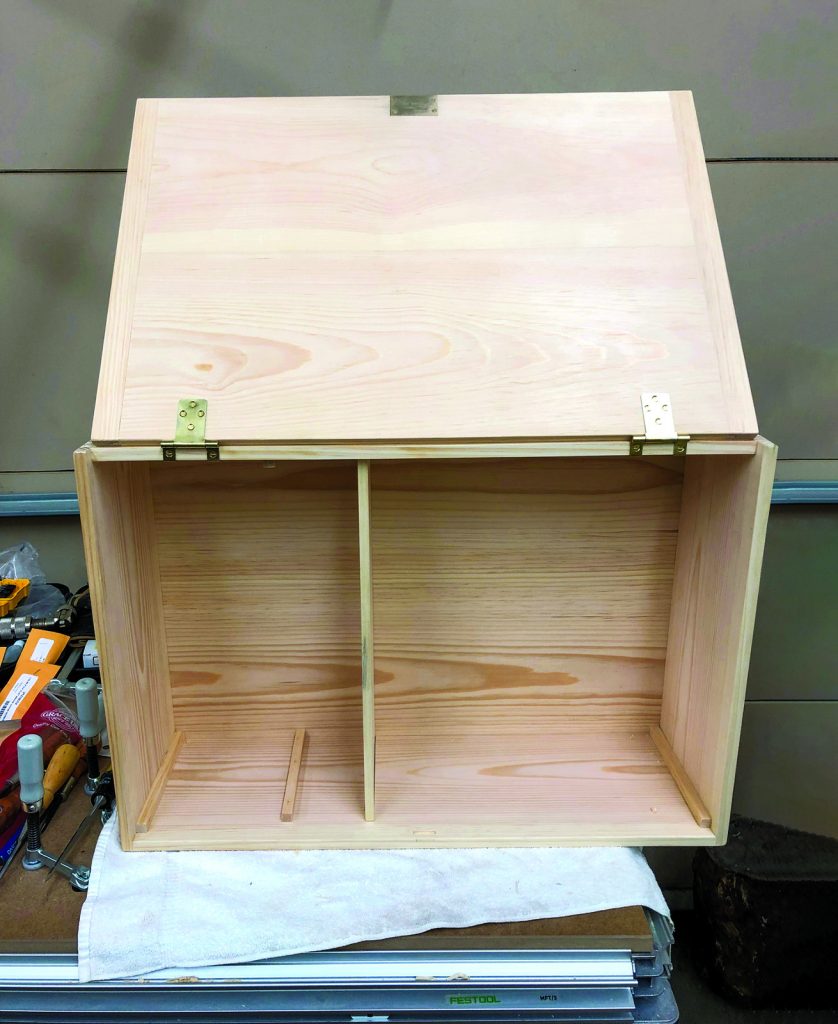
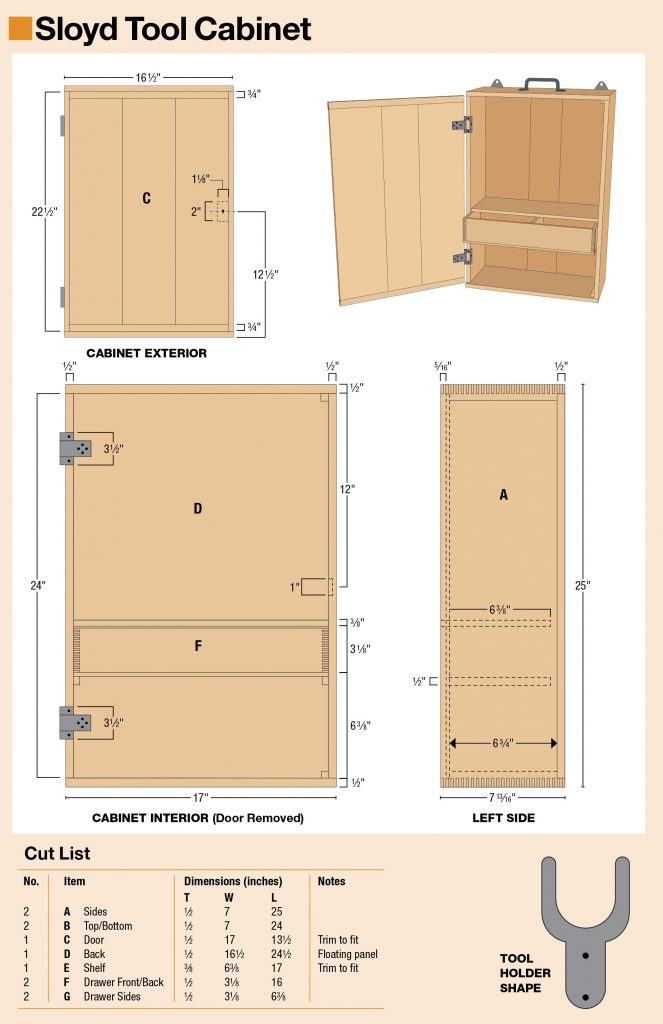
Building the Cabinet
Start off by milling your cabinet stock. I used clear Eastern White Pine, but Oak would also be appropriate if you want to build the more upscale option. Mill the stock for the cabinet sides, back and top to be 1/2″thick. The fixed shelf in the cabinet, and the drawer sides are 3/8″ thick. The drawer bottom is 1/4″ thick. The drawer runners and corner reinforcements are 7/16″ square. From some scrap wood mill a small amount of 1/4″ square stock we’ll use as part of our jig below. (You’ll want two 21/2″long pieces).
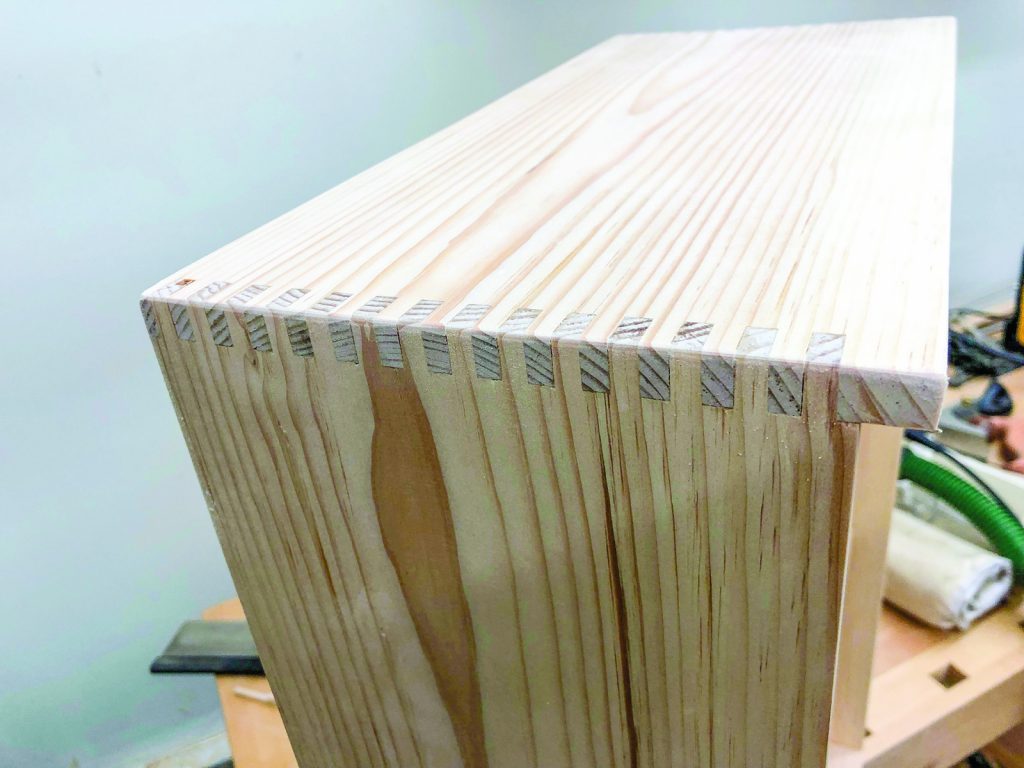
Finger Joints
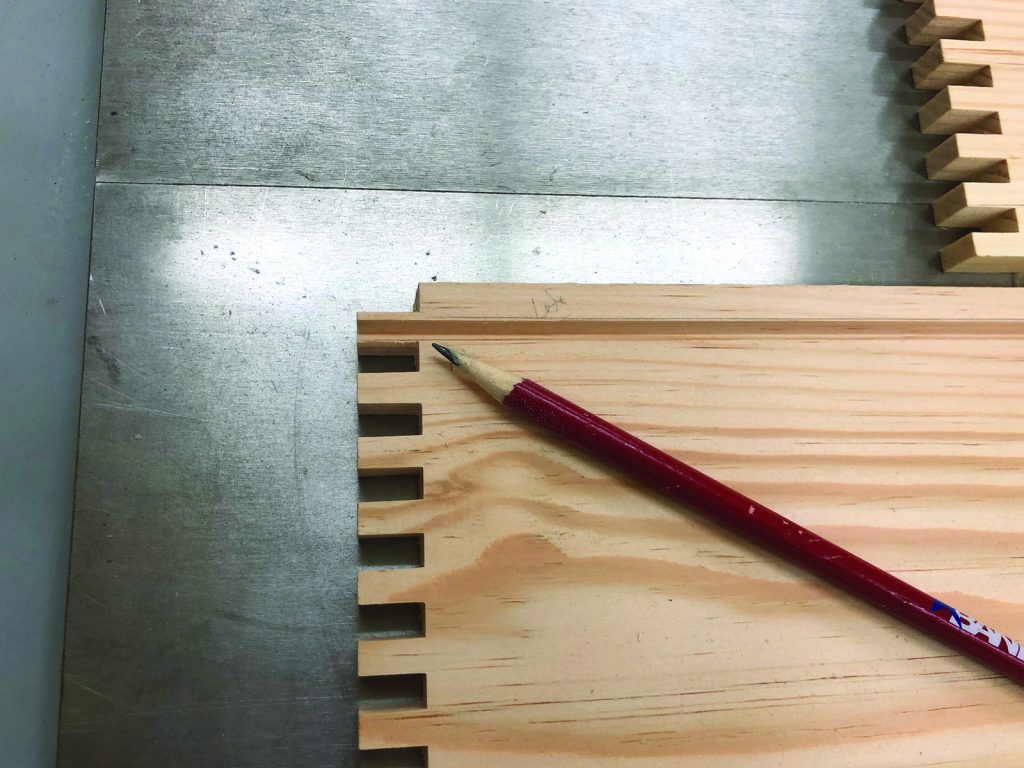
Cut your cabinet sides, top and bottom to size. Label your parts and explicitly label the inside and outside as it’s important when cutting the finger joints to know the orientation. Hold onto any sizeable off-cuts as you can use them to fine tune your finger jointing jig. I used a Freud Box Joint Cutter set which is similar to a dado set but specifically ground to cut clean shoulders on the box joint fingers. Configure the two blades to cut 1/4″ wide fingers and set the height of the blade to 1/2″.
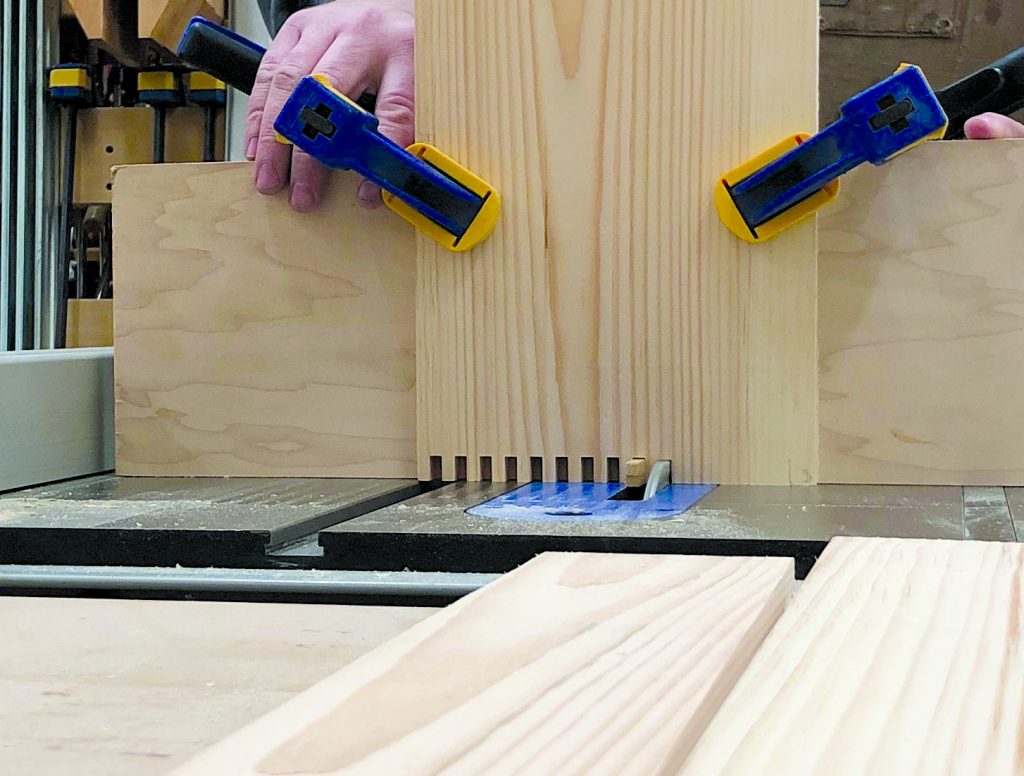
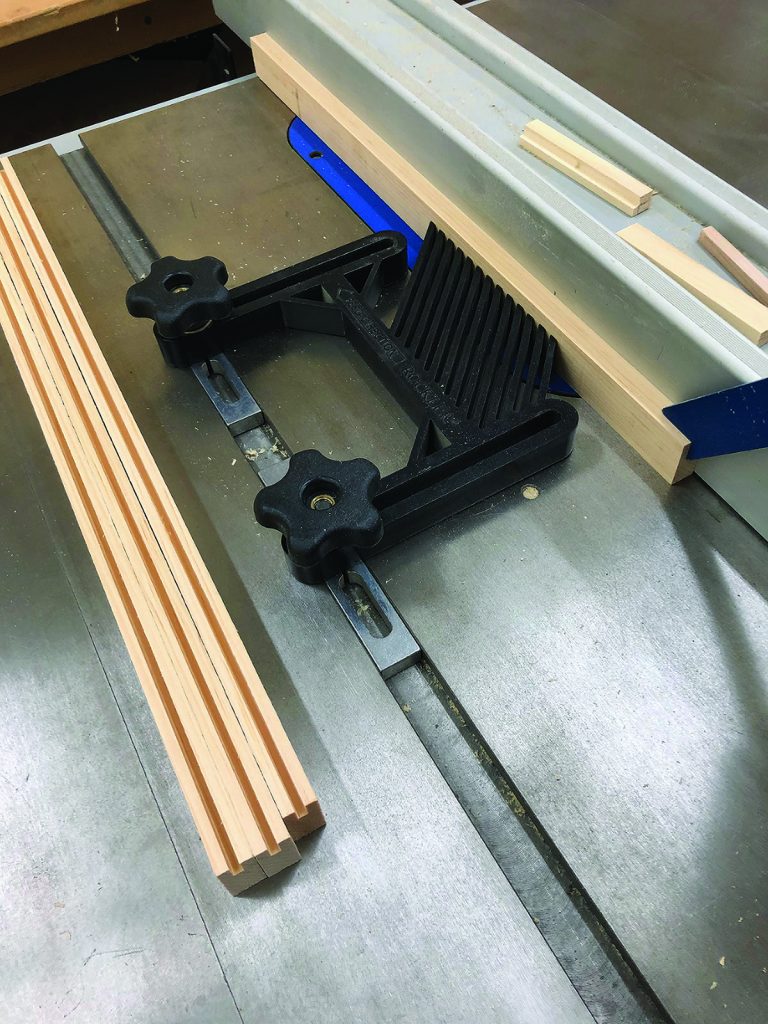
Set your rip fence to be 12″ to the right of your blade. With some scrap 3/4″ thick plywood cut a 24″ x 6″piece we’ll use as a sacrificial fence. Place the two 1/4″ square 21/2″ long pieces against the rip fence-they should be equal to twice your pin width. Slide the plywood piece up against those two pieces and clamp the plywood to your miter gauge (see images 1 and 2).
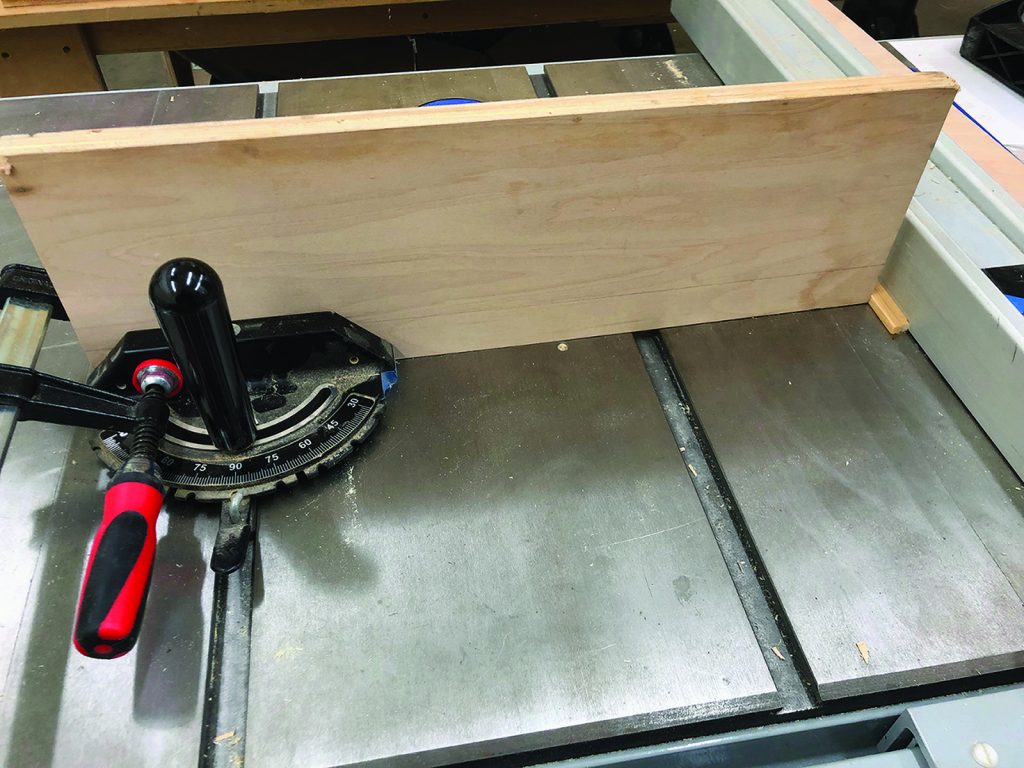
1. Build the box jig.

2. Slide the plywood piece up against the two 1/4″ pin pieces and clamp the plywood to your miter gauge.
Remove the small 1/4″ pieces. Using this clamped setup and minding your fingers push the jig through the saw. Turn off the saw. Now put one of the 1/4″ pieces back up against the rip fence, remove the clamp and carefully slide the fence up against this piece and the fence. Secure the plywood to your miter gauge with screws. Remove the 1/4″ piece from the fence. Run the jig through the saw again. Turn the saw off. This should produce a nice evenly spaced set of slots. Glue one of the 1/4″ pieces in the first slot you made (this is the slot now closer to the fence) and gently chamfer the ends of that alignment pin with some sandpaper. The jig is now complete.
Using the scrap you saved before let’s make some test cuts and fine tune the jig as needed.
Using the Jig
Place your stock on the jig vertically and slide it right until it’s firmly against the 1/4″ piece you glued into the jig. Use a quick clamp to secure the piece as you slide the jig through the blade-keeping your fingers well clear of the blade (see image 4). Return the jig to your starting position well clear of the blade.
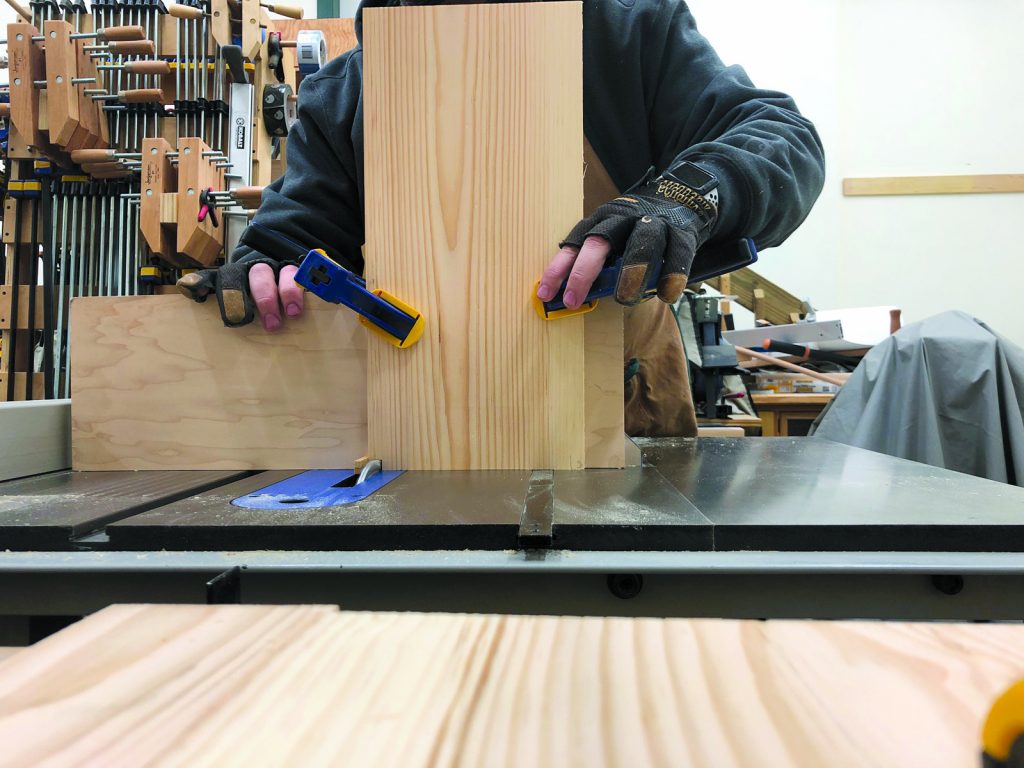
3. Cut your first joint with the board next to the pin.
4. Then, use the cut slot to index over the pin and repeat
On the next pass you’ll move the workpiece to the right by placing the slot in the workpiece over the 1/4″ alignment pin. Clamp the board and carefully slide the jig through the blade.
Then repeat the process of making a slot and moving the board over one notch until you finish cutting all the fingers.
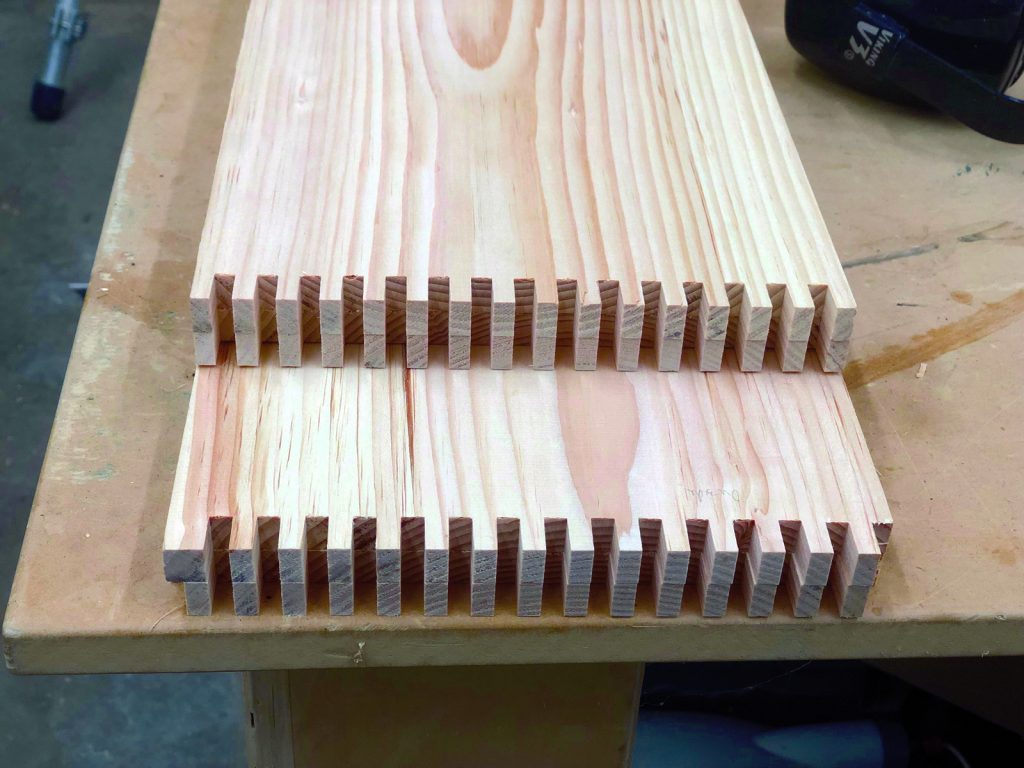
5. The joinery cut for the sides. Repeat the process for the top and bottom, using a 1/4″ spacer for the
first cut
Important Note #1: The piece that makes of the other half of this joint will need to start with a pin width offset so the board line up correctly when assembled. You can do this by putting a 1/4″ wood spacer between your workpiece and the alignment pin for the first cut on this second board, then clamp the piece to the fence, remove the spacer and make that first cut. The rest of the procedure is the same as before.
Important Note #2: The left side of the cabinet is narrower to accommodate the door and thus the fingers do not run all the way across the left side top and bottom pieces. Please layout and plan accordingly.
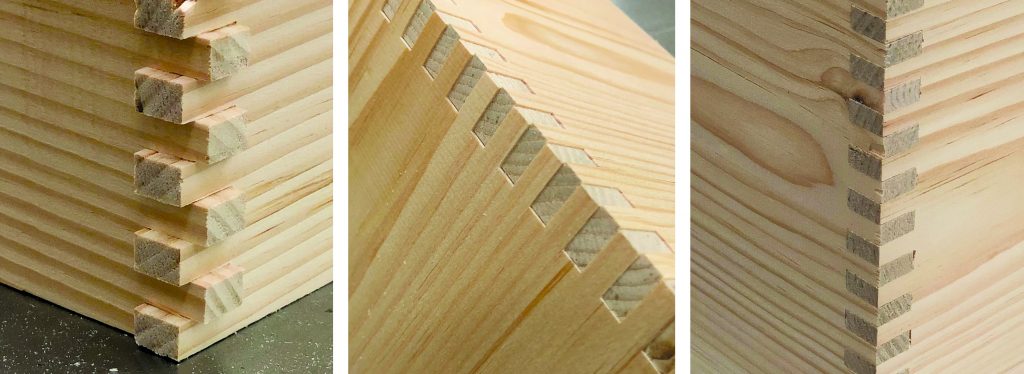
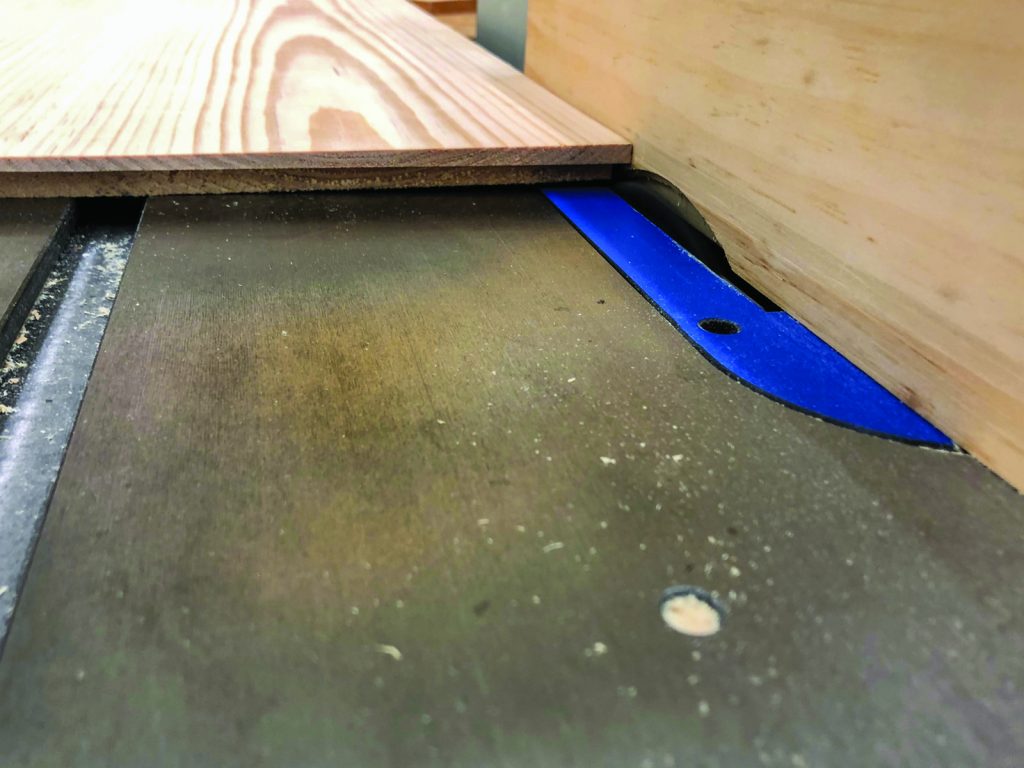
From left to right: blade is too high, blade is too low, blade is the correct height. NOTE: If you have to err on one side, go with longer fingers as you can always sand them off as needed.
Fixed Shelf
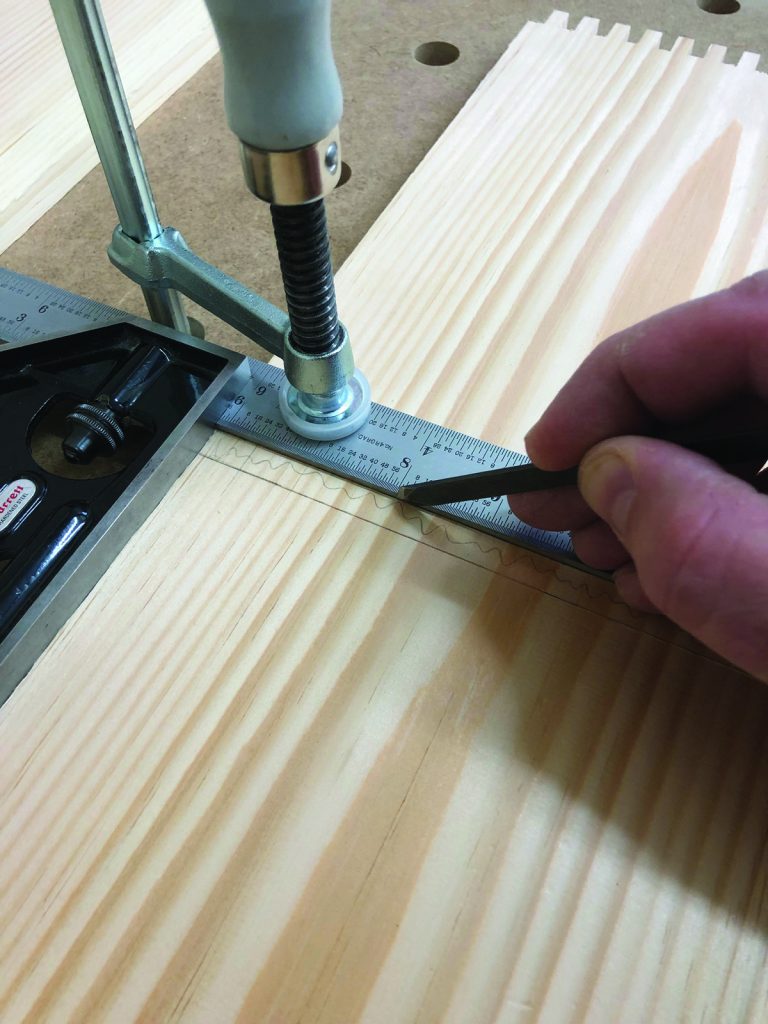
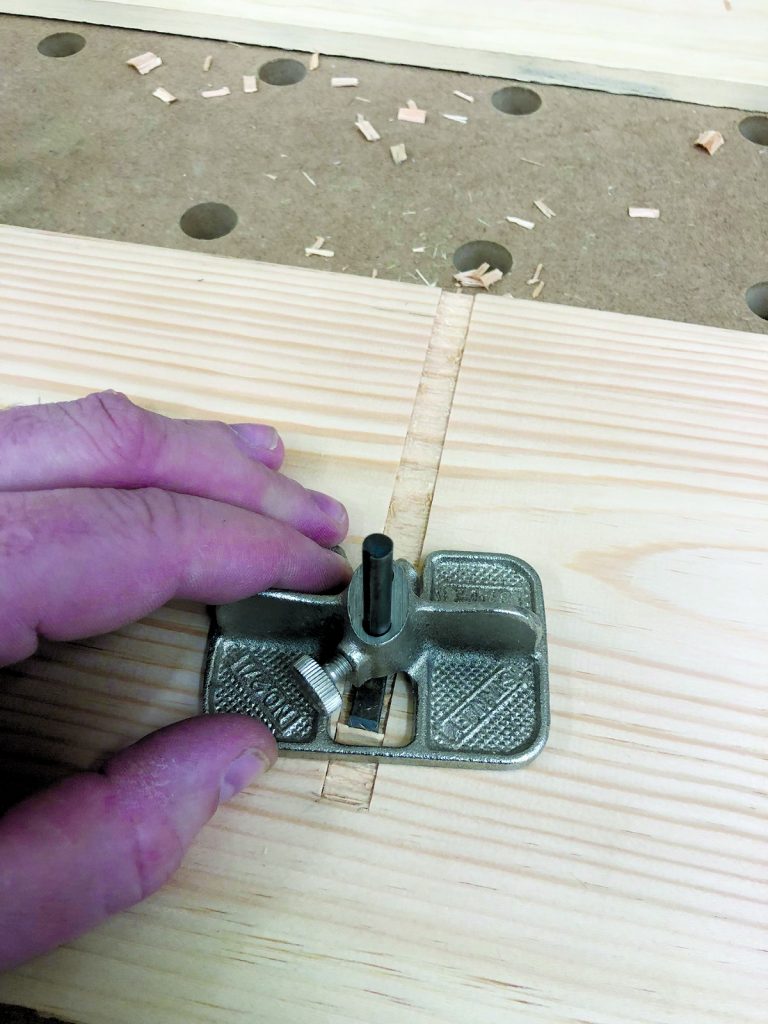
Test fit your sides. Once you are happy with the fit it’s time to layout a stopped dado for the fixed shelf in the cabinet. Use a marking knife to sever the cross grain fibers.
Use a chisel and router plane to remove the waste from the stopped dado.
Note: The dado should be about 1/2″ narrower than the width of the shelf (see images 7-9). You’ll cut a notch into the end of the shelf so that you won’t see any exposed dado slow when the wood moves seasonally.
7. Lay out the stopped dado to capture the fixed shelf. I mark the waste to be cut.
8. After removing the bulk of the waste with a chisel, I flatten the bottom of the dado with a router plane.
9. Because of the stopped dado, the shelf needs notches on both sides of the front edge. I cut these with a handsaw.
Cabinet Back
Now layout a dado the capture the back panel of the cabinet. This dado should align with one of the fingers. I used a single box joint cutter blade to accomplish this. Dry fit the sides and shelf and leave that in the clamps (see images 10-13).
10. Cut a 1/4″ dado for the back panel. Take care to line it up with a finger

11. The back panel is 1/2″ thick, with a 1/4″-deep rabbet cut around the edges.
12. Cut the rabbet on your table saw and fine tune the fit with a shoulder plane.
13. Dry-fit the back and cabinet carcase and make sure the pieces are ending up tight and square.
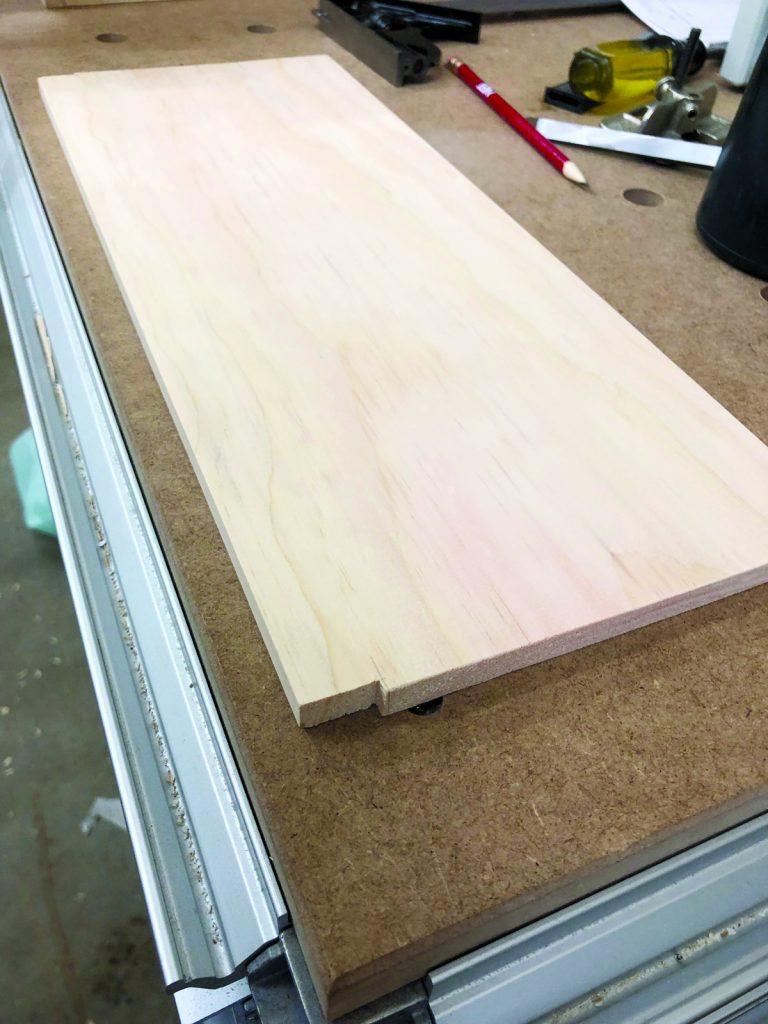
Edge glue up the panels that will form the door and the back of the cabinet. If using flat sawn wood alternate the orientation of the growth rings. Cut the dried panel to size. Cut it slightly narrow to allow for seasonal movement and in sizing the panel make sure you take into account how it will be captured in the side dadoes.
Using a sacrificial wood fence attached to your rip fence and your stacked dado blade cut a rabbet into the back panel on all 4 sides. Tip: Use some scrap from the panel blank to test your setup and make sure it fits nicely into the dado before cutting into your panel.
Test fit your panel on the dry fit carcase that is still in the clamps. Use a shoulder plane to fine tune the fit and allow room for seasonal expansion of the panel.
14. The back panel floats in the dado to accommodate seasonal expansion/contraction.
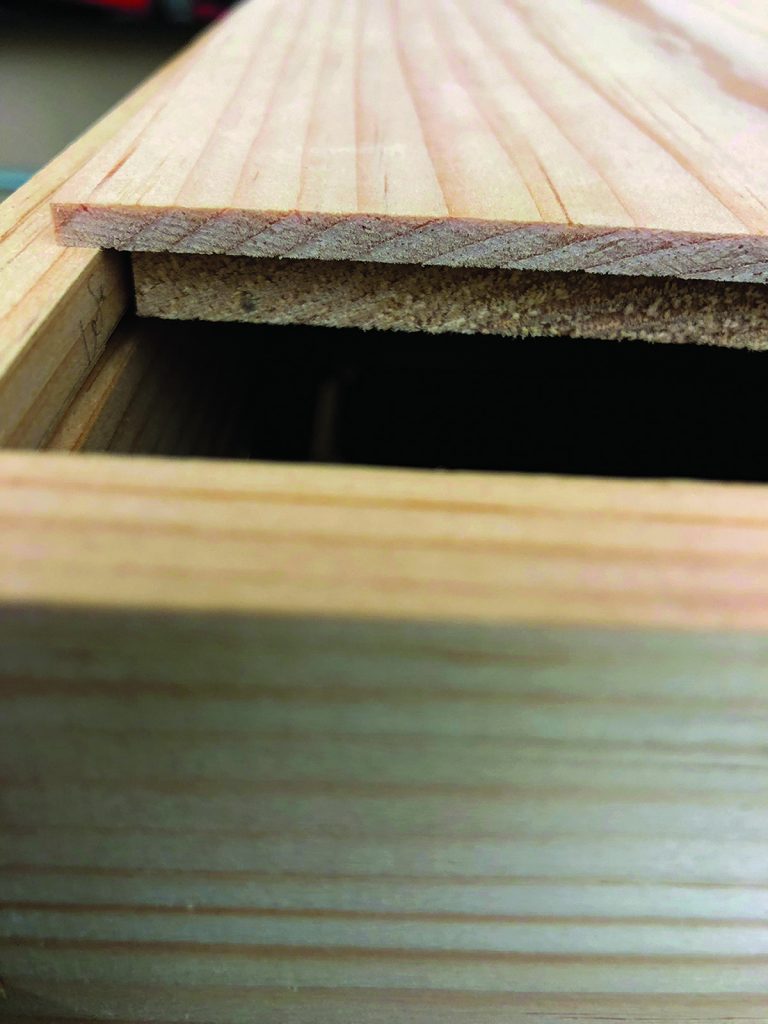
15. Size the rabbet to leave a small (1/16″) gap on each side.
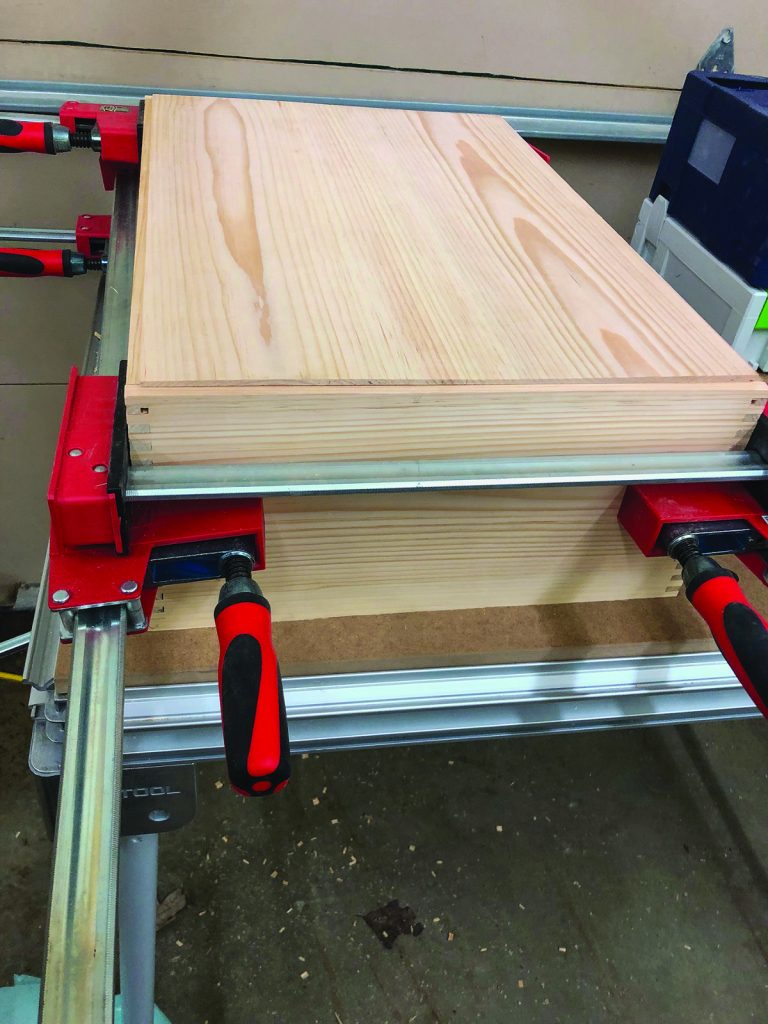
Glue and clamp up the carcase taking care to make sure everything is nice and square and all the joints pull up nice and tight. I used hot hide glue so any squeeze out would not affect the finish and to have a longer open time.
Once dried, plane and/or sand the fingers flush and roundover or radius the corners.
16. With the panel and shelf fitted, glue up the cabinet. Use hide glue or similar with a long open time to let you get all the pieces in place and clamped properly.
17. Sand the fingers flush, and add a small roundover on the edges.
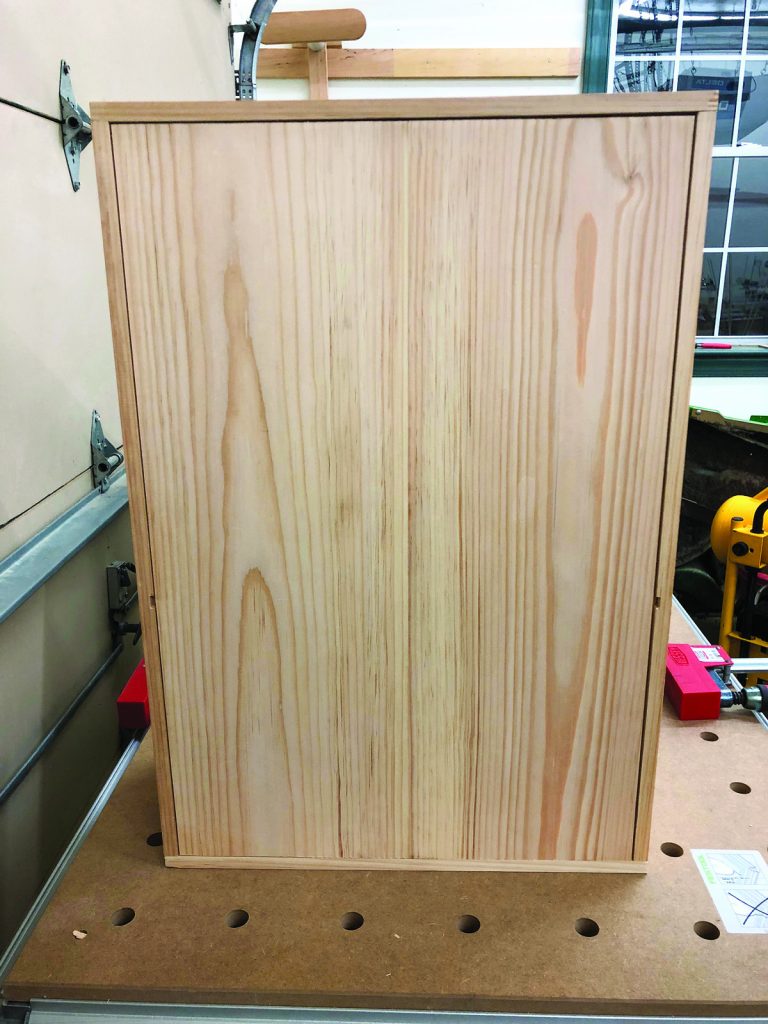
Door
Cut the glued up door panel size. Cut the breadboard ends slightly long. Mill a dado down the center of the breadboard end stock using a feather board to help keep things centered (see image 18). Use the same general setup (a dado and sacrificial fence) to mill a tenon onto the top and bottom of the door panel to fit snugly into the breadboard dado. Apply glue to the center 1/3 of the breadboard dado and clamp up the door. (This will allow for panel seasonal movement. See images 14-17.)
18. Mill a dado down the center of the breadboard end stock using a feather board to help keep things centered.
Once dry flush up the breadboard ends with the rest of the panel and test fit it into the carcase. Use cards or similar spacers to allow for an even spacing around the door top, bottom and right side and adjust as necessary. (Left side with hinges is flush with the outside of the cabinet.)
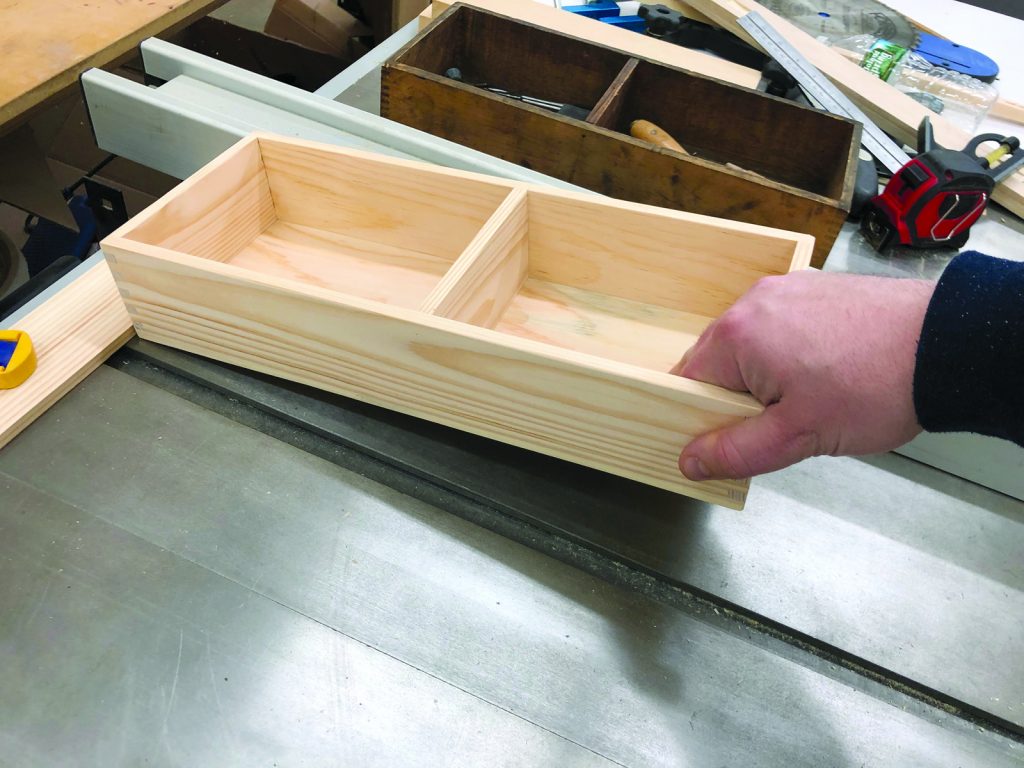
Build the Drawer
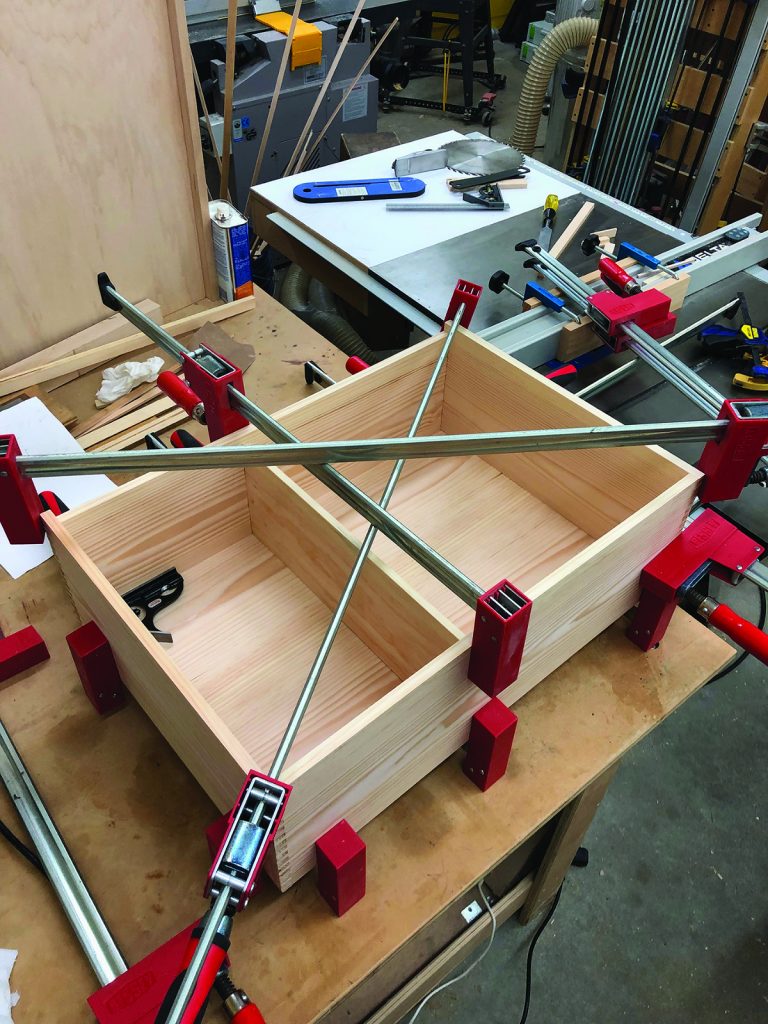
Follow same steps as used to make the carcase to make the draw and its divider (see images 19-21).
19. Use cards to space the drawer under the shelf, then add two square drawer supports under the drawer
20. I used a wide dado stack in my table saw to cut the hand hold in the bottom of the drawer
21. Just a shallow recess is enough.
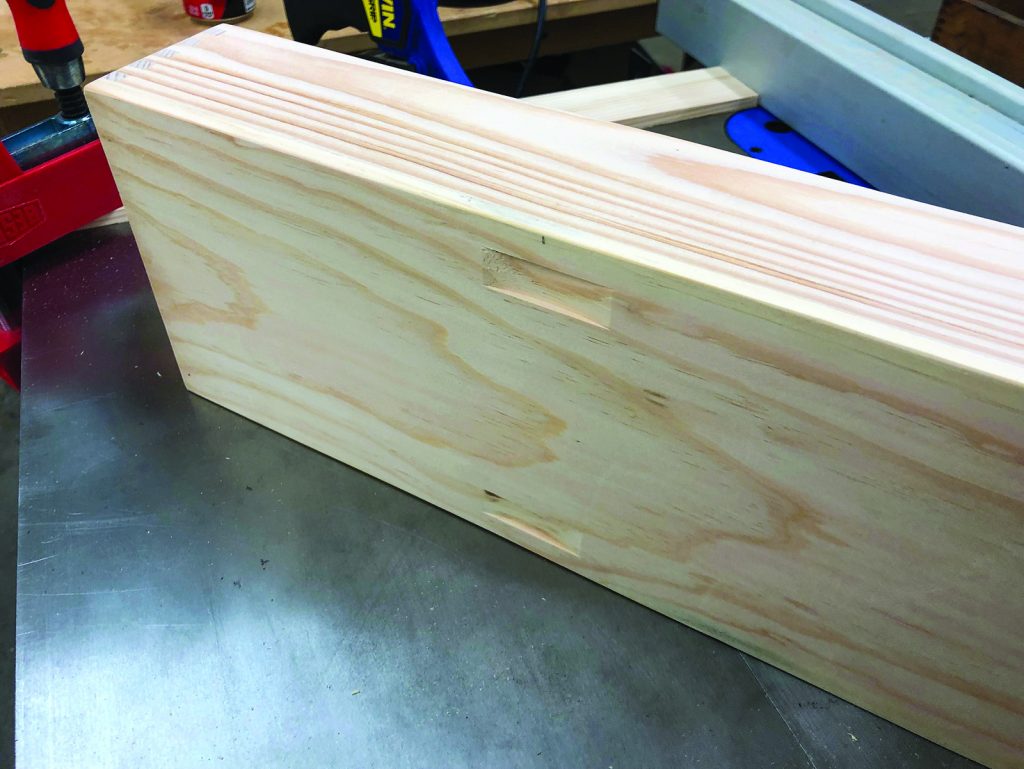
Once you have the sides glued up, shoot a pin nail or similar in through the fingers from the bottom to keep the joint together even if the glue fails in the future. (Do the same for the rear of the finger joints on the main cabinet as well.) Glue and pin nail the bottom onto the drawer and test fit and sand as needed. Use two credit cards as spacers between the top of the drawer and the fixed shelf.
Pin nail in a 7/16″ square profiled runner on each side to support the drawer. From that same size stock also nail in spacers on the right side of the cabinet to function as a door stop. The drawer divider partitions the space into a 60/40 split.
Once the drawer is complete you’ll want to use a wide stacked dado to cut in a finger grip that functions as a drawer pull. Securely clamp a stop block on the outfeed of your table saw. Place the far end of the drawer up against that stop block and slowly but firmly hinge the drawer down onto the blade. Be very careful when attempting this operation and make sure to do some test cuts first to ensure you are centered and not cutting too deep. Once you make the cut, turn off the saw and wait for it to stop before removing the drawer.
Hardware
In the late 19th and early 20th century there was a much wider variety of hardware available in the market-place. This Sloyd Tool Cabinet has a lot of interesting hardware, much of which you can fashion in your own workshop to provide some interesting tool storage solutions. I also took the time to ‘clock’ (align) all of the screw heads to be oriented the same way which adds a nice touch to this handsome cabinet.
Handle and Lock
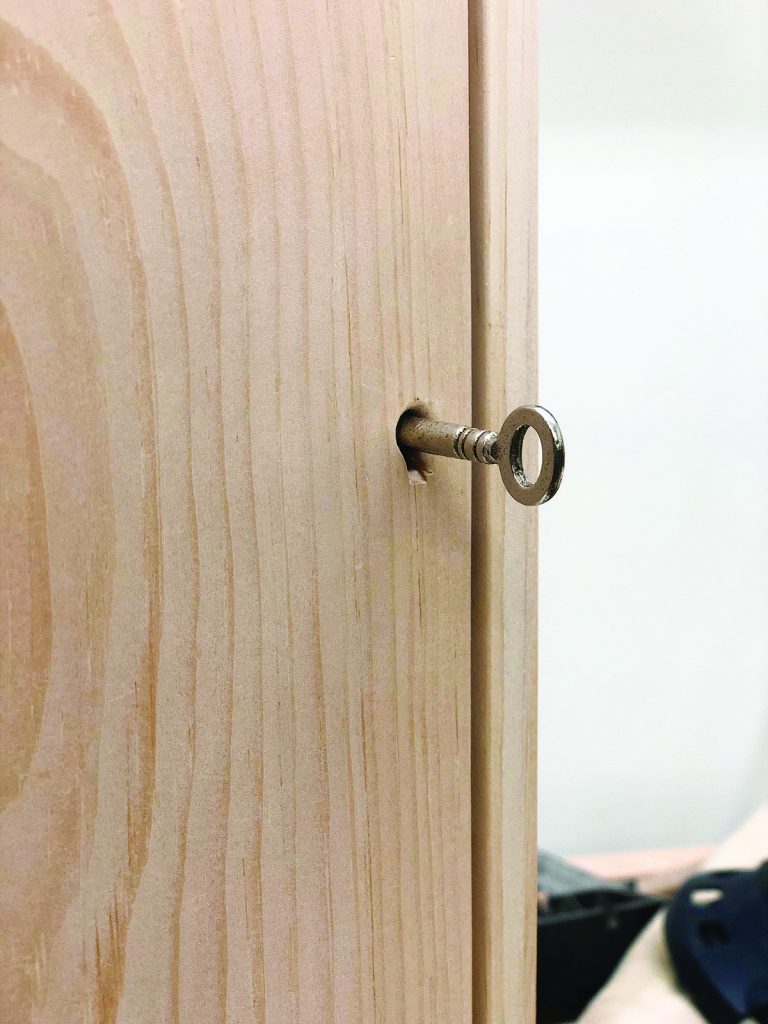
Center the brass handle on the top of the cabinet. Transfer the layout of the holes. Pre-drill through the top and into some scrap wood to prevent blow out. Use 1″ brass screws and a washer and doubled up nuts to secure the handle. Trace the lock onto the door and carefully remove wood and test fit as you go. Use a router plane to help excavate the wood. Use a file to remove the mill marks from the brass. Make sure to relieve the wood around the keyhole for a nice clean look.

22. The mortised lock is cut in stages.
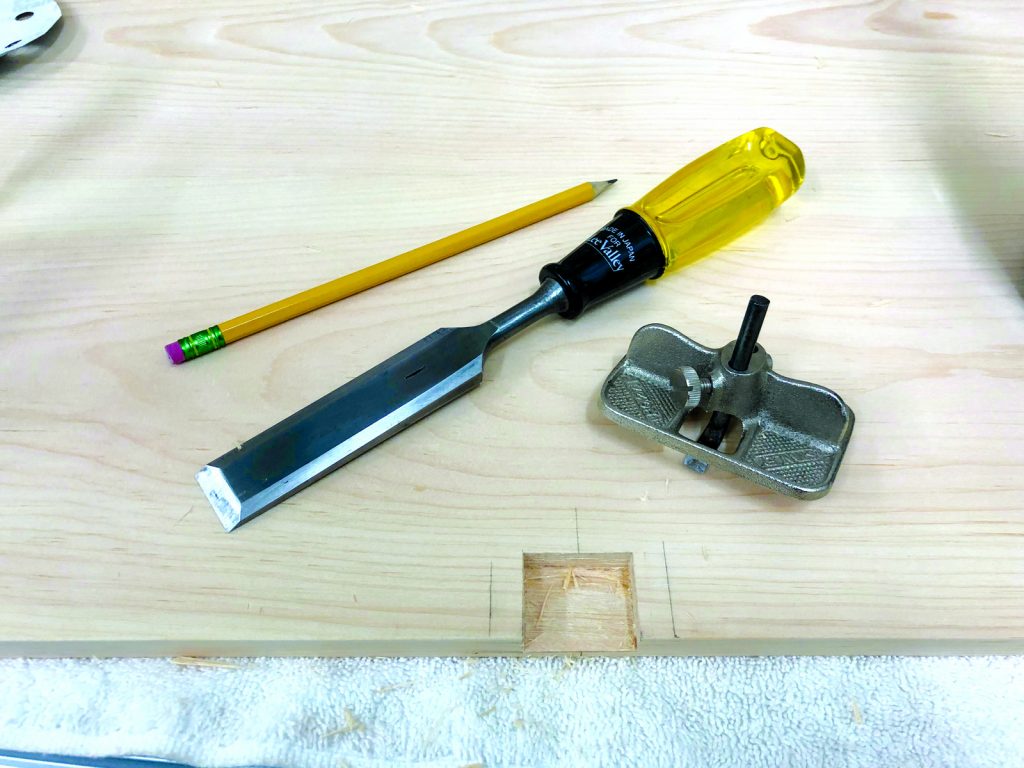
23. First, I cut the recess for the lock mechanism.
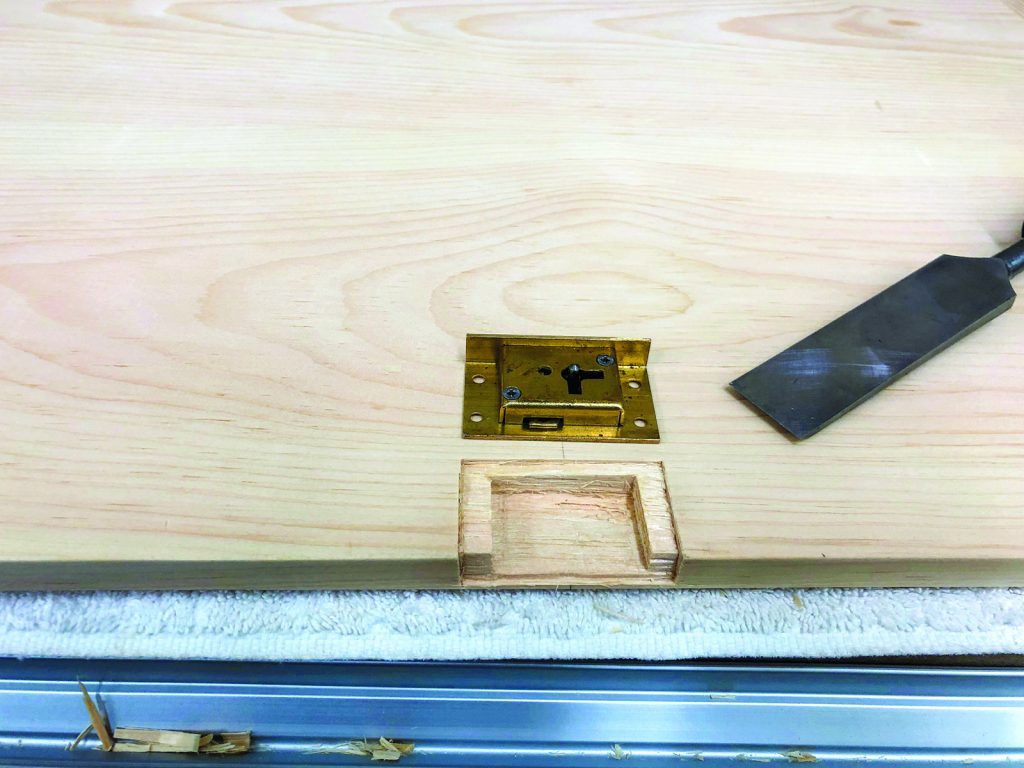
24. Then I cut the shallower portions to get the lock to be inset on the piece.
25. Front view.
Hinges
The hinges used on this cabinet are overlay hinges that don’t require any mortising (see images 22-27). The centerline of each hinge is located 4″ from the top and bottom of the cabinet respectively. Be careful not to drill through the cabinet sides or door. Once the hinges are installed apply some chalk or pencil graphite to the moving portion of the lock bolt, or use some carbon paper and turn the key in the lock to gently press the lock into the side of the cabinet. Using this mark excavate a small mortise to catch the lock.
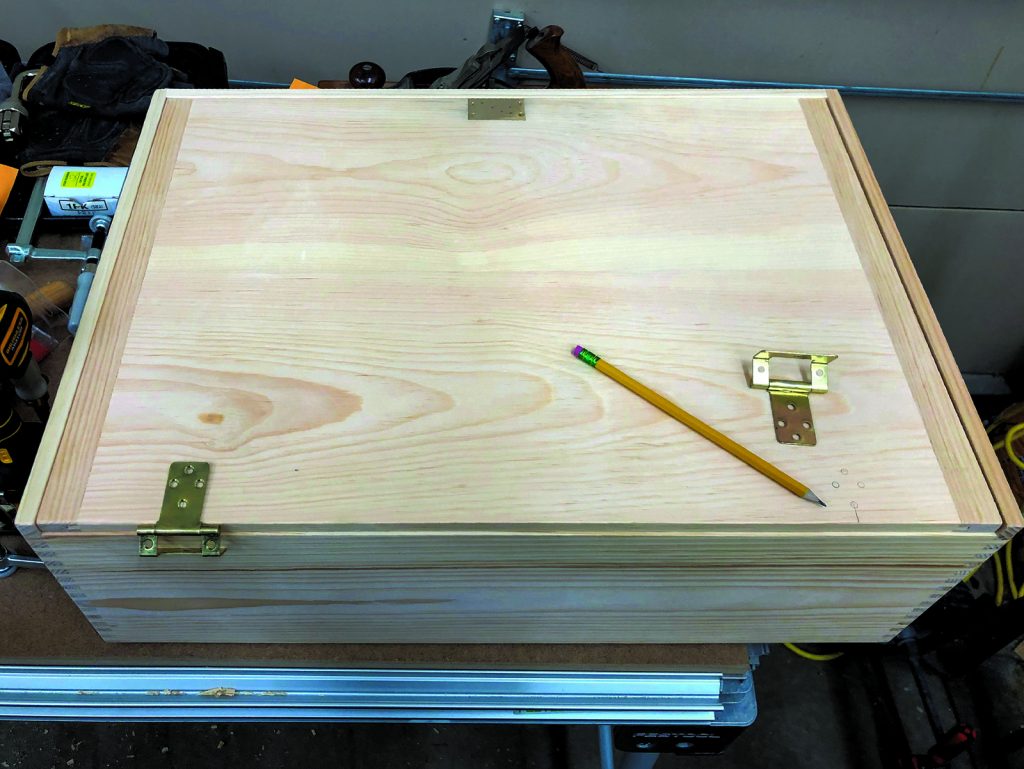
26. The hinges on this cabinet are just simple overlay hinges that don’t require mortising
27. The hinges attached.
Cast Brass Hooks
A pair of cast brass hooks are installed on the back wall of the cabinet to hold your bit brace and a pair are installed on the door to hold your panel saws. Layout where you want the hardware to be, use a center punch to start the hole and drill using a depth stop. Install the screws by hand as brass is a soft metal.
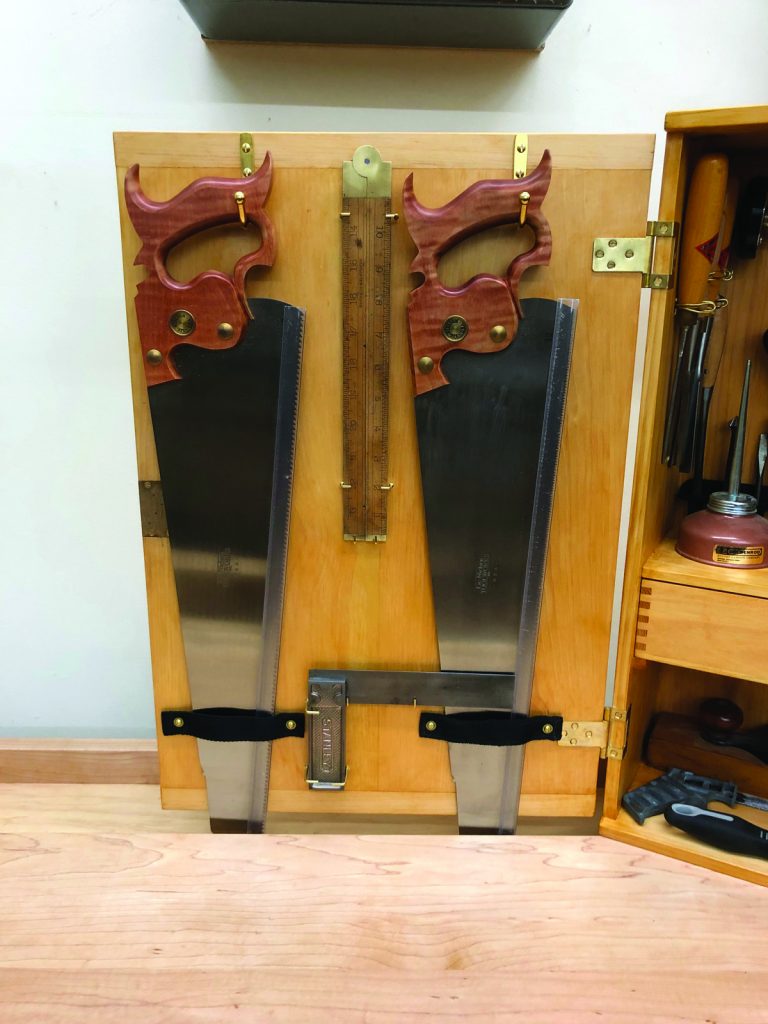
28. I used cast brass hooks to hold my saws, secured with simple straps. Square hooks hold the ruler and square.
Square Hooks
Square hooks are used to secure your folding rule and try square to the door. These simple little hooks do a surprisingly good job of keeping those tools in place. When laying them out make sure to use the actual tool(s) for reference and make sure they don’t interfere with the saws, the drawer or the ability to close the door.
Fabric Straps
To keep the panel saws in place you’ll want to cut two 6″ pieces of fabric-backed velcro or nylon webbing. Use a lighter to melt the ends. Screw each strap to the cabinet door with some pan head screws and washers for a clean look. When installing the fabric, the center should not be flush with the door, rather place the screws a little closer together so there is room to easily remove the saw. (I liked the velcro strap as I had it on hand from an old bag, it’s stiff and it gives some air to the saw blade so its less likely to rust.)
Wire Tool Holders
Some of the most interesting hardware in the cabinet are the bent brass wire tool holders. With some fairly simple tools and jigs you can make custom hardware to hold just about any tool you can imagine
Cut a 12″ length of the brass wire. Bend the middle of the brass around a metal bending form or socket. Form a sort of ‘M’ shape to make the arms. A wire jewelry bending jig or screws set into a piece of wood can be used. Using pliers twist each arm 90° and then bend the straight section of the wire on the same form you used in the first step of this procedure. Use the tip of your needle nose pliers form a tight circle and trim off any excess wire. Using pliers grab each arm about 1/4″ from the end and bend/flare them out just a bit so it’s easier to push a tool into the holder. You can further refine the fit once installed. Lay out where you want the hardware to be in the cabinet. Then mark where the screws will go (They are all going to be a little different) and use a center punch to mark the location.

30. Start the U shape with corresponding groove in the wire bending jig.
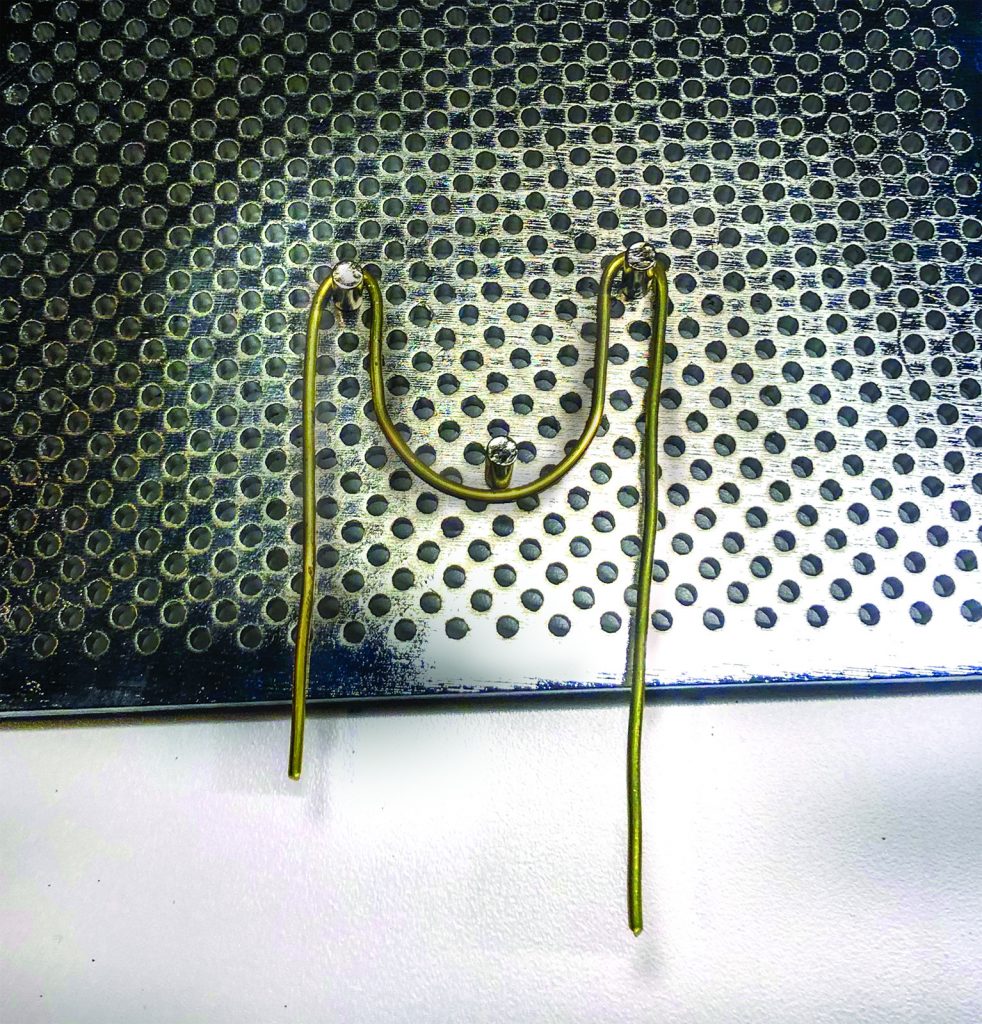
31. Then use the artistic wire jig to add a couple more bends.
32. Back to the wire bending jig for a second U, finished off with two small loops in the back, made with pliers.
33. The finished product.
You can set a countersink backwards on your drill bit to form a nice consistent depth stop and not drill through the wood. For narrow pieces you may consider filing down the points of some of the brass screws to make them a bit shorter.
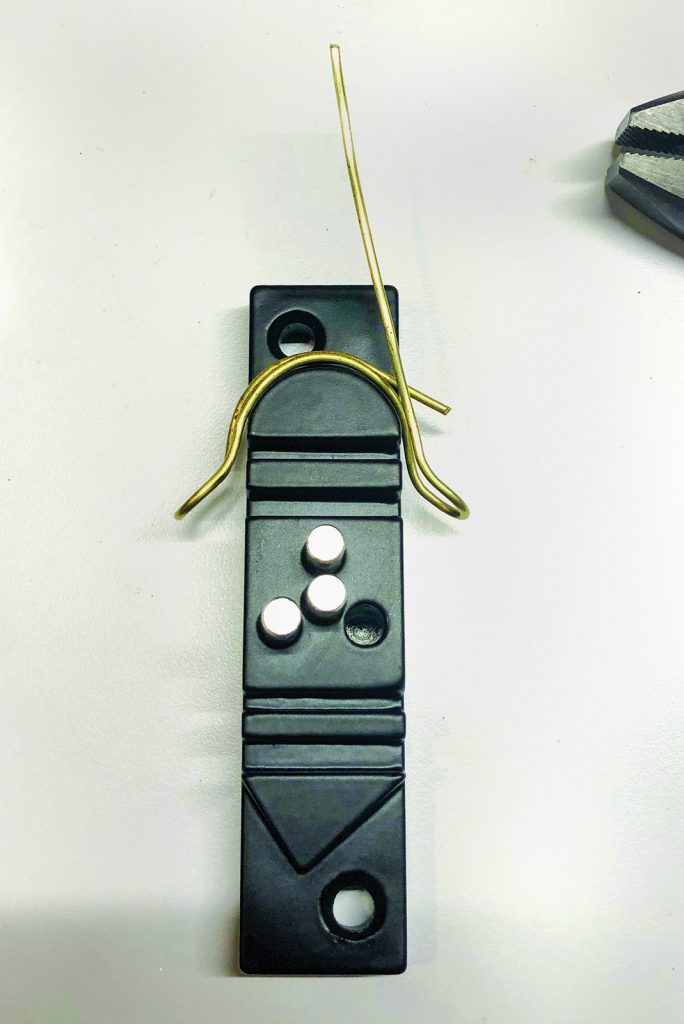
Heavy Tool Holders
This simple but sturdy tool holder is great for holding heavier items like hammers and larger items like your cutting gauge (see images 34 – 36). Start with some 0.063″- thick sheet brass. Trace your template onto the brass plate with a sharpie. Mark the center of the small mounting holes using a center punch. Use some scrap plywood to support the plate as you cut it with a jigsaw fitted with a metal cutting blade.
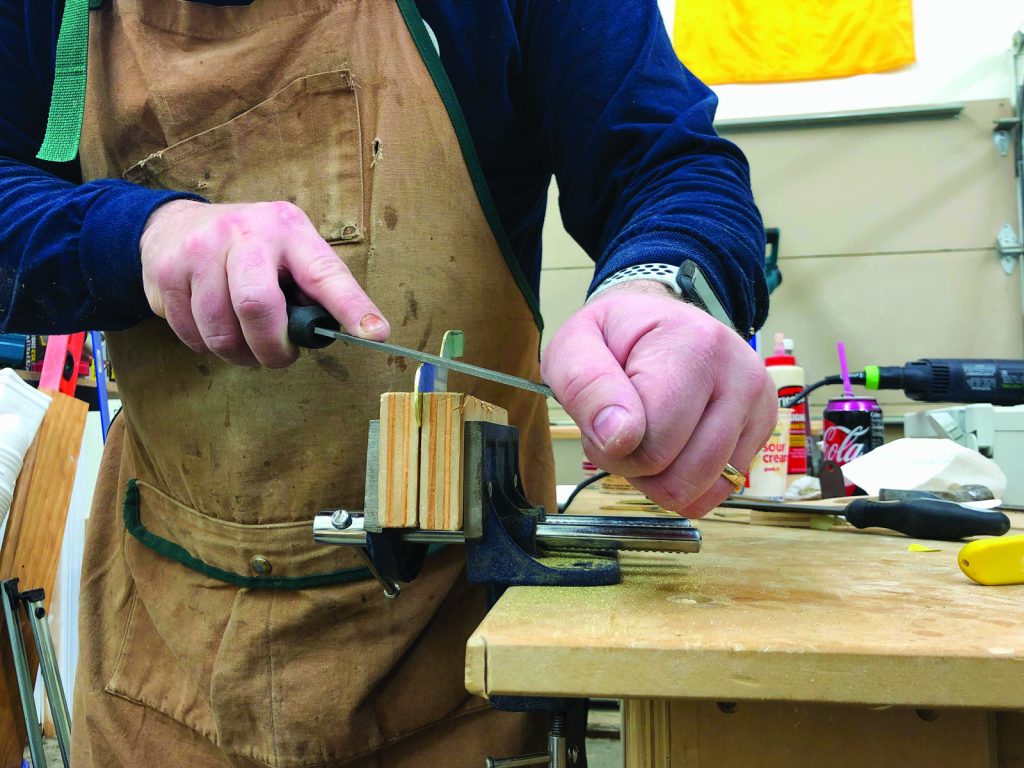
Place the rough cut holder in a vise with wood jaws and use a single cut file to refine the shape of your holder, remove any burrs and round over the edges. Remember that a file only cuts on the push stroke-don’t drag the file back and forth like a saw as that will only shorten the service life of the file.
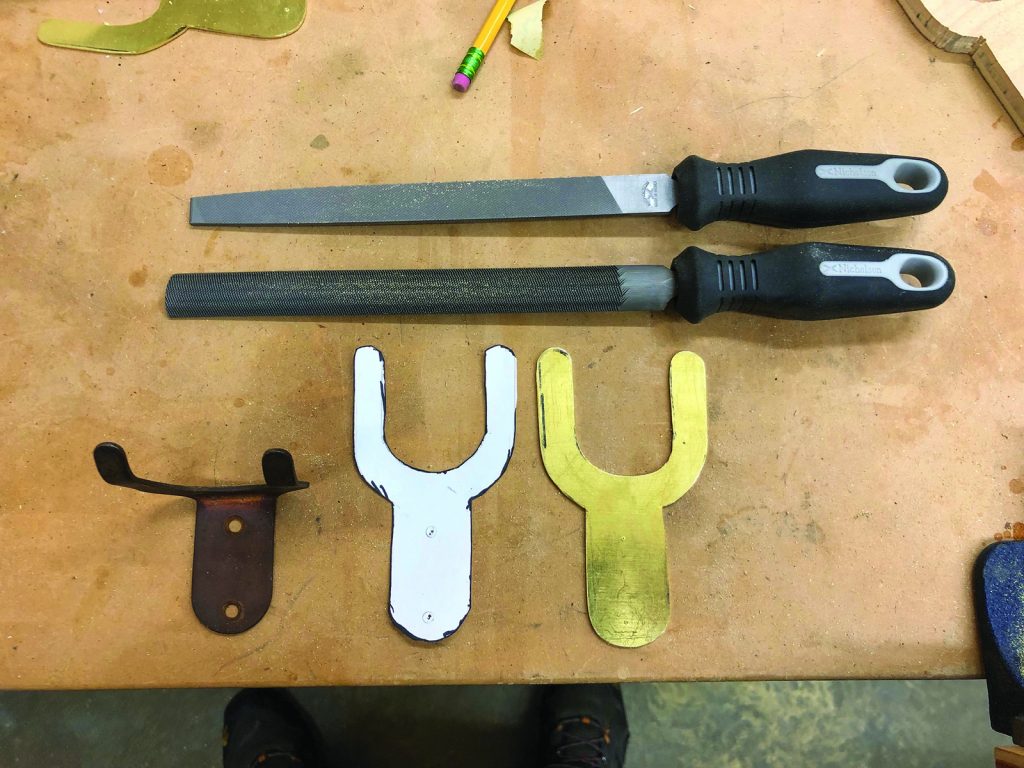
34. The hammer holder is also fashioned out of brass.
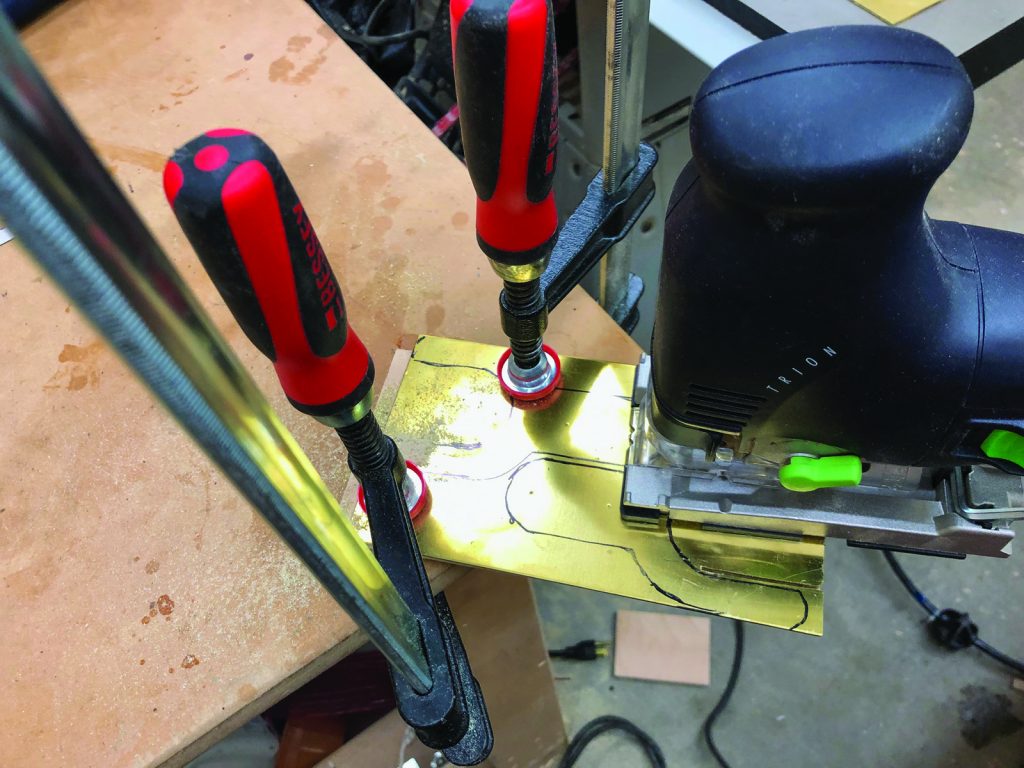
35. Make a template and trace onto a piece of brass sheet. I used a jigsaw with a metal cutting blade to cut it out
36. I filed the edges to finish the shape
Place the cutout holder in your wood faced vise jaws and bend it. Warm or hot brass will be more pliable. If you work quickly through the prior steps you may have enough residual heat left in the metal to help or you can heat it up a bit with an iron or a torch. If your bend has some spring back that leaves the arms tilted up just a bit that is ideal.
Flip the piece over and place about an inch of the arms in the vice to bend the tips of the arms up a bit more to help keep tools on the hook during travel. Drill through the marks you made earlier with the punch and use a counter sink bit to fit your brass screws. Install these hooks in the same manner you installed the wire tool holders.
3D Printed Hardware
One of the more interesting pieces of hardware in the back of this cabinet was a cast iron bit holder designed to hold tapered bits for use with a brace. This piece of hardware has not been made in almost a century so I needed to come up with an alternate way to produce this piece. Using the original as a sample I made a 3D model of this piece and printed it in black ABS on my 3D printer. Don’t worry, if you don’t have a 3D printer there are lots of online services that will print a part for you for a reasonable price or ask around as you may have a friend with one. Print the part with 100% infill, a brim and full support material.
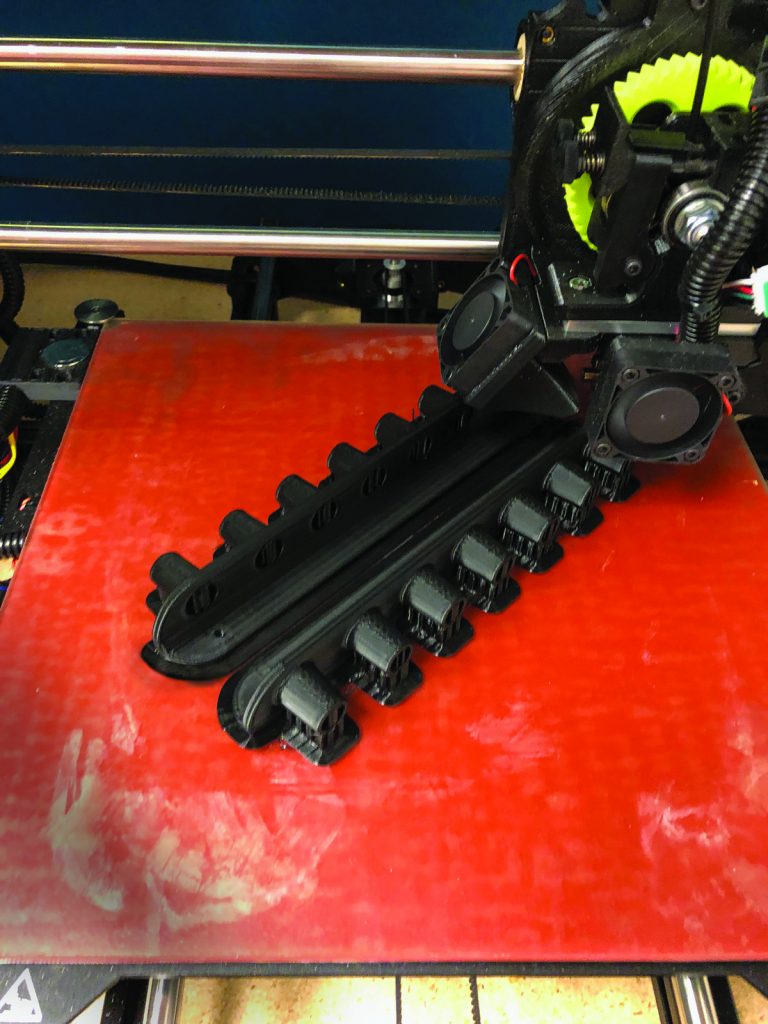
37. The original bit holder is cast iron, but I 3D-modeled it and printed it in black ABS plastic. It’s printed in two pieces to fit the bed of a small 3D printer.
For the 3D printed model, it’s made in two interlocking pieces to fit a wider range of print beds. Any support material can be removed with nippers, files and/or an X-acto knife. Once installed it does a great job of holding bits and from any reasonable distance it’s hard to tell its not also a cast metal piece. Use 3 slotted brass pan head screws.
Conclusion
The Sloyd Tool Cabinet is a nice skill builder that results in a useful object-much in the spirit of Sloyd training-and is great for taking some core tools to a workshop or jobsite around the house. You may also want to consider making one with or for someone eager to learn woodwork-ing. As we learned from an 1898 ad for the cabinet (see below), a cabinet filled with good tools that are useful makes a practical holiday gift.
Materials List
Lee Valley
1x #4, 1″ Flat Brass Screws (10ct)
1x #4, 3/8″ Flat Brass Screws (10ct)
2x #6, 3/8″ Round Brass Screws (10ct)
1x #6, 3/4″ Round Brass Screws (10ct)
2x #8, 3/4″ Round Brass Screws (10ct)
4x 2 3/4″ Utility Hook
1x 1/2″ Brass-Plated Square Hooks (100ct)
1x 1″ Brass-Plated Square Hooks (100ct)
1x 1/2″ Brass-Plated Overlay Door Hinges (1 pair)
1x 2″ Standard Cut Cupboard Right Lock
1x Old Brown Glue, 20 fl. oz.
McMaster Carr
1x Brass Slotted Flat Head Screw, 8-32 Thread Size, 1″ long (50ct)
1x Brass Hex Nut, 8-32 Thread Size, Width 11/32″, Height 1/8″ (100ct)
1x Brass Flat Washer, No. 8 Screw Size, 3/8″ OD, 0.025 – 0.039″ T (100ct)
1x Ultra-Formable 260 Brass Sheet, 4″ width; 36″ length; 1/16″ thick
1x Ultra-Formable 260 Brass Wire, 1 lb. Spool; 0.064″ Diameter, 83 feet
Amazon
1x Wire Bending Jig (made by Micro-Mark)
1x Artistic Wire Deluxe Jig Kit (made by Beadalon)
1x Nylon Webbing Strap*
*If you have an old backpack laying around, you can repurpose the strips. Simply cut to size and cut a lighter to seal/melt the ends.
Here are some supplies and tools we find essential in our everyday work around the shop. We may receive a commission from sales referred by our links; however, we have carefully selected these products for their usefulness and quality.


I agree, I kept looking at it thinking that I am missing something.
Nice project, but wouldn’t a good first step have been to measure your saws so you were assured of building a cabinet they could fit in? That detail jumped right out at me…you cannot close the door the way it’s built.