|
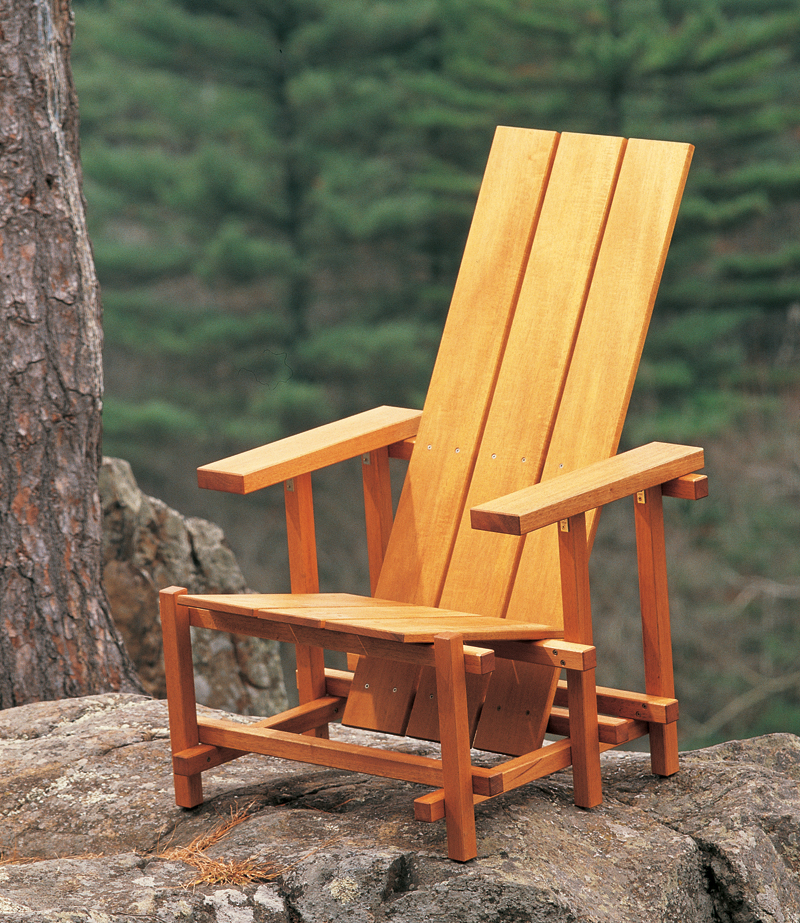
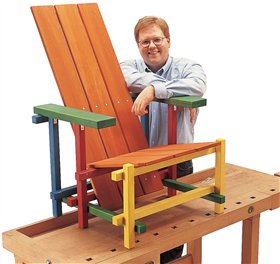
In 1918 the Dutch cabinetmaker
Gerrit Rietveld
reduced the idea of a chair to a 3D
grid of painted sticks and boards.
His revolutionary design became
one of the most famous pieces of
20th-century furniture—the Red-
Blue chair.
Let’s take a new look at it.
Although his chair appears easy to
put together, getting all those sticks
precisely located is tough, especially
if you have only two hands. And all
the pieces look alike! To make this jigsaw
puzzle simpler to put together,
I’ve figured out a building system
based on two plywood boards and a
few spacing blocks. If, like most people,
you want to build a bunch of
chairs instead of just one, this system
is the ticket. Once you’ve built the first
chair, the rest will be easy as ABC.
The Design
I’ve revised Rietveld’s elegant design
to make a chair that’s stronger, easier
to build, more comfortable to sit in
and rugged enough to put outdoors.
I’ve used screws instead of Rietveld’s
dowels to hold it together, increased
the size of the sticks and added a
stretcher. We tested our chair with
both large and small people, and it
gets two thumbs up for comfort.
Some said it was perfect for leaning
back and playing video games!
Tools and Materials
Building this chair requires only a
minimum of tools and experience. You’ll need a tablesaw, planer and router to mill the wood, and a #2
square-drive bit for your drill to put it together. That’s it. A drill press
and a router table are helpful, but not necessary.
Honduras mahogany is a good choice for this chair. It’s easy to cut,
sands quickly and is weatherproof, even without a finish.Alternative
woods include teak and white oak. Softwoods that are often used for
outdoor furniture like cedar, redwood and cypress are probably too
weak for this chair and do not hold screws well. If mahogany is too
pricey for you, I’ve scaled the chair so you could use tough construction
lumber such as Douglas fir or Southern yellow pine instead. Both are
available at most lumberyards and should hold up outdoors if painted.
One chair requires about 12 board feet of 6/4 wood and about
10 board feet of 4/4 wood. That’s about $150 per chair for mahogany,
$50 for fir.
If your chair will be outdoors, use stainless steel screws and waterresistant
glue.Unlike stainless steel, standard screws will leave unsightly
stains on the wood. I prefer Titebond II glue for kiln-dried hardwoods
such as mahogany, but if you’re using construction lumber,
polyurethane glue (Gorilla Glue, for example) would be a better
choice because it works well on wood with a high
moisture content.
Getting Started
Begin by cutting all the
parts to size (see Cutting List, below). Rout a bevel or
roundover on every edge,
including the ends
(Fig. C, Detail 1).
A router table
makes this
repetitious
job go much
faster. Make some extra legs and rails, too. You’ll need
them to make spacers (see Cutting List,
below, right) and stop blocks. The spacer
you’ll use over and over again, spacer #1, is
simply a scrap piece of rail. I added a tab to
it to make it easy to use (Photo 3). Most of
this chair’s dimensions are based on multiples
of this block of wood.
Don’t sand the sticks before you glue
them together, or you might accidentally
round over the flat surfaces. They must
remain flat for a good glue joint.
Now build the two gluing and screwing
fixtures (Fig. E) and follow the photo
sequence 1 through 12.
Finishing Touches
You don’t have to apply a finish to your
chair. Mahogany turns a silvery-gray color
if left outdoors and stays sound for many
years.However, if you’d like to preserve its
original color, you can apply a clear exterior
oil (see Sources, below) each year.
The most vulnerable part of an outdoor
chair is the bottom of the legs. Moisture
wicking up into the legs can support the
growth of wood-destroying fungi.
You can slow down that process by
liberally coating the end of the legs with
epoxy glue.
Sources
McFeely’s, mcfeelys.com, 800-443-7937, Square-Drive Stainless Steel
Screws, #8 x 1-5/8",
#0815-FA5, $13.50 for a box of 100; #10 x 2-1/2",
#1024-FA5, $23.45 for a box of 100.
Penofin, penofin.com, 800-736-6946, Marine Oil Finish,
$49.95/gal.
Cutting List
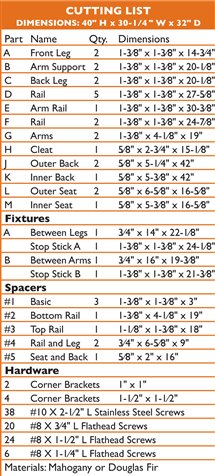
Fig. A: Guide Block for Screw Holes
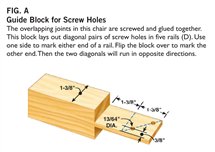
Fig. B: Good Screw Joints
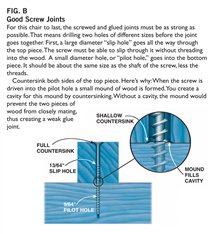
Fig. C: Exploded View of Chair
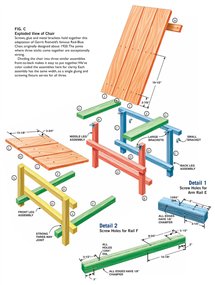
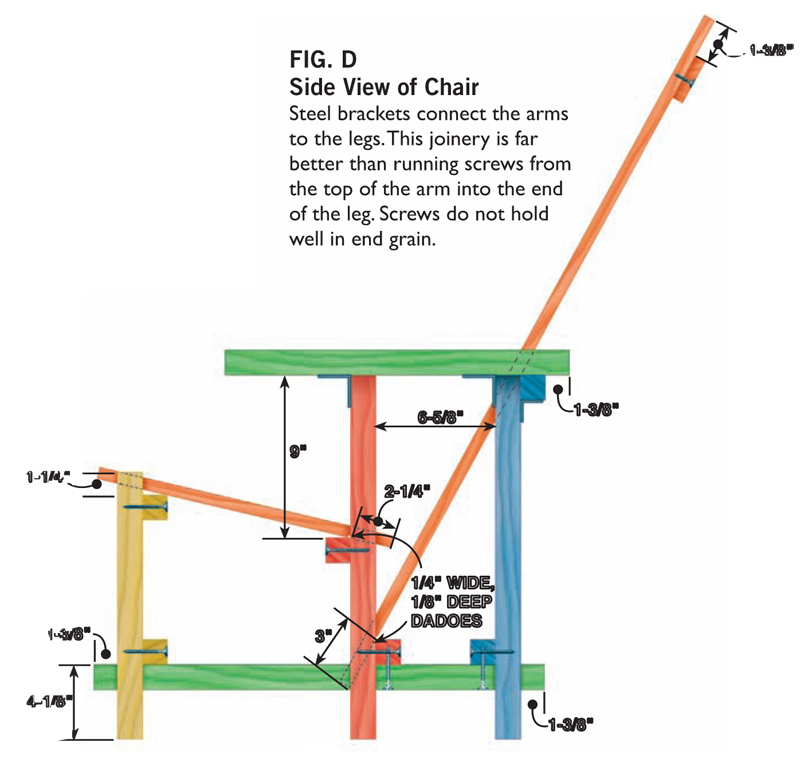
Fig. D: Side View of Chair
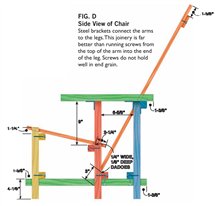
Fig. E: Screwing and Gluing Fixtures

This story originally appeared in American Woodworker April 2000, Issue #79.
April 2000, Issue #79
Purchase this back issue.
|
|
Click on any image to see a larger version.
We've changed the chair show in these how-to photos to show you how easy it is to
put together. Each color refers to a
separate group of parts.
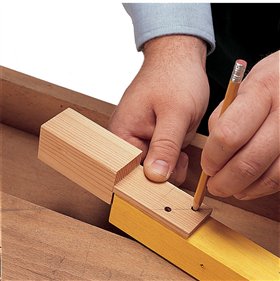
1. Mark the ends of all the D
rails with this reversible guide block
(Fig. A). Drill holes on your marks by
hand or with a drill press. The screws
must easily slip through these holes.
Countersink both sides (Fig. B).
While you have the drill set up, put
holes in rails E and F as well (Fig. C,
Details 1 and 2) and countersink
both sides.
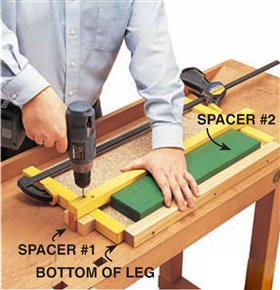
2. Assemble the front legs
and bottom rail. Lock them in place
on Fixture A (Fig. E). Spacer #1, at the
end of the rail, sets the overhang. Spacer
#2 (which is actually a chair arm) fixes
the rail’s distance from the bottom of
the leg. Drill pilot holes into both legs,
then remove the rail and blow off the
wood dust. Apply water-resistant glue
to the joints. Then replace the rail and
drive in the screws.
Repeat this operation for the middle
and back assemblies.
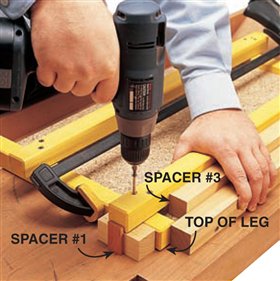
3. Flip the leg assembly
around and re-install it in the fixture.
Then insert spacer #3 to position the
upper rail. (See Cutting List for size.)
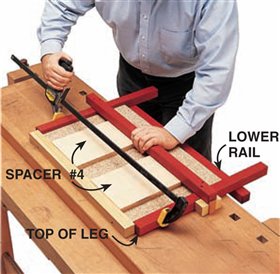
4. Install the upper rail of the middle
assembly with two #4 spacers. (See
Cutting List for size.)
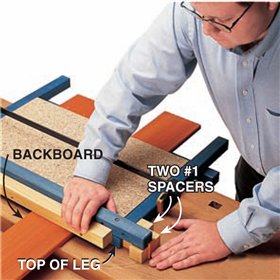
5. Butt rail E of the back
assembly against the stop stick. Place
two seat boards under the fixture to
raise the stop stick to the level of the
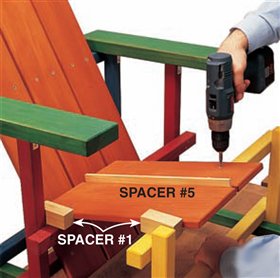
rail. Use two spacer blocks #1 to set
the overhang.
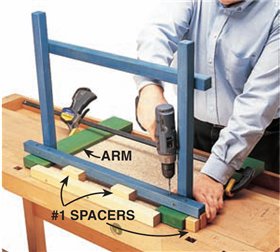
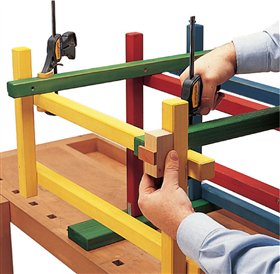
6. Screw the back leg
assembly to the arms. Clamp the arms
in place across Fixture B. Spacer blocks
#1 position the arm rail from the stop
stick and set the overhang.
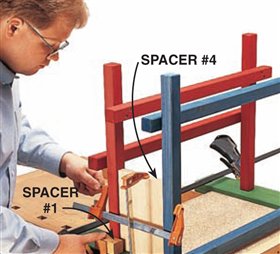
7. Clamp the middle leg
assembly in place with spacer #4 (the
same spacer you used in Photo 4, but
turned the other way around). Spacer
#1 sets the legs in from the arm’s edge.
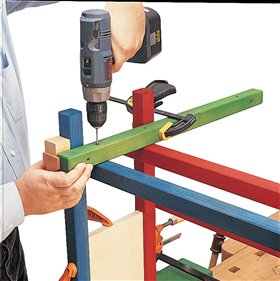
8. Drill pilot holes through
rail F, then screw and glue it in place.
Repeat the same process on the other
side of the chair and remove Fixture B.
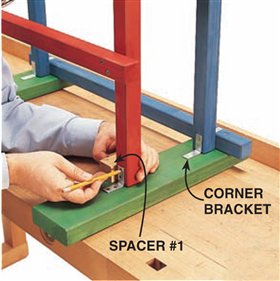
9. Install three corner
brackets on both arms (Fig. C). Use
stainless steel screws if your chair’s
going outside.
10. Clamp the front leg
assembly in place. Drill pilot holes
into the legs and drive in two screws to
temporarily hold the assembly in place.
Then remove the clamps, drill the pilot
holes into the front assembly’s rail and
remove the temporary screws. Apply
glue to the assembly and drive in all
the screws.

11. Add the backboards. Tilt
the chair back on a support block made
from the spacers. Pre-drill the holes
in the backboards and cut registration
dadoes in them (Fig. D). Then drill pilot
holes into the chair rails and drive in the
screws. This is not a glued joint.
12. Insert a thin spacer
between the seat boards to keep
them parallel. The seat is not glued
to the rails.
Glue and screw the cleat behind
the top of the backboards.
|