We may receive a commission when you use our affiliate links. However, this does not impact our recommendations.

While I have used a lot of bowsaws in the last two decades, I’ve never made one. But during the last few weeks, I’ve made five.
The reason is that I fly to Germany on Friday to teach a couple woodworking classes. One class on building Roorkhee chairs, plus a one-day class on how to make a bowsaw. Both classes are administered through the tool company Dictum Gmbh. Usually these classes are held in eastern Bavaria. But due to the fact that the classroom is under water because of flooding, my classes are being held in Munich instead.
I love Munich, so I’m OK with this change – though I will greatly miss my friends at the monastery in Neideralteicht where the classes are usually held.
So, here’s a little bit about this bowsaw design.
I used the hardware from Tools for Working Wood as a jumping-off place. The hardware is easy to use, and the plans the company offers are quite nice. But I needed a plan for how to make a bowsaw (sometimes called a turning saw) that was simple, but didn’t look simple.
We have only one day in Munich to make the bowsaw, but I didn’t want it to look like we did it in one day.
So I looked at a lot of historical examples, I built five working prototypes, and I tried to distill what I liked about all the designs into one saw.
This saw is the result of that work.
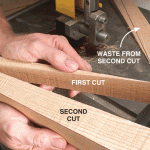
Made from beech, this saw accepts the hardware and blades from Tools for Working Wood, but the cheeks, stretcher and toggle are simpler to make – without looking too basic.
With this saw, I used a simpler joint between the cheeks and stretchers. Yes, the pieces are joined by a mortise-and-tenon. But many of these historical turning saws use a rotating style of joint that allows the saw to hold blades of different lengths.
Because this saw is designed to take only the blades from Tools for Working Wood, the joint between the cheeks and stretchers could be vastly simplified.
The shape of the cheeks was adapted from a historical example I borrowed from my friend Andrew Lunn. The toggle design is my own. The handles are adapted from historical examples.
While all this sounds like a lot of work and fussing, it isn’t. Each design took only about two hours to knock out. The handles and toggle take less than that.
I’ve included scans of parts below for you to use to to design your own bowsaw. These scans are ready for you to adapt. Don’t feel constrained by them. The bowsaw is, after all, only four sticks of wood, two handles, a blade and some monofilament fishing line.
— Christopher Schwarz