We may receive a commission when you use our affiliate links. However, this does not impact our recommendations.

Historic proportions and details are still the best.
Since I started woodworking in about 1993, I’ve stored my tools in almost every way imaginable – from plastic buckets to wall cabinets, racks and a variety of tool chests.
Read about how the lid was built here.
After exploring each of these methods, I kept coming back to a traditional tool chest because I have not found a better way to protect and organize my tools. I also appreciate the finite capacity of a tool chest – it forces me to think hard before buying an additional tool.
During most visits to the tool store I conclude: If it doesn’t fit in the chest, I probably don’t need it.
The Right Chest Size

The gang’s all here. When cutting through-dovetails, I gang-cut the tail boards to save time and effort.
Tool chests are built in a number of fairly standard sizes that are based on the sizes of typical tools and the limits of our bodies.
Large floor chests are usually about 24″ x 24″ x 40″ and are designed to hold full-size saws and large jointer planes, which can be longer than 30″. These chests also hold a full set of moulding planes, bench planes and all the small tools needed to make any piece of furniture. These chests are difficult to move alone, which is a disadvantage if you are by yourself, but is an advantage if someone is trying to steal your chest (the thief needs an accomplice).
Medium-size chests are just big enough to hold panel saws and smaller metal jointer planes – about 18″ x 18″ x 30″ – and can be picked up by one person. It’s an ideal size for someone who works alone, has to move the chest on occasion and doesn’t require a full set of moulding planes.

Ease the entry. Beveling the interior corners of the tail boards makes assembly easier. And you are much less likely to damage your tails when driving them into the pins.
This medium-size chest can hold a remarkable amount of tools – two panel saws, three backsaws, the three standard bench planes, a rabbet plane, plow and router plane all fit on its floor. The two sliding trays and rack hold everything else you (should) need.
Smaller chests – the third size – were usually used for site work or by “gentlemen” woodworkers who had a small kit of tools.
The medium-size chest in this article is ideal for someone getting started in woodworking with a small shop and a budding kit of tools. It’s easy to build, fairly tough and can easily be transported to schools. When I build tool chests for customers, this is far and away the most requested size.
How it’s Built

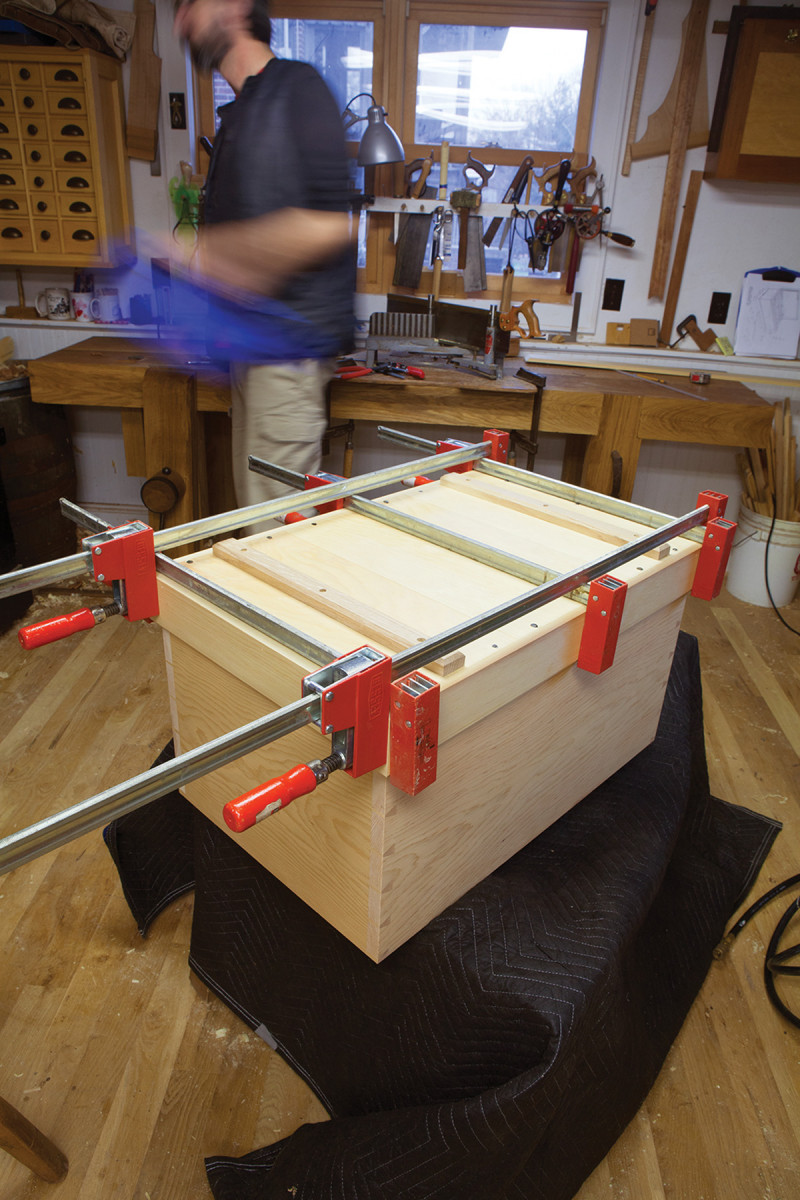
Long sleeves. Sleeve the assembled carcase over your benchtop to make it easy to level the front and back of the chest.
The carcase is dovetailed together – the strongest joint available. The bottom boards are, however, nailed onto the carcase so they are easily replaced if they rot. Speaking of rot, the entire chest sits on two oak “rot strips” screwed to the bottom boards, keeping the chest off a wet floor.
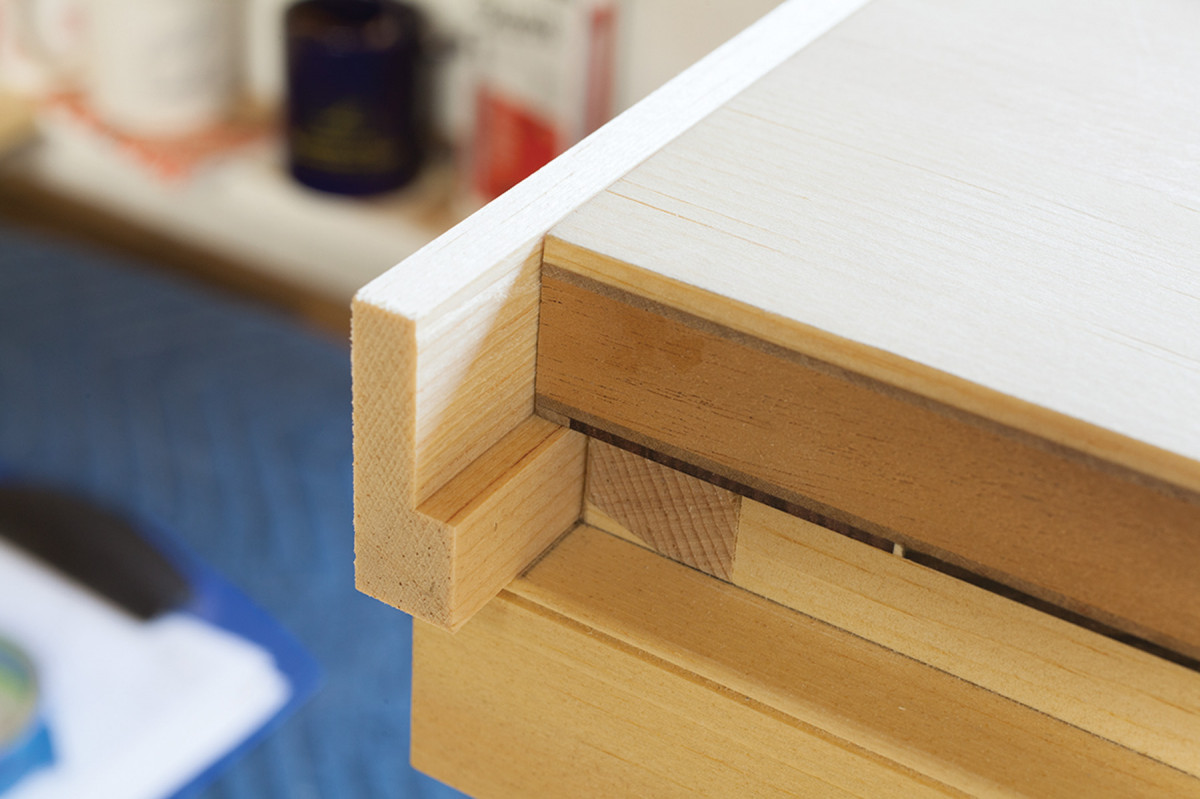
The bottom and top skirts on this chest are mitered and nailed to the carcase. I typically dovetail the skirts at the corners, but a well-made miter can survive just fine.
The lid is a thick panel that is surrounded by a dust seal on three sides; the seal pieces are dovetailed at the corners because this area of a tool chest takes heaps of abuse.
Most of the carcase is made from a lightweight and inexpensive wood such as pine. The parts that will see heavy wear are oak. We’ll discuss the interior fittings after we get the carcase complete.
Make the Shell

Groove your bottom, then tongue it. I use a tongue-and-groove plane to cut the joints on the long edges of the bottom boards. This plane cuts both the male and female bits.
Join the corners of the carcase with through-dovetails – six dovetails at each corner are suitable for a chest this size. Smooth the inside faces of the boards and assemble the carcase. Once the glue is dry, level the joints and remove the tool marks from the case’s exterior.

Tweaked. If your carcase isn’t square, clamp across the long diagonal to pull it square while you nail on the bottom boards.
Now fetch the pine bottom boards. The grain should run from front to back in the chest (for strength), and the long edges of the boards should have some sort of joint to accommodate wood movement. I used the tongue-and-groove joint. Then I cut a 3⁄16” bead on the tongue boards as decoration.
Attach the bottom boards to the carcase with 6d headed nails – I used cut clouts. Be sure to leave some room between the boards for expansion and contraction. Trim the bottom boards flush with the carcase.

Resist rot. Either make your rot strips impervious to water (plastic would work, too), or make them so they will rot off immediately by using pine and iron nails. Either way works.
The last bit on the shell is to attach the rot strips to the underside of the bottom boards. I use water-resistant white oak and attach it to the bottom with waterproof glue and brass screws. After finishing, I oil and wax these rot strips to make them repel water.
Traveling Tool Chest Cut List
No.ItemDimensions (inches)Material
t w l
❏ 2 Front/back 3⁄4 x 14 7⁄8 x 28 Pine
❏ 2 Ends 3⁄4 x 14 7⁄8 x 18 Pine
❏ 1 Bottom* 5⁄8 x 28 x 18 Pine
❏ 2 Rot strips 3⁄4 x 1 3⁄8 x 17 1⁄2 Oak
❏ 2 Bottom skirt, front/back 1⁄2x 3 1⁄4 x 29 Pine
❏ 2 Bottom skirt, ends 1⁄2 x 3 1⁄4 x 19 Pine
❏ 2 Top skirt, front/back 1⁄2 x 1 5⁄8 x 29 Pine
❏ 2 Top skirt, ends 1⁄2 x 1 5⁄8 x 19 Pine
❏ 2 Chest lifts 1 1⁄4 x 1 3⁄4 x 12 Oak
❏ 1 Lid panel 7⁄8 x 18 1⁄16 x 28 3⁄8 Pine**
❏ 1 Dust seal, front 1⁄2 x 1 1⁄2 x 29 Pine
❏ 2 Dust seal, ends 1⁄2 x 1 1⁄2 x 19 Pine
interior fittings
❏ 2 Bottom runners 7⁄8 x 7⁄8 x 16 1⁄2 Oak
❏ 2 Middle runners 1⁄2 x 5 1⁄2 x 16 1⁄2 Oak
❏ 2 Top runners 1⁄4 x 2 3⁄4 x 16 1⁄2 Oak
Bottom Tray
❏ 2 Front/back 1⁄2 x 5 1⁄8 x 25 3⁄8 Pine
❏ 2 Ends 1⁄2 x 5 1⁄8 x 8 Pine
❏ 1 Bottom 1⁄4 x 8 x 25 1⁄2 Oak
Top Tray
❏ 2 Front/back 1⁄2 x 2 1⁄2 x 25 7⁄8 Pine
❏ 2 Ends 1⁄2 x 2 1⁄2 x 8 Pine
❏ 1 Bottom 1⁄4 x 8 x 26Oak
Tool holders
❏ 1 Panel-saw till 7⁄8 x 2 5⁄8 x 5 3⁄4 Oak
❏ 2 Backsaw tills 7⁄8 x 4 x 5 3⁄4 Oak
❏ 1 Rack, front piece 1⁄4 x 3⁄4 x 25 1⁄2 Oak
❏ 4 Rack spacers 5⁄8 x 3⁄4 x 1 Oak
*Made from multiple boards; **Plywood if making a marquetry lid

Profile

Interior Fitting

Elevation

Trays
Mitered Skirting

Completely stuck. Mould the entire stick of wood before cutting it apart for mitering. This ensures the moulding will match at the corners.
The bottom skirt protects the carcase from kicks and bumps. The top skirt helps seal the interior from dust and protects the lid’s dust seal. The skirting is 1⁄2“-thick stuff that wraps around the entire carcase and is mitered at the corners.

Miters all around. I begin mitering at one front corner of the chest. I get that joint perfect, then I make my way around the carcase.
Before cutting the miters, however, cut any moulding or bevels. These are not just decorative – a 90° corner is fragile and will quickly splinter off in the shop. I used a 3⁄8” square ovolo on the bottom skirt. The top skirt has a 1⁄8” bead on its top edge and a 30° bevel on the bottom edge.
Now attach the skirting to the carcase. I miter moulding with a miter box, which I find more accurate than power equipment. All the miters here were assembled right from the saw. That’s not because I’m awesome; it’s because a miter box allows you to put a sawtooth right on a knife line.
Yes, clamp. Glue the short grain of each miter and clamp it at the corners. The glue will have more strength this way.
Glue and nail the skirting to the carcase – don’t forget to apply glue to the miters themselves. Then clamp the corners while the glue dries. At this point I would typically work on the lid and its dust seal. But because Jameel Abraham was working on the lid panel, I fitted out the interior with trays, saw tills and a rack.
The Interior

This high. The 51⁄4″-wide spacer acts as a shelf when installing the runner above it. The 51⁄4″ height is critical for holding standard bench planes below the bottom tray.
The arrangement shown in this chest is typical and works well. On the floor of the chest are two small saw tills – one for backsaws and the other for two panel saws. I like these tills because they take up little space.

Smooth-sliding bottom. The bottom boards are the only part that touches the runners. So shoot them to perfect length until you get the sliding action you want with zero racking.
Floating above the floor are two sliding trays – one deep and one shallow. The deep tray is for bulky tools such as the brace and bit, plus anything in a tool roll. The top tray is for all the small tools you use every day – layout tools, a block plane, a mallet, hammer and wax, for example.
The walls of the trays are made from pine. The bottoms and the runners they slide on are made from oak to resist wear.

Proud bottom. Here you can see how the bottom protrudes from the end of the tray, making the tray a cinch to fit.
On the back wall of the chest is a simple rack for holding chisels and other small or handled tools – dividers, combination squares and screwdrivers.
Install the Runners
The sliding trays run on oak runners that are affixed to the inside of the carcase. There are three layers of runners for the two trays, all of different thicknesses and widths so that the trays can be pulled up and out of the carcase.
The lowest runners are installed 51⁄4” from the floor of the chest – that gives your bench planes the headroom they need. I install these lower runners by first making a spacer board from some scrap that is 51⁄4” wide (see photo at left). I use that as a temporary shelf to hold the lower runners in position while I glue and nail them.
After the lower runners are installed, remove the spacer and install the runners above, also with nails and glue. I cut a small bead on the top edge of each to protect the corner from damage and to spruce up the interior a bit.
Build the Trays

Rack at the back. This simple rack can hold a variety of tools.
The trays are dovetailed at the corners and each has a thin oak bottom that is nailed on. The interesting detail here is that the finished trays are 1⁄8” smaller than the bottoms are long. In other words, the bottoms are 1⁄16” proud on either end of the assembled trays.

My other favorite form of rack is a board that is poked with 1⁄2″-diameter holes on 11⁄8″ centers.
This detail makes the trays easy to fit. You only have to get the bottoms to slide smoothly on the runners. The trays never touch the runners or interfere with the sliding action.

Quick saw till. Kerf the block of wood for the saws, then shape the block so it looks nice.
So fit the bottom boards so they are a close but smooth fit on the runners.

Then screw it to the side of the carcase and to a bottom board.
Now dovetail and assemble the trays. Then nail or screw the bottoms on. If you need to use multiple boards for the bottoms, shiplap the joints at their mating edges.
Racks & Tills

Turn the bone. The center section of the dog bone is turned down to 1″ diameter. Then remove the piece from the lathe.
I like simple racks and tills for my chests because that leaves more room to arrange the tools. The rack on the back wall is made from scrap bits of oak that I glued together, then screwed onto the back wall with No. 8 x 11⁄4” screws.

Rasp the bone. Then shape the ends of the lifts. This shape leaves plenty of meat for the screws to bite into.
The saw till for the panel saws is simply one piece of oak with two kerfs cut into it. One kerf is for the crosscut saw and the second for the rip saw. This till holds the saws at their tips. The weight of the handle and the teeth at the heel of the saw prevents the tools from whipping around in the chest.

Loading up. The backsaw till offers more protection than the panel-saw till because backsaws are more fragile.
The till for the backsaws is made and attached in the same manner. The only difference is that there are two blocks of wood and three kerfs in each for the dovetail, carcase and tenon saw. This till is at the back of the chest.
Chest Lifts

Screwed either way. Affix the lifts with stout #8 screws from both the inside and outside of the carcase.
While you should carry your chest by holding its bottom (or put it on a cart), the lifts help you get the chest into position or to balance your load. Each lift is made from a single piece of oak that looks like a dog’s bone when you begin. You turn down the center to make a handle. Then shape the ends of the “bone” to make them look nice. I used a simple ogee curve.
The proper way to attach the lifts is to screw them in place from both the outside and the inside of the chest. The screws from the outside pass through the narrow ends of the lifts. The screws from the inside are driven into the thick part near the handle.
The Lid
Rabbet the seal. The rabbet on this piece of the dust seal allows you to sneak up on the perfect fit all around.
If you are skipping the marquetry panel, make the lid from a softwood that doesn’t move much, such as one of the white pines. And glue it up from several pieces of quartersawn or rift-sawn stock to further reduce seasonal movement.
After cutting the panel to size – it’s a bit larger than the rim of the carcase – attach it to the carcase with hinges. With the lid in its final position, you then can build the dust seal around it to create a perfect fit.

Rabbeted dovetails. This joinery looks a little involved, but it’s actually simple. Begin by cutting a tail on the seal, then show it to its mate. You’ll then know what to do.
After building about 20 of these chests, I have found a better way to make the dust seal fit. I rabbet each piece until that piece fits perfectly flush with the top skirt and the top edge of the lid. I can adjust this fit in tiny increments with a shoulder plane.
Then, once all three pieces of the dust seal fit perfectly, I dovetail them together at the corners.
I attach the seal using a combination of glue and nails. Glue and nail the front edge of the dust seal to the lid. To attach the “returns” along the ends of the chest, use glue and nails along the front 4″ of the lid. Then use nails alone for the rest. This fastening method allows the top to move.
To keep the chest secure, I installed a traditional crab lock – a blacksmith-made lock built for chests that allows for some wood movement. They are easy to install because they are surface-mounted to the inside of the chest. And they are gorgeous.
The Best Finish

Keyholed. The only tough part about installing a crab lock is cutting a well-placed and crisp keyhole. I bore the hole for the round part of the key. Then I cut the remainder with a chisel.
Almost all traditional tool chests were painted. It is the most durable and easy-to-renew finish. You can use any paint you like – milk paint, oil paint or latex. Paint the outside of the chest, but leave the inside of the chest bare – or use a coat of wax alone if you like.
If you insist on a film finish for the inside, use shellac. Please avoid oils – they will stink forever.
Once your chest is complete, my final caution is to avoid bringing it into your house. Many chests like this begin their lives intending to hold tools but somehow end up at the foot of the bed stuffed with blankets and doilies. A sad situation, indeed.
Video: Take a short video tour of the chest
Blog: Read more about “dog bone” chest lifts.
Blog: Read about a commercial crab lock.
Plan: Download a free SketchUp model of the traveling tool chest.