


We may receive a commission when you use our affiliate links. However, this does not impact our recommendations.
I’m pressing pause on my saw restoration for a bit because I realized that once it’s refurbished, I will have no place to put it. I have a few hand tools that I’ve accumulated over the years, but they’ve mostly been subjected to the lonely life of storage boxes…until now.
I decided to build the Dutch tool chest from the October 2013 issue of Popular Woodworking Magazine for my fledgling hand tool collection. My original plan was to build the traditional English tool chest, but I drive a Volvo sedan and there is no way I could fit in in there. Plus, the Dutch chest has far fewer dovetails and I had never hand-cut dovetails before three weeks ago. I was terrified of being a failure.
The woodshop that I started in built Shaker reproductions and time was money. There was simply no time to hand-cut dovetails so they were all cut on a dovetail machine. (I admit, at times I do miss the speed and ease of use of that machine.)
So I set out to learn how to hand-cut dovetails. I read Megan Fitzpatrick’s blog about laying out dovetails (and the video that accompanied it). I watched every video that I could find on marking, measuring and cutting techniques. Finally I decided to practice.
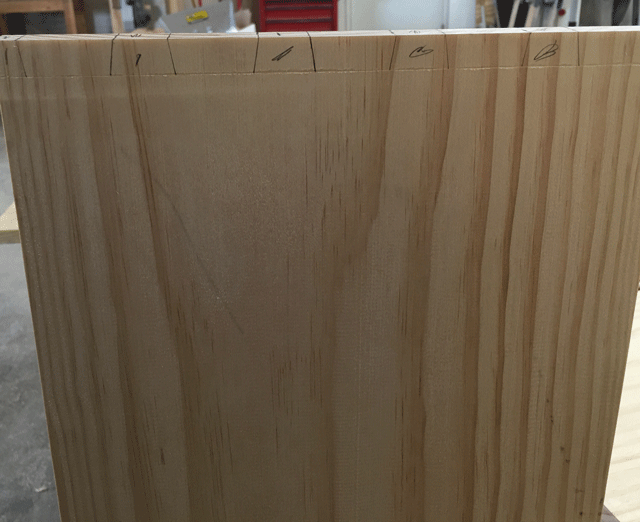
I bought a 1″ x 12” x 8’ board of pine from the local hardware giant and cut it into pieces for practice. I’m building my tool chest out of products that can be purchased at a box store, so the pine was perfect for practice.
Test-fit before cleaning up the edges.
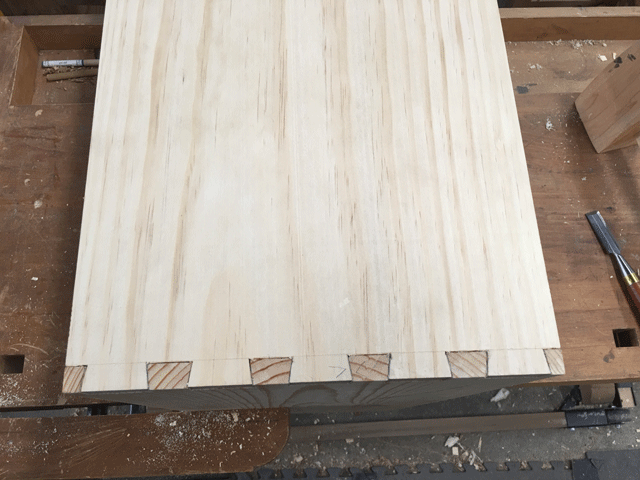
Then I tried cutting the joint…and failed. So I tried again. I tried over and over until I could cut a serviceable joint. The dovetails still aren’t perfect, but they will work for this project. I will keep practicing long after my tool chest is finished, until I am satisfied with the outcome (so I will probably never stop practicing).
I filmed a video of cutting the pins and chopping the waste to show that there’s no shame in struggling to master a new technique. Woodworking involves a lot of trial and error, and learning new skills along the way. Don’t be scared of looking like you don’t know what you’re doing when you learn a new skill — you don’t know what you’re doing, take pride in the fact that you’re learning.
P.S. After trying out every technique I could find, my preferred process is this: tails first, pull saw and chisel out the waste (no coping saw…sorry Megan).
Here are some supplies and tools we find essential in our everyday work around the shop. We may receive a commission from sales referred by our links; however, we have carefully selected these products for their usefulness and quality.


Starting t the baseline with your chisel cut means that, regardless of what angle you hold the chisel at, you are likely to have the chisel cross the baseline. The wood pressure on either side of the chisel bevel is the same, so the chisel is being used as a wedge. Do all of your work shy of the baseline, then a quick cleanup to the line. When laying out the pins, consider using a knife–using a pencil no matter how sharp, builds in error. Also, don’t take the time to mark the opposite side–if you have a line squared across the top and the tail angle on the face and saw on those two lines, by definition you will be square in back. Taking time to look over only breaks your concentration. When marking the pin board, consider using a slim support only at the back edge so that when you lean on the board there will be tension on it and you will be way less likely to have the pin board shift even slightly during the markup. Lastly, revisit the concept of the coping saw, as you can come to within a 1/16″ of the line right off the bat, then only need cleanup cuts to the gauge line to finish.
I was taught that before practicing dovetails I should practice sawing the layout line. I’ll scribe 20 or 30 lines (vertical and slanted) on the end of a practice board and just cut on them all. At the end of the first 10, I’ll stop and evaluate. I’ll correct my technique to improve my cuts. When I can cut the scribed line 10 times in a row, I’ll lay out practice dovetails as my next step. That said, I’m building a replica campaign secretary. The boards are 18″ wide. I’m using a jig for the dovetails because there are just too many of them.
Nice! One thing I noticed though when you started the chisel cuts at the baseline – you were consistently not starting at 90 degrees. If you look from the side, it is much easier to see if you’re square than cutting from straight on…
That’s a method someone with years of experience doing this taught me.
Not bad. You might be a little happier in future with the board lower in the vise—less vibration—and with something along these lines to prevent the vise racking (exerting force unevenly from side to side). http://www.leevalley.com/US/wood/page.aspx?p=69605&cat=1,41659 That one is from polyethylene but an L shaped piece of wood works just as well, if a bit less flexibly.
Dovetails are one of those things where there’s a million different ways to do it that work and mostly you need to just cut a bunch of them to develop the skill.