


We may receive a commission when you use our affiliate links. However, this does not impact our recommendations.
Honestly, I’ve tuned so many dang metal planes in my lifetime that I’ll never worry about having enough iron in my diet. They might mine my carcass for the mineral when I’m dead.
For me, it has always been an analog process: Do it by hand with inexpensive supplies.
Today I spent the day tuning old bench planes with a half-dozen Australians in the shop of toolmaker Chris Vesper. It was, for me, like finding a room in your house you had never before spotted.
Vesper is, without a doubt, one of the most passionate and talented toolmakers I’ve ever met. He lives above his shop and plows a huge portion of his profits back into purchasing better equipment and better supplies. He can set up his machines in a heartbeat, and so today we were able to fix problems on planes in minutes instead of hours (or weeks).
Here are some highlights of the process:
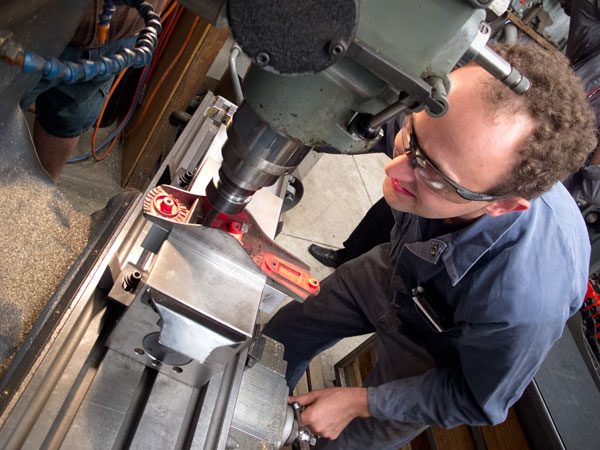
Sole Evaluation: We began by stripping down all the planes and sorting out what needed to be done. After lightly dressing the sole of each plane with a stone, Vesper placed each plane on the bed of a surface grinder and evaluated it with the thinnest feeler gauge available. He then sorted the tools into two camps: Those that required surface grinding and those that didn’t.
Surface Grinding: Vesper used two surface grinders to true up the soles and sidewalls of the handplanes. Watching the process will make you think that every household should have a surface grinder. (Hmm, this ham sandwich would be tastier if the edges were 90° to the face of the ham….)
Frog Evaluation: Several of the planes had frogs that wouldn’t sit flat on the base casting. When I encounter this problem, the solution is a tedious process of marking the high spots with dye and filing them away. For Vesper, it was a 10-minute process of tweaking the frog and base casting with a milling machine – removing only a few microns of material.
Hand Lapping: For the soles that were almost flat, Vesper set up an enormous and flat welding table outside with #150-grit sandpaper. There the attendees flattened their soles manually when they needed just a wee bit of metal removed.
Improving the Bits: Also incredible was the process of improving the individual parts that make up a handplane. Vesper cleaned all the gunk out of the screw threads with a wire wheel. Plane irons that were warped were trued up on the surface grinder (again, incredible).
Fiddly Bits: So what the heck did I do? Finish up the fiddly bits. I helped the students true their breakers, set up their tools, sharpen their irons and take shavings. It was impressive to see how many of these old junkers came to life after a day of work and Vesper’s talented hand and machines.
One of the students became a “true believer” that day – always fun to watch. He kept planing and planing the board in the vise with his old Marples plane. After he was chased off, he came back for more planing.
Right before he left, he said: I’m going to go home and plane all night.
That moment made the whole day worthwhile.
You might not have a machine shop in your back yard, but I’ll bet you know someone who does. If you need to restore a handplane, seek that person out. Bring them a case of beer, offer to do their taxes or mow their lawn. You might just learn something about machine work, handplane mechanics or both.
Even if you don’t seek out a machine shop, you can true up your metal planes by yourself. We have a DVD on this process called “Super-Tune a Handplane.” Good stuff.
— Christopher Schwarz

Here are some supplies and tools we find essential in our everyday work around the shop. We may receive a commission from sales referred by our links; however, we have carefully selected these products for their usefulness and quality.


Chris-
Isn’t the term for truing a plane “fettling”? Seems to me I ran across the word “Fettle” in regards to planes many years ago (overt 70 of them) when I got my first set of carpenter tools on my 10th birthday from my uncle who had obtained the tools and chest from the carpenter he had apprenticed to around 1905-1010. He taught me to file my own handsaws and to fettle my planes so I could make paper thin shavings.
Liked the article though.
Dave
Many forget that back-in-the-day Stanley, Record and other makers used machine tools to make their metal planes from the beginning. I’ve rehabbed planes both by hand and by machine. In the end the results were basically the same, just a lot faster with a Bridgeport Knee Mill and Thompson Surface Grinder.
Thanks for the article Chris!
Chris
I’ve had a couple of old plane soles ground flat. Whenever I inquired about how it should be done, I was always told the sole should be ground while the plane is fully assembled, and the blade raised above the sole. The reasoning behind it, was that screwing in the frog and blade assembly added a certain amount of stress to the sole. If you ground it without the assembly, when you went to use it, the sole may nott be flat.
As far as I can tell from the photos, it appears that Chris Vesper is grinding the soles, with the plane unassembled. Am I seeing it correctly? Is the information I have correct?
Dave
Chris,
When I worked in a machine shop, the surface grinder was the one tool I wanted to take home. I was never allowed to use it on a plane because cast iron is MDF of the machine trades; nasty dust.
Rob Millard
Thanks for a great class, Chris (and Chris). I did go home and plane all night! And thanks for the autographed shaving as well!
Hi Chris,
It was an enjoyable day wasn’t it. One important correction though; it was half a dozen Australians – and one Kiwi!!
Thanks again for making the time for it.
Cheers, Matt (Master BBQ Chef)