We may receive a commission when you use our affiliate links. However, this does not impact our recommendations.
The most embarrassing jig I’ve ever owned has been photographed, measured and pondered more than any single piece of fine furniture I’ve built.
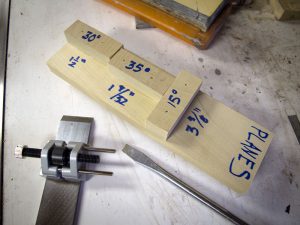
It’s a stupid little block of wood with stops on it for many common chisel sharpening angles I use with my side-clamp honing guide – sometimes called the “Eclipse” guide because that was an original manufacturer.
Making a chisel sharpening jig with stops for a honing guide isn’t a new idea. It shows up in the earliest woodworking magazines and has been taken to a high art by Deneb Puchalski of Lie-Nielsen Toolworks. Download free plans from the Lie-Nielsen site here.
I think the appeal of my version is that it takes up little space and is so crude that anyone can build it. I get asked all the time for plans for it. So here’s how I build one.
First examine your chisel honing guide. If it’s one of the Taiwanese ones, then the following measurements will be correct for the different angles. If you have an English one labeled Eclipse 36 or some such (lucky you!), then you will need to figure out the measurements because the English-made guides are smaller.
Build the jig out of junky scraps – I used a scrap poplar 1×4. The base is 10-1/2” long. Then crosscut four 3/4” x 3/4” stops from the 1×4.
The next step is to nail the stops to the base. The distance that the stops are located from the edge of the base determine the angle the tool is held in your honing guide.
OK, I am now trying to find my power animal. Calm my aura. Take a frickin’ chill pill. Why? I am about to discuss sharpening angles. Allow me to lay some hard-earned truth on you: The exact angle you sharpen at with your honing guide isn’t as critical as the same angle you used last time you sharpened. Period. Read that sentence until it sinks in. Consistency is more important than accuracy.
Setting the exact angles of plane irons is tricky in these side-clamp guides because … oh I don’t think we should go into it. People will fall asleep. Join a woodworking forum and you can read the dissertations on the topic.
The bottom line is that if I put the thinnest plane iron in my honing guide and set it to extend 1-1/2” from the front of the jig, it will sharpen the tool at 30°. If I put the thickest plane iron I have in my shop in the honing guide and set it to extend 1-1/2” from the guide, then it will sharpen the tool at a little more than 31°.
Does that matter? No, no and no.
The point is that a 1-1/2” projection will return your tool to that same angle every time you sharpen. This will greatly reduce your time on the stones and save abrasive material, steel and a family of sea lions.
So for plane irons, nail a block that is 1-1/2” from the edge of your 1×4. Label it 30°. Nail a block at 1-9/32” from the edge and label it 35°. Then nail a block that is 3-3/8” from one end of the block. That will be used to set your plane iron to sharpen a 15° back bevel on a plane iron.
(Note: If you don’t know about back bevels, keep your pants on. I’ll do a blog entry on that later this week.)
Turn the block over.
The other face of the 1×4 is for chisels, which are held in a different notch in the honing guide. If you need to check the angles produced by your particular guide, clamp a ruler in the guide and use that to check the angle on a protractor.
If you have the ubiquitous (Megan taught me that word) honing guide, nail a block at 1-3/16” from the edge for 30°. Nail a block at 15/16” to get 35°. If you want other angles (I don’t), then you can figures those measurements out with ease.
And that’s it. Apply a French polish to the jig – I recommend 10 coats – and then some conservator’s wax.
— Christopher Schwarz
Want to see this jig in action? Order my DVD “The Last Word on Sharpening,” one of the DVDs I’m most proud of. It’s not about the best system of stones ever. It’s about grinding, honing and getting back to work. It’s about finding the system lurking behind all those sharpening systems out there so you can make good decisions and buy only one sharpening kit for your shop.
- Photo courtesy Chipstone Foundation
Here are some supplies and tools we find essential in our everyday work around the shop. We may receive a commission from sales referred by our links; however, we have carefully selected these products for their usefulness and quality.


But the finish coat will actually make the distance the iron projects out from the guide shorter, yes? So, I’ll go 1/128″ further out with my stops. 😉
Thanks much for this blog Chris. The details on construction (and those that Deneb provided) are terrific. I always wanted to comment on the changing angle with blade thickness (engineer training), but was uncomfortable asking. “No, no and no, It doesn’t matter” is perfect. Thanks again.
I made something similar with a 10″ 2×2. That gives me eight ends to work with, I haven’t used them all yet.
That thing makes me dizzy…..
Chris,
Is that 1 9/32 or 1 9/64? And what if you lap the back do you have to change the length?
So what you’re really saying is it is better to be accurate then precise!
Send in the clowns….don’t bother, there HERE.
What brand of conservator’s wax would be the best to use on balsa wood? :<)
I just built one of these per your instructions and I cant figure out how to get the pumice out of the corners from the french polish…;-)
If you need other angles (keeping your 3/4″ poplar) you can just type this into google:
.75/sin(XX degrees)
replacing XX with the required angle
Leave it to you Chris to spill the beans! Now everyone else will know about how a bundle of sewn-together sea lion nasal hair will brush away all the unnecessary metal and give you a microscopically sharp cutting edge! Now there’ll be no hope for saving them!
I built a similar sharpening angle guide in 1986 after reading an article on the eclipse jig in another woodworking magazine. Still have that jig around and use it…
Well, props to Lie Nielsen for using countersunk brass screws, but Chris you ought to encourage them to publish an errata with images showing properly clocked screws.
My jig’s even simpler than your jig. Just one stop for bench planes – 35 degrees for the micro bevel. A ruler sets the primary bevel just fine.
Though I must confess I only use the camber friendly Eclipse jig for bench planes. For chisels and block planes I use a Richard Kell device and a whole other setting jig because I’m posh.
But if your block plane iron fits the lower Chisel slot (which I think the copies do) in the Eclipse guide, then a 1 stop jig @35degs for bench planes and another @30degs for pairing chisels and block planes should get you started. Though I like to hone my chopping chisels at 35degs, so that’s two stops on the second jig. Steady on.
Obviously I’ve yet to discover back bevels.
Precision versus accuracy.
I am having difficulty finding the SketchUp model for this accessory. Could you please provide the link. I would like to print out the cut list before I rive my poplar.
The second time I used my cheapo honing guide, I was grinding a blade straight and I didn’t realize the wheel had frozen in place. While grinding the blade I also ground a flat spot on the wheel. Important note, give that wheel a couple of drops of 3-in-1 oil when you’re done using it, and verify that it turns before using it next time.
Of course I replaced my cheapo guide with a fancy guide that has an attachment that does what the block does, so my French polished honing jig goes in the hall of shame pile. 🙂
Or learn to sharpen freehand and don’t worry about jigs or guides. 🙂