We may receive a commission when you use our affiliate links. However, this does not impact our recommendations.

Simple joinery allows (time to add) cool design details.
I like traditional joinery, and I enjoy working with hand tools. But I also like completing a project without having it drag on because the joinery is labor intensive. This table has all the earmarks of a traditional heirloom: beautiful hardwood, classic proportions and solid construction. And you can build it in a weekend.
What’s the secret? Instead of using traditional joinery to build it, I used pocket screws, a contemporary joint-making method. I discovered pocket screw joinery years ago, while designing a coffee table project that featured haunched mortise-and-tenon joints, web frame structure, and dovetailed drawers. To work out the design details, I built a prototype using pocket screws. The prototype went together amazingly fast, and it was solid as a rock. The table you see here descends directly from that discovery.
Pocket screw joinery is definitely blue collar: It won’t win any aesthetic awards, but it does a good job with minimal fuss. If you can fit a butt joint, you can master this method, which employs specially designed screws driven at precise angles to secure the joints. Of course, butt joints that include the end of a board are notoriously weak, so reinforcing them is nothing new—dowels, splines, biscuits and loose tenons serve the same purpose. To give pocket hole joinery a go, you’ll need a pocket screw jig, a specialized drill bit and pocket screws.
Playing with tradition
The table’s design continues the play on traditional methods. The tapered legs are simply turned upside down and inside out from their traditional pose (Fig. A, below). And rather than standing at 90˚, the aprons follow the slope of the tapers. Thanks to pocket screw joinery, these changes present only minimal building challenges—basically, some of the butt joint surfaces have to be beveled to fit, and the front ends of the drawer sides have to be cut at an angle, so the drawer front slopes to match the frame that surrounds it. Incidentally, the drawer front and frame are cut from a single board, so the grain flows continuously—a traditional building technique that’s too good—and too simple—to ignore.
This table requires only 25 bd. ft. of primary wood and 9 bd. ft. of secondary wood, so building it won’t cost an arm and a leg. Both amounts include a generous amount of waste, so you may do with even less. Also, all of the pieces are short and/or narrow, so you might not have to buy top-grade lumber, either. You can glue up 4/4 stock for the legs if 8/4 stock isn’t available.
Friday evening
(Okay, it’s going to be a long weekend.)
- If you’re working with rough sawn lumber, mill all your boards to thickness. Then decide how each board will be used.

Fig A. Leg and Apron Details
- Choose the best boards for the top (Part A, Fig. B and Photo 1). Cut them slightly oversize in length and joint the edges square. When you glue these boards together, make sure their faces are flush, to minimize sanding. Remove all squeezed-out glue before it hardens. Leave the top clamped up overnight.

Fig. B. Exploded View


Fig C. Top rail support and drawer kickers (top view).
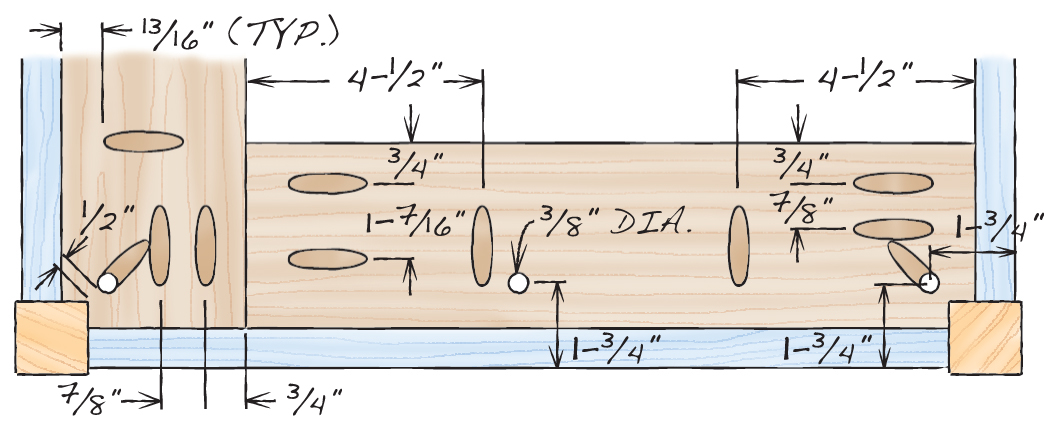
Bottom rail and drawer supports (bottom view.)

- If you’re gluing up the leg stock, do it now.

Photo 1. Use your best-looking boards for the top. You can save money by using #1 Common lumber for this project, because all of the pieces are relatively short and narrow.
Saturday morning
- Unclamp the top and set it aside for the time being. Stand it on end, so air can circulate freely all around, or raise it on stickers if you store it flat.
- Mill the leg blanks (B) square, cut them to final length, and pencil full-length tapers on two adjacent sides. Mark the inside corner on both ends of the blank—it’s the only corner that will remain untouched and square after the tapers are cut.

Photo 2. Saw tapers on two adjacent sides of each leg. Remove the saw marks by sanding or planing.
- Saw each taper on the waste side of the layout line (Photo 2). Remove the saw marks using a hand plane, a jointer, or by sanding.

Photo 3. Tilt the tablesaw blade to match the taper. All the beveled cuts for this project are made at this angle.
- Use one of the legs to determine the bevel angle (Photo 3). Note the angle on your saw’s bevel scale (about 2-1/2˚), because all the beveled cuts will be made at this angle.

Photo 4. Bevel both edges when you rip the aprons to width. Bevel one edge with the board face side down and the other edge with the board face side up, so both bevels slope in the same direction.
- Rip the aprons to width with both edges beveled (Photo 4). Okay, this step is out of sequence. You have to make the front apron assembly—the drawer front and frame—before you can complete this step. I just wanted to emphasize that all the bevel cuts in this project match the slope of the leg tapers.

Photo 5. Make the drawer and its frame from a single oversize board. First, rip the board into three pieces. Next, crosscut the middle piece to create the drawer front. Locate the drawer ends by marking from a centerline.
- Make the front apron assembly (C1-C4) from a board that’s oversize in both width and length (Photo 5). Start by marking a centerline across the width of the board. Keep the board oriented in the same direction for both rip cuts. First, rip a 1″ wide length, to create the top rail (C1). Then reset the fence and rip a 4″ wide length, to create the piece that includes the drawer front and end spacers (C2 and C3). The offcut from this second rip—which should also be at least 1″ wide—is the bottom rail (C4).

Photo 6. Glue the board back together, using the unglued drawer front as a spacer. Bevel-rip this assembly to width along with the other aprons. Measure from the centerline to locate the ends for cutting to length.
- Crosscut the middle piece to create the drawer front. Measure from the centerline to locate both ends. Then make each cut on the outside edge of the line. The two offcuts become the end spacers.
- Create the front apron frame by gluing the board back together with the unglued drawer front trapped inside (Photo 6). Use the centerline to locate the drawer front and rails, and snug the end spacers against the drawer front ends. Use waxed paper to keep the drawer front from getting stuck by squeezed-out glue. Make sure the rail and spacer faces are flush at the glue joints.
Saturday afternoon
- Tilt the saw blade to the predetermined bevel angle. Then rip the front apron assembly’s top rail to final width, 3/4″, measured on the back face. Make sure the bevel slopes toward the front face. Keep the drawer front installed during the cut, to stabilize the assembly.
- Rip the top edges of the back and side aprons (D and E) at the same angle. Again, make sure the bevel slopes to their front faces.
- Bevel-rip the front apron assembly to final 5-1/2″ width. The top and bottom bevels must slope in the same direction (Photo 4), so this time, turn the assembly end for end and flip it over to make the cut—with the drawer front installed.
- Use the same setting and follow the same procedure to bevel-rip the back and side aprons to final width.
- Crosscut all the aprons to final length. Measure from the centerline to locate the ends of the front apron assembly and keep the drawer front installed while you make the cuts. Make sure each pair of aprons are identical.
Saturday evening

Photo 7. Assemble the legs and aprons with pocket screw joinery. A pocket screw jig positions the workpiece and guides the drill bit, which automatically drills a counterbored shank hole.
(You’re having too much fun to go out, right?)
- Drill pocket screw holes in the aprons (Photo 7). Stagger the holes so they’re lower on the side aprons (Fig. A). Then the screws won’t collide when you fasten the legs.

Photo 8. Fasten the aprons so they follow the slope of the tapered legs. Use spacers to create the 1/8″ setback. Make sure the top edges are flush. Reinforce the joints with glue.
- Assemble the table ends (Photo 8). Clamp an apron to your bench face-side down, with 1/8″ hardboard spacers underneath. Locate the apron so its top beveled edge overhangs the benchtop. Position the legs, oriented with a square face butted against the apron and the adjacent tapered face on the bench (The legs’ other square face will face up and its other tapered face will face out. The inside corner mark you’ve made on the end of the leg should be on top, against the apron.)
- Apply glue to both ends of the apron. Snug the legs against the apron and clamp them to the bench, making sure the top of the leg is flush with the beveled top edge of the apron. Then gently clamp the legs to the apron. Allow the glue to tack-set (5 to 10 minutes). Then install the 1-1/4″ fine thread, washer head pocket screws. Unclamp the assembly and remove the squeezed-out glue.
- Follow a similar procedure to fasten the back rail to the assembled ends. Before you install the pocket screws, make sure each assembled end is square to the back rail. Repeat the process to fasten the front rail assembly.
Sunday afternoon
- Complete the table base. Cut and fit the bottom rail support (F). Bevel the front edge to match the front apron rail and both ends to match the side aprons. Carefully notch the front corners to fit around the legs. To determine the support’s length, measure at the bottom edges of the aprons. Then cut the support to fit. Start oversize in length; then shave one end with additional cuts to achieve a perfect, snug fit.
- Drill pocket holes in the bottom support (Fig. C). Use a 45˚ support to drill the holes for the leg screws. Don’t drill these holes full-depth. Leave about 1/2″ between the end of the hole and the notch.

Photo 9. Install the bottom rail support with glue and pocket screws. To fit the sloping rails, this piece is beveled on the front edge and both ends. Allow the glue to tack-set before driving the screws.
- Apply glue and clamp the support to the front rail and side aprons (Photo 9). The support should be flush with both edges of the rail and with the bottom edge of both side aprons. Let the glue tack; then install the pocket screws. Don’t forget the screws that go diagonally into the legs.
- Cut the drawer supports (G) to fit. Bevel the outside edge and the back end of these mirror-image parts, and cut the notches.

Photo 10. Install the drawer supports with glue and pocket screws. A special clamp holds the joint flush while you install the screws. Follow the same procedures to install the top rail support and the drawer kickers.
- Drill the pocket holes. Then install the supports with glue and screws (Photo 10).
- Install the drawer guides (H).
- Cut and fit the top rail support (J), using the same procedure used for the bottom rail support. Drill the pocket holes (Fig. C). Note that there aren’t any leg screws at the top, so no holes are drilled at 45˚.
- Fasten the top rail support with glue and screws.
- Cut, fit and install the drawer kickers (K).
- Cut the drawer front and drawer sides (L) to final width.

Photo 11. Cut the front end of the drawer sides at an angle, so the drawer front will slope to match the apron, which slopes to match the tapered leg.
- Cut the front ends of the drawer sides at the bevel angle (Photo 11).
- Saw or rout grooves to house the bottom in all three pieces.
- Cut the drawer back (M) to final width. Then cut the drawer front and back to final length, 1/32″ shorter than the opening in the frame.
- Create the drawer joints. I used a drawer lock bit. Used in a router table with a fence, it allows routing all the parts from the same basic setup.
- Finish sand the inside faces of all the drawer parts.
- Assemble the drawer with glue and brads. Lay beads of glue in the grooves. Slide in the bottom (N) and check to make sure the drawer is square. Then fasten the bottom to the drawer back with screws.
- Test fit the drawer and make any necessary adjustments. Glue on the drawer stops (P). Position the drawer so it’s front is flush with the frame. Then butt the stops to the back end of each drawer side.
- Make the drawer pull (Q). Bevel one edge of a wide 3/4″ thick board at 10˚. Return the blade to 90˚ and rip the pull from the board as an offcut. Cut the pull to length. (Just for fun, I mitered the ends at the 2-1/2˚bevel angle, so the pull’s face is wider at the bottom, like the legs.) Sand the pull and the drawer front. Then glue on the pull with its beveled edge down, so it acts as a finger grip.
Sunday evening
- Glue the screw block (R) to the back rail. Drill holes in the drawer kickers, the screw block and the top support rail for the top-mounting screws (Fig. D). Elongate all the holes but the two at the center, to allow for the top’s seasonal movement.
- Drill access holes for your screwdriver through the bottom rail and supports (Fig. C).
- Rough sand both sides of the top, to level both surfaces.
- Cut the top to final dimensions. I beveled both the edges and ends at 2-1/2˚, but this time, the bevels slope in, so the top edge is wider than the bottom edge.

Photo 12. Fasten the top after centering the base and clamping it in position.
- Fasten the top to the base (Photo 12). Mark centerlines on the bottom of the top and on the appropriate inside edges of the base: the drawer kickers, screw block and top rail support. Then use the lines to automatically center the base on the top.
- Clamp the base to the top. Then install the screws.
Next weekend
(I said you could build this table in a weekend. I didn’t say you would finish it.)
- Remove the top.
- Finish-sand the top and the base.
- Apply your favorite finish. I started with a coat of SealCoat (dewaxed shellac) to bring out the rich color of the walnut. Then, as this table is likely to get lots of wear, I brushed on two coats of polyurethane.