


We may receive a commission when you use our affiliate links. However, this does not impact our recommendations.
Add some mood lighting to your next outdoor affair with this great Arts & Crafts luminary.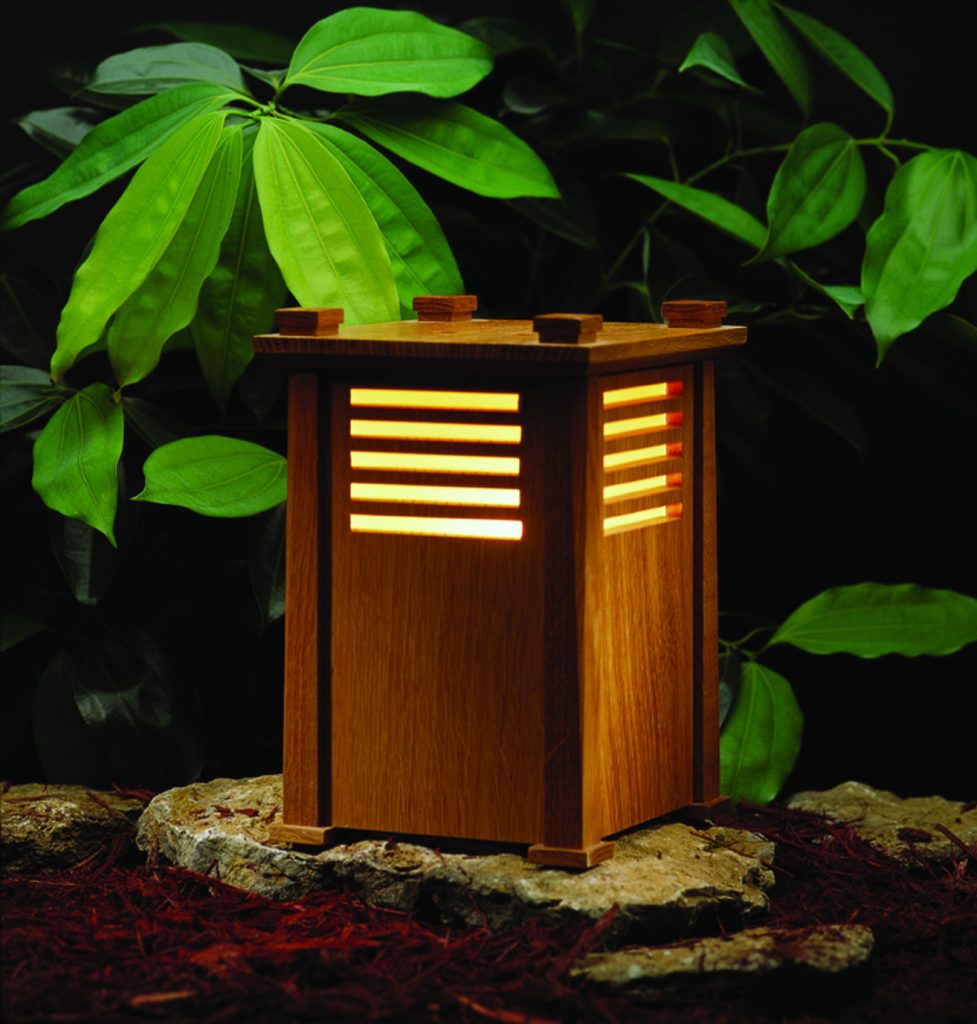
Call me dull, but I’ve never been a Tiki torch kind of guy. And the last time we lit an outdoor party we used oil lamps – which, because of the flammable nature of oil, almost ended in disaster. So my task before our next party was to build a lantern that’s low-key and electric (to ensure that only ribs were barbecued and not the neighbor’s dog).
This lamp can be used in a variety of ways. It looks great on a patio table, or you could glue 6″-long dowels into the feet and stake it in your garden. Either way, it’s going to stand up to the elements.
The lantern’s body is made from quartersawn white-oak scraps. The “rice paper” behind the slats is actually acrylic ($4 for an 18″ x 24″ sheet) that I sanded on both sides with a random-orbit sander and installed in the lantern using waterproof silicone.
The light fixture itself ($3 from my nearby home center) is vinyl clad and is intended for outdoor use. It’s also installed in the base of the lamp using silicone.
Construction
There’s no complicated joinery in this project, but it does require more precision and care than most outdoor furniture. Essentially, the four panels are glued at the edges to the four posts. This is a long-grain-to-long-grain joint, so no real joinery is required. However, to keep all the parts aligned during glue-up, I used a single No. 10 biscuit in each joint. This saved me some real headaches when clamping.
The lamp base, which holds the light fixture, rests on two cleats nailed to the inside of the panels. The removable top is held in position by four cleats nailed to the underside of the top.
Begin construction by cutting out all your parts. Cutting the five 3/8″-wide slots in the panels – the first task – is the trickiest part of the whole project. Once you do that, you can breathe easier.
There are several ways to cut these slots. A plunge router with an edge guide is an obvious way to go about it. I chose to use a dado stack in my table saw. Place a dado stack measuring 3/8″ wide into your table saw and get out your miter gauge or table saw sled, which will hold the work during the cut. You’ll make a plunge cut into the panel for each slot.
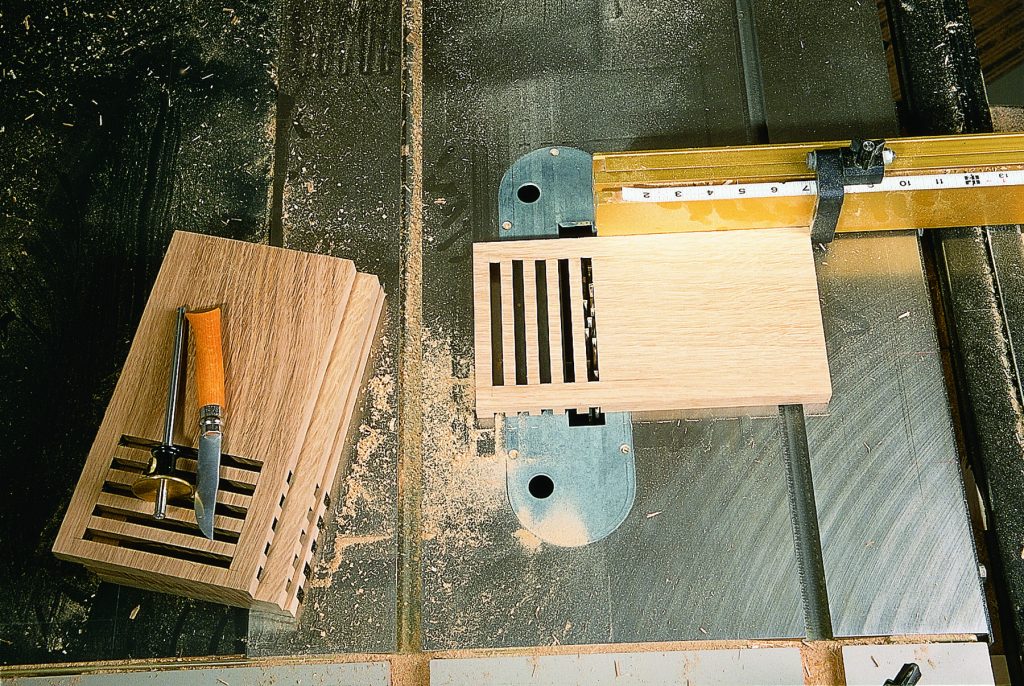
Make sure you hold or clamp the stock firmly against your miter gauge’s fence as you raise the dado stack. If you let the workpiece shift, it’s very likely that it will self-destruct in your hands.
First pencil a line on both long edges of the panel that shows where the slot should start and end. Position your panel slightly back of the blade’s center, then raise the blade until it emerges from the panel and has nibbled to the far line. Move the piece forward until the dado stack nibbles to the near line. Lower the dado stack back under the saw’s table, move the workpiece over 3/4″ and repeat the same process.
If you’re feeling like these slots are more work then they’re worth, consider other patterns. You can drill a series of holes with a drill press, or you can use a scroll saw to create a design that suits your brand of outdoor parties.
After all of your panels are cut, sand them to their finished grit or take a hand plane to them before turning your attention to milling the four posts.
Five-sided Posts
As I mentioned earlier, I used a biscuit in each joint to line everything up during assembly. Now it’s time to cut those biscuit slots. Mark the location of each slot and cut a recess for a No. 10 biscuit in each post and in each long edge of the panels.
You could leave the posts square and your lantern will look fine. I tapered one corner to give the lantern a lighter look. The taper clips 3/8″ off the top outside corner of each post and then tapers to nothing at the base.
Some woodworkers might build a jig to make this cut. The simplest way is to mark the taper in pencil on the post, then plane down to that line using a block plane or bench plane. Each post should take less than five minutes to complete.

Clamp the post with one corner facing up. Check the grain direction and start planing. Begin with short strokes at the top of the post and, as your taper lengthens, make your strokes longer.
Sand your posts to their final grit and you’re ready for assembly.
Assembly
Don’t try to glue up all four posts at once. You’ll want to be able to adjust the panels and posts as you clamp everything, and eight parts sliding around is enough to make any woodworker panic.
When deciding which posts should go where, take a look at the figure. Each post should have one face that is flat-sawn grain and one that is quartersawn grain. Position the posts so the flat-sawn grain faces are together and the quartersawn grain faces are together. This is one of those things that might bug you about a project years later.
Begin by gluing up two assemblies that have two posts and one panel. While the glue is drying, nail the cleats for the lamp base to the other two panels in the location shown in the illustration. Then glue the two assemblies to the two remaining panels.
Final Details
Next, turn your attention to the top. Begin by cutting the 3/8″ x 3/8″ chamfer on the underside of all four edges. To let the heat from the light bulb escape, drill four 3/8″-diameter holes in the top, following the diagram.
Glue and nail the spacers to the top. Then add the top caps on top of the spacers. Screw and glue the feet centered on the posts.
The light fixture I purchased for this lantern was designed to sit in a 1-1/2″-diameter hole. Drill the hole for your fixture in the center of the lamp base and attach the fixture to the base using silicone. Then attach the lamp base to the cleats using (again) a little dab of silicone.
The “rice paper” is my favorite part of the project. It’s made from inexpensive 3/32″-thick acrylic I bought at my local hardware store in the glass section. Cut the acrylic to size using your table saw and sand both faces with a random-orbit sander to get a frosted effect. Attach acrylic to the inside face of each panel using silicone. A spring clamp will hold it in place while the silicone cures.

Load your sander with #100-grit sandpaper and sand both sides of the acrylic. It takes only a couple of minutes to turn the clear plastic into frosted plastic.
Four cleats hold the top in position on the base. Turn the entire lamp upside down on your bench with the base centered on the underside of the top. Mark the location of the base. Measure in from those lines the combined thickness of the panels and the acrylic. Then nail four cleats at those locations.
As for the finish, I left mine natural for now. I might someday put a few coats of an outdoor finish on it, such as tung oil. But first I want to see if it survives our next outdoor party. PW
Click here to download the cutlist for this article.


SketchUp model by reader Gordon Black.
Here are some supplies and tools we find essential in our everyday work around the shop. We may receive a commission from sales referred by our links; however, we have carefully selected these products for their usefulness and quality.


