We may receive a commission when you use our affiliate links. However, this does not impact our recommendations.
An ideal project for learning how to make a bent lamination.
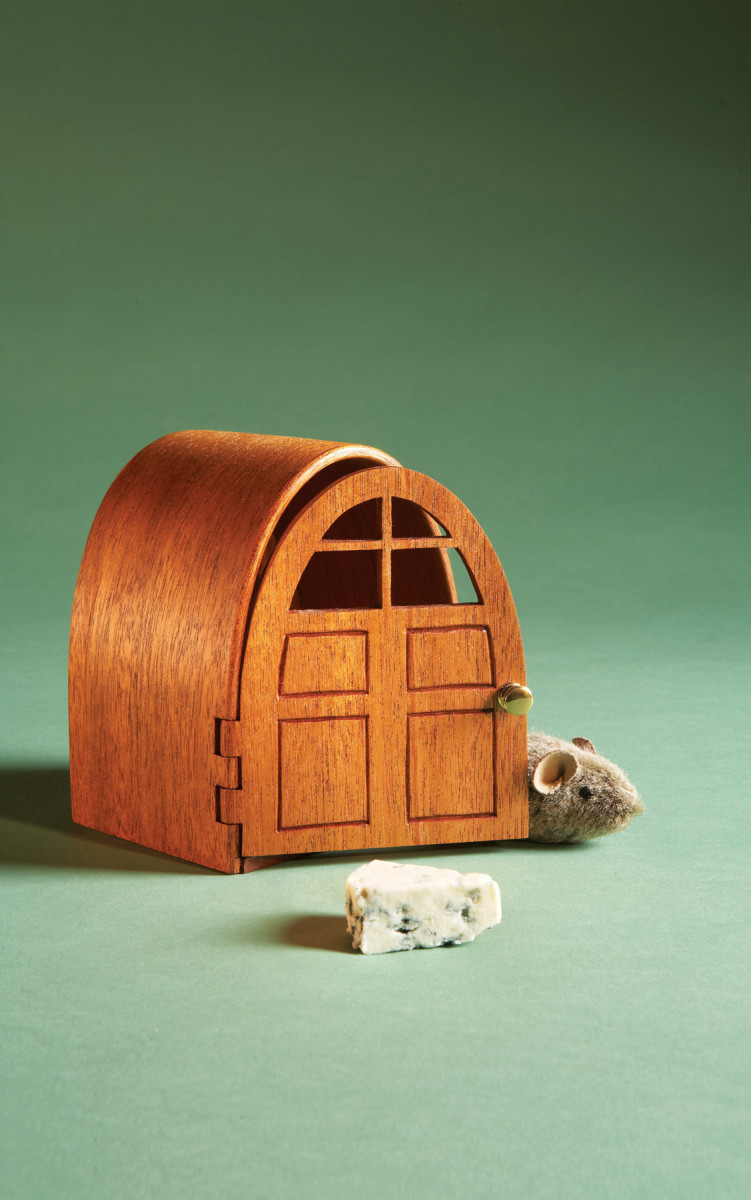
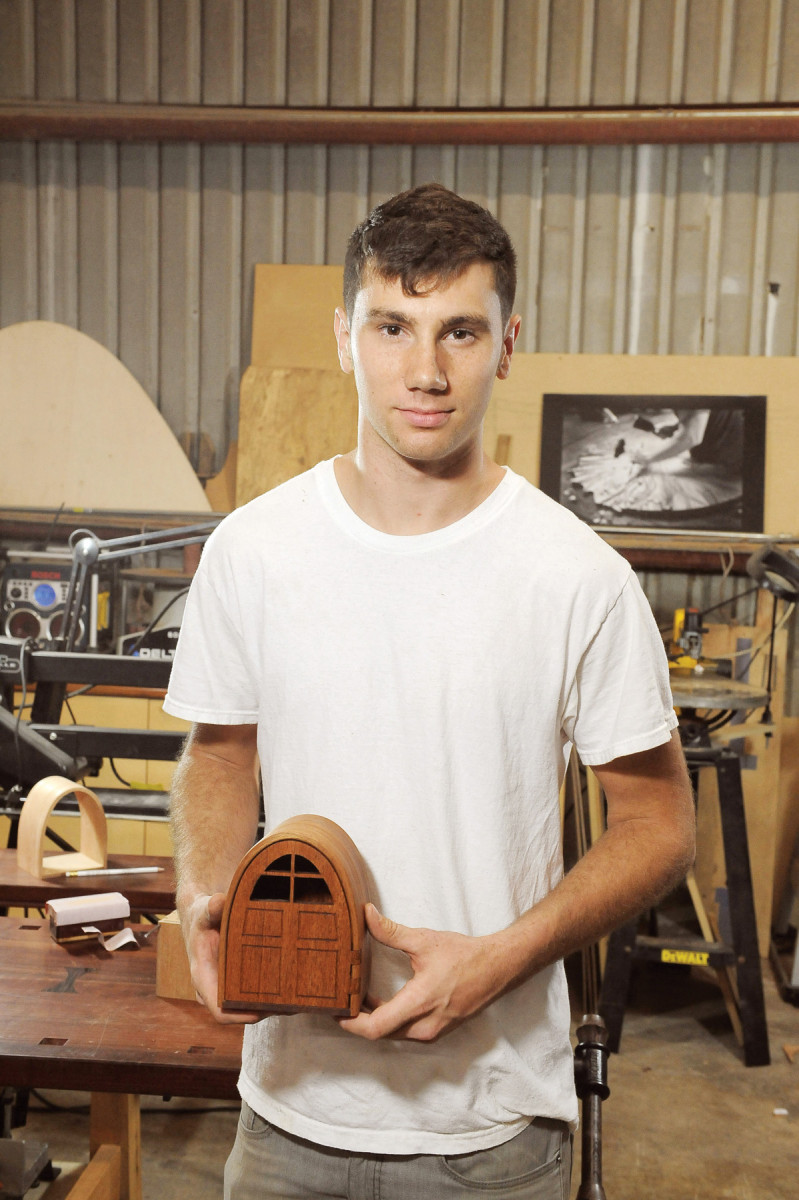
A Mouse needs a nice home too, doesn’t it? At least, that’s what a friend had in mind when she asked me to design a little house to cover a mouse-chewed hole in her baseboard. She wanted to turn a lemon into lemonade, I guess.
The project turned out so well that I’ve made more as gifts. The tale of how the mouse house came to be goes with the gift, too, and always makes people laugh.
As far as the woodworking goes, though, this is a serious project. Using few materials, it’s an inexpensive way to learn the fundamentals of making a bent lamination (a curved part that’s built up from thin layers of wood). With this skill in hand, you can design and build much larger and more ambitious curved furniture.
To build the mouse house, you’ll need to make a hot-pipe bending jig. You’ll also need a vacuum bag, which you can buy or make yourself. Cheese is optional.
Make a bending form
The outside of the mouse house, which I’ll call the arch, is composed of four layers of 1/16″ thick veneer glued together. To make the arch, you’ll need a form to bend the veneer to the correct shape. Let’s start by building the form.
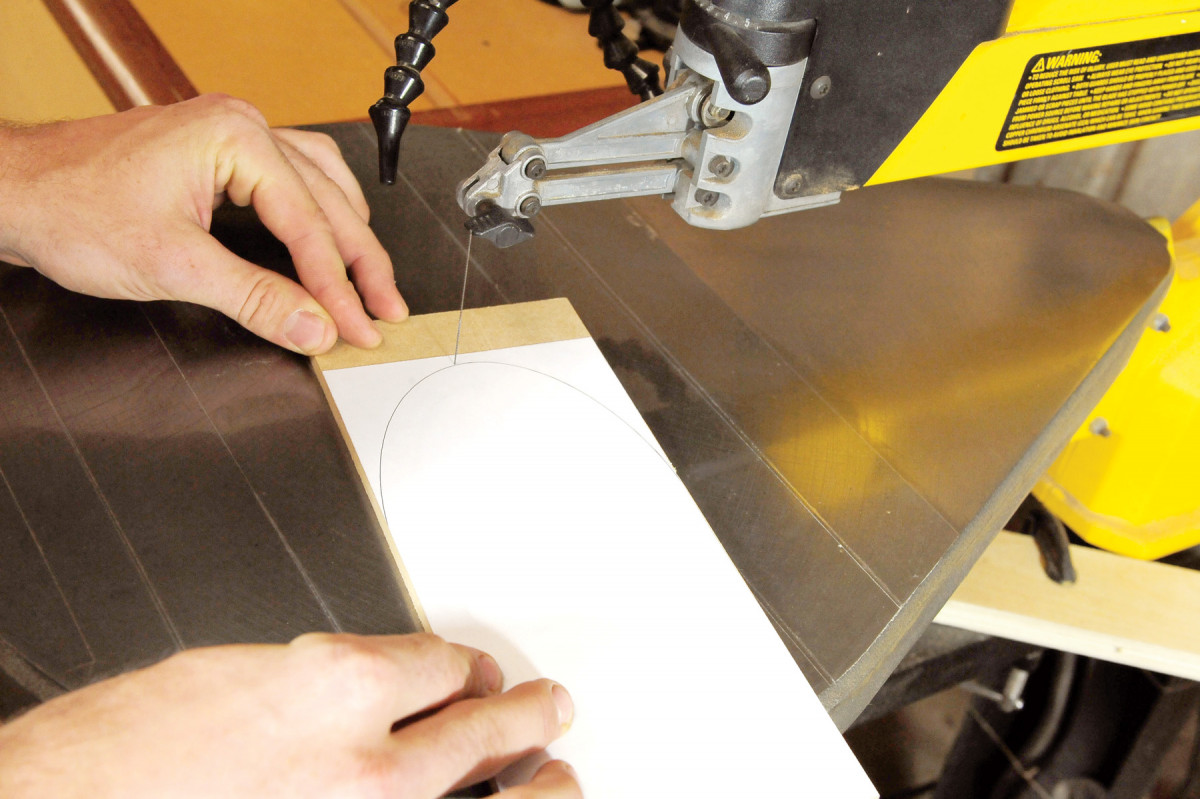
1. The outside of the mouse house is made from four layers of 1/16″ thick veneer, glued and bent over a form. Begin making the form by sawing out a template. Nail the template to a second piece of 3/4″ MDF, slightly oversized.
First, make a full-size drawing of the arch (Fig. D), or download the drawing from the AW website and print it out. Cut a rectangular piece of 1/4″ MDF or plywood the same width and length as the pattern. Glue the pattern to the wood. Cut the curved portion with a scroll saw or coping saw, making a template (Photo 1). Smooth the curve with a file or sandpaper.
2. Rout the second piece flush with the template. Add another piece of MDF and repeat the process. Keep on adding pieces, one at a time, until the form is 8 layers thick.
To build up the bending form, cut seven pieces of 3/4″ MDF or plywood 1/8″ longer and wider than the template. Glue and nail the template to one of these pieces with an even overhang all round. (You’ll be cutting into this block later, so don’t put any fasteners in the “No Nail Zone”—see Fig. E). Using a flush trim bit in a router table, rout the 3/4″ piece so it’s even with the template on all sides (Photo 2). Repeat the same process with four more 3/4″ pieces, gluing, fastening and routing them one at a time.
The procedure for attaching the last two 3/4″ pieces is a bit different. Glue one piece on top of the 1/4″ template, then glue the other on top of the 3/4″ pieces. Don’t use any fasteners for either of these pieces. Rout both pieces flush. Cover the entire block with wide packing tape so glue won’t stick to it.
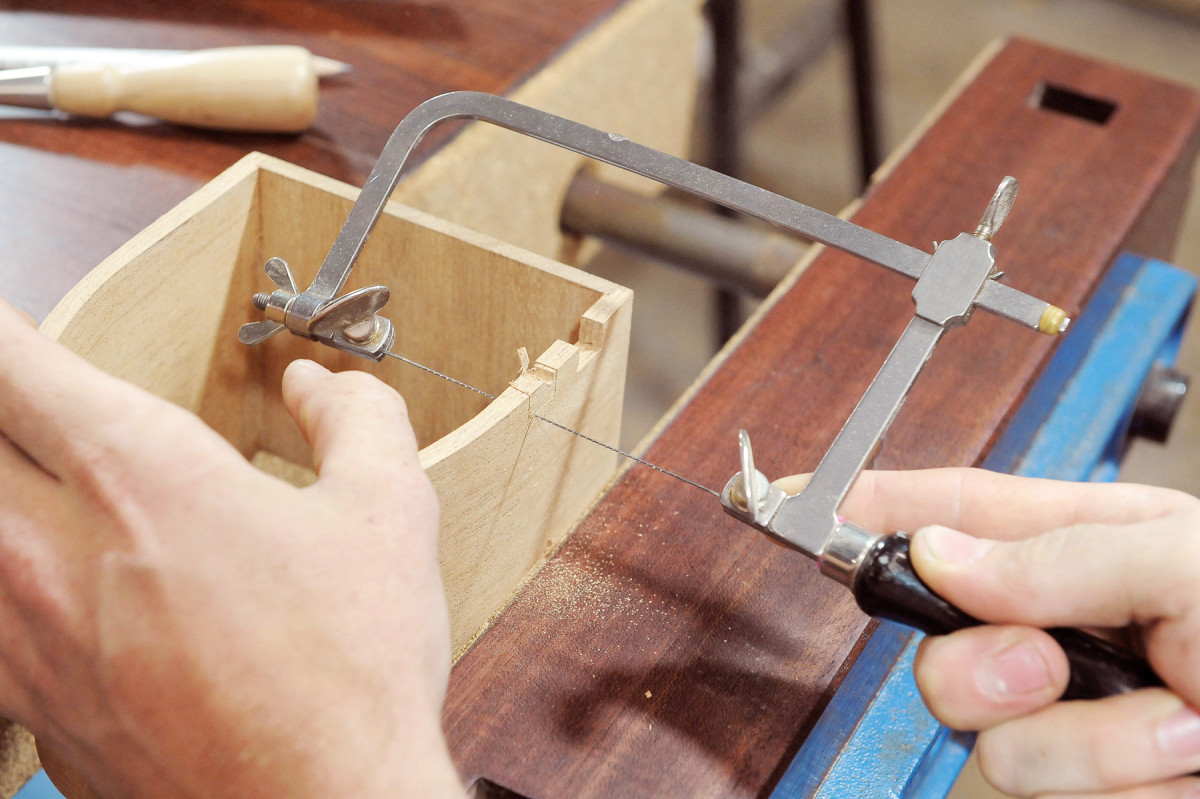
Bend the arch
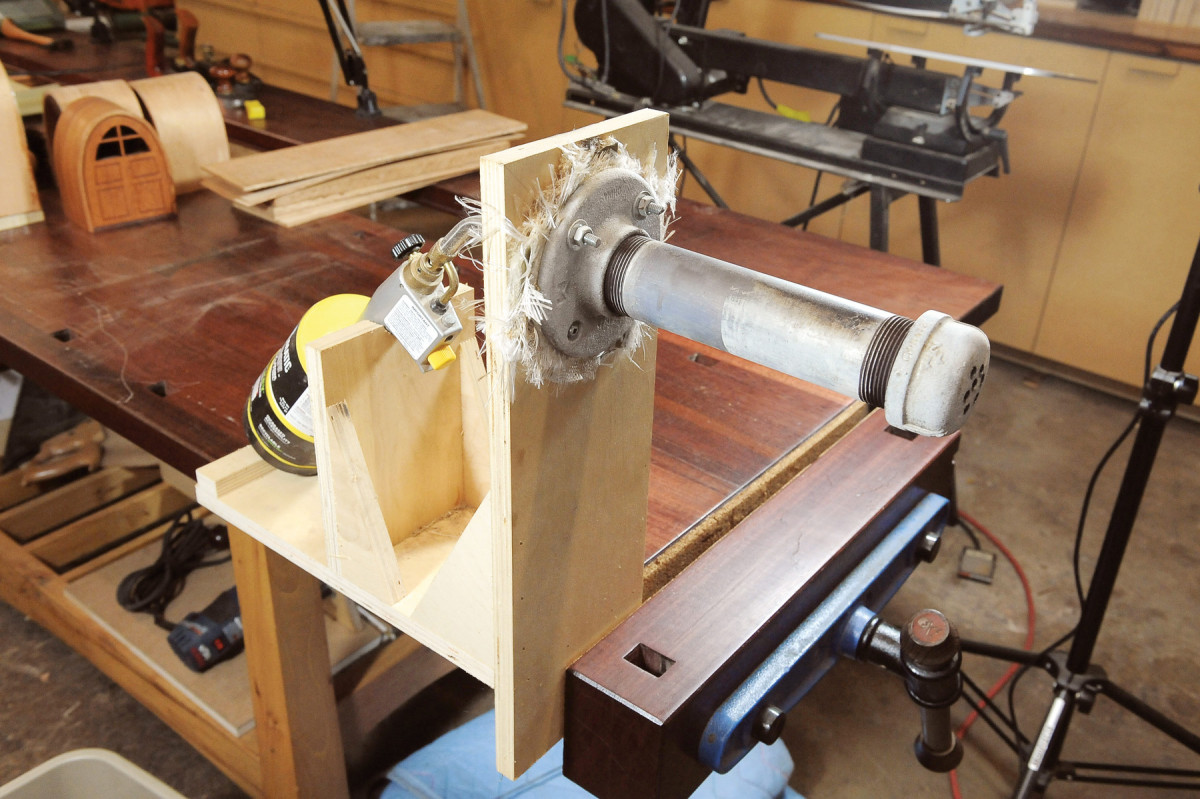
3. Set up a jig to pre-bend the veneer. The jig is basically a piece of steel pipe that’s heated by a propane torch. Soak the veneer pieces in water before bending them on the jig.
At 1/16″ thick, the veneer you’ll be using to make the arch is too stiff to bend around the form. This problem has a clever solution: a hot-pipe bending jig (Photo 3 and Fig. B). Using this device, you’ll bend each piece of veneer into a U-shape before gluing them together on the form. Heat applied to wet wood does the trick, in much the same way that steam allows you to bend thicker pieces of wood into a permanent curve.
Cut the arch pieces (A) to rough size (see cutting list, near bottom). Soak them in water for about 15 minutes before bending. Secure the jig in a vise or clamp it to the benchtop. Light the torch, adjust the flame to low and secure the torch in its cradle. The nozzle should extend 1″ or so inside the pipe. After a few minutes, dribble some water on the pipe. If the droplets boil in place, the pipe isn’t hot enough; when the droplets skitter off, you’re good to bend.
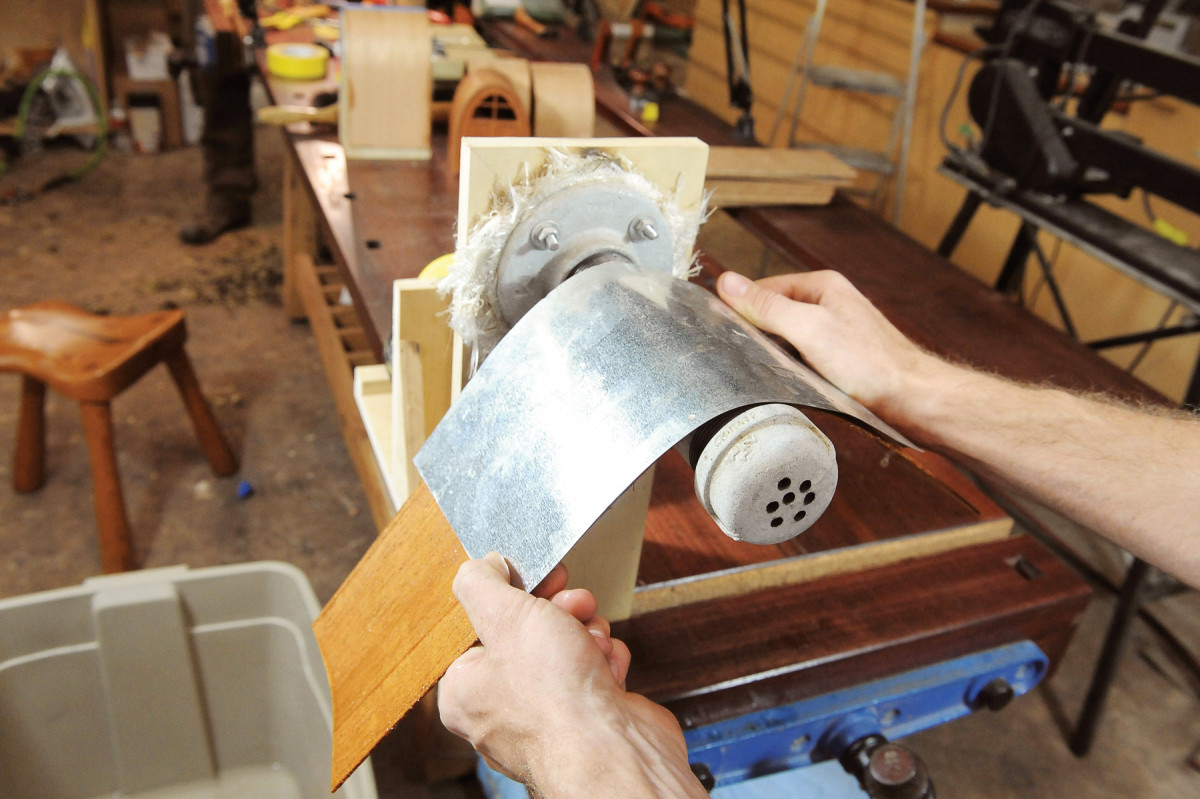
4. Place each piece of veneer onto the pipe and slowly bend the wood into a curve. Back up the veneer with a piece of sheet metal to trap steam coming off the wet wood. After cooling, the wood will retain its bent shape.
The bending technique is fairly simple (Photo 4). Be sure to keep the wood moving to avoid scorching. Remove the piece now and then and place it back in the water for a few seconds to re-wet it. Keep the bending form handy so you can eyeball the radius you need. The pieces don’t have to match the form perfectly—close is good enough. When you’re done with each piece, place it on edge to dry. Let all the pieces cool for several hours.

5. Coat the pieces of veneer with glue and place them on top of the bending form. Tape them to the form so they won’t slide around, then wrap the whole assembly in plastic.
You’ll use a vacuum bag to further bend the veneers to match the form. Getting everything ready to slide into the bag takes a few minutes, so I use Pro-Glue Veneer Bond, which has a long open time. To start, place the form on a large piece of clear plastic sheeting. Coat the pieces with glue using a wide plastic putty knife and stack them on the form (Photo 5).
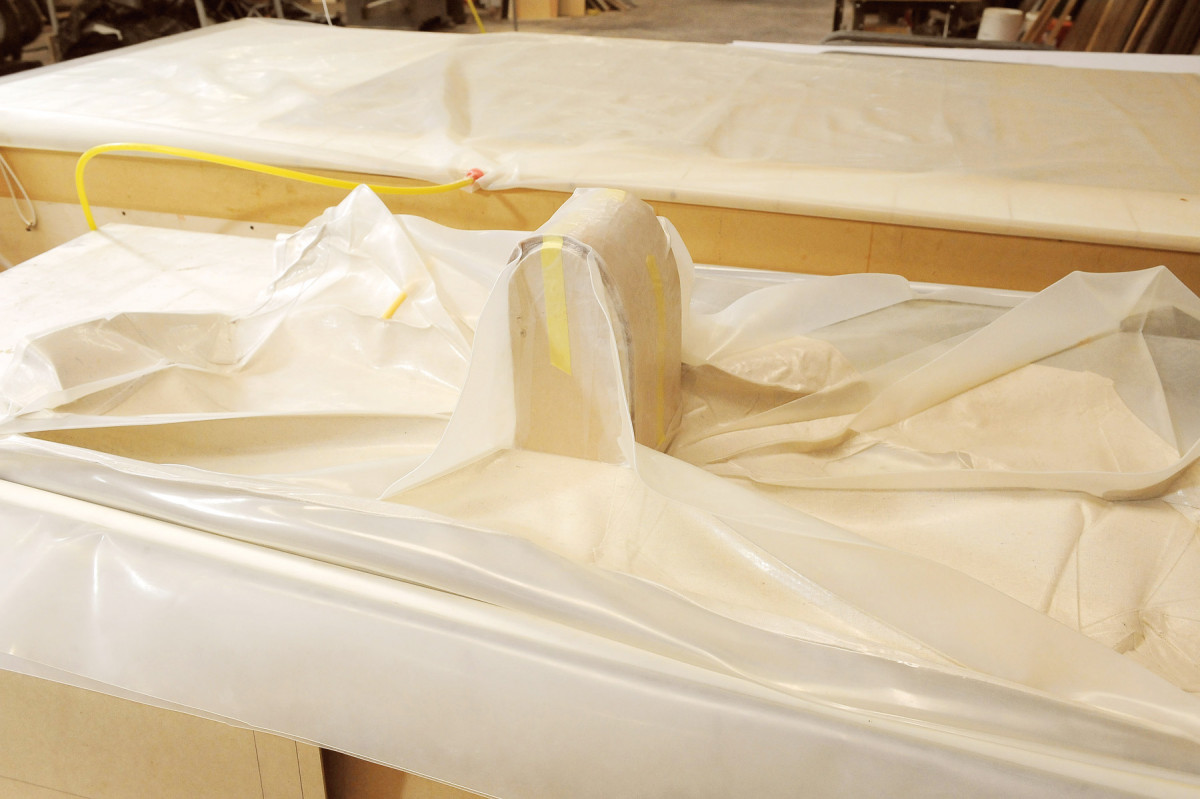
6. Compress and bend the veneer by using a vacuum bag. Once all the air is removed from inside the bag by a pump, normal air pressure will squeeze the bag and the veneer tight around the form, making a stiff arch.
Tape the pieces to the form so they don’t shift. Wrap the form in the plastic sheet and secure it with tape. (The sheet prevents glue from adhering to the vacuum bag.) Place the form in the vacuum bag and turn on the compressor (Photo 6). Leave the form in the bag overnight to give the glue time to cure.
Remove the form, unwrap the plastic and remove the tape. Center the arch on the form, if necessary, and nail it to the form along the bottom edges of both sides.
Build the house
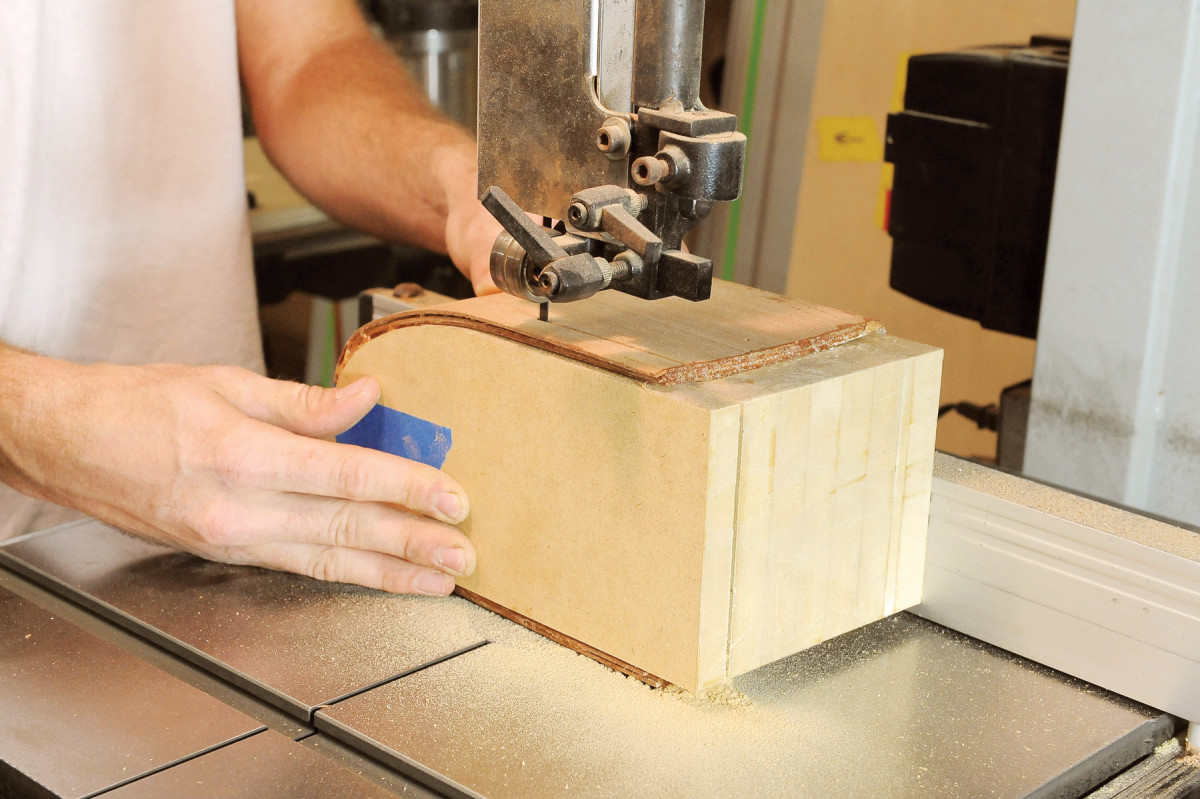
7. Rip the front and back of the form using your bandsaw, equipped with a fence. This is the easiest and safest way to cut the house’s arch to width.
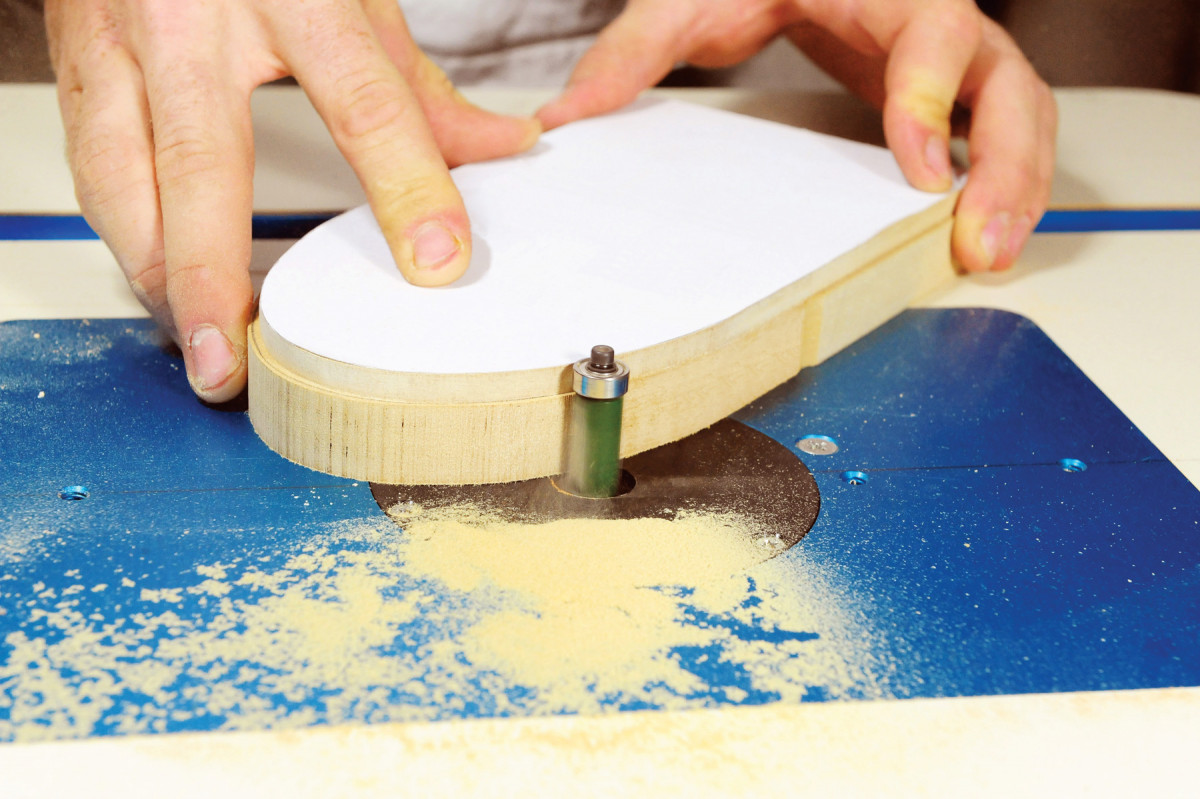
Rip both sides of the form to cut the arch to final width (Photo 7). (You must use a bandsaw—this is not a safe operation on the tablesaw.) Clamp the form to the fence of a miter saw and cut the arch to final length (Photo 8). Remove the arch from the form. Sand inside the arch (a spindle sander works well) to remove any glue that has seeped through.
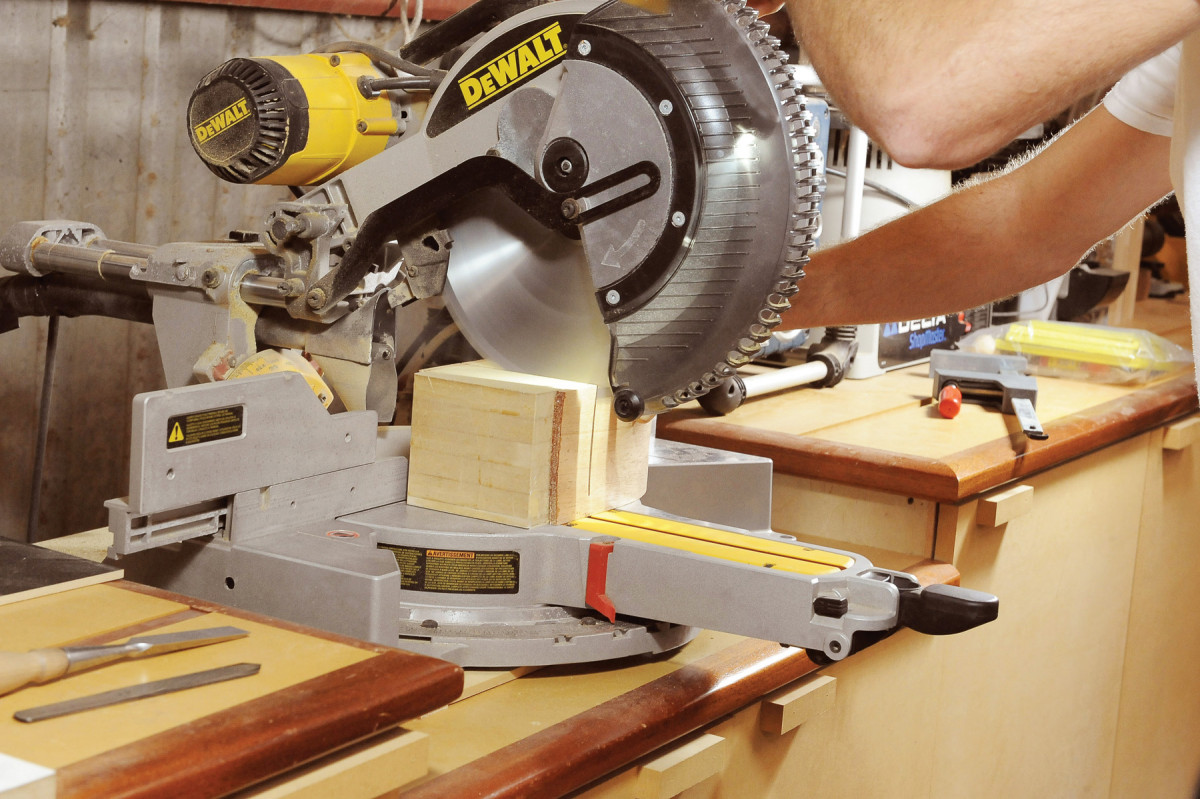
8. Crosscut the form to length. After this cut, remove the arch from the form.
On the router table, cut a 1/16″ deep rabbet inside the ends of the arch (Photo 9). To do this, I replace the bearing on the end of my flush trim bit with one that’s 1/8″ smaller in diameter, but you can also use a rabbeting bit, which usually comes with a set of bearings for making rabbets of different depths. Cut a similar rabbet all the way around the inside back of the arch.
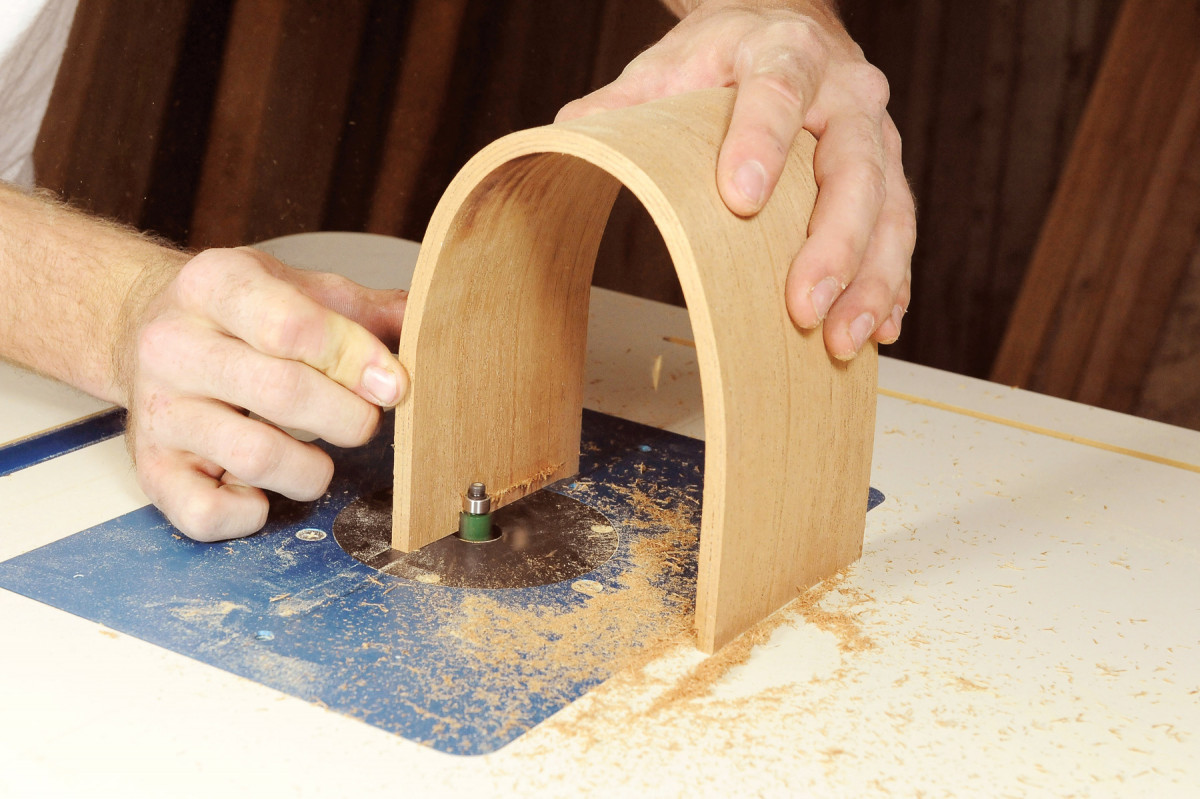
9. Rout shallow rabbets on the bottom and back side of the arch.
Next, prepare stock for the bottom (B), back (C) and door (D). You can make these pieces from solid wood or, to guarantee that their grain and color matches the arch, laminate them from additional pieces of 1/16″ veneer.
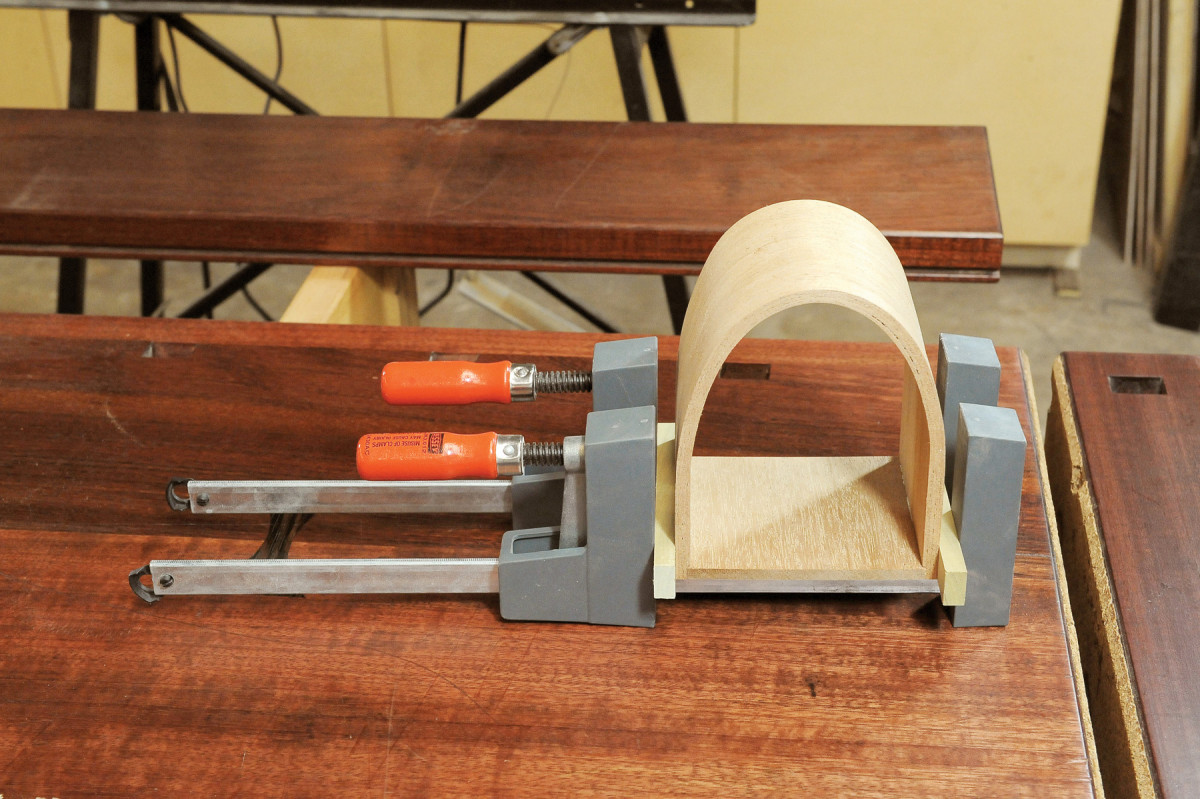
10. Glue a bottom to the rabbets.
Cut the bottom piece to width and length (note that the grain goes from front to back). Stand the piece upright, clamp it to a large block and cut a rabbet on its back end. Glue the bottom to the arch (Photo 10).
Cut the back piece about 1/2″ oversize in width and length. Place the house on top of the back and trace around inside the rabbets. Cut the curve and fit the back to the house, but don’t glue it in yet.
Mouse House Cut List
Overall Dimensions: 6-5/16″ H x 5″ W x 4-1/4″ D
|
Part |
Name |
Qty. |
Material |
Th x W x L |
|
A |
Arch |
1 |
Veneer |
1/4″ x 4-1/4″ x 6-5/16″ tall (a) |
|
B |
Bottom |
1 |
Solid wood |
1/4″ x 4-5/8″ x 4-1/4″ |
|
C |
Back |
1 |
Solid wood |
1/4″ x 4-5/8″ x 5-15/16″ |
|
D |
Door |
1 |
Solid wood |
3/8″ x 4-3/4″ x 5-3/4″ |
|
E |
Stop |
1 |
Solid wood |
1/4″ x 1/4″ x 4-1/2″ |
|
F |
Hinge pin |
1 |
1/8″ rod |
1/8″ dia. x 2-3/8″ |
Notes:
a) The arch is glued up from 4 pieces of 1/16″ x 5″ x 20″ veneer.
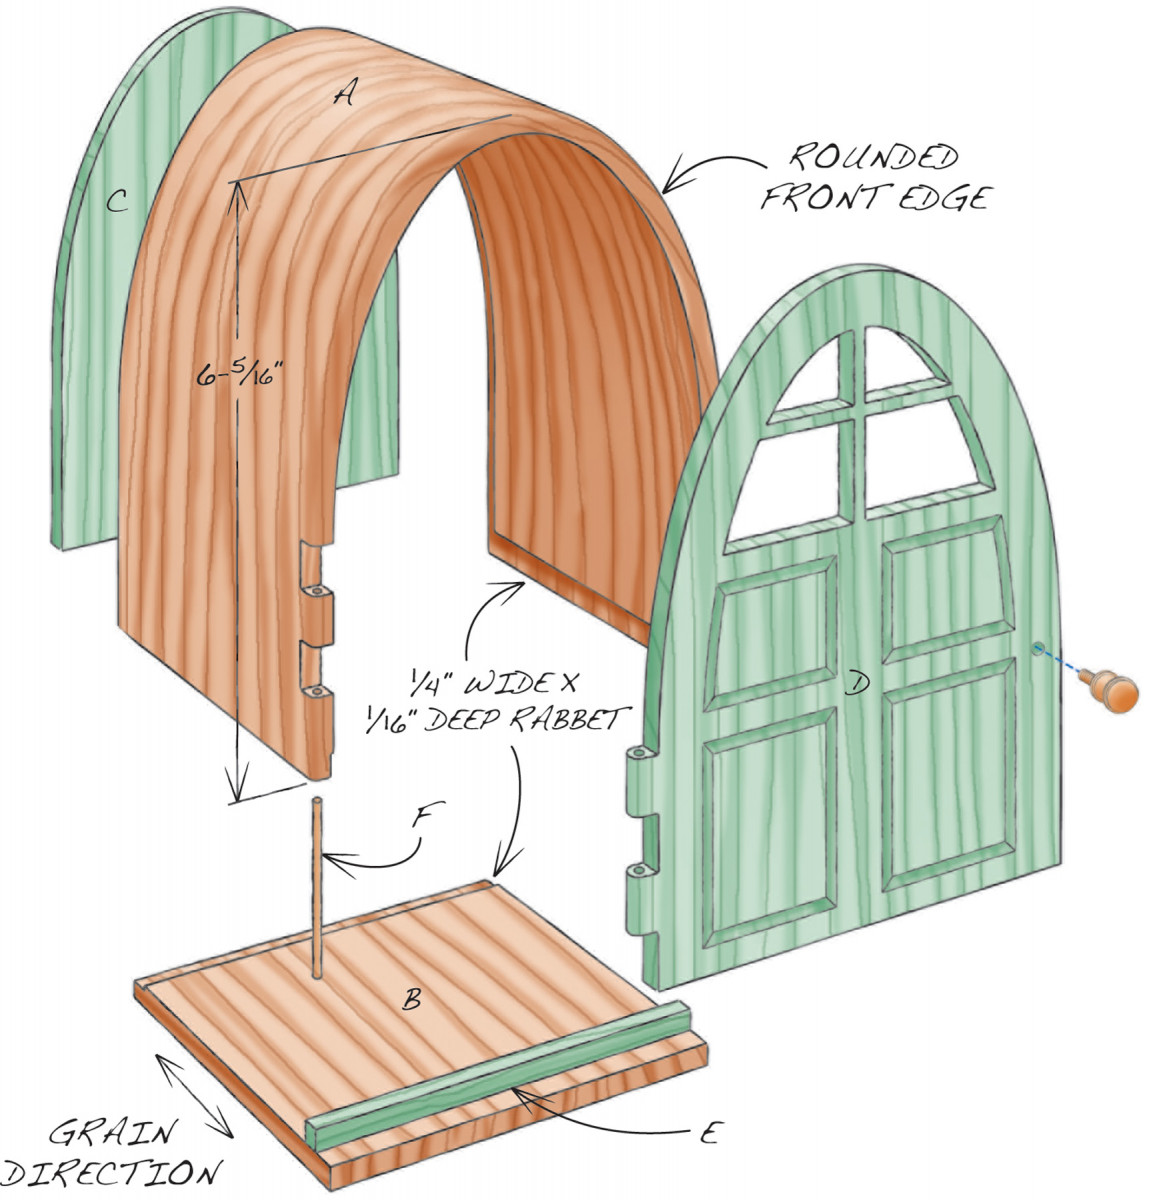
Fig. A) Exploded View
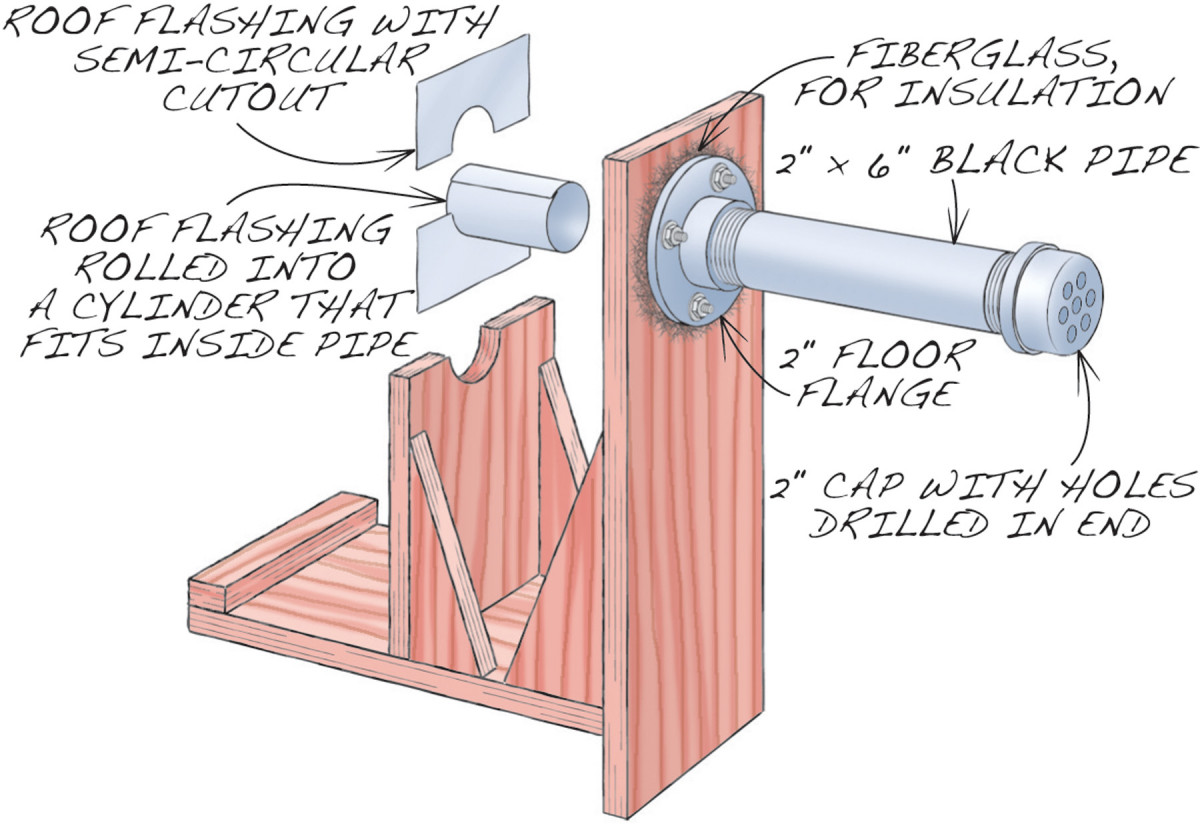
Fig. B) Hot Pipe Bending Jig
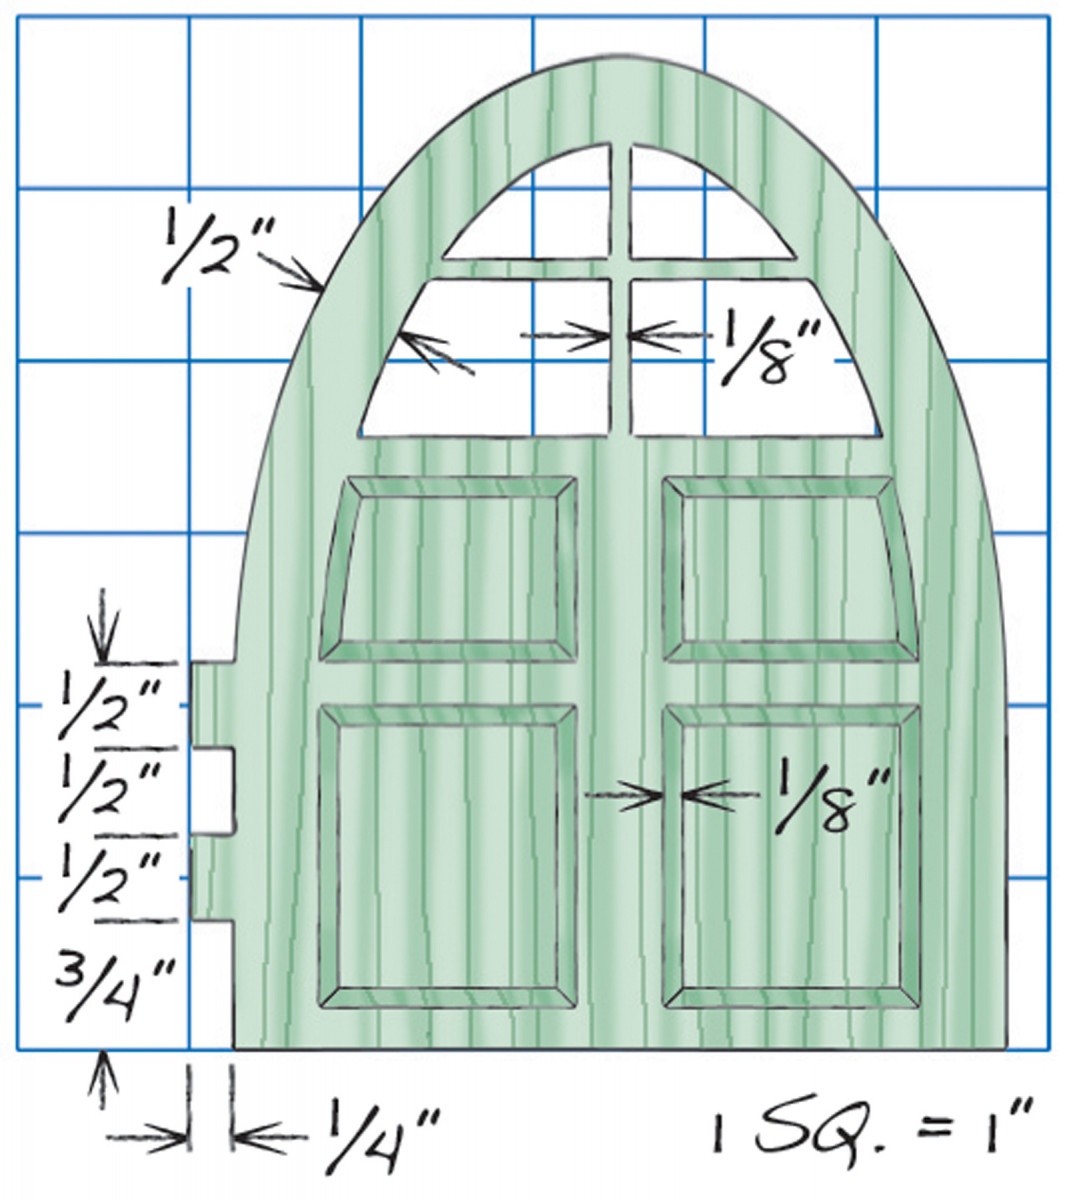
Fig. C) Door Pattern
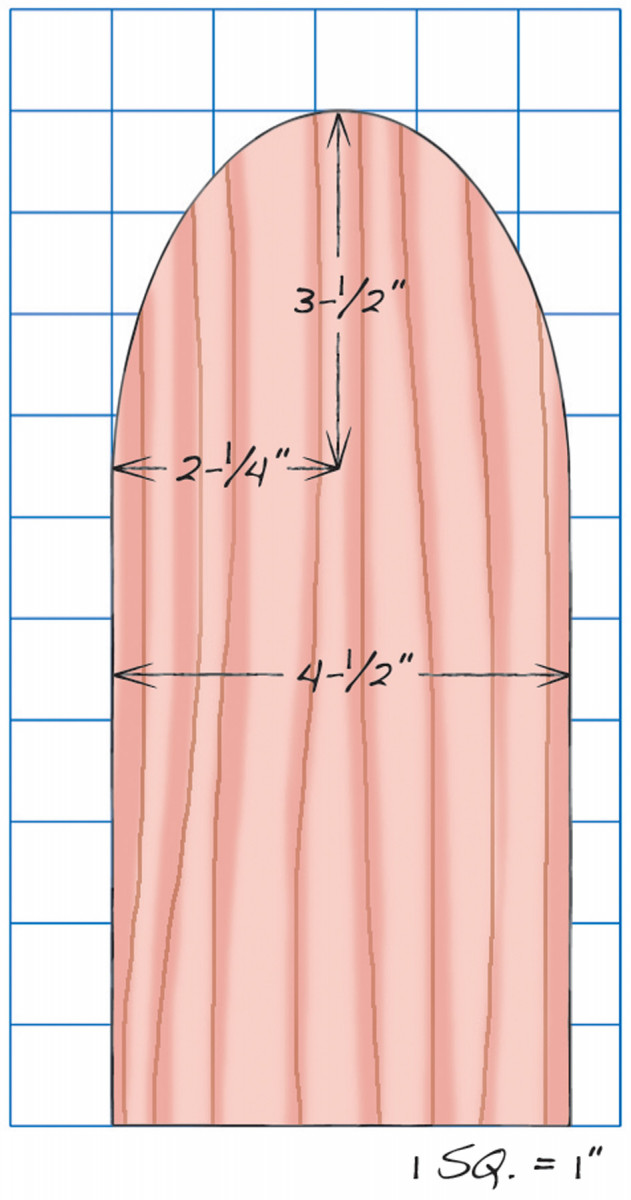
Fig. D) Bending Form Pattern
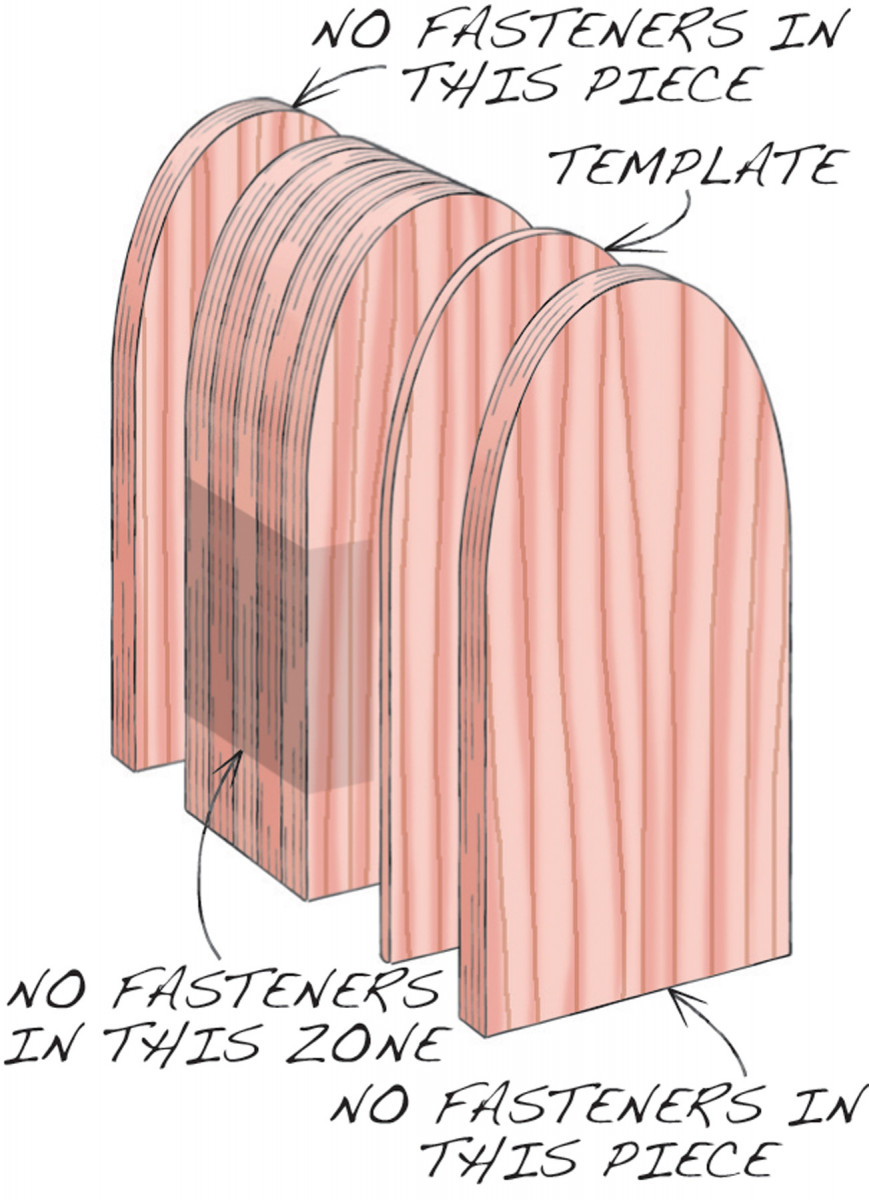
Fig. E) Bending Form
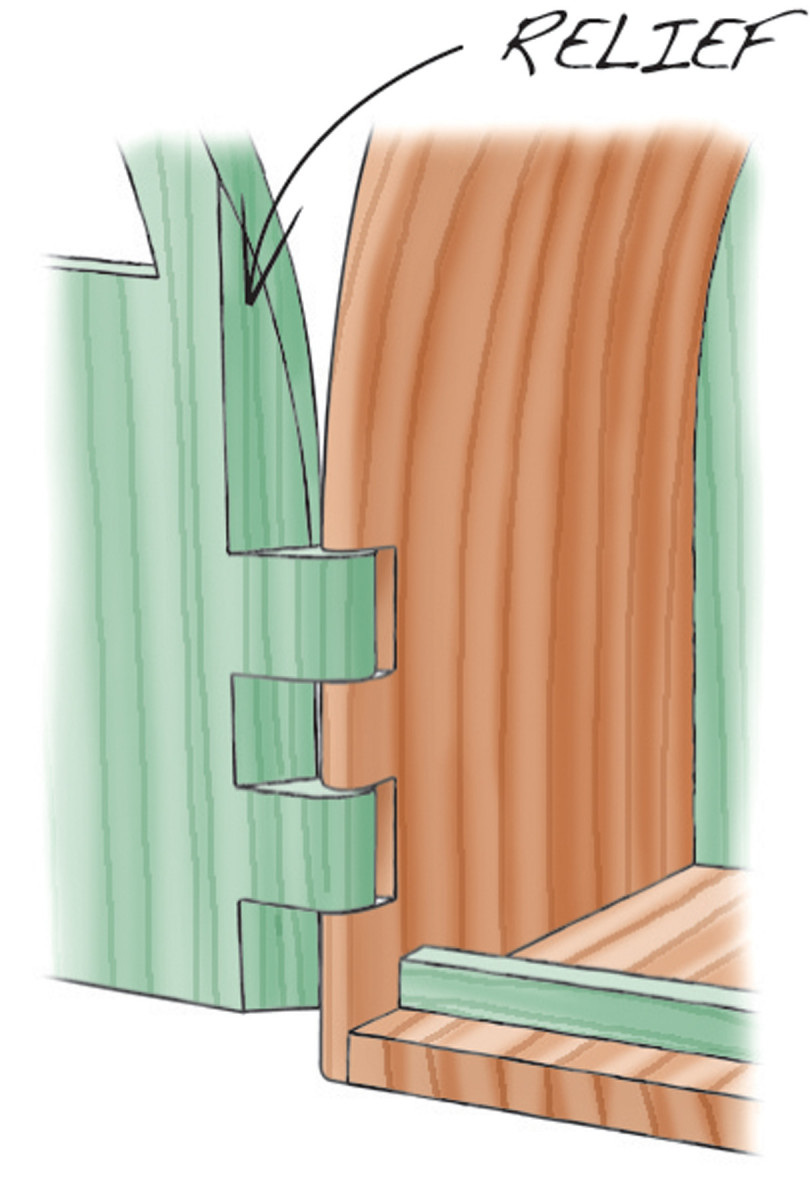
Fig. F) Door Detail
Make the door
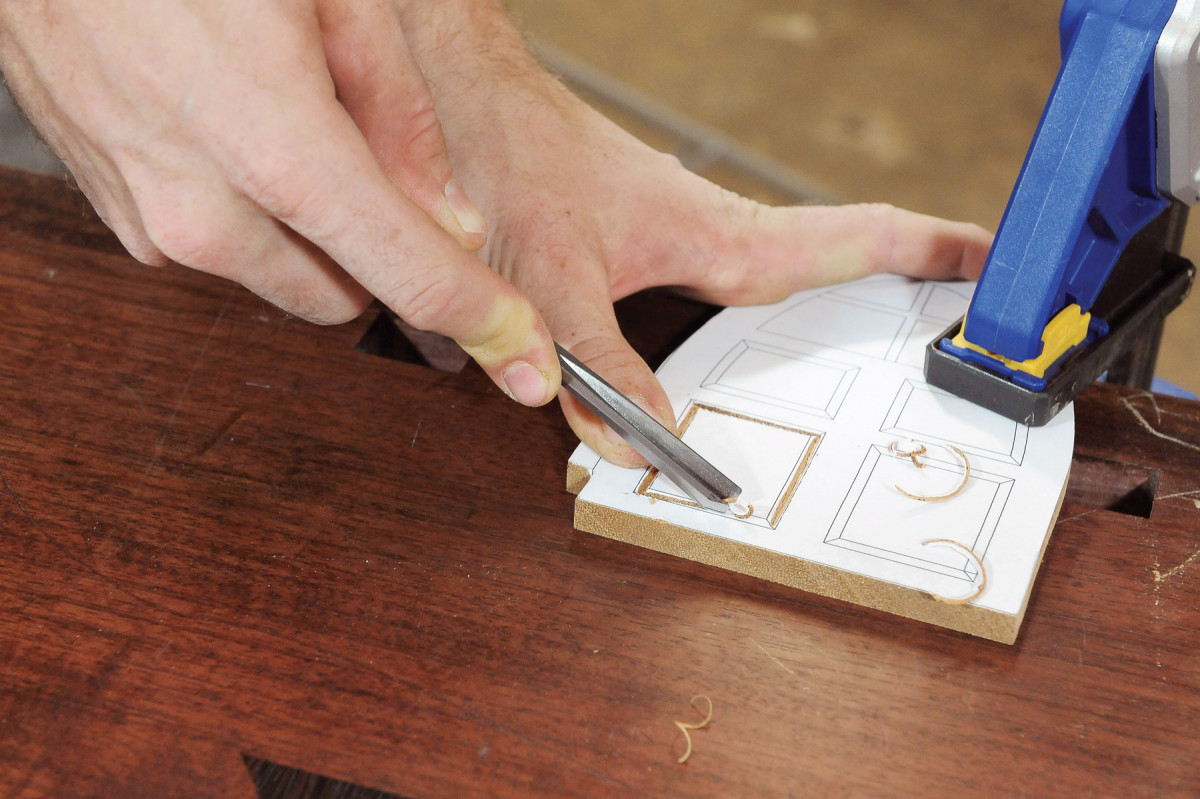
Cut a rectangular blank for the door—make it exact width and about 1/2″ extra long. Mark its front face. Place the house on the door and trace around the arch. Next, using a square and a marking gauge, lay out the hinges on the side of the door (Fig. C). Cut out the hinges, using a fine-toothed handsaw for the crosscuts and a fret saw or coping saw for the rip cuts.
11. Make the door from a single piece of wood. Carve the panels with a V-gouge and cut out the windows on a scroll saw.
Saw the door’s curve. Draw the door’s panels and windows directly on the door, or download the pattern from the AW website, print out a copy and glue it to the door. Carve the panels (Photo 11) and saw out the windows. Fit the door, then glue on the back piece.
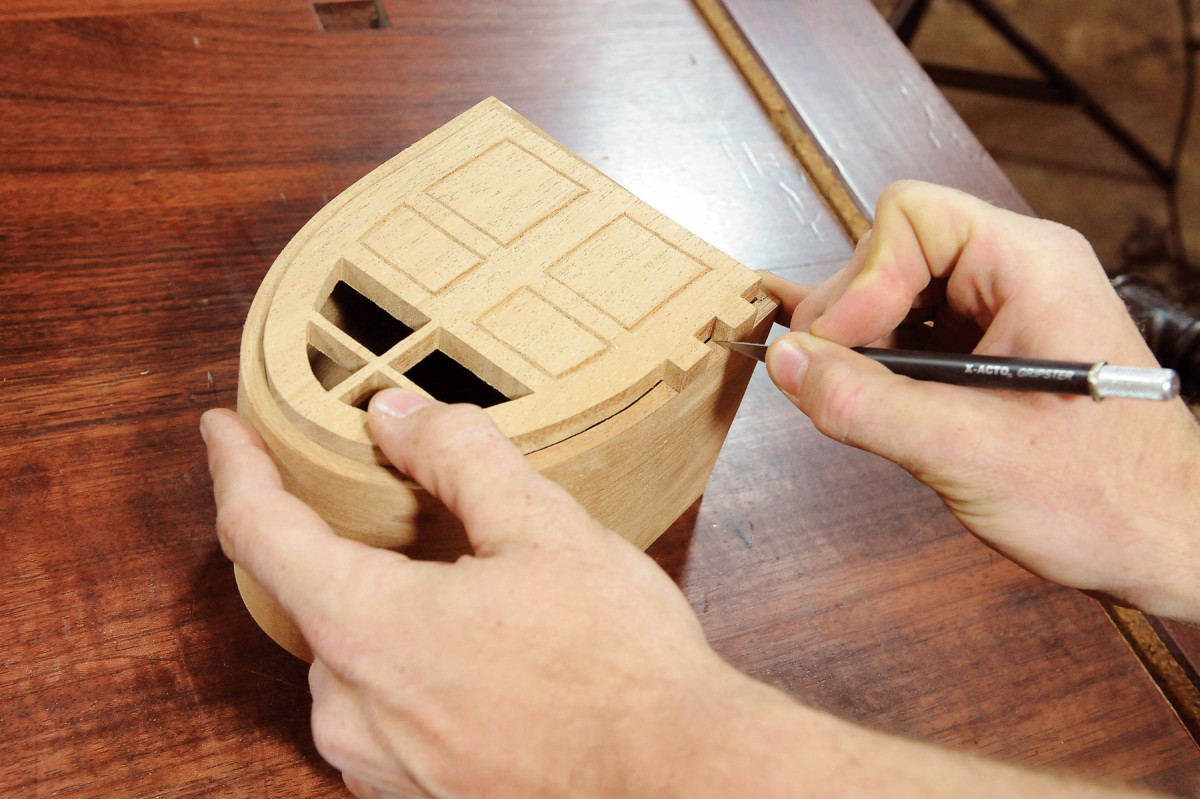
12. Trace around the door’s hinges with a knife.
Place the door on the house and trace around the hinges with a marking knife (Photo 12). Saw out notches for the hinges (Photo 13). Place the door in the notches and drill a 1/8″ dia. hole for the hinge pin (F). This hole must be plumb for the door to swing properly, so it’s best to use a drill press, with the house clamped to a fence.
13. Saw out notches for the hinges. Make sure the door fits OK, then round over the ends of the hinges, so the door can rotate. Round over the front of the arch, as well.
Round over the front of the house’s arch with sandpaper or, on the router table, with a 1/8″ roundover bit. Make a similar roundover on the ends of the door hinges. On the inside of the door, carve a bevel around the hinges (Fig. F). To test how the door swings, cut a 1/8″ rod about 2″ extra long, coat it with wax and insert it in the hinge pin hole (Photo 14). (The rod’s extra length enables you to pull out the rod and remove the door for further fitting).

14. Drill a hole through the hinges and insert a 1/8″ rod into the hole. Open the door and host an open house for a mouse!
Once the door swings correctly, glue the stop (E) in place. Cut the hinge pin to final length and permanently hang the door. Finish the house with a wiping oil, then add a knob to the door.
This article originally appeared in American Woodworker #158
Here are some supplies and tools we find essential in our everyday work around the shop. We may receive a commission from sales referred by our links; however, we have carefully selected these products for their usefulness and quality.