We may receive a commission when you use our affiliate links. However, this does not impact our recommendations.

Art Nouveau meets Arts & Crafts in this oval-topped piece.
Although he died in poverty, the Scottish architect Charles Rennie Mackintosh’s furniture now sells for tens of thousands of dollars at auction. Part of the appeal of his work comes from the sheer variety of his designs, which range in style from Art Nouveau to Arts & Crafts to Modern. Mackintosh first designed this tea table as part of a renovation commissioned by the ship owner Robert James Rowat in about 1901. Another copy of the table featured in exhibitions in Turin and Moscow in 1902. In the pre-television era, the tea table provided a place for conversation over drinks and food. Typically lower than a dining table, it fosters an intimate atmosphere.
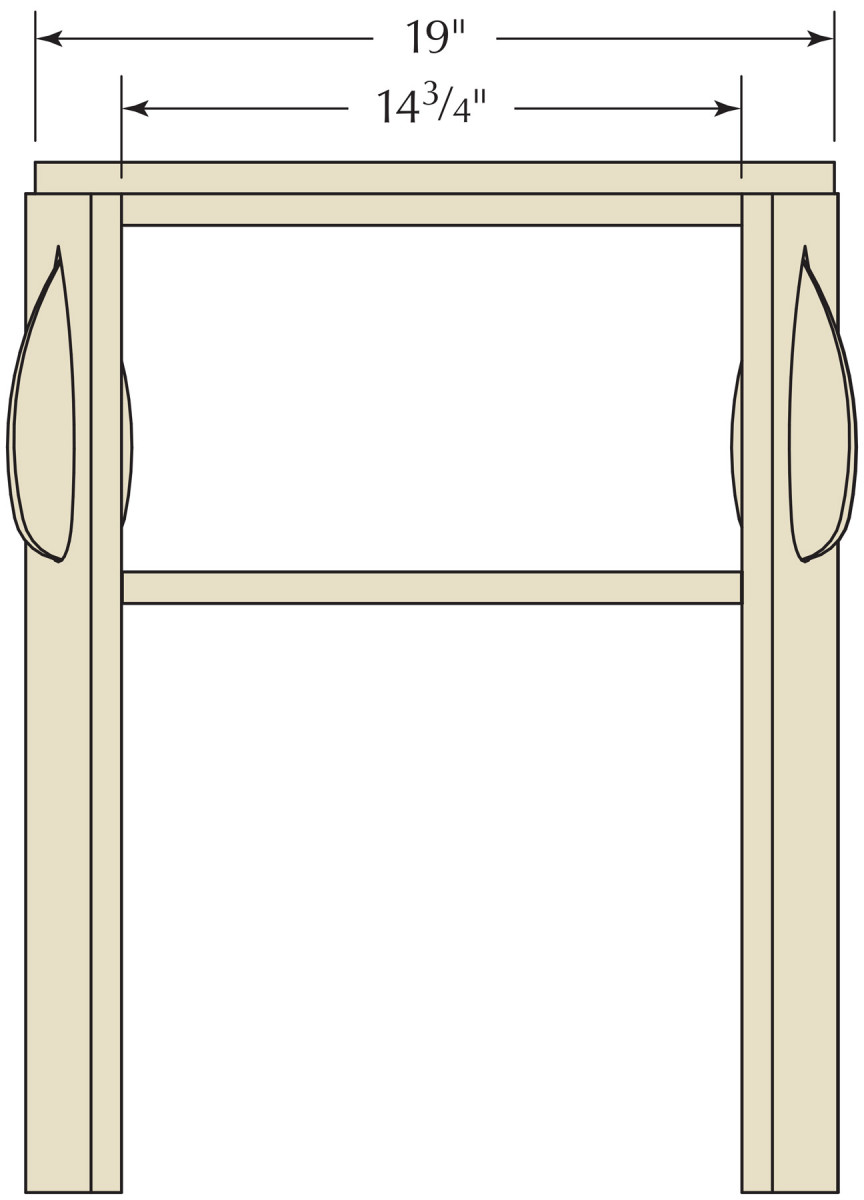
This design is one of several variations on an elliptical table Mackintosh designed in the early 1900s and marks a transition from the stylized organic forms featured in his Art Nouveau-inspired work to the minimalist geometric forms of his later designs. The table features an elliptical top over a base formed by a shelf and four slab legs, with the legs turned so that they appear to follow the shape of the top. Echoing the top’s oval shape, the ovoid cutouts in the legs capture stylized leaves. The legs are dadoed to capture the shelf, and half-blind dovetails join the stretchers to the legs.
Like much of the furniture Mackintosh designed at the time, the original was painted white, but with its contrasting forms and eye-catching cutouts, the table would look good in a variety of woods and finishes. To play up the table’s roots, I chose quartersawn white oak and used a fumed finish for my reproduction.
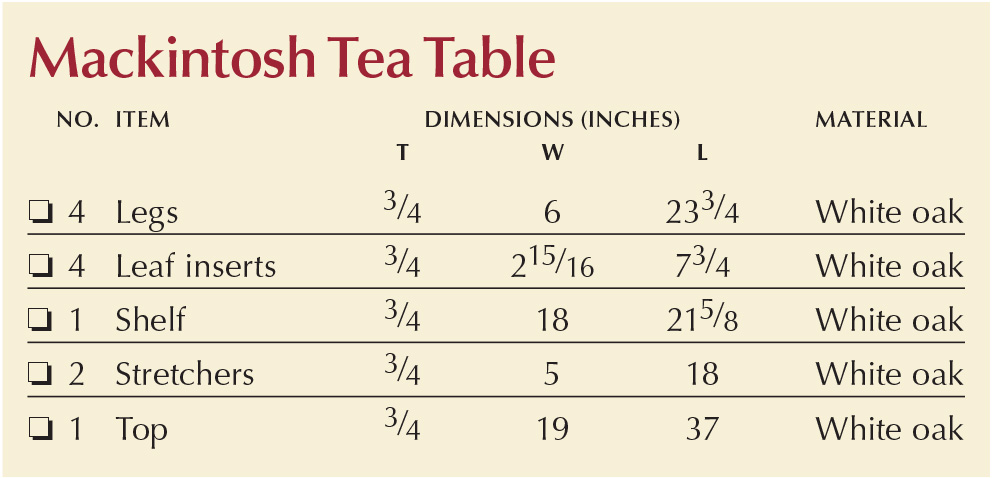
Mackintosh Tea Table Cut List
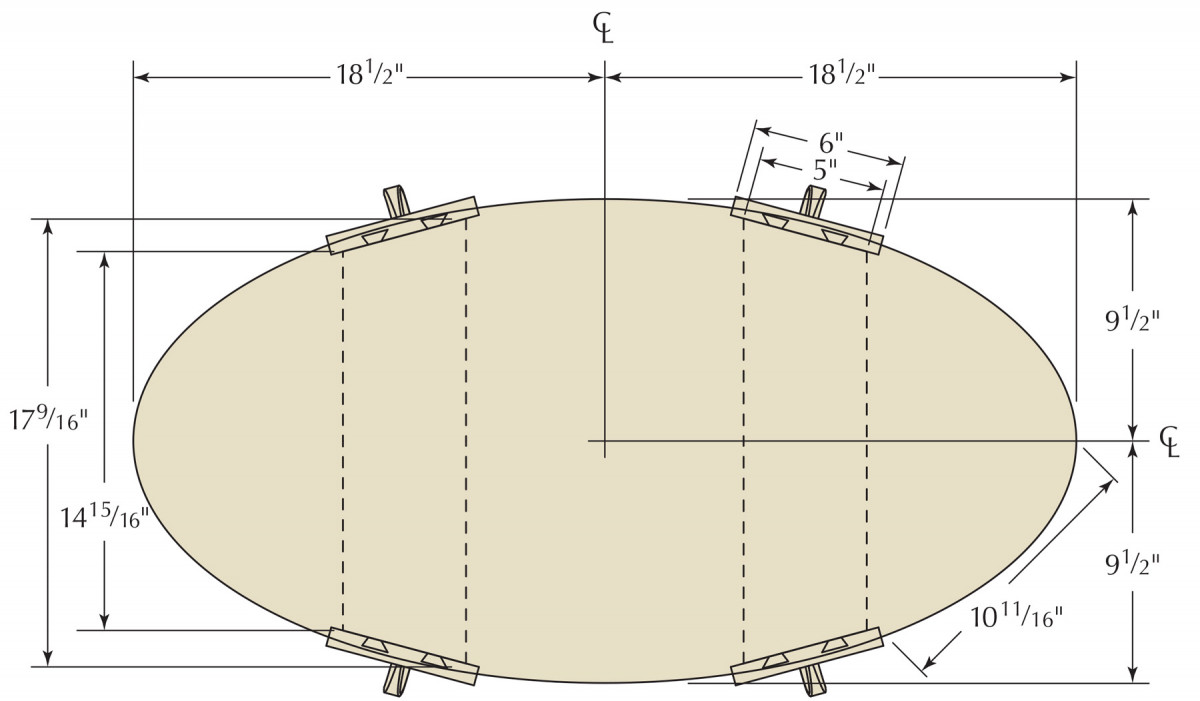
Top Plan
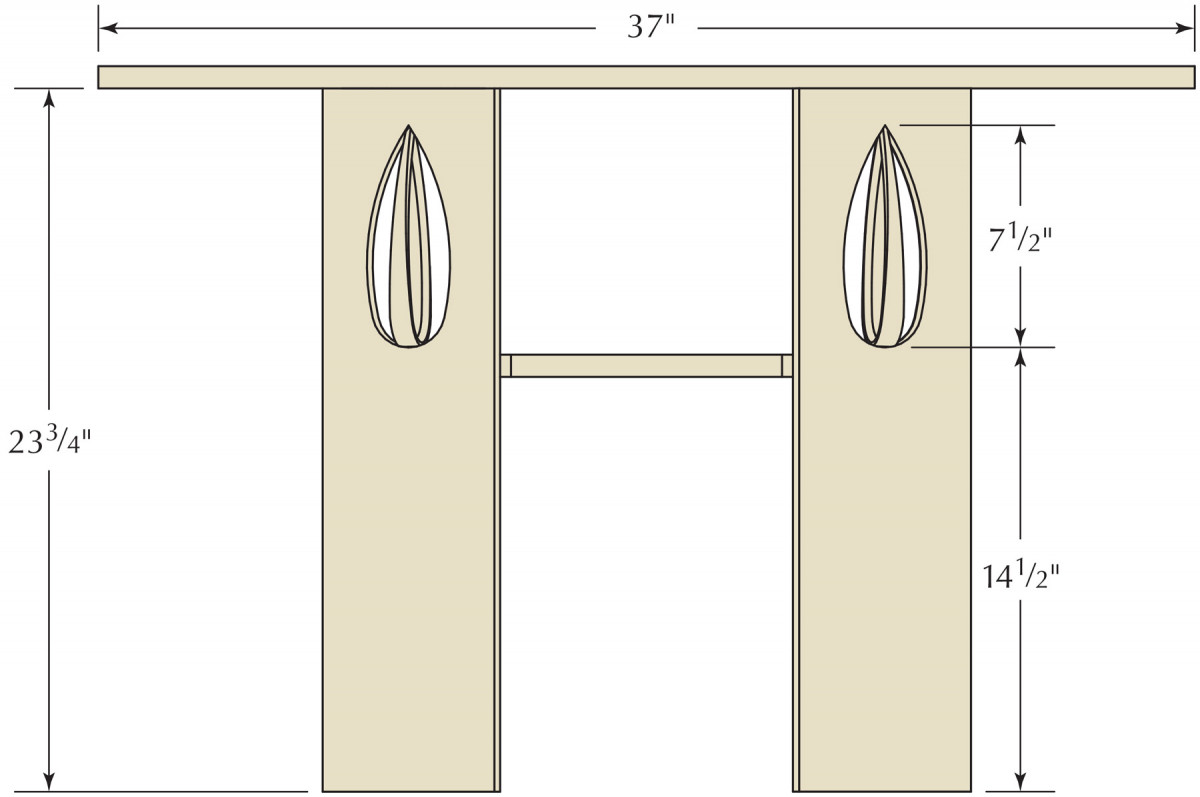
Elevation
Profile
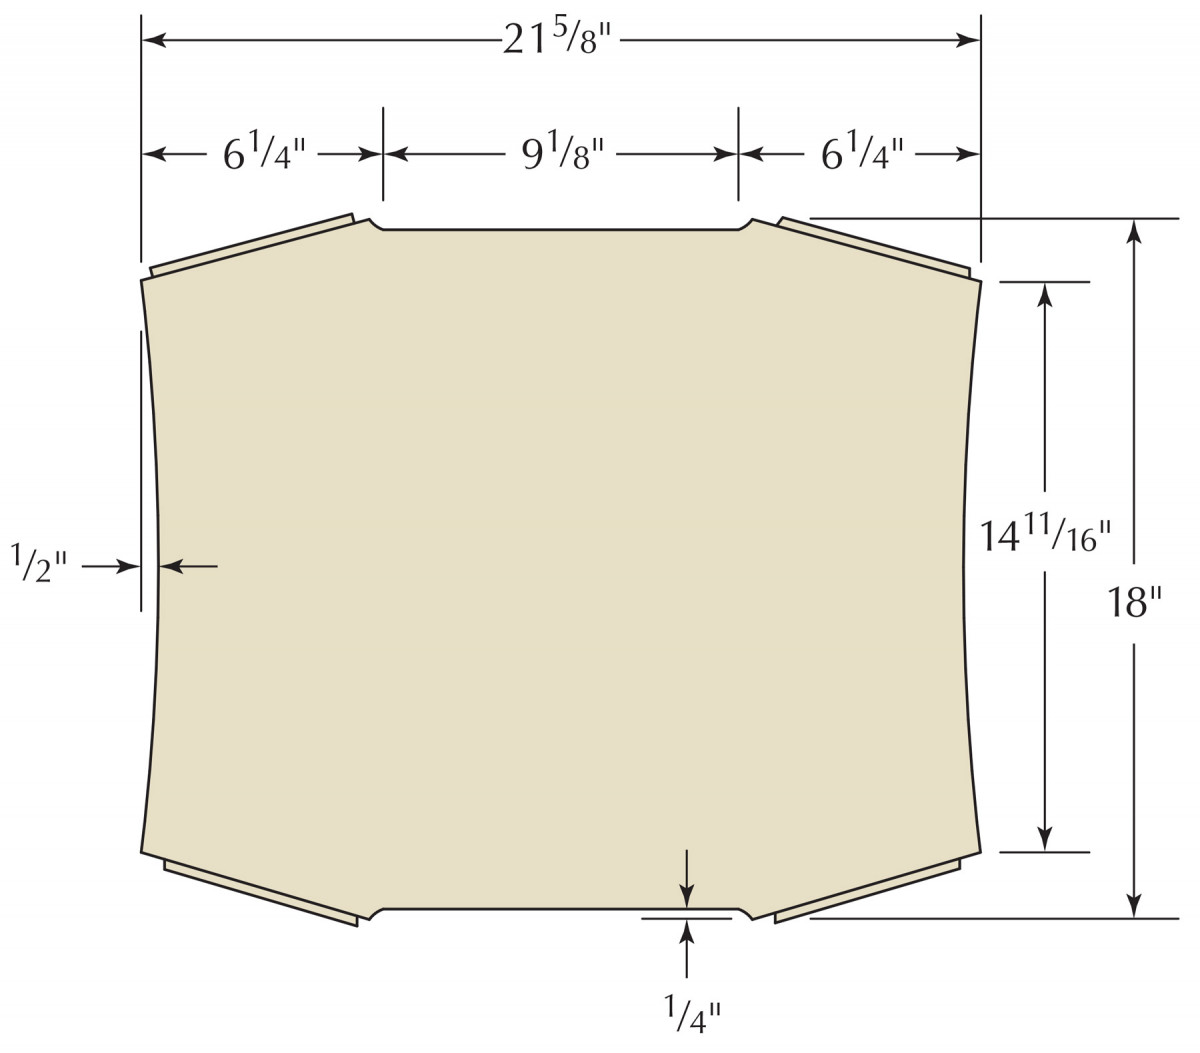
Shelf Plan
Patterns Make Perfect
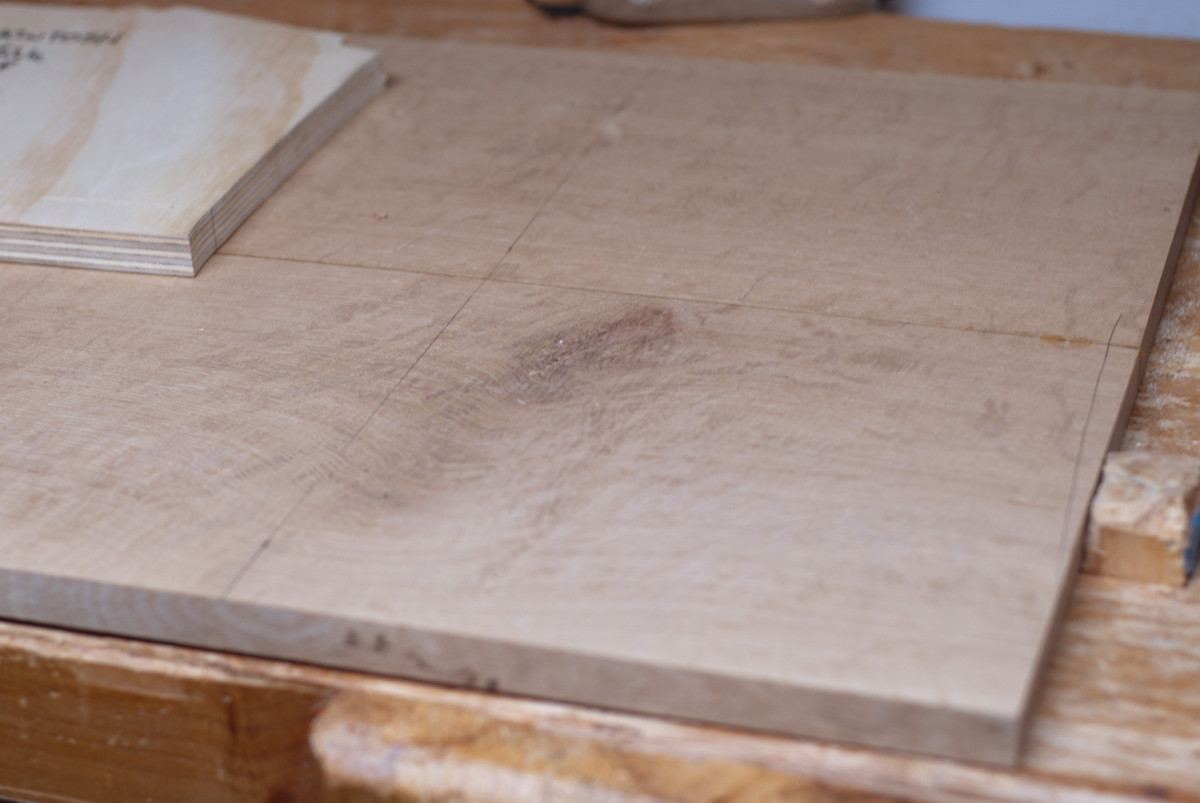
Lined up. Mark horizontal and vertical centerlines on the bottom of the shelf blank.
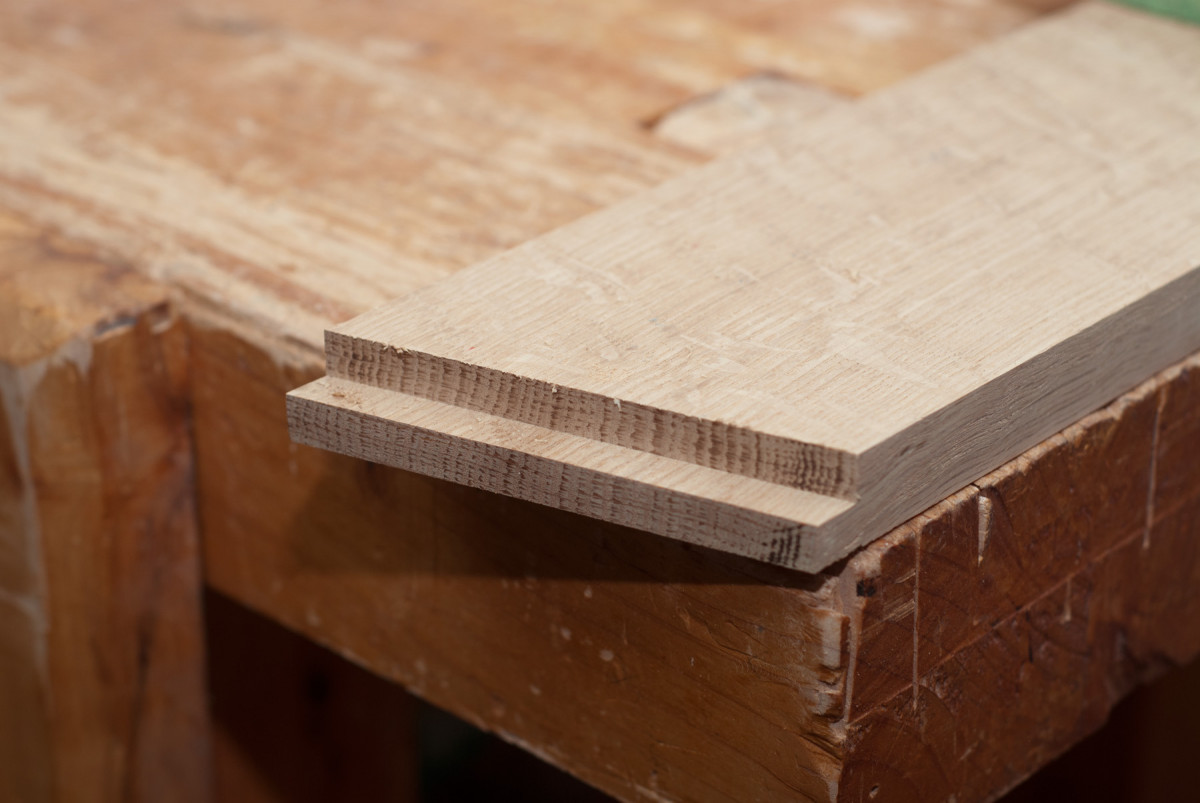
If you have access to wide stock, you may be able to cut the top and shelf from single boards. I had to glue up both, slip-matching a single board for each part, then turning my attention to pattern making.
There are three patterns used to shape the parts of the table: one for the top, one for the shelf and one for the leg cutout. I used 3⁄4” plywood for the patterns, but thinner stock will work as long as it is thick enough for the bearing of a flush-cut router bit to follow.
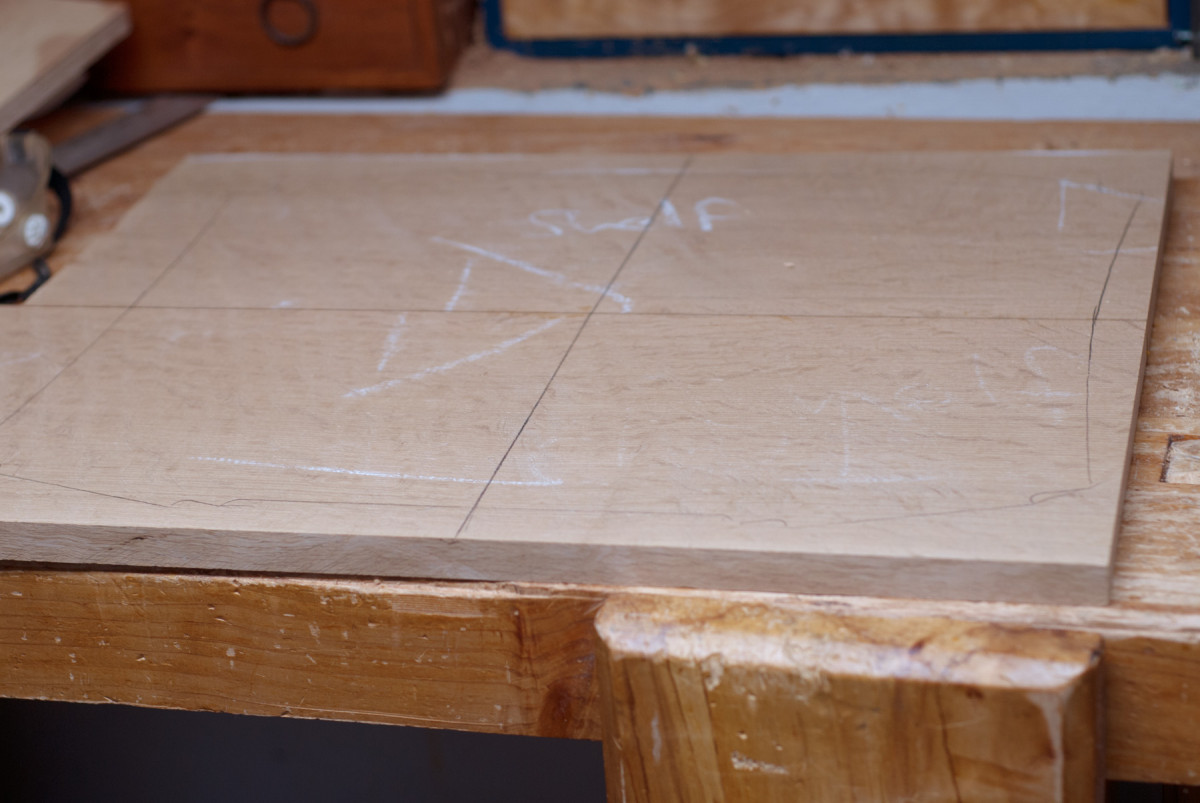
Pattern position. Position the shelf pattern on the blank so that it overlaps the centerlines by one inch and trace the outside edge.
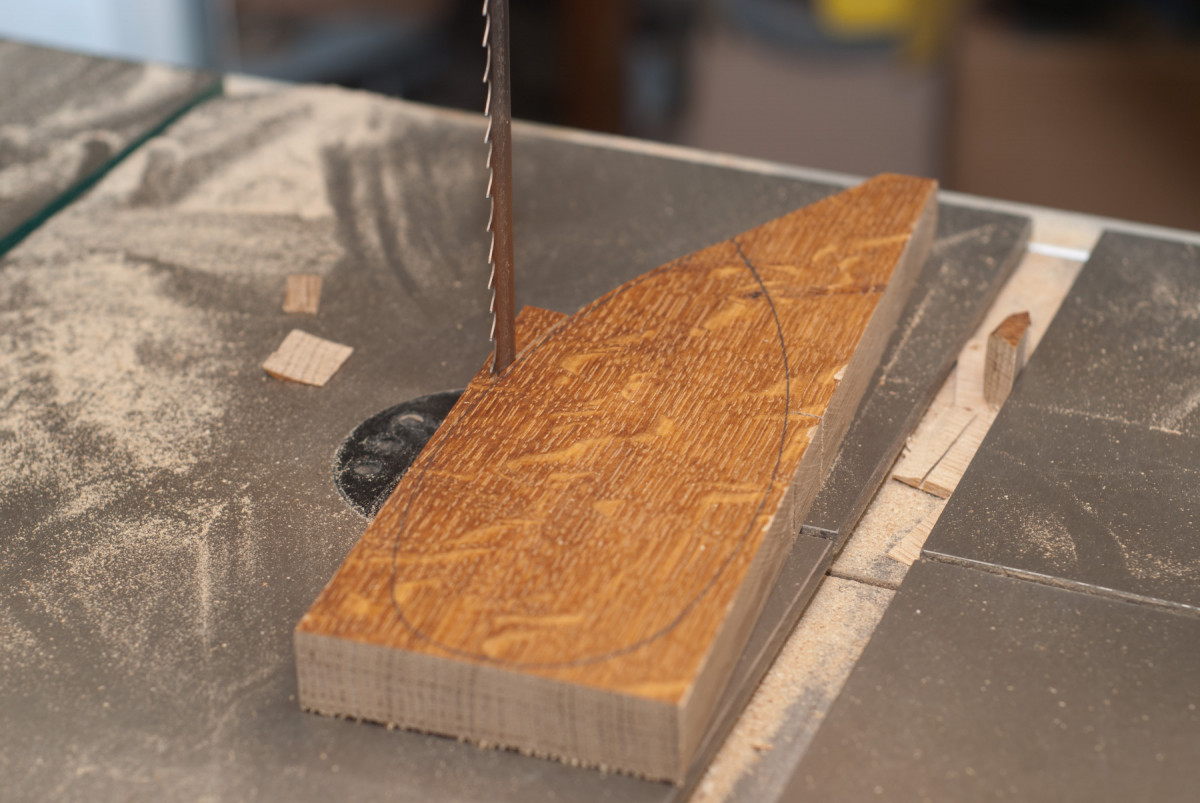
To make the cutout pattern (download the pattern PDFs from Online Extras), rip your stock to 6″ wide and trim it to final length, then trace the cutout. Drill a clearance hole at the base of the cutout and cut close to your lines with a jigsaw. With the bulk of the waste removed, sand the curves fair. A spindle sander can handle much of this work, but the tapered point of the cutout will require handwork. Once you’re satisfied with the cutout, turn your attention to the pattern for the shelf.
Because the shelf is symmetrical along both its axes, you need to make only a quarter pattern. Outline the shelf using the downloadable pattern (see Online Extras) or by using the measured drawings on the next page as a guide, then trim close to your lines on the band saw or with a jigsaw.
Cut it close. After tracing the shelf pattern, cut close to your layout lines.
Sand the pattern to its final shape, taking care to hit your layout lines – any mistakes will be repeated four times when you rout the shelf shape.
After shaping the pattern, strike a line 1″ back from each inside edge. The setback provides a margin of overlap for smoother routing.
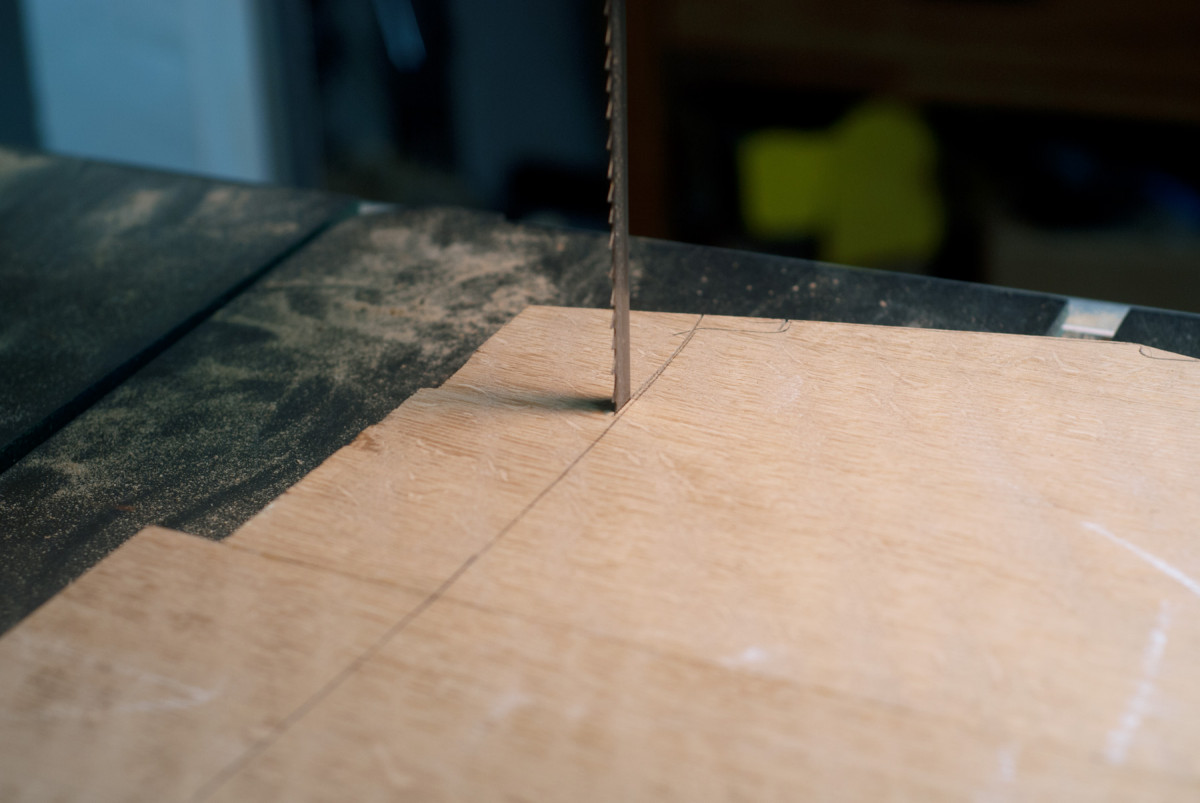
Like the shelf, the top requires only a quarter-pattern. Pattern routing the top eliminates the need to fuss with string and nails to trace an ellipse on the workpiece itself – instead, fuss over making a perfect quarter-pattern. Cut it out and smooth the arc to a fair curve, then strike lines 1″ back from the straight edges of the pattern.
All About that Base
Final shape. Rout the shelf to final shape.
The four slab legs surround the shelf and are joined at the top by two dovetailed stretchers. Begin building the base by preparing the shelf. On its bottom face, mark centerlines along the short and long axes.
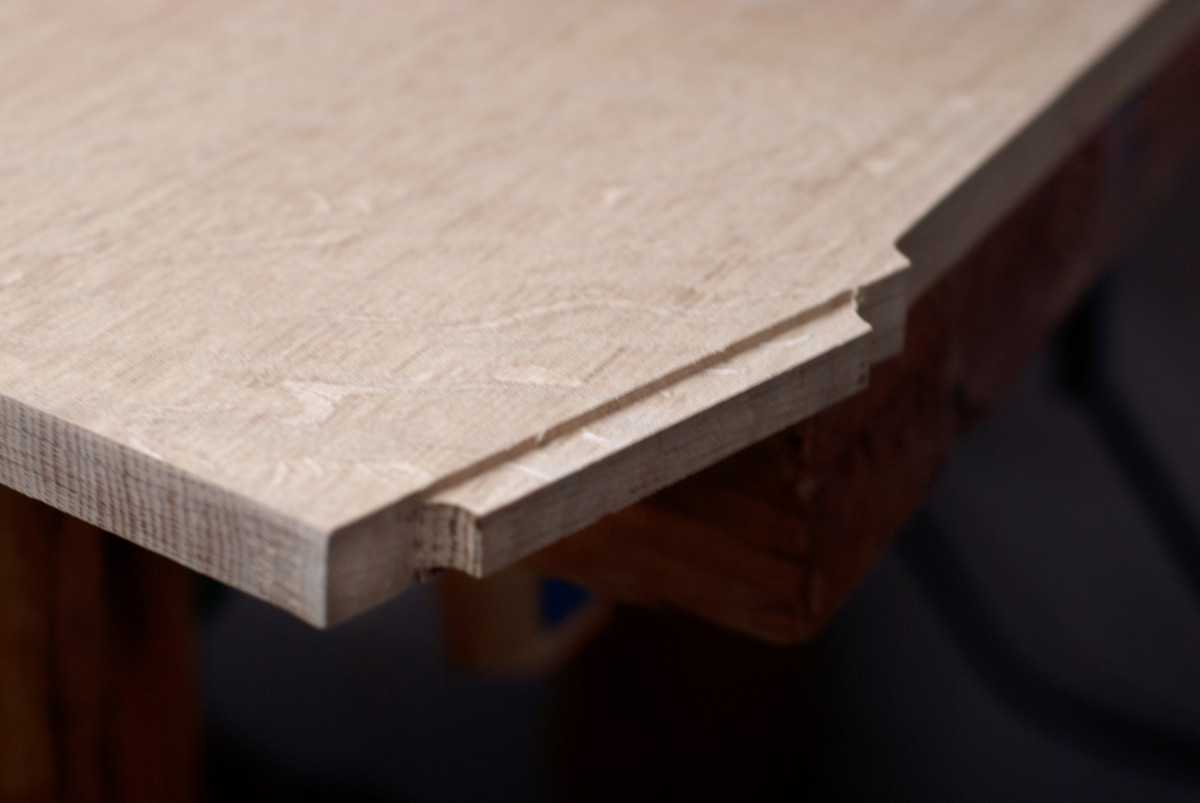
Tongued. Rabbet both sides of the shelf at each corner to form tongues.
These centerlines are used to align the pattern with the blank for layout and routing to final shape. Position the pattern so that its inside edges overlap the centerlines of the workpiece by 1″, clamp the pattern in place (spring clamps are convenient here) and trace the outside edge of the pattern. Reposition the pattern and continue tracing.
Mark the spots. The leg pattern serves a double purpose: it shapes the cutout and provides a template to trace the cutout for the carved leaves.
You’ll need to flip the pattern over to finish two quadrants of the shelf.
Wasted. Begin the leg cutout by drilling a clearance hole, then remove the remaining waste with a jigsaw.
After marking the shelf, rough it out on the band saw or with a jigsaw, cutting within 1⁄8” to 1⁄16” of your layout lines.
 Once you’ve roughed out the shelf, trim it to final size using a flush-cut bit in your router. Routing the shelf feels a lot like tracing it – position the pattern and rout, then re-position and rout some more. Because the bottom of the shelf won’t show, you can screw through the pattern into the shelf to keep it in position (or use double-sided tape if screw holes offend you).
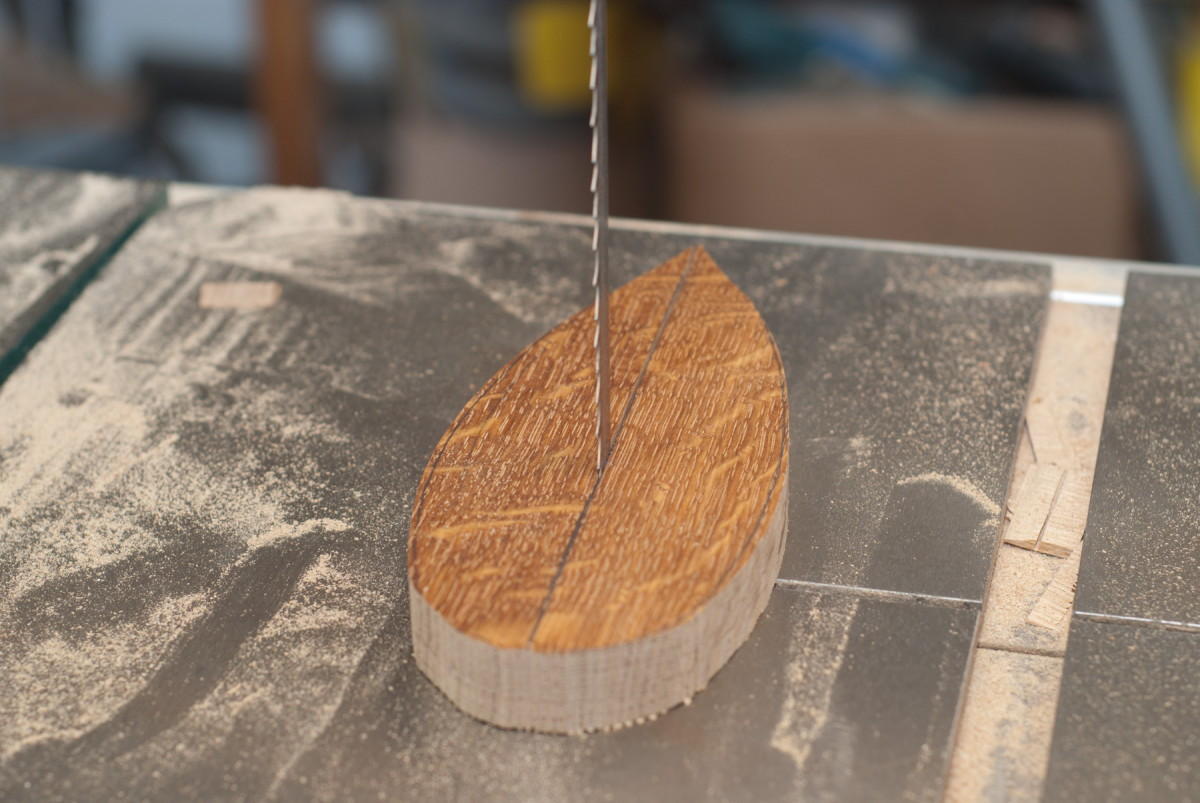
Flush it up. The flush-cut bit follows the curve of the pattern, trimming the cutout to shape, but leaves a curve at the top of the cutout.
Cut the opposite corners of the shelf, then flip the pattern to cut the remaining corners, positioning the pattern so that the already cut edges will blend smoothly with the final cuts. If you end up with alignment problems after routing, fair the edges.

Saw, pare or file the sharp point.
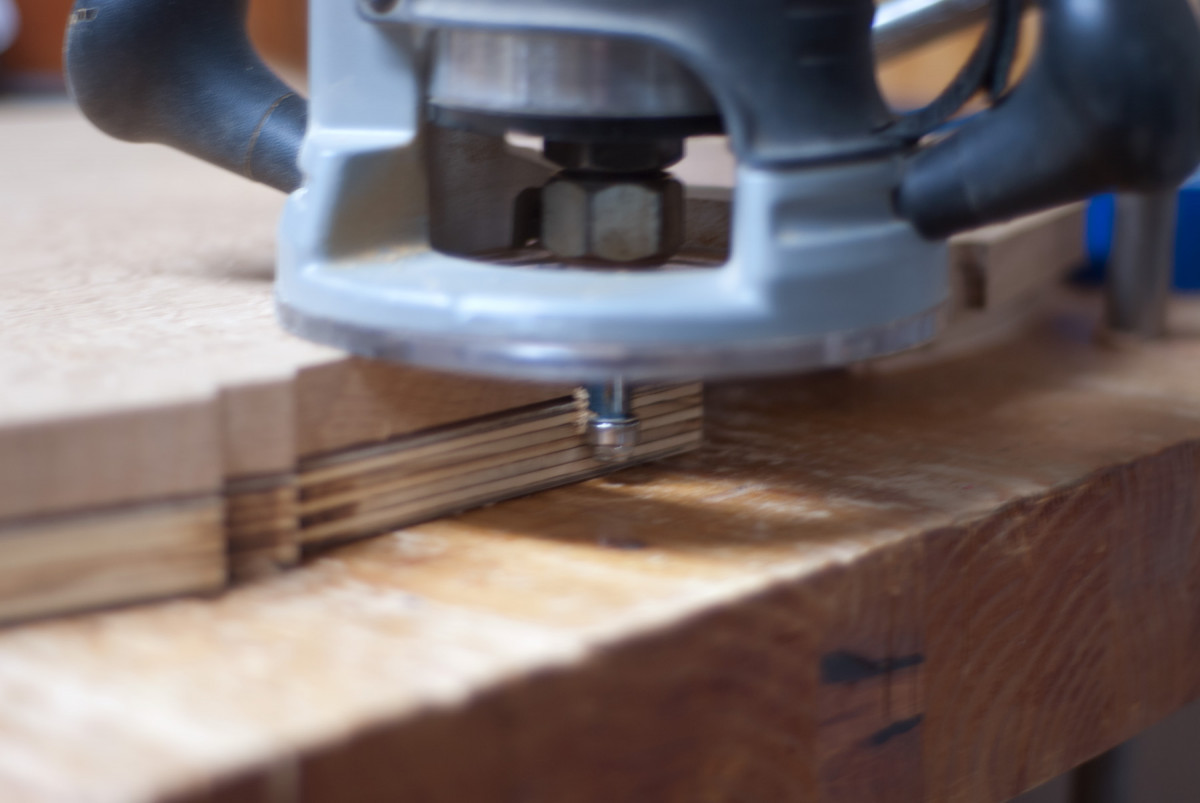
To cut the tongues on each diagonal, rabbet the top and bottom faces with a 1⁄4” rabbeting bit set to a 1⁄4” depth. Then notch the resulting tongue on both sides to form shoulders.
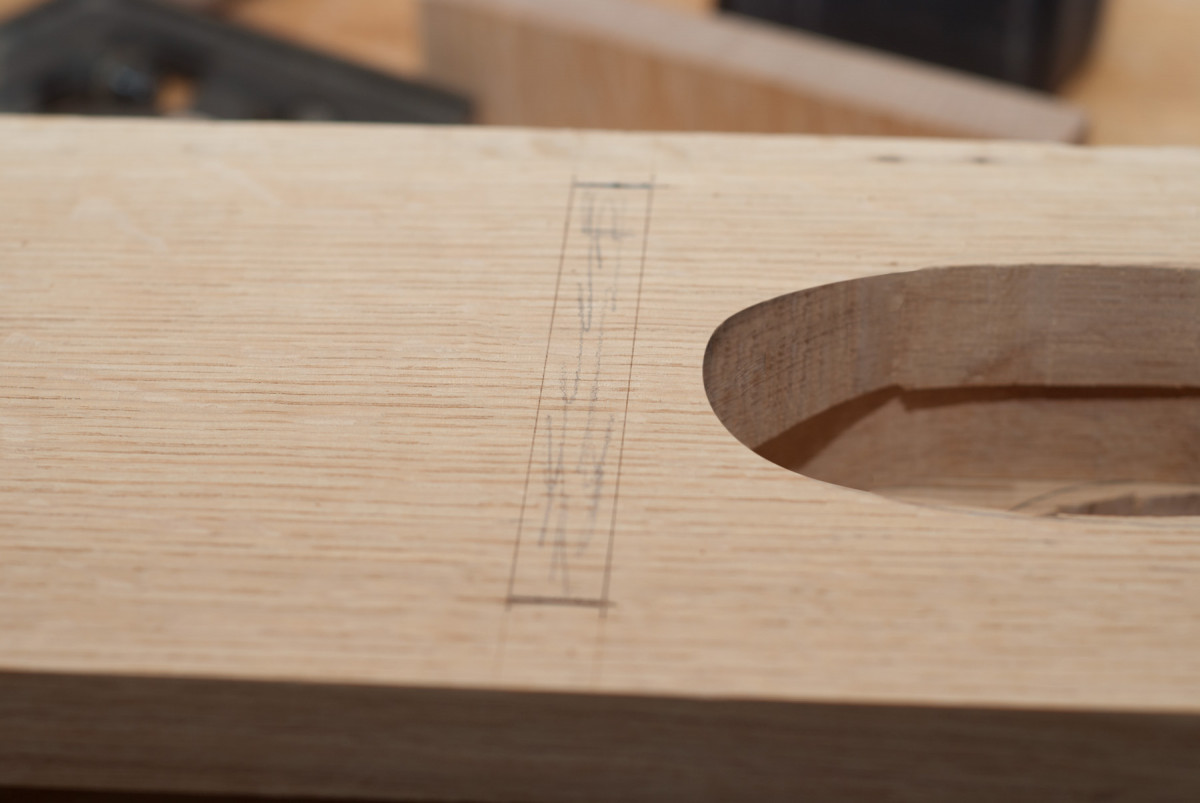
Dado layout. Mark the position of the stopped dados on the legs and align the jig with the marks.
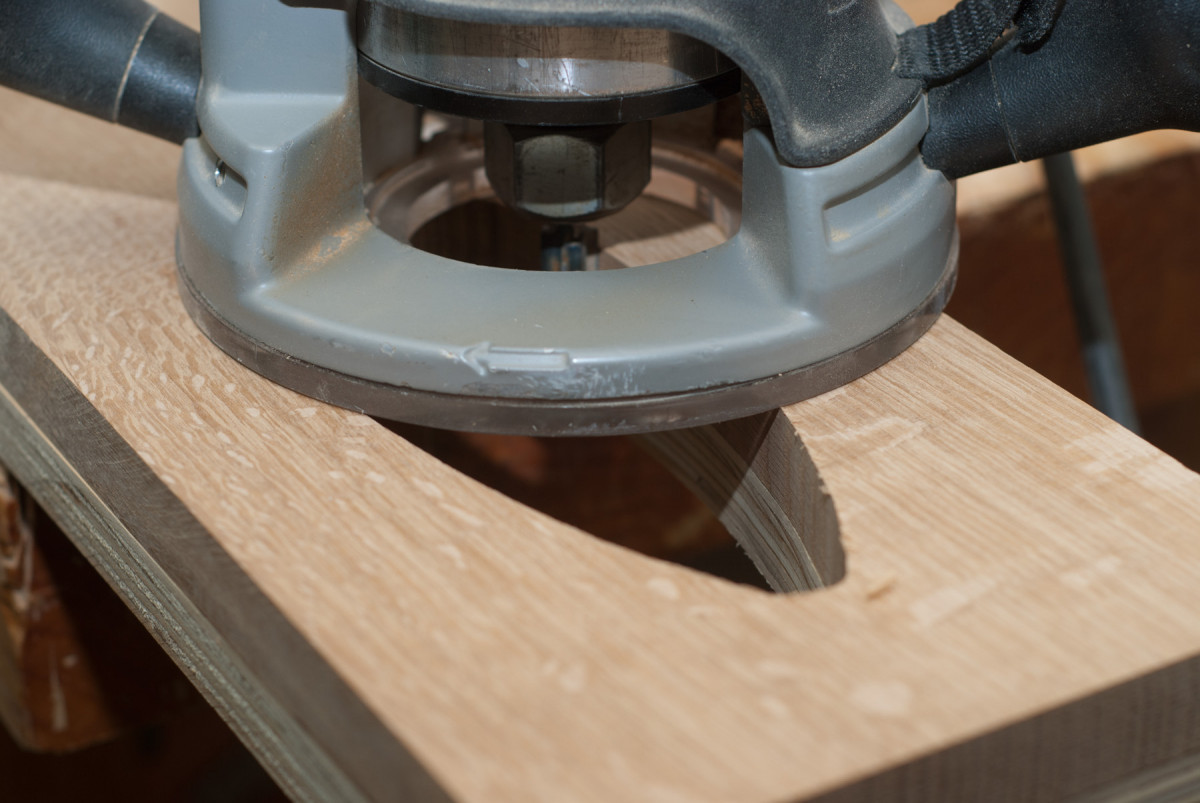
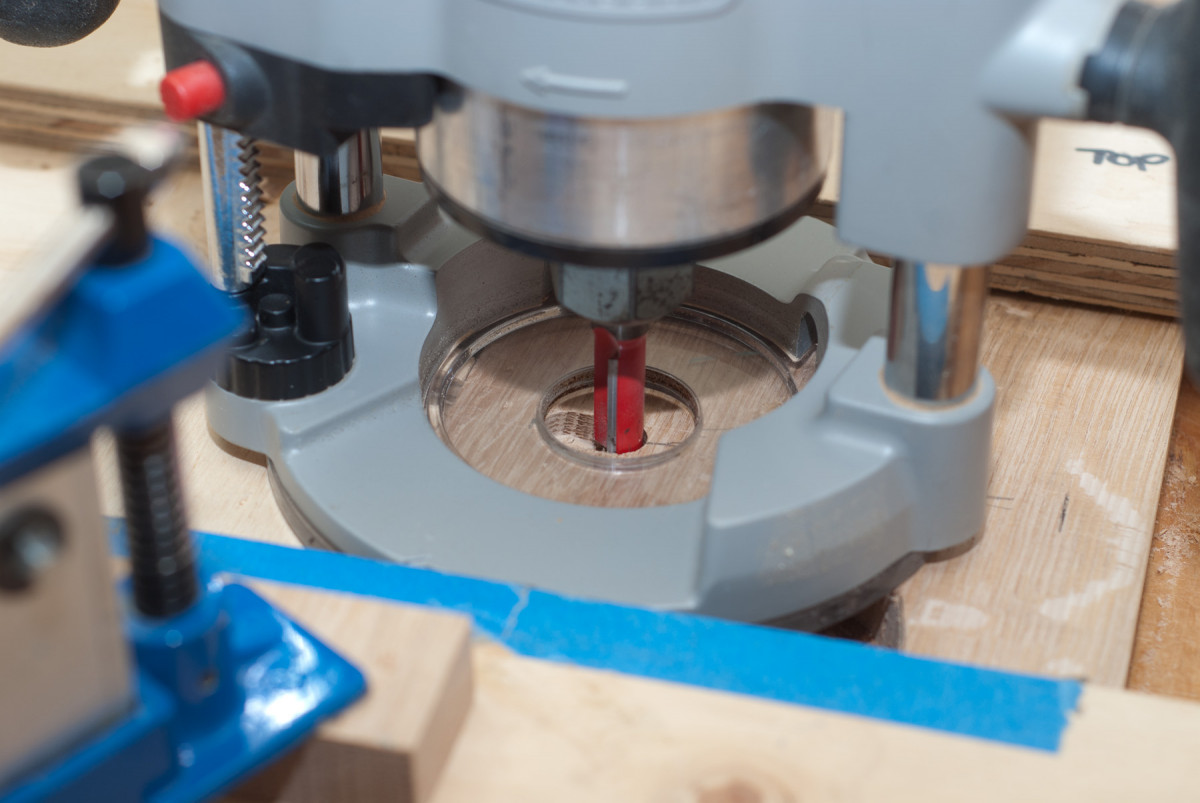
Now rip the legs to width and length. Using the leg cutout pattern, trace the cutout on the top of each leg, then drill a clearance hole and saw out the waste with a jigsaw, cutting close to your layout lines.
 To rout the cutouts, clamp a leg on top of the pattern and finish the cut with a flush-trim bit. The bit won’t be able to finish the pointed end of the cutout, so finish up with a saw or chisel.
Cut ’em. Plunge cut the stopped dados. A simple jig captures the router between two fences, ensuring a straight dado.
To complete the legs, mark the location of the stopped dados and cut them with a 1⁄4” bit in a plunge router. A simple jig captures the base of the router between two fences to ensure the dados are perfectly straight.
Shoulder it. Rabbet the undersides of the stretcher ends to form a shoulder.
Rip and crosscut the stretchers to size with the ends cuts at a 16° angle. To ensure consistent length, stack the stretchers and cut both at the same time. Trim one end to 16°, then flip the stock over so that stretchers will taper to one edge, and cut the stretchers to final length.
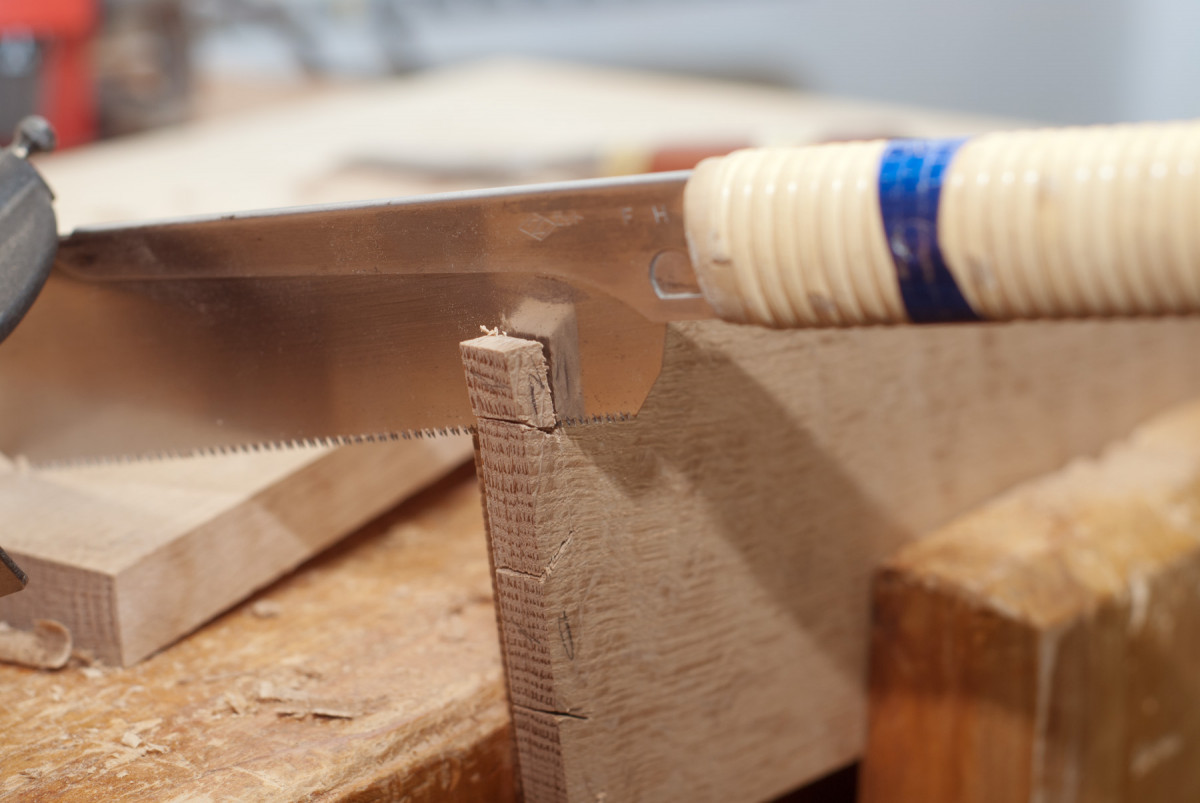
Tails. Cut the tails using your preferred method. (Mine is by hand, with a pull saw.)
Cut a 3⁄8“-wide x 1⁄4“-deep rabbet along each end on the bottom face of each stretcher, then cut a couple of dovetails in the ends.
Socket locations. Position the stretcher between a pair of legs and mark the position of the dovetails.
Layout isn’t critical here – I made my dovetails about an inch wide and 3⁄4” in from the edges. Finally, drill elongated screw holes through the stretchers to attach the top to the base.
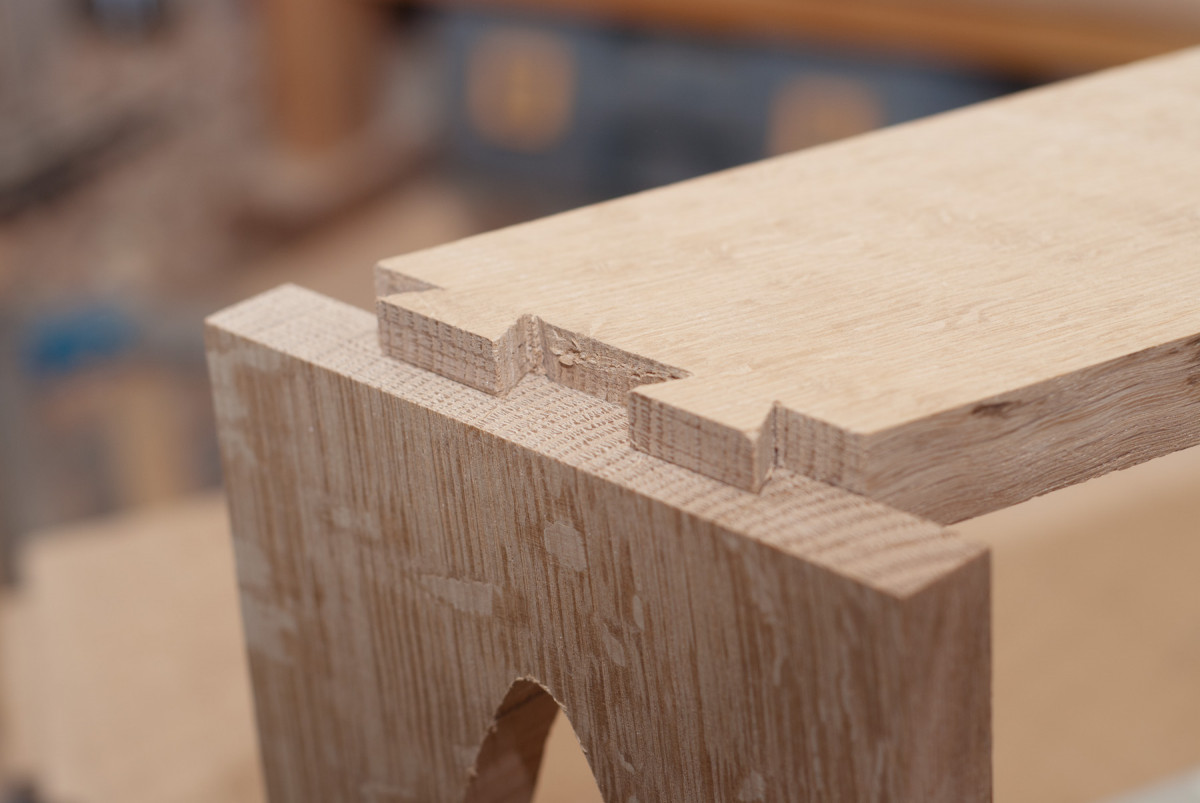
That’ll last. The finished half-blind dovetails provide a strong joint between stretcher and legs.
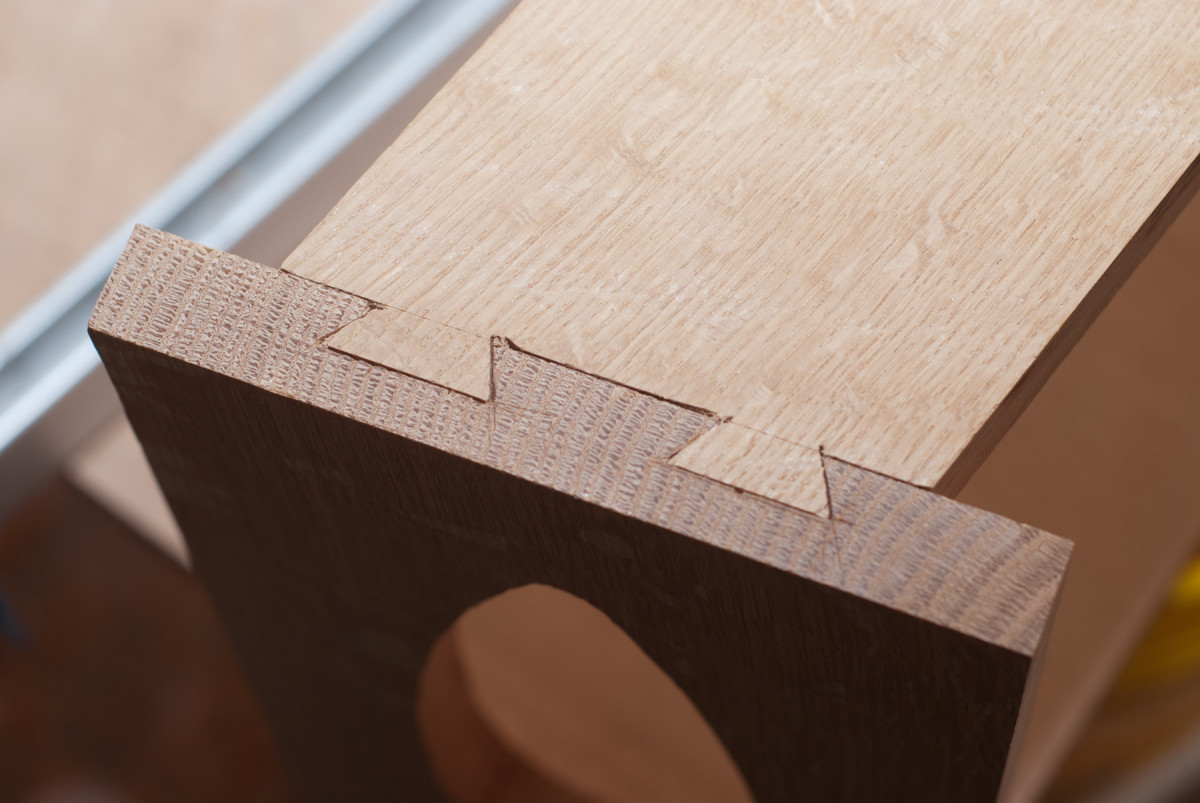
To lay out the dovetail sockets, dry-fit the base (and mark the corresponding parts of each joint for easy reassembly) and set the stretchers on top of the legs. Then scribe the shape of the dovetails onto the top of the legs with a marking knife.
Trace & cut. Trace the arc of the pattern, then re-position and trace again to create an ellipse. Cut just wide of the top’s perimeter.
Use a marking gauge to strike lines about 1⁄2” to 3⁄8” in from the end of the top of each leg. With the sockets marked, saw out the waste and pare to your layout lines with chisels.
Shape the Leaves
Leaves. Cut out the shape on the band saw (twice).
Echoing the spear-shaped cutouts, the carved leaves provide a finishing touch for the base. Although the table is attractive without the leaves, they elevate the design while showing its roots in the organic forms of Art Nouveau. The leaves might look difficult, but shaping them with a band saw and sander is straightforward.
Blanks. Rip each leaf shape in half to prepare two blanks.
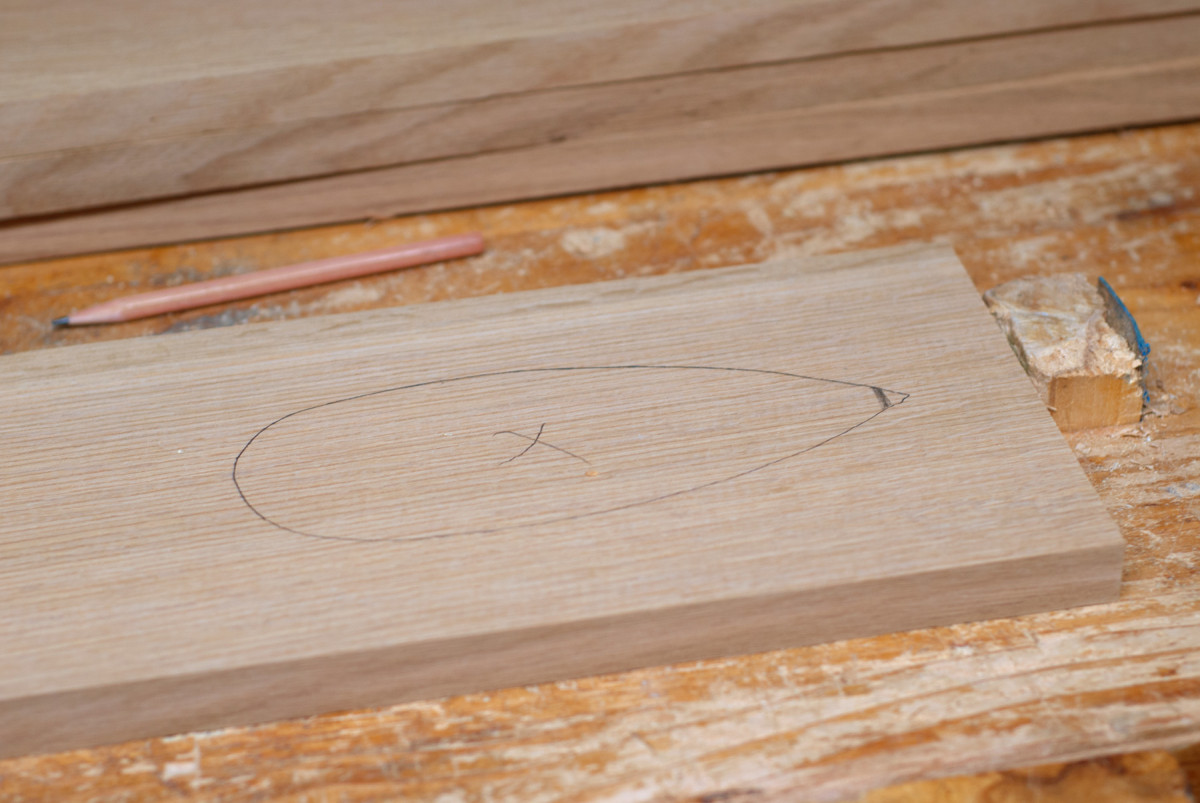
Begin by tracing the cutout onto your stock (it’s a good use for scraps) and cut to your layout lines, then rip the spear shape in half to produce two leaf blanks from each.
To shape the curve, waste out material on the band saw (cut with the flat edge of the leaf on the table) and sand or plane to final shape, then prepare the parts for finishing using a sander or smoothing plane.

Rough curve. Rough out the curve of the leaf on the band saw.
Cut two complementary pairs so they curve toward each other when installed. To cut the 1⁄8” stub tenons used to attach the leaves to the legs, notch the curved edge of each leaf about 1⁄8” from the ends.
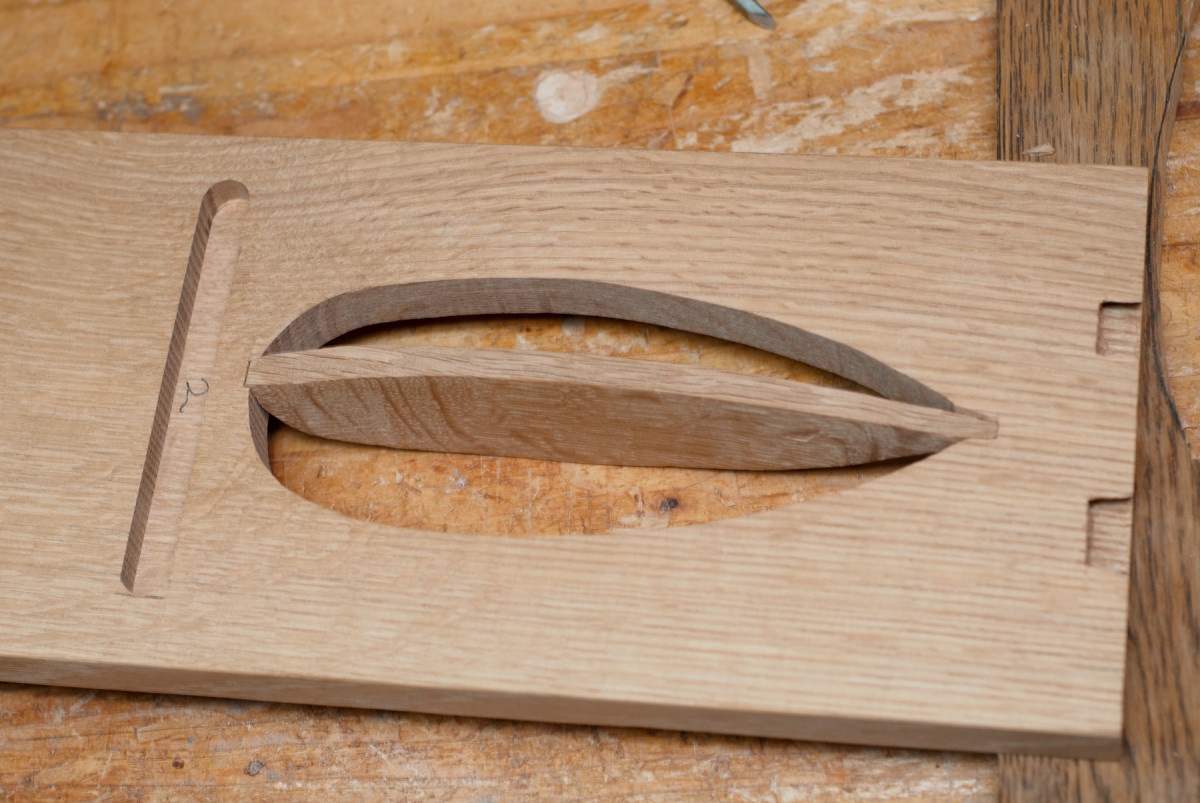
Mastic. Quick-set epoxy and 1⁄8″ tenons join the leaves to the legs.
Position the leaf within its cutout and trace the tenon to mark the mortise on the backside of the leg. Chop the mortise with a chisel, cutting deep enough that you’re satisfied with how far the leaves protrude from the outside face of each leg. A quick-set epoxy eliminates the need for clamping. Simply mix a small amount of epoxy and spread on the inside of the mortise and press the leaf home.
—MC
Top it Off
Oval top. Align the jig with the centerlines on the underside, then screw it in place. A sharp router bit will leave a clean edge.
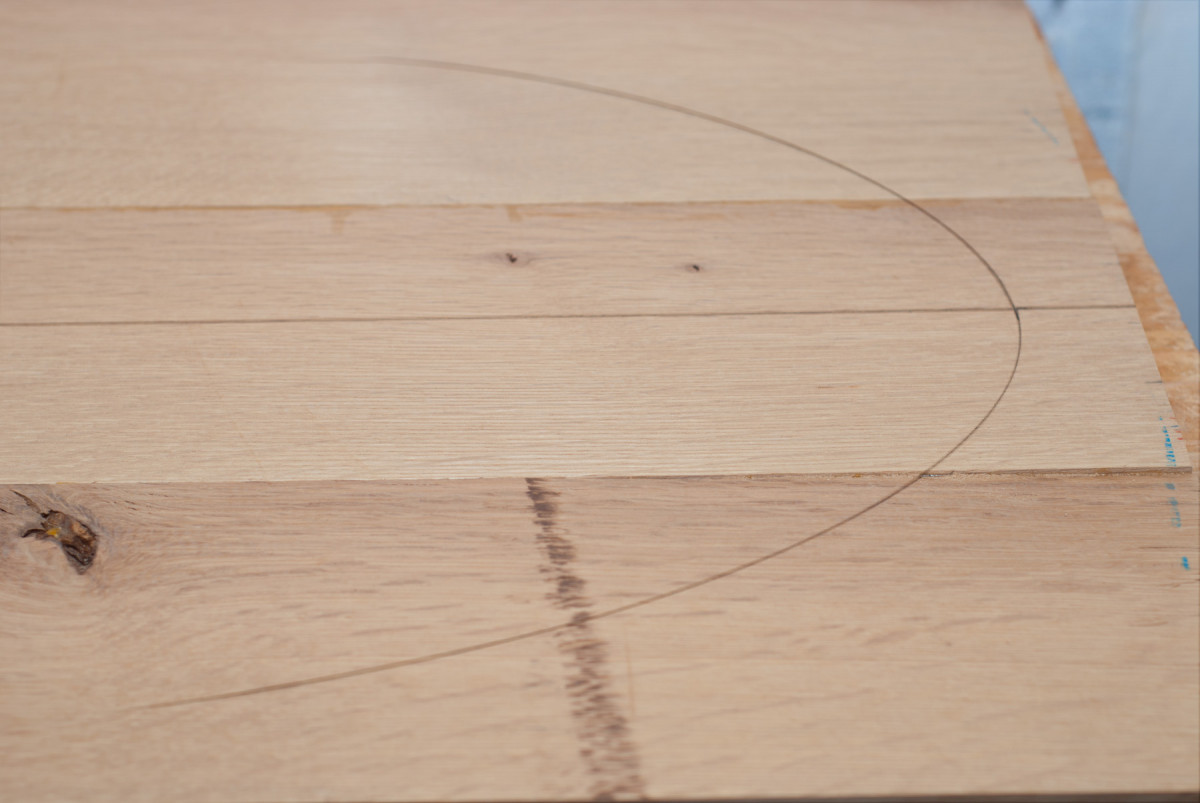
Like the shelf, the top is pattern routed to final shape by positioning and flipping the pattern. Mark horizontal and vertical centerlines on the bottom face of the top, then trace the ellipse.
Cut close to your layout lines with a band saw or jigsaw, then attach the pattern to the top for routing.
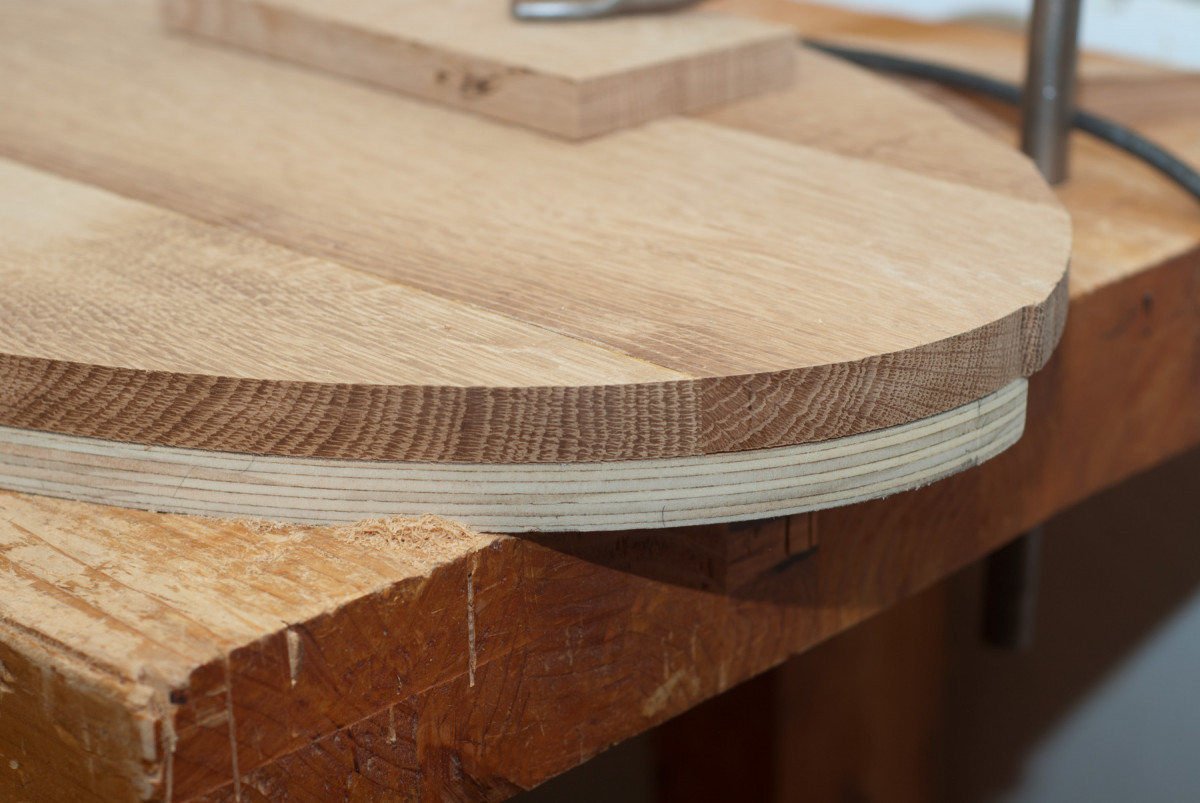
Rout to the final shape and fair the edges if needed. After chamfering or rounding over the edges, the table is ready for finishing.
Fumed Finish
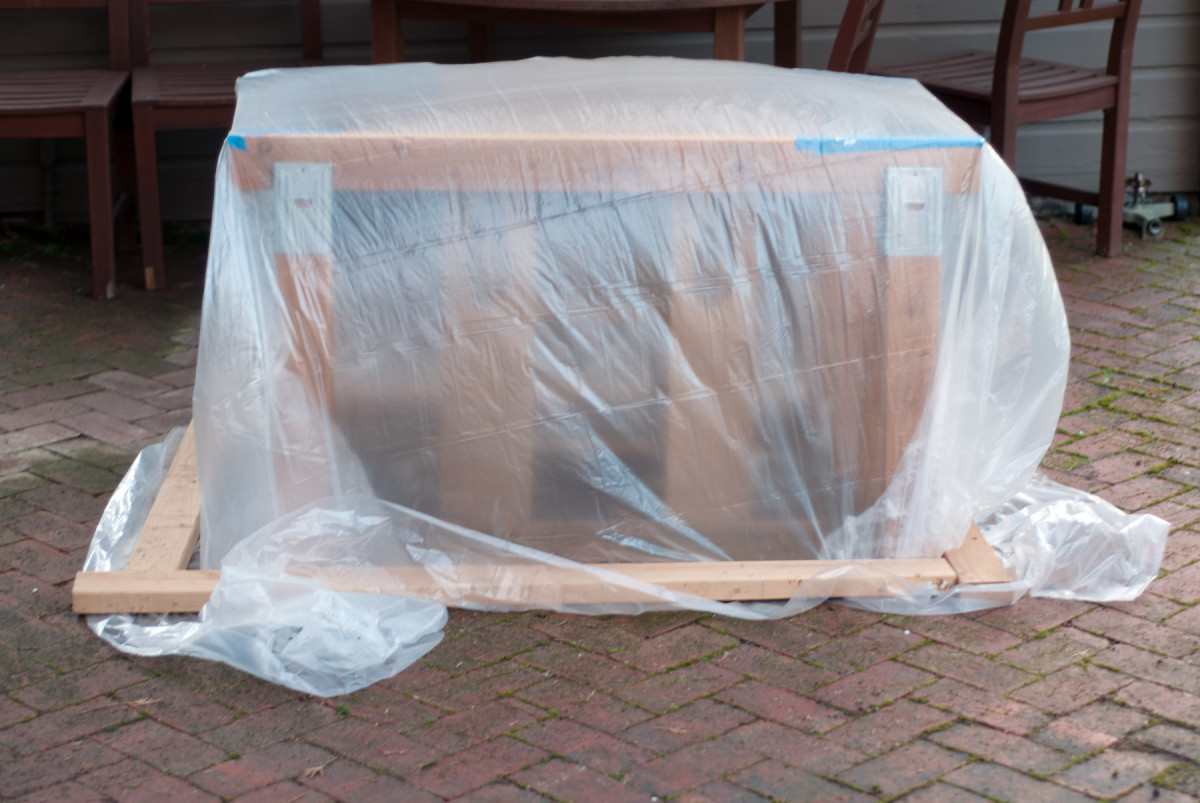
Fume it. The table is fumed for 48 hours in a tent made from sawhorses and plastic sheeting.
Depending on your material choice and tooling, your finishing schedule may differ from mine. For Arts & Crafts and related projects in white oak, I typically choose a fumed finish. I also finish my parts before assembly. Here, I sanded through #220 grit, then dry-fit the table.
To fume, I built a tent using sawhorses and plastic sheeting, then exposed the table to 26-percent ammonia for 48 hours. After taping off the joinery, I applied three coats of boiled linseed oil, wet sanding with #300-grit paper after the first coat.
When the last coat of oil was dry, I assembled the base.
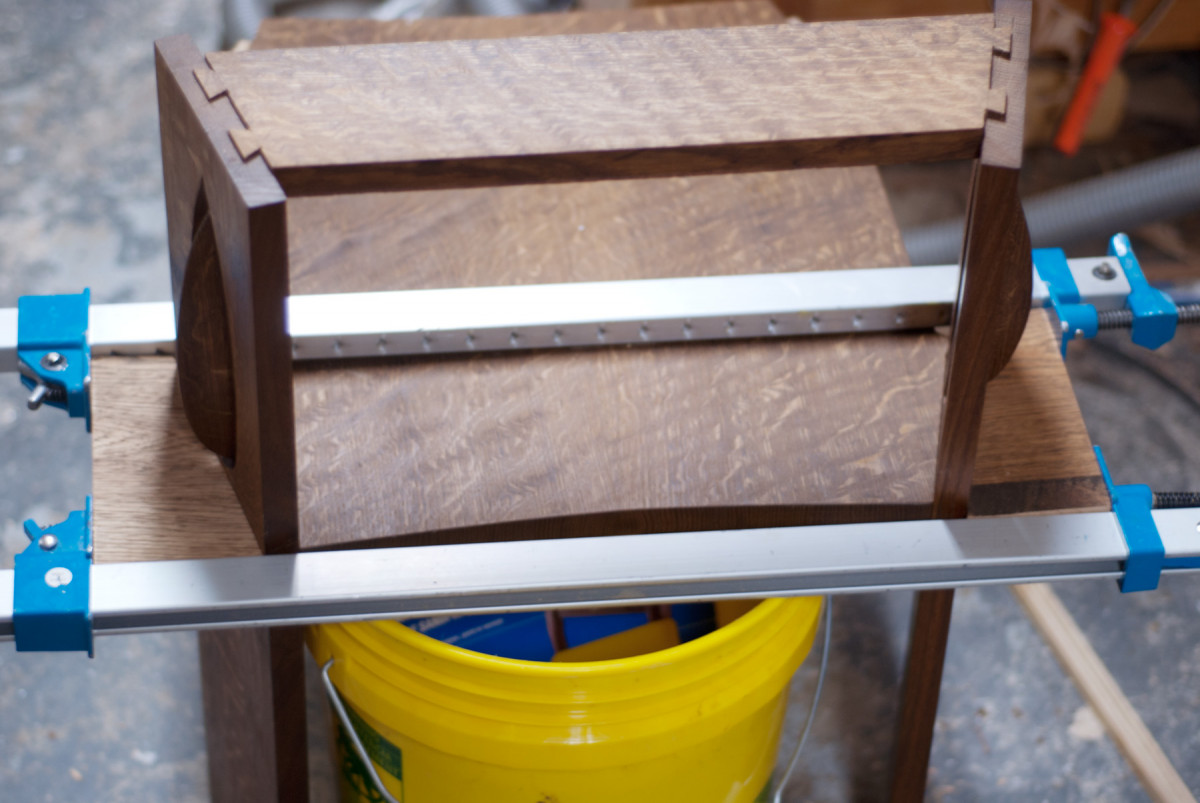
Cauls help. Clamp the legs to the shelf with angled cauls.
The angle of the legs makes for awkward assembly, so cut I some cauls to 16° and glued one pair of legs to their stretcher and to the base at a time, waiting for the glue to dry before tackling the other side.
After the base was together, I centered it on the bottom face of the top and marked the location of my screws, then drilled pilot holes in the top and screwed the base to the top.
With everything together, I applied a last coat of oil and two coats of dark paste wax. When the wax had dried, I was ready for tea. Patterns: Download full-size patterns for the leg cutouts, top and shelf.
Model: Get the free SketchUp model from our 3D Warehouse.
Here are some supplies and tools we find essential in our everyday work around the shop. We may receive a commission from sales referred by our links; however, we have carefully selected these products for their usefulness and quality.