We may receive a commission when you use our affiliate links. However, this does not impact our recommendations.
3 Kitchen Storage Projects
Squeeze more space from your cabinets with customized roll-outs.
by Eric Smith and David Radke
It’s time to increase the storage space in your kitchen by accessing its underutilized space. Here’s how to reclaim that wilderness area underneath the sink, install a mini-pantry and fasten an extra drawer under a cabinet.
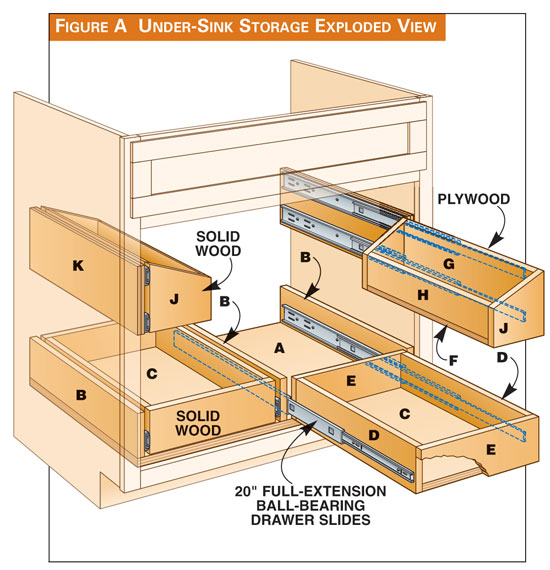
Under-Sink StorageMany base cabinets are only half used because the back is inaccessible.The sink cabinet, for example, is usually stuffed with long-forgotten items you can’t see unless you get down on To begin, measure the areas of open space around the plumbing. You may only be able to put a single pull-out on one side, or you may have to shorten them or build them around pipes coming up through the base. MaterialsTo make the trays shown here, you’ll need a half sheet of 3/4-in. hardwood plywood, 2-ft. x 2-ft. of 1/2-in. plywood, 17 lineal ft. of 1-in. x 4-in. maple, 2 lineal ft. of 1-in. x 6-in. maple, four pairs of 20-in. full-extension ball-bearing slides, a box of 1-5/8-in. screws, wood glue and construction adhesive. Bottom Pull-OutsMeasure the frame opening and cut the base (A) 1/4 in. narrower (Fig. A, page 67). Make the drawers 1 in. narrower than the opening between the partitions. Cut and assemble the base assembly (A, B) and drawer parts (C, D, E). Sand and apply two coats of finish to the base and drawers. Set the drawer slides on 3/4-in. spacers flush with the front edge of the partition (B). Screw them to the partitions; then pull out the drawer members. Set the drawer members on the same 3/4-in. spacers to create the proper bottom clearance for the tray, and screw them to the sides of the trays flush to the fronts. Screw the base assembly to the bottom of the cabinet (Photo 1). Slide in the drawers. Side-Mounted Pull-OutsMake the side support cleats (K) so they sit flush or slightly proud of the face frame. Check for hinges that might get in the way of the pull-out tray. Assemble the trays with glue and screws. Apply finish. Attach the slides and mount them in the cabinet (Photos 2 and 3). Scuff the cabinet side with sandpaper and use construction adhesive and screws to hold the cleats. Cabinet sides are often finished, so screws alone may not hold well. Cutting List
Fig. A: Under-Sink Storage Exploded View
|
Click on any image to view a larger version |

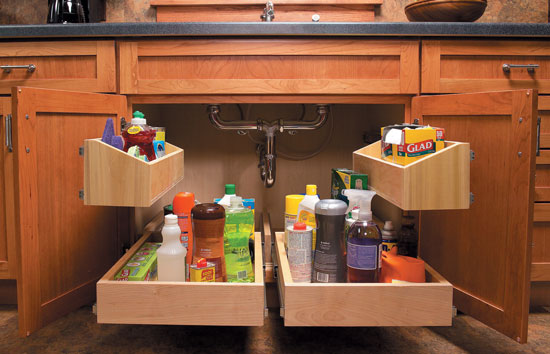
Under-Sink Storage

Full-Extension Ball-Bearing Drawer Slides
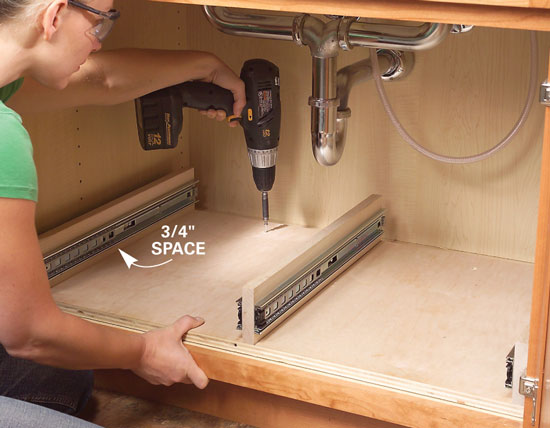
1. Build and install a base assembly for the bottom pull-outs. Center the base assembly in the cabinet just behind the hinges. Align the front edge with the face frame and screw it to the bottom of the cabinet.

2. Install the slides on the side pull-out trays. Center a 3-1/2-in. template on the cleat and the tall side of each tray and trace the edges. Center the mounting holes of the slides on these lines.

3. Attach the support cleats to the side of the cabinet using screws and construction adhesive. Use a temporary plywood spacer to hold each cleat in position.
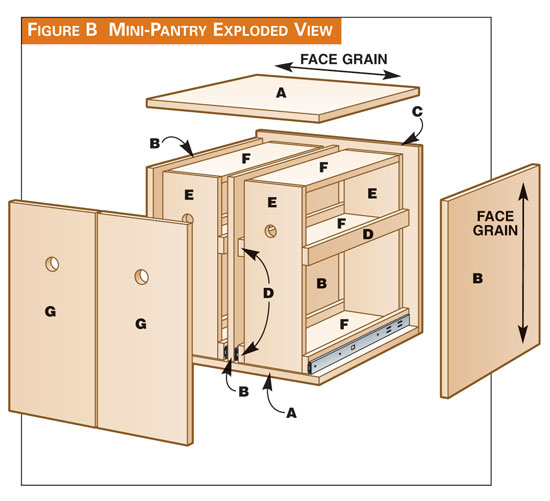
Mini-PantryThese pull-outs bring boxes, jars and cans within easy reach. To build this mini-pantry, you’ll need two sheets of 3/4-in. hardwood plywood (I used Baltic birch for its attractive edge) and two pairs of 20-in. full-extension ball-bearing slides. Start by building a box to fit inside the cabinet. Measure the frame opening and subtract 1/4 in. to get the box’s outside dimensions. I made this pantry for a 24-in. base cabinet, so change the cutting list to fit your base. Also keep in mind that most 3/4-in. plywood actually measures 23/32 in. Cut the box parts (A, B, C) and assemble them with glue and screws (Fig. B, below right). Find the drawers’ width by subtracting 1 in. from the openings in the box. Cut all the pieces for the drawers (D, E, F, G). Soften the edges of the drawer sides (D) and drawer face (G) using a 1/4-in. round-over bit. Assemble the drawer parts (D, E, F) with screws and glue. Position the center shelf (F) at the height you prefer. Attach the sides (D) with finish nails and glue. Set the drawer slides on the bottom of the box. Align the slides with the front edge and attach. Remove the drawer member and screw it to the drawer side 1/4 in. above the bottom. Install the box (see photo, right). Install the drawers. Center the drawer faces (G) on the drawers and screw them from the inside. Drill 1-1/2-in.-dia. holes for finger pulls or attach shallow pulls. Apply two coats of finish. Cutting List
|
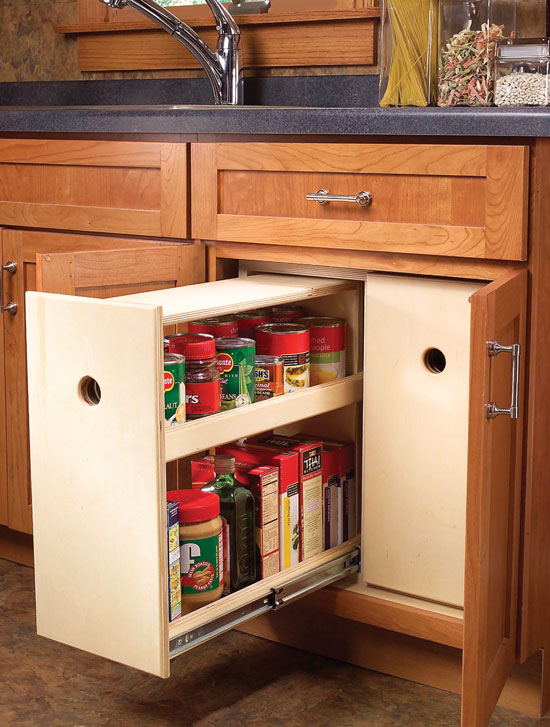 |

Mini-Pantry

Build a box for the drawers to fit inside the base cabinet. Remove the cabinet doors and slide the box into the cabinet. Screw the box securely to the bottom of the cabinet.
Fig. B: Mini-Pantry Exploded View
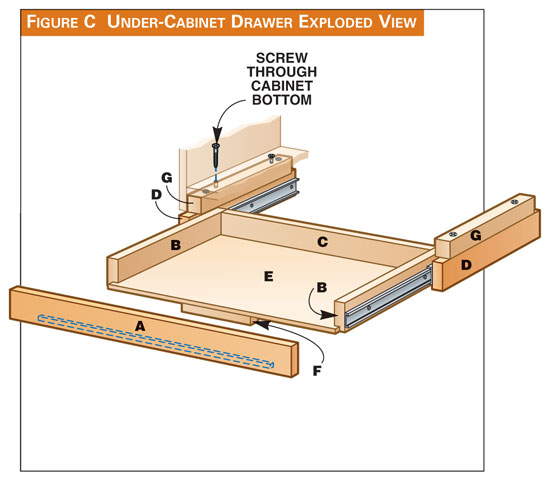
Under-Cabinet DrawerUnused space often sits in plain view under the upper cabinets. This pull-out is perfect for storing knives or coupons. You’ll need 8 lineal ft. of 3/4-in. x 1-3/4-in. hardwood that matches your cabinet, 2 lineal ft. of 1-1/8-in. x 1-1/8-in. hardwood, 1 ft. x 2 ft. of 1/4-in. hardwood plywood and one pair of 12-in. full-extension drawer slides. Measure the space under the cabinet. Cut the supports (G) to fit this space and protrude about 1/16 in. below the cabinet. Size the drawer by subtracting 2-1/2 in.—1 in. for the slides and 1-1/2 in. for the two fixed sides (D). The front-to-back dimension is the minimum required for a 12-in. drawer slide. Cut the drawer parts (A, B, C, E). Assemble the drawer using pocket screws or glue and finish nails. Rout the bottom of the drawer frame with a 3/8-in. rabbeting bit set 1/4 in. deep. Square the corners with a chisel. Then nail in the plywood bottom with 3/4-in. brad nails. Draw a centerline 3/4 in. up from the bottom edge on the fixed sides (D) and the drawer sides (B). Screw on the drawer slides, flush to the front. Glue and screw the undercabinet supports to the fixed sides. Install the drawer assembly. Glue the drawer pull (F) in the center behind the drawer front. Then finish the drawer to match the cabinet. Cutting List
|
 |

Under-Cabinet Drawer
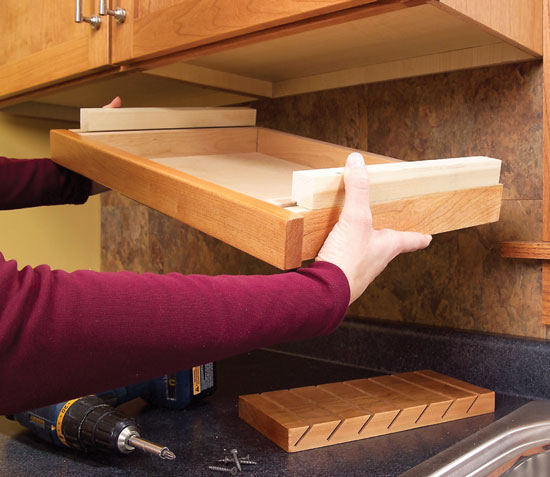
Install the completed drawer assembly. Clamp it to the cabinet and fasten it with screws from above.
Fig. C: Under-Cabinet Drawer Exploded View
Click here for six tips for building your own kitchen cabinets…
Here are some supplies and tools we find essential in our everyday work around the shop. We may receive a commission from sales referred by our links; however, we have carefully selected these products for their usefulness and quality.