We may receive a commission when you use our affiliate links. However, this does not impact our recommendations.
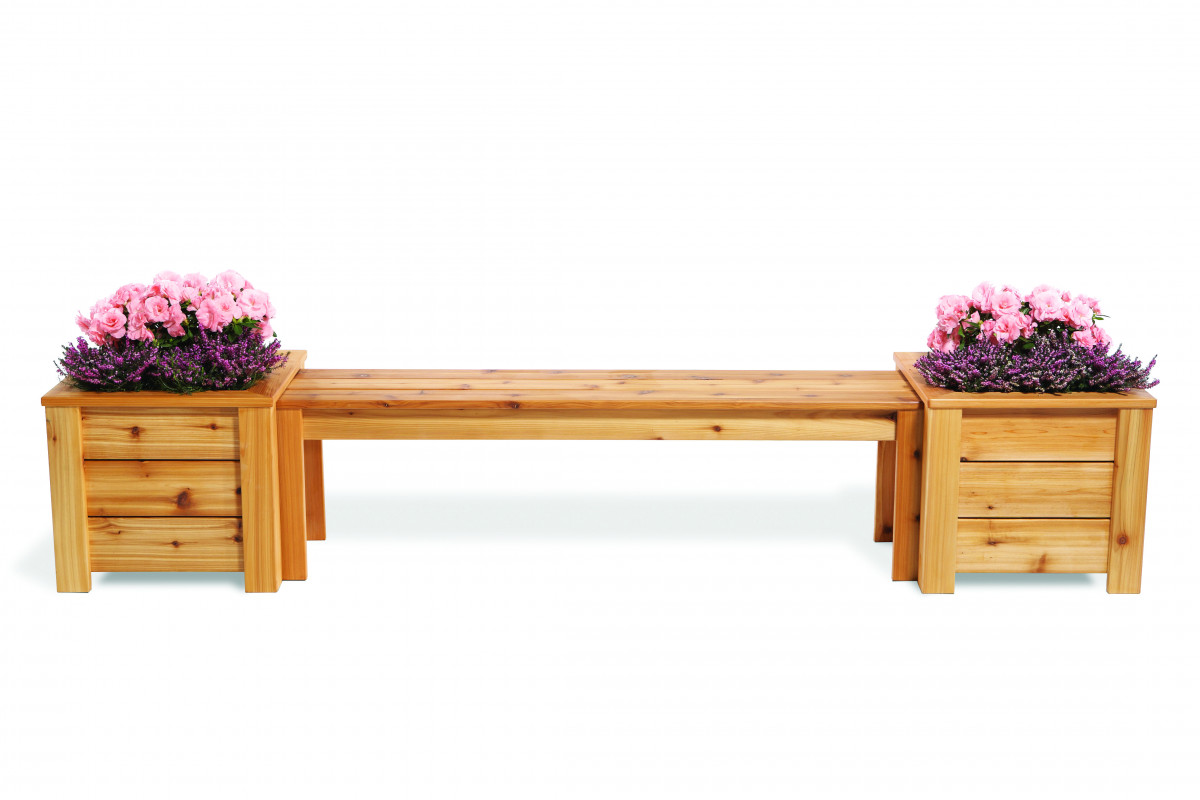 The planters and bench are separate parts—arrange them as you wish.
Smell the flowers. Touch the leaves. It’s easy to enjoy plants when they’re placed at a convenient height—and easier still when you can sit right next to them. Sitting on a planter bench brings nature close to hand.
While you can make this project with red cedar boards just as they come from the lumberyard, your planter bench will last longer and look better if you mill the wood first (see “Working with Red Cedar,” below). The joints will definitely be stronger because mating surfaces will be flat.
To build this project, you’ll need about 17 1×6 deck boards 12′ long and about four 2x4s 8′ long. You’ll also need some No. 8 deck screws (one box of 1-1/4″ screws and one box of 1-5/8″ screws) plus a bottle of water resistant glue suitable for outdoor projects.
Planter Bench Cut List
Approx. Overall Dimensions: 18” H x 20” D x 8’ L
|
Section |
Part |
Name |
Qty. |
Th x W x L |
|
Planter |
A |
Narrow corner |
8 |
7/8″ x 2″ x 17-1/4″ |
|
B |
Wide corner |
8 |
7/8″ x 3″ x 17-1/4″ |
|
|
C |
Long panel |
12 |
7/8″ x 5-1/8″ x 18″ |
|
|
D |
Short panel |
12 |
7/8″ x 5-1/8″ x 16-1/4″ |
|
|
E |
Ledger |
4 |
7/8″ x 7/8″ x 16-1/4″ |
|
|
F |
Ledger |
4 |
7/8″ x 7/8″ x 14-3/8″ |
|
|
G |
Top |
8 |
7/8″ x 3″ x 20-3/16″ |
|
|
H |
Floor support |
4 |
1-1/4″ x 1-1/4″ x 16-1/4″ |
|
|
J |
Floor board |
4 |
7/8″ x 5-1/8″ x 16-3/16″ |
|
|
Bench |
K |
Wide leg |
4 |
7/8″ x 3″ x 16-1/4″ |
|
L |
Narrow leg |
4 |
7/8″ x 2″ x 16-1/4″ |
|
|
M |
Long rail |
2 |
1-1/4″ x 3-1/4″ x 56-1/4″ |
|
|
N |
Short rail |
4 |
1-1/4″ x 3-1/4″ x 8-1/4″ |
|
|
P |
Ledger |
4 |
1-1/4″ x 1-1/4″ x 8-1/4″ |
|
|
Q |
Seat |
3 |
7/8″ x 4-1/4″ x 58″ |
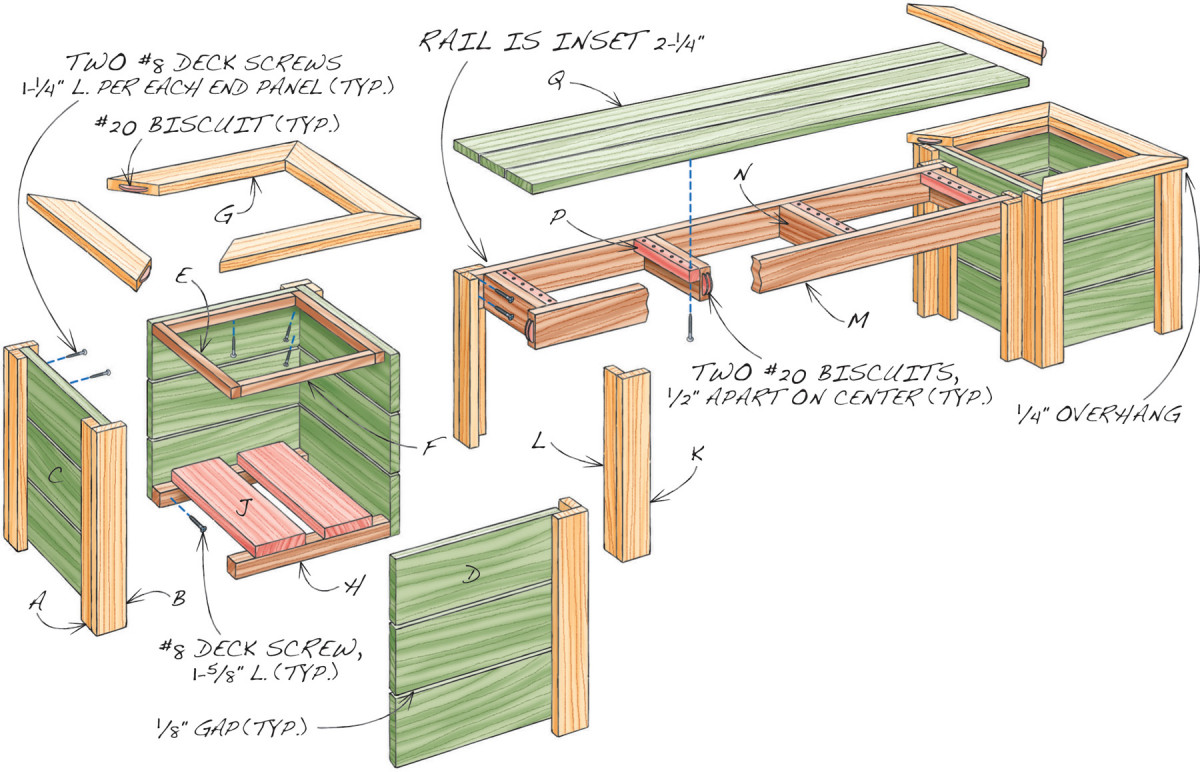
Fig. A) Exploded View
By cutting the lumberyard boards to rough size first (Photos 1 and 2), you should be able to mill the deck boards to 7/8″ thick and the 2x4s to 1-1/4″ thick. The exact thickness isn’t really important, though.
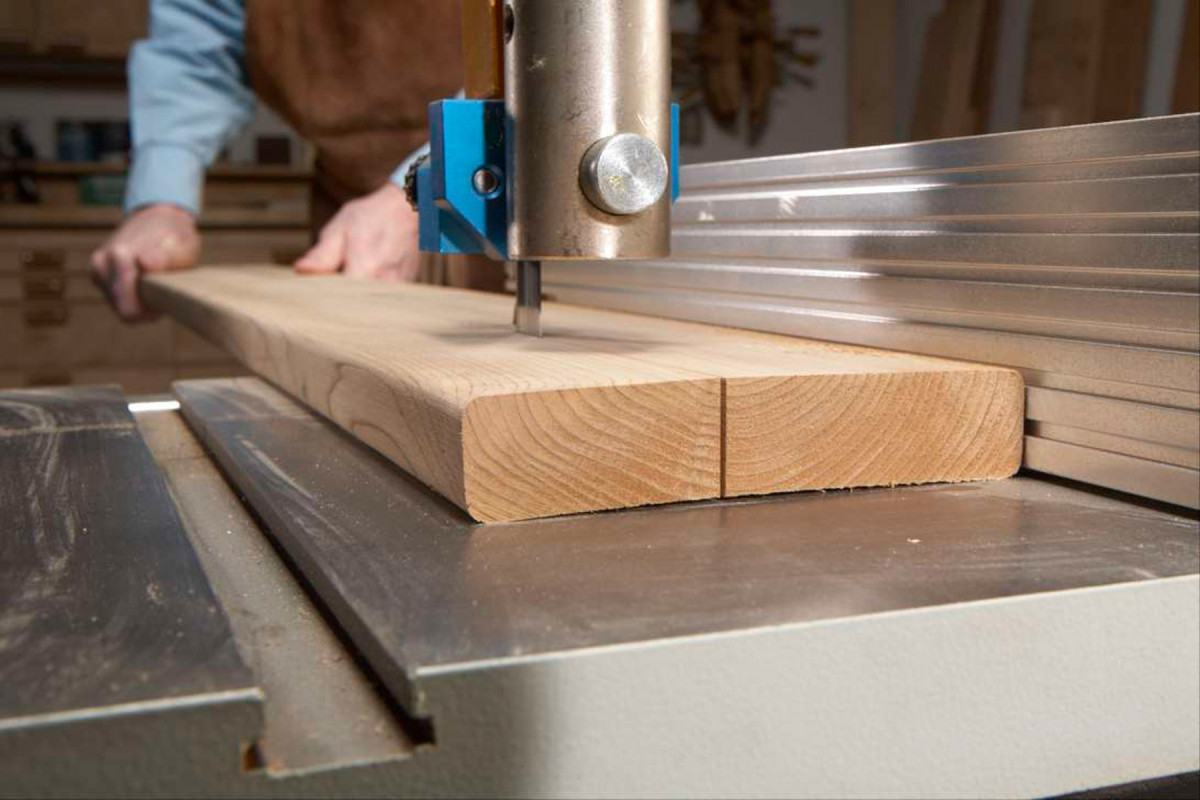
1. Rip warped boards on the bandsaw. This is much safer than cutting them on the tablesaw—there’s no danger of kickback. To prevent a cupped board from rocking, put the concave side down.
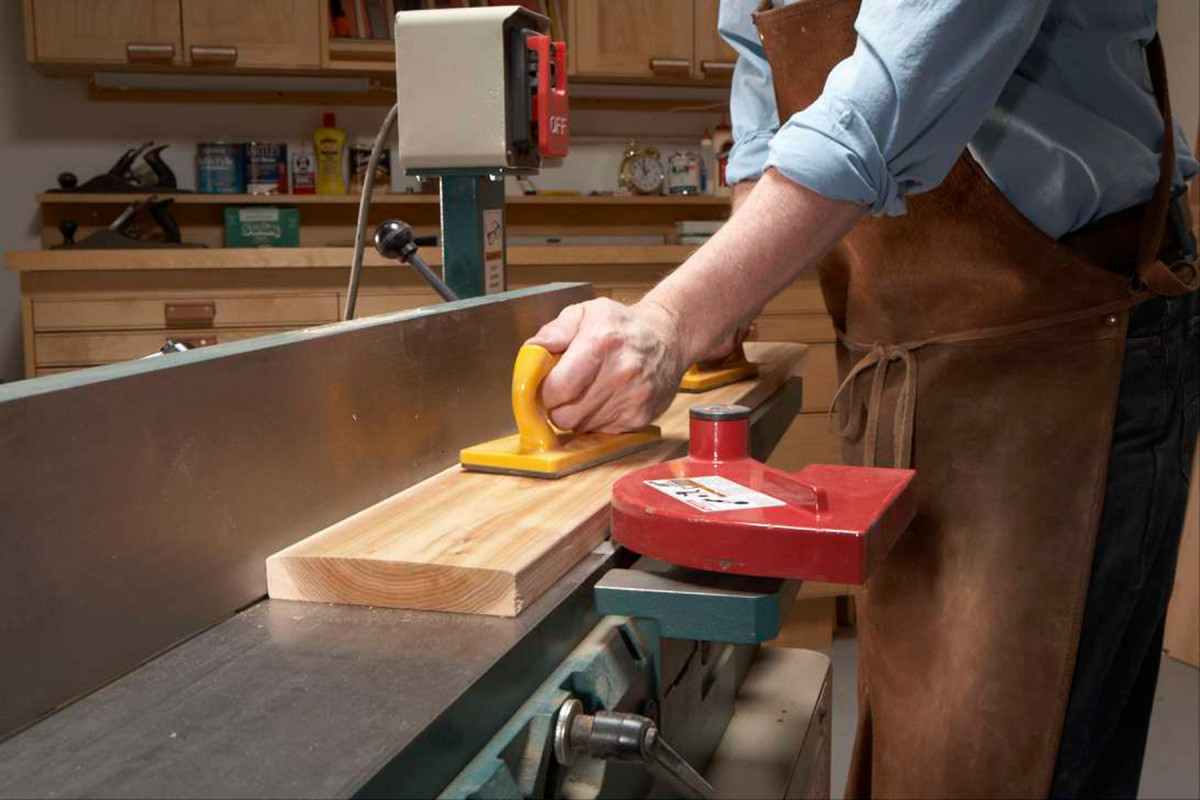
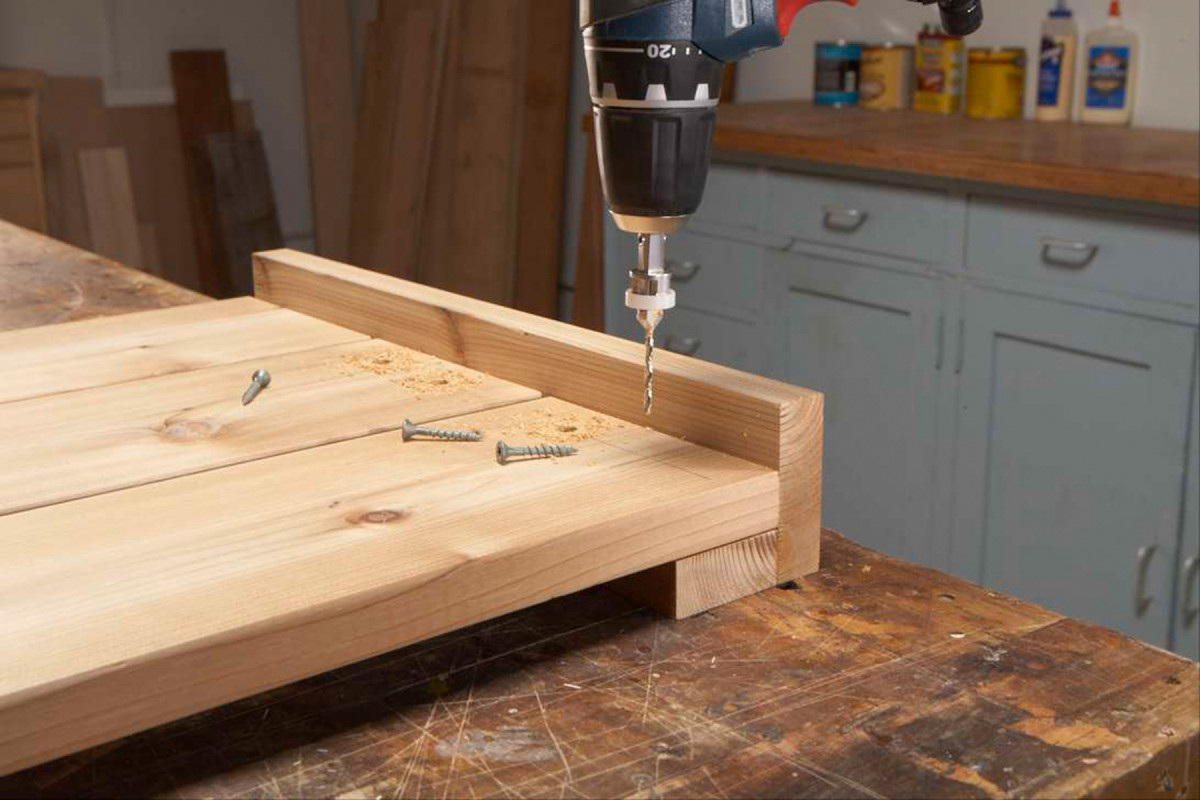
Build the planters first. Start by making the corners (A and B). Cut the individual pieces to exact size, then glue them together. Mill the long panels (C) and short panels (D). Leave the short panels 1/4″ extra-long. Glue and screw the long panels to the corners (Photo 3). Drill the pilot holes with a combination bit, counterboring the holes deep enough so the screws will penetrate at least 1/2″ into the panels.
2. Flatten each board on the jointer, then run it through the planer. Building a piece of outdoor furniture is much easier when you’re working with flat stock.
Measure the total length of one of the side assemblies, then trim the short panels to a length that makes the planter exactly square. Complete the box structure by adding the short panels. Run the short-panel screws at an angle, like toenailing a board.
Make the ledger strips (E and F) and glue them to the panels. Mill the top pieces (G). Miter them 1/2″ longer than the total length of the box’s sides, to create a 1/4″ overhang all around. Cut the biscuit joints and glue the pieces with a band clamp.
3. Pre-drill holes for screws. Once red cedar is dry, it’s very easy to split—particularly near the end of a board—if you don’t pre-drill first.
Sand the planter base and top with 120 grit paper to make the joints flush. Screw the top to the base. Glue and screw the floor supports (H) to the base and make the floor boards (J).
Build the bench by starting with the legs (K and L). Glue the pieces together. Mill the long and short rails (M and N). Cut double biscuit slots in the ends of the long rails and in the legs (Photo 4). Use a 1/2″ thick board under the plate joiner to space the slots. Cut more double biscuit slots in the ends of the short rails and inside the long rails, again using the 1/2″ spacer.
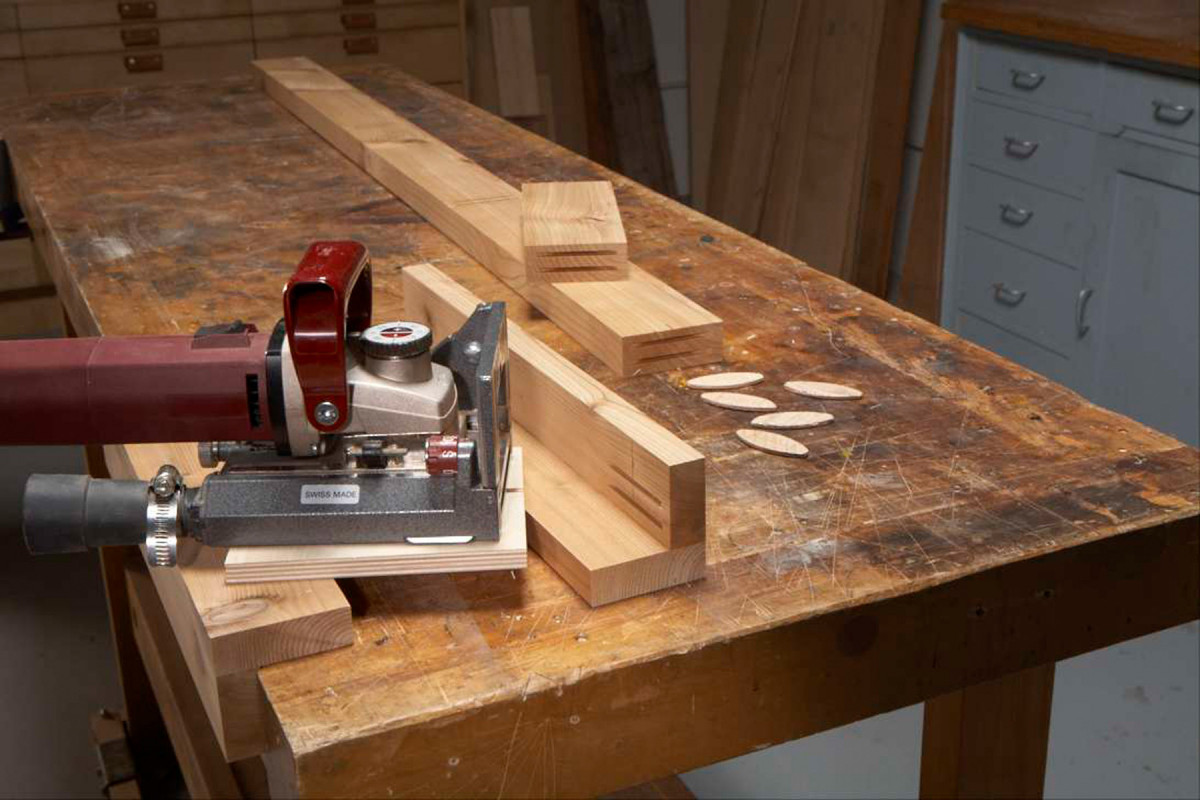
4. Biscuit joints work well. These are the leg joints for the bench in this project. Once your pieces are flat and square, these joints can be made quite easily.
Glue the legs to the long rails. Reinforce these joints with screws (Fig. A). Complete the base by gluing the short rails between the long rails. Add the ledger pieces (P) and counterbore holes in them for fastening the seat. Mill the seat boards (Q) and install them.
Before you put on a finish, turn over the bench and planters and apply two or three coats of epoxy or waterproof glue to the ends of the legs and corners. Rot starts on end grain, but sealing these surfaces slows it down.
Working with Red Cedar
If you’ve ever built with red cedar, you probably know that most boards are cupped, bowed and twisted. That’s not necessarily a problem for projects that are nailed or screwed together, such as fences and decks. But when it comes to making outdoor furniture with glued joints, warped boards won’t do. You’re better off treating those boards—smooth as they may be—as if they were rough lumber.
Before you start milling the wood, check its moisture content. It should be no more than 12%-14%. At that point, the wood has reached equilibrium with average outdoor humidity and has stopped cupping, bowing and twisting. (Although it will continue to move if it dries further.)
The first step in milling the wood is to cut your pieces to rough length. Group them in twos or threes—for example, to make two 12″ pieces, cut a piece 25″ long.
Rip the pieces to rough width. Look at the growth rings at the end of a board and make the cut nearest the center of the tree. This creates pieces that have the best chance of staying flat.
Flatten the pieces on a jointer and run them through the planer. Joint one edge and rip them to exact width. Finally, crosscut to length.
Reinforce glued face joints with screws. Screws won’t hold well in end grain, though, so make those joints with biscuits.
Here are some supplies and tools we find essential in our everyday work around the shop. We may receive a commission from sales referred by our links; however, we have carefully selected these products for their usefulness and quality.