We may receive a commission when you use our affiliate links. However, this does not impact our recommendations.
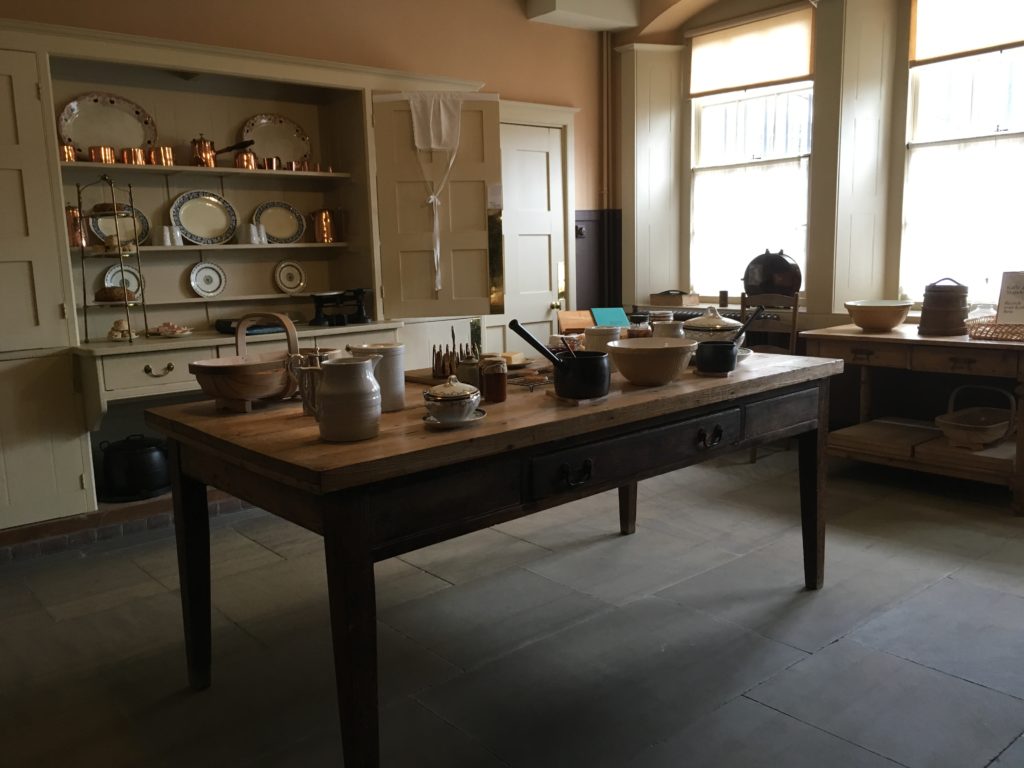
Be still, my heart! Kitchen worktable at Standen, a National Trust property in Sussex, designed by English architect Philip Webb.
Kitchen islands are the contemporary version of the old-fashioned kitchen worktable: a centrally located station at which to chop, slice, mix, roll, and knead. Today’s islands typically provide enclosed storage, as well as work space; some even house sinks, dishwashers, and other appliances. And of course lots of people also use their island as a place to eat. Some islands are freestanding pieces of furniture designed with work and storage in mind. Others are essentially an arrangement of cabinets that would ordinarily be built in, topped with a counter. Here is an example of how to make an affordable kitchen island by pulling together separate base units with decorative paneling.
***
One of my current commissions is an island for a new house designed by architect James Rosenbarger. The builder had included an unrealistically low allowance for kitchen cabinets and counters; the clients didn’t want the kind of stuff they could buy commercially for that sum. They asked if I would design and build their cabinets as a phased project that would allow them to catch up financially after the first phase was done. To make the cabinets as affordable as possible while keeping the quality high, we agreed that they would do whichever parts of the job they could. This is always a tricky subject, but in this case I had known these people for years — I first worked for them two decades ago. They have high standards, are very capable (one of them used to work in the trades), and are happy to work hard. So I agreed.
We decided to make the island first. It was going to house the sink and dishwasher, along with four drawers and a shallow bookcase. When supplemented by a stove and fridge, this would give them the basics of a functional kitchen.
The sink was going to be centered on a window with a view that’s beautiful in every season. The dishwasher would go to its left; to its right, the small set of drawers. A shallow open bookcase would hold cookbooks and decorative pottery at one end, and the other end would have an overhanging counter extending across the entire back, to provide plenty of space for family and friends.
The sink, centered on the window, would determine the rest of the layout.
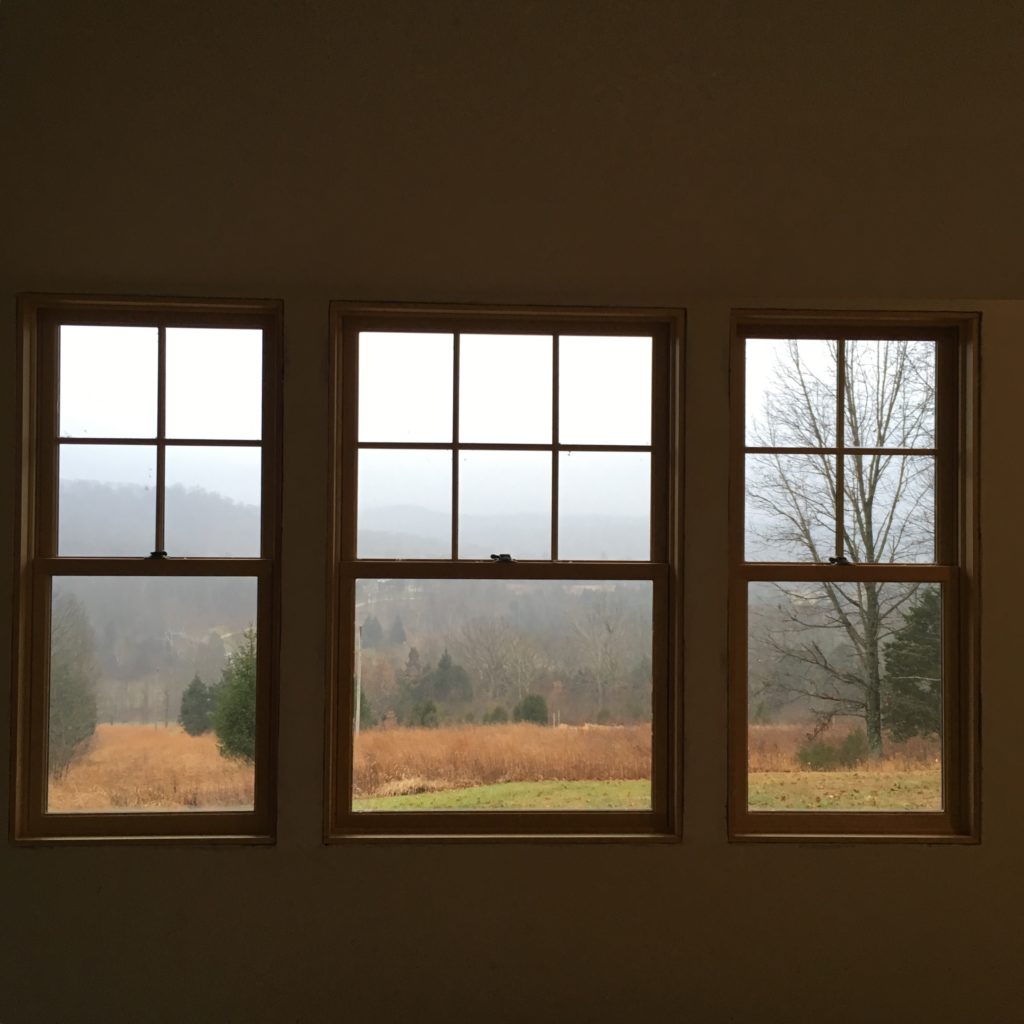
The view from the kitchen sink: rolling hills of field and forest
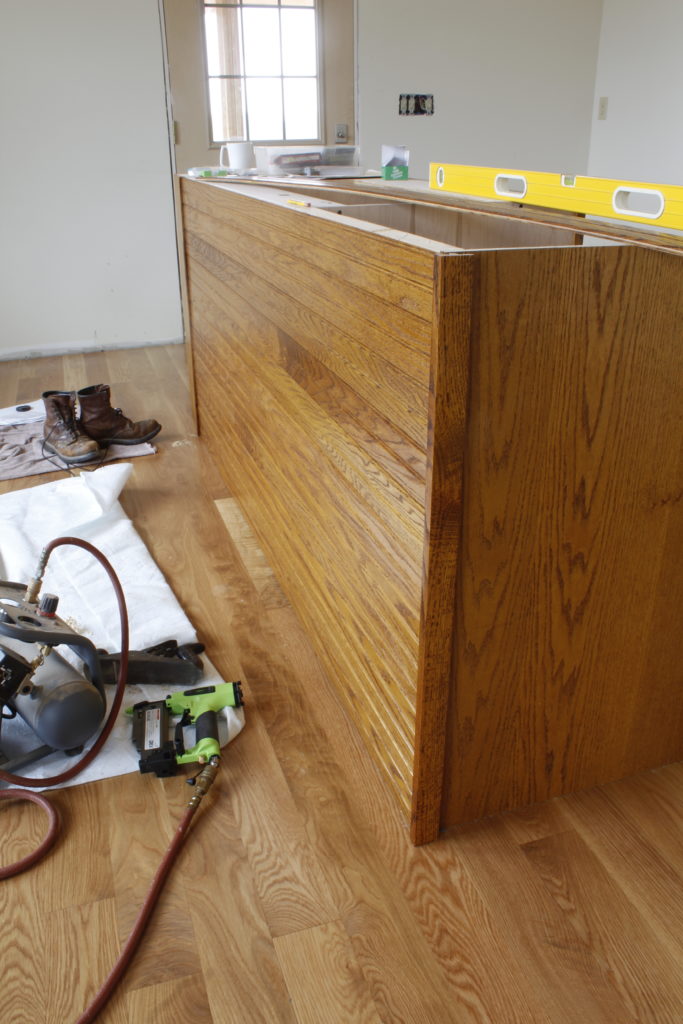
Including the countertop overhangs, the island would be 102″ long by about 40″ deep. To keep the cost down, I planned it as an assemblage of basic cabinets that would be screwed to the floor, then pulled together with a back and end panel. In other circumstances I would have made the back and end with solid frame-and-panel construction, mitering the corners for a neat appearance. But plainsawn red oak beadboard was a far more cost-effective option in this case. I suggested we run it horizontally to avoid any 1980s/”country” associations. (Yes, horizontal-everything is all the rage in this moment’s take on mid-century modern, but that is not why I suggested it. Many an early-20th-century built-in has horizontally run beadboard as its back and end panels. Although this kitchen is not evoking a historical period, I felt better about suggesting it for this job, knowing that its history goes beyond the 2010s.)
I made the units — a sink base with the drawer base attached, and a separate bookcase — in my shop. The clients picked them up, along with the beadboard, counter support brackets, and other parts, and took them back to the house to finish. Here’s how I turned these discrete elements into an island.
Affordable kitchen island, Step 1: Determine the location
When plumbing fixtures and an architect are involved, the location of an island becomes a matter of relatively high stakes. (Heh.) I measured the distance from the nearest adjacent wall to the center line of the middle window, then measured that distance out from the same wall at the approximate location for the island. I marked the spot with masking tape. The architect had specified a distance of 48″ between the edges of the counter that will go on the main wall of built-ins and the counter on the island. The main cabinets will be 24″ deep, so allowing for a 1″ overhang, that meant I needed to measure out from the rear wall 25″ + 48″ + 1″ for the overhang of the island counter, to determine the position of the sink cabinet’s front. I marked that, too, on the floor with tape.
Step 2: Mark and drill for plumbing lines
The builder had stubbed in the supply lines and the drain pipe so the drain would be centered on the window. I marked the center line of the sink base on the cabinet floor using a framing square.
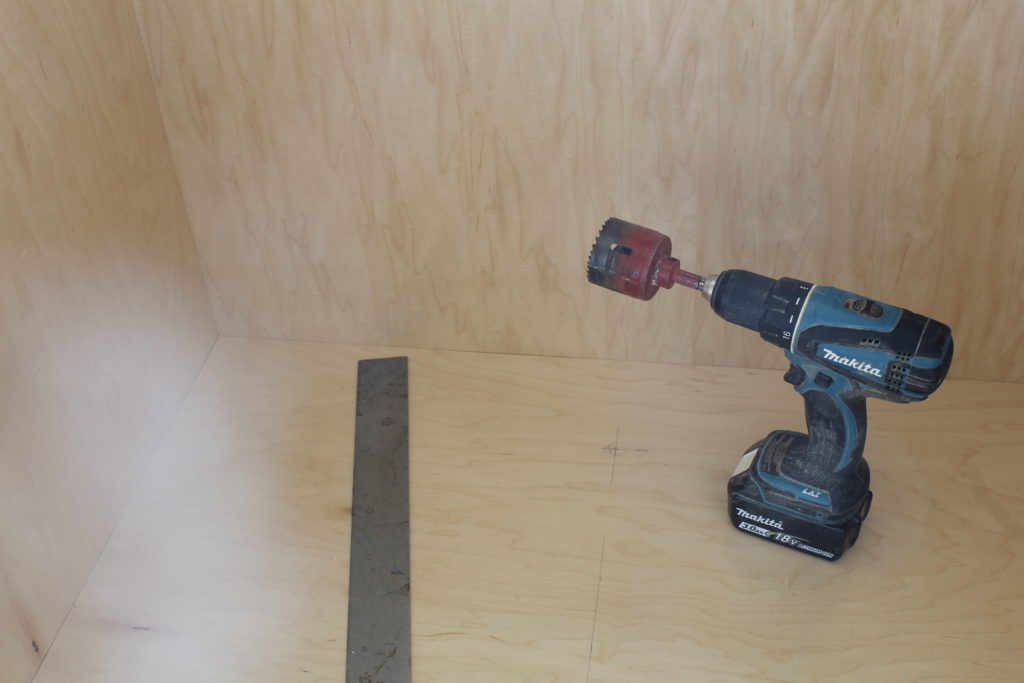
If you look closely you’ll see the spot where the long line intersects with the short horizontal line, marking the center of the hole for the drain pipe.
Next I marked the center line of the drain pipe in the cabinet’s depth (i.e., front to back), basing my calculations on the position where the front of the cabinet would land. (See Step 1.)
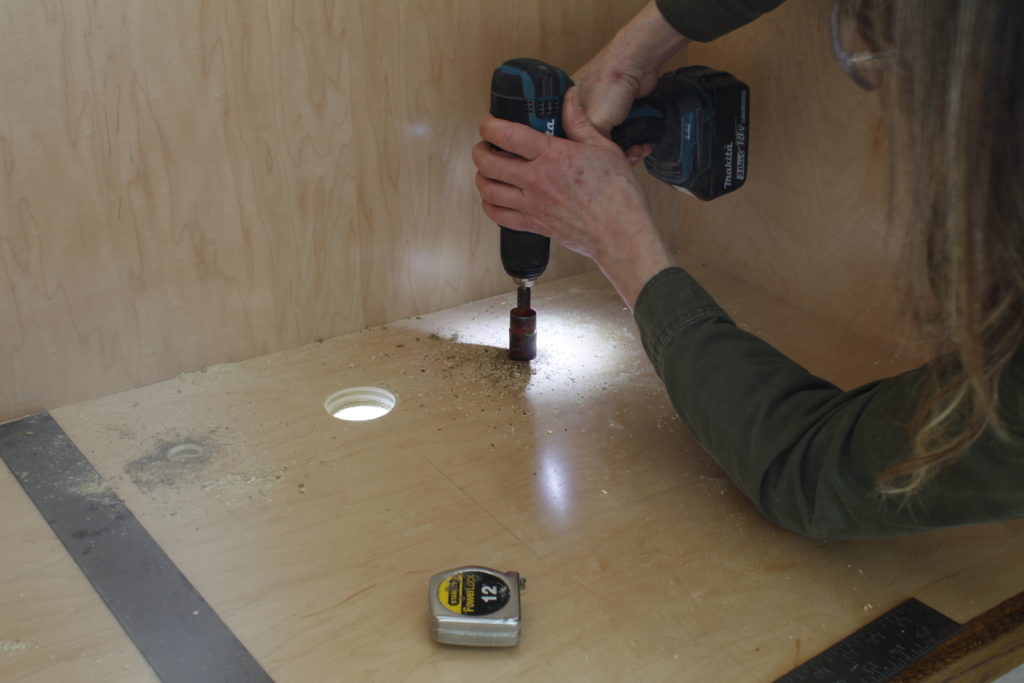
Chuck a hole saw in your drill. Pro tip: Put a scrap of plywood beneath the cabinet in case your drill bit goes a little too enthusiastically through the cabinet floor. (You don’t want to ask how I learned this “trick.”) The diameter of the hole should be slightly larger than that of the pipe. It’s best to avoid making the hole too large, as mice and other pests can squeeze through and gain entry to the cabinet’s interior.
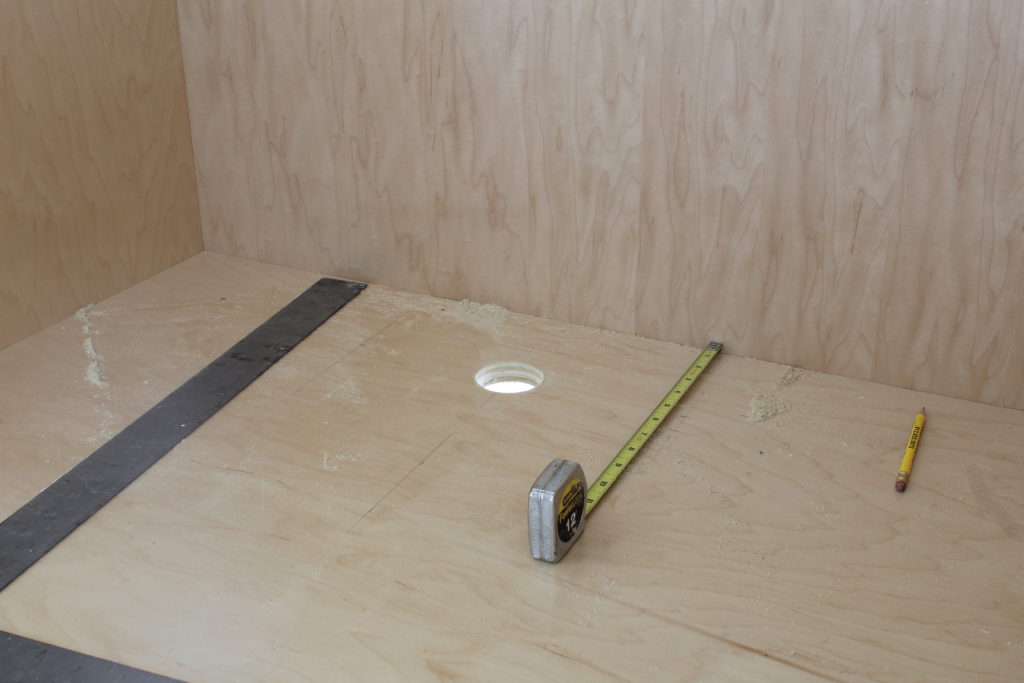
Next I measured from the center of the drain pipe to the center of the cold supply line and marked that spot on the cabinet floor. I repeated this step with the hot supply line, then drilled both holes, using a hole saw of the appropriate diameter.
Step 3: Set the sink base
My client and I lifted the sink base over the plumbing lines and asked the tile setter to come and guide the cabinet into place, since we couldn’t see over the top of the sides into the cabinet. (It’s important to avoid bending or hitting water supply lines, because they can break. It may sound obvious, but it ain’t necessarily so.)
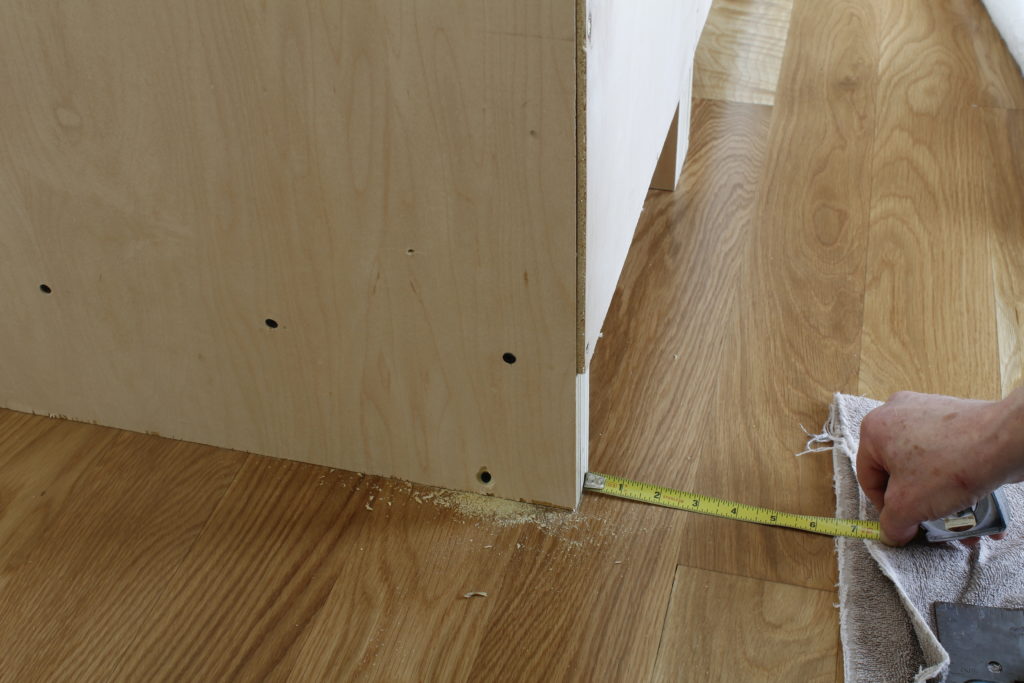
Once we had set the sink base over the pipes, I measured the distance from the cabinet’s back edge to the nearest floorboard joint, making sure the cabinet was parallel with the floor. Few things look worse than a cabinet that’s markedly out of alignment with the joints between floorboards or tile.
I drilled and countersank a couple of holes through each end of the base cabinet to attach it to the floor. The end visible above would be covered by the bookshelf unit. The other end would be hidden by the dishwasher.
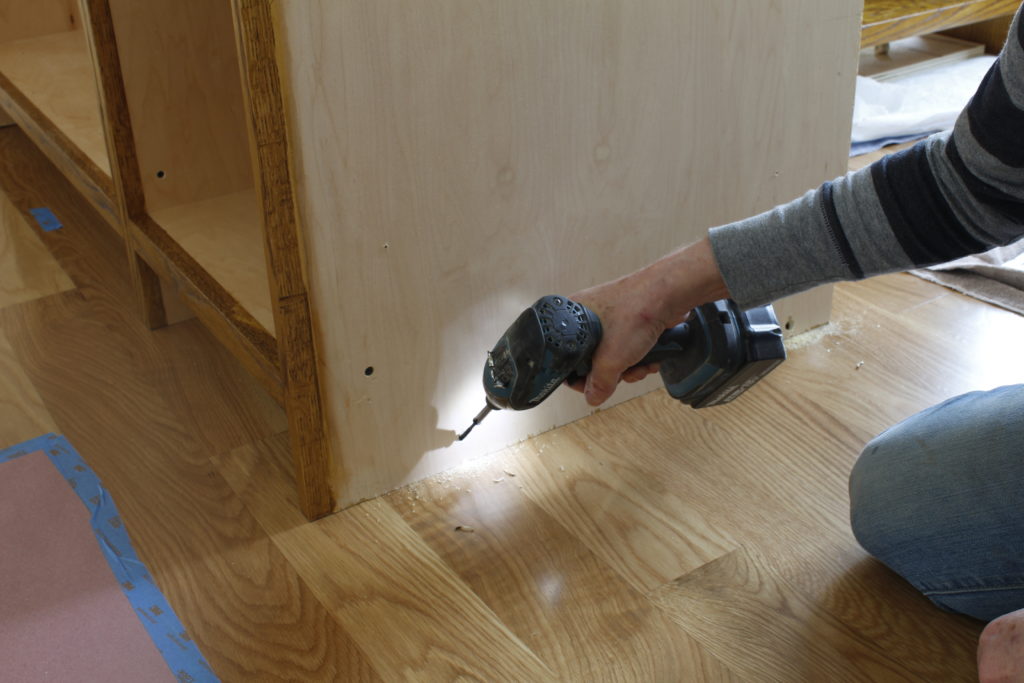
Step 4: Add the next cabinet(s)
Clamp adjacent cabinets in place to hold them securely while you drill and insert screws. Again, to keep the cost of this job as low as possible, I simply screwed through the back of the bookcase into the end of the sink base. As you can see below, I built the drawer base into the same unit as the sink, to conserve materials; the drawer base is between the sink and the bookcase.

To hide the joint between the sink base and the bookcase and mark the transition from the working part of the island to the more leisurely end that will be greet people coming in from the porch, I had milled a piece of simple rectangular trim. I cut it to length and fastened it with brads.
Step 5: Dishwasher panel
In an ideal world, there would be a wall or another cabinet to hide the dishwasher, but in this case I had planned to install a panel. I had added a piece of face frame material to the front edge of the panel to make it look like part of the island instead of an afterthought.
Measure the width of the dishwasher and mark it on the floor. In this case I measured 24″ from the protruding edge of the face frame, which created a cavity more like 24-1/2″ wide. (Obviously if you have protruding trim such as this and allow just 24″ between the panel and the sink base, the opening will be too small for the dishwasher to fit.)
To make the front of the dishwasher panel in line with the front of the sink base I measured from the nearest flooring joint to the front of each and marked the position on a piece of masking tape.
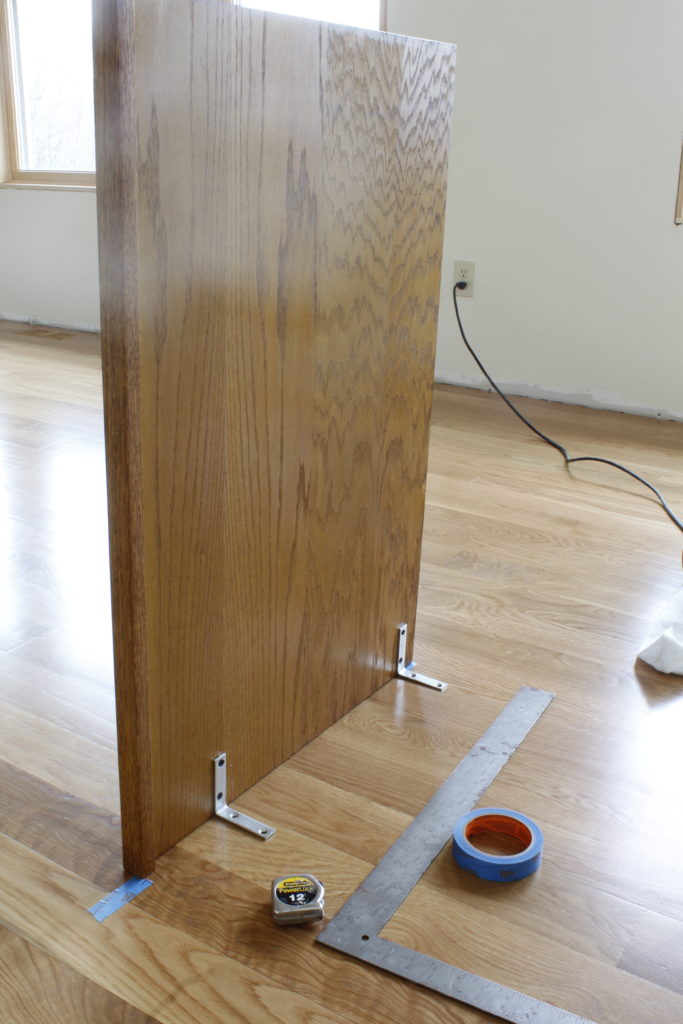
I used angle brackets to fasten the panel to the floor. Screw the brackets to the panel first, then to the floor.
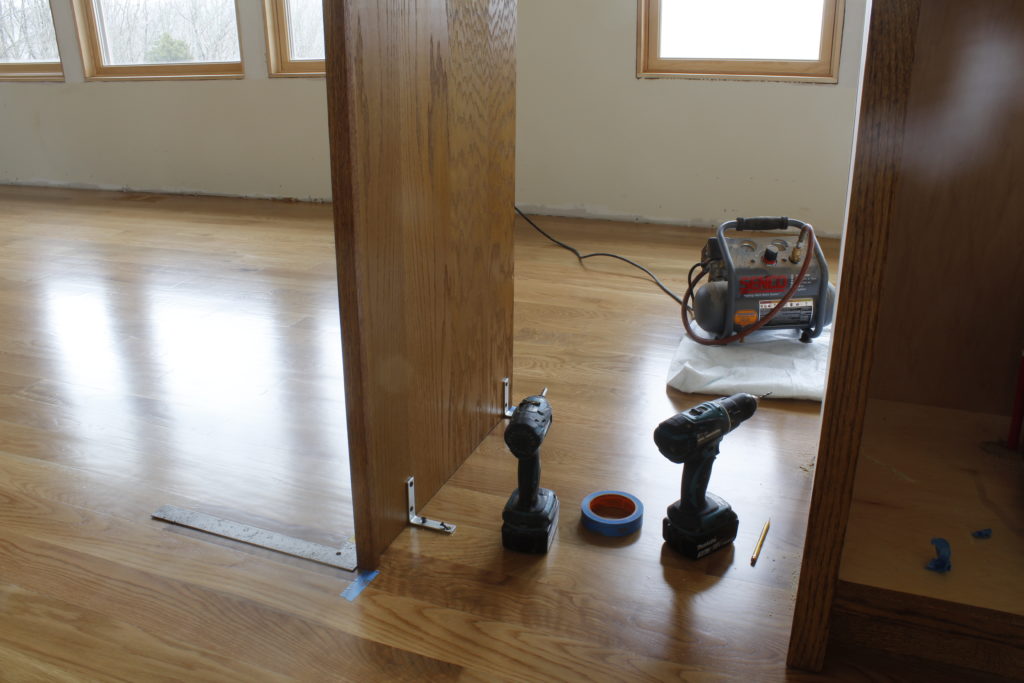
A framing square ensures that the dishwasher panel is square to the flooring.
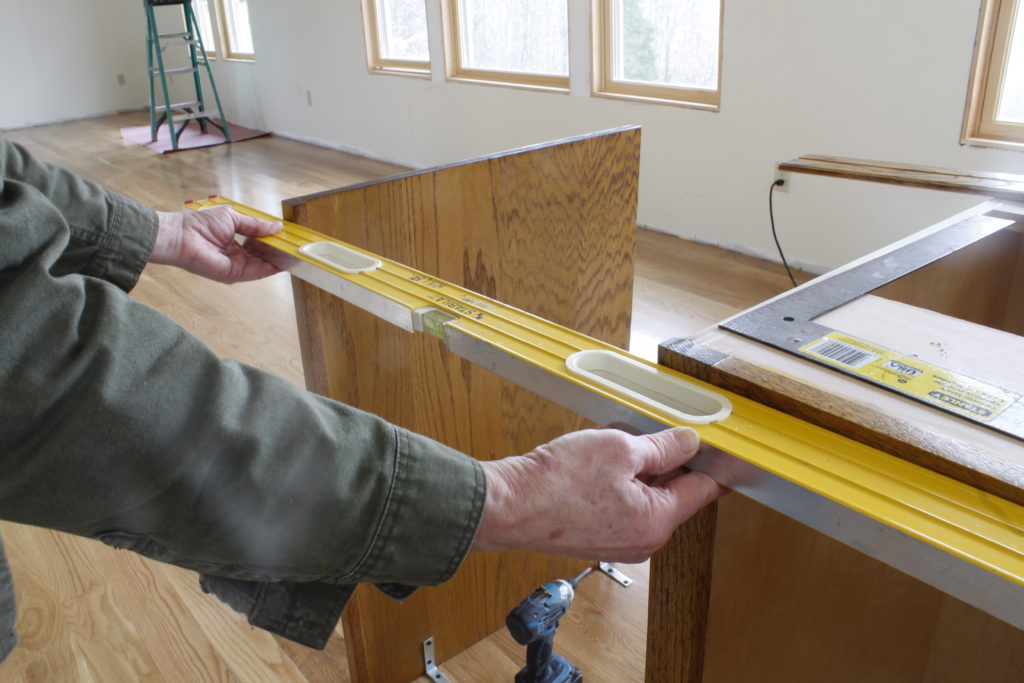
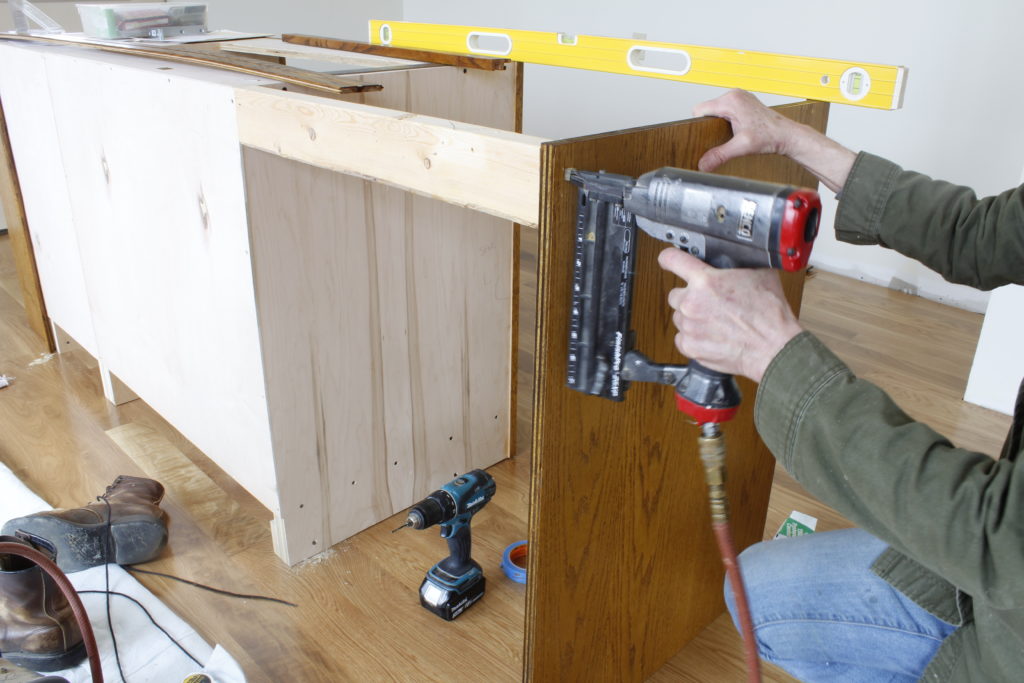
Use a long straight-edge to double check that a panel (or cabinet) is in line with the face of its neighbors. Here I used a 4′ level.
I measured the distance from the sink base to the dishwasher panel at the floor, NOT at the top of the panel, because I know from experience that corner brackets like these cannot be counted on to hold things square. To the contrary; they tend to pull things inward at less than 90 degrees.
I cut a piece of 2 x 4 to the measurement I had made at floor level, then wedged it into place at the upper back of the dishwasher cavity. To secure it temporarily, I shot in a couple of 2″ brads.
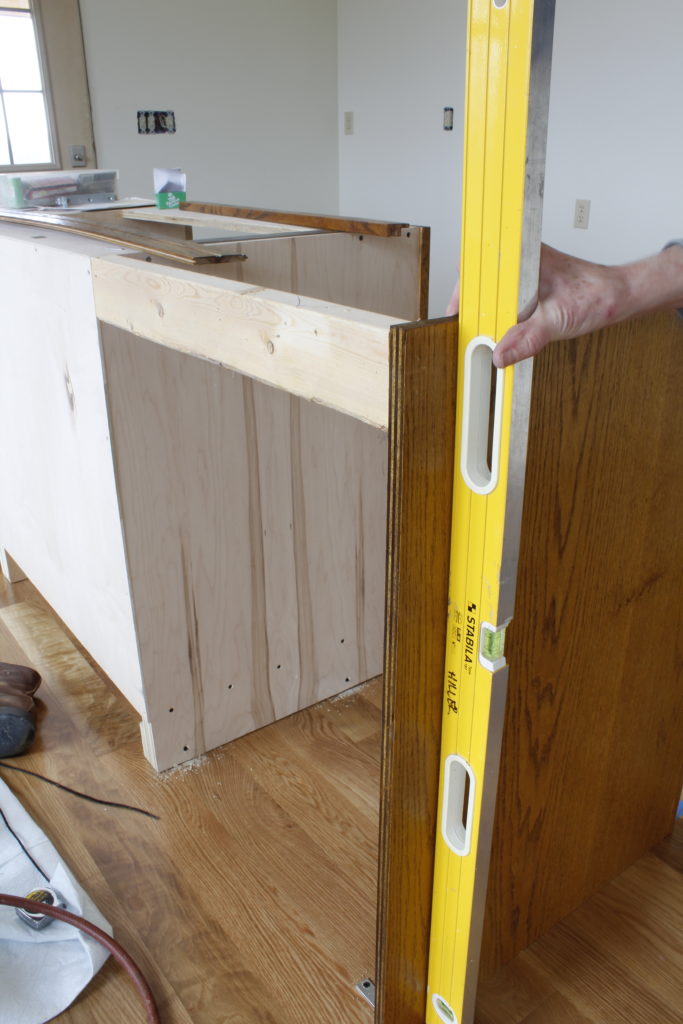
Double check that the panel is plumb.
Finally I drilled into the 2 x 4 spacer from the interior of the sink base and inserted a couple of screws.
Step 6: Finish materials tie the parts together
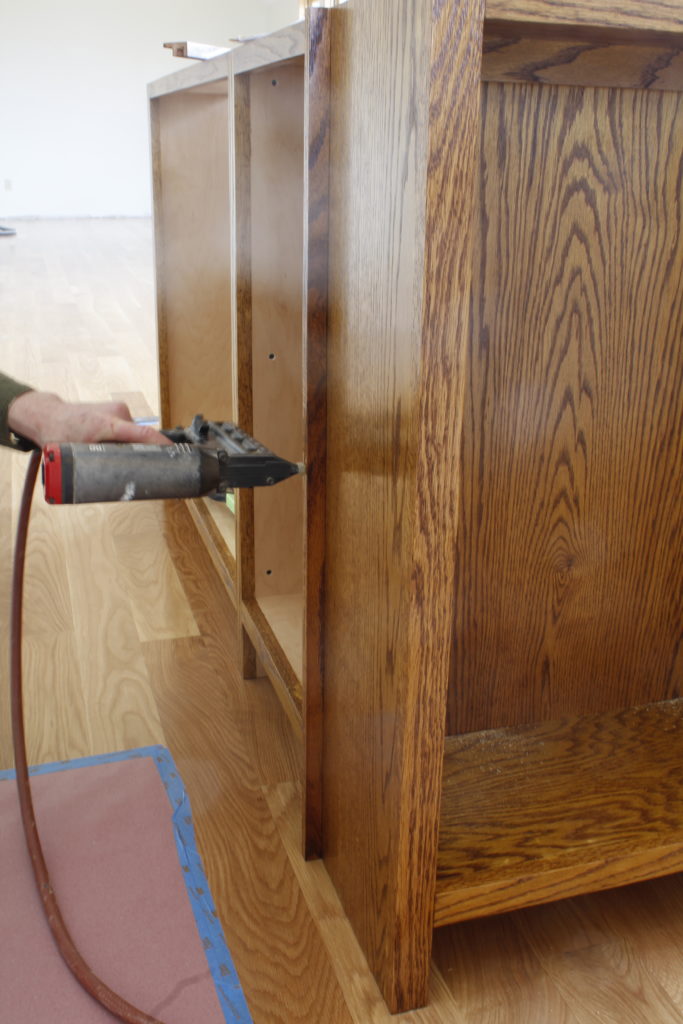
I had milled a couple of trim pieces to finish the ends of the beadboard. Each trim piece had a rabbet into which the beadboard would slide; this made for a neat finish, in addition to holding the beadboard tightly against the cabinets. (Remember, there was not a whole lot of solid meat to nail the beadboard onto in this case.)
I cut the first piece of end trim (at far left) to length and fixed it in place with 18-gauge brads. I set the end trim loosely in place at the other end so that I could measure for the length of the beadboard, then cut the beadboard for the back to length and simply laid one piece on top of another, fastening them in place with 22-gauge pins.
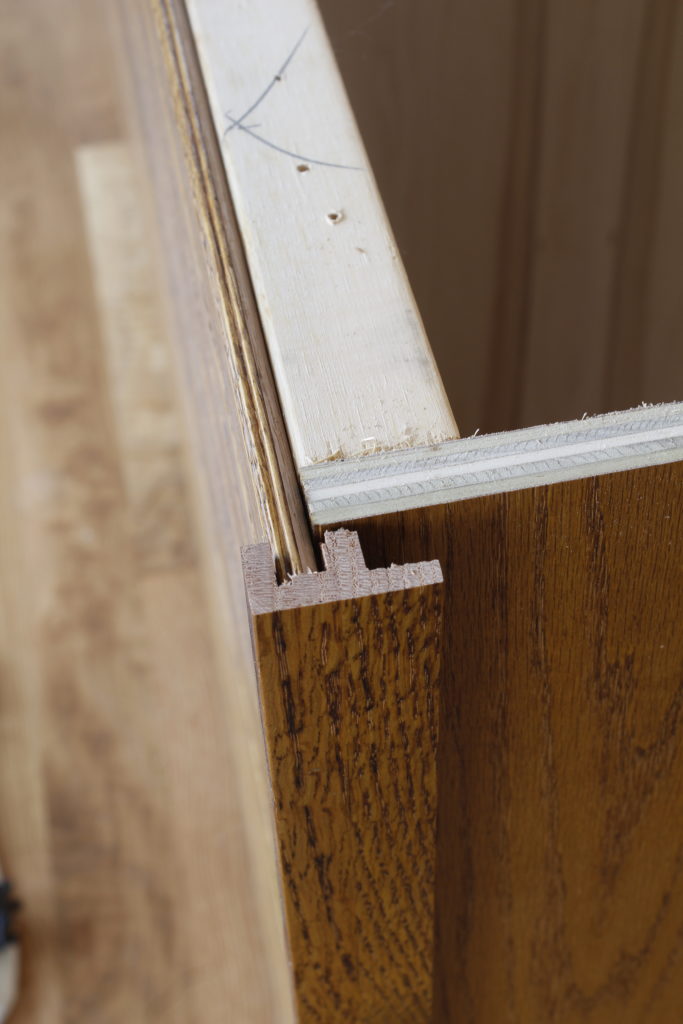
Rough and ready: The trim I made to hold the beadboard in place at the dishwasher panel end is rabbeted in one direction and grooved in the other, to hold both sections neatly. I cut the rabbets and groove on the table saw.
Next I cut the beadboard for the dishwasher end panel to length and set it in place. Another rabbeted piece of end trim would conceal the cut-off ends at the front of the dishwasher panel.
Step 7: Support brackets for the counter
My clients had asked the counter supplier whether additional support would be needed for the 12″ overhang at the back and dishwasher end of the island. Based on the supplier’s recommendation, I made up three very simple brackets that combine speed of assembly (remember: affordability!) with strength and reinforce the house’s overall architect-modern take on a barn aesthetic. A Domino tenon joins the vertical and horizontal parts at the rear; the angled brace is glued and held in place with #8 Twinthread screws. I centered the brackets on the beadboard section of the back, drilled through the cabinet backs into the brackets, and inserted #8 Twinthread screws, choosing the longest screws the bracket’s thickness would take.
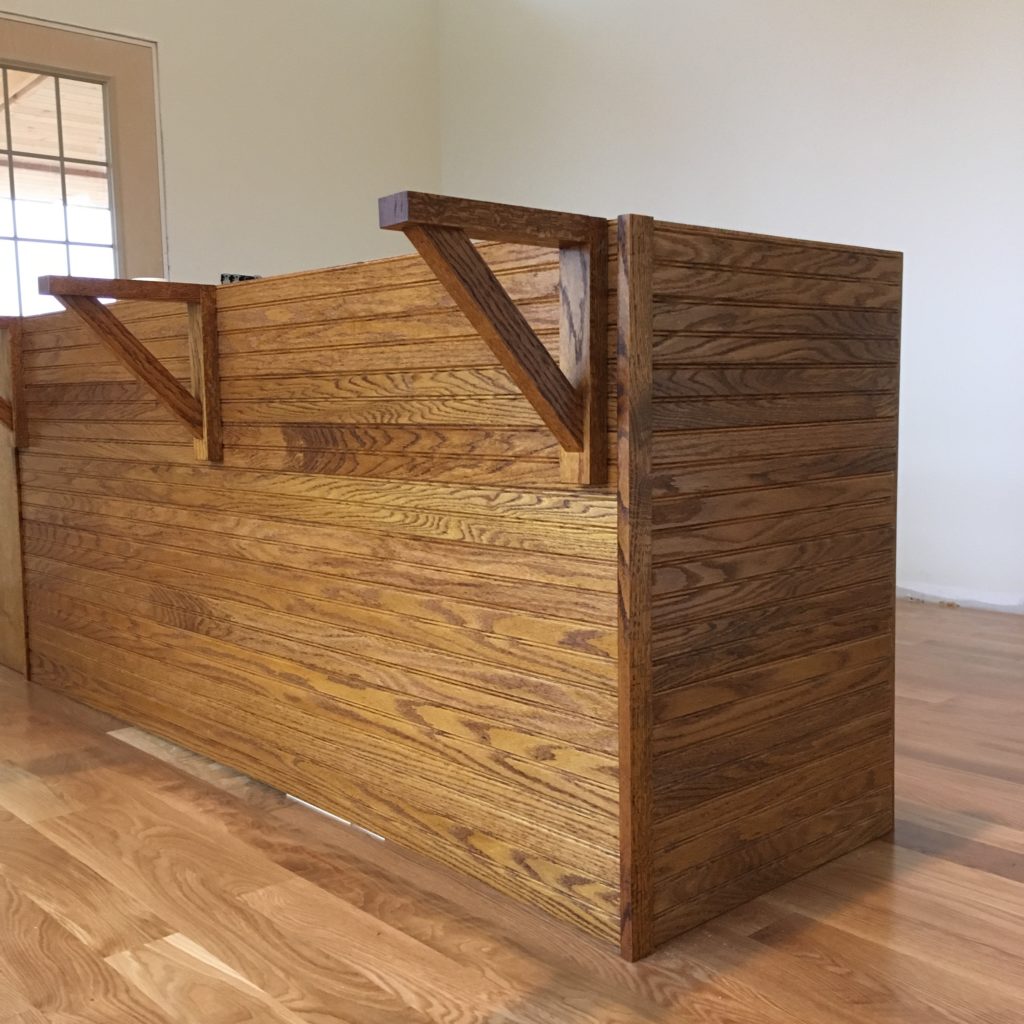
Almost there. Shims inserted to build out the back of the cabinetry at floor level so that the beadboard would lay flat are still visible here. Final touches will include simple rectangular trim at floor level to conceal these shims and give the beadboard a more finished look.
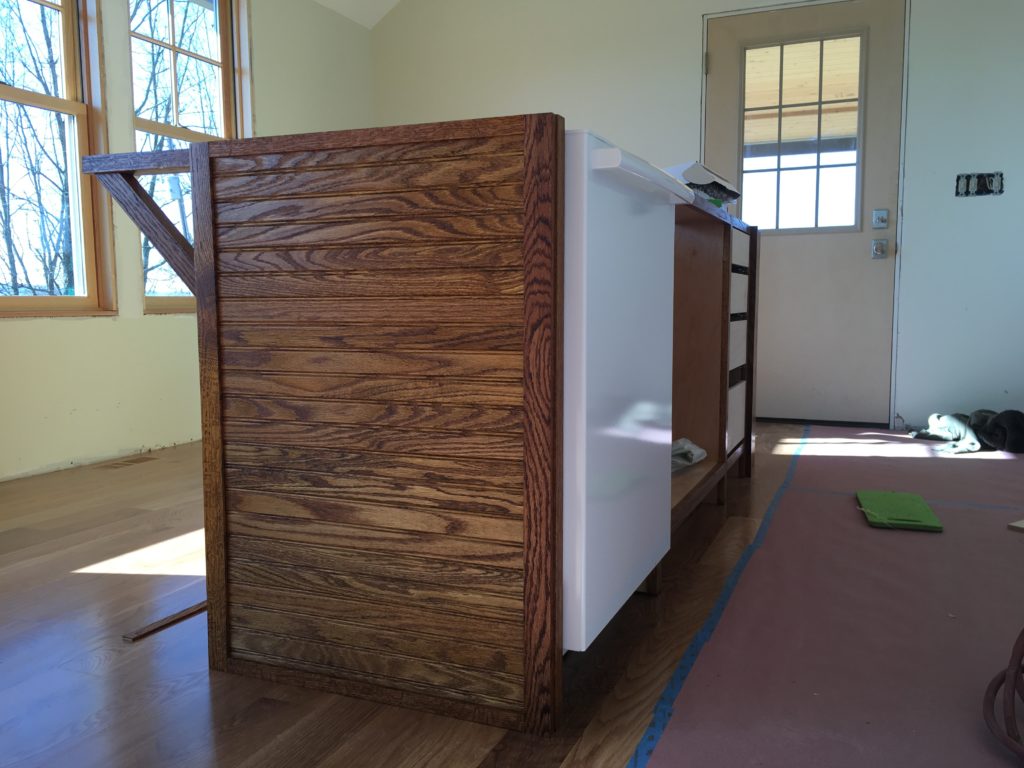
The dishwasher is set and the drawer boxes (made of 1/2″ Baltic birch with rabbeted and pinned joints instead of dovetails, for the sake of affordability) are in place.
Next up: The counter, which will be honed black granite, doors for the sink base, and drawer faces. This kitchen will be featured in the book I’m writing about kitchens for Lost Art Press.
Here are some supplies and tools we find essential in our everyday work around the shop. We may receive a commission from sales referred by our links; however, we have carefully selected these products for their usefulness and quality.