


We may receive a commission when you use our affiliate links. However, this does not impact our recommendations.

This handsome piece is simple to build and easily adapted to fit your stock.
A friend asked me to design and build a table using a special piece of walnut. I was given approximate measurements, but everything else was up to me.
I love the freedom these types of projects offer. While the table would be quite utilitarian, I knew it was going to be displayed as a piece of art, which meant very little clutter on its horizontal surfaces.
I wanted something slim, open and uplifting, nothing too heavy. The table would be visible from both the front and ends, so I decided to focus on the legs, which curve inward from the front and outward from the ends.
The shape “moves” as you travel around the table. This project is really an exercise in compound band-saw work with some exposed joinery for added interest.
As with most projects, I start with stock preparation. In this case, I focused on the legs and aprons first, setting aside material for the top and shelf. It is well worth the effort to find 12/4 rift-sawn material for the legs, which will offer the most consistent grain on all sides.
Choose the legs and aprons for the best appearance, then mark their orientations in the build, as directed in the top-left picture on the next page.
Leg Template & Drilling Jig

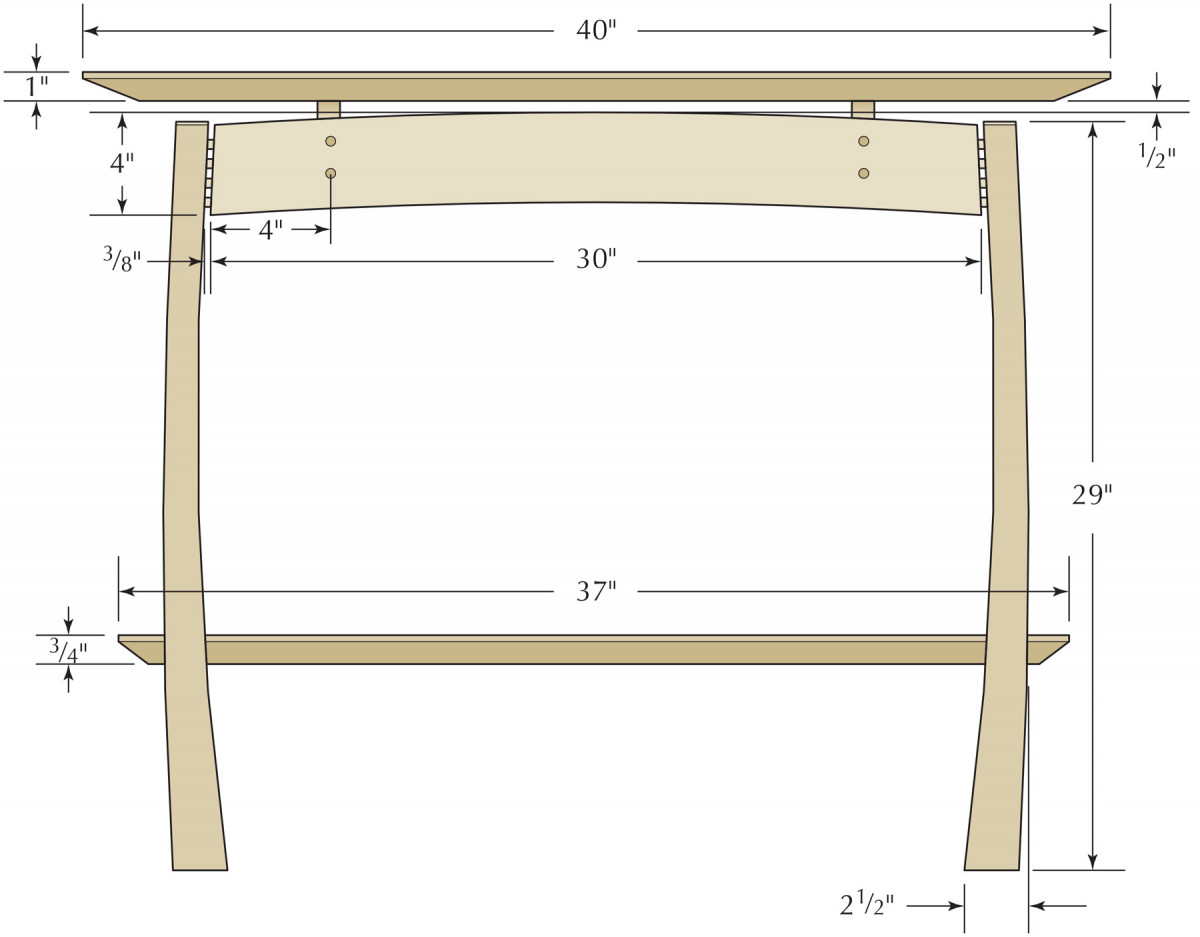
Legs & aprons. The FL, FR, BL and BR designate the Front Left, Front Right, Back Left and Back Right leg and apron positions. The Roman numerals I and II identify the leg-to-apron junction, as well as the drilling-jig orientation. The asterisk denotes the face of the leg that will eventually receive the shelf-support dowels.
 Make a leg template from 1⁄8” material. Trace the leg profile on the two inside faces of each of the four leg blanks. Keep in mind when selecting the best faces that the legs curve inward when viewed from the front and curve outward when viewed from the end.

Leg Pattern
Now that you know the relationship of legs to aprons, shift your attention to fabricating the drilling jig. The drilling jig establishes the location of the dowel joinery that will connect the legs to the aprons. If you’ve ever attempted doweling before, you know what an exacting process this needs to be. Making an accurate drilling jig, and, more importantly, maintaining correct orientation when in use, is key to proper dowel alignment between legs and aprons.
I used a scrap block of bubinga, but any dense hardwood that will withstand repeated drilling operations will suffice as the drilling guide. Cut your block 33⁄4” long, 11⁄2” wide and 2″ high. At the drill press, clamp a straightedge to the table 1″ back from the center of a 3⁄8” drill bit. Starting 3⁄4” in from either end of the block, drill four holes in a straight line down the length of the block spaced 3⁄4” apart on centers. It’s more important that the holes run in a straight line than be exactly spaced. During use, the jig will compensate for holes not drilled precisely 3⁄4” apart, as long as the jig is positioned the same for both the leg and mating apron.

Leg layout. Trace the leg pattern and drilling locations on the two inside faces of each leg blank to help set things up for successful joinery.
After drilling the block, attach an auxiliary fence (I used 1⁄2“-thick MDF, 33⁄4” wide and roughly 4″ long) to the side of the jig that was against the straightedge at the drill press. This maintains the 1″ offset. A little glue and some brads are all that are needed to secure the fence to the block.
The fence aids in accurately locating the jig on the legs and aprons, and provides a clamping surface during use.
With the drilling jig fabricated, I mark one end of it with “I” and the opposite end “II.” These Roman numerals correspond to the marks on the legs and apron to ensure proper jig orientation during the drilling process.
Drill for Dowels

Jigged up. The drilling jig imparts accuracy and repeatability as you drill 13⁄4″-deep 3⁄8″ holes in the legs and aprons.
Start by drilling the legs to receive the apron. Place the drilling jig in the proper orientation with the auxiliary fence on the inside of the leg and the top of the jig flush with the top of the leg. Clamp and drill all four holes to a depth of 13⁄4” using a 3⁄8” drill bit with a stop collar in order to achieve a consistent depth.
The process is repeated on the aprons with a few adjustments.
You need a 1⁄4“-thick spacer taped to the inside of the jig’s auxiliary fence to shift the hole location close to center on the apron.

Apron holes. Place a 1⁄4″-thick spacer between the fence and apron and align the jig with the bottom edge of the workpiece.
And this time, the bottom of the jig should be aligned flush with the bottom of the apron. This will result in the apron standing proud of the jig by 1⁄4” at the top. This establishes an offset between the top of the leg and the top of the apron. To maintain correct orientation, the jig’s auxiliary fence should be clamped to the outside of the apron. Clamp and drill all four holes to a depth of 13⁄4“.
The last bit of dowel joinery – the support for the shelf – can be accomplished at the drill press with a 3⁄4“-diameter bit. Mark the location off the leg template on the inside face adjacent to the apron holes. Drill 11⁄4“-deep 3⁄4“-diameter holes using a Forstner bit at the drill press.
Shape the Legs

Cut multiple curves. To cut curves on all four faces, the trick is to saw right at your layout lines.
With the leg joinery cut, it’s safe to proceed to the band saw to cut the square legs to their final curved shape. Because all four sides of each leg are curved, this operation requires cutting the profile from two adjacent faces of the leg, just as with a traditional cabriole.

Tape the offcuts back in place as you make the second cuts. This keeps the workpiece square and makes things safer and easier.
Make the first set of cuts with the dowel holes for the apron facing upward, just leaving the pencil line as you cut. Then tape the waste material back in place on the concave side of the leg and redraw the leg profile on the opposite convex side of the leg. (This should be the side with the 3⁄4” hole for the shelf support dowel.) Back at the band saw, make the remaining cuts.

Sander finesse. A slightly curved shim inserted between the platen and sanding belt on a small belt sander allows the machine to be used to fair gentle inside curves.
Clean up the band-sawn faces and fair all the curves down to the pencil lines. To fair curves on the inside/concave surfaces, I like to use a small belt sander I’ve modified by inserting a thin, slightly curved shim between the platen and sander body, creating a gentle outward curve on the sole of the sander.
I clean up the outside/convex leg surfaces on a stationary belt sander by continually rocking the legs over the belt.

For outside curves, I rock the legs on a stationary belt sander.
When you think you have all the faces complete, sight down the length of the leg at each corner. If you did a good job, you should see a crisp line down the length of each corner.
Further shaping can be done by rounding the corners down the length of the legs. You may choose, as I do, to have a smaller radius at the top and a larger radius at the bottom, say 1⁄8” and 3⁄8“, respectively. There is nothing scientific about this. Just sand, rasp, spokeshave or plane until you are happy with the look and feel of the legs. (Care should be taken not to encroach too much on the dowel locations.)
I also use a block plane to chamfer the tops of each leg, then carve in a texture in the chamfered areas using a small carving gouge.
Make the Aprons

Face first. Dry-fit the legs to the apron then transfer the leg’s curve to the apron.
Before shaping the aprons, there’s some joinery to wrap up while the material is flat and square.
First, cut two dados on the inside face of each apron to accept the cross-members that support and anchor the tabletop. These dados are located approximately 4″ in from the ends and are 7⁄8” wide x about 3⁄4” deep. I cut these with a dado stack at the table saw.

After cutting, reassemble the dry-fit and transfer the leg shape to the ends.
Now dry-fit the aprons to the legs to scribe some lines to the fitted apron so you can shape it to match the leg profile when viewed from the front and the ends.
To do this, I use four dowels sanded slightly undersized and long enough to yield a gap of 1⁄16” between the apron and leg at the tightest point when seated. Using a compass, transfer the shape of the leg to the face of the apron. Make certain that the dowels remain seated during this procedure, clamping if necessary. Separate the assembly, cut to the scribe line at the band saw and clean up the cut.
Now you need to angle the front of the apron. Dry-fit the apron-to-leg assembly as before, and scribe the ends of the apron to match the leg profile. You only need to scribe from the outside face of the leg to the ends of the apron.
Tilt the band saw table to closely match the angle of the scribe lines. Due to the band saw work and hand work already performed on the legs, you can expect some variations when setting the angle to the scribe lines. Go with an average and you can make adjustments later, if necessary.
Cut to the scribe line on the outside face of the apron. Now you can see the importance of the dado depth: too deep and it will break through the face; too shallow and you’ll begin to remove a portion of the dado on the inside face of the apron during the next shaping step.
Clean up the sawn face at the jointer or by hand with a plane. Pass the piece through the planer or drum sander at an angle, with the freshly dressed face down. Angling the apron during this process helps compensate for the dado voids so there’s constant pressure on the workpiece as it passes through the cutter/sanding head. Make continuous passes until the inside face is parallel to the outside face.
Test-fit once again and make adjustments as needed with a handplane. The goal is to have the apron face closely parallel with the leg profile and recessed by approximately 1⁄16” so the leg stands slightly proud of the apron. With the inside face, aim for similar results, but don’t fuss too much; it’s on the inside.
One final bit of apron shaping remains – the arch on the top and bottom to accentuate the floating top.
Lay out the curves (the arch rises 1⁄2” in the center at the top and bottom) with a drawing bow and make the cuts at the band saw with the table tilted at the same angle you cut the face of the apron; that ensures the edges will be in the same plane as the top.
Floating Table Cut List
No.ItemDimensions (inches)MaterialComments
t w l
❏ 2 Aprons 1 1⁄2 x 4 x 30 Maple
❏ 2 Cross-membes 7⁄8 x 4 1⁄4 x 8 1⁄4 Maple
❏ 4 Legs 2 1⁄2 x 2 1⁄2 x 29 Sapele Rift-sawn
❏1 Top 1 x 12 x 40 Walnut
❏ 1 Shelf 3⁄4 x 6 x 37 Walnut
❏ 2 Shelf supports 3⁄4 dia 2′ Walnut Cut to fit
❏ 16 3⁄8” dowel 3⁄8 dia 4′ Maple Cut to fit
❏ 8 Plugs 3⁄8 dia 1⁄4*Ebony
*Length is approximate; cut to length as needed.

Profile
Elevation
Fabricate the Cross-members

On edge. Tilt your band saw table to match as closely as possible the scribe line on the apron ends, then cut.
The distance between the front and back apron to this point is variable and ultimately determined by the cross-members that fit into the dados. The defining component here is the width of the top. In my case, the cross-members ended up 81⁄4” long, which yielded a overhang of roughly 1″ front and rear with a 12″-wide top. Your sizes may vary.
The cross-members stand slightly taller than the highest portion of the apron (about 1⁄2“), causing the top to “float” above the apron. They also serve as a means to attach the top to the base.

On a curve. A thin offcut makes an excellent bow for laying out curves.
After milling the pieces to size, you’ll drill a series of holes in the bottom edge of each cross-member. The cross-members will be secured in the dados with screws, but because end grain doesn’t offer adequate screw-holding power I also insert a “cross-dowel” to improve the screw joints.
These 1⁄2” holes are located approximately 1⁄2” from the ends of the cross-members, and should be about 3″ deep. Glue and insert 1⁄2” hardwood dowels.

Stepped holes. At the drill press, drill stepped holes to accept the screws that will attach the tabletop to the cross-members.
Adjacent to these cross-dowels, you’ll bore an oversized stepped hole, about 3″ deep, to accept the #10 x 2″ screws that will attach the top. The oversized hole allows movement for seasonal expansion and contraction cycles. Oversized pan-head screws (also called washer-head screws) come in handy here, spanning the gap created with the oversized stepped hole.
You also need to drill two 3⁄8” pilot holes along the centerline of each apron dado to secure the cross-members.

Profile transfer. Dry-fit the pieces then transfer the shape of the aprons to the end grain of the cross-members.
After drilling those pilots, chase them with a 3⁄8” Forstner bit to yield flat-bottomed holes to accept pan-head screws during assembly (I prefer pan-head screws because they don’t sink into the material). Drill just deep enough to accept the heads of the screws, plus the plugs to be installed that will cover them.
You’re ready shape the cross-members to match the profile of the aprons.
Dry-fit the entire apron assembly. Trace the profile of the apron top, and bottom, onto the end grain of the cross-members. Also transfer the apron screw locations to the cross-members so you can drill pilot holes.
The slight bevel on the bottom edge of the cross-members is easily cut at the table saw. The top side requires a little more effort. To accentuate the floating top, cut a curve at the top corners of the cross-members so they are not as visible. The band saw is a good choice for this operation. Be sure to tilt the table to match the scribe line from the apron. Leave your pencil line, then sand to it during clean-up.
With a thin shim taped to the table of my oscillating spindle sander, I clean up the cut, testing the fit as I go so as not to remove too much material. The shim creates the angle needed to match the scribe line.
Assembly Time

Angle-ease. A thin shim on the oscillating spindle sander’s table lifts the cross-member to the desired angle.
After a final sanding of all the workpieces, you’re ready for some assembly.
I start by applying a light coat of yellow glue to the end grain of the cross-members, waiting a minute then reapplying. (This “sizing” allows the end grain to absorb some glue for better end-grain adhesion so the joint is not starved.)

Screw & plug. After sizing the end grain and gluing the cross-member in its apron dado, add screws immediately; they act as clamps.
Now apply a thin coat of glue to the dado and position the cross-member, running screws in place to act as permanent clamps. I do one apron (two cross-members) at a time.

The screws are covered with ebony plugs.
With the screws in place, cut ebony plugs with a 3⁄8” plug cutter for the countersunk screw holes. Apply a little glue in the hole, tap in the plugs, saw off the excess and plane flush.
After the glue dries, if needed, attend to any final sanding and shaping of the cross-members to make a smooth transition into the apron.

Sand & flute. If your dowels are too snug for a press fit, chuck them in the drill press to sand.
Now direct your attention to the legs. First, you need to cut and fit dowels to connect the legs to the apron. The fit of these should be snug, but not so tight that you can’t insert and remove them by hand. The dowel length should be enough to yield a 1⁄4” to 3⁄8” gap between the leg and apron.
After cutting the dowels to length, sand them at the drill press for a precise fit. I also flute the first 5⁄8” or so down each end of the dowels using a fluting dowel plate. Fluting offers some additional bite and space for excess glue. And finally, I chamfer the ends of each dowel to ease assembly and offer a space for excess glue.

Then use a fluting plate to flute the first 5⁄8″ or so for a better glue grip.
Dry-fit and clamp the legs to the apron assembly.
Now measure for 3⁄4“-diameter dowels that run from the front legs to the back legs to support the lower shelf. This is easily accomplished by inserting two short sticks or dowels into the holes and marking a line across both pieces. Remove them, realign your mark, then measure the overall length. Repeat at the other end. If you discover discrepancies from end to end, take an average and cut to that measurement. Cut the dowels to length, then sand, flute and chamfer as before. A 3⁄4” dowel exceeds the capacity of my fluting plate, so I use a V-gouge to score/flute the ends.
Dry-fit the leg assembly one last time to make sure you’re happy with the joinery fit and that you are familiar with the assembly sequence.

Pin it. With round joints, consider adding a small pin to keep things from rotating. A bamboo skewer works well as a pin.
I start the gluing process with the lower shelf support dowels in the legs. Apply an even coat of glue to the hole and a very light coat to the fluted sections of the 3⁄4” dowels. Assemble and clamp, making sure the legs are parallel with one another and not spun or skewed around the dowel.
Dry-fit the legs to the apron assembly to help keep things in their proper places. (It’s easy for clamping pressure to toe the legs; the dry-fit overcomes this.)
This is also a good time to drill holes for and insert 1⁄8” bamboo pins to lock the shelf-support joints in place. The pins can be on the inside or outside of the leg, or can pass completely through the joint if desired.

Aligned. After driving the dowels, make sure they’re all the same height before proceeding.
To begin the leg-to-apron assembly, start by gluing four dowels into each leg. Squeeze-out is difficult to clean up here, so don’t get carried away with the glue. A good coat applied with a bamboo skewer to the inside of all the holes, along with a very light coat to the tip of the fluted portion of the dowels, is all that is needed.
Drive each dowel with a steel hammer until you hear and feel them bottom out.
Using a straightedge, make sure all four dowels in each leg are aligned perfectly even in height. If one or more is tall, you need to hammer it in farther or cut it to align it with the others. If they don’t match, your aprons won’t seat properly.
Now you’re ready to attach the legs to the aprons. Start by taping 1⁄8“-thick Baltic birch strips to the outside of each leg to protect them while clamping. And have a dead-blow mallet and clamps at the ready.
Dry-fit one leg to the apron assembly. Working quickly, glue all eight holes on the opposite end of the apron assembly in the same fashion as before. With the glue applied, tap the assembly together with the mallet. If the dowels don’t fully seat, pull the ends into final position with the clamps.
After the glue sets, repeat the process on the other end.
Get Horizontal

Safe cuts. A carriage safely supports the workpiece at the desired angle (in this case, 7°) as you make the cuts on the end grain.
The substructure is now complete, so it’s time to turn your attention to the tabletop and shelf.
For this table I dimensioned my friend’s claro walnut that was thick enough to re-saw and bookmatch for both the top and the shelf.
With your top cut to size, undercut the long edges at the table saw with the blade tilted to 40°. The ends are also cut at the table saw, using a shop-made carriage to safely support the top turned on end. The carriage is angled at 7°; the blade is at 90°.
After some sanding and easing of the corners, you’re ready to attach the top. With it upside down, center the base front to back and side to side. Mark the screw locations with a brad-point bit. Remove the base, drill the pilots and screw on the top.
The shelf will receive the same undercut treatment as the top, however, the width still needs to be determined. Due to variations in band-saw work and hand shaping, some measurement discrepancies should be expected, so use an average.

Furrow. A core-cox bit at the router table cuts a curved recess in the bottom of the shelf for the shelf-support dowels.
Measure the distance between the legs just above the lower shelf-support dowel on both ends. From this measurement, subtract 3⁄8” to allow for a small gap between the shelf and leg. This is the final width for the shelf.
After cutting the shelf to size, center it on top of the supports and mark the location of the dowels on the underside of the lower shelf. With a 3⁄8“-radius core-box bit at the router table, rout a cove on the underside of the lower shelf to receive the support dowels.
Finally, drill two slightly countersunk holes from the underside of each shelf-support dowel, drill pilot holes in the shelf, then screw it in place.
Now inspect the project and do any final sanding by hand, making sure to clean up any glue squeeze-out so it doesn’t interfere with your finish.
For this finish on this piece I used an equal mixture of urethane, tung oil and mineral spirits.
Flood the surface and wipe off all excess after allowing the varnish to soak in for a few minutes. After the first coat has been allowed to dry for a couple of days, sand lightly with #400-grit stearated sandpaper and repeat the process.
I typically apply two to three coats of the varnish followed by a light coat of full-strength urethane.
Once the finish is complete and dry, screw the top and shelf in place, and you’re done.
Plan: Download the free SketchUp model for the floating table.
Brian is a Colorado-based professional furniture maker who specializes in custom work with an Asian flair. You can see more of his work at brianhubel.com.
Here are some supplies and tools we find essential in our everyday work around the shop. We may receive a commission from sales referred by our links; however, we have carefully selected these products for their usefulness and quality.


