We may receive a commission when you use our affiliate links. However, this does not impact our recommendations.

Once you understand ‘resultant’ angles, sawbenches (and chairs) are easy.
Most first-time chairmakers are intimidated by the compound joinery used to fasten all the legs, stretchers, spindles and arms. The truth is, it can be quite complicated if you try to figure out everything using trigonometry. But if you take some lessons from other chairmakers (like I did more than 10 years ago), there are easy ways to design and build chairs without math.
So put away the scientific calculator and fetch some scrap pine, 12-gauge steel wire from the home center and needlenose pliers. We’re going to design and build a simple sawbench with five pieces of wood and compound angles.
What is Rake, Splay & ‘Resultant Angle?’
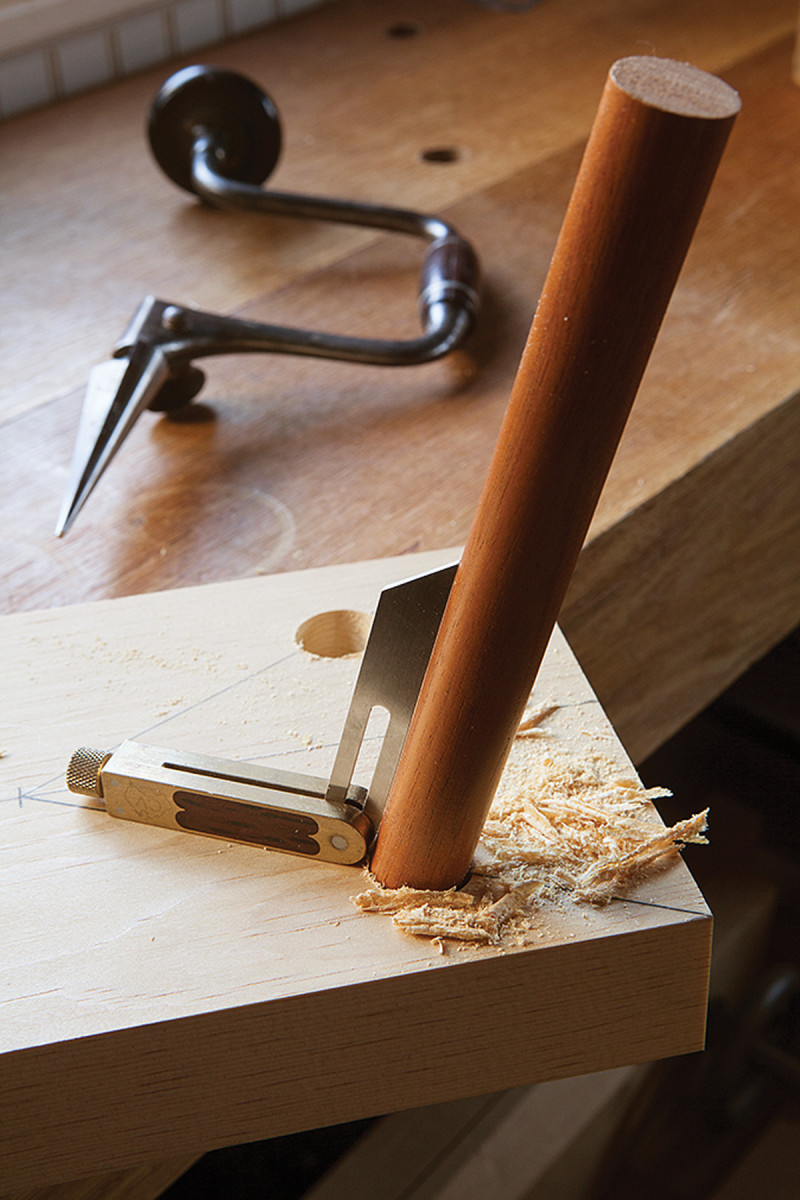
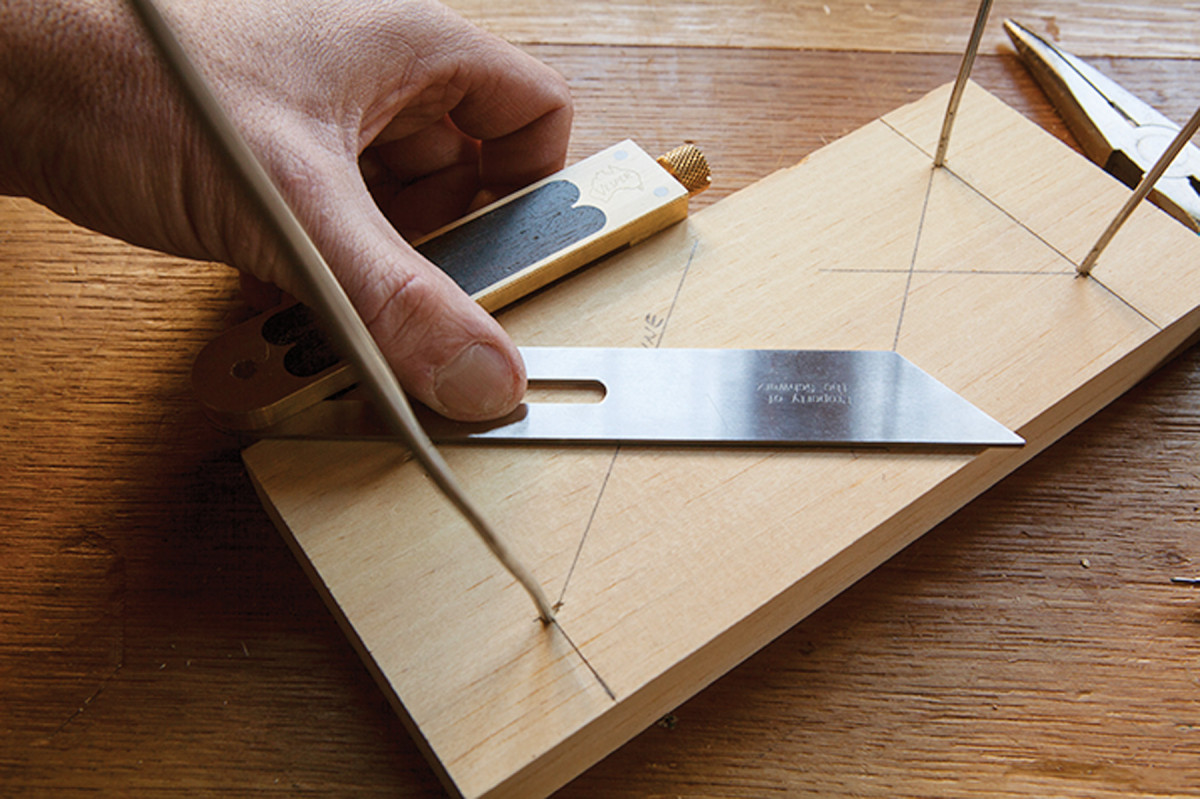
One angle. The bevel gauge is set to 15° and has been placed on the sightline on the underside of this sawbench. This “resultant” angle allows you to drill the holes for your legs with one line and one setting of your bevel gauge.
When chairmakers talk about the angles of chair parts, they use the terms “rake” and “splay” to describe them. Rake is the angle of the legs when you look at the chair from the side. The front legs rake forward; the rear legs rake back. Splay is the angle of the legs when you look at the chair from the front. Chair legs splay out.
I don’t mess around with describing or measuring rake and splay much, except to explain it to other builders.
Instead, I use what is called the “resultant angle” – one angle that describes both the rake and splay. You can calculate this angle with trigonometry, but there is a simpler way to think about compound leg angles for those who consider mathematics a cruel master.

Leg layout. Here I’ve laid out the leg locations in this half-scale model of my sawbench.
The resultant angle is not measured from the front or side of a chair. Instead of looking at a chair from the front or side, you look at the chair from a position in space where the leg doesn’t appear angled at all.
If I’ve lost you, try this: Sit on the floor with a chair in front of you. Rotate the chair until the leg closest to you looks to be perfectly 90°. Imagine that one of your eyes has a laser in it and can shoot a line through the leg and onto the seat. That laser line is what chairmakers call a “sightline” – an imaginary line through the leg and onto the seat. Put a single bevel gauge on that imaginary line and you can position a leg in space with a single setting on a bevel gauge that is placed on your sightline.
Most plans for Windsor chairs include instructions for laying out the sightlines and the resultant angles for setting your bevel gauge. But what if you want to design your own chair? Or you want to build a table, desk or footstool using the same joinery?
Build a Model
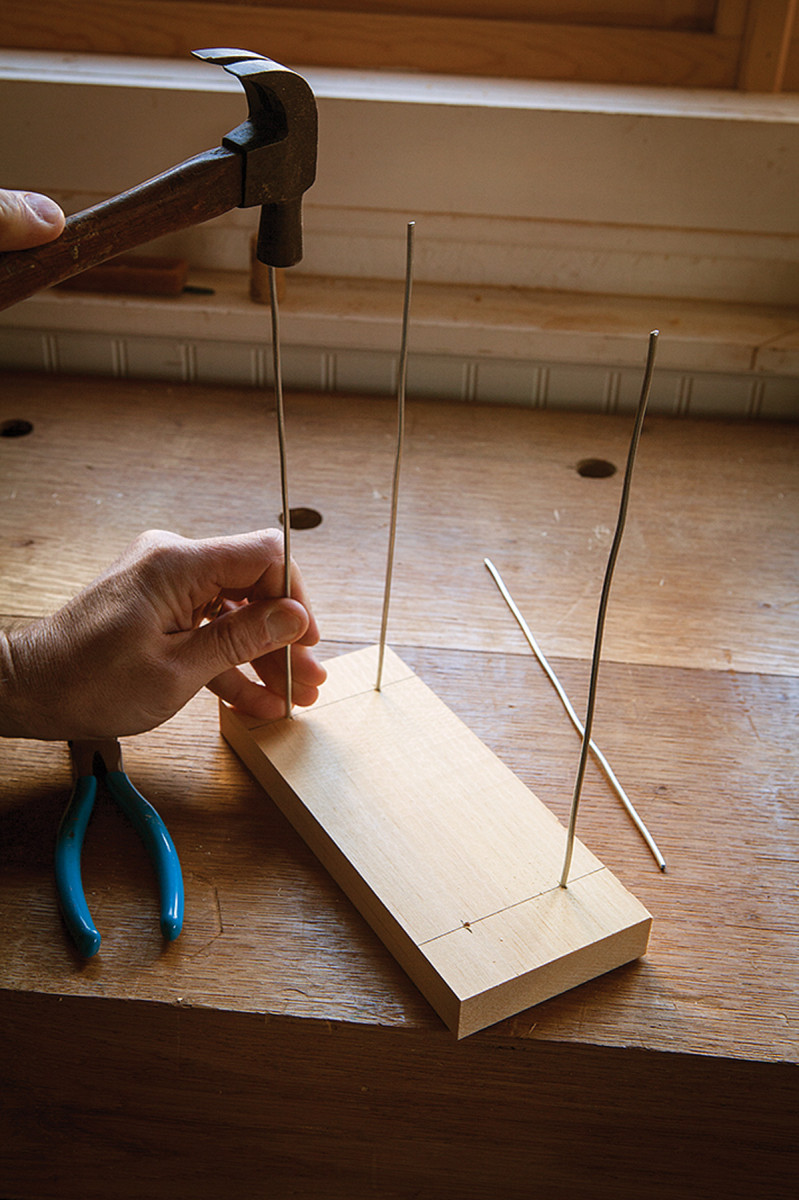
Guided by wire. The wire should be straight and strong enough that you can tap it into its hole on the underside of the model.
When I design a chair, I make a simple half-scale model using scrap wood and bendable wire. This method helps me visualize how the parts will look when I walk around the chair. The model also gives me all my resultant angles and sightlines without a single math equation.
I first learned this technique from Drew Langsner’s “The Chairmaker’s Workshop,” a fantastic book. I then adapted his method to remove all math. Let’s use it to design a sawbench.
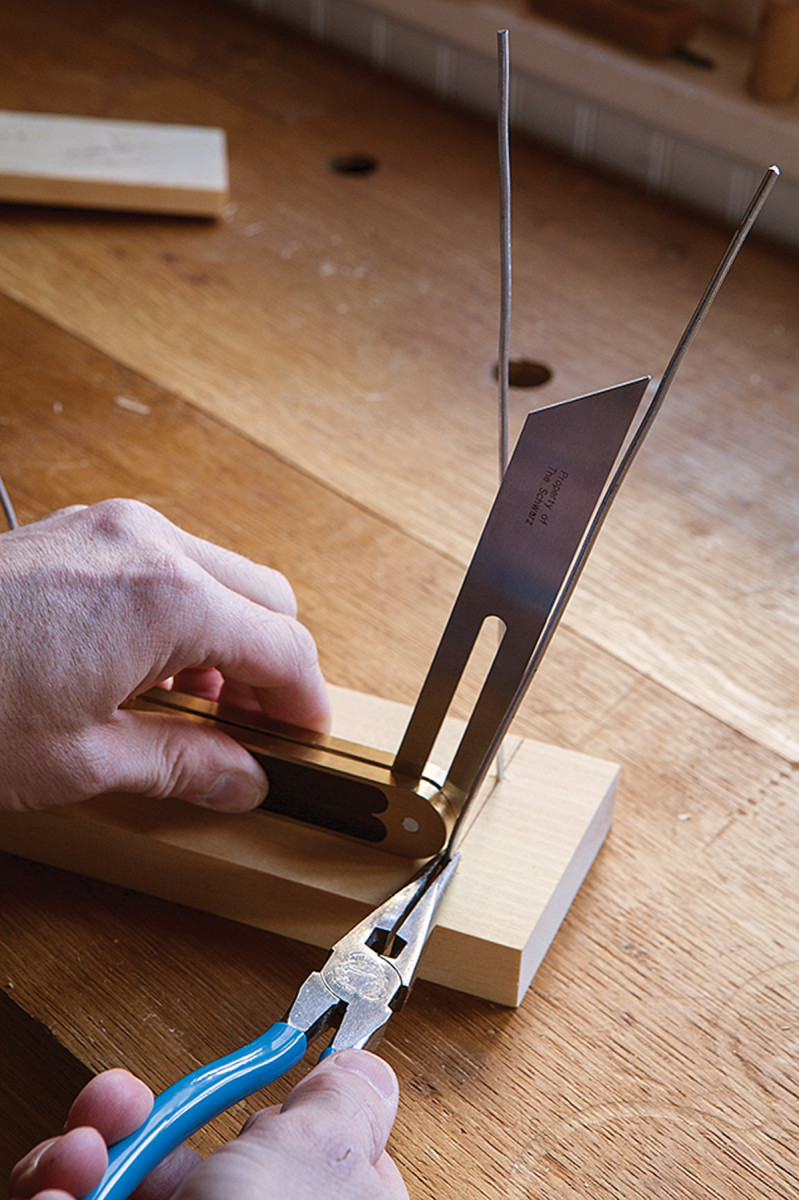
Make the rake. Use the pliers at the base of the legs to bend them to 14° to match your bevel gauge.
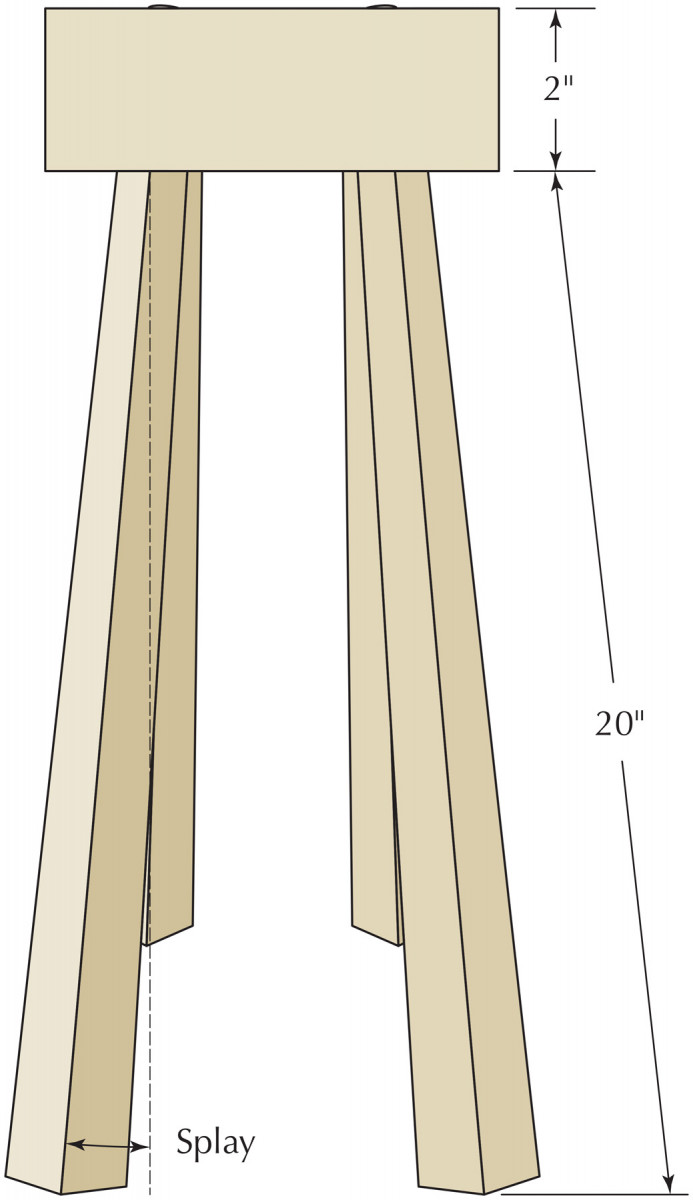
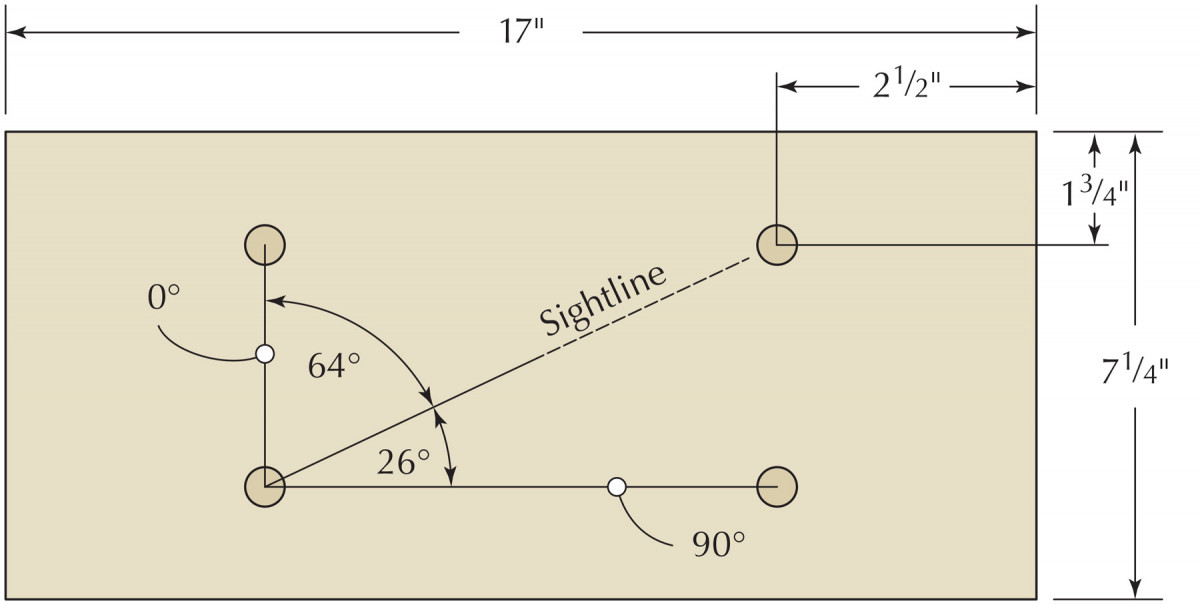
Take a piece of 3⁄4” pine and cut it to half the size of the finished sawbench. The finished top will be 2″ x 71⁄4” x 17″, so make your model 3⁄4” x 35⁄8” x 81⁄2“. Next, decide where you want the legs and lay out their locations on the model. Each leg is located 21⁄2” from the end of the model and 13⁄4” from the edge. A lot of this is “by eye” so don’t worry about it too much.
Now snip four pieces of 12-gauge wire to 10″ long. (Note: You can also use wire coat hangers.) This wire will represent the legs of the sawbench. Drill a 5⁄32” through-hole for each “leg” on your model and epoxy the wire into the hole.
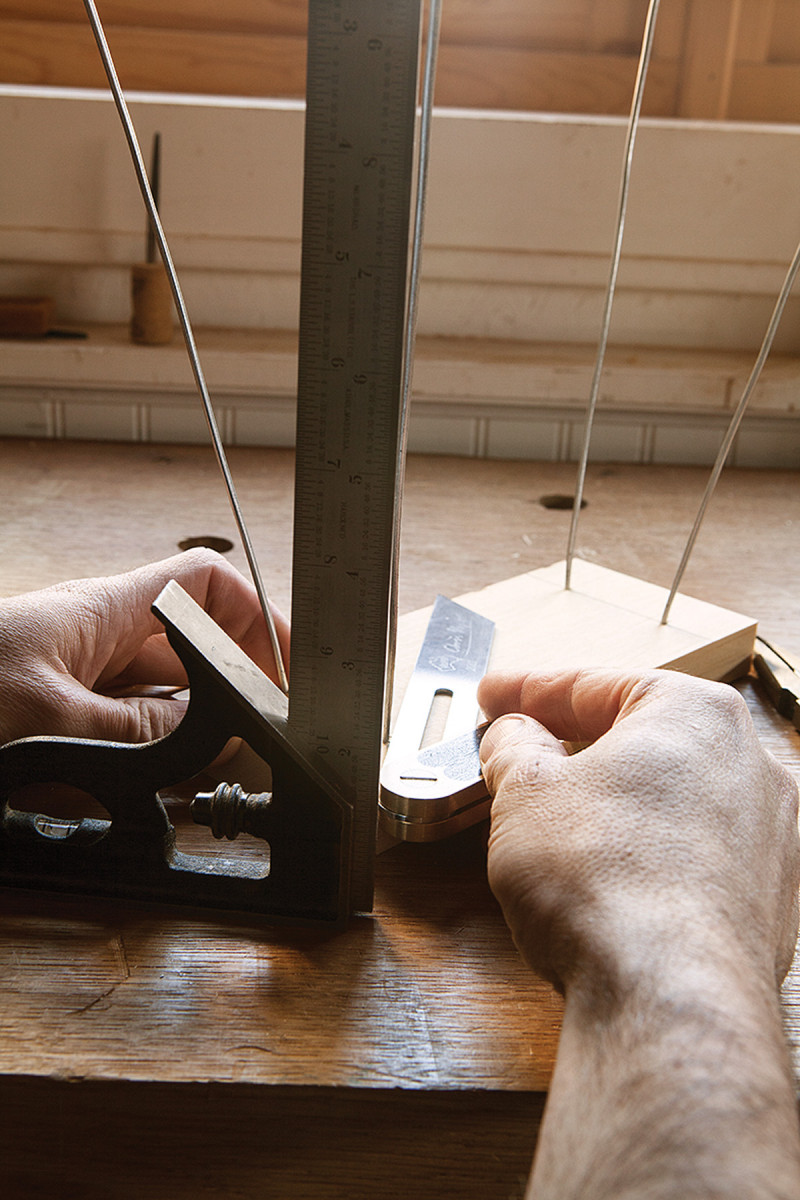
When the tools align. Rotate the sawbench model until the leg looks vertical compared to your try square. Adjust the bevel gauge until its blade aligns with the leg and square. Hold your head still and you will be surprised by how accurate this is.
Now comes the fun part. Set your bevel gauge to 7° using a plastic protractor. Look at the model directly from the end of the board. Let’s call this the front of the sawbench. Use needlenose pliers to bend the wire legs so they all splay out 7° from the top. Try not to manipulate the rake.
When they all match your bevel gauge, change the setting of the bevel gauge to 14°. This will be the rake. Look at the sawbench directly from its side and use your pliers to bend the legs to 14°. You might have to tweak things a bit so all the legs look the same.
Turn the model on its feet and look at the result. You will be surprised by how easy it is to spot angles that look wrong. Adjust the wires until they all look the same and the sawbench looks stable.
Find the Sightline & Resultant Angle
See the sightline. Use your bevel gauge to draw in your sightlines on the underside of the model. You are almost done.
Turn the model back over. Place a try square on the bench with the blade pointing to the ceiling. Rotate the model until one of the legs appears to be 90° in relation to the square. Place the stock of your bevel gauge against the long edge of the model and push the blade of the bevel gauge until it appears to line up with both the leg and blade of your try square. (Hold your head still.)
 Lock the bevel gauge. This is your sightline. Place the bevel gauge on the underside of the model. Butt it against one of the legs and draw a line. You have found the sightline (by the way, it’s about 64°).
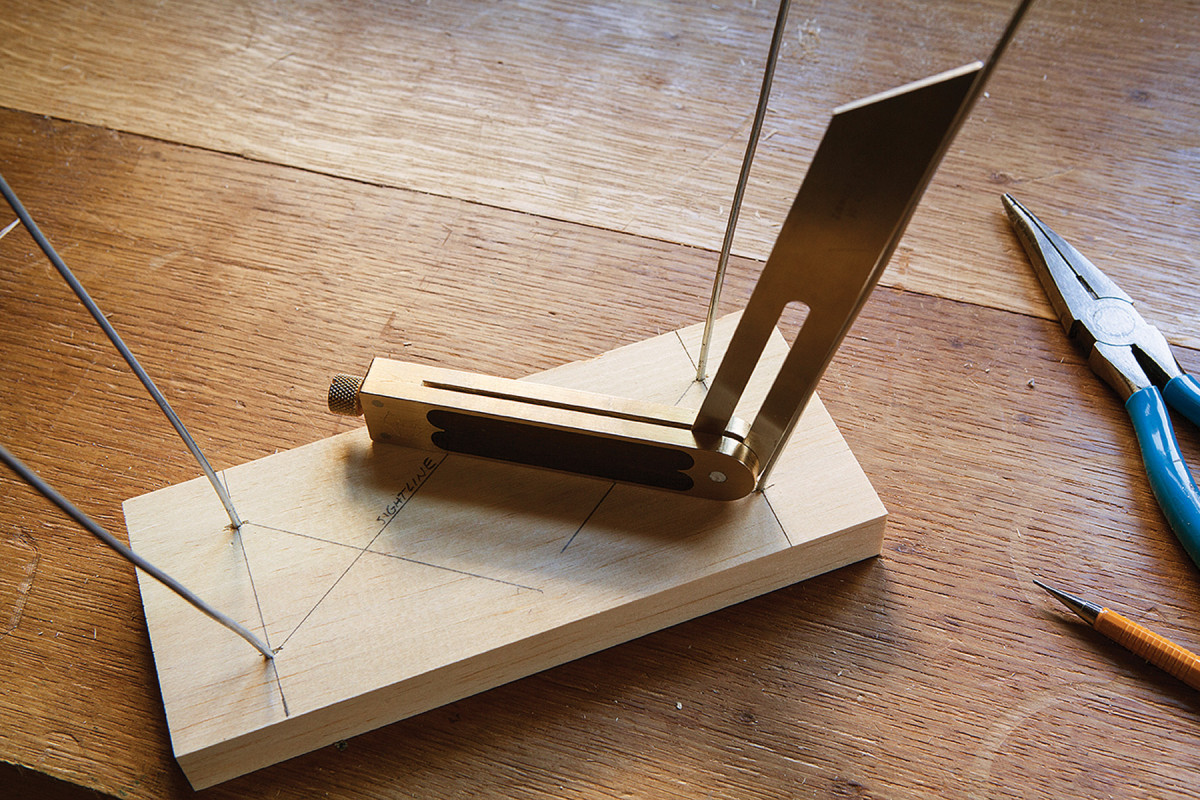
The result. You just found the resultant angle. Paired with the sightline, you can build these sawbenches with great ease.
Now find the resultant angle. Unlock the bevel gauge and place the tool’s stock on the sightline. Lean the blade until it matches the angle of the leg. Lock the gauge. That is your resultant angle – it should be about 15°.
Build the Sawbench
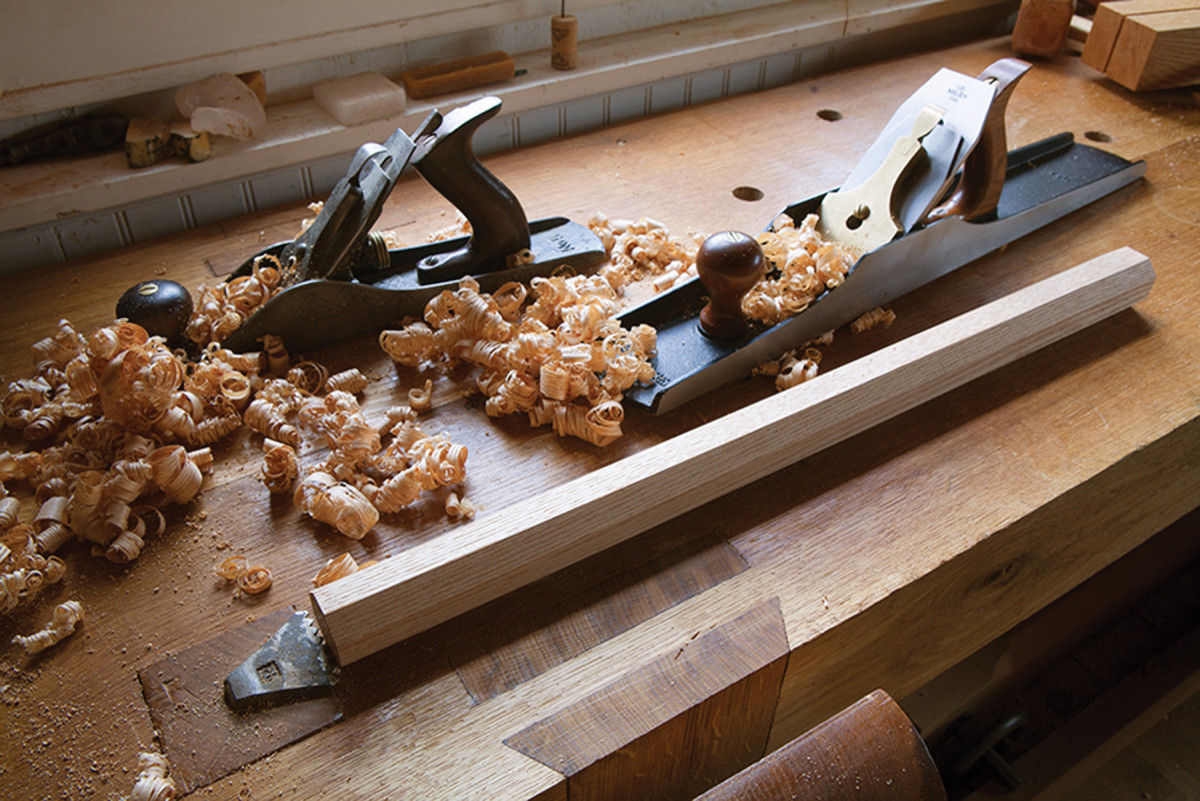
Taper the legs. You don’t have to taper the legs, but they sure look a lot less like broom handles when you do. I taper legs with jack and jointer planes.
Building this quickie sawbench in a day will cement these concepts in your brain and give you a great workshop accessory. It also will introduce you to the basic ideas behind Windsor chair joinery.
I used pine for the top and oak for the legs. You can use other species, but I recommend a soft species for the top and a hard species for the legs. The top is 2″ x 71⁄4” x 17″. Cut the four legs to 13⁄4” x 13⁄4” x 22″ and make them into octagons, either with a plane or your table saw. Taper the legs so they are 11⁄4” square at their tops.
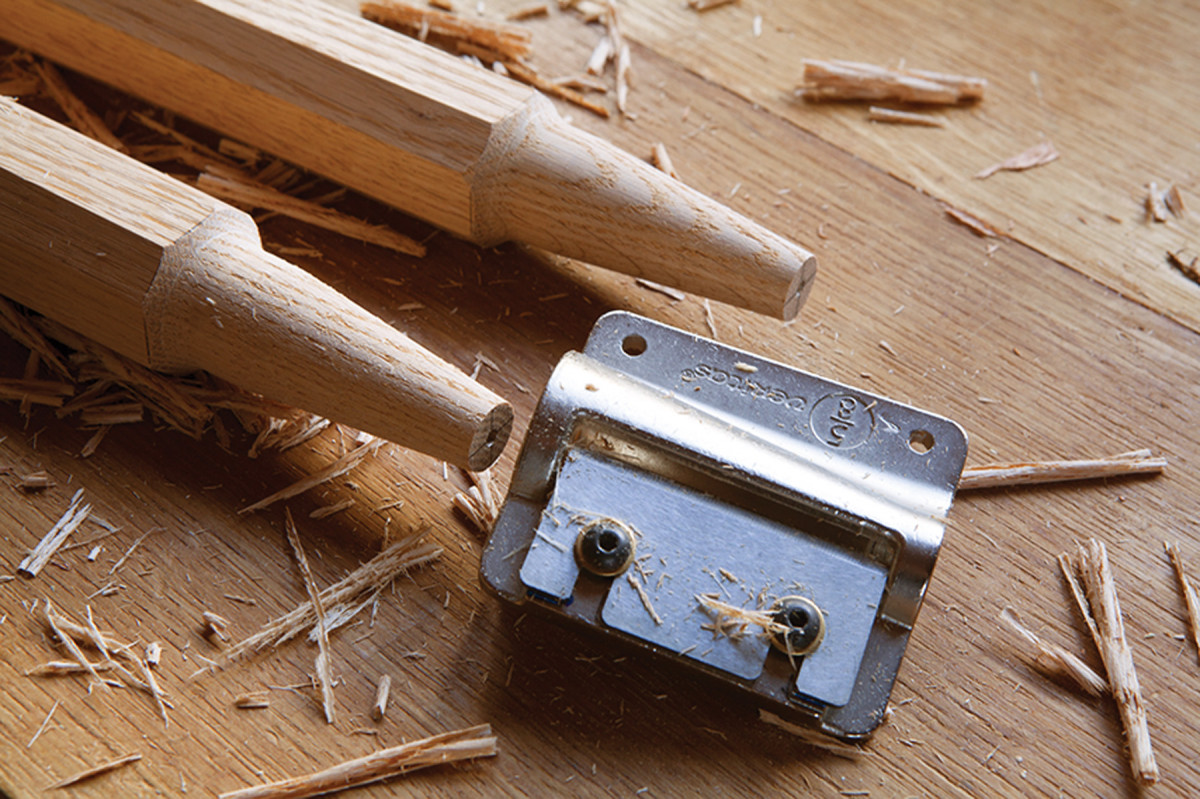
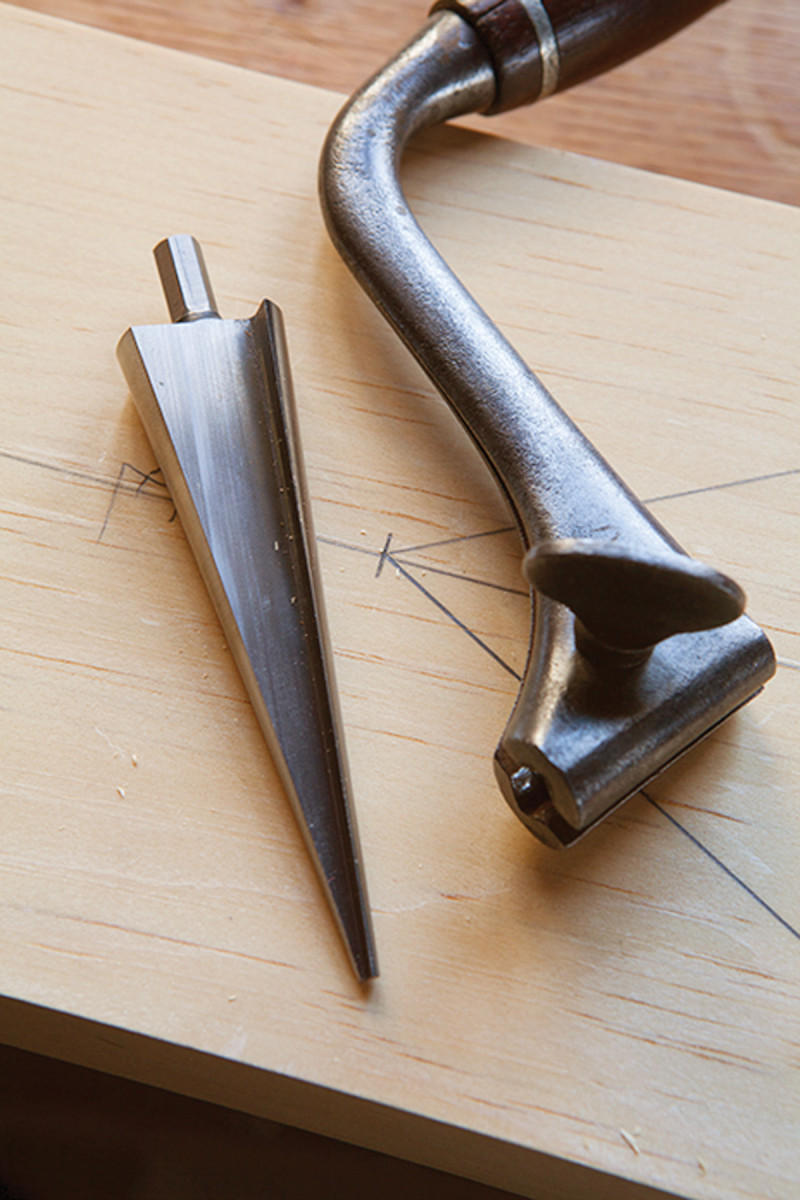
Shave those tenons. A tapered tenon cutter makes this joint as easy as sharpening a (very large) pencil.
Now form the tenons on the tops of the legs. Rough in the tenon using a drawknife, or you can do this on the lathe. Each tenon should be 27⁄8” long, 11⁄8” in diameter at its base and taper to a little more than 5⁄8” diameter at the tip.
Now finish the shape with a 5⁄8” tapered tenon cutter. This inexpensive tool is available from Lee Valley Tools and works like a pencil sharpener.
Windsor Sawbench Cut List
No.ItemDimensions (inches)Material
t w l
❏ 1 Top 2 71⁄4 17 Pine
❏ 4 Legs 13⁄4 13⁄4 22 Oak

Side
Front
Top – underside layout
Make the Top
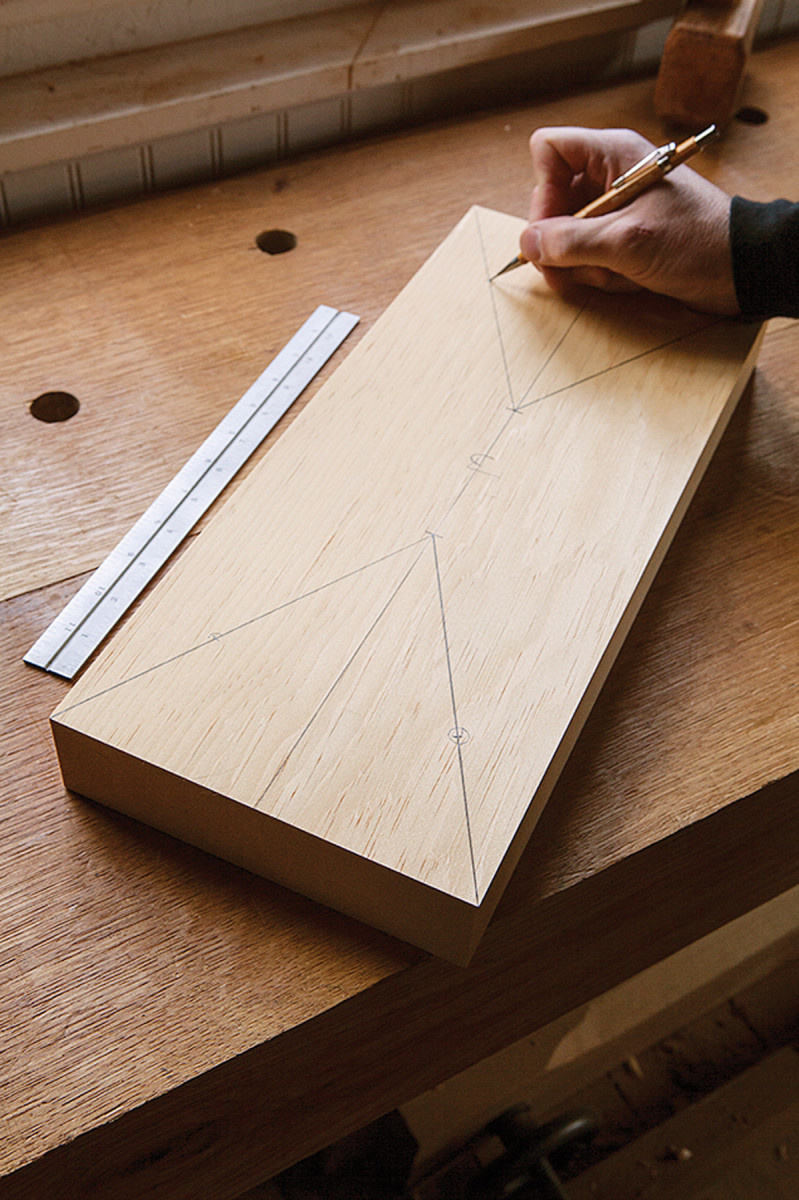
Ready to be bored. Lay out the sightlines and leg locations on the underside of the top. I also drew in a centerline to confirm my sightlines and leg locations were consistent.
Use your model to lay out the location of the legs on your real sawbench and draw in the sightlines (64°) using a bevel gauge. Then reset your bevel gauge to the 15° resultant angle. Clamp it to the sightline and your workbench.
Nice resultant. Use a spotter to help make sure you stay parallel to the blade of your bevel gauge. You’ll outgrow a spotter eventually.
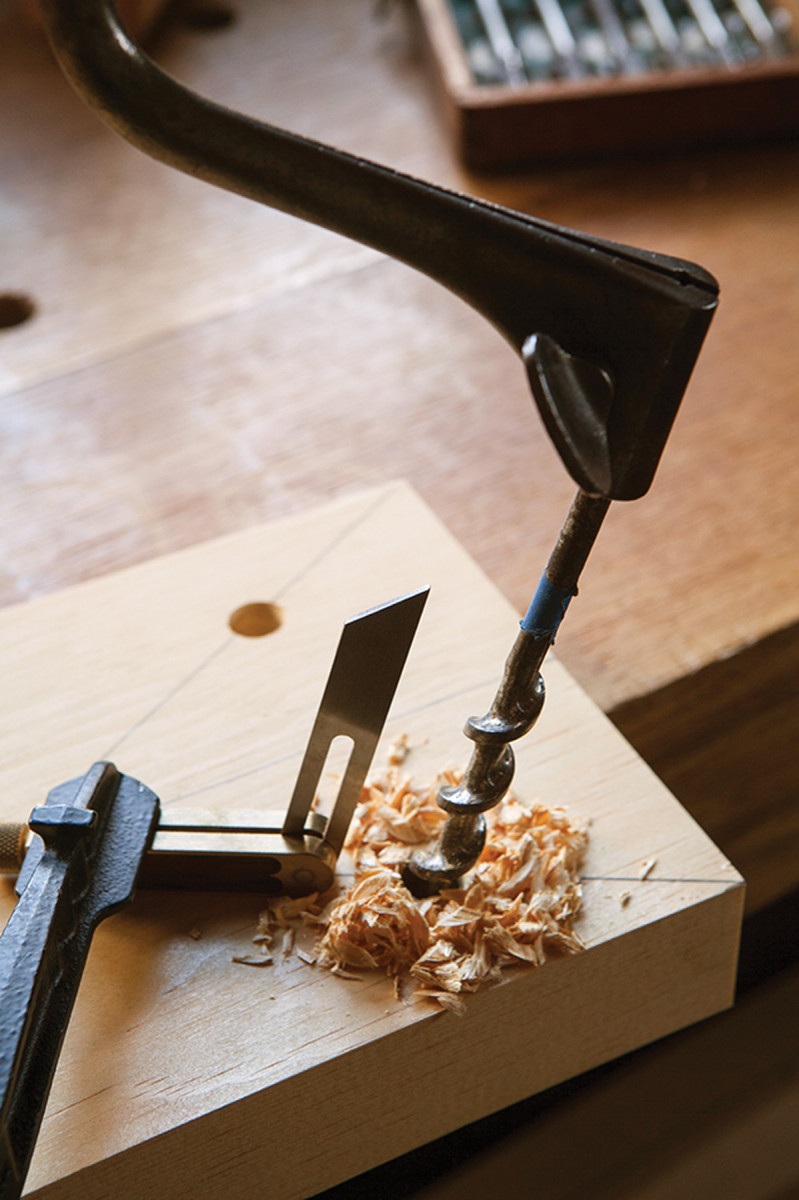
Chuck a 5⁄8” auger bit in your brace and plant your feet perpendicular to your sightline. Put the tip of the bit on the location of your leg mortise and tip the brace to match the resultant angle. Bore until the lead screw of the auger pokes through the other face of the seat. Remove the bit, flip the top over and finish the cut from the top of the sawbench.
Now ream this hole to a shape that matches the tenon. Lee Valley sells a matching reamer than can be used in a brace, electric drill or drill press. Ream the 5⁄8” holes until the tip of the reamer just fills the 5⁄8” exit hole on the top.
Good Wood for Staked Furniture
Many woodworkers have limited access to green, rivable stock. So when I started building staked furniture such as these sawbenches, I began with the assumption that you will buy wood from the local lumberyard or the home center. That translates to legs from red oak and seats from poplar.
Tulip poplar is soft, cheap, difficult to rive and can be found in thicknesses up to 4″ at most lumberyards. It’s fairly easy to work with hand tools and is quite paintable. So it’s perfect for a seat or a tabletop.
For the legs you need something hard, readily available and cheap – red oak. You can buy tons of it for little cash, and it’s readily available in 8/4, which is perfect for the legs of staked pieces.
For the leg stock, look for straight grain on both the face and edge of the board. And the straight grain on the edges is more important than the grain on the face. If you can find a board with straight grain on its edges, buy it.
What about moisture content? If you work with green wood, you ideally want bone-dry legs and slightly moist stock for the seat or top. That way the seat will shrink on the legs and tighten the joint.
If you buy your stock from the lumberyard, you might not have much choice about the moisture content of your wood. So don’t worry too much about it. Buy your red oak. Cut it into 24″ or 30″ lengths and let it sit until you are ready to use it. You want the leg stock to be dry.
Right before you build your staked project, buy the poplar and get to work. Whether it’s dry or wet, things will be OK. Just make sure the legs are at equilibrium before you get busy.
You might have other options in your area. Seats can be basswood, white pine or cedar. Legs can be white oak, maple (soft or hard), hickory, ash or anything harder than the seat and tough enough to take a hard knock with a mallet.
But don’t let the available species stop you from building something you need. It didn’t stop people during the last 500 years or so.
—CS
Assembly
Matching tools. The Lee Valley tapered tenon cutter and reamer have the same taper, which makes Windsor joinery a snap.
Assign each leg to a mortise and number the legs and holes. You want the annular rings of each leg’s end grain to run parallel to the grain of the top. So twist the legs in their mortises until this is the case and make a mark that allows you to get back to that position after you have added glue.
Remove the legs and saw a 1″-deep kerf in the top of the legs to hold an oak wedge. The kerf in each leg needs to be perpendicular to the grain of the top (and perpendicular to the annular rings of the leg’s end grain) so you won’t split the top when you drive the wedges in.
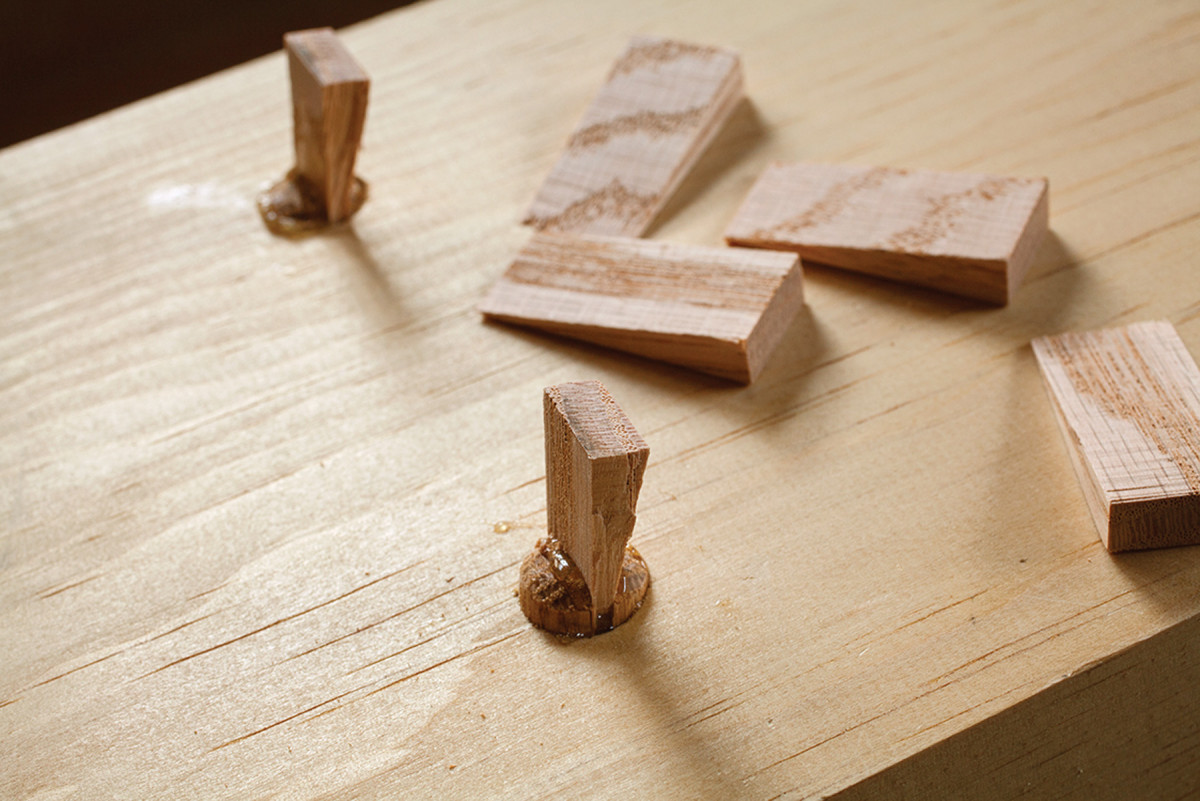
Locked. Wedging the joint from above makes this a long-lasting joint.
To assemble, paint the joinery surfaces with hide glue (it’s reversible), and drive in the legs with a mallet. Then flip the sawbench over. Paint the wedges with glue and hammer them into the kerfs in your legs.
After the glue is dry, level the wedged joints. Then level the legs (there’s a short video listed below in Online Extras in case you need leveling instruction). I paint my sawbenches; they usually end up covered in paint eventually anyway as they make a great platform for finishing furniture.
That’s really all there is to compound angles – the only math you’ll do is counting all the additional things you can build with this skill.
Here are some supplies and tools we find essential in our everyday work around the shop. We may receive a commission from sales referred by our links; however, we have carefully selected these products for their usefulness and quality.