


We may receive a commission when you use our affiliate links. However, this does not impact our recommendations.
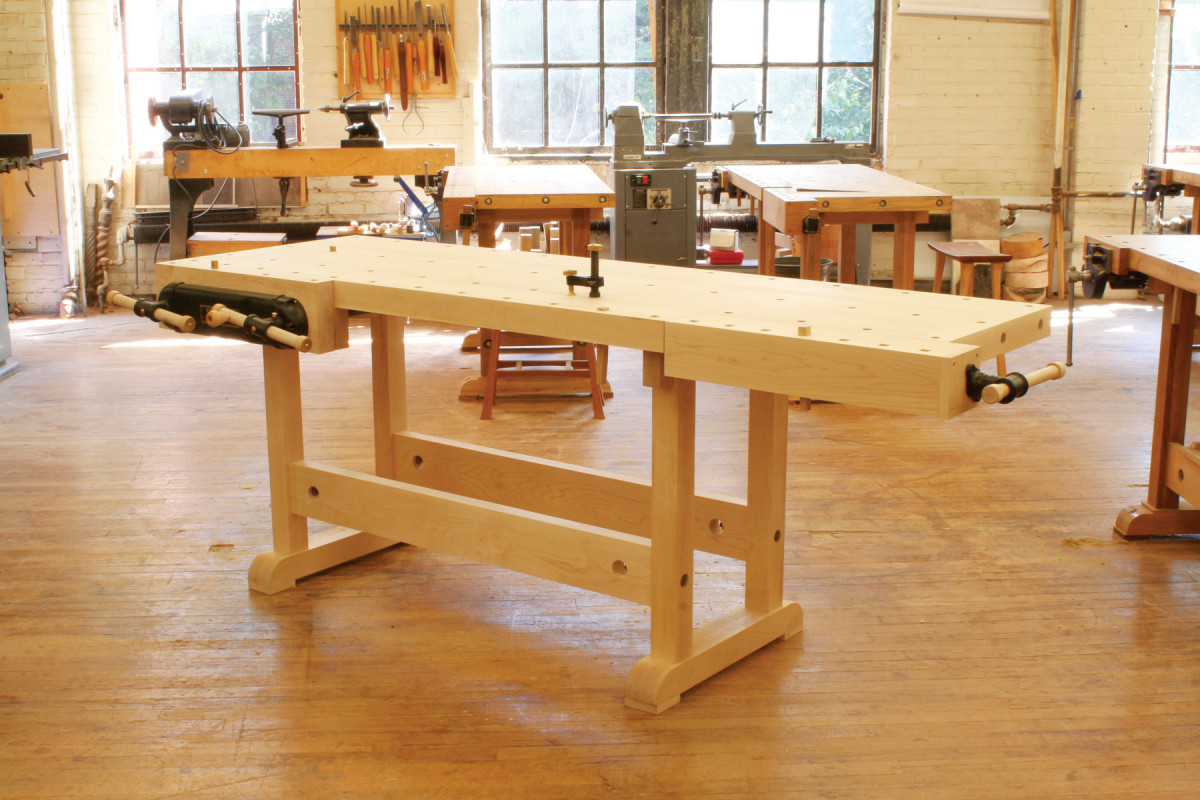
A proven design that will last a lifetime.
I have many fine tools in my shop, but the most important one is my bench. It has a classic design, favored by cabinetmakers for generations.
I’ve spent a long time refining the details of this bench. I’ve built 15 of them over the years, simplifying and improving the design each time. At Philadelphia Furniture Workshop, where I teach, I’ve helped students build dozens more.
The materials are top-notch. I’ve used the best wood (3″ thick hard maple), the best tail vise hardware (imported from Germany), and made the bench plenty big and very heavy (it’s 7′ long and weighs 250 lbs). The materials aren’t cheap, but for a lifetime of service, they’re worth every penny.
Key features
• Thick top. It will always stay flat. At 2-5/8″ thick, it won’t bend when you plane a board or bounce when you chop mortises.
• Robust, knockdown base. It will stand stiff under any pressure. It can easily be disassembled or retightened.
• Strong, versatile vises. You can hold work in nearly any position: between dogs, using the tail vise; vertical or horizontal, using the face vise; perpendicular, again using the tail vise; and flat–anywhere on the top–using a holdfast.
Master Cabinetmakers Bench Cut List
Overall Dimensions: 34-1/2″ H x 26-1/2″ W x 84″ L
|
Section |
Part |
Name |
Qty. |
Stock |
Th x W x L |
|
Base |
A1 |
Leg |
4 |
12/4 |
2-5/8″ x 2-5/8″ x 31″ (a) |
|
A2 |
Foot |
4 |
8/4 |
1-3/4″ x 2-3/4″ x 25″ |
|
|
A3 |
Wedge |
8 |
4/4 |
3/16″ x 1-1/2″ x 2-1/4″ (b) |
|
|
A4 |
Top stretcher |
2 |
8/4 |
1-3/4″ x 3-1/2″ x 22-1/4″ |
|
|
A5 |
Pad |
4 |
4/4 |
3/4″ x 3-1/2″ x 3-1/2″ |
|
|
A6 |
Rail |
2 |
8/4 |
1-3/4″ x 5-1/2″ x 47-1/4″ (c) |
|
|
Top |
B1 |
Main |
1 |
12/4 |
2-5/8″ x 21-1/8″ x 79″ (d) |
|
B2 |
End cap |
2 |
12/4 |
2-5/8″ x 3″ x 21-1/8″ (e) |
|
|
B3 |
Long dog block |
1 |
12/4 |
2-5/8″ x 4-3/8″ x 62-1/8″ (e) |
|
|
B4 |
Blocking |
1 |
8/4 |
1-1/2″ x 2″ x 17-1/2″ |
|
|
B5 |
Front cap |
1 |
5/4 |
1″ x 2-5/8″ x 62-1/8″ |
|
|
Tail vise |
C1 |
Top |
1 |
5/4 |
1″ x 4-5/16″ x 23-3/4″ |
|
C2 |
Short dog block |
1 |
8/4 |
1-11/16″ x 3-1/2″ x 23-3/4″ |
|
|
C3 |
Front jaw |
1 |
12/4 |
2-3/16″ x 3-1/2″ x 2″ |
|
|
C4 |
Rear blocking |
1 |
12/4 |
2-5/8″ x 3-1/2″ x 1-1/2″ |
|
|
C5 |
End cap |
1 |
4/4 |
3/4″ x 5-5/16″ x 4-1/2″ |
|
|
C6 |
Front cap |
1 |
5/4 |
1″ x 4-1/2″ x 23-3/4″ |
|
|
Front vise |
D1 |
Rear jaw |
1 |
8/4 |
1-3/4″ x 4-1/8″ x 24-3/8″ |
|
D2 |
Front jaw |
1 |
12/4 |
2-1/4″ x 6-7/8″ x 24-3/8″ (f) |
|
|
Bench dog |
E1 |
Body |
2 |
4/4 |
11/16 ” x 3/4″ x 6-1/2″ |
|
E2 |
Spring |
2 |
4/4 |
1/8″ x 3/4″ x 5-11/16″ |
(a) Length includes 2-3/4″ long tenon. (b) Taper at 3°. (c) Length includes two 1/4″ long stub tenons.
(d) Build initially in two sections, each no wider than planer width. (e) Plane to same thickness as top.
(f) Taper this piece by by 2°, across its width, after fitting.
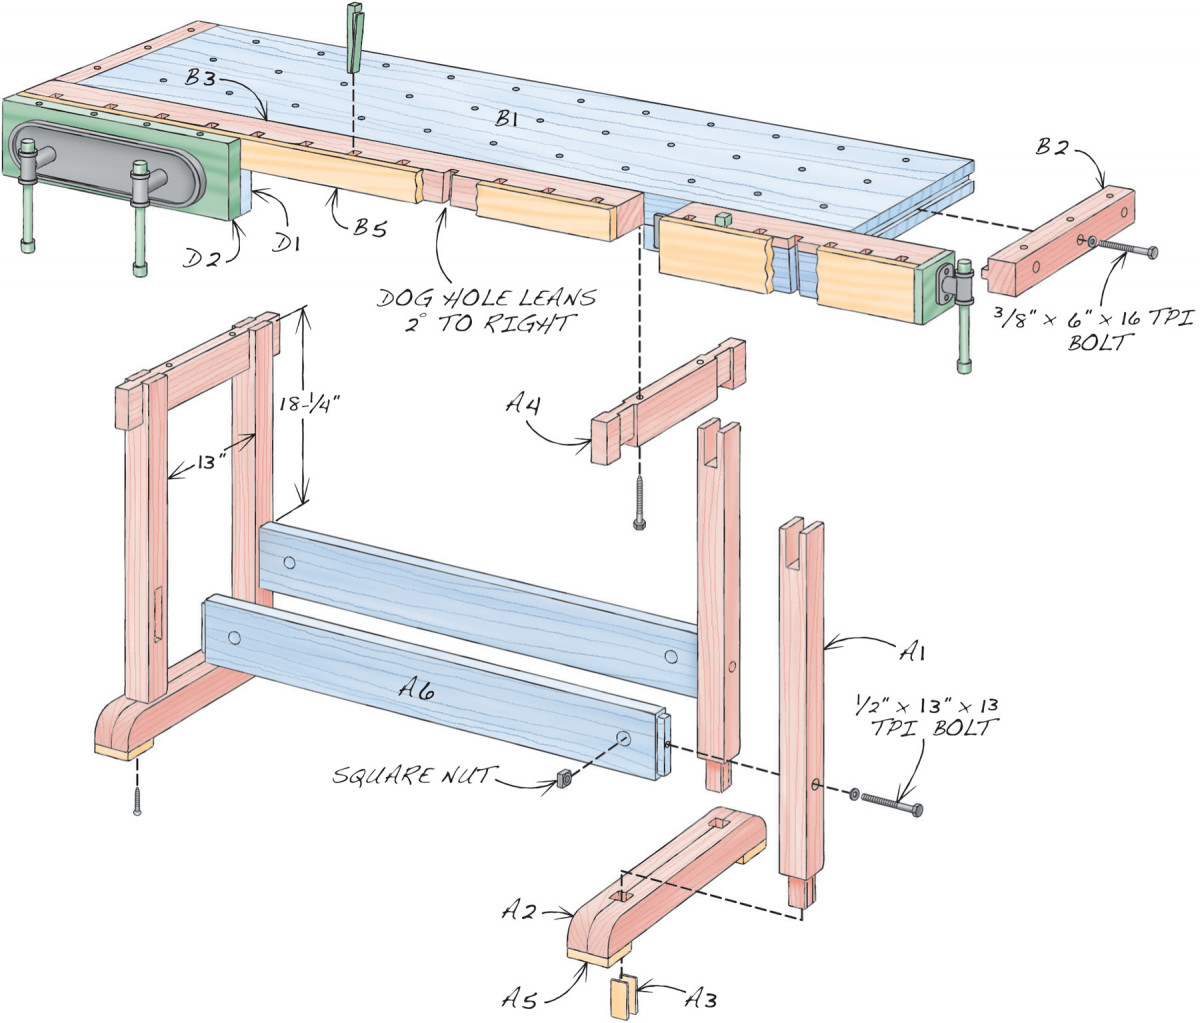
Fig. A) Exploded View
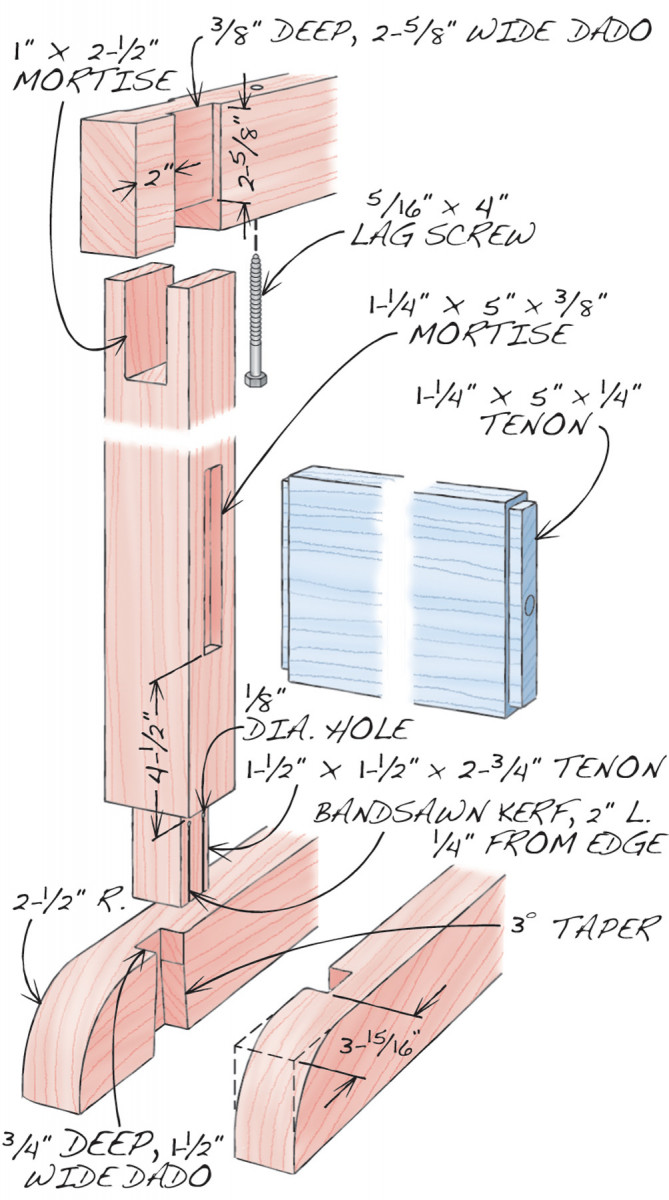
Fig. B) Base Joinery
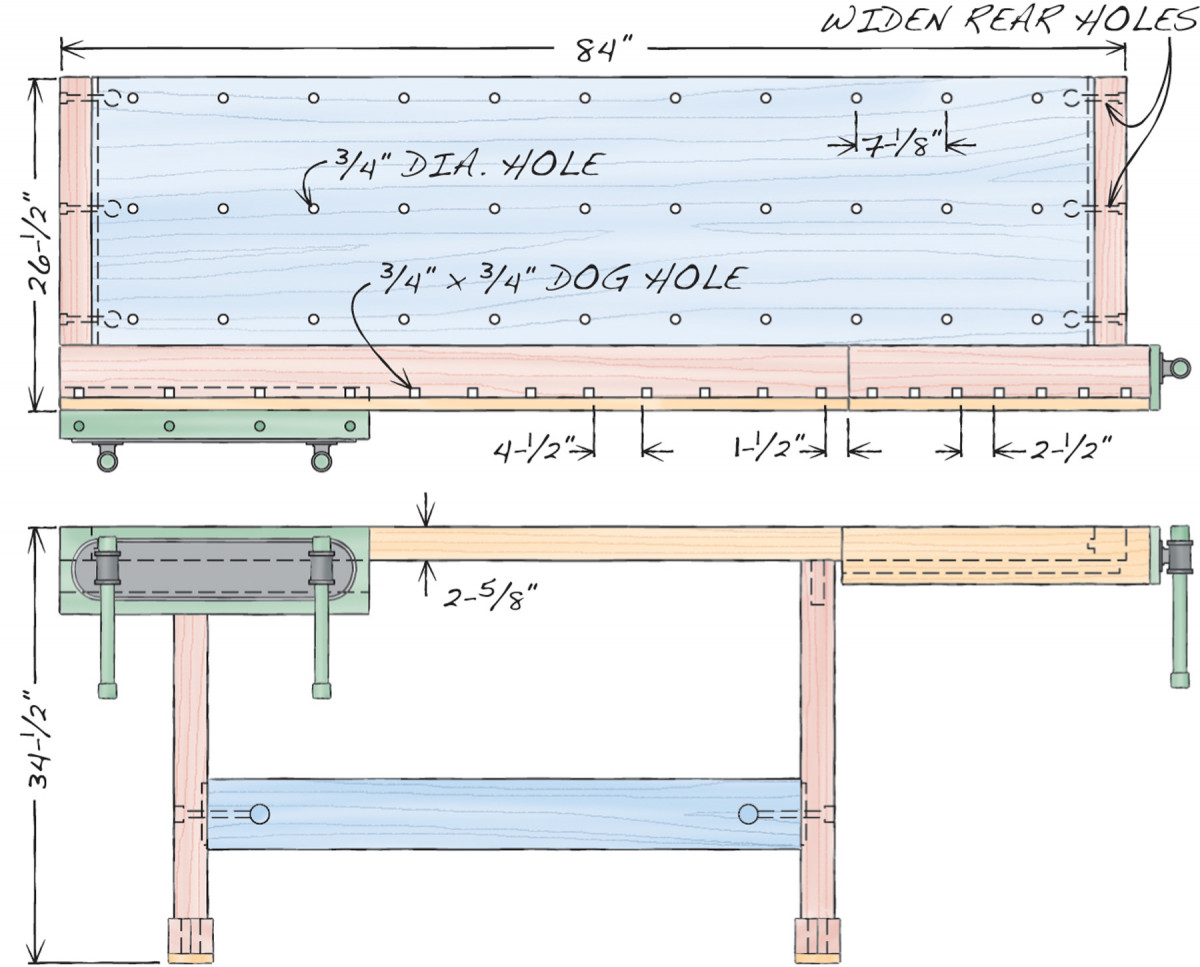
Fig. C) Plan and Elevation
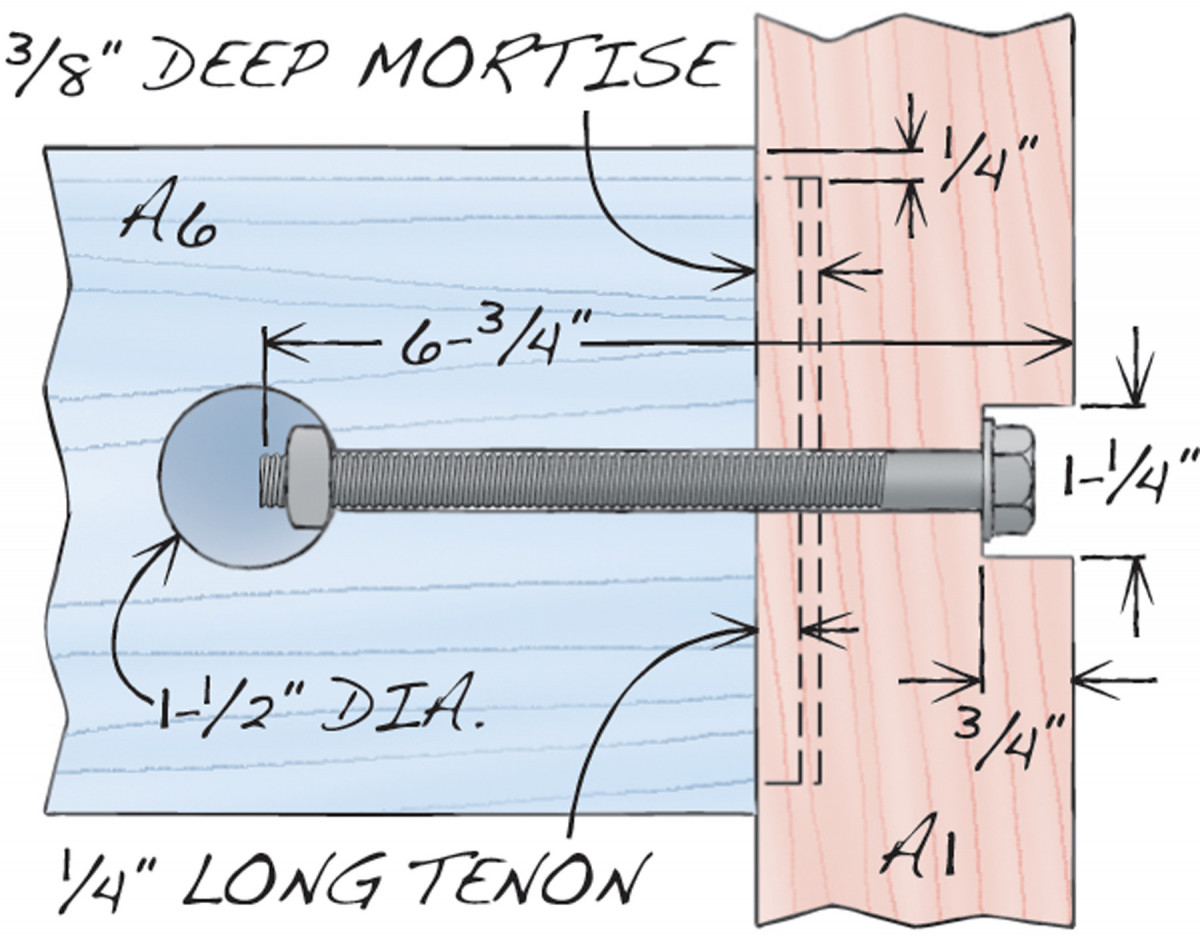
Fig. D) Leg-to-Rail Bolts
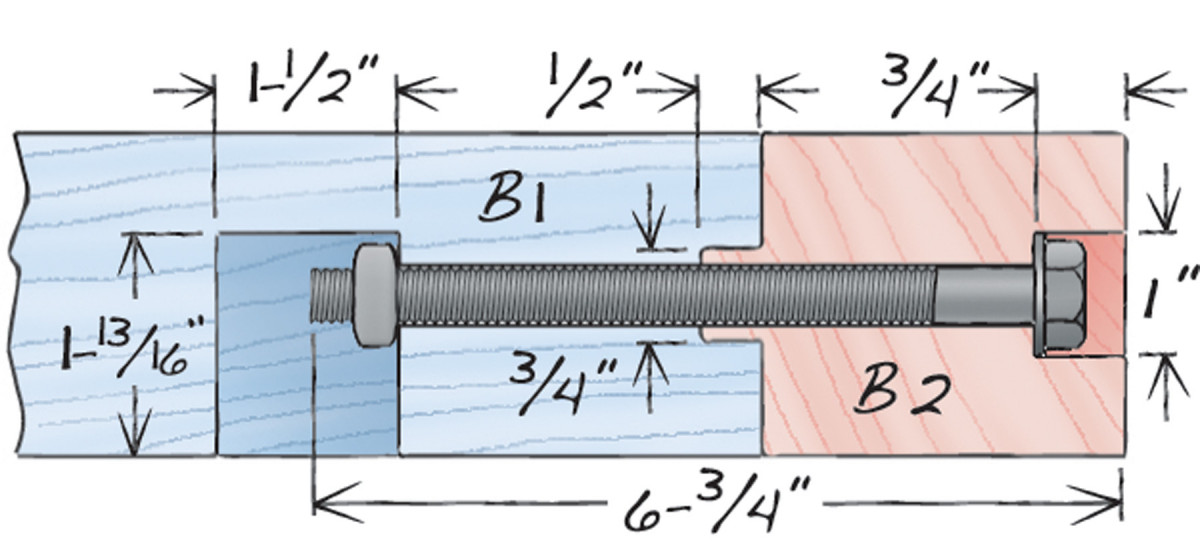
Fig. E) End Cap Bolts
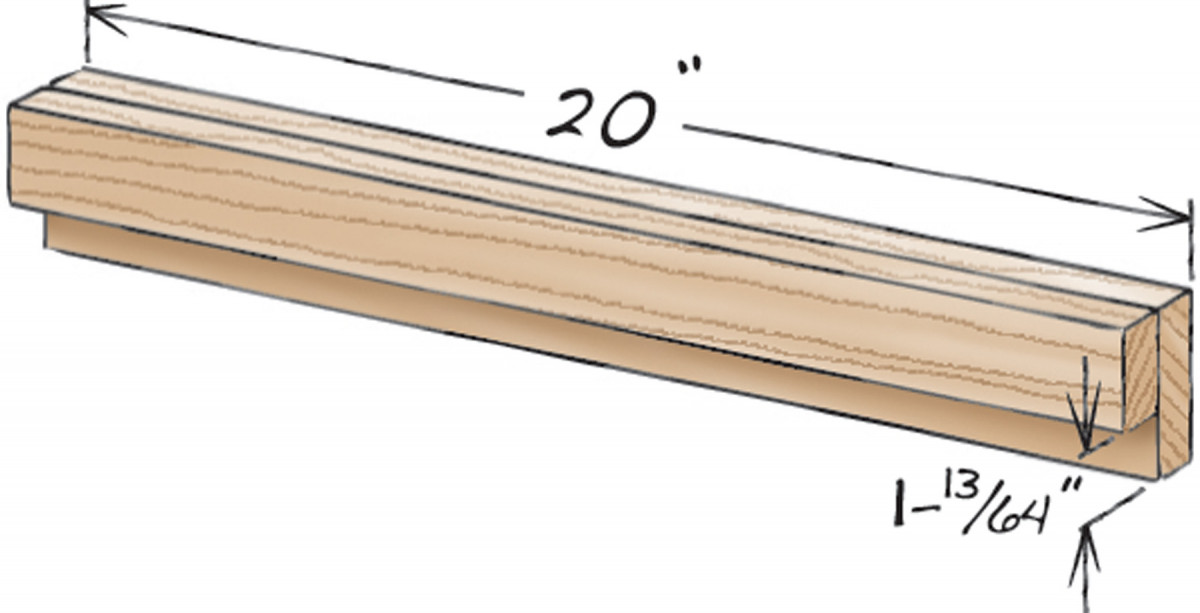
Fig. G) Tail-vise Plate-setting Jig
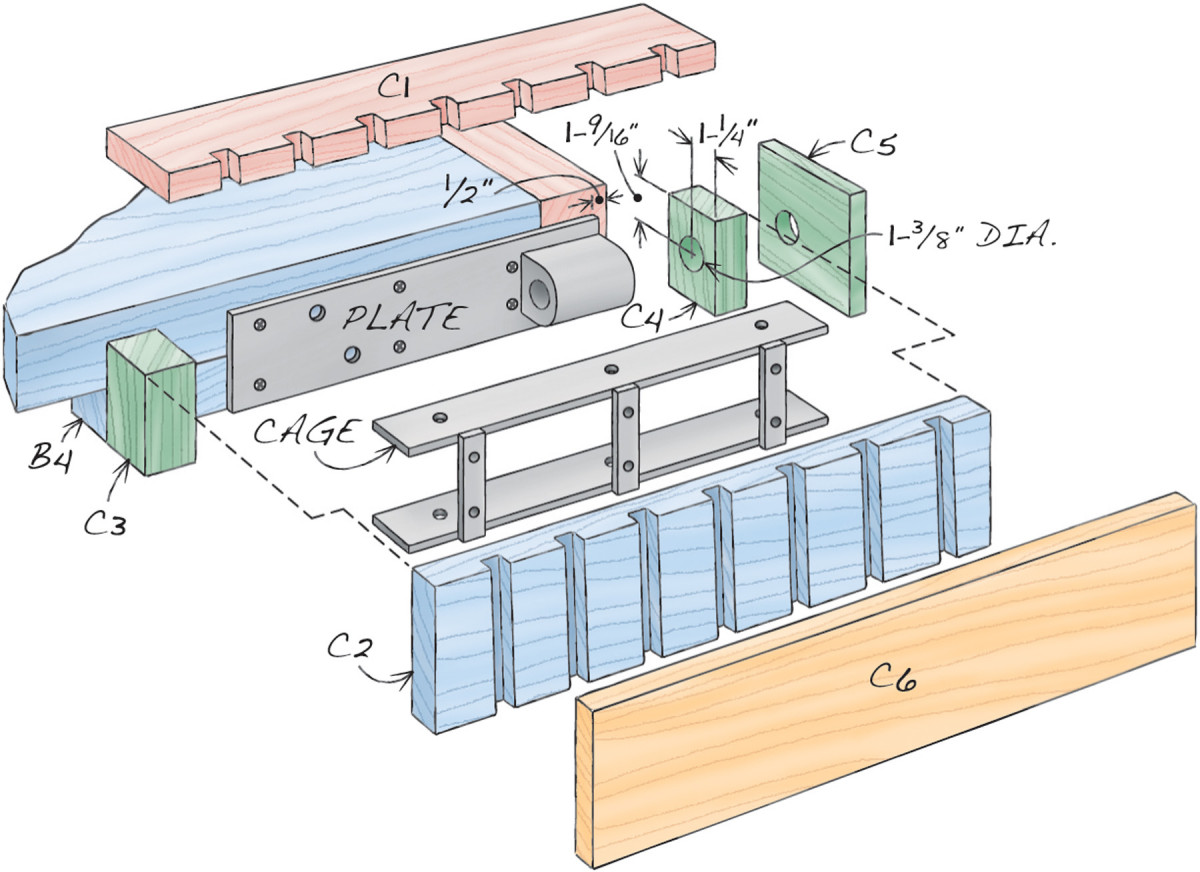
Fig. F) Tail Vise
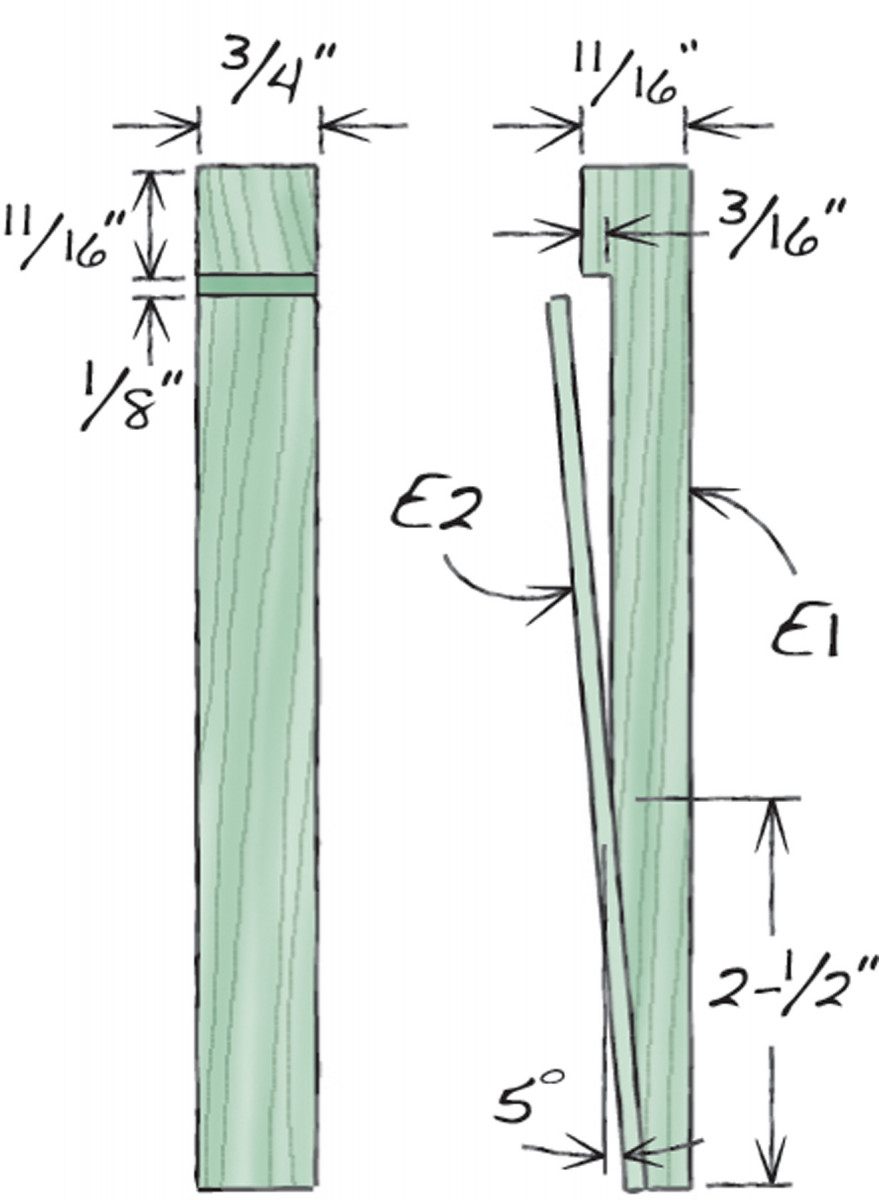
Fig. H) Bench Dog
Build the base
Before you begin building, decide what height is best for you. It’s easy to make this bench taller by adding thicker pads under the feet, but hard to make it shorter, once it’s built.
1. Start with the base. The legs are joined to the feet with large, through mortises (see Fig. A, above). Each foot is composed of two pieces, which will be glued together later on. Begin making the mortises by dadoing each half of the feet.
Be picky about the wood for the entire bench, which is all hard maple. Reject boards that are twisted; they may never stay flat. Machine the pieces in stages, over a few days, so they have a chance to stabilize before you mill them to final size.
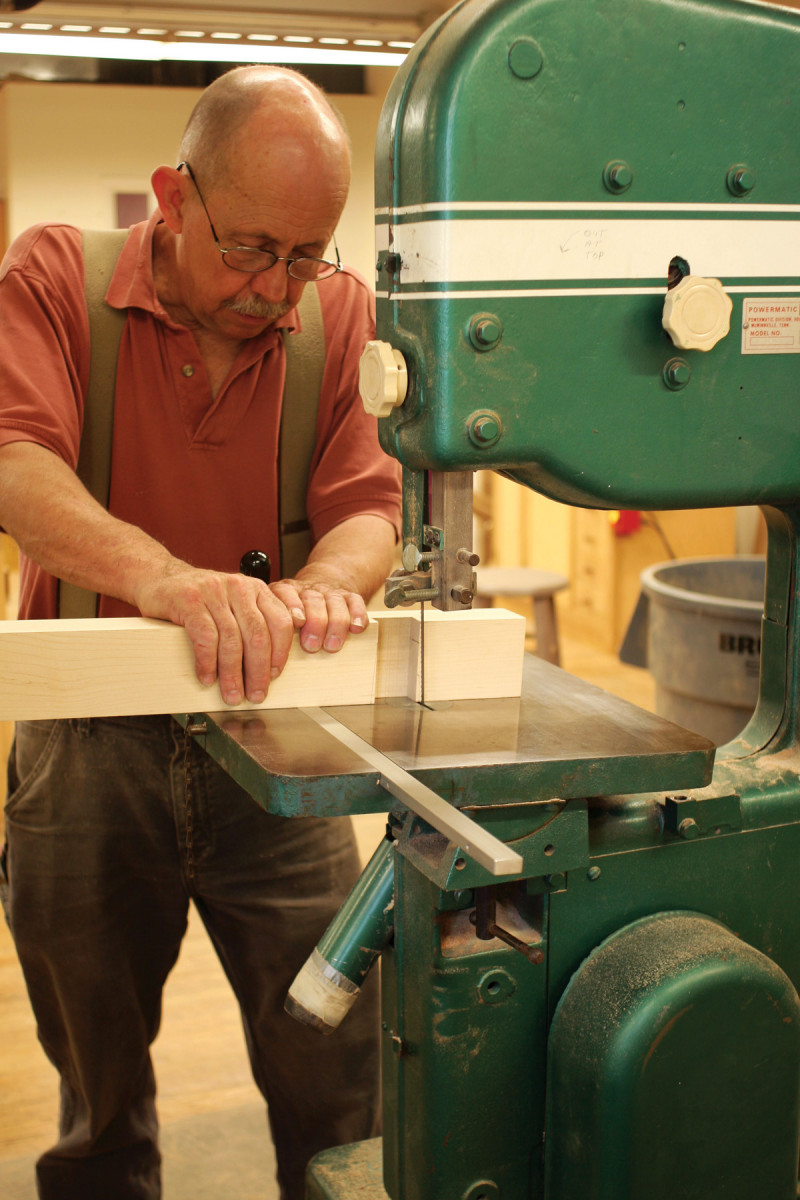
2. Angle a portion of each dado using the bandsaw. This creates a flared opening for the leg’s tenon, which will be secured by wedges.
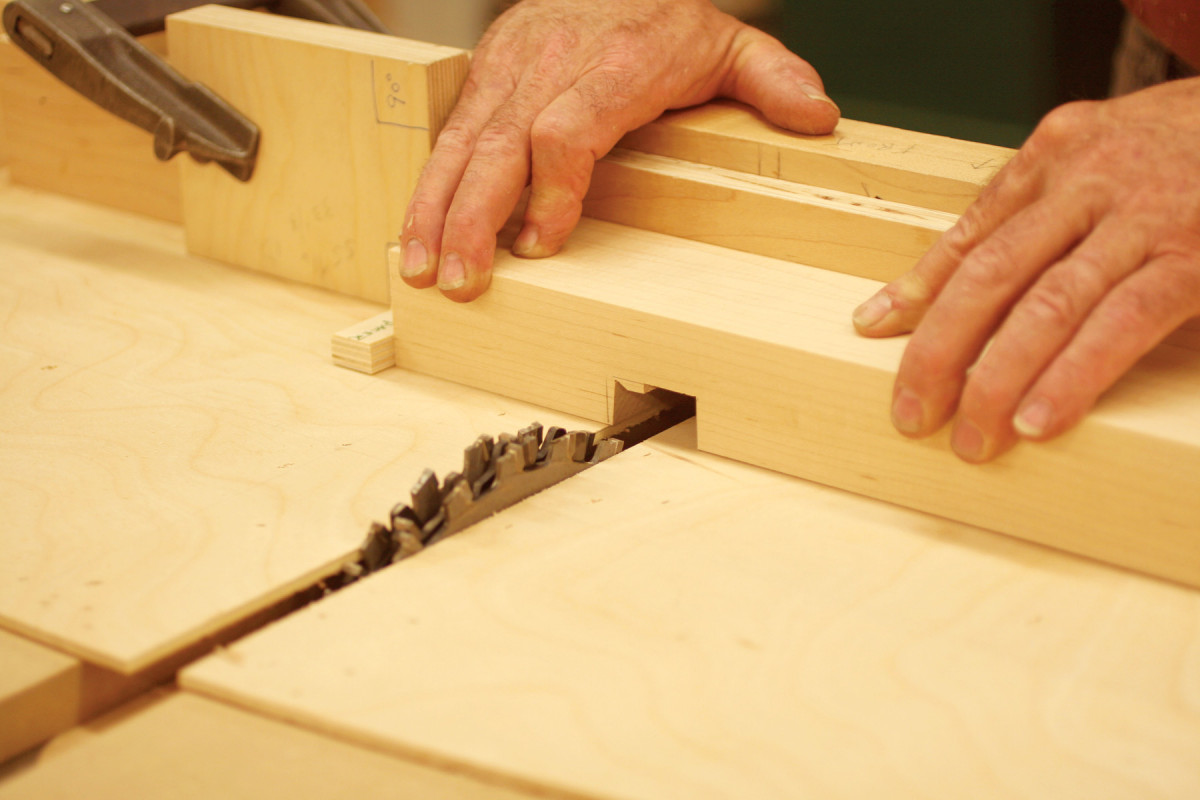
Mill the legs (A1; see Fig. A, above). Mill pieces for the feet (A2). Note that each foot is glued up from two pieces. Cut dadoes in the feet (they will become mortises for the legs; see Fig. B). Remove most of the waste using a bandsaw. Next, square the dados on the tablesaw, using a stop block and spacer (Photo 1). Finally, angle the ends of each dado (Photo 2), so the tenons can flare when wedges are inserted into them. Make two blocks the size of the leg’s tenons to register the feet. Glue the feet together (Photo 3). Bandsaw a radius on the front end of each foot.
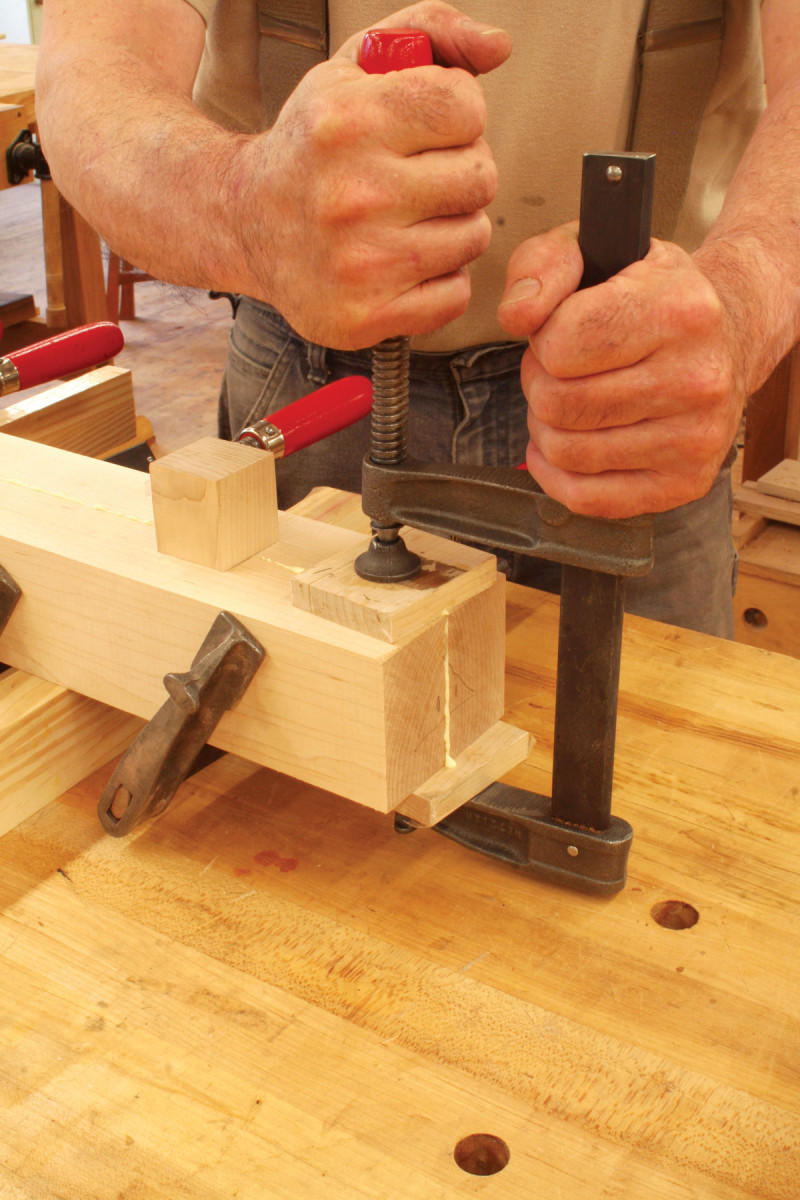
3. Glue together the two pieces of each foot. Insert a mock tenon, covered with clear cellophane packing tape, into the dadoes. Clamp small, taped blocks above and below the feet to align the pieces.
Cut tenons on the legs. Begin by cutting the tenons’ shoulders all the way around each leg, then cut the cheeks using a tenoning jig (Photo 4). Only one setup is needed, because the legs and tenons are square. Drill 1/8″ dia. holes in the tenons (they prevent the wedges from splitting the legs). Cut slots for the wedges, up to the holes, using the bandsaw. Cut the wedges (A3) on the bandsaw, making them extra long. Lay out the open mortises on the top of each leg. Remove most of the waste on the bandsaw and finish the joints using the tenoning jig.
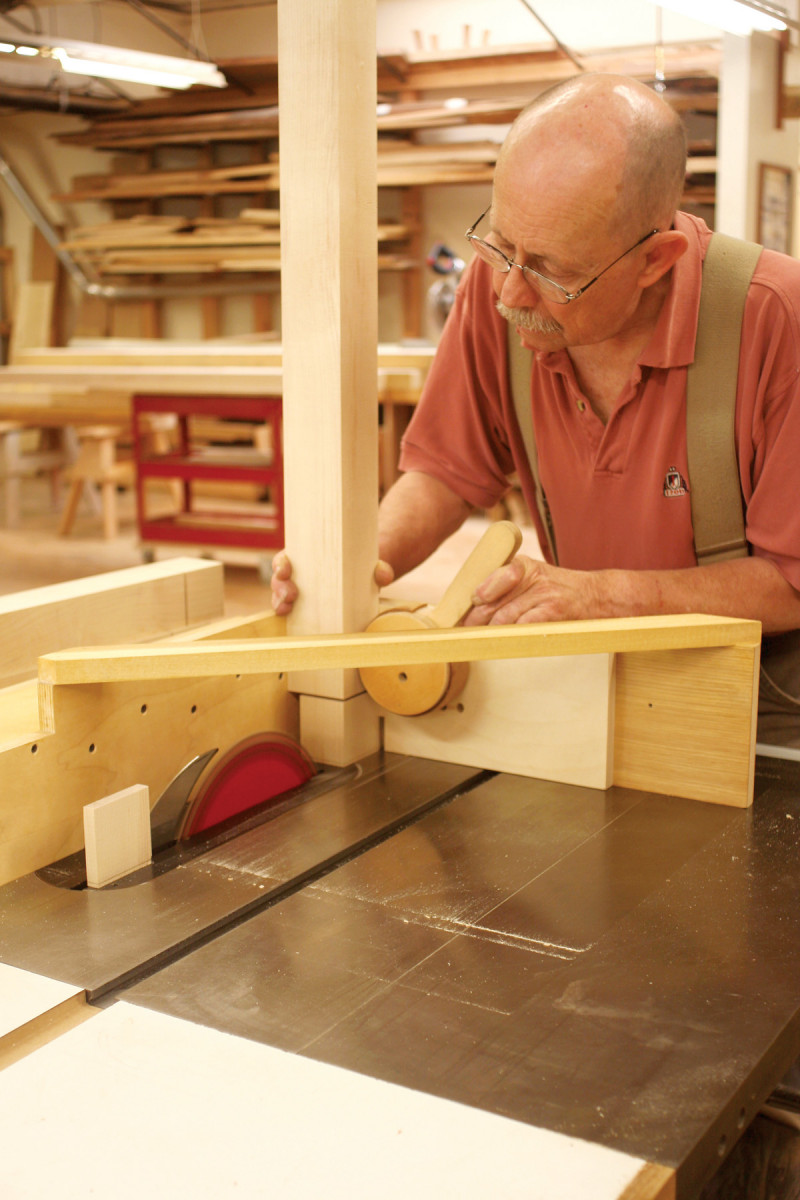
4. Cut tenons on the legs using a tenoning jig. Using the bandsaw, cut two slots in each tenon to receive the wedges.
Mill the top stretchers (A4). Assemble the legs and feet, without glue. Clamp a board across the legs to keep the assembly square. Mark the position of the dadoes on the top stretchers directly from the legs. Cut dados on three sides of each joint. Note that the top stretchers will be 1/8″ proud of the top of the legs.
Rout mortises for the rails (A6) that connect the leg sets. Make a template and cut the mortises using a top-bearing pattern bit. Drill holes in the legs for the bolts that will fasten the rails to the legs (Fig. D). Drill holes in the top stretchers for the lag bolts that will be used to fasten the top. Make the rear holes larger than the front holes, to allow the top to expand and contract.
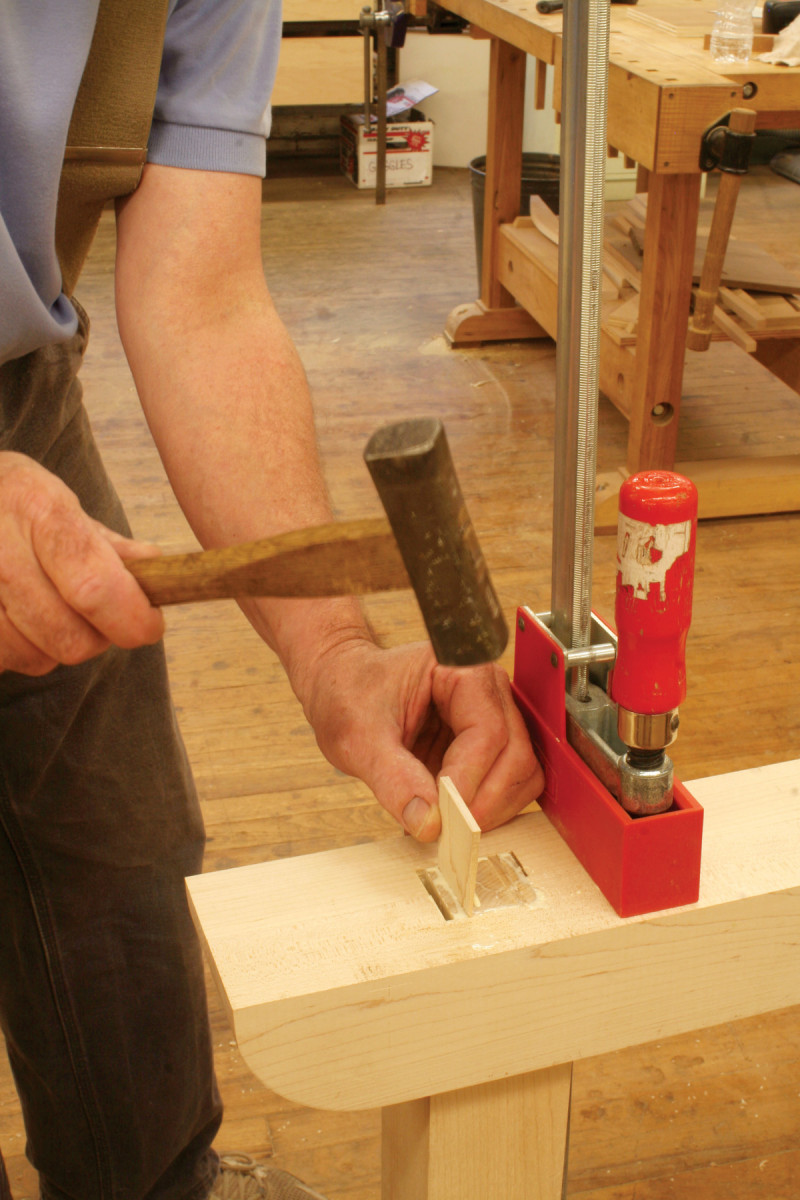
5. Add stretchers across the top of the legs, then glue the feet to the legs. Drive wedges into the slots to flare the ends of the tenons. These joints will never come loose!
Plane, scrape and sand the legs, feet and top stretchers. Glue the two leg sets and drive home the wedges (Photo 5). Fasten pads (A5) to the feet. (Don’t glue them. This allows you to change the bench’s height later on.)
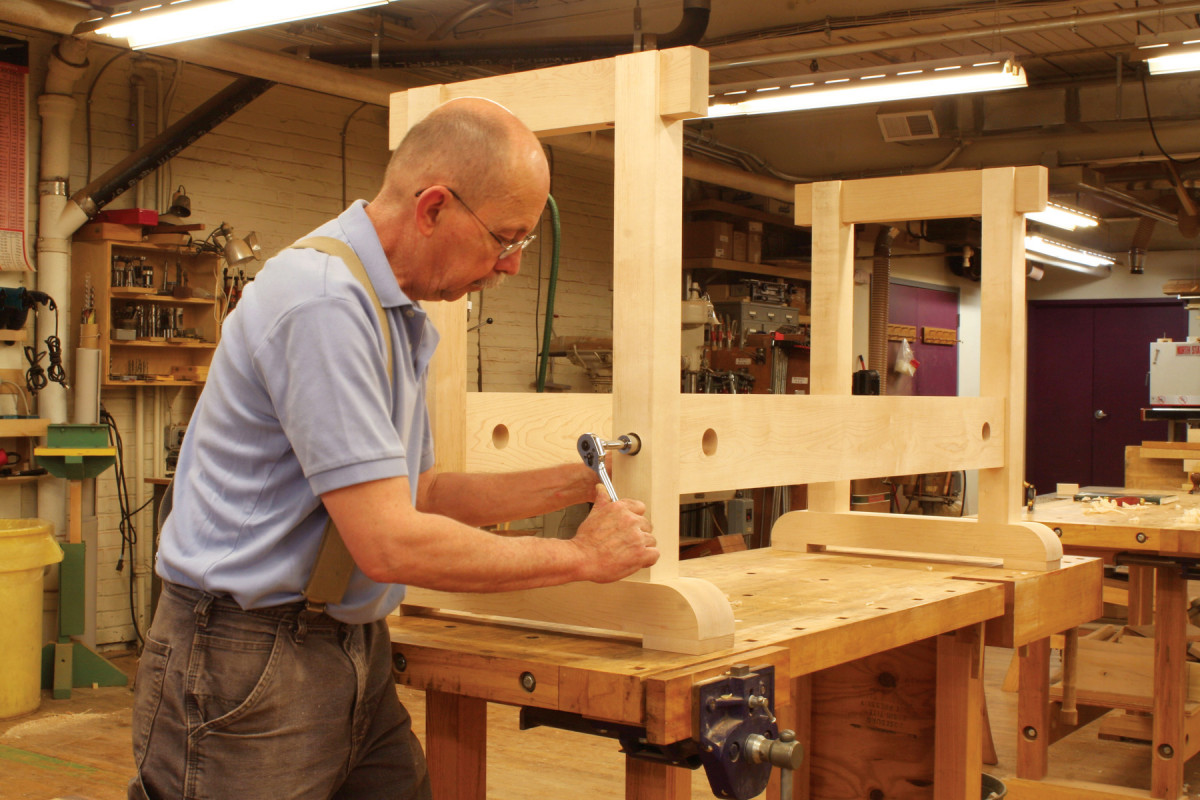
6. Bolt the base together. The bolts engage square nuts inside the rails.
Mill the rails. Cut their stub tenons using a dado set. Clamp the rails between the leg sets. Continue the bolt holes by drilling as deep as possible into the rails with a 1/2″ brad point bit. Disassemble the rails and continue drilling. Insert a bolt into each hole and mark the location of the nut holes in the rails. Drill these holes. Assemble the base (Photo 6).
Start the top
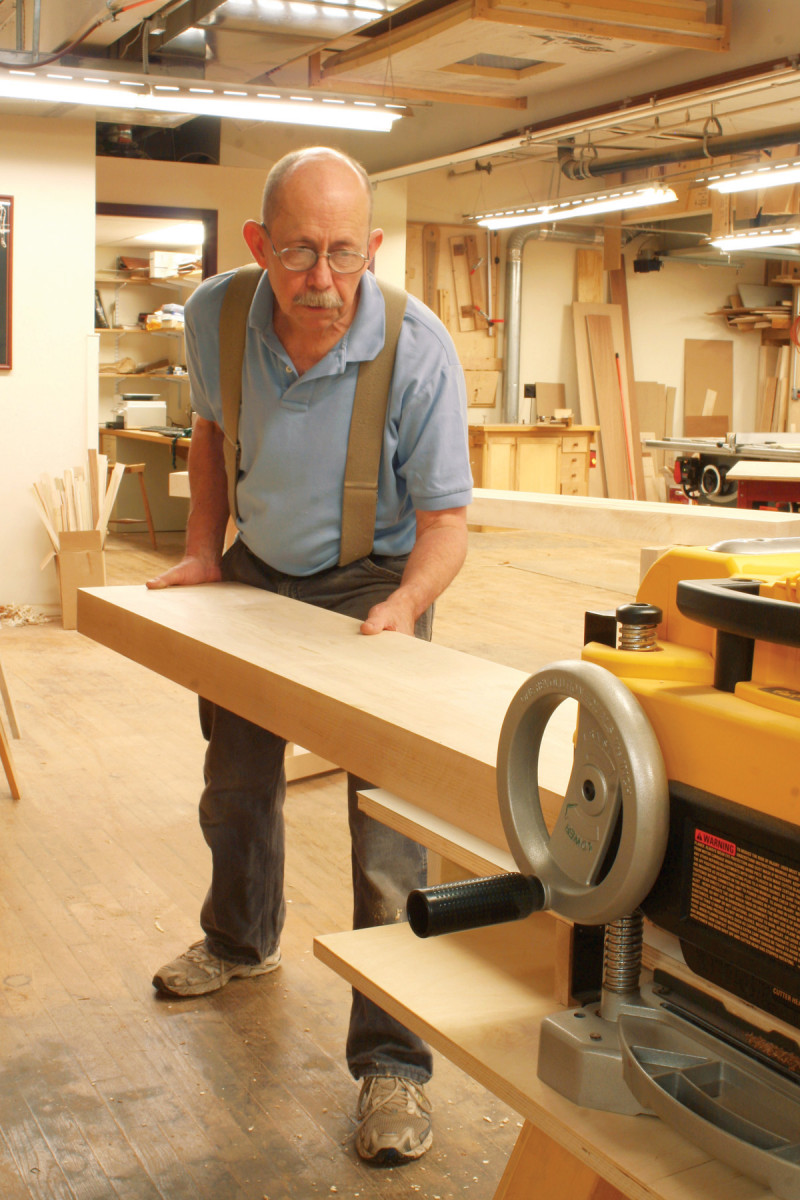
7. The benchtop is made from 3″ thick hard maple. Glue the top in two sections. Run each half of the top through the planer to even the glue joints.
Make the main top (B1) in two sections of approximately equal width. Each section may be built up from any number of boards you wish. When cutting these 3″ thick boards to width, I use an 18-tooth rip blade to ease the load on my cabinet saw’s motor (see Sources). Joint one face of each board and plane the opposite side. (At this point, it’s OK if the planer skips over some areas.) Joint one of the board’s edges, rip the board to width, and joint the sawn edge. Glue the boards together.
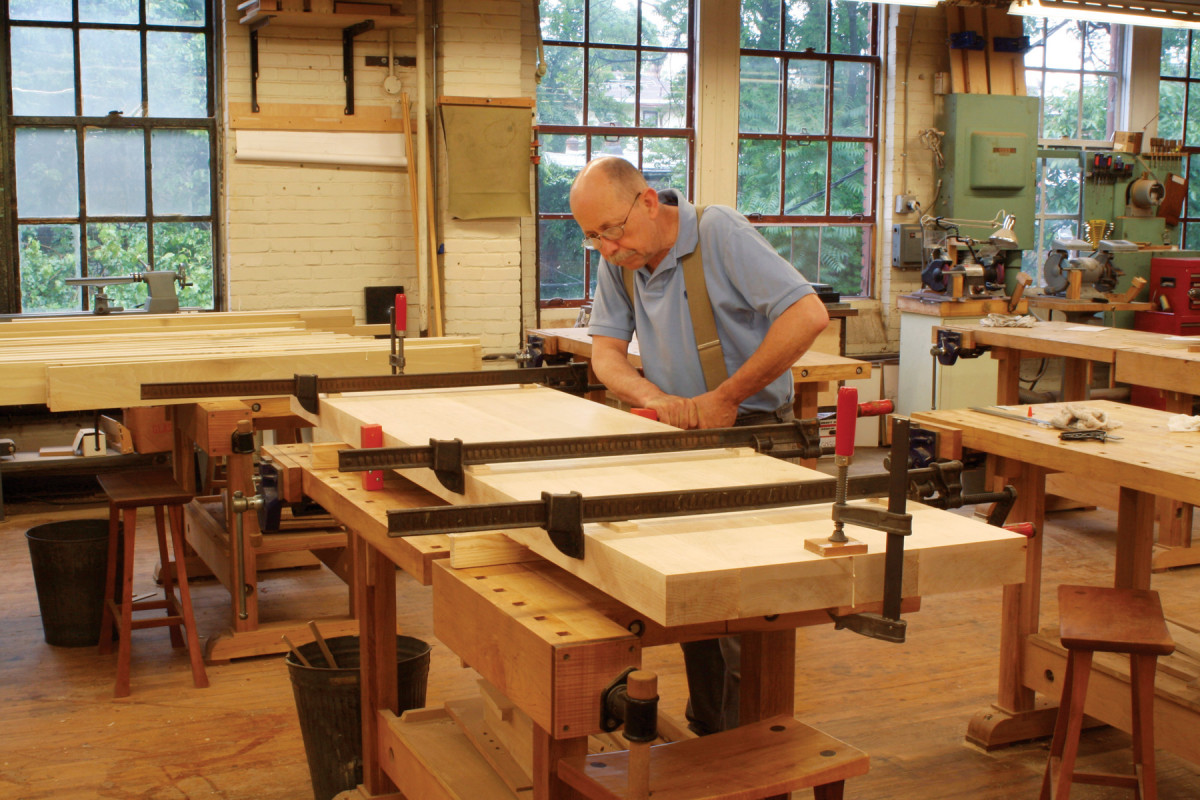
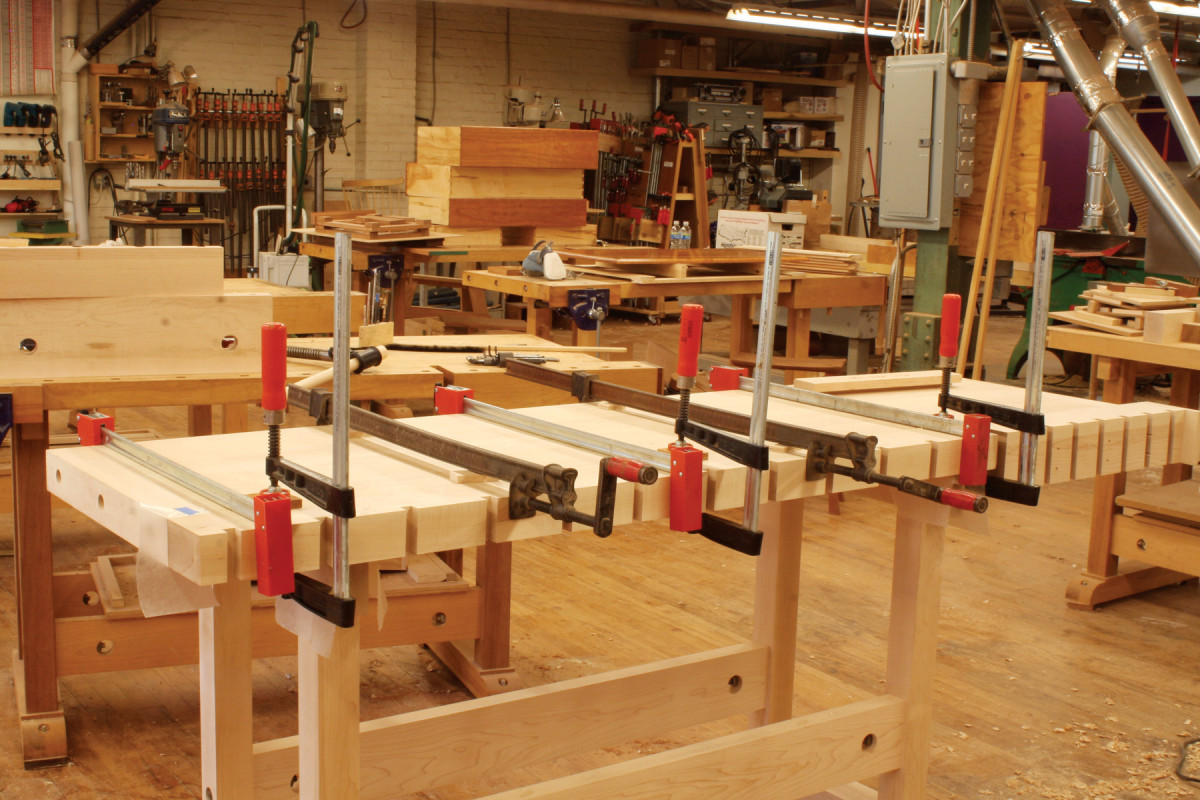
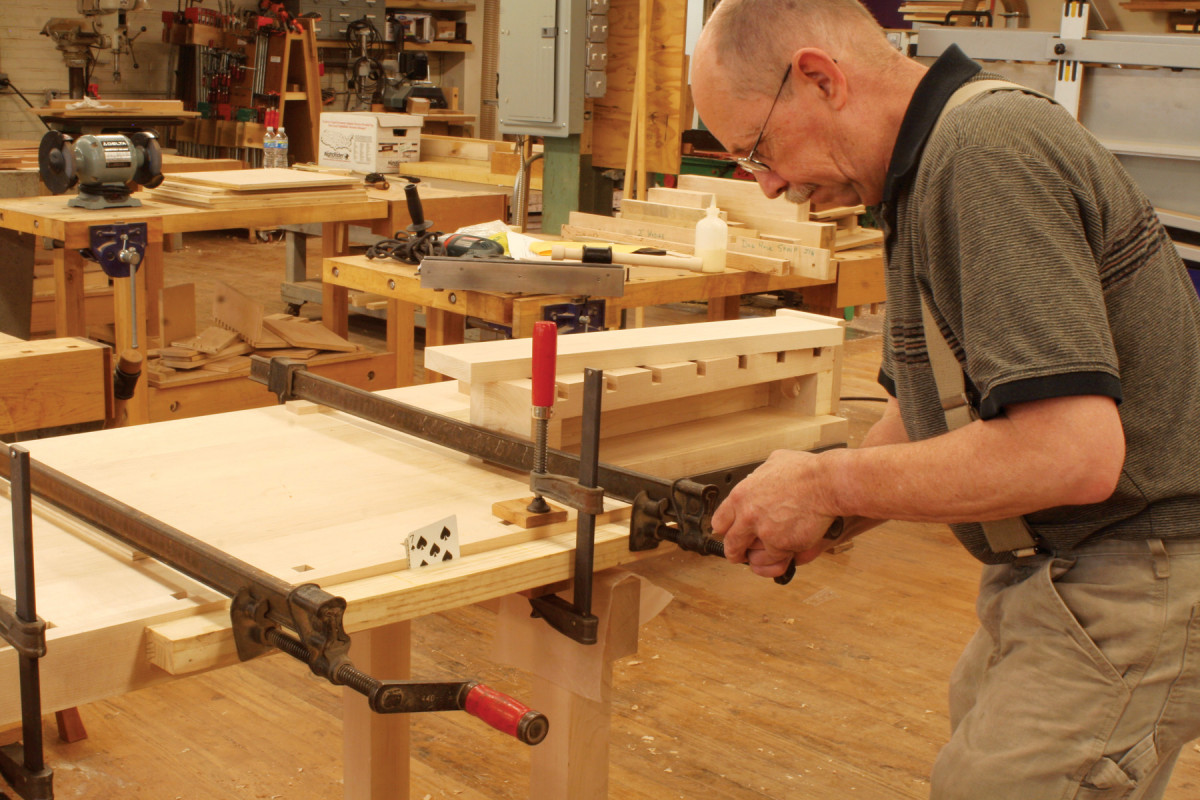
8. Glue the top. Support it on straight, wooden bars. Clamp the ends to help align the two halves.
Mill and bring to final thickness the end caps (B2) and the long dog block (B3), but leave them 1″ extra long. Plane the two glued-up top sections to the same thickness as these pieces (Photo 7). Glue the two top sections using strong bar clamps (Photo 8).
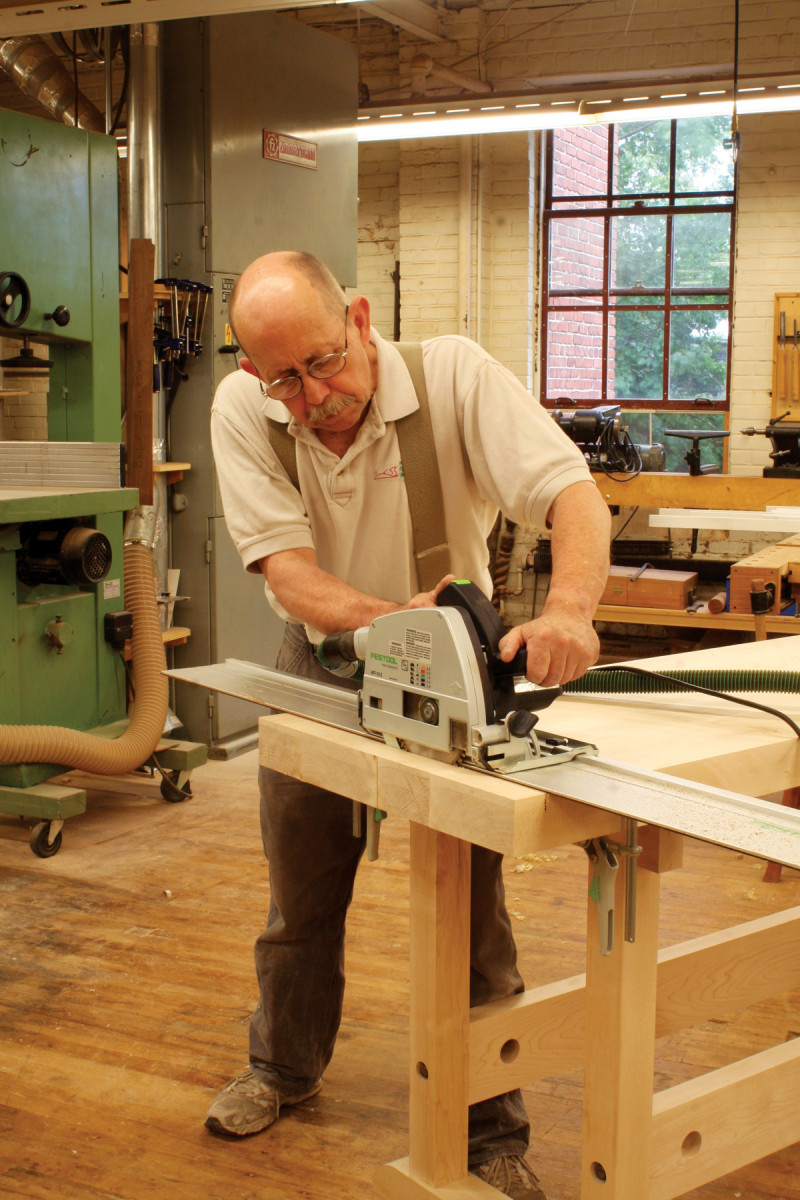
9. Rough-cut the ends of the top. Use a guided circular saw or a standard circular saw following the edge of a board. Cut from both sides.
Use a circular saw with a guide to cut the top about 1/8″ longer than its final size (Photo 9). Saw from both sides. This top is heavy! To aid in flipping it, clamp a 4′ long 2×4 to one end, across the top’s width, and use the 2×4 as a lever. Cut the ends of the top to final length using a router and a guide (Photo 10).
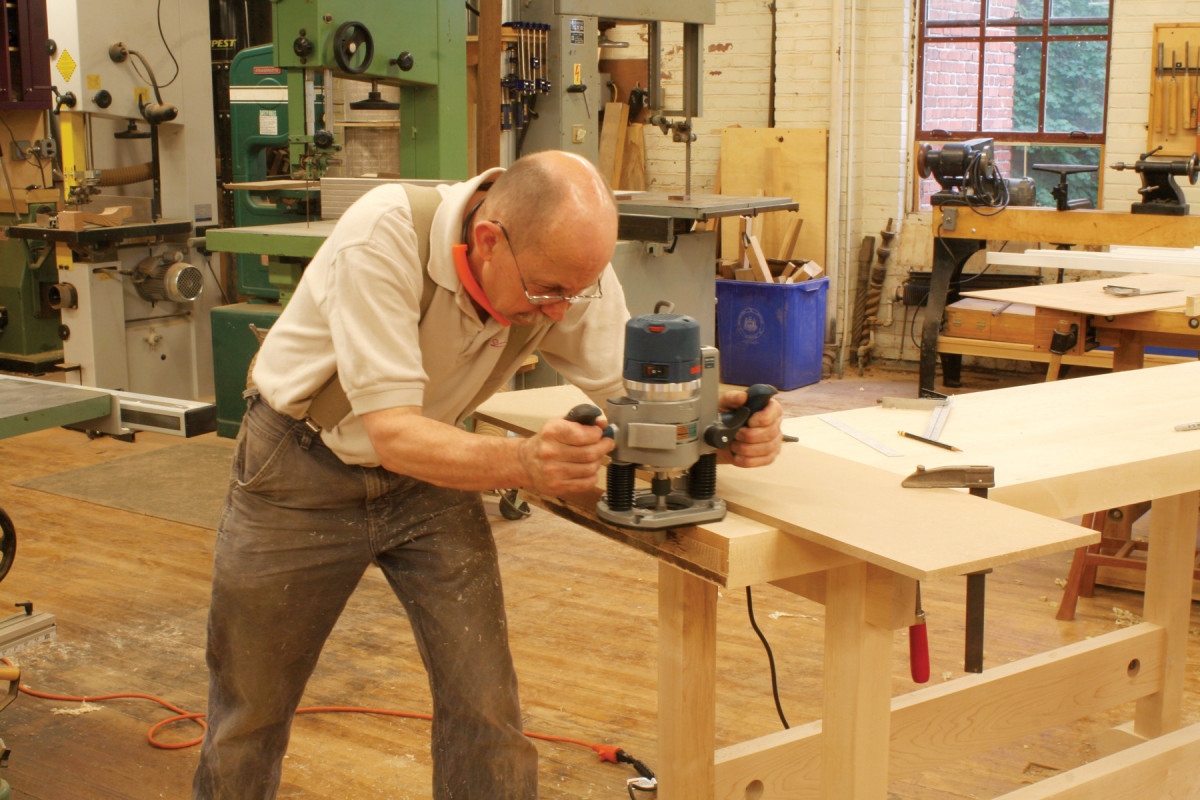
10. To make the ends square and smooth, follow up with a router and straight bit. Use a board to guide the cut, which only goes halfway deep. Flip the top and finish the process with a long bottom-bearing bit.
Trim the end caps to final length. Using a slot-cutting bit with a 4″ long arbor and a top bearing, cut slots in the end of the top (Photo 11 and Fig. E). Work from both sides of the benchtop to center the slots. Using the tablesaw, cut tongues on the end caps to fit the slots, again working from both sides. Drill three holes in each end cap for the bolts that secure the caps to the top. Make the front holes tight (3/8″), and drill the two rear holes at a larger diameter (5/8″) to allow the top to expand and contract. Clamp the end caps to the bench. Lengthen the holes for the bolts by the same method you used for the rails above. Drill blind holes for the captured nuts.
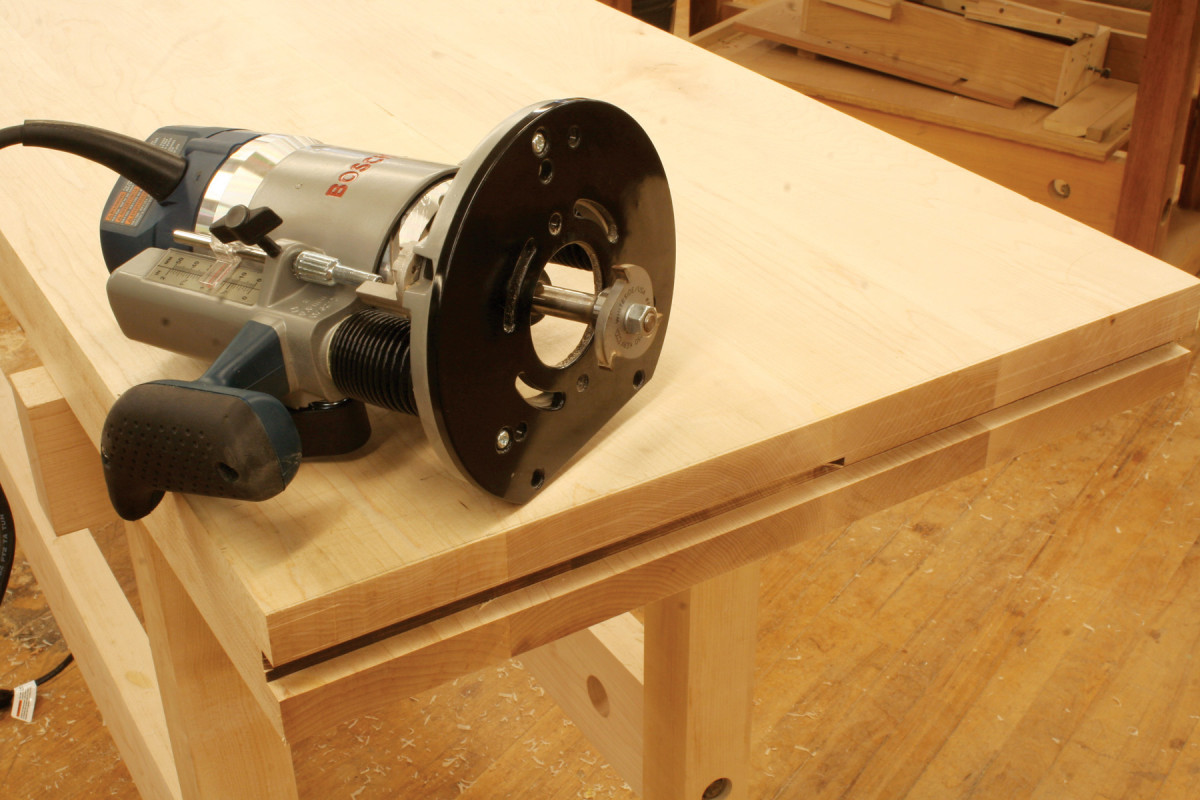
11. Using a slot-cutting bit with a long arbor, make a series of passes to cut a 3/4″ slot in each end of the benchtop. Then make end caps to fit the slots. The end caps keep the top flat, and are attached with bolts.
I use holdfasts and other clamping devices to secure work to my bench. These generally require 3/4″ dia. holes, drilled all the way through the top and end caps. I use a Colt Forstner bit for this work.
Install the tail vise
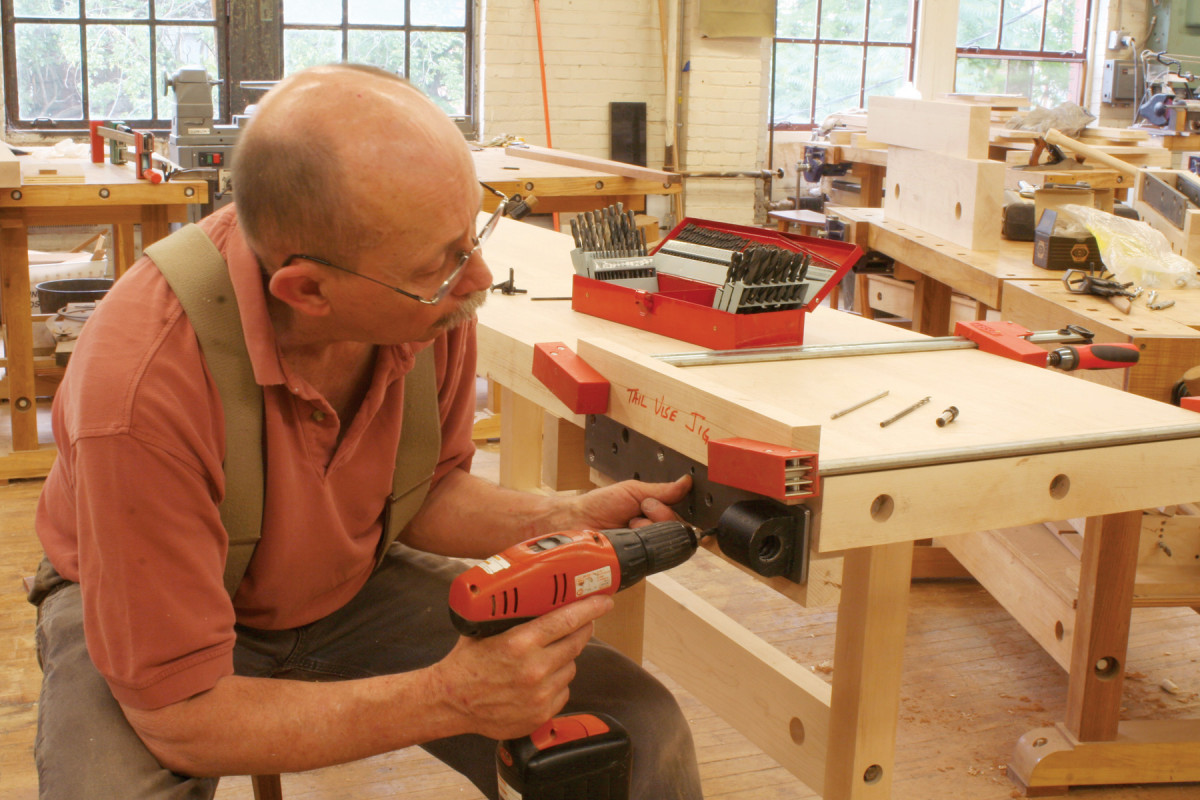
12. Move on to mounting the tail vise, whose metal parts are available as a kit. The vise travels on a steel guide plate, which must be precisely located using a shop-made gauge block.
I’ve searched long and hard for sturdy tail vise hardware that’s not too difficult to install. The best I’ve found is made in Germany by Dieter Schmid [Link]. It consists of a plate that’s fastened to the bench and a cage that’s fastened to the tail-vise assembly. Note: this hardware is right-handed only.

13. Glue together the top, ends and short dog block of the tail vise. Use a spacer between the ends to ensure that they’re the correct distance apart.
Begin by fastening the plate to the bench. First, glue a block (B4) under the bench, flush with the top’s edge, to increase the top’s thickness (see Fig. F). (Don’t apply glue under the end cap, though.) I fasten the plate with machine screws (see Machine Screw Joinery, page 43), so it’s easier to remove for cleaning and lubrication. Alternatively, you can use a self-centering (Vix-style) bit and #14 FH screws. In any case, the plate must be installed precisely parallel to the top of the bench. Make a spacing jig to locate the top of the plate (Fig. G). Clamp the jig and plate to the bench, then drill a pilot hole for one screw at one end of the plate (Photo 12). Install the screw, then drill a second hole and install another screw. Remove the gauge block and double check that the plate is parallel to the top using a combination square. If it’s not parallel, remove the second screw and use a different hole in the plate. Drill holes for the remaining screws and install the plate.
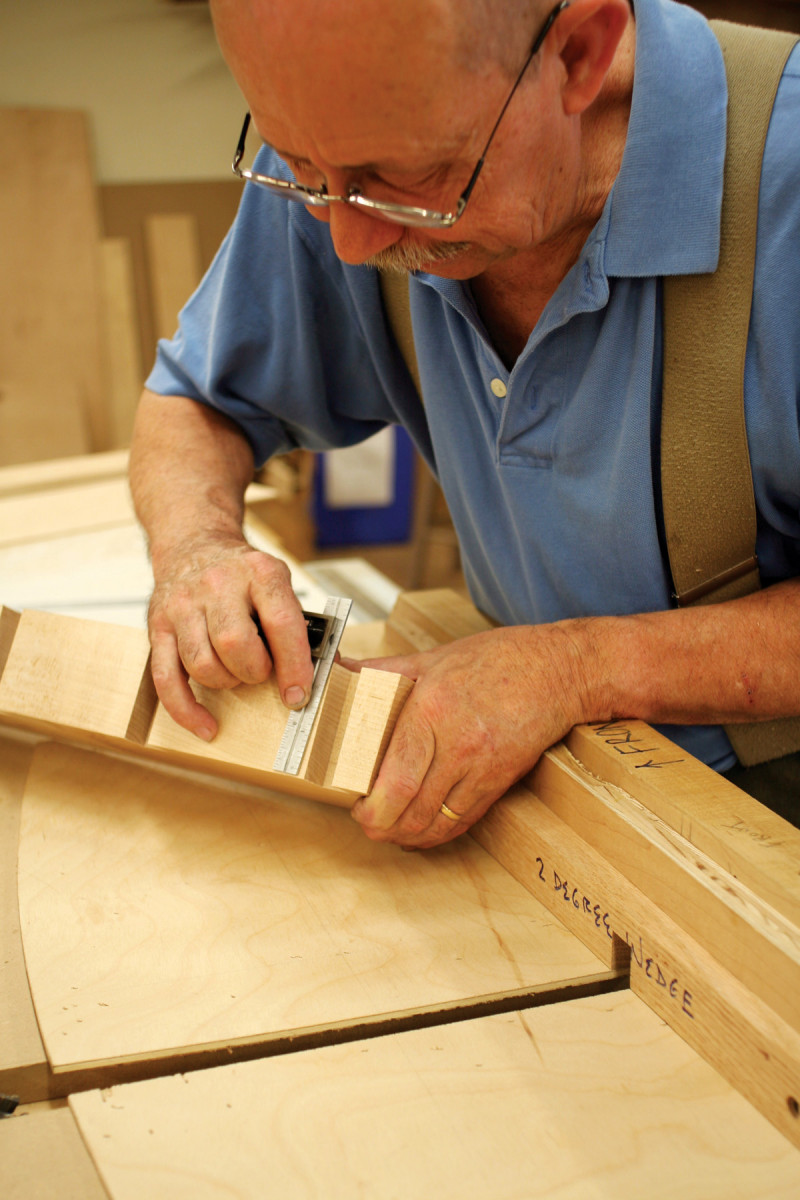
14. Cut dadoes, angled at 2°, in the tail vise’s dog block and top. Use a long wedge to create the angle. These dadoes will become holes for the bench dogs.
Build the tail vise. Mill the top (C1) and short dog block (C2) to thickness and width, but leave them 1/4″ extra long. Mill the front jaw (C3) and rear blocking (C4). Drill a hole for the vise’s screw in the rear blocking. To assist in gluing these parts together, make a 20-1/4″ long spacer (Photo 13). Clamp this block between the front jaw and rear blocking, and then glue up the four pieces you’ve made. The top and short dog block should overhang 1/8″ on both ends. When the glue is dry, trim the top and short dog block flush using a crosscut sled or flush-trim bit.
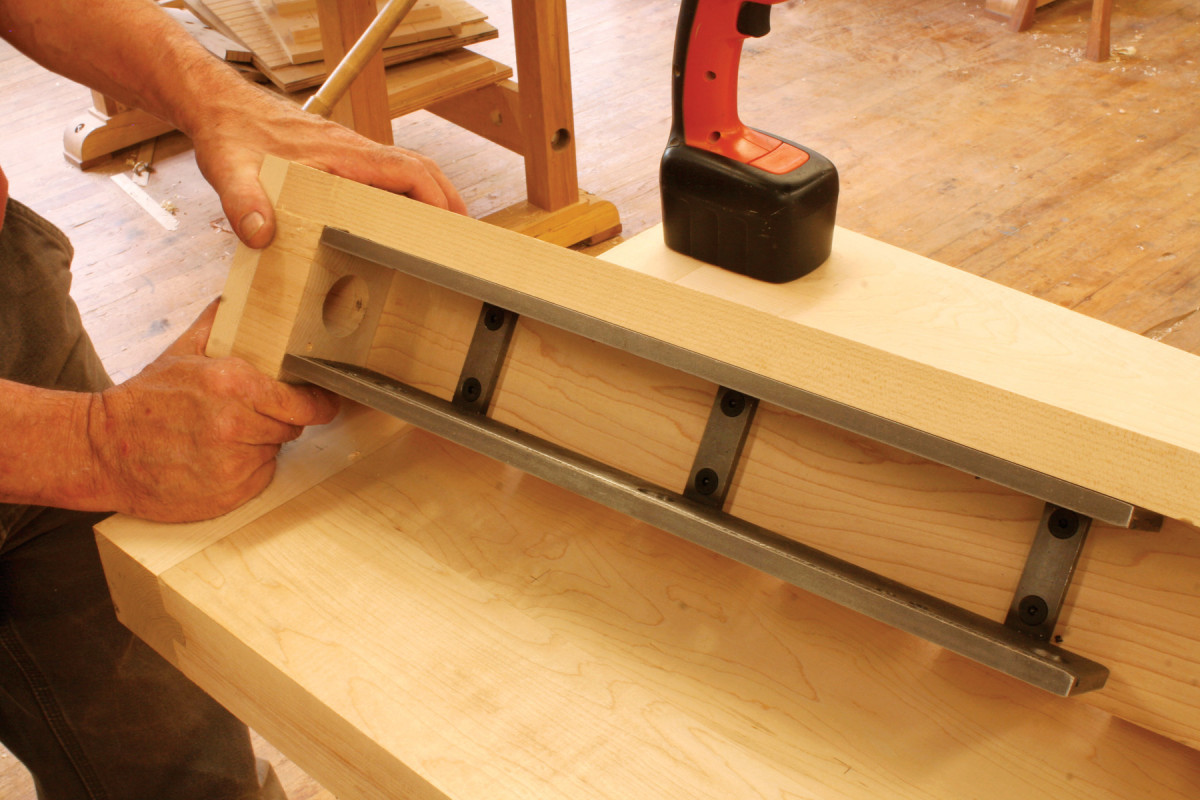
15. Fasten the mating part of the guide plate inside the tail vise, then mount the assembly on the bench.
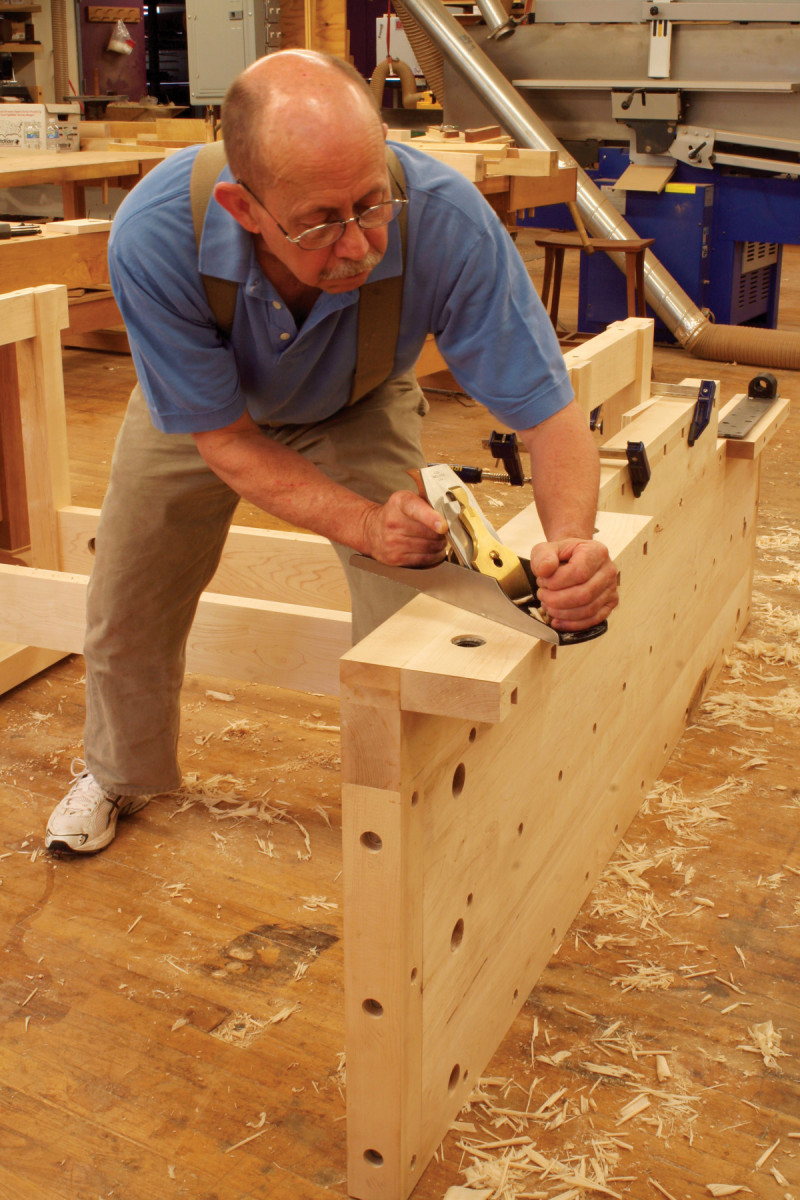
Next, cut the dog holes in the tail vise. They’re angled 2° to the left, while the dog holes in the bench top will be angled 2° to the right (Fig. A). Cut the dog holes with a dado set using a sled with a 2° wedge screwed to the fence (Photo 14). (To help you make this wedge, a 2° angle rises about 3/4″ over 20″.) Make the wedge long enough to extend off both ends of your crosscut sled. You’ll need this extra length later on, for the bench top’s longer dog block. Note that the thin end of the wedge is to the left of the blade, to lean the dadoes the correct way. Clamp the tail-vise cage to the tail-vise assembly, and as before, drill and tap to mount it (Photo 15). Cut, drill and install the end cap (C5), leaving the overhang on the left, and mount the tail vise. It should be slightly proud of the benchtop, for now.
Complete the top
16. Cut dog-hole dadoes in a long block, leaning the opposite way from the dadoes in the tail vise. Glue the block to the benchtop.
Next, install the long dog block on the front of the benchtop. To begin, screw the tail vise all the way in. Measure the distance from the front jaw to the left end of the bench–this will be the actual length of the long dog block. Cut the block to length and mark the locations of the dog holes. Be sure to take into account the guide bars and screws of your front vise–you don’t want dog holes directly above them. Cut dados in the long block. Reverse the 2° wedge you used above so the dados lean the right way. Glue the dog hole block to the top (Photo 16).
17. Complete the benchtop by gluing a face piece on top of the dog block. Glue a similar piece to the front of the tail-vise assembly.
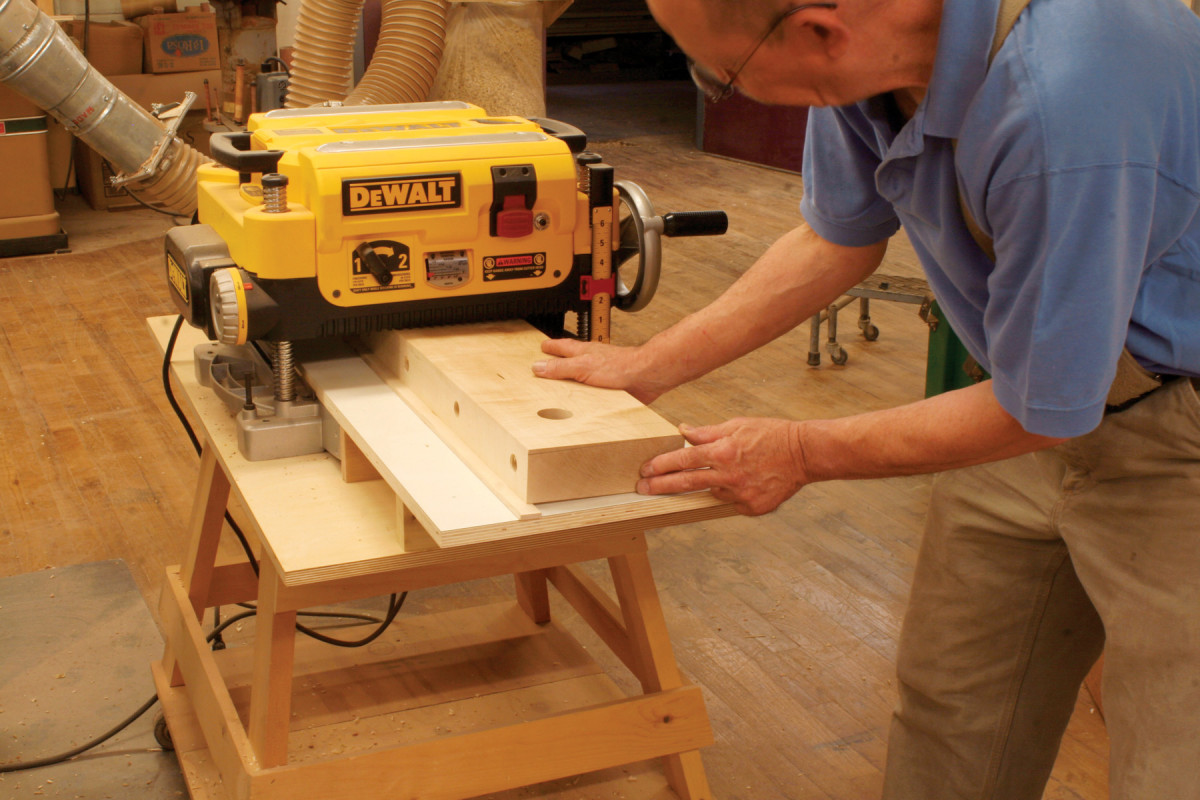
Mill the front caps for the bench (B5) and vise (C6) and glue them on (Photo 17). Fasten the top to the base, then plane the caps and the top of the tail vise flush with the top. Make the bench dogs (E1 and E2, Fig. H).
Install the front vise
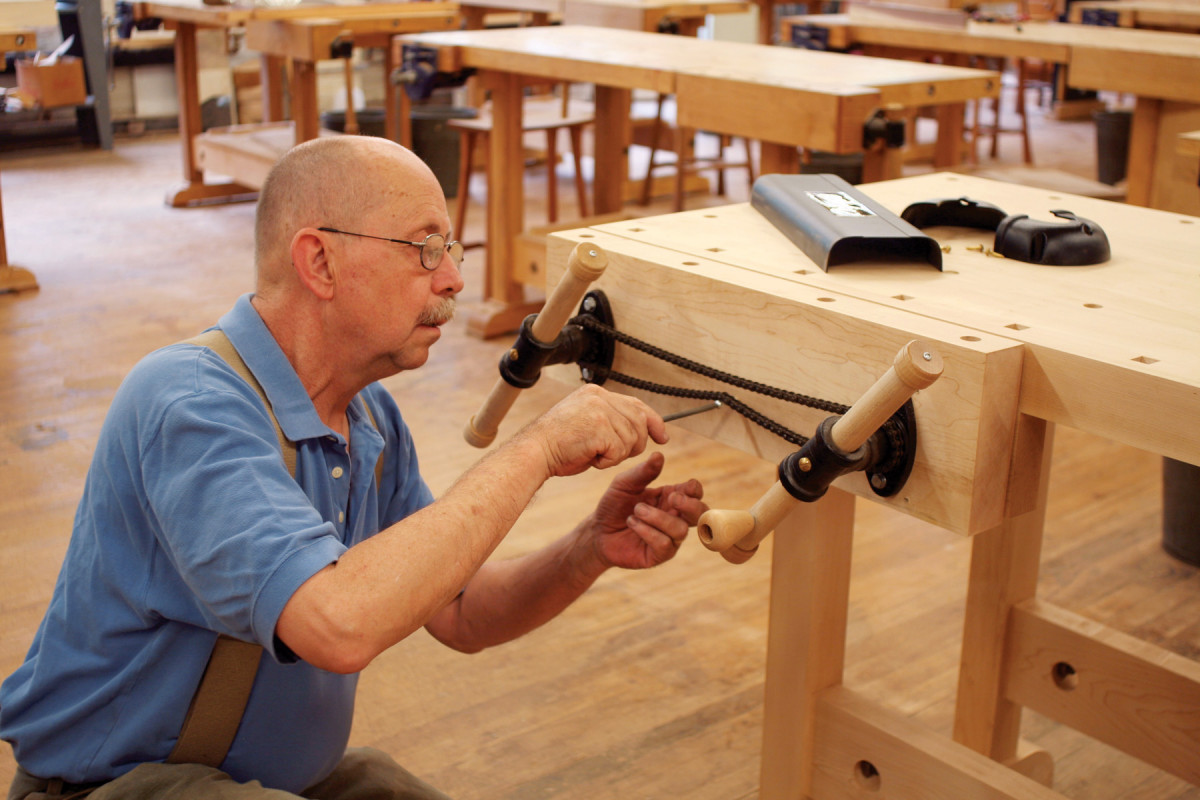
I used the Veritas Twin Screw vise [Lee Valley] on this bench. This vise has a 16-7/8″ opening between its two screws, which are connected by a chain. Turning one of the vise’s handles also turns the other handle, which keeps the front of the vise parallel to the bench as it clamps a workpiece.
The Veritas is just one option; many other types of vises would work well on this bench. Whatever vise you use, its front face should be flush with the front of the bench. If your vise has iron jaws, cut a recess in the back side of the front cap for the vise’s rear jaw before gluing the cap to the benchtop.
18. Glue an additional piece below the top in order to mount the face vise. Plane the piece so it’s level with the edge of the bench.
The Twin Screw comes with complete mounting instructions, but you’ll have to add an additional piece under the bench top, a rear jaw (D1), to accommodate the vise. Mill this piece, then clamp it to the top and mark where the top’s dog holes are located. Cut dados in the back of the rear jaw to align with the dog holes–note which way the dados should lean. Drill holes in the jaw for the vise’s screws and glue the jaw to the bench. Plane the jaw flush to the top (Photo 18).
19. Make the front of the face vise. Use a sled and shim to taper its inside surface. This 2° taper ensures that the vise will pinch at the top when it is fully tightened.
Make the front jaw (D2). Taper it from top to bottom using the planer and a shim (Photo 19). Install the front jaw, screws and chain (Photo 20). After everything is tight, plane the top of the front jaw flush with the benchtop.
20. Install the front vise. You can use any kind of vise here–I’m using the Veritas Twin Screw. Its unique design minimizes the amount that the vise will rack from side to side.
Finish your bench by applying a light coat of thinned shellac. This gives the maple a pleasant amber tone, offers some resistance to stains, and prevents glue from adhering to the top.
Sources
• Freud, www.freudtools.com, (800) 334-4107, 10″ Thick-Stock Rip Blade, #LM71M010, $63.
• Woodworkersworld.net, www.woodworkersworld.net, (800) 266-0699, Whiteside 4″ Long arbor, #A220, $10; 1/4″ Slot Cutter, #6710A, $15.10; Bearing for 1/2″ depth of cut, #B5, $4.
• Infinity Cutting Tools, www.infinitytools.com, (877) 872-2487, Colt Forstner Bit, 3/4″ dia., #101-123, $27.90.
• Dieter Schmid Fine Tools, www.fine-tools.com (located in Germany), Large Tail Vise, #300650, 115 euros (approx. $160), plus shipping.
• Lee Valley, www.leevalley.com, (800) 871-8158, Large Veritas Twin Screw Vise, #05G12.21, $219.
Alan Turner is the founder of Philadelphia Furniture Workshop (www.philadelphiafurnitureworkshop.com), a woodworking school dedicated to traditional furniture built with hand and power tools.
Here are some supplies and tools we find essential in our everyday work around the shop. We may receive a commission from sales referred by our links; however, we have carefully selected these products for their usefulness and quality.


Very nice work, Alan. I was taken by your saw jig to cut tenons on the legs. Have you ever published the plans for it? The clamp is what makes sense to me.
Thanks for the article.
Richard.
This is from an older American Woodworker article, and I haven’t been able to track down plans for that specific jig yet. Here’s a similar one from Glenn Huey, though it’s missing the clamping mechanism: https://www.popularwoodworking.com/wp-content/uploads/2010/10//Web-Table-Saw-Tenon-Jig-New.pdf