


We may receive a commission when you use our affiliate links. However, this does not impact our recommendations.
 My wife, who loves to cook, is also an inveterate recipe collector. Every one she clips or copies goes in her “recipe” drawer. But as this drawer is stuffed chock-a-block full, she can never find the recipe she wants. To get organized, she decided to transfer the recipes onto 5×8 cards. (We’ve learned that handwritten recipes are often too long to fit on one side of a 3×5 card and most recipes clipped from magazines are too big). I designed this box to hold the cards—and look good doing it (with style?). The lid works as a recipe holder when it’s open, and inside, an adjustable clip keeps the cards in place, whether the box holds only a few recipes or a drawer-full!
The curved lid may look challenging to make, but it’s actually pretty easy, because most of the work is done on the tablesaw. The same goes for the through mortise and tenon joints: The mortises are routed with a template and the tenons are roughed out on the tablesaw. Don’t worry about fitting the wedged tenons—the wedges are fake.
 Shape the curved lid
Make the lid (A, Fig. A) from a 1″ thick blank that’s roughly 13″ long. The blank’s extra length provides a short test piece that will be used later, when you mount the lid. To shape the inside of the lid, you’ll pass the blank across the blade at a 90° angle. This may sound crazy, but it’s actually just a variation of the traditional method for cutting coves on the tablesaw, in which a fence clamped at an angle to the blade is used to guide the work. In this case, the fence is clamped perpendicular to the blade. (By the way, you can use this method to hollow a curved lid or door of almost any size, whether it’s made from a single piece of wood or coopered.)
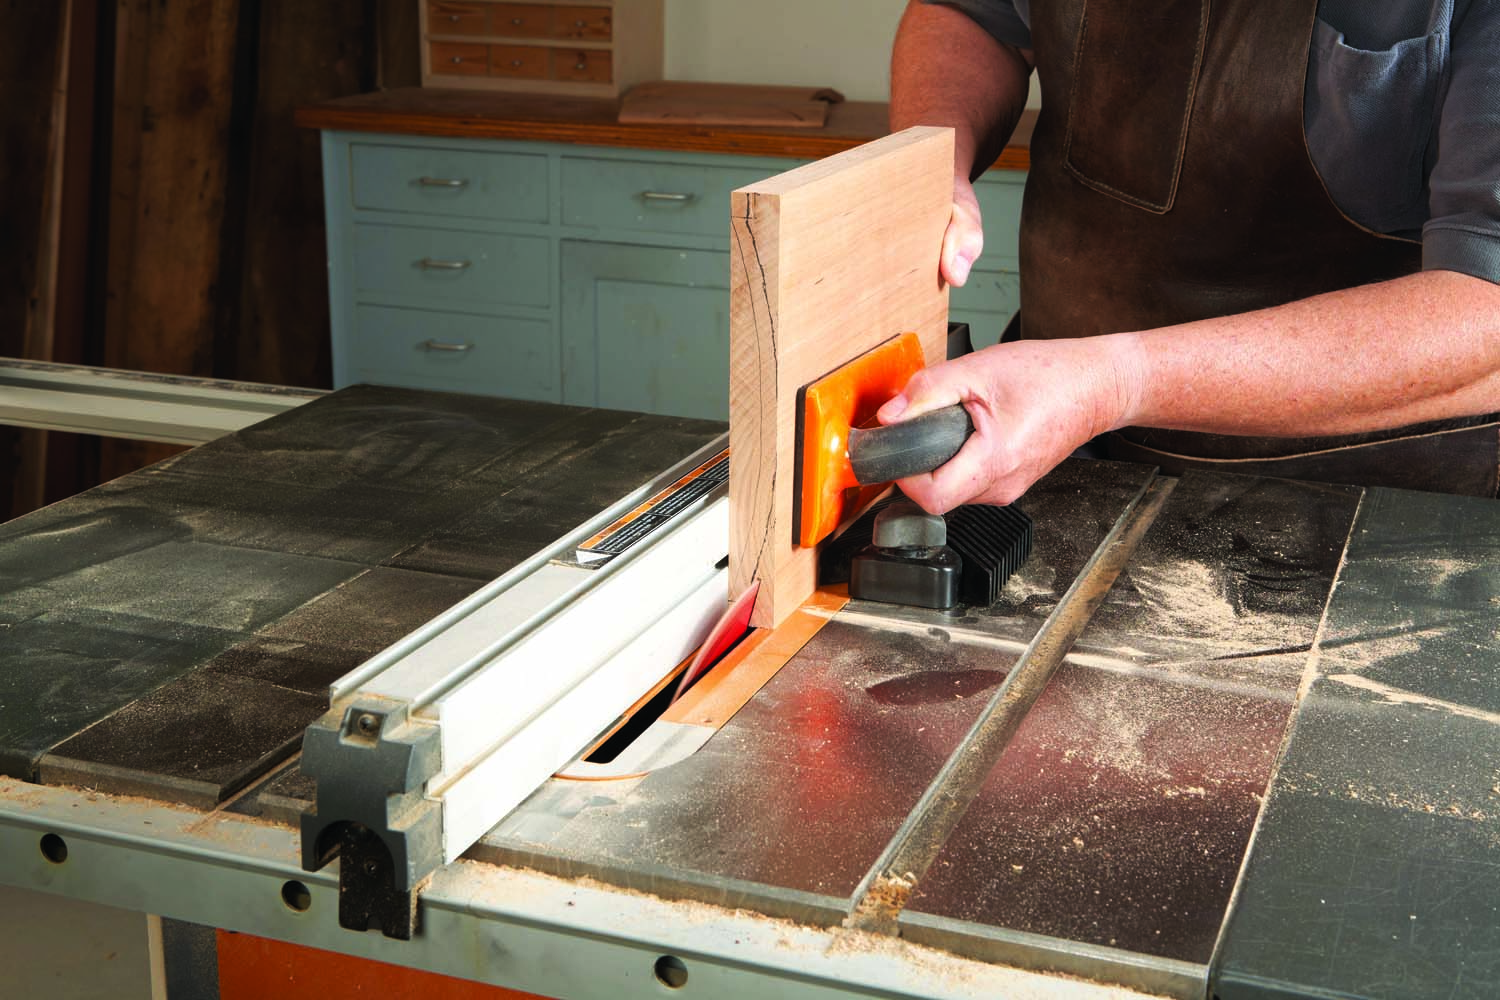
Photo 1. Start shaping the curved lid by removing excess material from the top of the blank. This reduces the amount of planing you’ll have to do later.
Draw the lid’s profile on both ends of the blank (Fig. B). Leave 1/2″ waste on each side to provide a stable surface for the blank to ride on as its coved shape nears completion. Then remove the waste on the top of the lid by making a pair of 15° cuts (Photo 1).
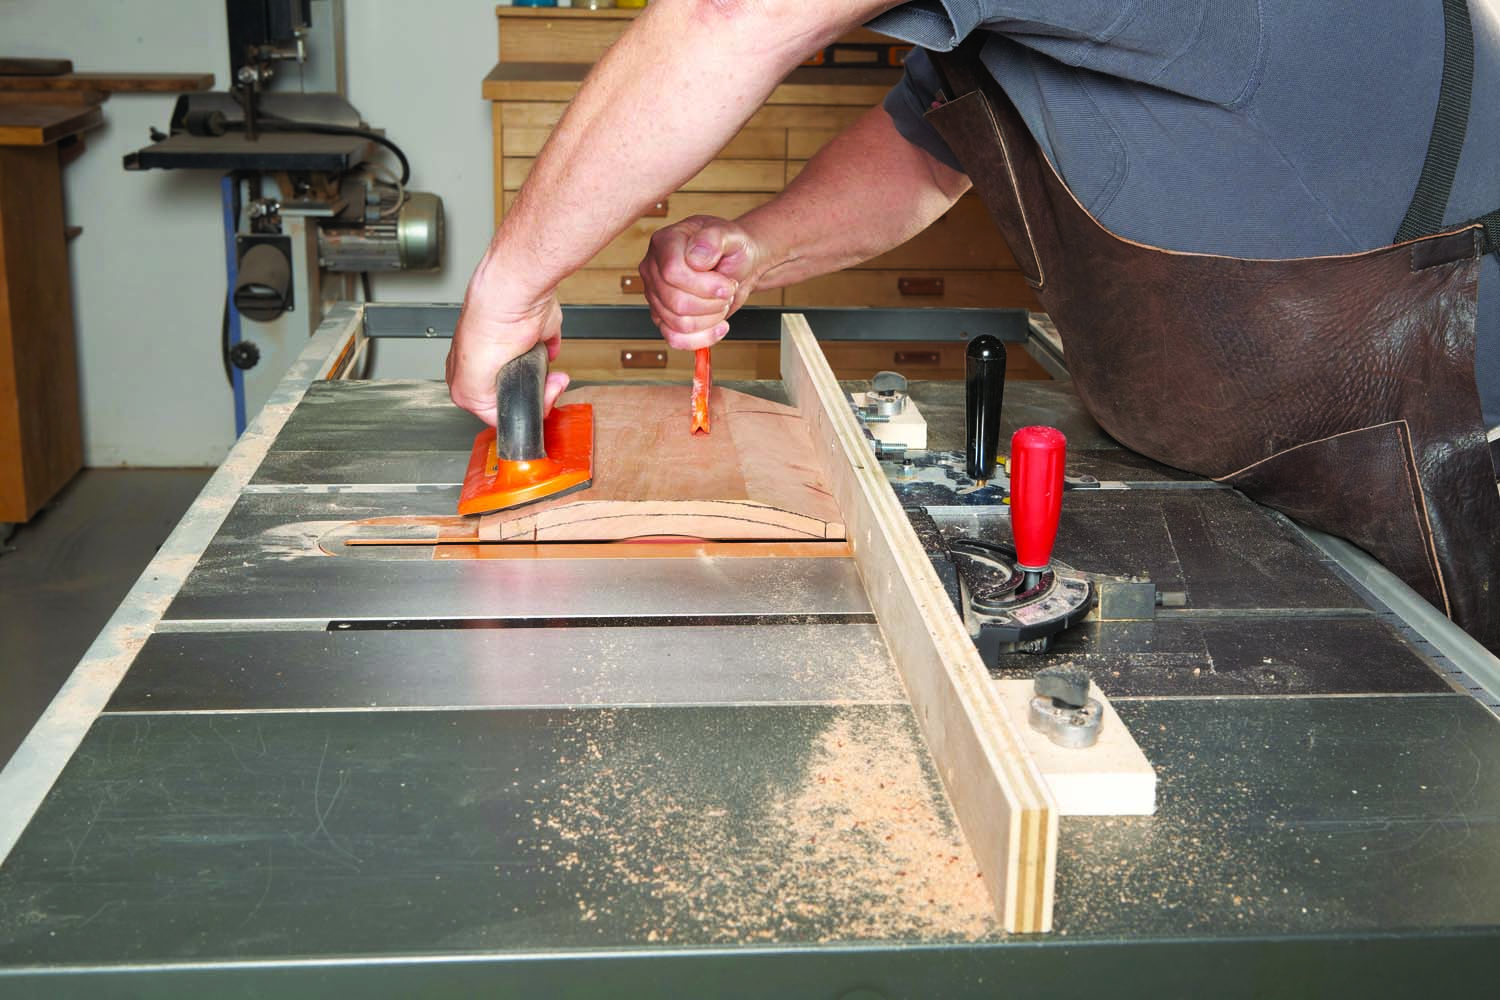
Photo 2. Use a perpendicular fence to hollow the bottom. Set the blade to make a minimal cut. Then rake the blank across the blade. Make successive passes with the blade raised incrementally to complete the cove.
Build a fence to hollow the blank using a piece of 3/4″ plywood that’s 2″ wide and slightly more than twice as long as the blank (Photo 2). Center this piece on the blade and attach it to two miter gauges set at 90°—this keeps the fence rigid and holds it perpendicular to the blade. Install Magswitch magnets in a pair of blocks and attach them to the fence. These magnets switch on and off to provide both strong holding power while cutting and easy adjustability between cuts.
For the smoothest results (and the least sanding), use a blade with flat-topped teeth to hollow the blank—a rip blade is best, but a combination blade will also work. (A combination blade has flat-topped teeth mounted between alternately beveled teeth). Mark the center point where the blade emerges from the table and place the center of the blank on that mark. Move the fence up to the blank and lock it in place. Set the blade so that only 1/8″ extends above the table.
Make the first cut by sliding the blank slowly and deliberately across the blade while holding it firmly against the fence. Do not force the cut by moving too fast. Measure from the edges to the start of the cut on both sides of the board. If the distance is not the same, adjust the fence so that it is. Then make additional cuts, raising the blade in 1/8″ increments, until you reach the profile line.
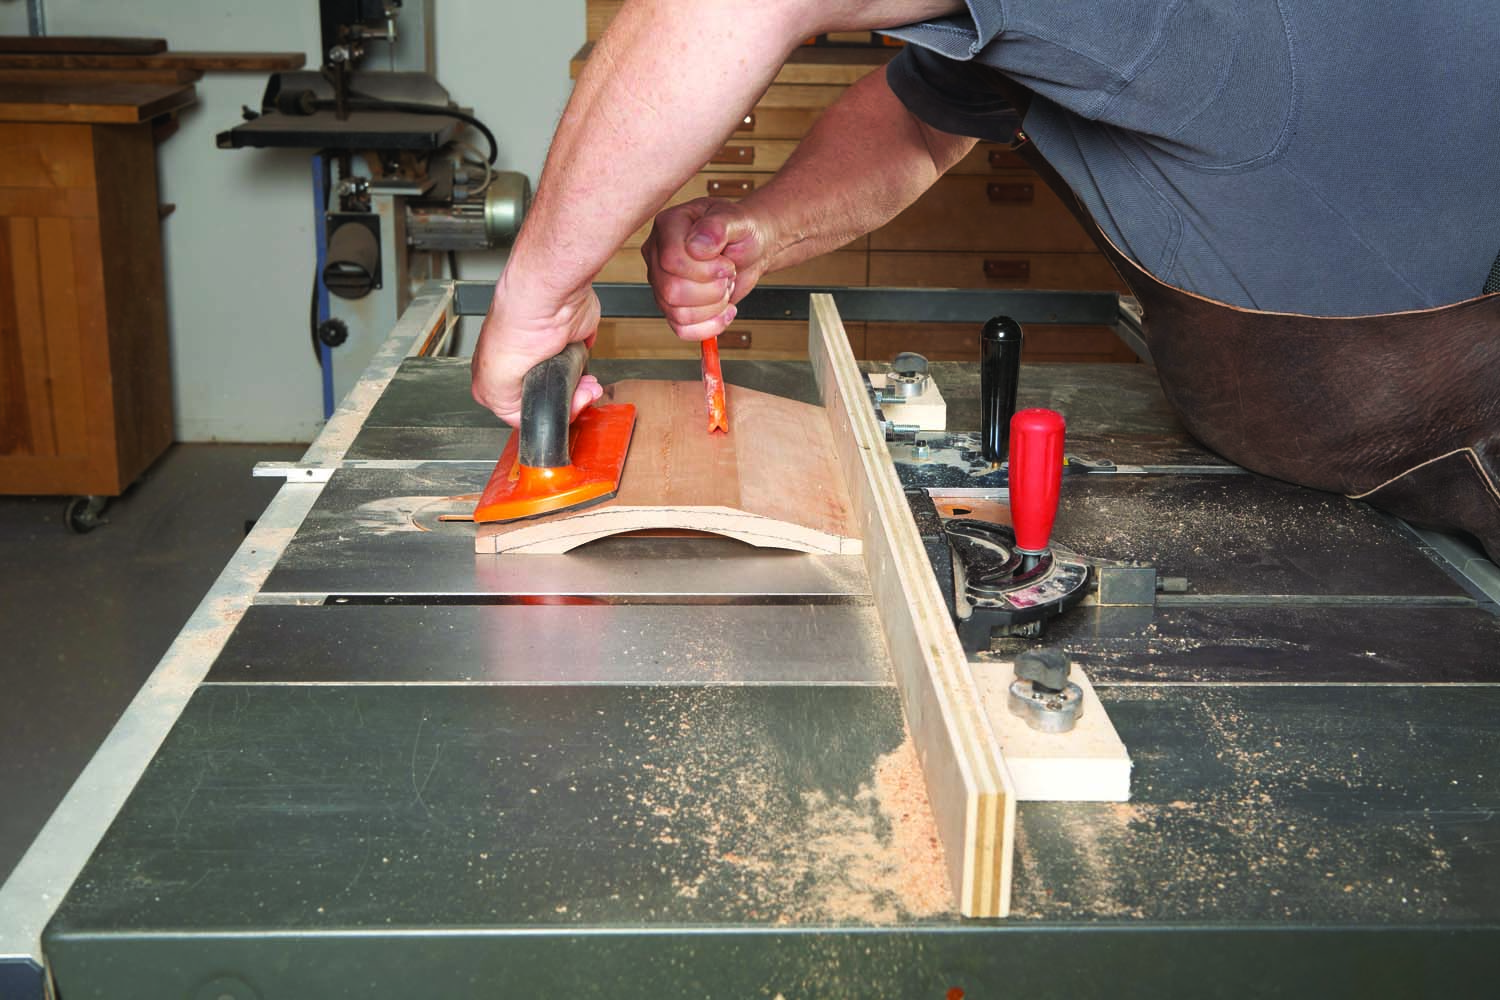
Photo 3. Extend the initial cove on both sides to complete the hollowing process. Simply reposition the fence, lower the blade and repeat the process. Flip the blank end-for-end to cut on both sides.
To complete the hollowing, simply repeat the process to extend the cut from edge-to-edge, while following the profile line (Photo 3). Make two passes with each setup, one on each side of the initial cove. After shaping the inside of the lid, remove the saw marks and smooth the surface by sanding or by using a gooseneck scraper (see Sources). Then cut off the waste on both sides so you can shape the top of the lid (Photo 4). Finish-sand the top and then cut the lid to final length. Save the curved offcut.
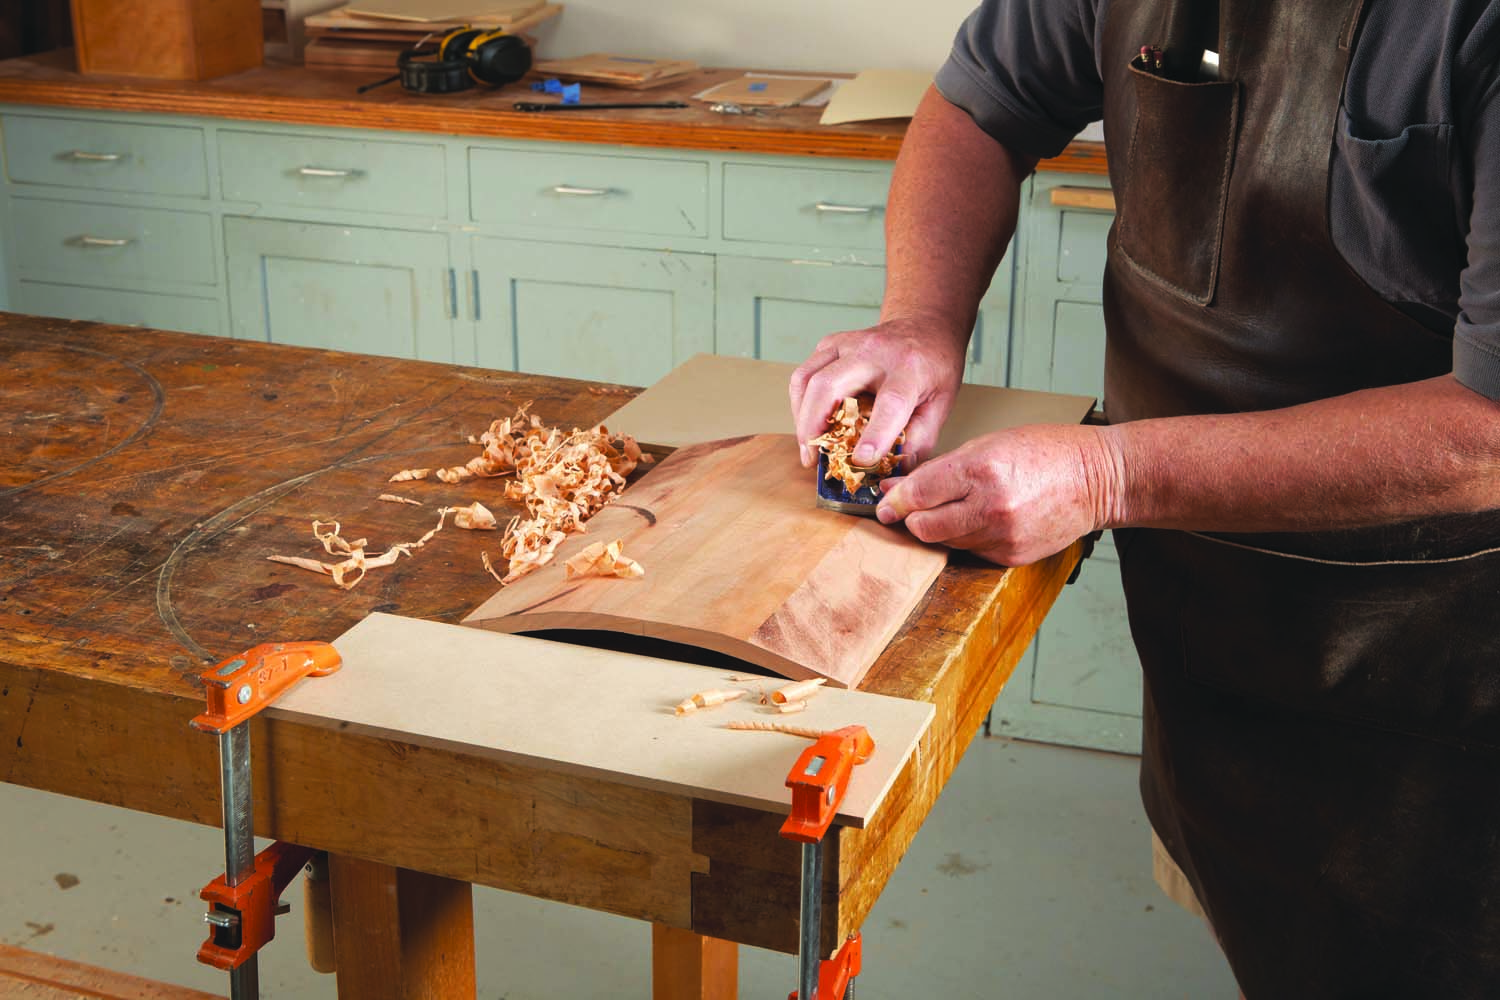
Photo 4. Shape the lid’s curved top with a block plane. Then smooth the surface by sanding.
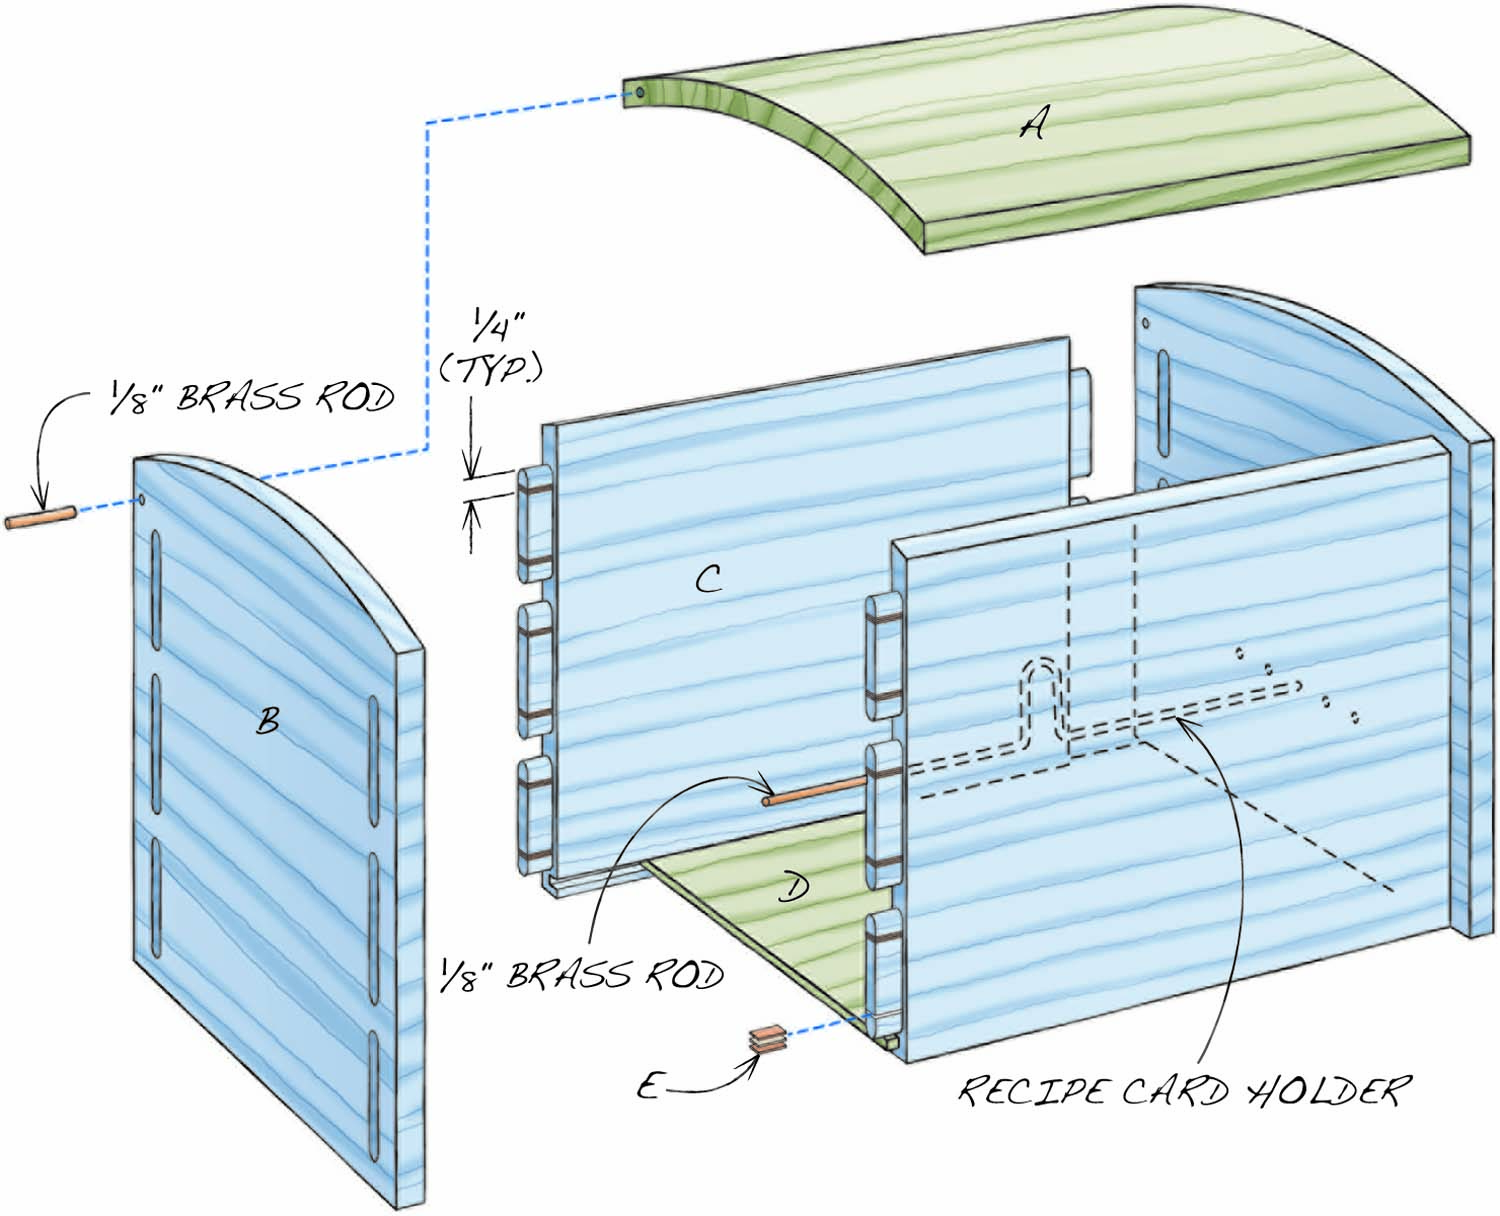
Fig. A. Exploded View
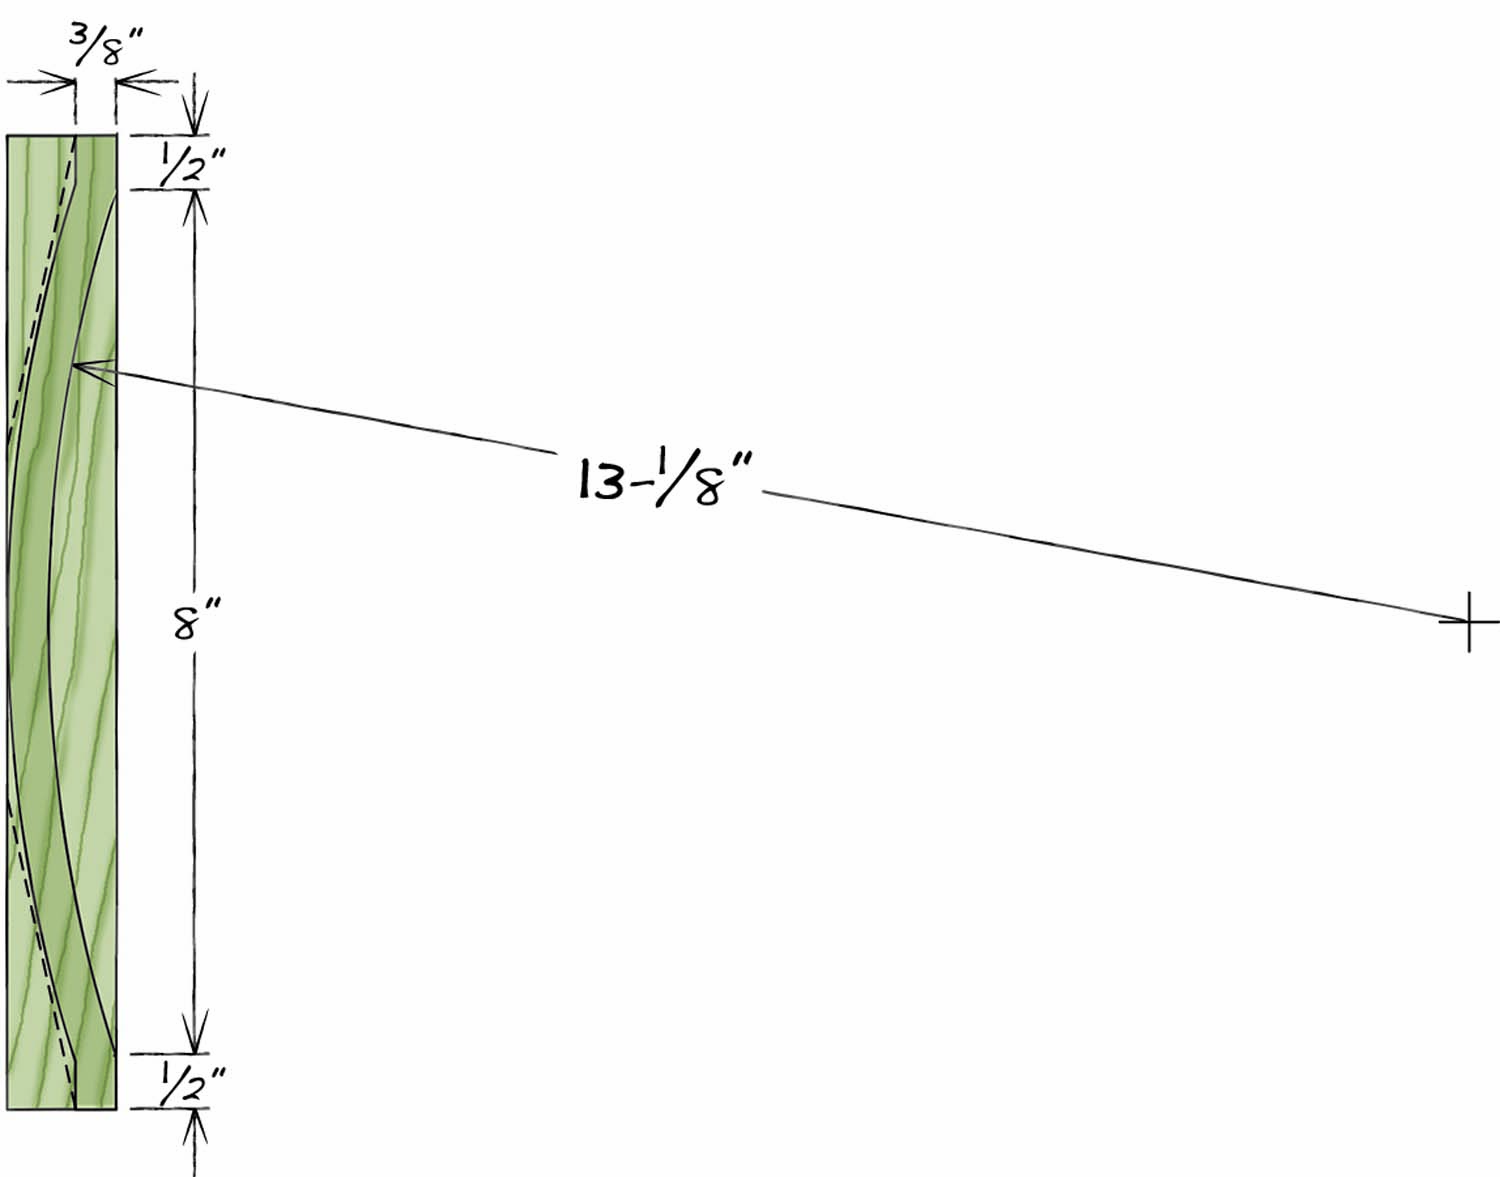
Fig. B. Lid Profile
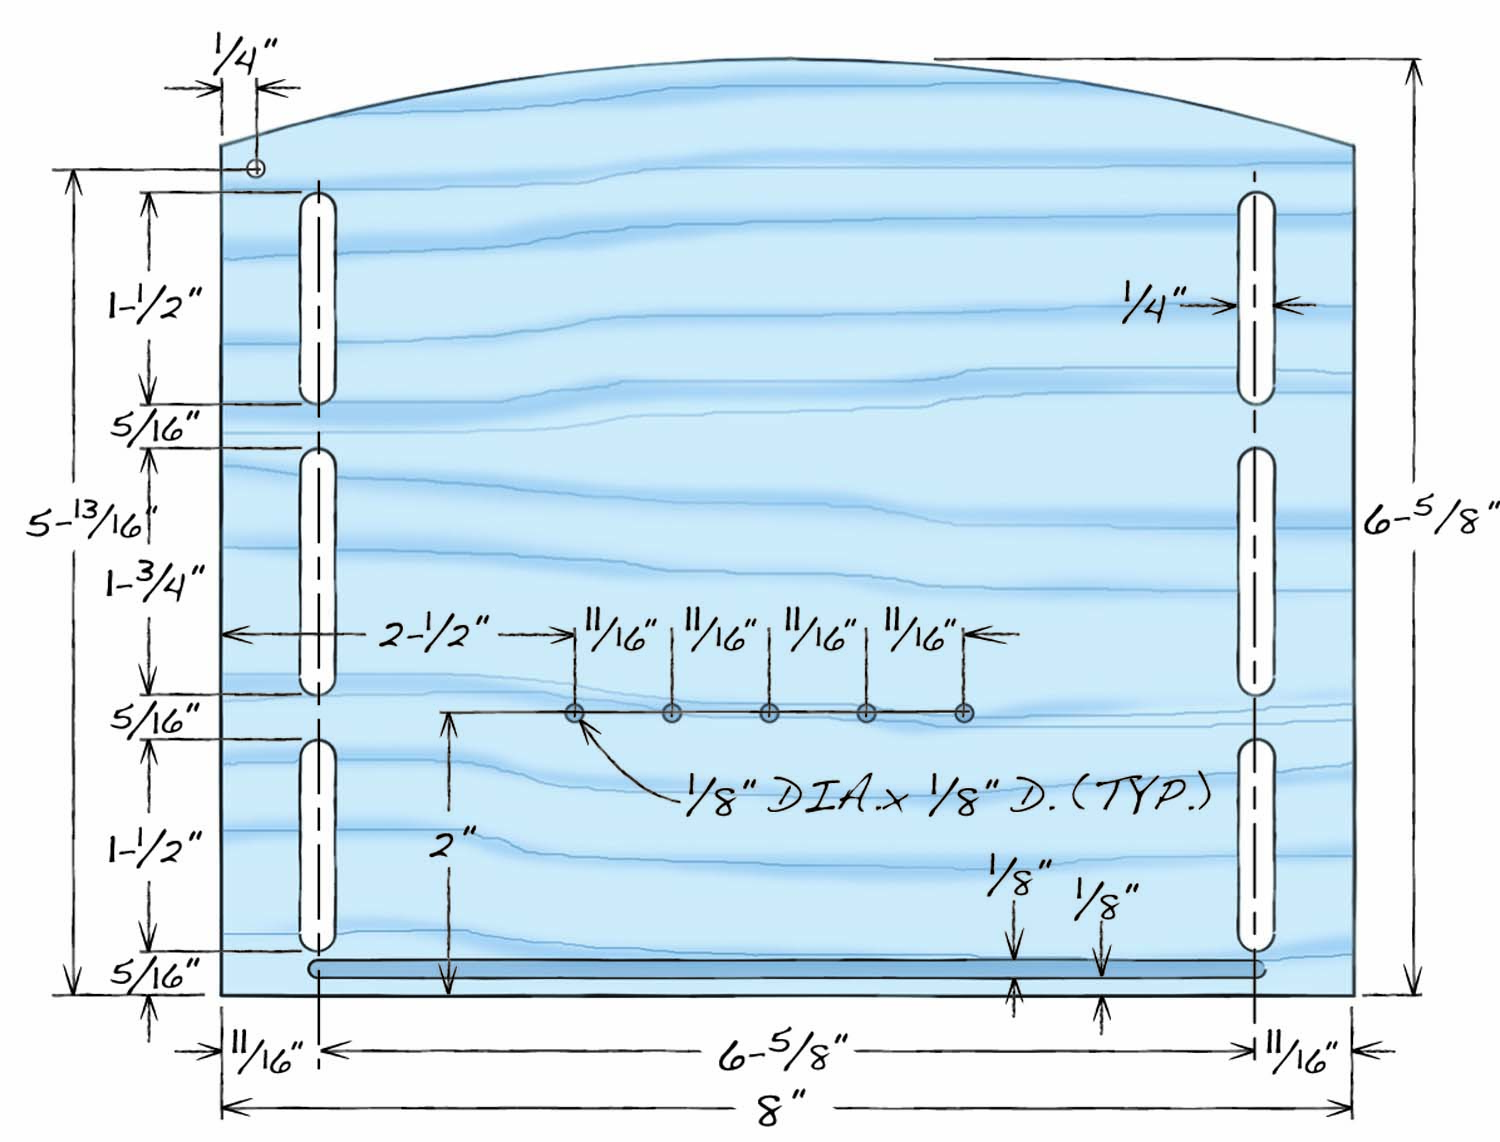
Fig. C. End Dimensions
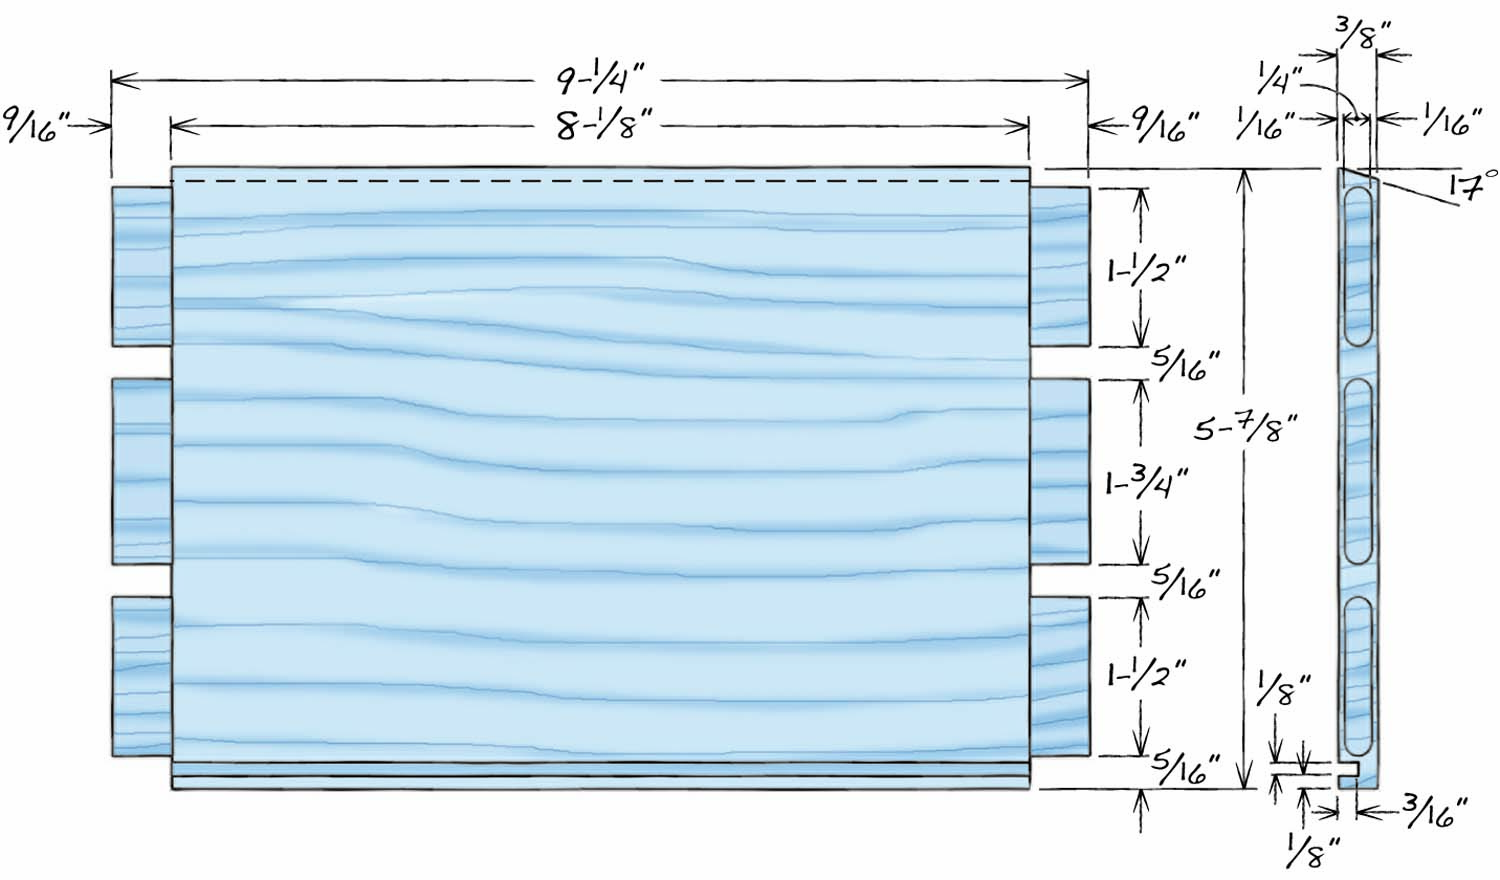
Fig. D. Side Dimensions
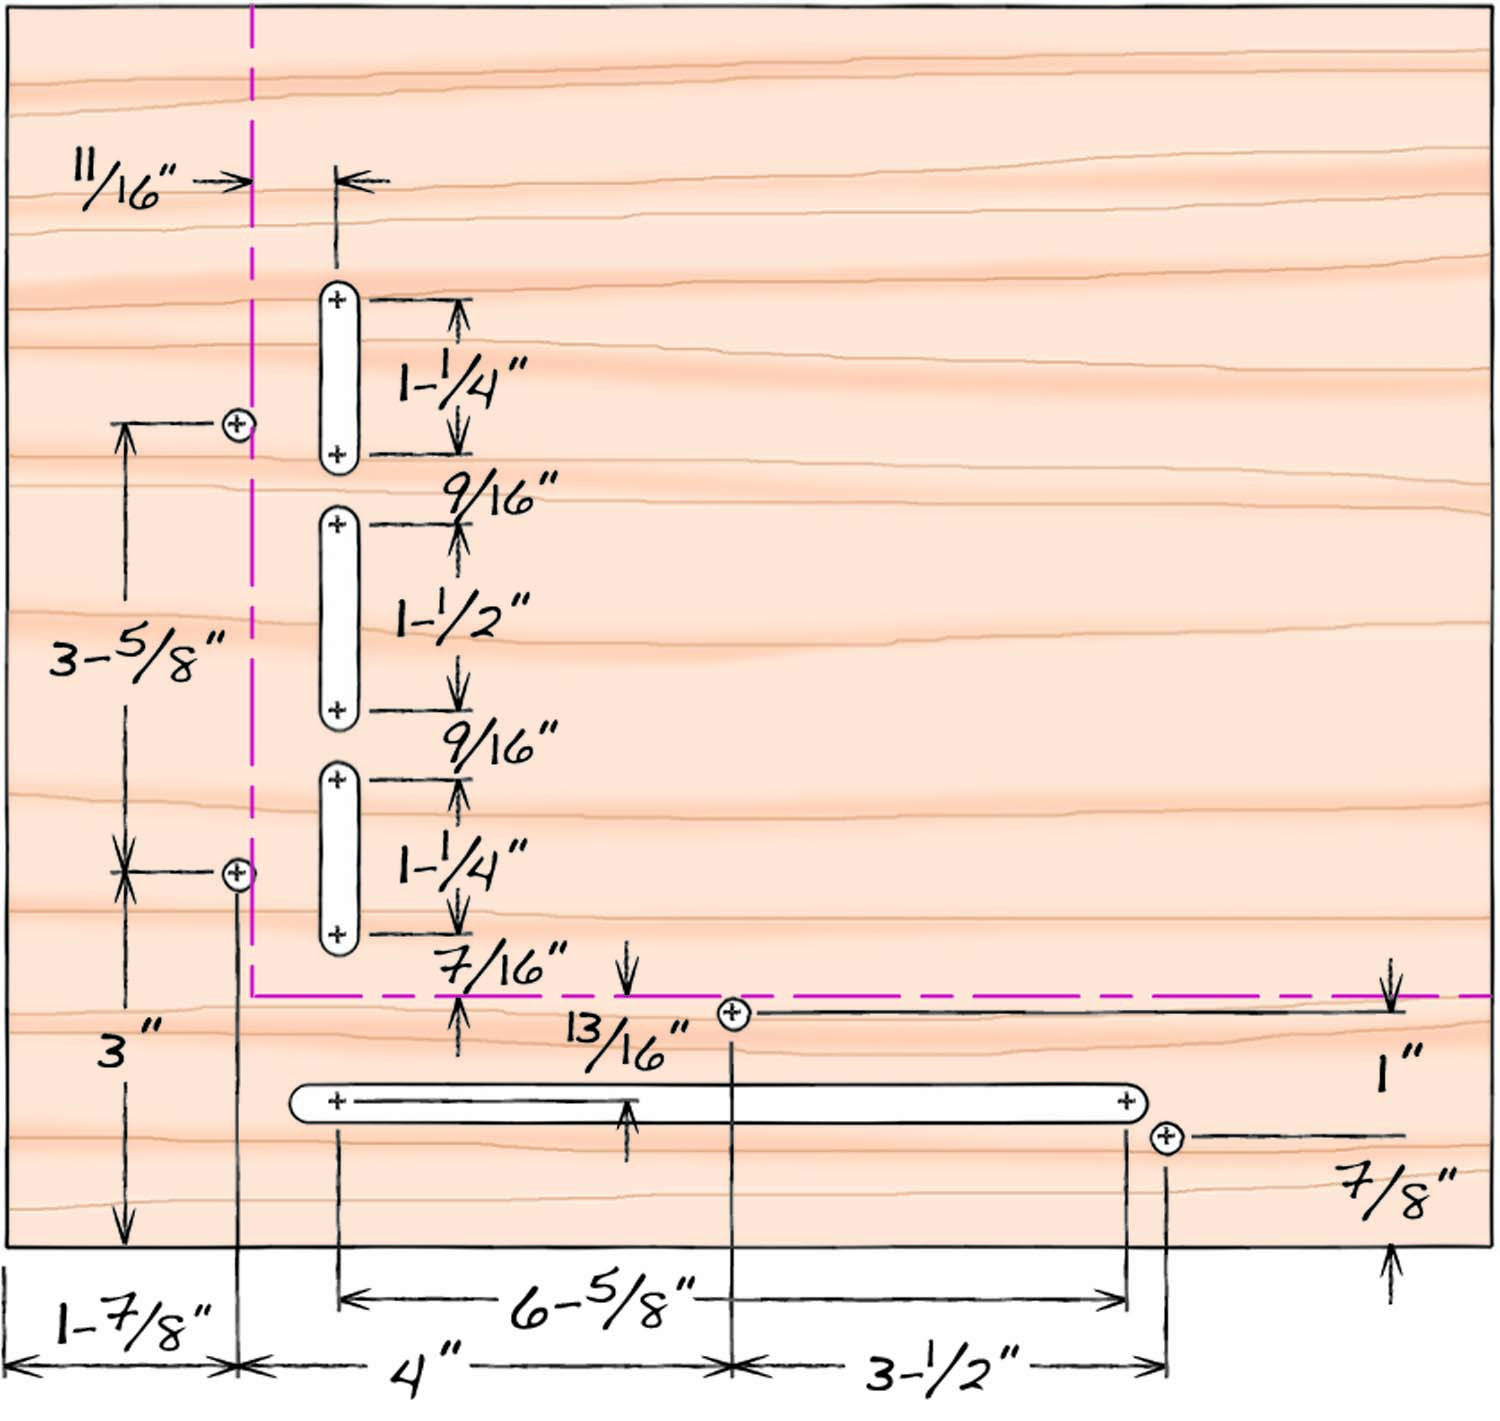
Fig. E. Mortising View
 Rout mortises and slots
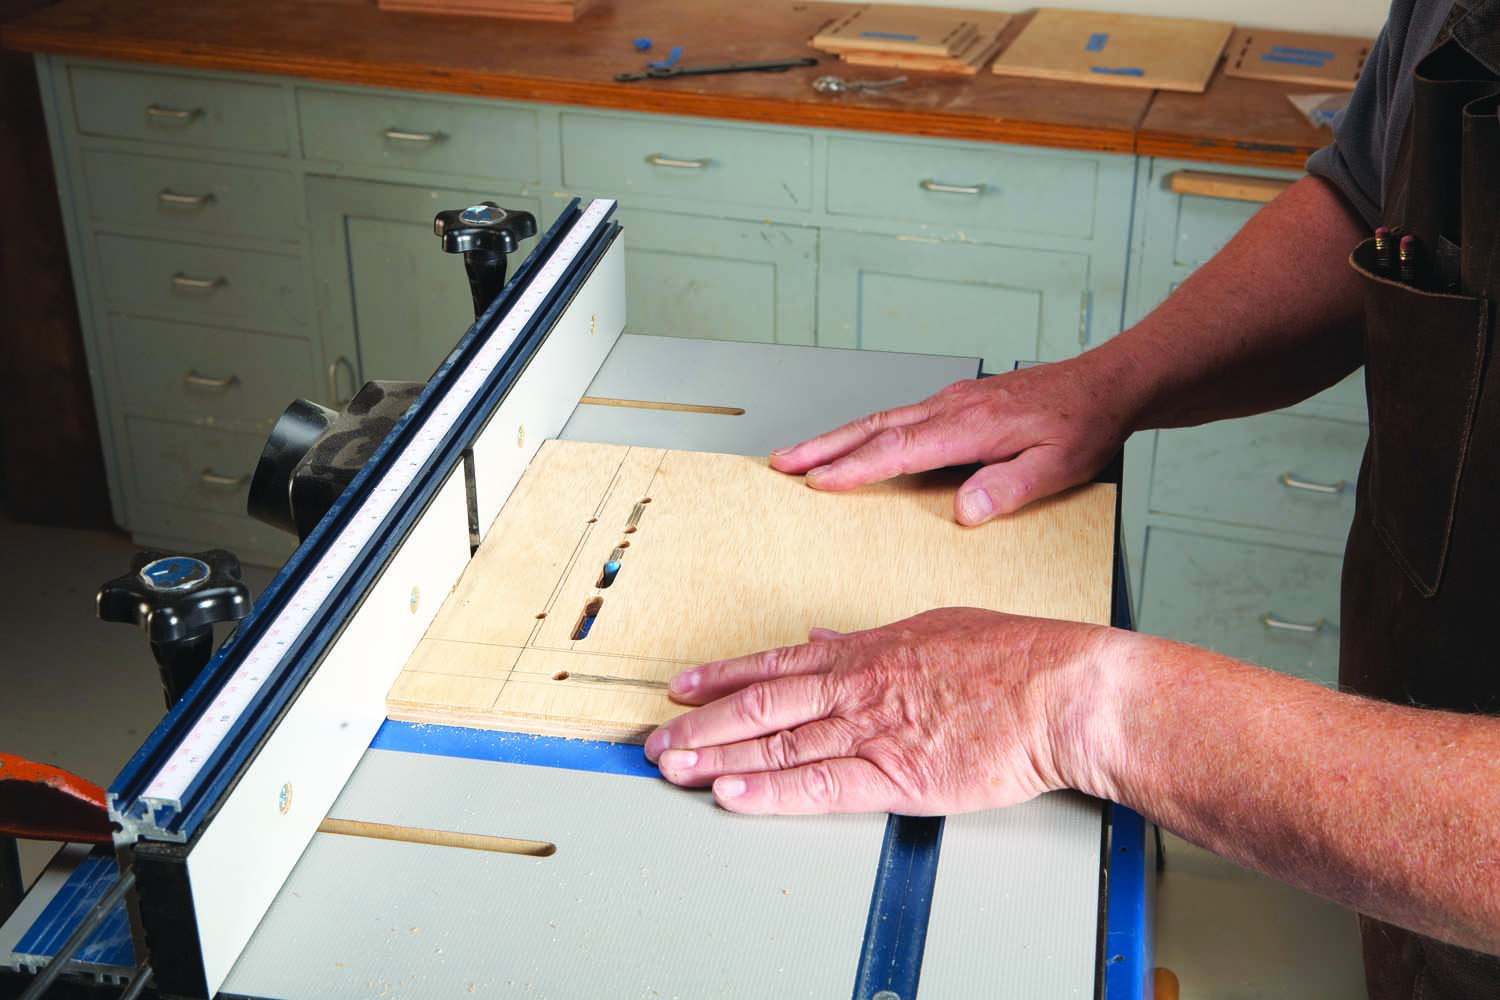
Photo 5. Make a template with slots to cut mortises in the box ends. Lay out the slots and drill holes at both ends. Then use a straight bit and a fence to finish the job.
Make a template so you can rout consistent mortises and slots in the box ends (Photo 5; Fig. E). This template has indexing pins that allow using it on both sides. Carefully lay out and drill the four 1/4″ dia. index pin holes on the template. Then cut three 1/4″ dia. x 13/16″ long dowels and install them as indicated in Figure E. Place a try square or a framing square against the three dowels and use the two sides that touch the dowels to mark a pair of perpendicular lines that form an “L” on the template. Then use these two lines to locate the three mortise slots and the long slot for the box bottom. Install a fence on your drill press and drill 5/16″ dia. holes at both ends of all four slots. Then use a 5/16″ dia. straight bit and your router table to finish routing the slots.
Outfit a plunge router with a 5/16″ guide bushing and a 1/4″ up-cut spiral bit to rout the mortises in the end pieces (B; Fig. C). Place each end piece on your bench, on top of a sacrificial board. Position the template on top of the end piece with its indexing pins firmly registered against the end’s side and bottom. Then clamp the assembly to your bench—after clamping, check to make sure all three pins remain registered.
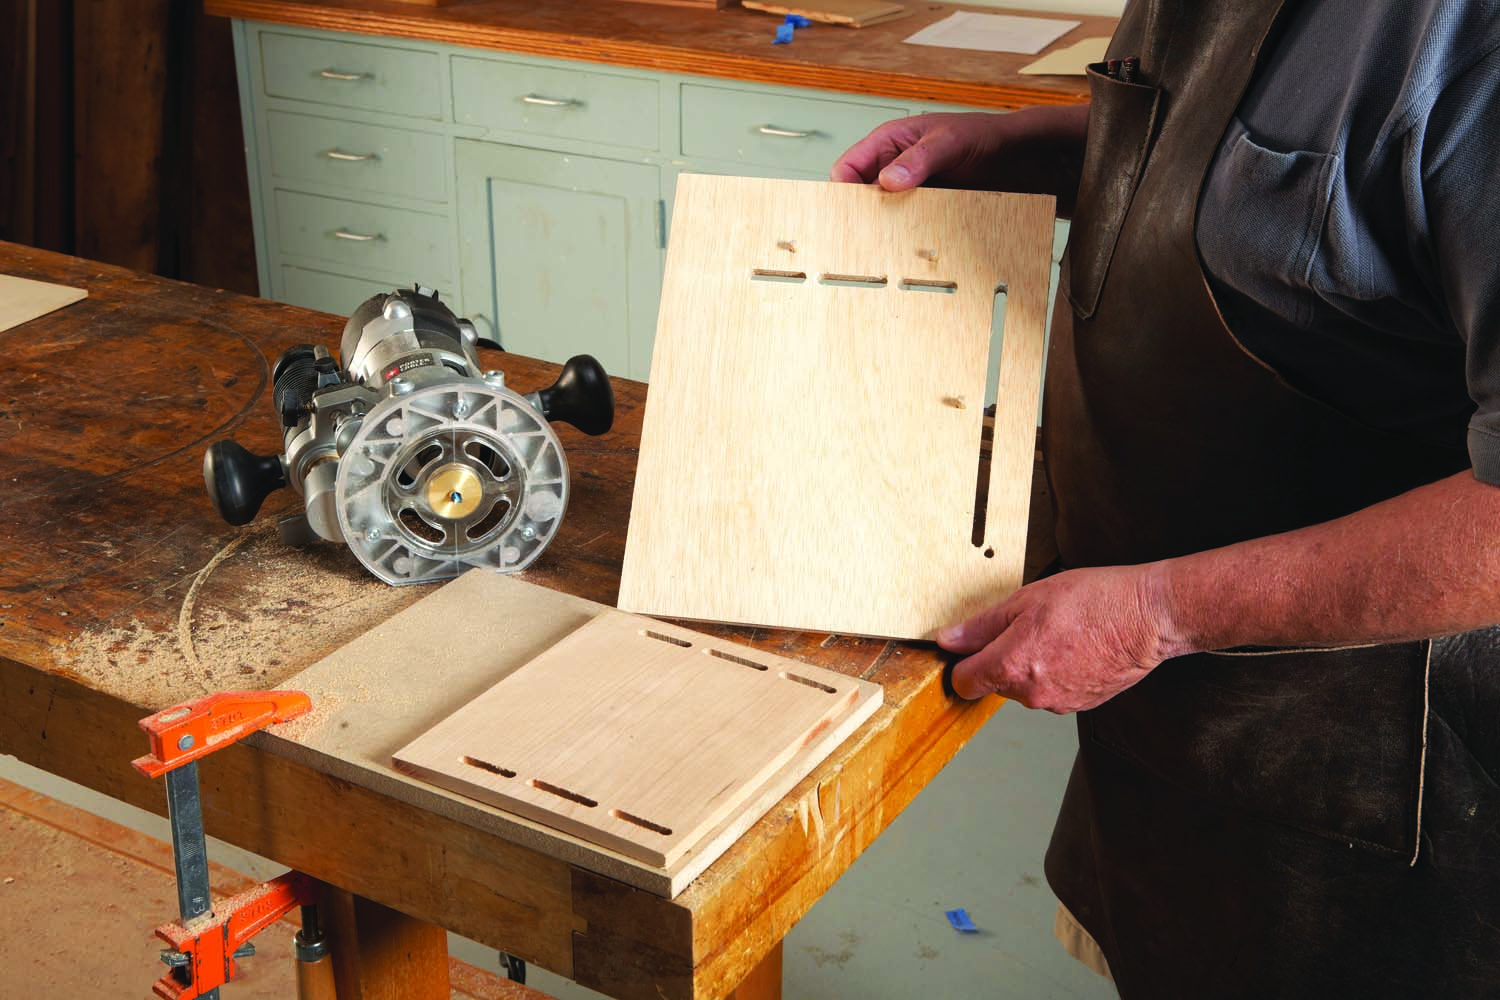
Photo 6. Rout mortises in each end piece using both sides of the template. Rout the first three mortises. Then flip the template, push its pins through to the opposite face, and go again.
Plunge-rout the first three mortises, using the guide bushing and the slots to guide the cuts. Then flip over the end piece and repeat the process to rout the remaining mortises (Photo 6). To rout the slot for the box bottom, move the template’s bottom indexing pin to the fourth (lowest) hole and install a 1/8″ up-cut spiral bit in your router. Then follow the same procedure as for routing the mortises.
Locate and drill the hinge-pin hole and the five 3/16″ deep stopped holes for the card retainer on each end piece, using the drill press. Stack the end pieces and use the fence and a stop to drill the hinge-pin holes, so they’re identically located.
Cut tenons
Cut the side pieces (C; Fig. D) to final length and width. Then rabbet both ends of each piece to establish the tenon cheeks—make test cuts first, using scrap stock, to match the tenons’ thickness with the mortises in the end pieces. Cut tenon cheeks on two scrap pieces as well—they’ll be used later, when you mount the lid. Cut the bevel on the top of each side piece (and both scrap pieces) with the blade tilted to 17°. Then saw or rout the groove for the box bottom.
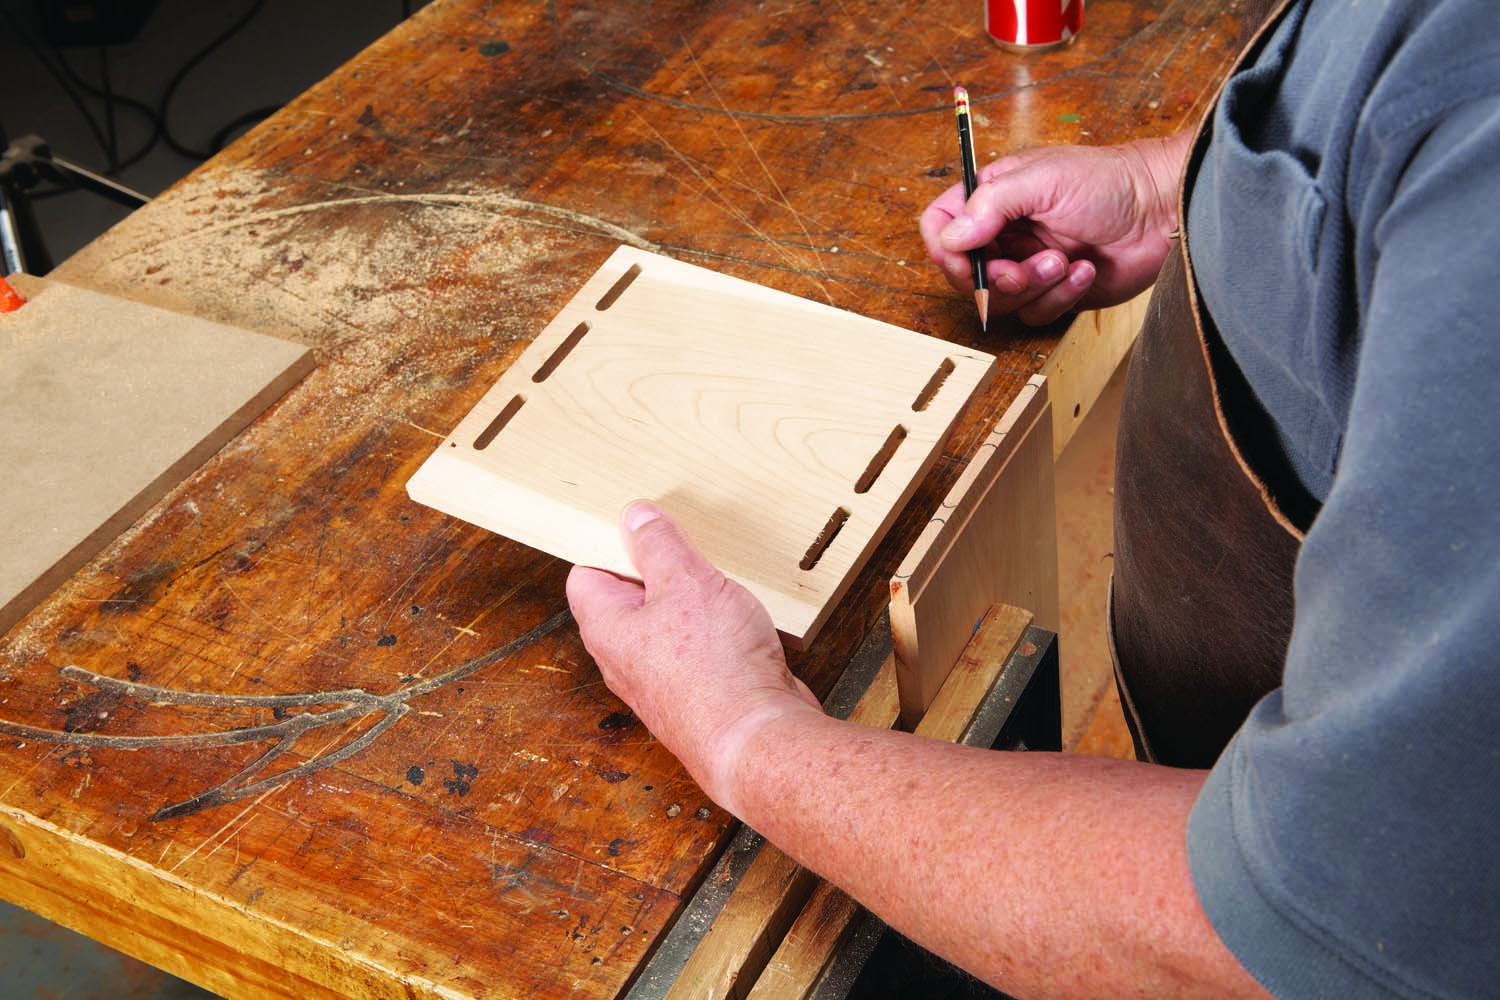
Photo 7. Use the mortises in an end piece to mark the rounded tenons on the adjacent side piece. Make sure the bottoms of both pieces are flush when you mark.
Clamp each side piece in a vise to mark its rounded tenons (Photo 7). Remove the waste between the tenons using a bandsaw and a chisel—leave the ends of the tenons square for now. Next, cut slots 1/4″ from both ends of each tenon for the fake wedges. Make the wedges by gluing a strip of maple veneer between two strips of walnut veneer (The kerf of a 1/2″ bandsaw blade is just wide enough to hold three strips of veneer.) Cut the glued-up strip into short pieces and glue one piece in each kerf (Photo 8).
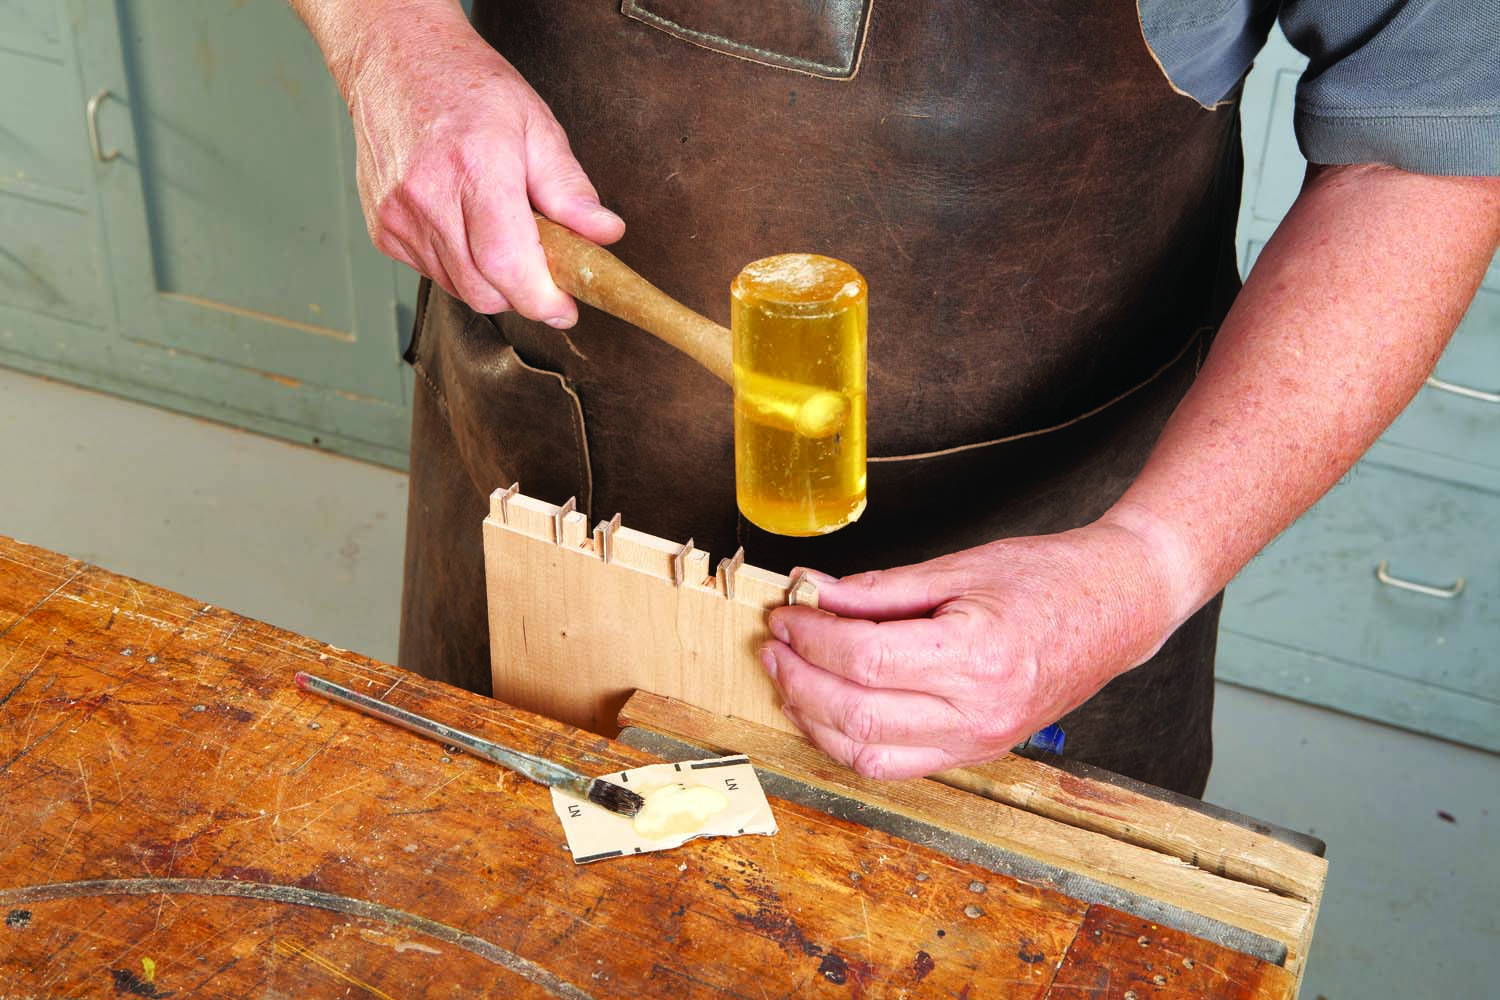
Photo 8. Glue fake wedges made from strips of veneer in slots cut in the tenons. Trim the wedges flush all around after the glue has dried.
Use a chisel and an auger file to round the ends of the tenons to fit the mortises. (An auger file has no teeth on its edges, so it won’t mar the tenon shoulders as you round the ends). File carefully and stop frequently to check the fit. Assemble the fitted joints and mark the tenons at the point where they protrude beyond the side. Then disassemble the joints and finish-sand each tenon to the lines you’ve just marked (Photo 9).
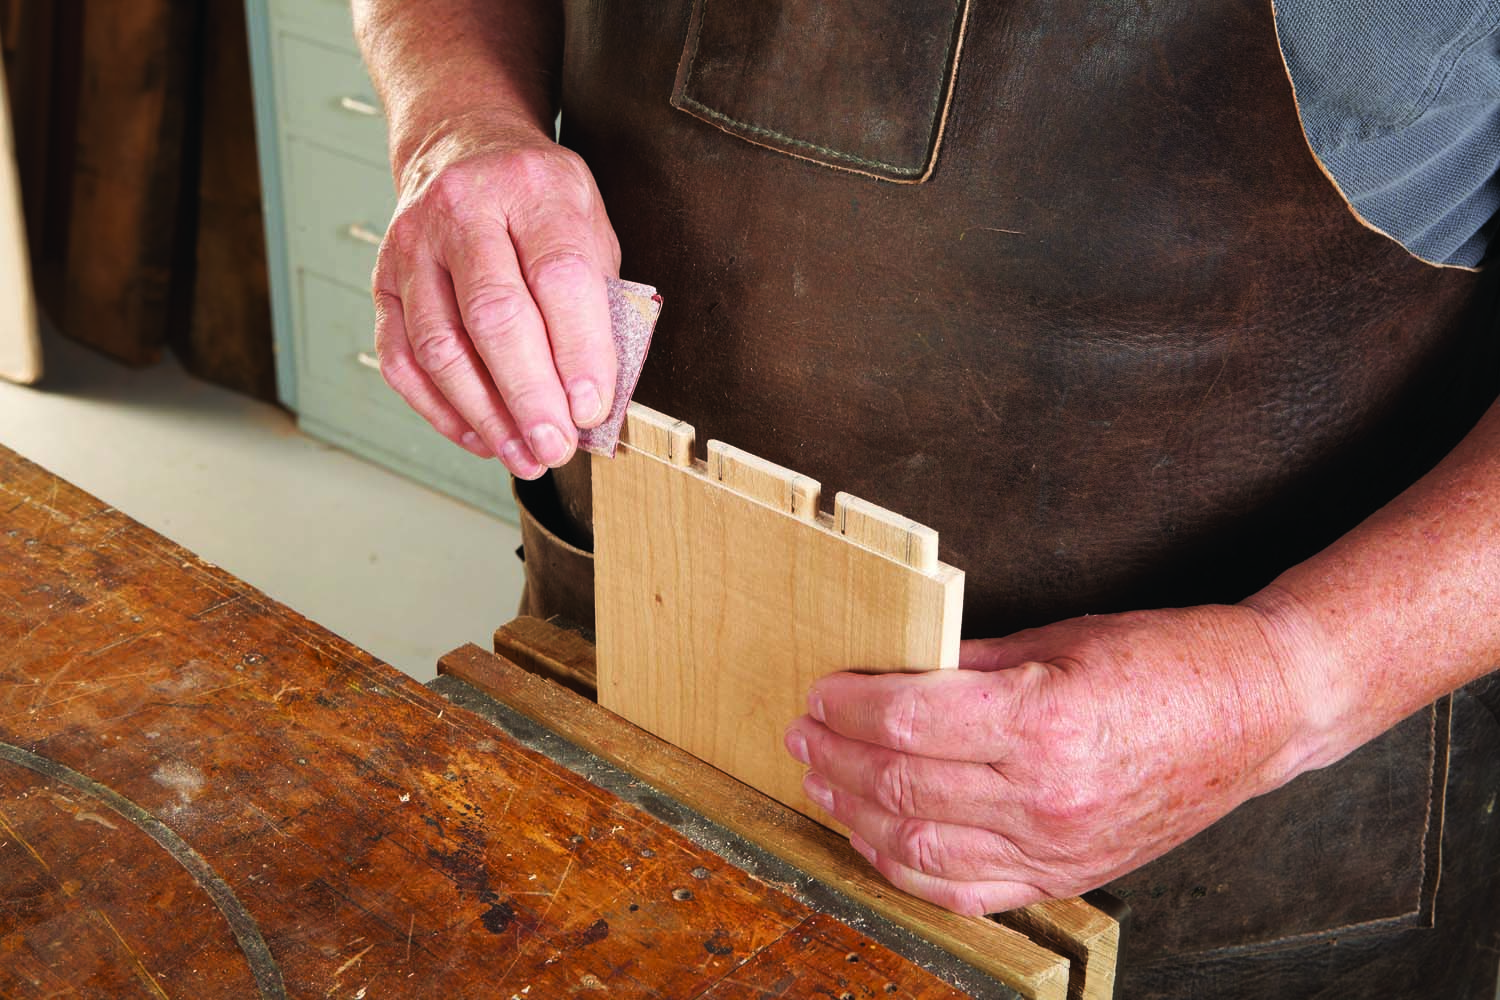
Photo 9. Slightly round the ends of the tenons after shaping them to fit the mortises in the sides.
Assemble the box

Photo 10. Drill a test hinge-pin hole in the lid offcut, using scrap stock sides to hold the end piece. Install a pin and open the lid. It should cant slightly back, so it will hold a recipe card.
Cut rough tenons on the ends of the two scrap side pieces you made earlier—don’t round the tenons; just cut them narrow enough to fit through the mortises. Then use these pieces test the lid’s hinge pin location (Photo 10). Place the lid offcut (henceforth, the “lid”) on top of the scrap sides and flush with the box end piece at the front and back. Then insert a 1/8″ drill bit through the hinge hole and tap it to lightly mark the edge of the lid. Drill a 1″ deep hinge-pin hole at the mark—this hole must be perpendicular to the box end to ensure the lid pivots easily, so use your drill press.
Press a 3-1/8″ length of 1/4″ brass rod through the hole in the box end and into the lid. Lift the lid and see if it stays up and cants slightly back. If it does, you’re good to go; if it doesn’t, remove the lid and plane a little off its back inside corner—the point at which the lid contacts the box. Then try again. When the lid stays up, plan to remove the same amount from the inside corner of the real lid.
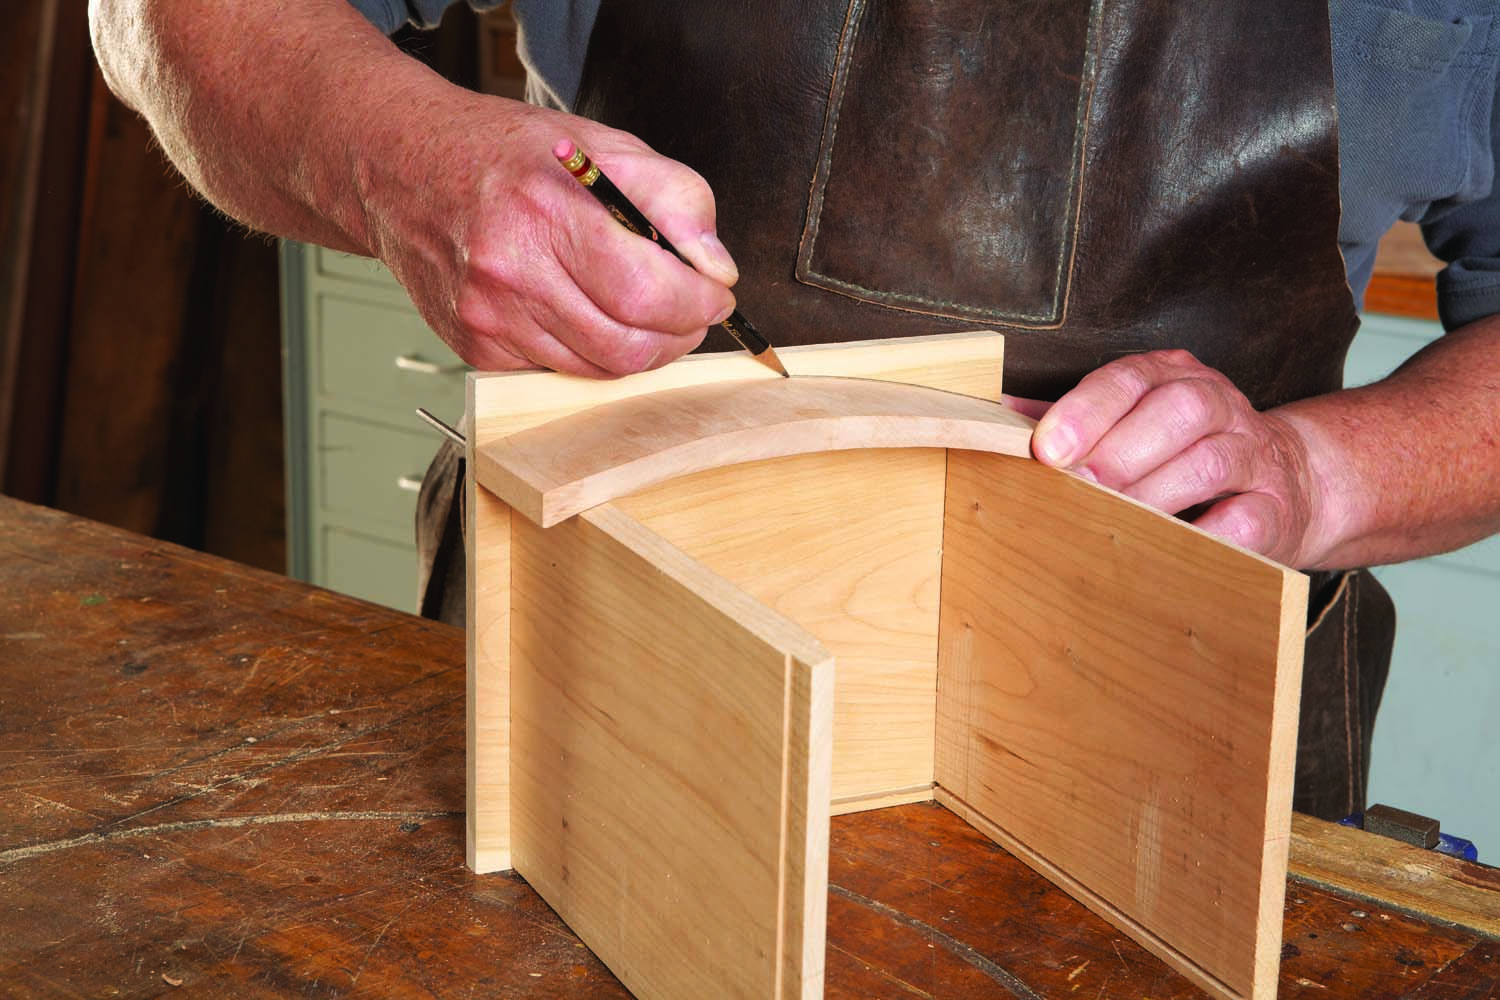
Photo 11. Mark the lid’s curved profile on each end piece, using the same scrap-side setup. Then cut the profile on the outside edge of the line.
Use the same setup to mark the lid’s curve on the box ends (Photo 11). Then bandsaw the curve. Cut the 1/8″ thick plywood bottom (D) to size and dry-assemble the box to make sure it fits.
Finish-sand the entire box (except the tenons and the lid, of course) and apply your favorite finish. (By pre-finishing, any squeeze-out that occurs during glue-up will be easy to remove.) Make two scrap-wood cauls with grooves cut to house the protruding tenons. Then apply glue and clamp the box together (Photo 12).
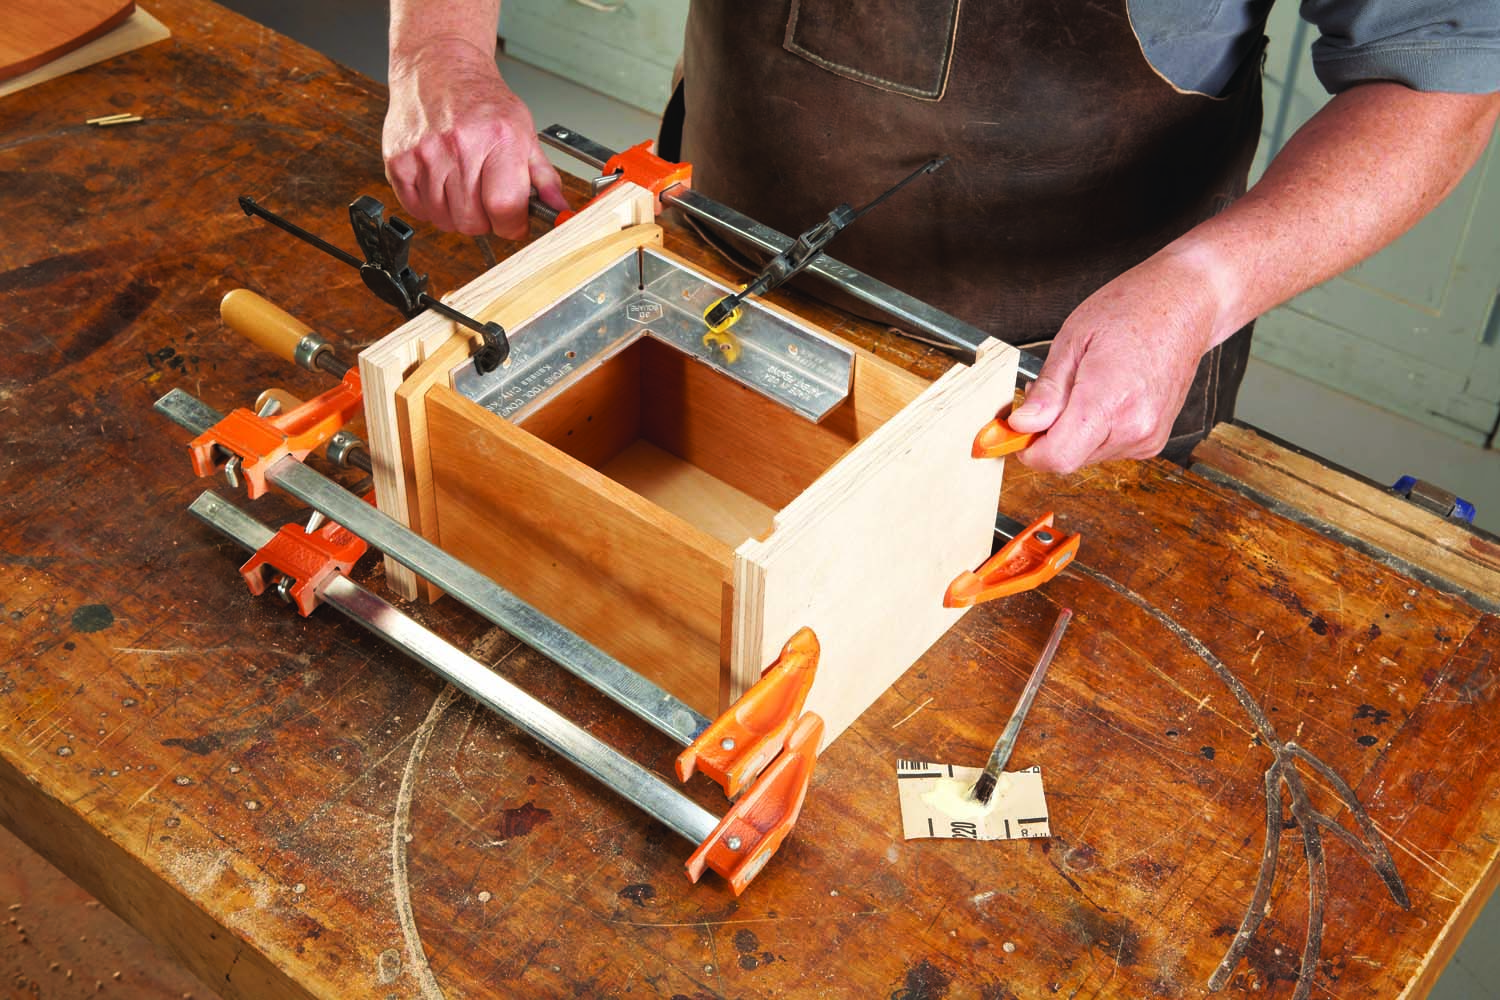
Photo 12. Glue the box together after pre-finishing all the parts. To tightly clamp the joints, use cauls with grooves cut to house the sides’ protruding tenons.
Install the lid
Position the lid on the box, mark the hinge pin locations and drill 1″ deep hinge-pin holes, using the drill press. Cut two 1-7/16″ long hinge pins from 1/8” brass rod. File a point on one end and smooth the other end flat. Then insert the pins in the holes in the box end and gently tap them into the lid (Photo 13).
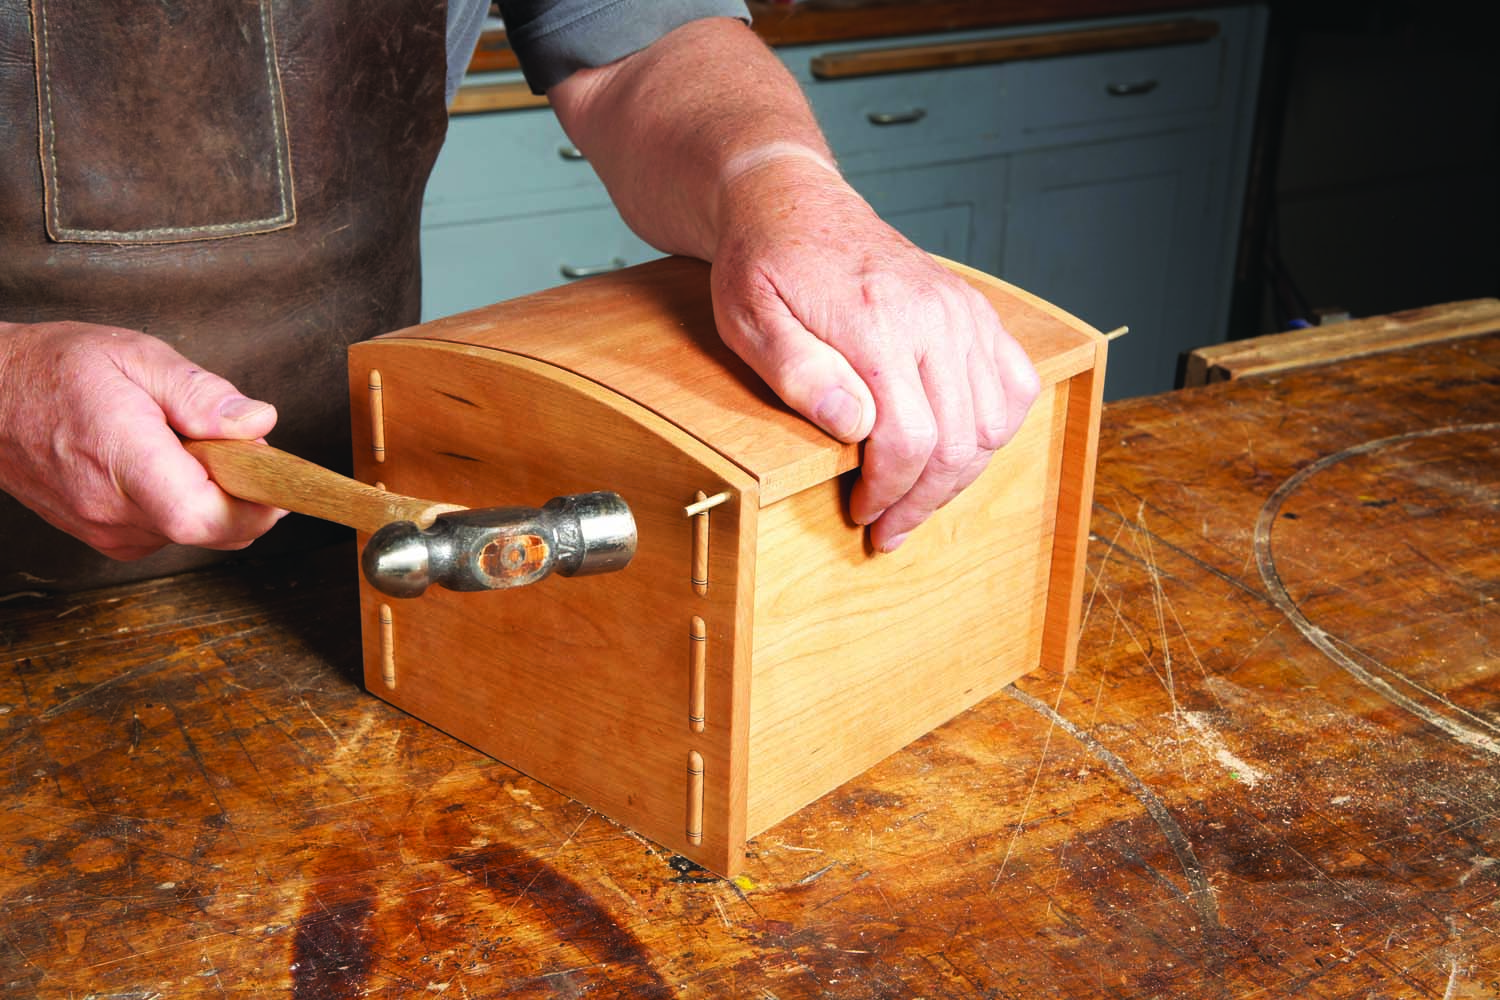
Photo 13. Install the lid by tapping home the hinge pins.
Sidebar: How to Bend a Card Retainer
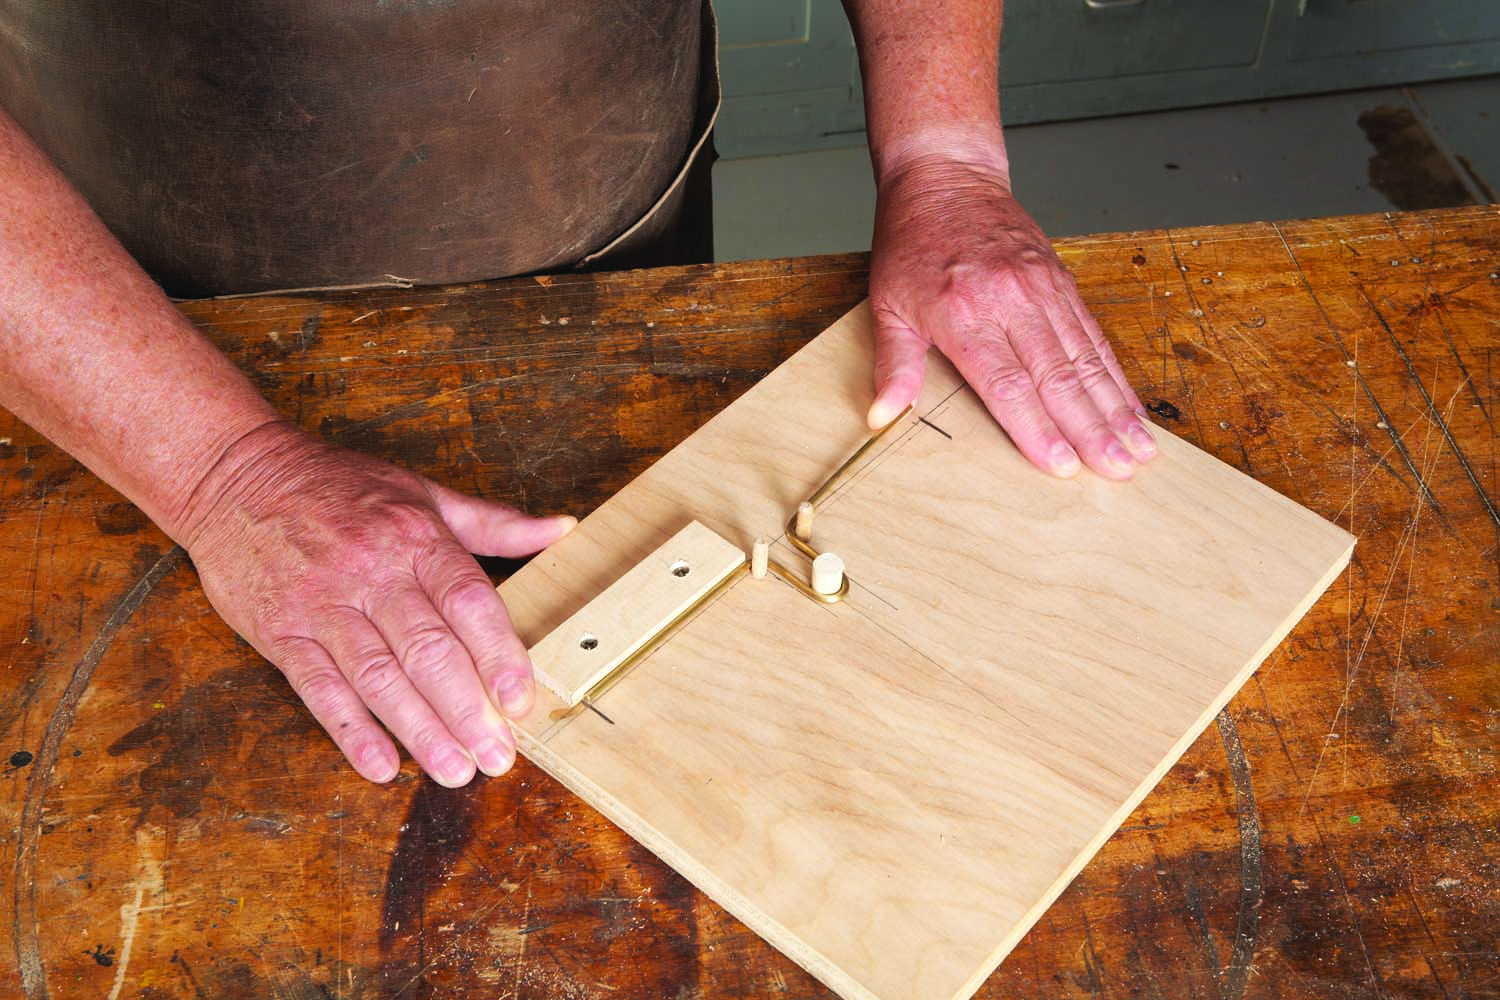 Make a retainer to hold the recipe cards upright inside the box by bending 1/8″ brass rod around a form. This retainer installs in the stopped holes drilled in the box ends. As more cards are added, you just move the retainer forward to the next pair of holes. Make the form by attaching a stop and drilling holes for dowels in 3/4″ plywood. Place the rod along the stop and bend it around a 1/4″ dowel. Once the rod is at 90° and tangent to the 1/2″ hole, insert a 1/2″ dowel. Bend the rod around the 1/2″ dowel until it’s tangent to the last 1/4″ dowel hole. Install the last dowel and bend the rod until it’s parallel with the first part of the retainer. Cut the retainer to length and file a dull point on each end.
Richard Tendick is a retired engineer who loves designing projects and working wood.
Here are some supplies and tools we find essential in our everyday work around the shop. We may receive a commission from sales referred by our links; however, we have carefully selected these products for their usefulness and quality.


Is this Popular Woodworking emerging from your
“financial restructuring” ?
Al Limiero