<img height="1" width="1" style="display:none" src="https://www.facebook.com/tr?id=376816859356052&amp;ev=PageView&amp;noscript=1">
 In Shop Blog

We may receive a commission when you use our affiliate links. However, this does not impact our recommendations.

12958_Handplane_lead

Troubleshoot Your Plane

Practical Solutions to 6 Common Problems

By Tom Caspar

When a plane is working right, it can produce a silky-smooth surface that absolutely glistens. When it doesn’t work, you get an ugly surface covered with blemishes. The problem can be your sharpening, your technique, or the plane itself. Quite often, it’s the plane.

A handplane can be a mysterious tool. These troubleshooting tips should go a long way to clearing up how a plane works and how to tune it up. Most Stanley, Record and similar types of planes certainly require a tune-up. You’ll probably encounter every problem addressed here. Premium planes, such as a Lie-Nielsen, Veritas or Clifton, usually don’t need much tuning at all.

Plane Talk

Before launching into troubleshooting, let’s identify a plane’s basic parts. I cut open one of my No. 3 Stanley planes to give you a better look at how the parts fit together. We’ll start at the bottom and work our way up.

• The sole is the full length of the plane’s bottom.

• The frog holds the blade assembly at a 45-
degree angle to the sole.

• The frog adjusting screw moves the frog forwards
or backwards.

• Moving the frog effectively opens or closes the
plane’s mouth, the gap in front of the blade.

• The uppermost part of the blade assembly is
the lever cap.

• The middle part of the blade assembly is the
chip breaker. It’s screwed to the blade.

• Pushing down on the lever clamps the blade
assembly to the frog.

• This clamping pressure is regulated by the
lever cap adjusting screw.

• Turning the depth-of-cut adjusting nut rocks
the “Y” adjusting lever, which slides the blade
and chip breaker up or down the frog.

• Pushing the lateral adjusting lever side-to-side
levels the blade with the sole.

Click any image to view a larger version.plane talk

Problem 1:

Your plane cuts at the beginning or end of a board, but not in the middle.


Cause

The plane’s sole may not be flat.


Solution

Rule out some simpler causes first. Test the board’s flatness with a
long straightedge. If it’s hollow in the middle, the problem is with the
board, not your plane. Similarly, test the flatness of your bench. If
it’s hollow, the board will bend as you plane. Time to flatten the
bench. But if your board and bench are just fine, and this mysterious
behavior persists, chances are the sole of your plane isn’t flat.

A plane’s sole must be extremely flat for the blade to remove
continuous, thin shavings the full length of the board, your ultimate
goal. Test your sole by placing the plane on a very flat surface, such
as a tablesaw’s cast iron wing. Try to slide a thin strip of paper
underneath it at various places. If it slips under at any point, the
sole isn’t flat enough. It needs lapping (a machinist’s term for
flattening).

The easiest way to lap is using self-adhesive sandpaper
on a rigid, flat surface, such as a tablesaw’s cast iron wing, a
jointer bed, or a long piece of 1/4-in. plate glass. (You can also use
regular sandpaper and a low-tack spray adhesive.) You may have to remove
a lot of metal, so it helps to have a variety of grits available, from
80 to 220. The surface and paper should be at least twice as long as the
plane’s sole.

Retract the blade and start lapping with 120 or 150-grit paper
(photo, above). If the sole is convex, grip the plane as shown to avoid
rocking it. Inspect the bottom after a few strokes (photo, left). The
newly sanded areas should be easy to see. If there are lots of low
spots, switch to coarser paper.

Whichever grit you start with, keep sanding until the entire bottom
is scratched with sanding marks. The area right in front of the mouth is
very important; it must be flat to prevent tearout. Don’t worry about
the sole’s extreme ends, though, or old scratches from previous use.
Once the sole is flat, work up to 220 grit or more to polish it.

12958_5F00_02Mark your sole with a felt-tip pen to help reveal the low spots. Planes with corrugated (grooved) soles have less metal to remove than planes with smooth-bottomed soles, so they’re easier to flatten.

12958_5F00_03

Flatten your plane’s sole using sandpaper. A flat sole enables a plane to make long, thin shavings.

Problem 2:

You retract the blade to take a lighter cut. The plane works fine for a while, then suddenly stops cutting.


Cause

There’s backlash (play) in the plane’s adjustment mechanism.


Solution

Always set a blade’s final depth of cut by adjusting the blade
downwards, deeper into the wood. If your blade cuts too deep, back it
out until it cuts a very thin shaving or not at all. Then advance the
blade bit by bit until the shaving is the thickness you want. If you
overshoot, start over again.

To understand the “why” behind this procedure, let’s back up to the
original problem. You’ve retracted the blade, and eventually it stops
cutting. What’s happened is that the blade has slowly crept back up the
frog. If you remove your plane’s lever cap, you can see how this works.

Turn the adjusting nut clockwise to advance the blade, then
counterclockwise two turns to retract it. Hold the blade with your
fingers and push it up the frog (photo, left). It will move by at least
1/32 in. That’s why the blade stopped cutting.

Now turn the adjusting nut clockwise again, two full turns, to
advance the blade. Try moving the blade up the frog with your fingers
again. It shouldn’t budge.

Backlash is the problem. (“Backlash” is the play between mechanical
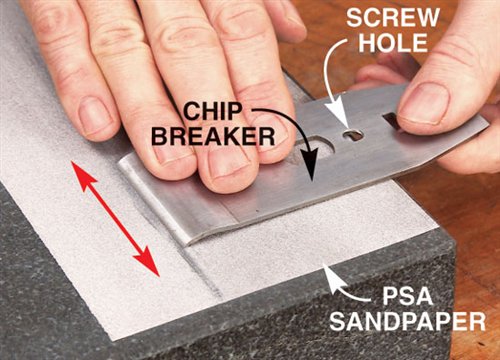
parts.) In a plane, there’s often significant play in two places. First,
there’s play between the adjusting nut and the “Y” adjusting lever’s
fork. Second, there’s play between the top of the “Y” lever and the slot
in the chip breaker. Some planes have more play than others, but there
must be some play in any plane or the parts won’t move. It’s usually
impractical to alter the plane to remove backlash, so the best strategy
is to learn to live with it.

12958_5F00_04 


Problem 3:

Your plane suddenly stops cutting. When you take it apart, you find shavings wedged between the blade and chip breaker.


Cause

There’s a gap between the blade and chip breaker.


Solution

First, lap the chip breaker’s bevel, located under the breaker’s
leading edge (photo, below). The angle of this bevel is important. It
must be steep enough so that the bevel’s point, not its heel, touches
the blade. With most chip breakers, if you keep the screw hole aligned
with the sandpaper’s edge, the bevel’s angle will be just fine. Keep
lapping until you feel a wire edge develop along the chip breaker’s
entire width, just as in sharpening a blade.

The second step is to round the top of the chip breaker. You can use a
file if the chip breaker is quite blunt, but sandpaper usually works
well enough. Use a rolling motion to create a rounded edge, ending up at
about 45 degrees (middle photo). Keep sanding until the wire edge you
formed earlier is gone, then alternately sand both the bevel and the top
until the chip breaker is sharp.

When you’re done, hold the chip breaker firmly against the blade, as
if it the two were clamped together by the lever cap. Sight from behind
the chip breaker. There should be a slight gap at the heel, but no light
showing between the chip breaker and blade.

12958_5F00_gap

12958_5F00_06

To eliminate gaps between the chip breaker and blade, begin by lapping the bevel underneath the chip breaker’s leading edge. Keep the chip breaker’s screw hole aligned with the sandpaper’s edge to form the bevel at the correct angle.

12958_5F00_07

Round the top of the chip breaker to create a sharp edge. Lift the cap iron up as you drag it across the sandpaper.

12958_5F00_08

Squeeze the blade and chip breaker together to inspect for gaps. No light should be visible between them. In addition, the chip breaker’s heel shouldn’t be touching the blade.

Problem 4:

Your blade chatters. It feels like its bouncing up and down as it cuts.


Cause

Your blade may not be clamped down tight enough, or your frog may not be flat.


Solution

Try simple fixes first. Your blade may be dull, or set too deep, or
your chip breaker may have slipped over the blade’s edge, so it’s trying
to do the cutting. If you rule out these causes, try the following:

First, increase the clamping pressure on the blade. This is
controlled by the lever cap adjusting screw (photo, below). This screw
isn’t something you fiddle with every time you plane, though.  Adjusting
it is a matter of finding the sweet spot that puts lots of pressure on
the blade, but not too much. If you overtighten the screw, applying too
much pressure, you won’t be able to turn the large brass wheel that
controls the depth-of-cut.

To find the sweet spot, loosen the lever cap and tighten the screw
1/8 turn. Re-tighten the lever cap. Turn the brass adjusting nut to move
the blade up and down the frog. If it moves very freely, loosen the
lever cap again and tighten the lever cap screw another 1/8 turn.
Re-fasten the lever cap. Repeat this procedure until the adjusting nut
is somewhat hard to turn with two fingers, but not too hard. Once you’ve
found the best setting for the screw, leave it there. You should rarely
have to re-adjust it.

A second cause of blade chatter may be a frog that’s not flat (photo,
below). To check your frog, unscrew it from the plane’s body and remove
the lever cap screw. Lap the frog on sandpaper. You won’t be able to
lap the entire surface because the Y lever sticks out the top, but
that’s OK. Flattening the first two to three inches’ worth is good
enough.

12958_5F00_05
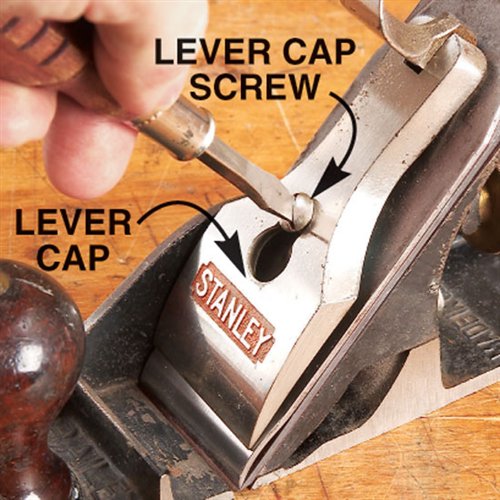
Your blade will chatter if the lever cap doesn’t provide enough
pressure to clamp the blade tight to the frog. Adjust the lever cap
screw to provide more pressure, if needed.

12958_5F00_09

Your blade will also chatter if your frog’s top surface isn’t flat. Flatten the frog with sandpaper adhered to a flat surface.

Problem 5:

Your smoothing plane leaves tracks on a board’s surface.


Cause

The blade isn’t level, or its corners are too square.


Solution

First, make sure the tracks you see aren’t ridges caused by a nick in
the blade. If the tracks look like shallow steps (drawing, below), one
side of the blade is cutting deeper than the other. Raking light or
chalk used flat-side down clearly reveals these tracks.

You’ll have more success avoiding track marks and leveling your blade
if you round it (photo, below). This prevents the corners from digging
in. Rounding a smoothing blade’s profile one way or another is an old
tradition. Here’s how I go about it. First, I round over the blade’s
corners on the grinder. I do the rest of the rounding work when I hone,
by rocking the honing jig to one side or the other on the pull stroke
(photo, above right). This creates a cambered edge and a transition to
the rounded corner.

If you’re new to planes, I recommend you camber the blade’s full
width. The amount of curvature to aim for is very small. To check it, I
hold the blade upright and lay the fat side of a small square on the
blade’s edge. The blade’s center should be higher than the edges by
about the thickness of one or two pieces of paper.

If you’re more experienced with a smoothing plane, it’s better to
leave the majority of the edge straight across, and only camber the
outer edges; that is, round 1/8 to 1/4 in. of each side. This will
create a flatter surface than the previous method, but the blade will be
more difficult to level.

To level your blade, make a narrow shaving using the outer 1/2 in. of
the blade’s left side. Make another shaving using the right side
(photo, below. Compare the thickness of the two shavings. Adjust the
lateral lever until the shavings are equally thick. Back off the blade,
re-adjust its depth of cut, and you’re good to go.

12958_5F00_10Round a blade’s profile by rolling the jig sideways as you hone.
Favor the right side, then the left side on alternate pull strokes to
produce a curved profile.

12958_5F00_11

Level your blade by comparing shavings made with each side. Hang the
plane off the edge of a board and make a narrow shaving using only the
blade’s left side. Turn the plane around and make another narrow shaving
using the blade’s right side. Adjust the lateral lever until these
shavings are equally thick.

12958_5F00_step

Shallow steps are caused by a plane blade that’s not set perfectly
level. One corner is digging in.  A commonly used method to minimize
this problem is to round the blade’s corners, and maybe its entire
profile. This produces a surface with extremely shallow valleys, which
are leveled by scraping or sanding.

12958_5F00_blade

Round a smoothing plane blade to avoid making steps on a board’s
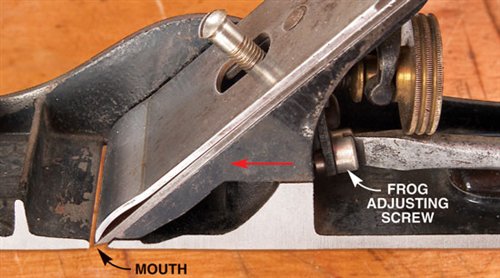
surface. The corners of this blade are rounded off, and the area in
between is cambered (that is, very slightly curved), or left straight.

Problem 6:

You get tearout, even though the blade is sharp.


Cause

The chip breaker is set too far back, or the plane’s mouth is too large.


Solution

First, adjust the chip breaker closer to the end of the blade (photo,
below). Second, move the frog forward to close the plane’s mouth
(photo, below).

In general, the finer the shaving you’re trying to cut, the closer
the chip breaker should be to the blade’s edge. A 1/32 in. setback is
ideal for most hardwoods, but when you get tearout, try moving the chip
breaker to within 1/64 in. or less of the blade’s end. This will make
the plane harder to push, however. (In soft woods, like pine, where
tearout isn’t an issue, you can adjust the chip breaker up to 1/16 in.
back from the blade to make the plane easier to push.)

To move the frog, remove the lever cap, blade and chip breaker.
Slightly loosen the two bolts that hold the frog to the sole. Reinstall
the blade assembly and adjust the blade until it barely sticks out of
the plane’s sole. Turn the frog adjusting screw with a long screwdriver
to close the plane’s mouth. Once you have created the desired opening,
remove the blade assembly and tighten the bolts that secure the frog.
Tighten each one a little bit at a time, like a car’s lug nuts.

Moving the frog may skew it, however. On most planes, you can only
eyeball the frog to make sure it’s front end remains parallel to the
plane’s mouth. Frogs on Stanley planes manufactured in the Sweetheart
Era, roughly 1920 to 1935, are self-aligning, so skewing isn’t a problem
(photo, below).

Tip: Rub your plane’s sole with a few squiggles of paraffin or
canning wax every ten strokes or so. This helps your plane glide much
more smoothly.

This story originally appeared in American Woodworker July 2007, issue #129.

Purchase this back issue.

12958_5F00_12To reduce tearout, adjust the chip breaker closer to the blade’s
edge. A projection of 1/32 in. is normal for most hardwoods, but to beat
tearout you may have to go down to 1/64 in. or less.

12958_5F00_13

To further reduce tearout, move the frog forward by turning the frog
adjusting screw. This closes the plane’s mouth. Normally, the mouth
should be about 1/16-in. wide. You can reduce it down to 1/64 in.

12958_5F00_14

If you move the frog forward, you must double-check that it hasn’t
wiggled side-to-side and become skewed. Many older Stanley planes have
an alignment tab to prevent skewing, which is an excellent feature.

 12958_5F00_tearout


Product Recommendations

Here are some supplies and tools we find essential in our everyday work around the shop. We may receive a commission from sales referred by our links; however, we have carefully selected these products for their usefulness and quality.

Recommended Posts

Start typing and press Enter to search

Designing kitchen cabinets in SketchUp