<img height="1" width="1" style="display:none" src="https://www.facebook.com/tr?id=376816859356052&amp;ev=PageView&amp;noscript=1">
 In Shop Blog

We may receive a commission when you use our affiliate links. However, this does not impact our recommendations.

Retrofitting anything to a bench is generally one of those things that looks great on a bar napkin, but when it’s all said and done, you’re ready for a drink. These retrofits rarely go as well as planned.

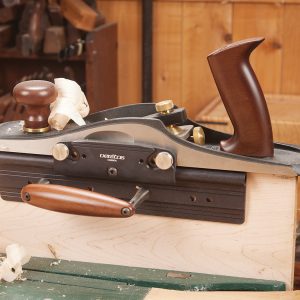
So when I got it in my head to add a wagon vise to my Roubo-style workbench, I should have first listened to the little voice in my head, but I didn’t hear it. Perhaps I stuffed its mouth full of bar napkins. What’s a wagon vise? It’s basically a simplified tail vise that is used to pinch your work between bench dogs. The vise is a screw that is fixed to a bench dog and the whole mechanism is integrated into the benchtop. There’s no dovetailed assembly to build around a tail vise frame. You just need a mortise in your benchtop. A really big mortise , something big enough to bury a small animal in. (If I understand the root word correctly , that’s a joke.)

A page from La Forge Royale’s catalog that made me ponder a wagon vise. The handle that turns the screw is shown disconnected. It made me wonder if perhaps it was removable because it’s shown disconnected in every plate. And the sculptor’s vise, which is similar, shows the handle integrated into the mechanism.

So I bought a small screw from Rockler for $23 and drew up the plan. Within the hour I was whaling away at the benchtop with a Ray Iles mortise chisel. The top is 4″ thick and the mortise is 2-1/8″ wide and about 9″ long. I defined the mortise all around with the chisel, which game me nice sharp corners, and then I bored out the rest of the waste with an auger bit. First the auger bit was in my Pexto 12″ brace. Then, after the headiness wore off, I chucked it in the corded drill.

The way I mounted the screw on the first go around worked OK, but I was afraid it would pull itself apart eventually. So I reworked the way the screw mounted to the bench and was pleased. That is, until I mounted the block of wood that held the movable bench dog.

The metal screw was a sloppy fit in its threads. It would wobble freely. When the vise was disengaged the end with the bench dog would droop down significantly. So I screwed a shelf standard below the block to support it. That worked, but when the screw was engaged the block of wood would rise up above the benchtop.

Gads, I hate sloppy mechanisms.

So I took the whole thing apart and reworked the underside radically. The block of wood with the bench dog now runs in a track beneath the benchtop. The track keeps the dog from drooping or rising up. It works great now.

By constraining the block of wood that contains the bench dog I stopped the dog from rising up when engaged against the work.

Except I’m a bit worried about the longevity of the thing. I wish there were more meat left where the bench screw enters the benchtop. If someone really wanted to, I imaginge they could bust out the end of the bench. I sized the vise’s components as shown based on the old French illustrations that showed the wagon bench, plus I sized it so I didn’t reduce the travel of the bench screw.

In hindsight, I wish I’d left more of the benchtop at right, by the bushing. It feels solid now, but if anyone ever borrows my bench, I’ll worry about this part.

So the little two-hour diversion turned into an 8-hour obsession. My coworkers were giving me odd looks by the end of the day. But the sucker works.

Now about that sliding leg vise…¦. I seem to have one more napkin left.

– Christopher Schwarz


Product Recommendations

Here are some supplies and tools we find essential in our everyday work around the shop. We may receive a commission from sales referred by our links; however, we have carefully selected these products for their usefulness and quality.

Recent Posts
Showing 9 comments
  • Alan DuBoff

    I love this vise, might be possible to have someone mill something up that would be more hefty, in the way of the screw and the nut, but it looks like it will work fine with plenty of clamping stregth. A traditional tail vise does look stronger as it has the metal to guide the screw. Having 2 channels, one on each side would really make this a strong vise. In fact, would have you had a steel liner that would fit inside the mortise? That would also give all the strength you would ever need.

  • dave brown

    Reminds me of an idea that I have — retrofitting a european-style shoulder vise to my workbench. I use my tail-vise much more than my front vise. My front vise consistently bugs the heck out of me — mostly its racking in two out of three axes.

    The retrofit won’t be as difficult as yours but I’m still not looking forward to diving into it.

  • Christopher Schwarz

    Brian,

    As I mentioned in the post, that is my primary concern with the bench as-is. Right now it is totally solid, and the bushing of the screw spreads the force out on that section, which actually is all long-grain-to-long-grain.

    However, if it does break, it probably won’t be me that does it. This vise requires almost no torque to hold the work. And if it does ever break out, I’ll add the end cap. Bench retrofits, as I noted, are always a compromise.

    Chris

  • Brian Ogilvie

    Aren’t you worried that the part of the bench with the nut in it will split out? It looks to be just glued-up end-grain with no real strength. I would have thought mounting the nut in a cross-grain end-cap held to the bench with a pinned tongue-and-groove joint would be the way to go.

    Love the magazine, by the way!

    –Brian

  • Andy

    Hi Chris,
    Neat blog entry. This seems like a really nice mod to the bench. I don’t quite understand the part about the "track" that the block runs in below the bench. I can imagine having grooves on the inside of the mortise, but the only way to get them there would be to build the mortise into the original construction of the bench, not as a retrofit. So, where is the "track" and what sticks into the track?
    Thanks,
    Andy

  • Christopher Schwarz

    I wish the screw were a little beefier and a little shorter. However, not too much shorter. As is, with the bushing and the plate at the end of the screw, you only get 5" of travel with this mechanism. My dogs are about 4" on center, so an 1" of over-travel is about right for me.

    There are clever ways to get around this limitation and use a shorter screw — like a bigger block with two dog holes in line with each other.

    Thanks for the letter!

    Chris

  • Kurt

    Is the reason that the vice you put in was as long as it is because that is the size of the screw you had available. Could you have put in a vice that was only as long as the space between the dog holes (about 3 inches). Thus instead of having such a long screw, you just move the dog when it needs to be longer. You wouldn’t have to spin it so much then. Just a thought. Love the bench tho, working on one of my own.

  • Christopher Schwarz

    Good point. Roubo shows several benches in his volumes. I started witht he simplest one. Well, almost the simplest. And I’ve been modifying it as I work. In the end, I’ll build it again so it fits my work.

    Andre Roubo was not a purist when it came to simple benches. The so-called German Bench he shows was loaded with gizmos.

    Chris

  • swanz

    I thought the idea of the Roubo bench was a large, thick,simple,uninterrupted workbench top.

Start typing and press Enter to search