


We may receive a commission when you use our affiliate links. However, this does not impact our recommendations.
 Dramatic details showcase leaded glass and English style.
 Dramatic details showcase leaded glass and English style.
Foreward: Nancy Hiller (1959-2022)
Nancy Hiller was a trailblazing writer and furniture maker who lived fully in two worlds. That of a small-town furniture maker known for taking on difficult projects. And that of a forceful yet careful writer who inspired a generation of woodworkers to pick up the tools and run a proper business.
 Formally trained in woodwork in Britain as a young adult, Nancy went on to study at Cambridge University (for Ancient Greek and Aramaic). Eventually she got her master’s degree in religious styles — specializing in ethics. This one-two punch of high-level woodworking skills married to an incredibly nimble mind made her a force in the woodworking community.
Yet, despite her hard-earned bona-fides, Nancy spent her energy lifting up others around her. She often wrote about the work of other woodworkers she admired or she shined a light on her own struggles running a small business.
As a woman in a male-dominated craft, Nancy endured the sexism that many female woodworkers face.
Her answer to the hurtful and cutting comments from men was to simply strive towards excellence. And her work was excellent.
On the furniture side of things, Nancy was one of the few woodworkers in the United States who specialized in English Arts & Crafts furniture, the forerunner to our own Arts & Crafts movement. Her 2018 book “English Arts & Crafts Furniture” exposed a new generation to the fluid style.
On the cabinetmaking side, Nancy specialized in difficult kitchen projects that had to fit into historic homes, and had to be made on a tight budget. Her book “Kitchen Think” decried the American tendency to gut the kitchen every few years. She offered an alternative: build a kitchen that fits the context of your house.
Finally, her book “Making Things Work: Tales from a Cabinetmaker’s Life” inspired a new generation of women (and men) to take up the tools and become professional woodworkers.
Her death in August 2022 was not a surprise. She had waged a very public battle with pancreatic cancer, but it was too soon. As her friend and editor, I mourn the loss of all the potential works and books that were still within her. -Chris Schwarz
 Some of the most aesthetically compelling pieces of furniture I’ve seen in the Arts & Crafts style were made by an English company most Americans have never heard of. Between 1890 and 1910, the Harris Lebus Company of London exploited the prevailing fashion in home décor, producing a variety of sideboards, hallstands, wardrobes, washstands and related furniture characterized by simple lines and bold proportions.
Many of these items were production pieces built with a price point rather than handcraft in mind. Yet by virtue of their affordability, these pieces achieved one of the Arts & Crafts movement’s central ideals: to make useful and beautiful things available to those of modest means.
While researching an article on Harris Lebus several years ago, I came across a knockout wardrobe. Detail photos revealed less-than-optimal fabrication; the door panels had been screwed into their frames rather than housed in grooves, which resulted in predictable splits. The Gothic-style door and drawer pulls looked like the kind of gaudy hardware that belongs in Hollywood. But the overall look…Wow!
So when I had the opportunity to build a bookcase to go in a bibliophile’s home library, I suggested using the Lebus wardrobe as a starting point for the design.
The basic form of the bookcase follows a range of Lebus pieces built with solid-slab side panels glued to front and back legs, without top and bottom rails. The long-grain to long-grain glue-up makes for a perfectly sound connection without any additional joinery.
These side assemblies are connected to each other by mortised-and-tenoned rails at the top and bottom, front and back. The bottom and top are added later – the bottom supported by wooden cleats, the top attached by metal fasteners or wooden buttons, after the piece’s decorative brackets have been installed in sliding dovetail slots.
A paneled back and leaded-glass doors with C. R. Mackintosh hardware complete the picture.
Arts & Crafts Bookcase Cut List and Diagrams


Make the Case & Brackets
When choosing lumber for the bookcase, bear in mind that the most visible features will be the top and bottom front rails, and the rails and stiles of the doors.
Mill and glue up the side panels (and the top, but set it aside for now), then mill the four legs and the top and bottom rails – but don’t cut the arch on the front bottom rail until after you have assembled the carcase (removing that much material prior to glue-up would reduce clamping effectiveness). Note: While the sizes for the rails, stiles and panels can be pulled from the cutlist, “verify in field” (direct-measure from the case) the rest of the workpieces rather than relying on the cutlist sizes).

Shelf-pin holes. The holes are 3⁄4″ on center from the inside edges of the legs, spaced 11⁄2″ apart vertically. I use a 1⁄4″ Forstner bit at the drill press to bore them. For the most harmonious appearance in the finished case, align one or more of the shelves with the lead lines in the glass (and with the muntins, in a mullioned door, for that matter).
Trim the side panels to final size, then mark and drill for the shelf-support holes. Sand the inside and outside faces now; it would be challenging to sand these after assembly.

Mortises first. Lay out the mortises so the rails and stiles will be flush. I like a 5⁄16″-wide mortise, and typically leave at least 1⁄2″ clearance from the top of the leg.
Now mortise the legs at the front and back to accept the top and bottom rails that will join the side assemblies to each other.

Bracket attachment. The brackets that wrap the front and sides of the case are seated with sliding dovetails. A router with a 3⁄8″ dovetail bit makes quick work of the slots on the rails.
Next, mark out the positions of the sliding dovetail slots for the decorative brackets on the top front rail, then cut them using a router against a clamped-down fence.

Switch to the router table to cut the slots on the four legs.
Fit the same dovetail cutter into your router table, setting it up so the height of the cut will be precisely the same as the depth of the slots you just cut in the top front rail. Set the fence so that the cutter is centered in the width of the leg, and set a stop so the slot will be approximately the same length as those in the top front rail. Absolute precision here is not that important because you can finesse the fit by hand later if necessary.

Scribe then rout. To cut the dovetails on the brackets, scribe the baseline to reduce tear-out, then run the blank over the router table. The bit height is the same as that for the leg sockets; you’ll need to adjust the fence to center the dovetail on the bracket.
Make a mark on the outside face at the top of each leg to ensure that you cut the slots in the correct place, then cut a slot in each of the four legs. If you have dust collection you can do this in one movement; if not, carefully pull the leg back and allow the dust to clear, then push the leg forward to the stop to complete the cut.
Although it’s not strictly necessary with brackets that are decorative rather than structural, I cut my bracket blanks so that the grain runs diagonally. Leave the blanks oversized, because the long mitered edges will help ensure accuracy on the router table. (If you run the grain diagonally, scribe the shoulder line of the dovetail on the face where the cut will be going against the grain to avoid tear-out.)
Next, cut the bracket ends square. If you do this on a power saw, you’ll need two stop settings: one for the height, and another for the width which includes 3⁄8” for the dovetail.

Stop cut. Set a stop to align each bracket for matching cuts as you square the end.
Cut off the dovetails up to the shoulder line of their slots using a tenon saw.
Finally, mark the radius for the arch on each blank, cut it at the band saw, then sand. To expedite the sanding of eight brackets, I rigged up a custom tool using an empty cat food can with sticky-backed sandpaper around it, and chucked it into my drill press. (You can, of course, use a spindle sander.)
Glue Up
Because the side panels are butt-glued to the legs without any locating joinery, you need to hold these parts in precise alignment during glue-up. Cut two 3⁄16“-thick spacers at least as long as the side panels to make the reveal consistent (apply wax to the spacers if you’re worried about glue squeeze-out sticking them to your panels). Be sure to glue up the sides on a flat surface; any deviation may alter the reveal. Apply glue to both panel edges, then line up the top of the panel with the tops of the legs.

Spaced out. Long strips of 3⁄16″-thick material hold the panels in the correct alignment as you glue the side panels to the legs.
When the glue in the side assemblies is dry, glue up the frame. Tape a piece of scrap over the dovetail slots in the legs to protect the slots from damage by the clamps. Sight across the top rails to check for racking, then across the front to check for twist. Check the diagonals across the front and top.

Clamp it. Pads over the dovetail slots for the brackets protect them from clamp damage as you glue and clamp the carcase (see detail below).
 Now make a routing template (I use 1⁄4” plywood) for the Tudor arch (refer to the rail pattern on page 28). Cut the arch in the lower rail with a jigsaw, clamp the pattern to the rail one side at a time, then clean up the arch using a top-mounted-bearing pattern bit.
Bottoms Up
Turn the case upside down and make the two-part feet. The blanks for the coved portion are 11⁄16” thick, 2-1⁄2” square. Cut the coves on a router table using a 1⁄2” cove bit, cutting the end-grain first so the long-grain cuts will remove tear-out. The bases are 1⁄4” x 2-3⁄4” squares. Glue and pin the parts together with the coved piece centered on the foot.
Center each composite foot on a leg; you can do this by eye – the overlap is small. Tack them in place, then drill for and attach two countersunk screws to prevent rotation.

Nice feet. A 1⁄2″ cove and slightly larger base combine to create an eye-catching bottom detail to the feet.
Take care when standing the case upright to avoid damaging the feet. Now cut the top to size.
Use traditional wooden “buttons” or metal fasteners to hold the top on the case. If using buttons, you will have to rout or chop mortises near the top of the sides, front and back rails; if using metal attachment hardware, you can cut slots at the requisite height using a biscuit jointer after the case has been assembled. In either case, set the height of the slots so there is a space of about 1⁄16” to 1⁄8” between the top edge of the case and the top of the fastener to ensure a positive pull.
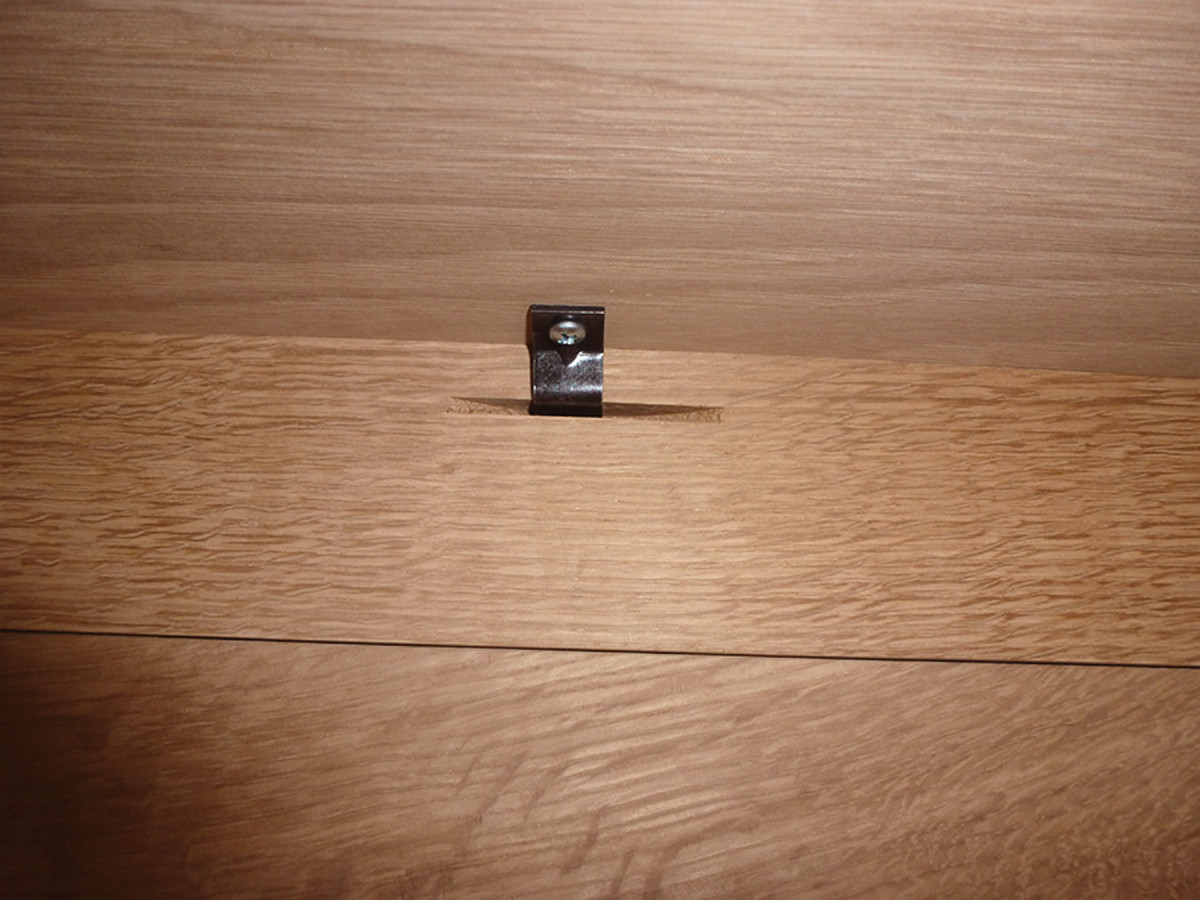
Metal or buttons. You can use metal connectors as I did, or wooden buttons to connect the top to the carcase. Either way, offset the slots in the case sides by 1⁄16″-1⁄8″ so the top pulls down tight.
After fitting the top and its attachments, remove it and set it aside for now.
The carcase bottom will be supported by the front and back bottom rails, and by cleats running from the front to the back legs.

Perfectly fit. Pull the proper length and notch location from the carcase, not from the cutlist.
Start by cutting cleats to fit between the front and back legs, then mark the inside corner of the legs on the cleat at front and back. Scribe the distance between the inside corner of each leg and the inside face of the carcase side (it should be about 1⁄2“) on the cleat and cut a notch with a backsaw or at the table saw. The rear notch cut should be offset about 1⁄8” toward the front to leave additional room for movement of the side.
Drill a 3⁄8“-diameter hole in the notched part at the back to allow the carcase to expand and contract, then glue and screw the cleat in place on the front leg, taking care to make the top face flush with the top edge of the front rail.
Mark the position of the hole on the back leg, drill at the center for a #6 screw, then screw the cleat in place on the back leg using a 5⁄32” x 3⁄4” fender washer and a pan head screw. Repeat on the other side. The washer spans the hole, which is quite a bit larger than a #6 screw, to allow for movement.

Washer wear. A fender washer transfers the tension between the fillet and side panel across the 3⁄8″-diameter hole that allows the side to move freely, and provides a solid surface for the screw head.
The 1⁄2“-thick bottom will sit flush with the front face of the cabinet; trim will cover the joint between these parts. Measure the distance from this face to halfway through the thickness of the back rail and rip the bottom to this dimension.
Crosscut the bottom to the full interior width of the carcase and notch it around the legs. Sand the bottom, then glue it in place on the front rail only (to allow for expansion and contraction toward the back).
Now cut and notch upper cleats to sandwich the bottom in place and keep it flat. Shape the front to avoid a clumsy look – I cut the same radius as I used for the brackets – and fasten the top cleats in place as you did with the lower ones.
So why go through what seems like more trouble than simply setting the bottom in dados? This down-and-dirty approach (I learned it years ago in a professional cabinet shop) actually makes life easier, particularly on large case pieces such as this one.
The 1⁄2” stock reduces the overall weight slightly, there are no dados to cut, and there is one less piece to juggle as you apply clamps to a carcase glue-up. But of course, feel free to approach the bottom in a traditional manner if you prefer.
Back it Up
I made a paneled back that fits inside the opening, without rabbeting the case. The back is joined with pegged stub tenons in a 1⁄2“-deep groove with floating panels.
You could opt for a plywood or ship-lapped oak back, but I think the paneled back adds an elegant touch.
Measure the height of the interior opening at the back and cut the stiles to this length, then use these dimensions to calculate the lengths of the top and bottom rails and vertical dividers.
You can avoid a small gap behind the shelves by rabbeting the panel edges so they’re flush with the back’s frame on the inside of the bookcase. (Because I bought 4/4 stock for these panels and bookmatched them, I made my panels 5⁄16” thick; this resulted in a 1⁄4” gap behind the shelves, which is negligible in a case designed for book storage.)

Mark the cut. With the back panel held in place, pencil a line where it meets the case bottom. Then, cut a 3⁄8″-deep rabbet (half the thickness of your back rail) to that line.
Fit the back into the opening and mark the horizontal line where it hits the bottom of the case on the interior of the cabinet. Rabbet the bottom rail of the back panel so that it will fit over the bottom of the case with its back face flush with the back of the legs.
Now, with the back set in place, measure for the thickness of the “keeper strips” to which you’ll secure it.
To determine this, measure the distance between the inside face of the back and the inside face of the legs – it should be about 3⁄4” – so that the strip will be flush with the front of the legs. Cut the strips to length and glue them in place.
What you’re basically doing here is creating a glued-on rabbet – it’s simpler than rabbeting the legs to accept the back, and – if you choose strips that match the grain in the legs – no one will ever notice in the back of a bookcase.
After the glue dries, secure the back to the strips with brass screws. (I use four or five on each side).
Now glue the arched brackets into their slots, taking care to make their tops level with the top of the case.
Beveled Trim
Many pieces of Arts & Crafts casework produced by Lebus feature bevels as a decorative element – on the inside edges of door rails and cornices, or to frame sections of casework. I incorporated bevels here in the form of trim above and below the doors; I varied the dimensions to produce proportions typical of a Lebus piece at the turn of the 20th century.

Bevel up. Set the blade on the table saw to 45° and rip one side of the trim, then the other. And, of course, use a push stick for this operation.
Leave your trim stock overlong until you have cut the bevels on the table saw. Rip one side with your blade at 45°, then reverse the cut to bevel the other side. Note: These cuts will leave a small flat at the edges.
Now cut a 45° bevel on one end, then lop approximately 1⁄8” off the end to match the long flat of the table saw bevels. Determine the final length (add 1⁄8” for the flat on the other end), then replicate the bevel there.
Glue and pin the beveled trim onto the face of the cabinet, leaving an 1⁄8” reveal between each piece of trim and the nearest edge of the top and bottom rail respectively.
Make the Doors
Although you could rabbet the backs of the doors with a router after assembly to accept the leaded-glass panels, the method I use is more traditional for glazed doors and leaves a clean shoulder at the inside corner.
Mill the door rails and stiles now, as well as enough extra stock to use for test cuts on setups.

Rabbet first. After cutting rabbets to accept a glass panel, it’s simple to see where the mortise needs to be laid out and cut.
On the inside of all the pieces, cut a 3⁄8“-wide x 5⁄8“-deep rabbet (it must be deep enough to accommodate the thickness of the zinc channel in the glass panels). Then use the rabbeted stiles and rails to guide the layout location of the 5⁄16“-wide x 11⁄4“-deep mortises.
Cut tenons on the table saw, setting the height of the cheek cuts with a piece of scrap with the mortise chopped all the way out to one end.
Set the table saw fence to produce a full-length tenon – the full mortise depth of 1-1⁄4” – on the cheeks for the face side of each rail, but for the cheeks that face the interior of the cabinet, reset the table saw fence so the back shoulder of the tenon will fill the groove.

Stepped shoulders. Show the rail to the stile to mark the location for the stepped shoulder that will fill in the rabbet.
To cut the haunches, leave the table saw fence at the same setting, but raise the dado blades to a height of 1⁄2” using the same principle as you did for the case joinery.
Once you’re satisfied with how everything fits, glue up the doors.
Door Catches

The tall doors should be fitted with catches at the top and bottom. You could certainly use brass ball catches, but I used rare-earth magnets.
Because I’ve had trouble with magnets exerting too strong a pull when mounted on a door’s face – something you really don’t want with a leaded-glass panel in a tall door – I mounted them in the top and bottom rails.
First, drill holes for the magnets on the top and bottom of the door stile using a Forstner bit.
Mark the position of the magnet on the cabinet floor and top rail, then drill.
Don’t recess the magnets completely; leave them flush or just a little proud, depending on the size of the gap around your doors. They need to touch in order to catch.
As the final touch, attach a small piece of oak to the rail at the top behind the doors, to serve as a stop.
Get Hinged
The type and installation of the hinges for this piece diverge from much of 20th-century English convention. Most of the casework I encountered in my training and work in England was built with fixed-pin butt hinges mortised into the door alone – not mortised into the surrounding cabinet frame.
But because the doors for this bookcase are relatively large and heavy (which is why you need three hinges per side), I used removable-pin hinges, mortising them into the case as well as the doors to relieve some of the stress on the brass screws.
More from Nancy Hiller: Installing 8 Common Hinges
Fit the doors in their openings, then chop mortises in the door stiles for the hinges. (I typically lay out the hinge location by going no more than 1⁄2” above or below where the rails meet the stiles.)
Set the doors on shims to create a small gap at the lower edge, then mark the positions of the hinge mortises on the face of each corresponding leg. Chop or rout the mortises in the legs. Now test-fit the doors with their hinges and adjust them until they hang well. Then remove them and get ready to finish.
The Big Finish

Shellacked. Here’s the case after the coat of amber shellac. (Note: Don’t panic after the dye and stain coats…you won’t get a good look until after the shellac.)
The finish I use here produces a classic Arts & Crafts look, but without the danger of ammonia fuming.
First, sand the entire piece to #180 grit then remove the dust. Apply a coat of TransTint Honey Amber dye at the ratio of 1 tablespoon of dye to 1 pint of distilled water.
Using a foam brush, apply the dye liberally with the grain, working quickly to avoid lap marks. Go over each section with a lint-free cloth to even out the dye before you move onto the next area.
After the dye has dried completely, scuff-sand the raised grain with #320-grit sandpaper. Remove the dust, then apply a coat of Minwax Early American stain using a foam brush. The stain will continue to bleed out of the pores, so wipe periodically with a clean cloth over the next couple of hours to remove any excess.
Allow the stain to dry overnight, then apply a coat of amber shellac.

Glaze of age. I mixed Old Masters’ Dark Mahogany and Dark Walnut gel stains to get the color I wanted, then added swipes of finish in crevices and corners to mimic age.
If you’re going to apply a topcoat such as oil-based polyurethane, use dewaxed shellac to promote adhesion. Use a high-quality bristle brush and apply the shellac quickly with the grain to minimize lap lines. You can adjust the color or mimic signs of age with a gel stain glaze, in which case you’ll want to wait at least overnight before applying a topcoat.
Don’t forget to apply a coat of shellac on the underside of the top and floor so that all surfaces are sealed (I used Zinsser Bulls Eye SealCoat).
A final going over with paste wax will produce a low-luster, satin-smooth finish that’s easy to renew with additional wax in the future.
I made my own leaded-glass panels, using directions available online and from various publishers. (The learning curve was steep, and the finished product less than perfect, but I find the panels quite attractive and serviceable.)
You can, of course, use plain glass, or have a glass artist make leaded panels for you.
Install the glass panels in their rabbets, then cut thin strips of wood that tuck into the rabbet to hold the glass in place. Miter the corners, then pin the strips in place, sinking the brads into the side of the rabbet (where there is no glass to avoid). Now attach the top and rehang the doors.
The final touch is to install the door pulls – which I do with the doors hanging because it allows you to get them exactly even. The ones shown in the opening photo (from Horton Brasses) are in the Mackintosh style, and come close to the hardware on original Lebus pieces of this vintage.
Here are some supplies and tools we find essential in our everyday work around the shop. We may receive a commission from sales referred by our links; however, we have carefully selected these products for their usefulness and quality.


