We may receive a commission when you use our affiliate links. However, this does not impact our recommendations.


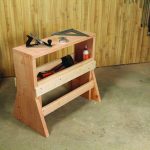
For tails, it’s up. This stool transforms from a step stool into a chair with a simple flip of the step. As it increases the reach of your children, it reduces the materials in your scrap bin.
Whether stepping or sitting, this multi-purpose stool is sure to give your youngster a boost.
You may not remember when you looked up at the sink, or when you climbed up to the potty – but if you’d had a few extra inches on your legs, things would have been so much easier. This stool can do that for youngsters – and help you clean out your scrap bin, too.

Fairing a curve. A thin strip of wood makes the perfect tool for designing a curve.
This column generally begins with a trip to buy lumber, but you probably have the needed material – scraps – floating around your shop. This especially holds true if you paint this piece instead of go all wack-nutty with figured maple like I did. But if you need wood, simply head off to the store with your cut sheet in hand.
On this project, you can cut the pieces to size at the beginning of the build (most times it’s better to cut to length and width as you need the parts in case things change). Once the parts are cut, the majority of the work is on the sides; they get laid out, drilled and shaped.
Find and mark the locations for the holes prior to any shaping work and make sure you have mirrored layout images. Keeping the drill square to the workpiece, bore the two 3/4″-diameter holes and one 1/4″-diameter hole in both sides.
Next, align the bottom edges of the two sides then lay out the centered arched cutout. To do that, set your compass at 2-1/2″ then find the location where the compass hits the marks along the bottom edge (3-3/4″ from the outside edges) and 1-1/4″ of height at the center – the compass point rests on the opposing workpiece when drawing the arch.
The photo below shows how to lay out the side’s curved shape. Clamp a workpiece to your bench, clamp a thin strip of wood to the bench just in front of the workpiece then bend that strip to the 2-7/8″ layout mark along the top edge to get a pleasing shape. The radius of the line should be around 9-3/4″.

Exact replication. A flush-cut router bit with a top-mount bearing makes shaping the curves quick work, but the profile is only as good as the one copied.
With the strip bent to position, transfer the line to your side with a pencil. Use your jigsaw to cut close to the line and finish smoothing the curve with a rasp and sandpaper. This is the only time that you’ll need to use this setup. The remaining layouts are transferred from this one curve.
A Choice of Power Tools
Align the sides to transfer the layout from the first side workpiece to the second side, then flip the shaped side and repeat to add the second curve to second side. There’s one curve yet to add, but that comes after you shape the second side.
You could use a jigsaw to cut the curve to the final dimension, but a router with a pattern bit installed does the job in a flash – then, rasp cleanup isn’t necessary and final sanding is minimal. (For more information on using a router, refer to the updated “ICDT” manual.)
Use a jigsaw to rough-cut and stay about 1/8″ from the layout line. (This allows the bit to cut exactly to the line.) Fit the sanded curve to the rough-sawn curve, clamp the pieces to your bench so the clamps are out of the path of the router’s base as the cut is made, and you’re ready.
Adjust the router bit so the bearing rides along the sanded curve while the bit’s cutting length is aligned to remove waste material. Make the cut moving the router from left to right, or with the direction the router bit is spinning. After routing the curve, flip the top board and repeat the steps to complete the work on that side.

Arrange and attach. The seat boards, as are the steps, are spaced with pennies, clamped together and clamped to the frame prior to drilling for screws.
Switch the sides then lay out, rough-cut and rout the remaining curved edge. The sides are complete after a bit of sanding.
If you want to bypass the router work, jigsaw, rasp and sand those three curved profiles.
There’s a bit of layout and shaping work done to the step supports. Make sure to locate the 1/4″ holes prior to any shaping. The bottom edges of the supports have gentle curves and the corners are softened, or rounded. Make the cuts with your jigsaw, then use a rasp and sandpaper to finish the shaping. Or use the router setup to complete this work, like you did on the sides.

Support Arm

Side Elevation

On to Assembly
The seat boards, with the edges rounded with a block plane, are taken from standard-width stock, but the steps need to be ripped to width. Use your jigsaw to make the cuts and clean the sawn edges with a block plane. Sand all the parts, including the dowels, to clean up the surfaces and you’re ready to assemble.
Position the dowels: The short dowel fits toward the bottom center of the sides with the ends flush with the exterior face of the sides. The longer dowel acts as a stop when the step is flipped up and the stool is in seat mode. This dowel extends 3/4″ beyond the exterior faces of the sides. After the dowels are positioned, drill 1/8″ cross holes through the edge of the sides and into the dowels. Glue in a dowel pin to secure everything.
The seat boards and the steps are attached with countersunk and piloted screws. Plug the screw holes then sand the areas smooth and it’s time for finish, be it paint, or stain and topcoats.
With the finish complete, attach the step support assembly to the main stool assembly using lag bolts, washers and nuts (slip an extra washer between the support and side to keep the parts separated) then take the stool into the house and watch your youngsters reach new heights.
Click here for a slideshow of additional step photos.
Click here for to download the PDF for this article.
Click here to download the free SketchUp plan for the step stool.
Here are some supplies and tools we find essential in our everyday work around the shop. We may receive a commission from sales referred by our links; however, we have carefully selected these products for their usefulness and quality.