We may receive a commission when you use our affiliate links. However, this does not impact our recommendations.

Arts & Crafts hallmark. Four through-tenons in a single board is a joinery challenge. The small stool above is a great way to practice with the two simple jigs and careful work needed to meet the challenge.
One of my favorite Arts & Crafts details is the through-tenon at the top of a table, bookcase or chair. When I was considering adding a joinery class to my curriculum at the Barnard Woodworking School, I thought of this joint. I prefer teaching joinery techniques while making a simple project rather than practicing on scrap wood.
Most of the through-tenons in antique furniture are in chair arms where the wood movement isn’t an issue because there is only one tenon in the board. It’s when there are two tenons with side grain between them that it becomes an issue. If you look at a magazine stand or music stand you will see the sides of the cabinet have vertical grain, and the sides can be simply glued to the legs, long grain to long grain.
Another application of the through-tenons on legs is the “round top tabouret” or tea table, seen in the photo at right. Some versions of the original antiques didn’t have the through-tenons on the top because they had hidden rails locking the tops of the legs in place.
I prefer to add the through-tenons to the top because it adds visual interest and communicates the satisfaction I get out of performing the feat. When I make these, I eliminate the hidden top rails; the bottom rails are sufficient to make the table strong and the legs will flex enough to allow the tenons to move with the top.
If you look at an old reproduction catalog of the Arts & Crafts furniture of the early 1900s you will see the through-tenon like this mainly on chair arms; the venerable Morris chair, many dining room arm chairs and several rocking chairs as well. We build a Grove Park Inn rocking chair in a class and it didn’t have the through-tenon on its arms, until now. I added that feature to make the chair more interesting, and to add a challenge and a new technique for most students in the class.
A Project for Practice
I decided that a small stepstool with four through-tenons in the same board would be a bit of a challenge (and through-tenons are a common skill needed for more complex furniture), and it’s a handy thing to have around your house – or to give away as a gift. I had some spalted quartered sycamore I’d been saving for something special, and this was it.
First, make a stable plywood jig with a square hole in the center the exact size of the square tenons, in this case 1 1⁄4“. This jig will be used to accurately size the through-tenons and to duplicate the square holes or mortises in the top. One nice-fitting through-tenon is a challenge; four of them in the same board is a real test of workmanship.
Make up 1″-thick plywood by laminating two pieces of scrap 1⁄2” plywood together. Next, rip a 1 1⁄4“-wide strip out of the center. Take the strip and cut a 2″ block from the approximate center, being careful to cut it square both ways. Now glue the plywood back together, turning the 2” block sideways so it spaces the distance between the two 1 1⁄4” strips at the same 1 1⁄4“. This technique ensures the hole is the same size in both directions.

Both sides the same. When gluing the marking jig it is critical that the sides are square and parallel to one another. After the glue dries I always check them and true them up on my edge sander, if needed.
It is not illegal to edge-glue plywood because half of the plies are long-grain-to-long-grain. Now, while the plywood is drying, I’ll tell you how I make my tenons for the legs.
These legs are 2″ square. The 2″ size is not critical. What is critical is that both measurements be the exact same size, and that they are square to one another. You may notice the quartersawn grain is on all four sides. I achieve this by gluing three pieces of 11⁄16“-thick lumber, then applying 1⁄8” veneer to the sides to cover the flat grain and the glue lines.

One is good. Here is the joint, assembled on the first try.
This is all done oversize to allow for jointing, planing and squaring, followed by a final planing. I use the same thickness setting on the planer for the final passes to ensure the uniform dimensions on the legs.

Sneak up on it. Slowly trim the tenon on the table saw until it just fits into the mortise pattern jig with slight hand pressure. Get this right because the final mortise in the top will fit exactly the same as the tenon fits into the jig.
I usually make tenons on a table saw with a stack dado set and a crosscut jig. I set the fence to determine the length of the tenon at approximately 1⁄4” longer than the thickness of the top. Making light cuts across all four sides, I slowly sneak up on the final size. Don’t rely on measuring the square tenon; test-fit the tenon into the plywood jig.
Raise the dado stack in small amounts when you get close. Don’t forget the amount you are trimming is actually doubled each time. When the tenon fits into the plywood jig nice and snug on all four sides, then go ahead and dado the tenons on the other three legs. All four should fit tightly into the plywood “mortise.” This is not the only use for this jig, so don’t toss it. It will be used later to guide the chisel when cutting the mortises (more information on this later).
To cut the leg mortises for the through-tenons on the aprons of the stool, lay out the locations and mortise each one halfway through from each side, being careful to lineup the ends of each mortise. I make the tenons on aprons in a similar manner as above – at the table saw with a stack dado set.
The two shorter aprons of the stool have the grain running vertically. This is so the cross-grain wood movement matches the top, and the top can be glued in place. The long grain of the apron is against the long grain of the legs, so I simply edge glue them together.
Better Than Measuring
After gluing all the legs to their aprons we will deal with locating the four mortises into the top. Sometimes accurate measuring is sufficient; however in this case there are too many possibilities for mistakes (please don’t ask me how I know this). I’ve designed a simple marking jig that will eliminate all measuring and most of the mistakes – provided it is made accurately.

Cheap insurance. The small block turned sideways fixes the same distance between the center strips as the width of the strips. Be sure not to glue the spacer block in place–but leave it there until the glue dries.
Take two 1⁄4“-thick MDF or plywood pieces about 2 1⁄2” x 6″ and a piece of hardwood 3⁄4” x 1″ and about 5″ long. Glue the MDF pieces on both sides of the hardwood so you have a U-shaped marking jig with a 1″ space between the two legs of the U. Be careful to make all sides square and parallel to each other. Let the glue dry overnight before using the marking jig.
When the jig is ready, clamp the top board to the stepstool so that the clamps don’t interfere with the marking jig. Slide the jig onto the top so the MDF is on the top and the bottom with an edge of the bottom piece snug against the side of the tenon. The MDF on the top is in the same plane as the bottom.
Use a sharp pencil to mark the top line. Repeat this process on all four sides of each tenon. Make sure the clamps don’t allow the top to move at all, or you’ll be sorry.

From here to there. When marking the mortise location be sure the bottom “finger” is touching the tenon all along its side and mark all four sides on all four mortises, making sure that the top doesn’t move.
Before you take the top off, mark a corner so the top goes back in the same orientation as it was when marked. Use a mortise machine or a Forstner bit in a drill press to hog out the waste between the marks, staying about 1⁄32” or 1⁄16” to the inside. If you use drill bits to hog it out, go ahead and chisel out the mortise within 1⁄16” of the inside of your marks.
Same Jig, Different Function
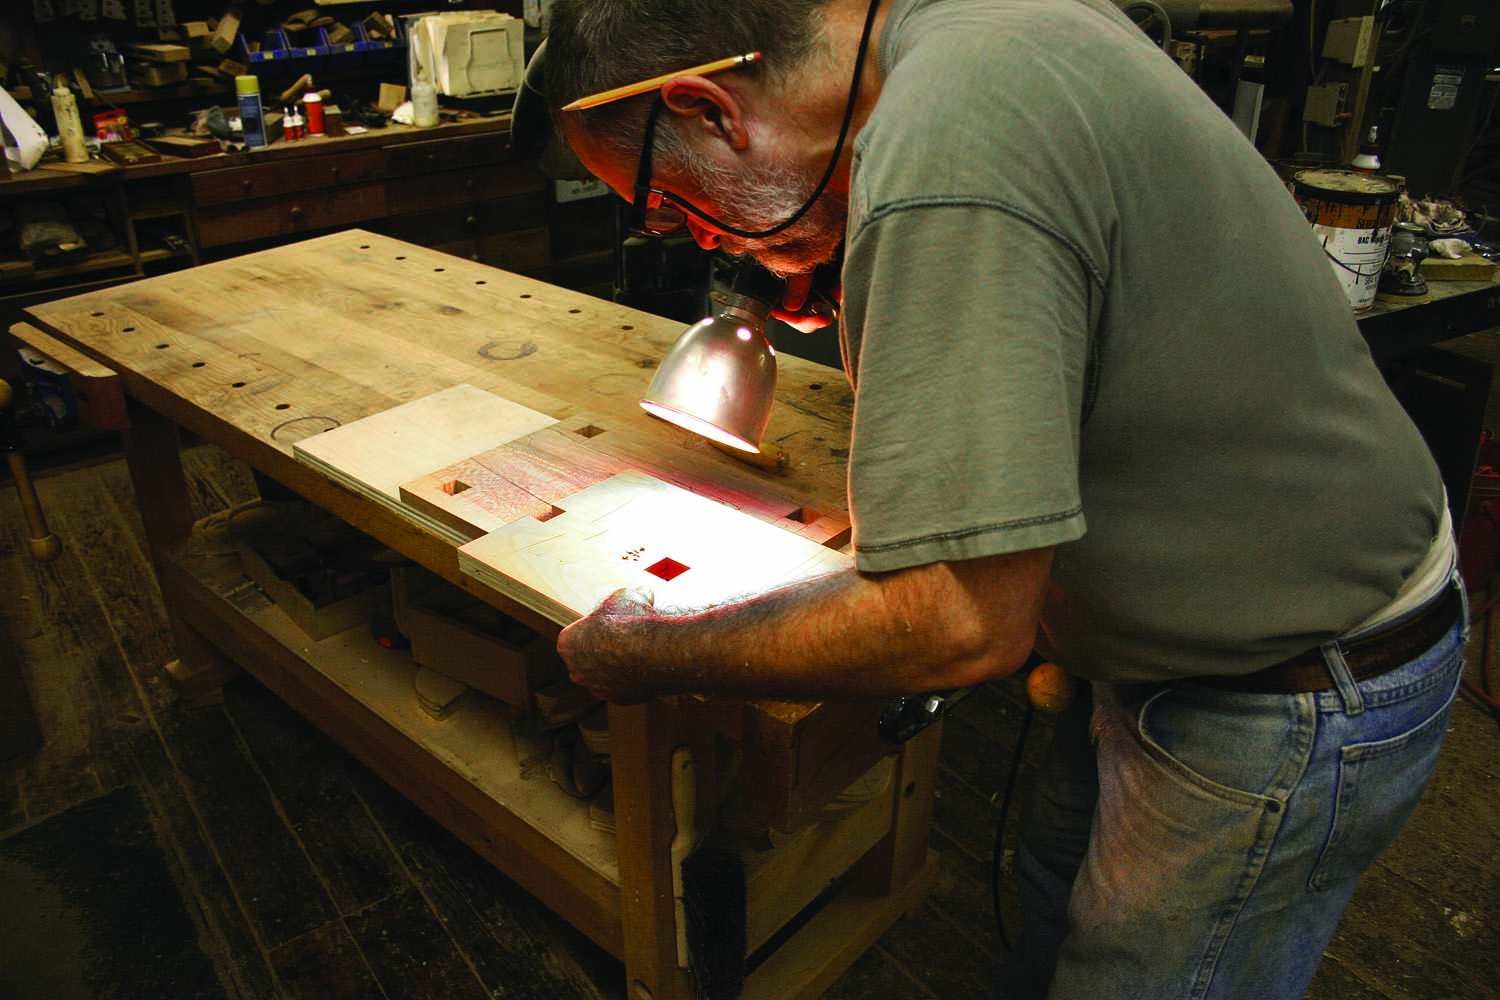
Get a good look. Using a light to see into the hole ensures that the jig is exactly lined up with the four lines around the mortise. Re-check after clamping the jig to see if anything slipped.
Now for the fun part – put a piece of plywood or MDF on your bench to protect it. On top of this place the stepstool top with its rough mortises. On the top of that, place the 1″-thick plywood mortise pattern jig. You will need a light to see into the mortise and line up the jig with all four lines for the mortise.

Wide guide. When paring down the sides of the mortise make sure the flat back of your chisel is snug against the plywood edge at the top and bottom. Here is where you will be glad that you took the time to make 1″ thick plywood for your jig.
Line up the square hole inside the 1″ plywood pattern with the marks on the top as close as possible and clamp this whole assembly to the bench, using several clamps. They need to be tight enough to prevent the top from moving when pounding. Now, use a very sharp 3⁄4” chisel and hold the flat back of the chisel tight against the 1″ plywood and snug into the corner, then tap with your mallet.
Go all around the jig, slowly and carefully. The back of the chisel should be tight against the jig. Take your time and be careful not to cut into the plywood jig (so you can use it later on other projects). It is much better and safer to make many light cuts than just a few heavy ones, and remember to be careful when placing the chisel into position. Also, I usually hone the chisel after each mortise. It doesn’t take long and it ensures a nice, clean-cut mortise.

Visual proof. Here we see the completed mortise. The pencil lines show how accurately we aligned everything.
You will end up with an accurate mortise, in the right place, that is square and parallel. A slight back bevel, especially on the end grain, will make it easier to install and remove the legs when you dry-fit. Repeat this process on the other three mortises and see if all four legs fit tight on all sides. If you are very careful and precise in all the steps, it will fit on your first try. This is a great project to test your skills on and the jig concepts can be adapted for use in other projects.
When you design through-tenons on a solid wood top like this small stool or in other applications, you have to allow for seasonal wood movement. This stool has unconventional vertical grain rails on the two short sides between the legs. There is a practical reason for this arrangement.
The legs and aprons will shrink and swell the same way that the top moves because all the grain is oriented in the same direction. Usually, the top will shrink in the winter and expand in the summer. If the legs were permanently locked in their position by conventional horizontal-grain rails, the top would crack when it shrinks, and as I tell my students, “that’s not good.”
To Top it all Off

Four is better. Fitting one mortise and tenon is not too difficult. But all four on the same top, on the first try? It doesn’t get much better than that.
When you consider the design of the top of the square through-tenon, there are several possibilities. When I first made these I would cut a 110˚ bevel on all four sides yielding a four-sided pyramid look. I was quite contented until I happened upon an old “V” back Stickley chair, No. 3541⁄2A. This chair had square through-tenons in the arms that are 1 1⁄2” square and about 1⁄4” proud of the arms. Instead of the four flat pyramidal angle cuts they are rounded, much like a small Greene & Greene ebony peg.
Another design possibility is to leave them mostly flat with a small 45˚ chamfer of about 1⁄4” on all four sides – not my favorite. When I designed this foot stool I wanted to do something a bit different so I thought of a steeper pyramid. But I didn’t like the way it looked so I simply cut the point off the top and came up with a “four-sided flat-top pyramidal-square through-tenon.” If you don’t like the look of it you have to love its name. If you hear that term someday in a country music song, remember – you heard it here first.

Head of the class. Here is the completed stool with the four through-tenons and the two simple jigs that make it so easy.
This design feature adds an extra element to any simple Arts & Crafts piece and showcases the skill of the maker. I hope from this article you can see how a few simple homemade tools and easy techniques can make a difficult project within the reach of most amateur woodworkers – and even a few seasoned professionals.
Here are some supplies and tools we find essential in our everyday work around the shop. We may receive a commission from sales referred by our links; however, we have carefully selected these products for their usefulness and quality.