In Projects, Shop Blog, Techniques

We may receive a commission when you use our affiliate links. However, this does not impact our recommendations.

3 Tapered Legs on the Jointer

Advanced jointer
techniques yield smooth,
consistent tapers.

By Seth Keller

After I learned to cut tapered legs on the jointer,
I never went back to my bandsaw or tablesaw.
Legs cut on the jointer take less time and, best
of all, require a whole lot less sanding. This is
especially true with the spade-foot design in which the jointer’s
cutterhead automatically creates the sweep above the
spade foot. The same leg cut on a bandsaw would require
hand shaping and sanding to finish the profile.

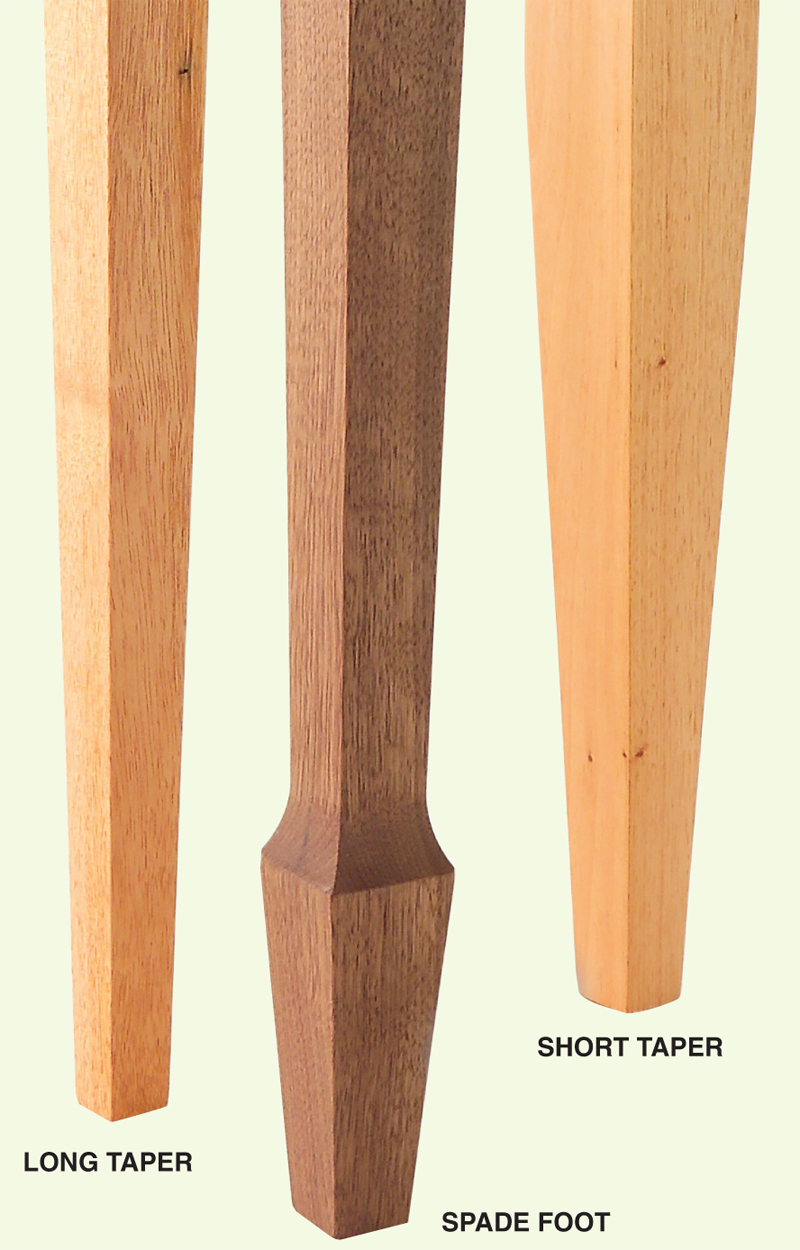
All three legs shown here are made from 1-3/4 x 1-3/4 x
29 in. stock. The first leg I’ll explain how to make is the
familiar long taper found in many Shaker designs. Often,
this leg has the taper on only two adjoining faces. The second
leg has a short taper used on cabinets with legs and on
some stylized modern pieces. The last profile, a tapered leg
with a spade foot, builds on the techniques used in making
the first two legs. This remarkable shape is both elegant and
refined. It hints at Hepplewhite and Sheraton furniture
designs from the eighteenth century and can make a piece
distinctive and stylish even today.

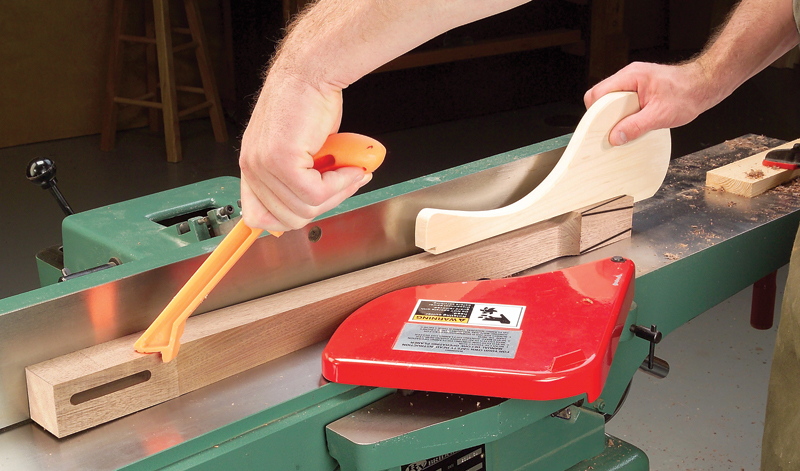
The technique involves dropping a leg down on a running
jointer. That may seem a bit scary at first, but stop and start
blocks make the procedure safer than with most tablesaw
taper jigs I’ve used and more accurate than for any taper I’ve
done on a bandsaw.

It is a good idea to use a test leg to set up the cuts. As always,
mill the mortises before you shape the legs. Finally, make sure
your knives are sharp and your jointer is well-tuned.

1. Long taper

1. Lay out the desired taper on all four sides of the leg.
Make alignment marks 1 in. below the top of the taper.
My taper goes from 0 in. to 1/2 in. at the foot.

2. Position the start block on the infeed table using
the alignment mark as a reference (Photo 1). The start
block gives you a consistent start point for each cut and
provides a pivot point for safely lowering the leg blank
onto the jointer.

3. Set your jointer’s depth of cut to 1/8 in. With push
sticks ready, turn on the jointer. Place the foot of the leg
firmly against the start block. Swing the guard out of the
way and lower the leg (Photo 2).

4. Complete the cut (Photo 3). Make three or four
passes on the same side of the leg, closing in on your
layout line.

5. Rotate the leg 90 degrees into the fence and cut
the adjacent taper. Continue until all four tapers have
been cut.

6. After all of your legs are tapered, you’ll likely see
a small divot from the cutterhead where the taper cut
begins. To clean this up, remove the stop block and
reset the depth of cut to about 1/64 in. Make a single
pass on each side to clean up the divot (Photo 4).

7. A little sanding completes the leg.

Click any image to view a larger version.

1. To set the start block, position the leg blank on the jointer
with the alignment mark centered over the cutterhead.
The alignment mark is placed 1 in. below where you want
the taper to begin. Butt the start block up to the leg and
clamp the block onto the infeed table.

2. Start the taper cut by slowly lowering the leg onto
the jointer with the foot set against the start block.
Almost no wood is cut when you first put the leg stock
down. The start block prevents kickback. Have your push
sticks ready.

3. Create the taper in several passes. Feed the leg slowly
over the knives. Use a push block that’s taller than the
fence to maintain light downward pressure on the infeed
table. To keep the cut square, use a push stick to hold the leg
tightly against the fence on the outfeed table.

4. Complete each taper with a shallow cleanup pass
using the jointer in a traditional manner. Keep the top
of the leg pushed tightly against the fence to ensure a
square cut.

2. Short taper

1. Lay out the taper on the leg blank. Construct a
sled that angles the leg up on the jointer so the taper
line is parallel with the bed (see photo, right).

2. With the jointer turned off, set the cutting depth to
about 1/8 in. Place the sled on the outfeed table and
swing out the guard. Place the leg on the sled so it is suspended
over the cutterhead and rests on the infeed table.

3. Turn the jointer on and make the cut, keeping
downward pressure on the foot and the leg where it
contacts the sled. (see photo, right). Make three or
four passes on the same side of the leg, until the cut
reaches the layout line. Rotate clockwise and cut the
same number of passes on each side of the leg.

4. Sand the leg smooth.

A simple sled angles the leg on the jointer to create the short taper. Position the leg on the sled
so the leg bridges the cutterhead. Slide a piece of 1/2-in. plywood under the top of the leg until
the taper layout is parallel with the infeed table. Attach a stop to the sled at that point.

3. Spade foot and taper

1. Lay out the taper and spade foot on the leg.
Unplug the jointer and position a start block as you
did for the long taper (see “Long Taper,” Photo 1, above).

2. Clamp a stop block on the outfeed table (Photo
1). The stop taper is about 1/2 in. deep, so set the
depth of cut to 1/2 in.

3. Turn on the jointer. With its foot against the
start block, lower the leg and make the cut (Photo 2).
Repeat for all four sides. Now you have a stopped
taper with a square block on the end. Don’t worry if
you see some tearout at the top of the foot; it’ll be
cleaned up when the spade foot is cut.

4. To create the spade foot, remove the start and
stop blocks from the jointer. Lay out the spade foot.
Make a sled similar to the one used for the short
taper. Reset the depth of cut to approximately 1/8
in. and cut the short tapers that form the spade foot
(Photo 3). Be sure to hold the top of the leg tightly
against the fence to ensure that your tapers start
square across the face of the foot.

All that’s left is a bit of hand-sanding to smooth the
faces and break the edges. With a few passes on a
jointer and a little light sanding, you’ve created an
attractive leg with a complex shape.

1. The spade foot starts
with a stopped taper.
To set the stop block on
the outfeed table, position
the leg on the jointer
so the taper’s end aligns
with the arc of the cutterhead
(see photo, above).
Set the start block the
same way you did with
the long taper.

2. Push the leg over the cutterhead. Slow and
steady is the pace to take. You can cut the entire
1/2-in. depth in one pass.

3. Create the foot using the same sled technique you
used on the short taper. I added a 3/4-in. board to the
short taper’s sled to make this sled for the spade foot.

This story originally appeared in American Woodworker January 2007, issue #126.

January 2007, issue #126

Purchase this back issue.


Product Recommendations

Here are some supplies and tools we find essential in our everyday work around the shop. We may receive a commission from sales referred by our links; however, we have carefully selected these products for their usefulness and quality.

Recommended Posts

Start typing and press Enter to search