We may receive a commission when you use our affiliate links. However, this does not impact our recommendations.
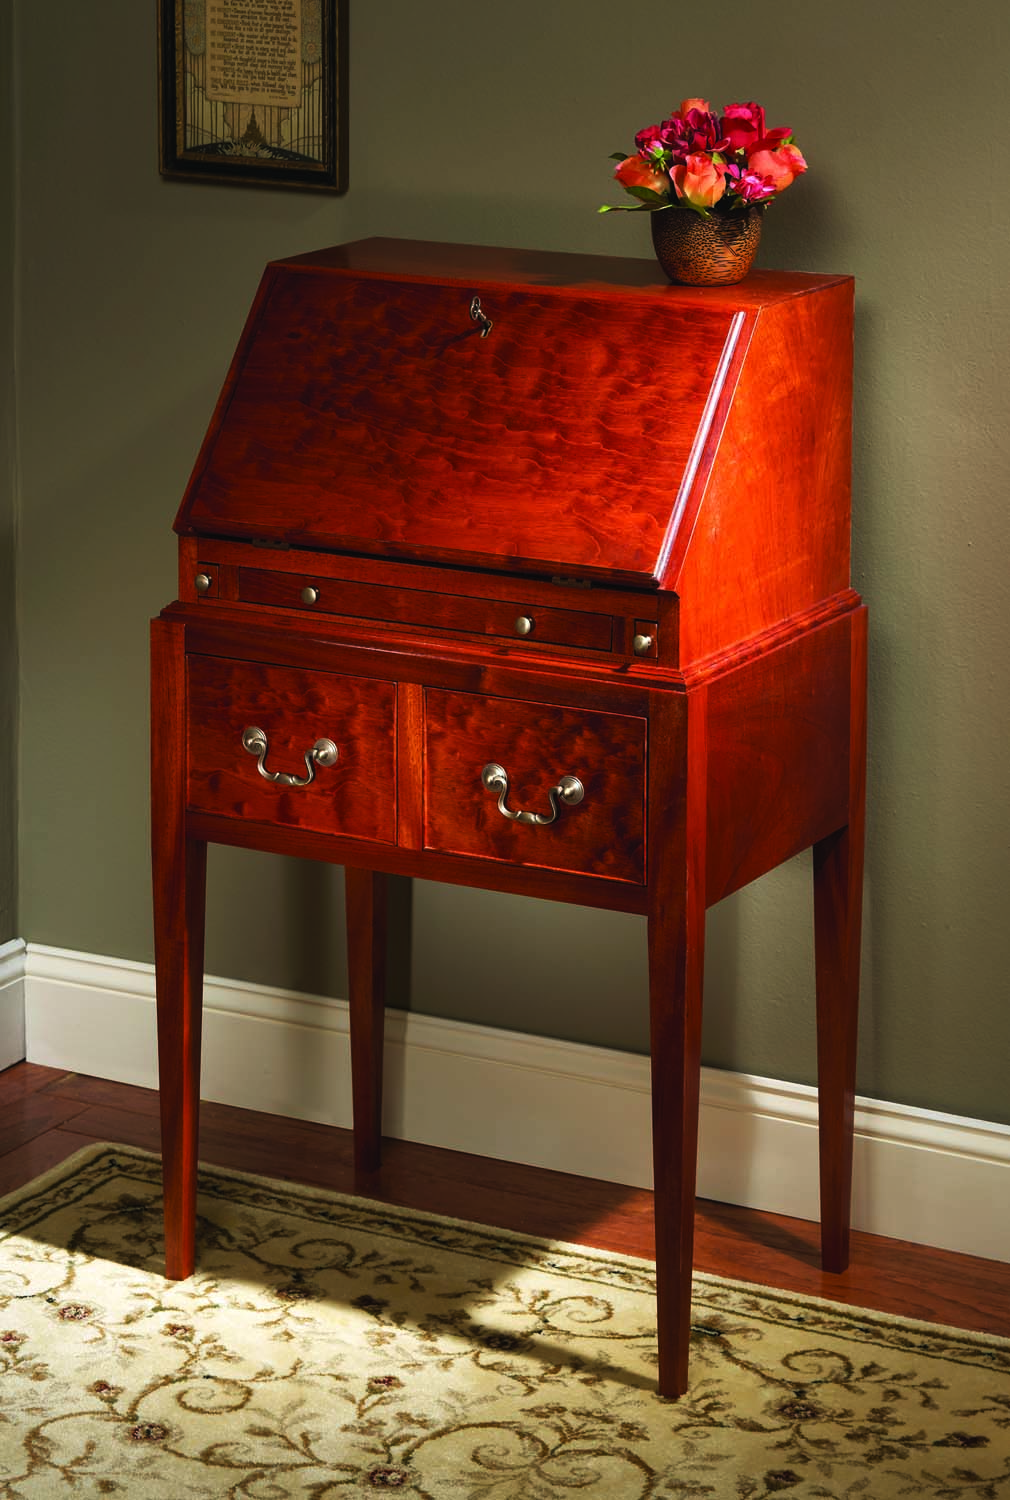
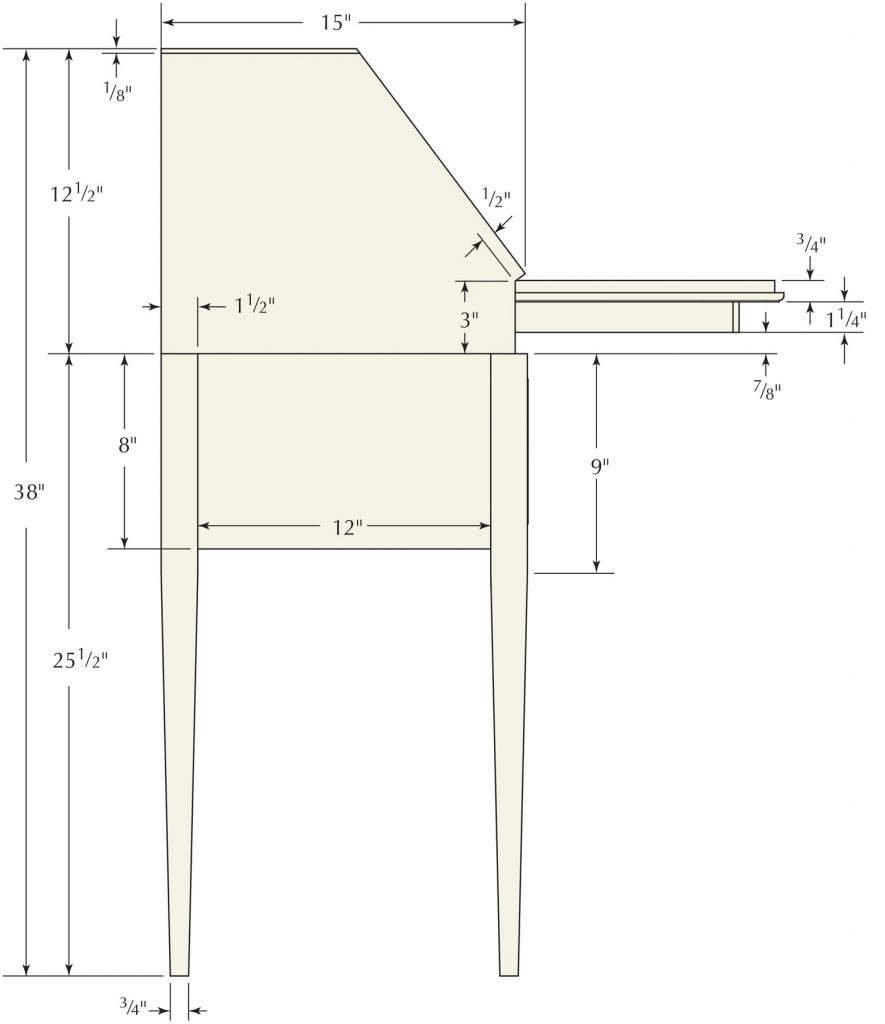
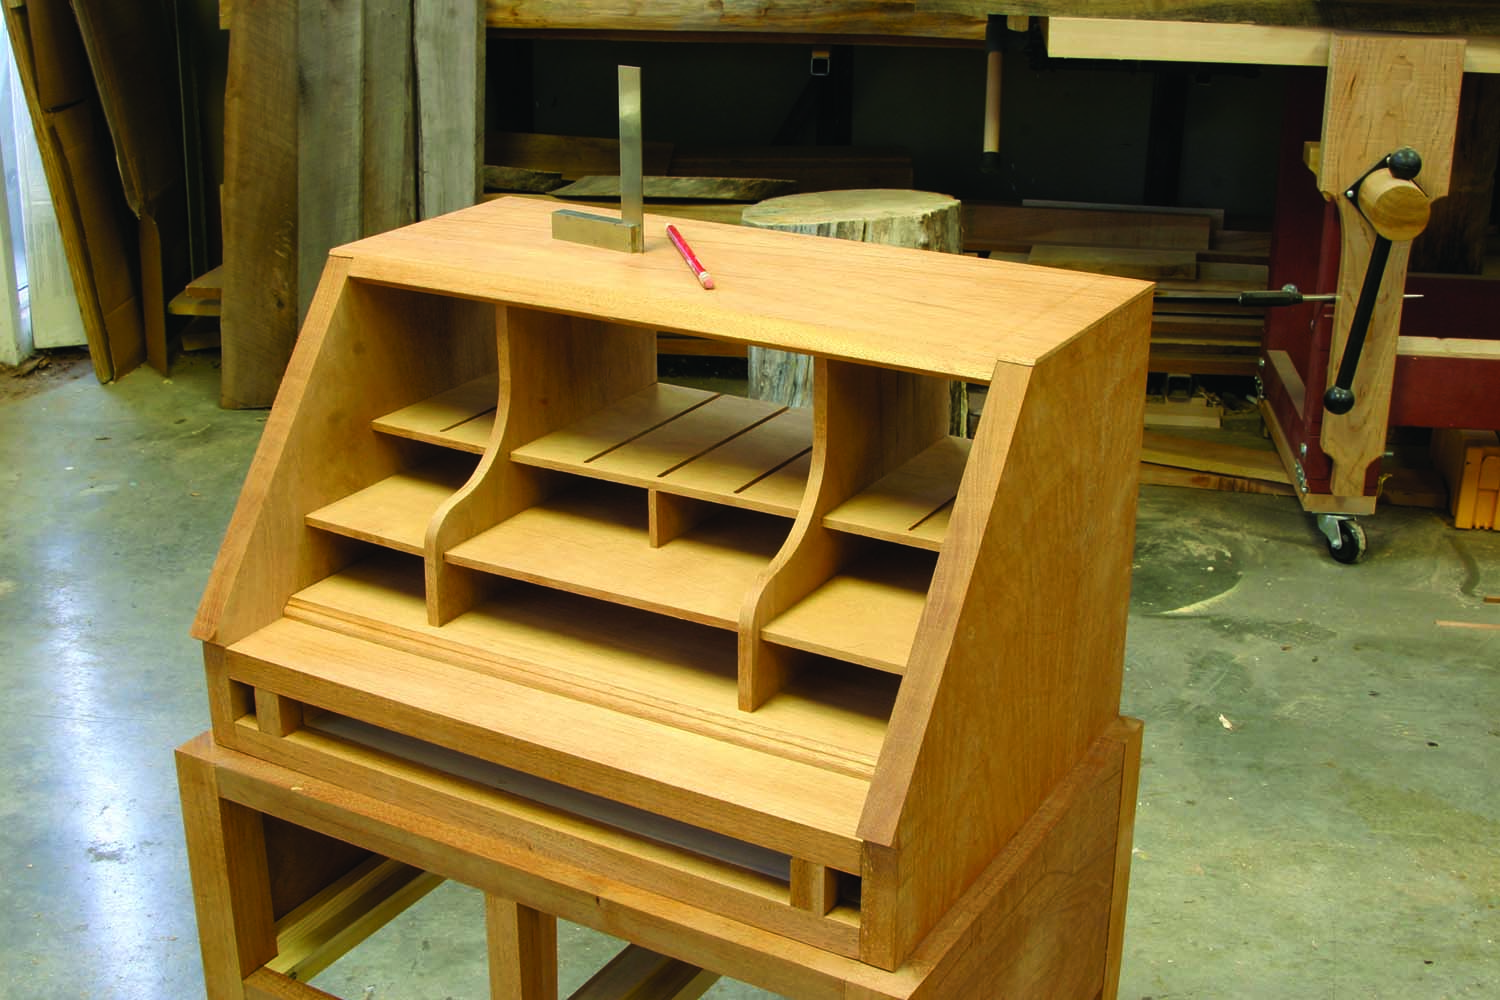
Substantial storage in a small size. While you can see only three drawers when the lid is closed – that’s right, it’s a pencil drawer between the lopers (the lid supports) – the interior of this mahogany desk is chock-full of small drawers and compartments.
This North Carolina beauty exemplifies the style of the early South.
I don’t consider myself a furniture snob, but until recently, I’d not studied furniture from the South beyond pieces featured in “Southern Furniture 1680-1830: The Colonial Williamsburg Collection” by Ronald L. Hurst and Johnathan Prown (Colonial Williamsburg). After spending a few days combing through file cabinets at the Museum of Early Southern Decorative Arts (MESDA), I found I’ve been missing a vast array of gorgeous furniture.
As we pored over candidates for our upcoming “Furniture in the Southern Style” book, this small secretary, called a “Lady’s Desk” in the MESDA files, immediately caught my eye. I like its petite size and the slender, tapered legs. It doesn’t hurt that the piece has two amply sized drawers that are great for storage, or that there is far more eye candy behind the drop front. And most of the parts are, like the investment in materials, small.
Get the Ball Rolling
Because the leg tapers are cut to 3⁄4” at the floor, it appears as if the desk is standing on its toes. It’s important to get the four-sided tapers correct to mimic the ballerina effect. Mill your leg stock to size making sure the pieces are square, and cut all four legs to a matching length. Tapering is, for me, a jointer operation – but no matter your method, make sure your tapers all match.
The grain changes as you taper – so I don’t cut mortises until my tapers are made. Position your tapered legs for the best look, then mark the legs for the appropriate mortises.
The mortises for the split tenons at the base back and side rails are identical: 3⁄8” wide x 31⁄4” long; they start 1⁄4” from the top and bottom of the overall width of the rails (with 1″ of material left between them). The front legs are mortised to accept upper and lower rails that are 7⁄8” thick and 1″ wide. These mortises are 1⁄2” in length, and 1″ deep.
Two Tenon Methods
Prepare the material for the back and side rails, and at the same time mill the pieces for the front rails and the drawer divider. Cut the rails to size then form 1″-long tenons on both ends. The drawer divider ends get 1⁄2“-long tenons. For the narrow front rails, I find it best to use a two-step method at my table saw. Define the tenon length and make the shoulder cuts with the stock flat on the table, then make the cheek cuts with the piece standing vertically in a tenon jig. (Don’t forget the centered 3⁄8“-wide x 1”-long x 1⁄2“-deep divider mortises in the top and bottom rails.)
I use a dado stack to make the tenons for the wider rails. With this method, all cuts are with my workpiece flat on my table saw. You need to sneak up to the final blade height – and unless you have a really wide dado stack, each tenon has to be cut in two passes. Set your fence for the final tenon length to keep from overcutting. Once you get the blade height set, cut all the tenons. Any additional fitting should be done using a shoulder plane.

Added strength. The solid area between the two mortises is 1″ long. In a rail this wide, split tenons should be used for strength and rigidity.
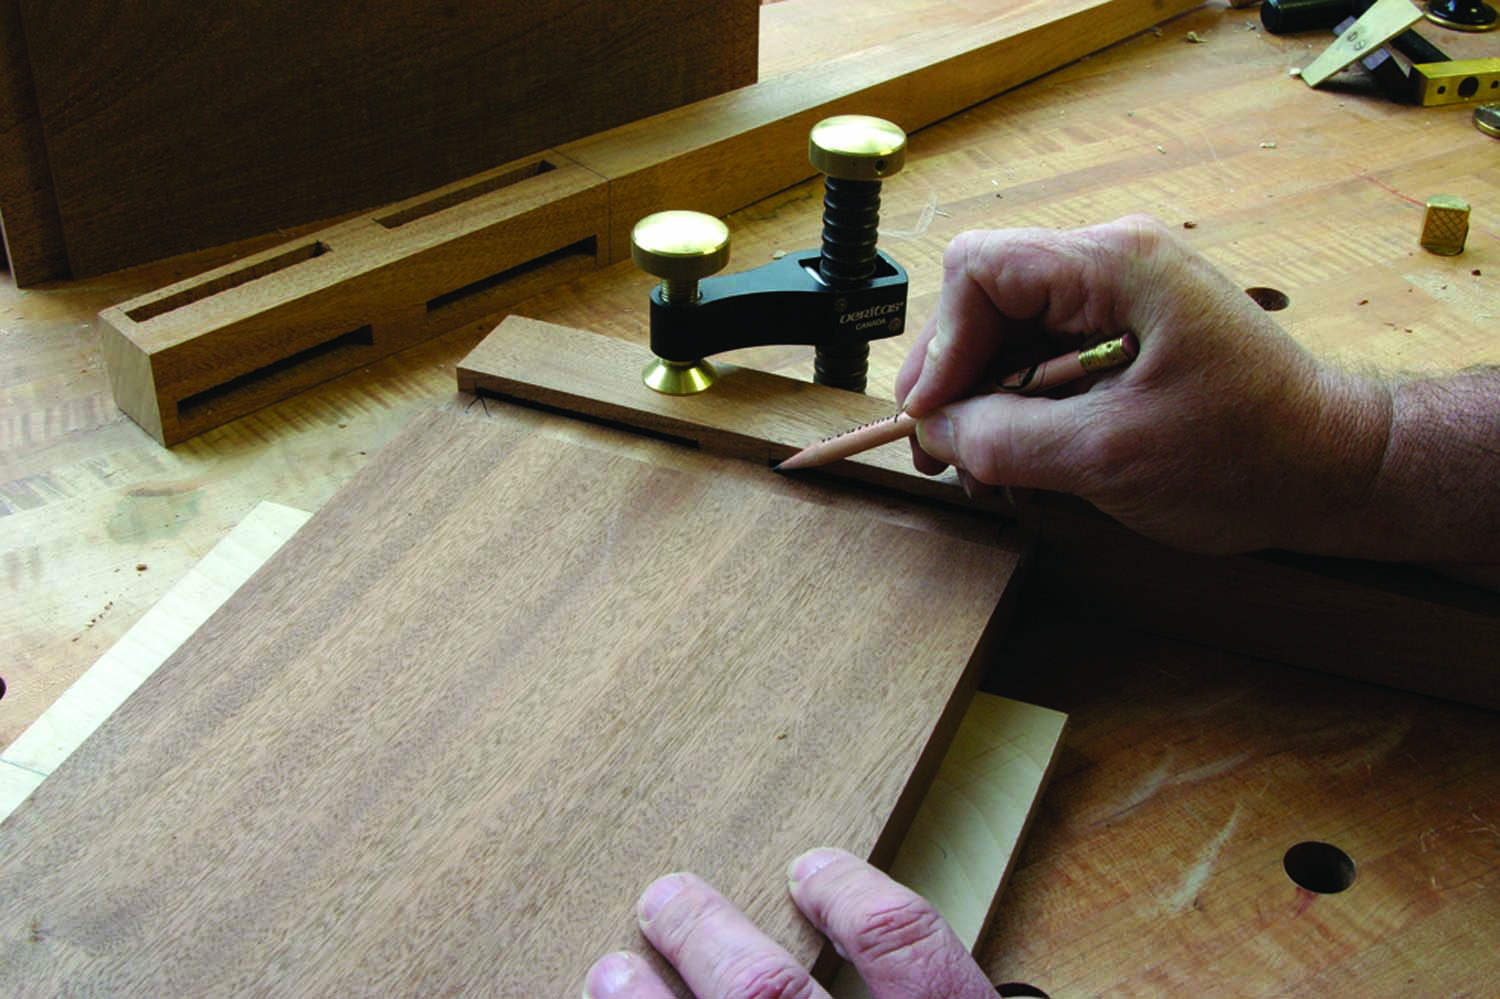
While the narrow rails come off the saw ready to install, the tenons on the sides and back piece need to be split. No need to measure – just align a rail to its leg mortises, then transfer the layout onto each tenon.
From those marks, extend straight lines down the tenons. You could use a band saw to make the cuts, but it’s so easy to use a handsaw here. The cuts are not critical – but don’t nick your shoulders. Grab a chisel to remove the waste from between the tenons. A couple hits in from both faces should do the trick, and you can saw off the end waste.
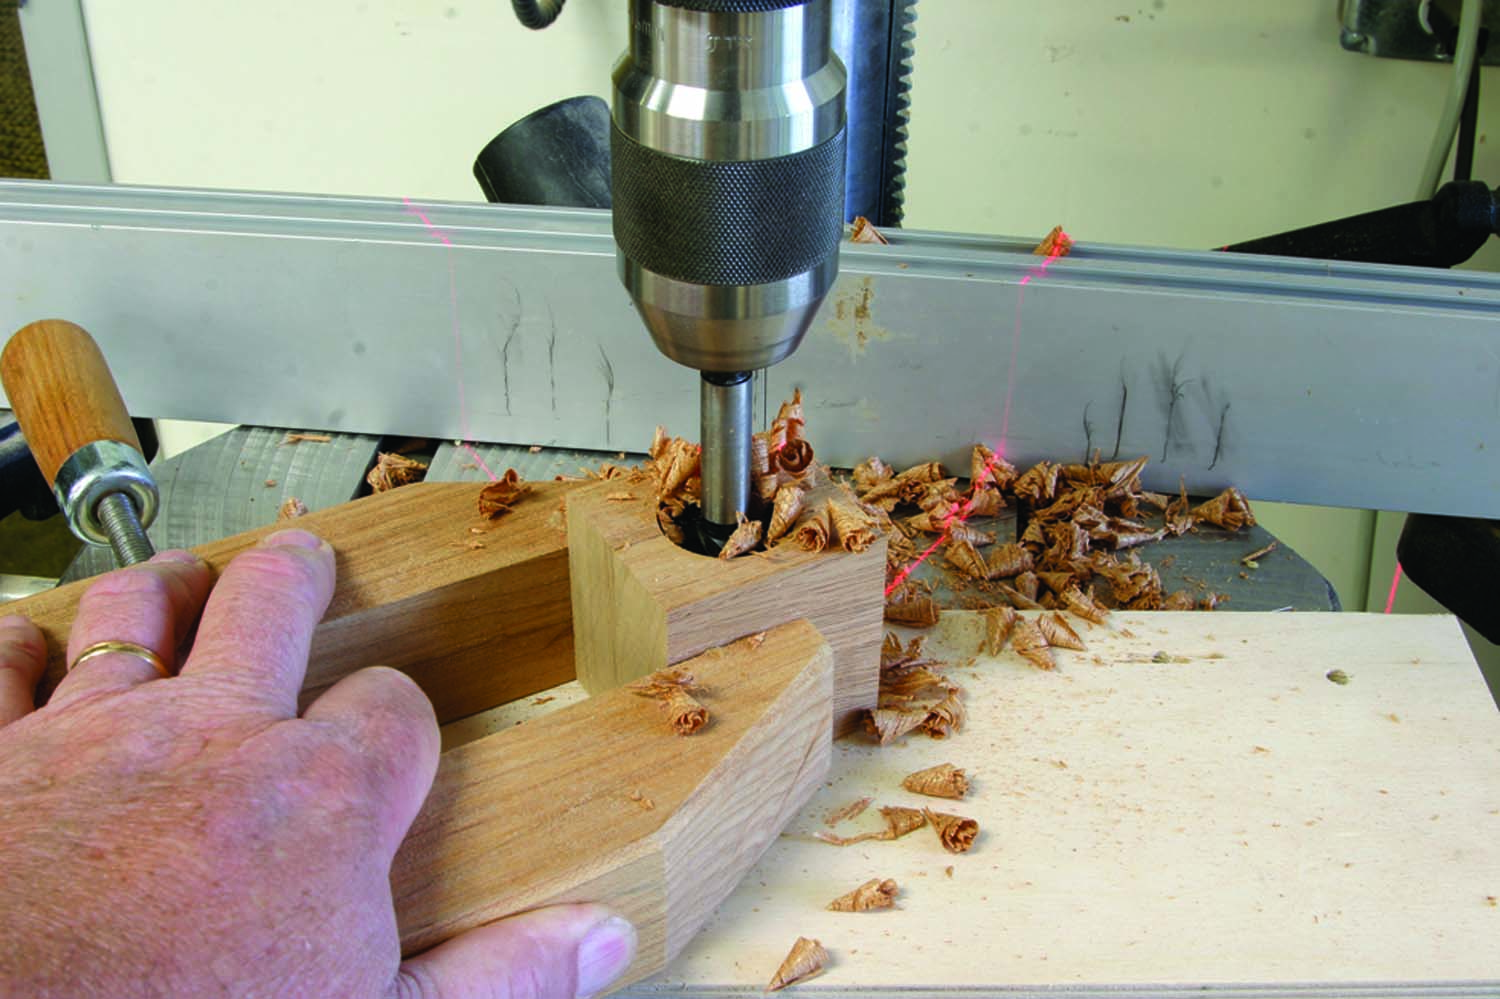
Before you dry-fit the base, there’s a mortise needed through the back to catch the center drawer runner. I but the back atop a couple 2x4s on my mortise machine bed, then set the fence and cut the mortise through the back piece.
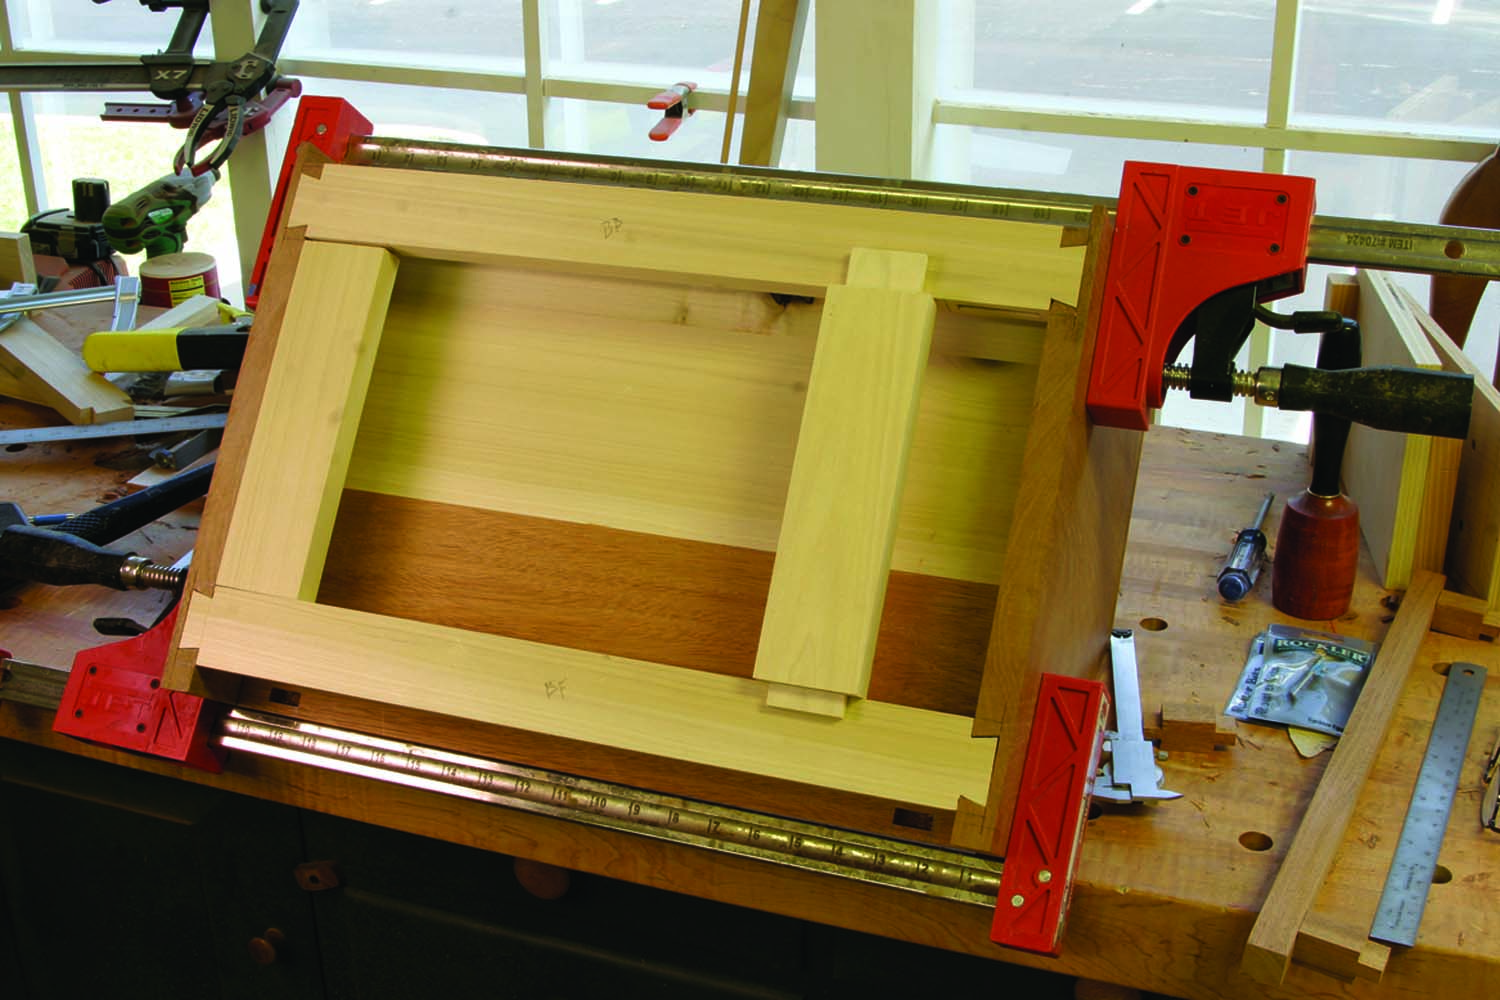
Dry-fit the base to make sure all the joints close and the parts are correct. While the unit is together, take measurements for the outside runners and center drawer runners. Remember to install the center runner as you glue-up the base. If you do forget, there are options – a bridle joint or a clever slip fit. (You can read more about that on our blog – check the Online Extras for a link.)
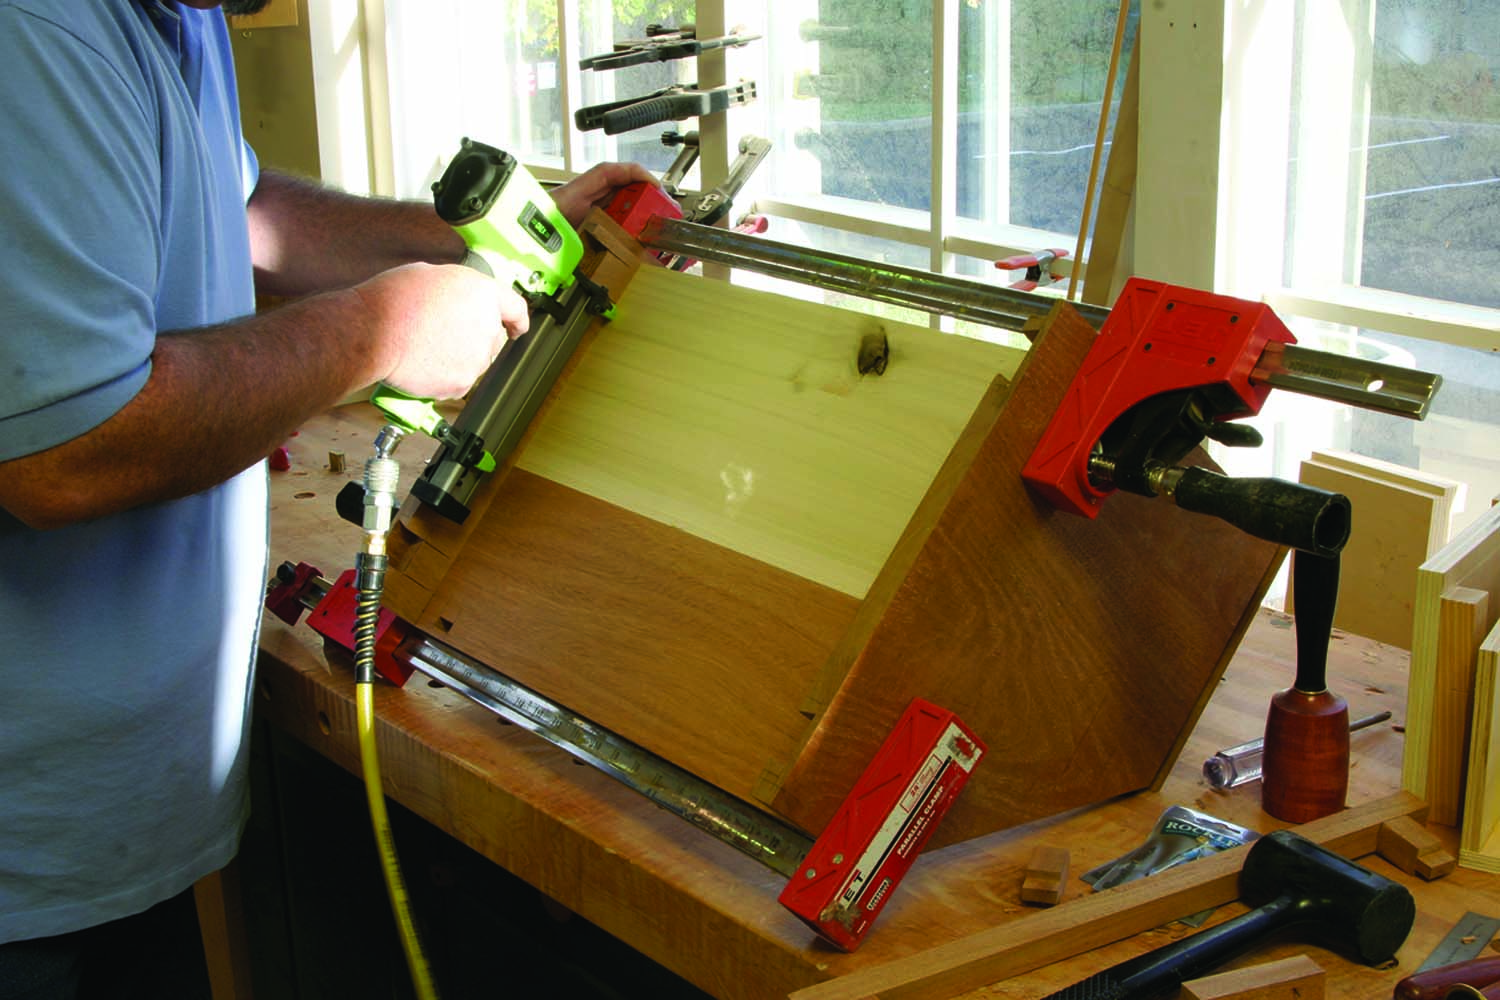
Join the three parts for the base front, then cut the runner mortise in the lower rail. Apply glue on each tenon and in each mortise, then assemble the base. It’s best to first connect the front and back rails to the legs. After the glue dries, complete the base assembly. Fit and install the runners then cut, fit and install drawer guides using brads and a little glue.
Interesting Joinery Ahead
Not so tight. A small space between the tenon and mortise allows you to adjust the rail up or down to fit flush with the top of your legs.
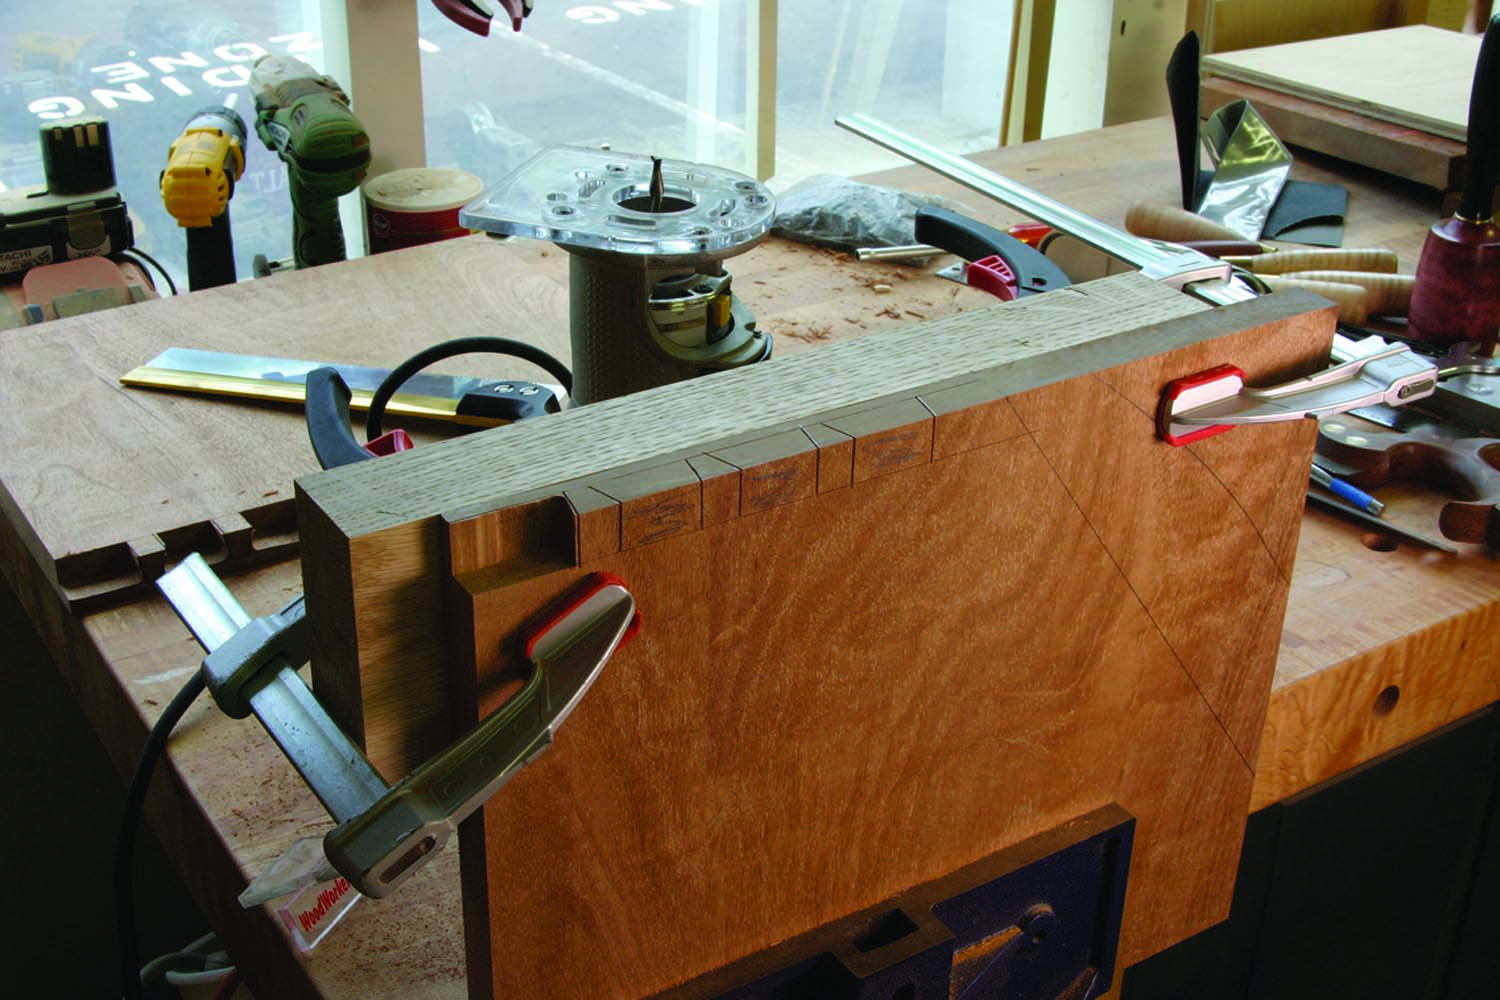
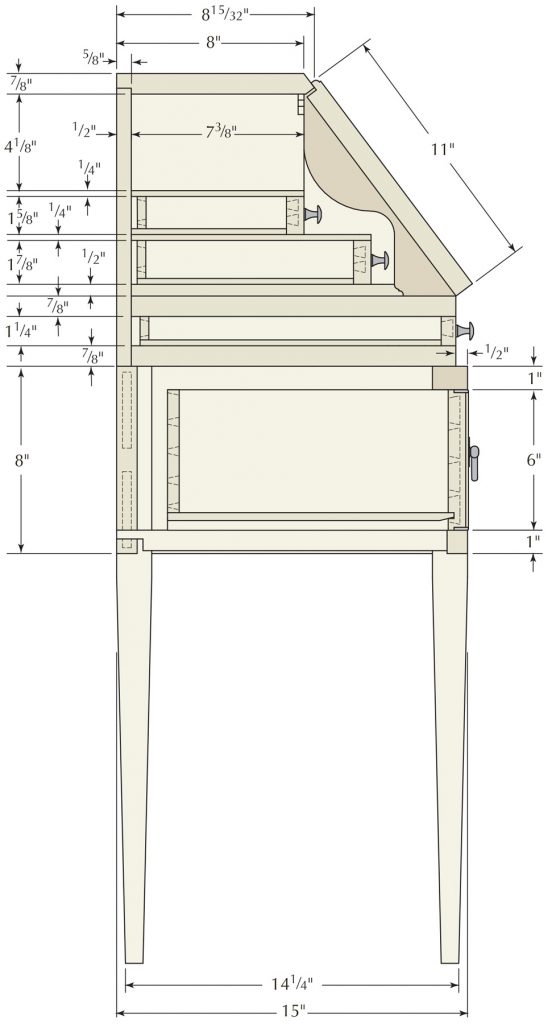
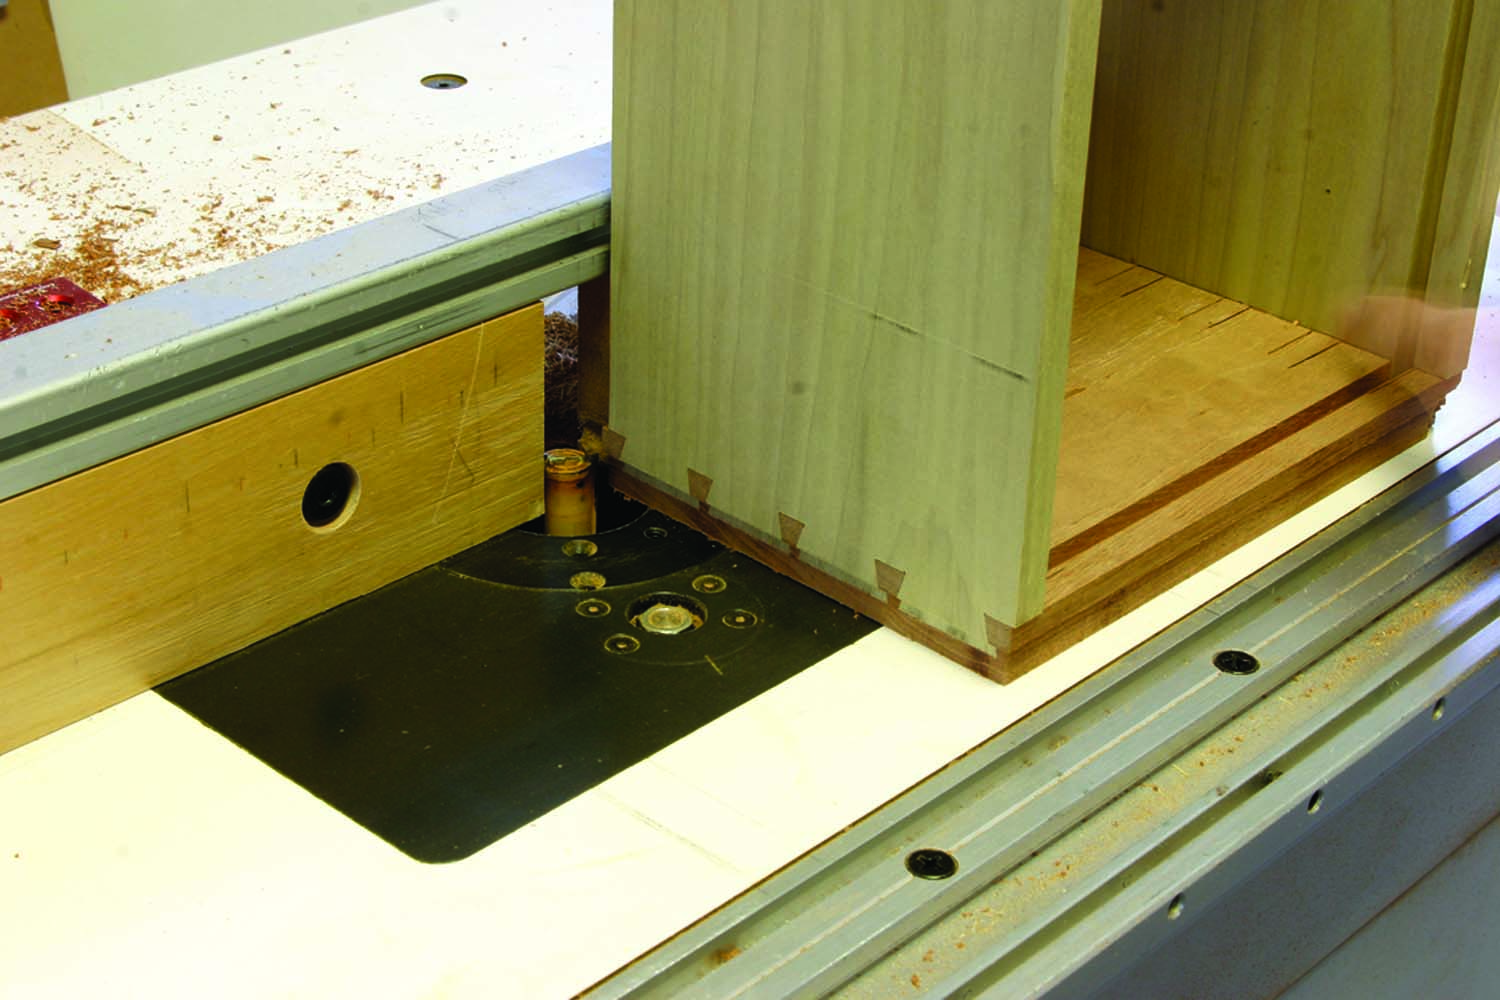
To begin the upper desk work, thickness and cut the desk sides and top to size, but leave the top long (it will be trimmed later). The side width is taken right from the assembled base. A little layout work helps to determine the dovetail sockets for double-blind dovetails. The desk lid area is angled at 36.9º off the front edge – or measure 31⁄4” up the front and 81⁄8” from the rear along the top edge, then connect the two points.
Create the dovetail pin-board sockets just as you would in half-blind dovetail joinery. Use a large half-pin at the front where the slope begins, and a large half-tail at the rear of the socket area as shown in the photo below. It’s best to leave your pin areas on the wide side (3⁄8” or more) to make waste removal on the tail board a bit easier.
Take another look at the photo below. You’ll see that the sockets sides are not over-cut beyond the scribeline – which I recommend on most dovetails. But overcuts would be visible as you look into the end letter compartments, so refrain from this common practice for this build. Because this makes these dovetail sockets slightly more work, I decided to approach them differently.
Powered waste removal. Using your router and a small diameter bit, you can work tight to the scribeline and hog out much of the waste just leaving a bit of chisel work to finish the sockets.
First lay out the sockets setting the scribe line at 1⁄8” less than the thickness of your desk’s top, then define the sockets using your dovetail saw. Slip a side into a vise to hold the piece vertical and clamp a wide piece of stock flush with the top edge of the workpiece to provide support for a router. With a 1⁄4“-straight bit loaded in your router, adjust the depth of cut so the bit just reaches the scribe line. Carefully remove the waste making sure to stay inside the saw cuts. Finish to the lines using chisels.
With the top dovetail sockets cut, flip the sides end-for-end to lay out and cut the sockets for the desk frame pieces that secure the sides at their bottom edges. The rear frame piece is set 5⁄8” in from the back edge while the front piece is held back 11⁄4“. Saw the lines then remove the waste using a chisel. Now cut the sloped front for the desk lid. Use a band saw to cut close to the layout lines, then use a plane to trim right to the lines, working up the slope.
Mill the frame parts according to cut list, then set the sides in position on the frame pieces to transfer the layout. Create the large dovetail on both ends of the frame pieces and dry-fit the parts to the desk side. Don’t glue them in place yet – they get more work later.
Easy hold. Handscrews grip the ends of the desk sides and hold them tight and vertical to make dovetail layout transfers a snap. Your dovetail layout can vary – as does mine between the workpiece and the drawing.
The top of the desk is where the real joinery changes are found. While you could attack this as a regular half-blind dovetail joint and leave the joinery exposed, I stayed true to the original. As you look down on the desk, you don’t see any dovetails – it’s not a common joint, especially in this application.
Your out-to-out measurement at the top needs to match what you have at the bottom with your frame pieces in place. Cut your top to that length plus 1⁄32“, to make sure you cover any end grain on the sides.
Next, rabbet the ends to create a lip to cover the lap on the pin board – the distance between the dovetail socket and the edge of the board. Measure that area then add 1⁄64” to the figure. Set your table saw fence to cut at that measurement, raise your blade to leave 1⁄8“, then trim away the material to form the rabbets.
The great cover-up. A lip on the ends of the desk’s top covers the lap of the dovetail socket area to form a full-blind dovetail joint. It’s invisible holding power.
With the rabbets made, work the dovetails as normal. Set a marking gauge to match the depth of the dovetail sockets, balance the sides on the upside-down top then transfer your layout. As with the pin board, define the tails with your saw, but don’t over-cut the baseline, and don’t nick the lip. Those nicks will live forever.
I again turned to my router to hog out the waste material. If, as I suggested, you used 3⁄8” (or more) as your pin width, the same 1⁄4” router bit will travel between the tails to cut away most of the waste. Pare residual waste with your chisels. Test your fit and trim as needed. Keep in mind that this joint is totally hidden so the fit doesn’t have to be dead-on perfect (but do strive to avoid a sloppy fit).
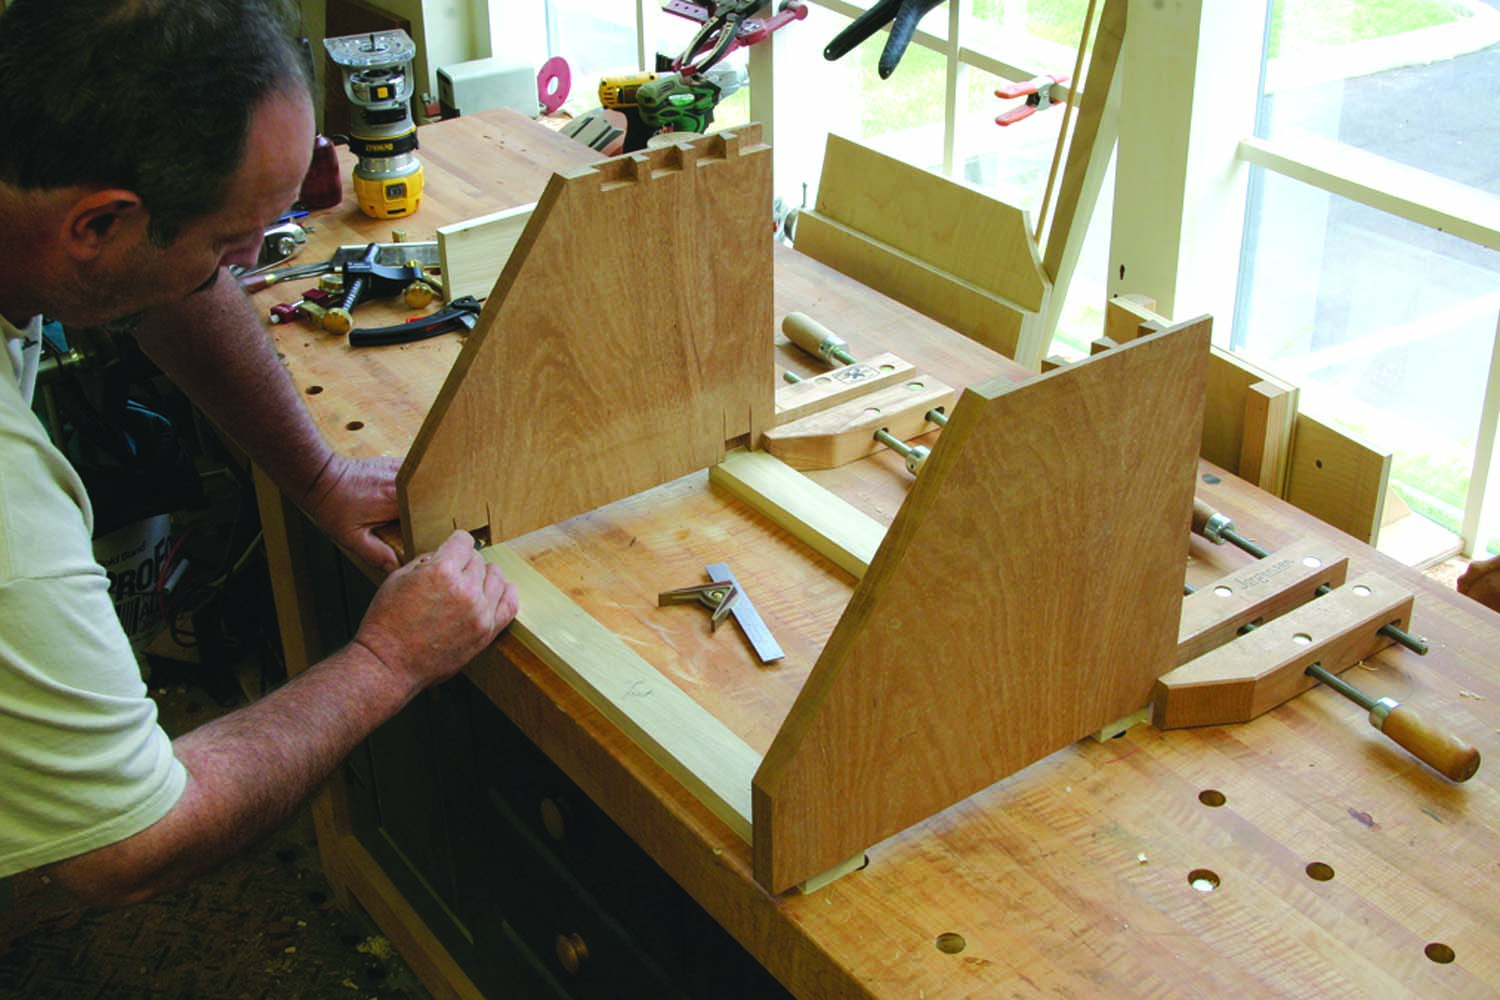
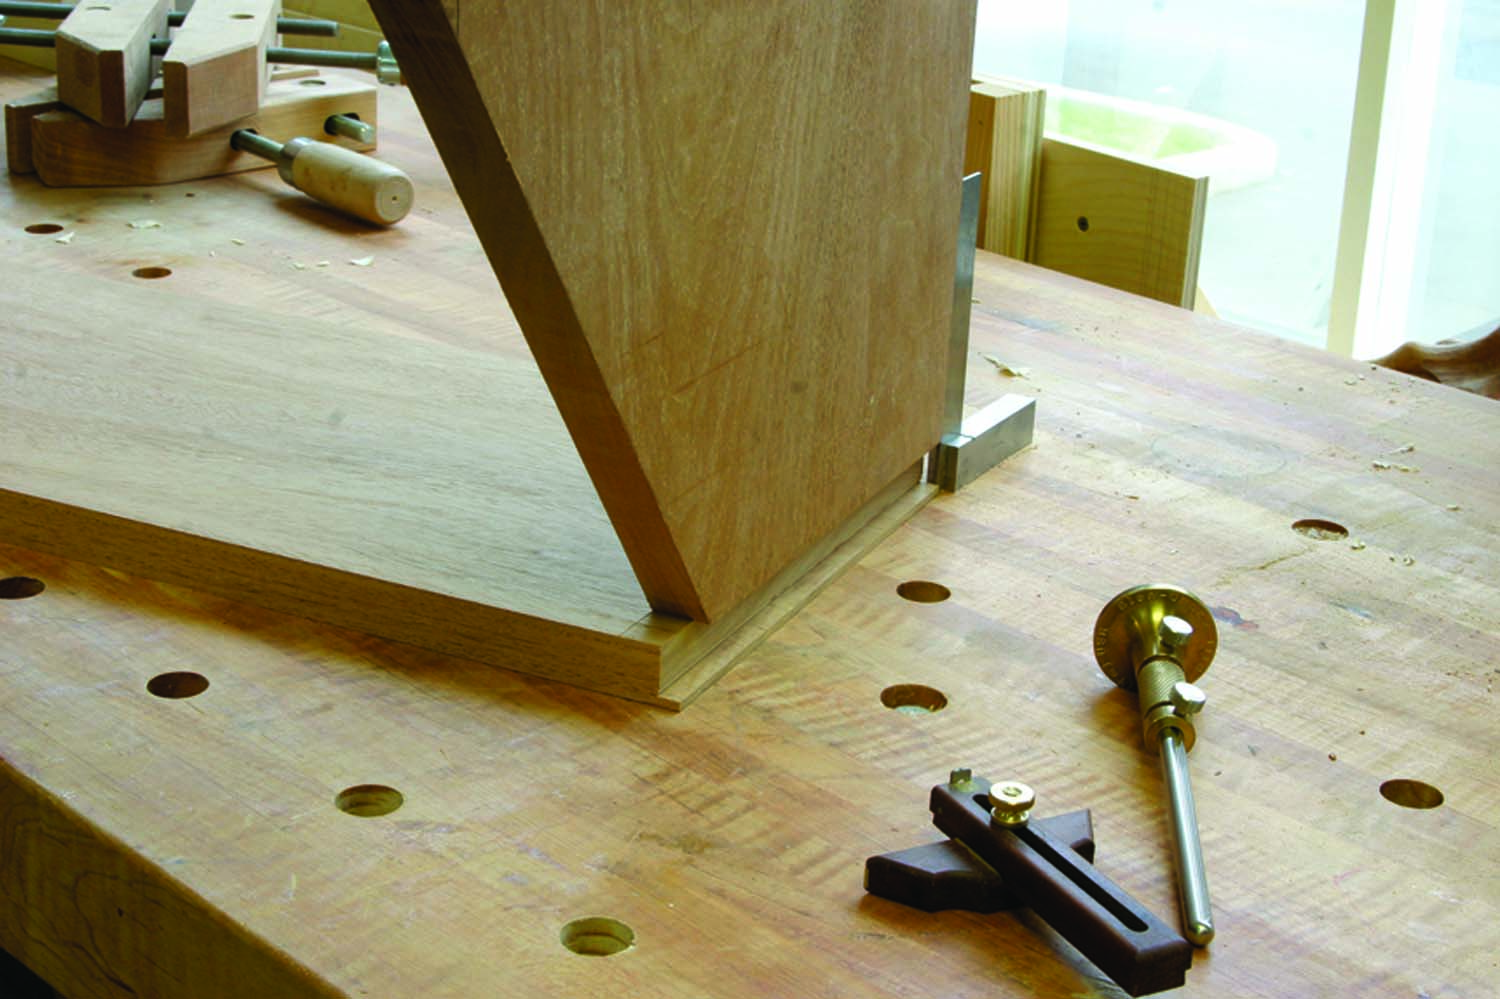
With the top fit to the desk sides, use a straightedge to continue the slope of the sides across the ends of the top. Adjust the tilt of the table saw blade to match the slope angle, then trim the top at those lines (if you’re off a hair don’t worry – a handplane can make small corrections). Your top now has a sharp pointed edge that has to be trimmed. From the outside face of the top, move 1⁄2” down the slope then square a line down the edge of the workpiece. Use a straightedge to connect the two lines on both faces, then clamp the piece at your bench before planing to the lines. Dry-fit the top back to the sides (no glue yet – there’s more work to do).


 Get Inside the Desk
There are dozens of dados to cut on the inside of the desk. A couple are cut using a dado stack; the balance are routed using simple shop-made guides. But before getting to that, you need to do some layout work on the sides.
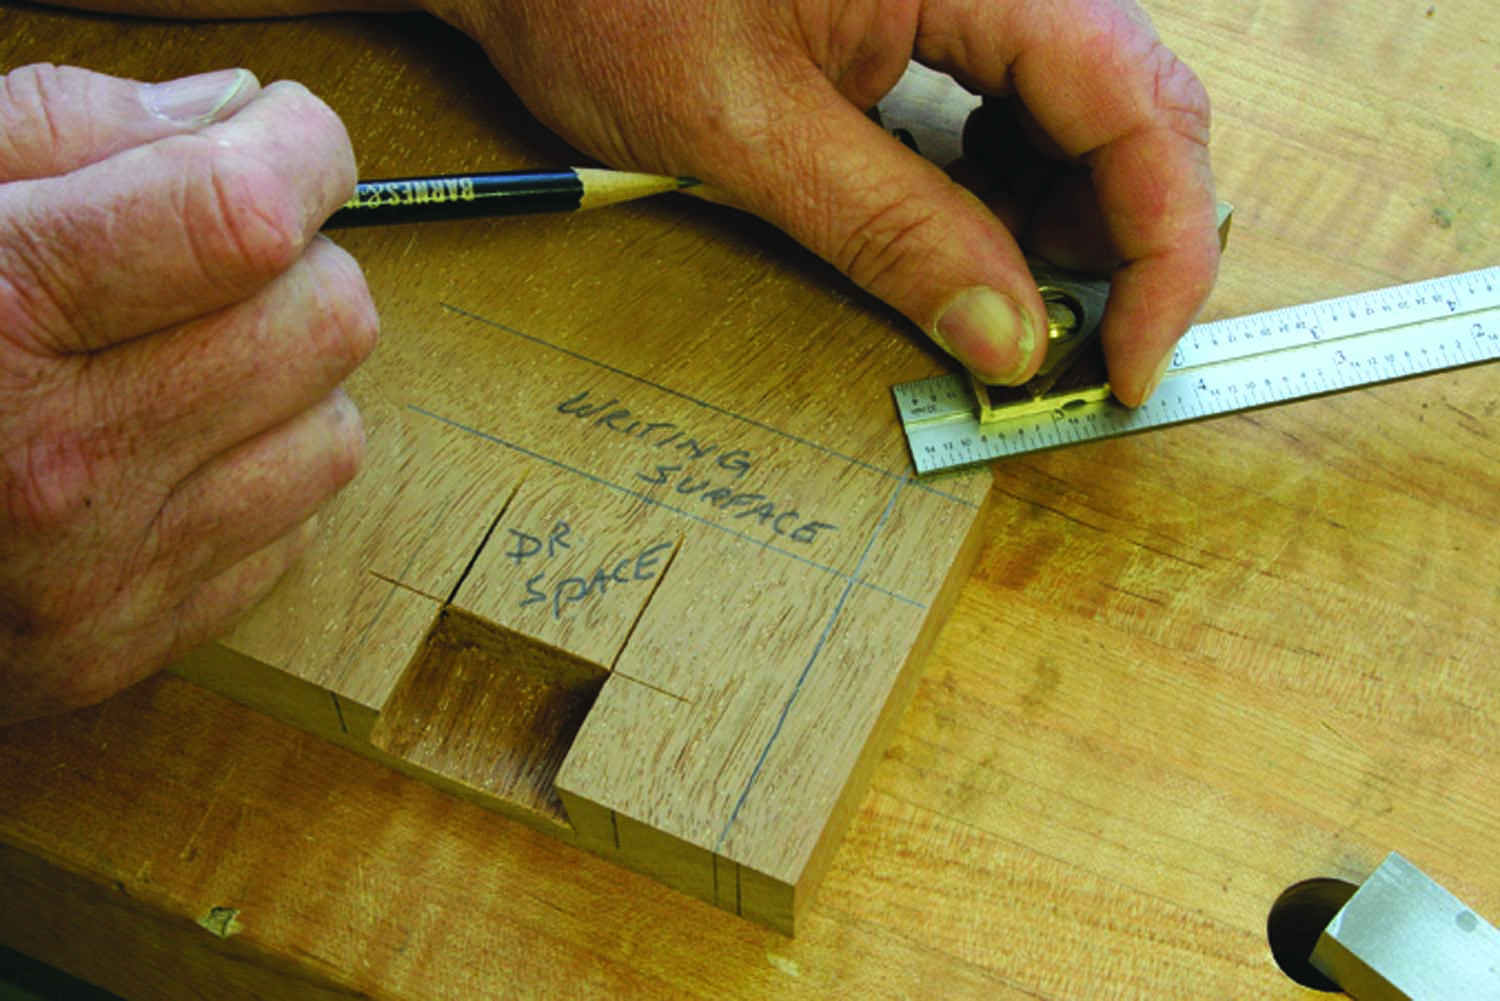
On-board calculations. A combination square set to the thickness of the lid minus its lip, plus some layout work, shows exactly where to trim the waste.
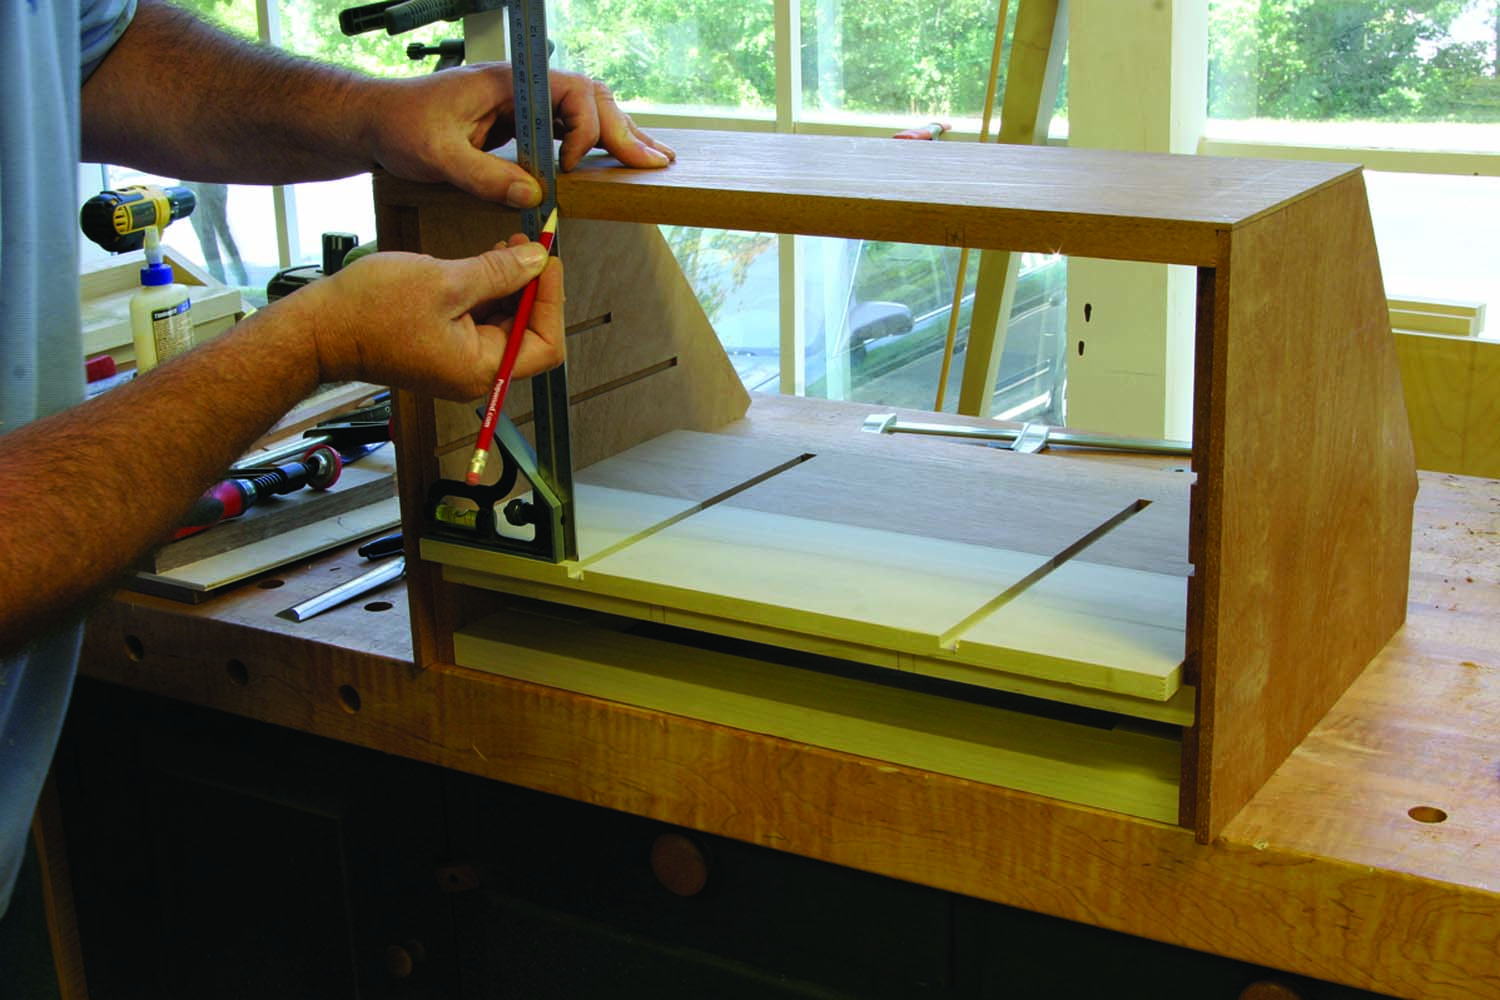
The interior writing surface is 7⁄8” thick and begins 21⁄8” up from the bottom edge. Mark the location on the inside of one desk side, then continue lines onto the front edge, even though this piece rests in stopped dados. Transfer the front edge of one side to the front edge of the second side. Square the marks back on the inside face of both desk sides.
It’s two steps. Whether you’re using a dado stack or a router and straight bit to make the dados for the writing surface, you’ll have to make a second pass – unless you have a 7⁄8″ straight bit.
Next, set a combination square at 1⁄2” then slide the square along the slope until the end of the rule touches the upper line of the writing surface dado. Draw that line onto the sides as shown above then square up from the bottom edge to the intersection of those layout lines. The small area is the notch you’ll trim off the sides – but don’t cut it yet.
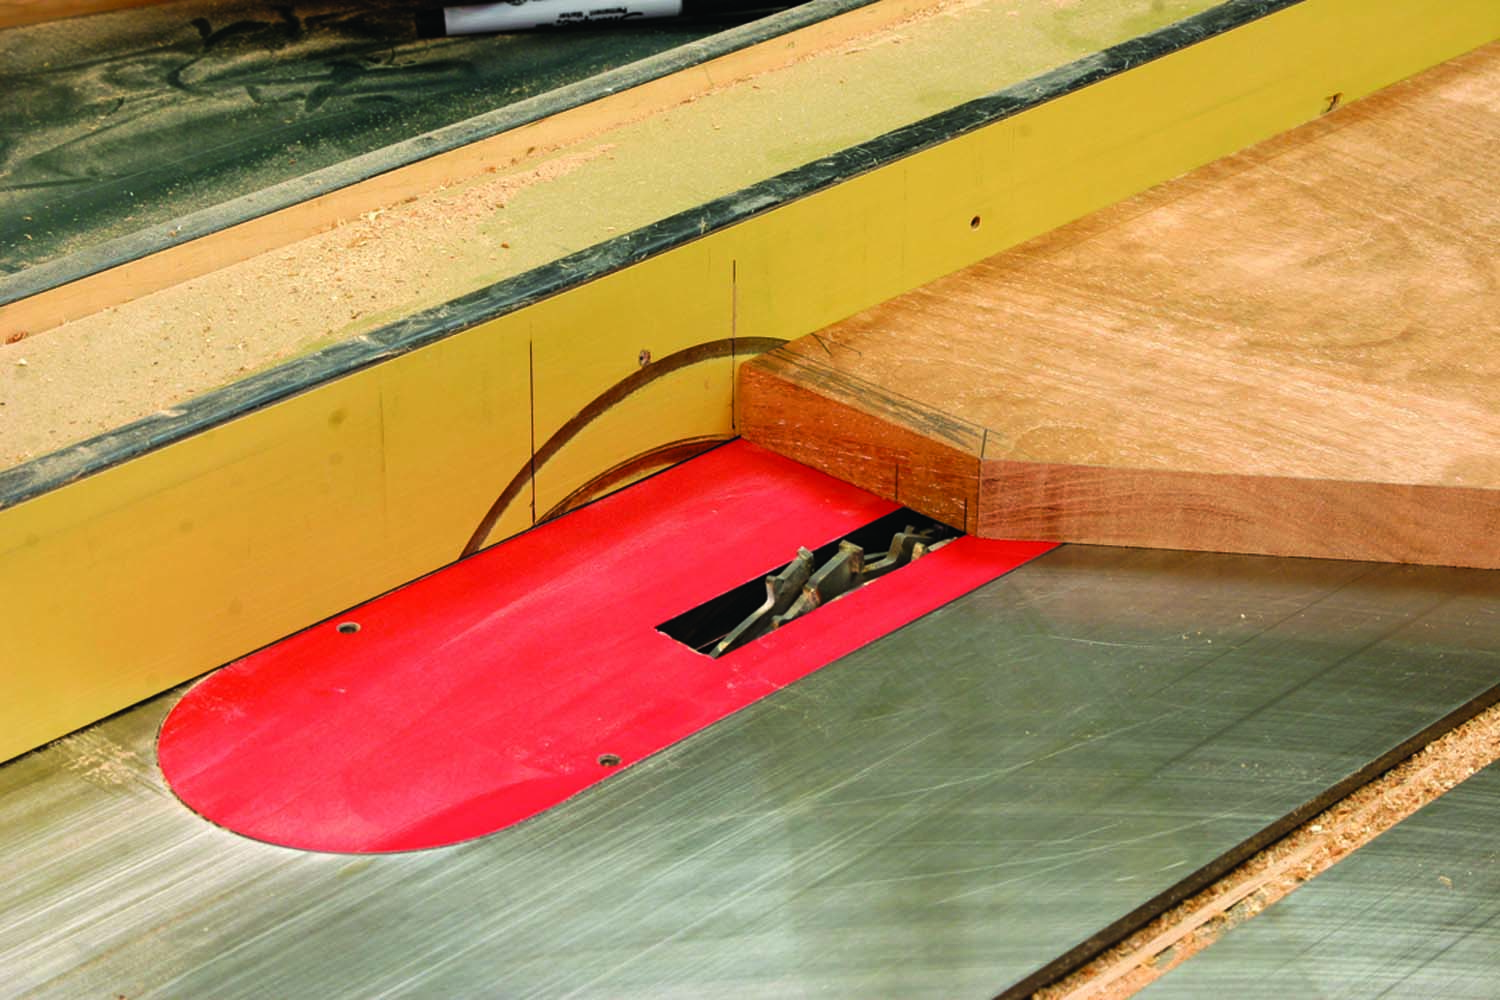
At your table saw, install a dado stack. Because most stacks will not cut 7⁄8“, these cuts need to be completed in two steps. First set the depth of cut. Next, with the saw unplugged, find the start and stop points of the blade using a square against the fence and blade, then mark the reference lines on your table saw fence. Use the layout on the front edge of your desk sides to align the blade with the top edge of the writing surface dado. Set your fence at that point.
Before you cut, mark a line along the bottom edge of the side’s face 1″ from the front edge on both workpieces. That line is the start/stop line that meets with the reference lines on the fence. To make the dado, one side drops onto the dado stack so the two lines meet, then pushes through the workpiece. The other side will use that meeting point to stop the cut. Dado both sides before adjusting the fence to cut at the top edge of the layout. Clean out and square the dados.
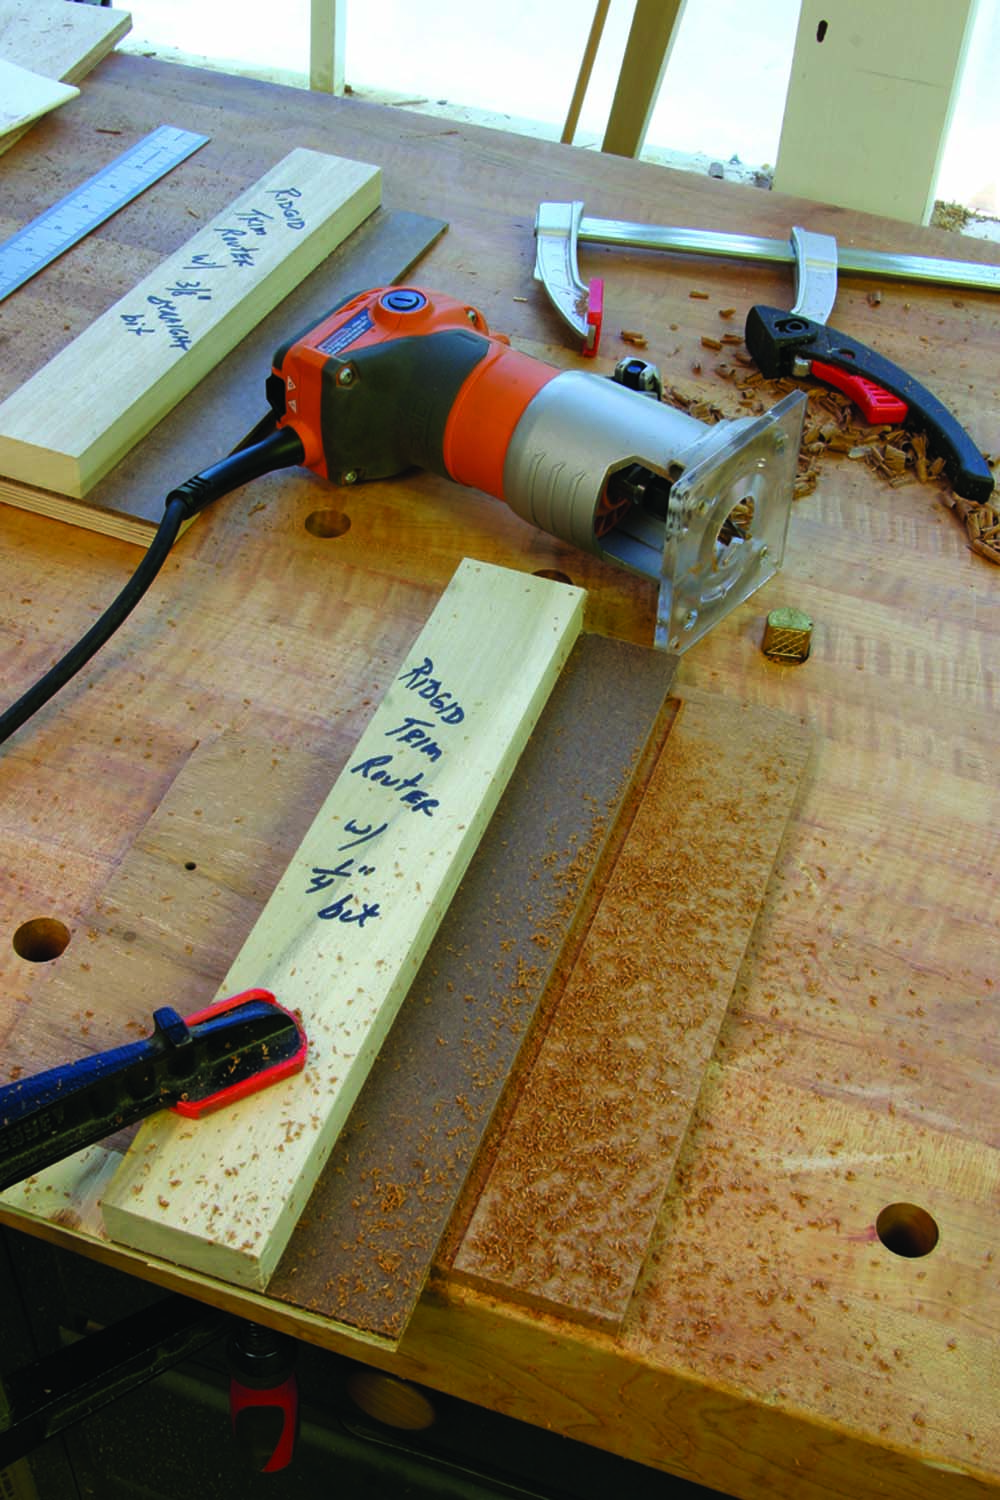
Shop workhorse. Router jigs are used to make dados throughout the inside of this desk. They are so simple to make that you should have one for each different router bit diameter.
Before returning to the bench, cut the notch at the front edge of each side. I used a band saw and cleaned up the saw marks using light touches with a rasp.
There are two gallery shelf dados cut into the desk sides. For these, because they are only 1⁄4” in width, I use a trim router guided by a shop-made jig, as shown in the photo above.
Lay out the location of the two dados, marking both the top and bottom of the dado. Make sure the two sides match. Set and secure a jig to the left of the dado – in normal use, router bit rotation forces the router to the left. The lower dado is 103⁄4” long; the upper is 73⁄4“. Cut the four 1⁄8“-deep dados then use your chisel to square the ends. To complete work on the desk sides, cut a 5⁄8” x 1⁄2” rabbet to accept the backboards.
Bottoms Up
Quick clamps. Because they cannot be seen in the finished desk, drive 1¼” 18-gauge brads from underneath to secure the writing surface to the upper section’s sides.
Cut and size the writing surface (the panel that’s under the gallery) according to plan. Only 21⁄4” of this piece is visible, so to save material costs, glue a piece of 3″-wide (or wider) primary wood to secondary wood. Each end of the panel needs to be notched at the front edge to fit in the 1⁄4“-deep dado. I made the cuts at my table saw using my regular saw blade and a sacrificial fence.
Both fixed & movable. The frame rails fit into 1⁄2″-deep mortises at the front (they are glued for strength) and into 1″ mortises at the rear. The back mortises are free to float to accommodate seasonal movement.
Before you install the writing surface, locate and cut the two mortises for the loper dividers on its bottom face. Make these mortises just as you did the center mortise in the base rail. To install the writing surface, put a small amount of glue at the front of the dado, fit the panel into your sides and clamp. Toenail with a couple brads for extra hold.
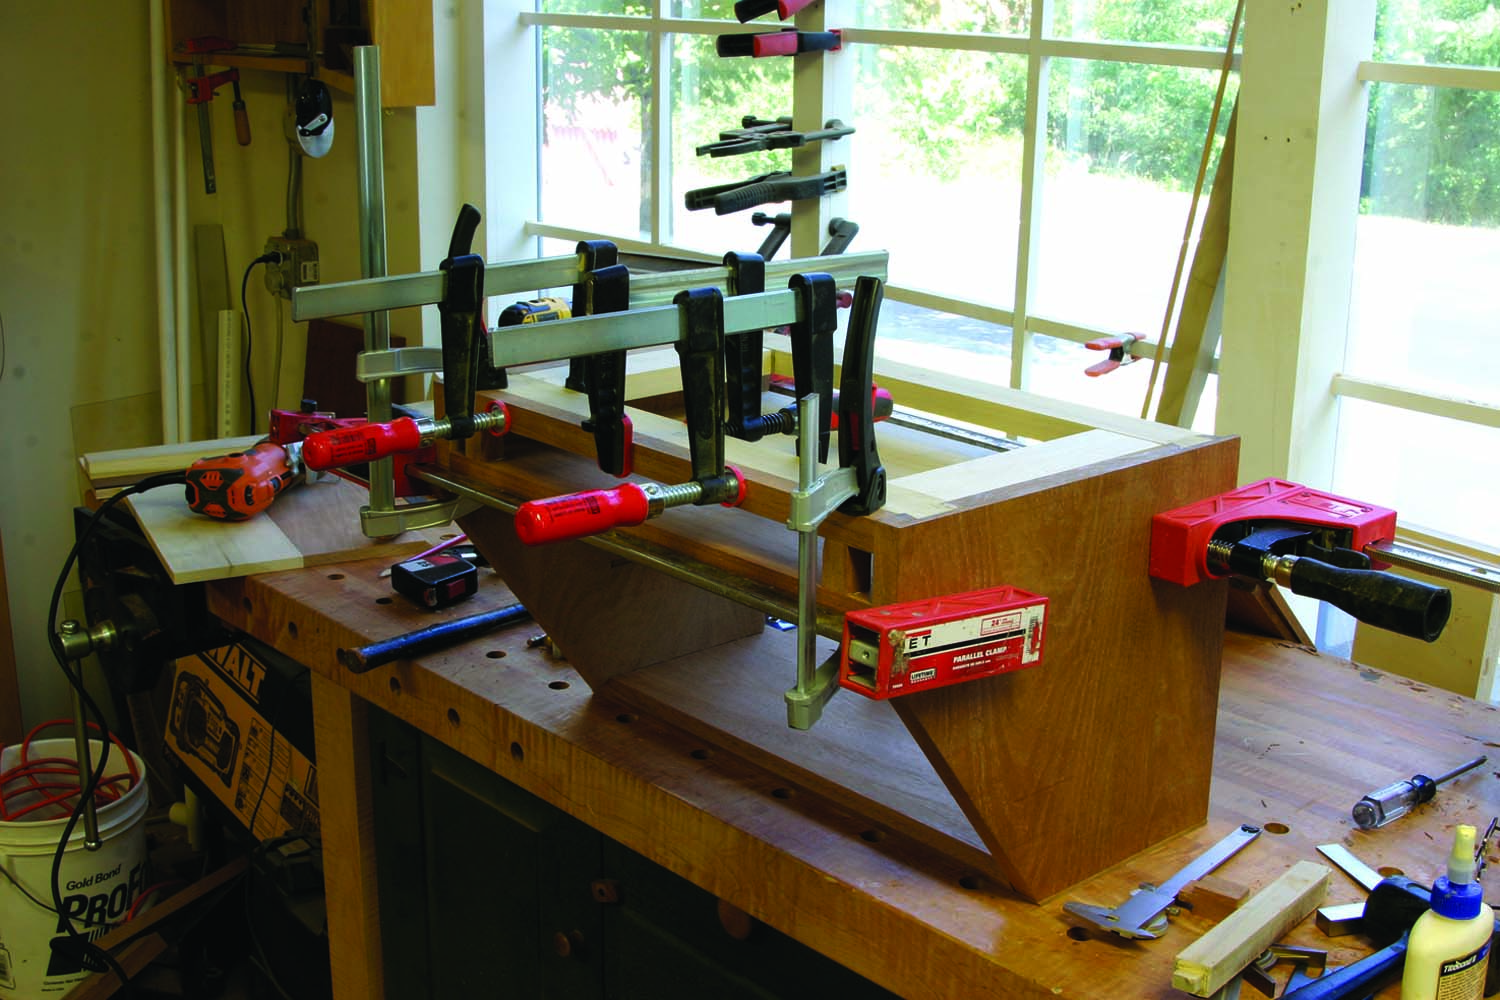
While you’re working with the desk inverted, finish up work on the frame and frame rails. Cut your mortises and fit the tenons before installing the frame to the desk. Assemble the front mortise-and-tenon joints, slide the rear joints together then add glue to the large dovetails on the frame pieces. Slip the tails into the sockets (you may have to knock the rear joint out a bit).
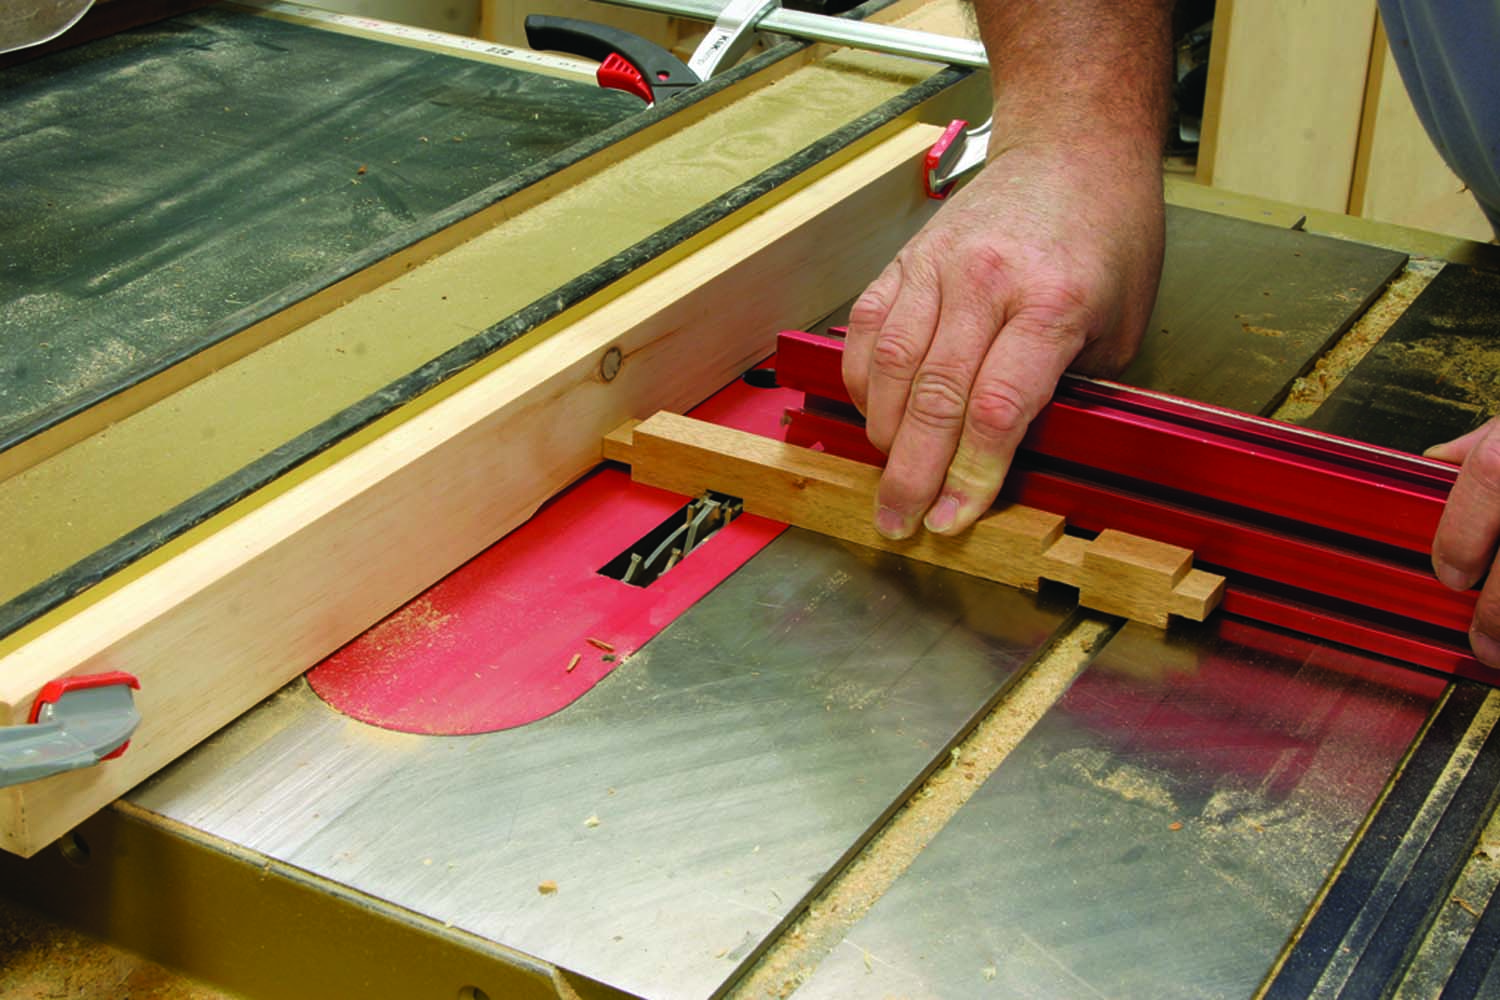
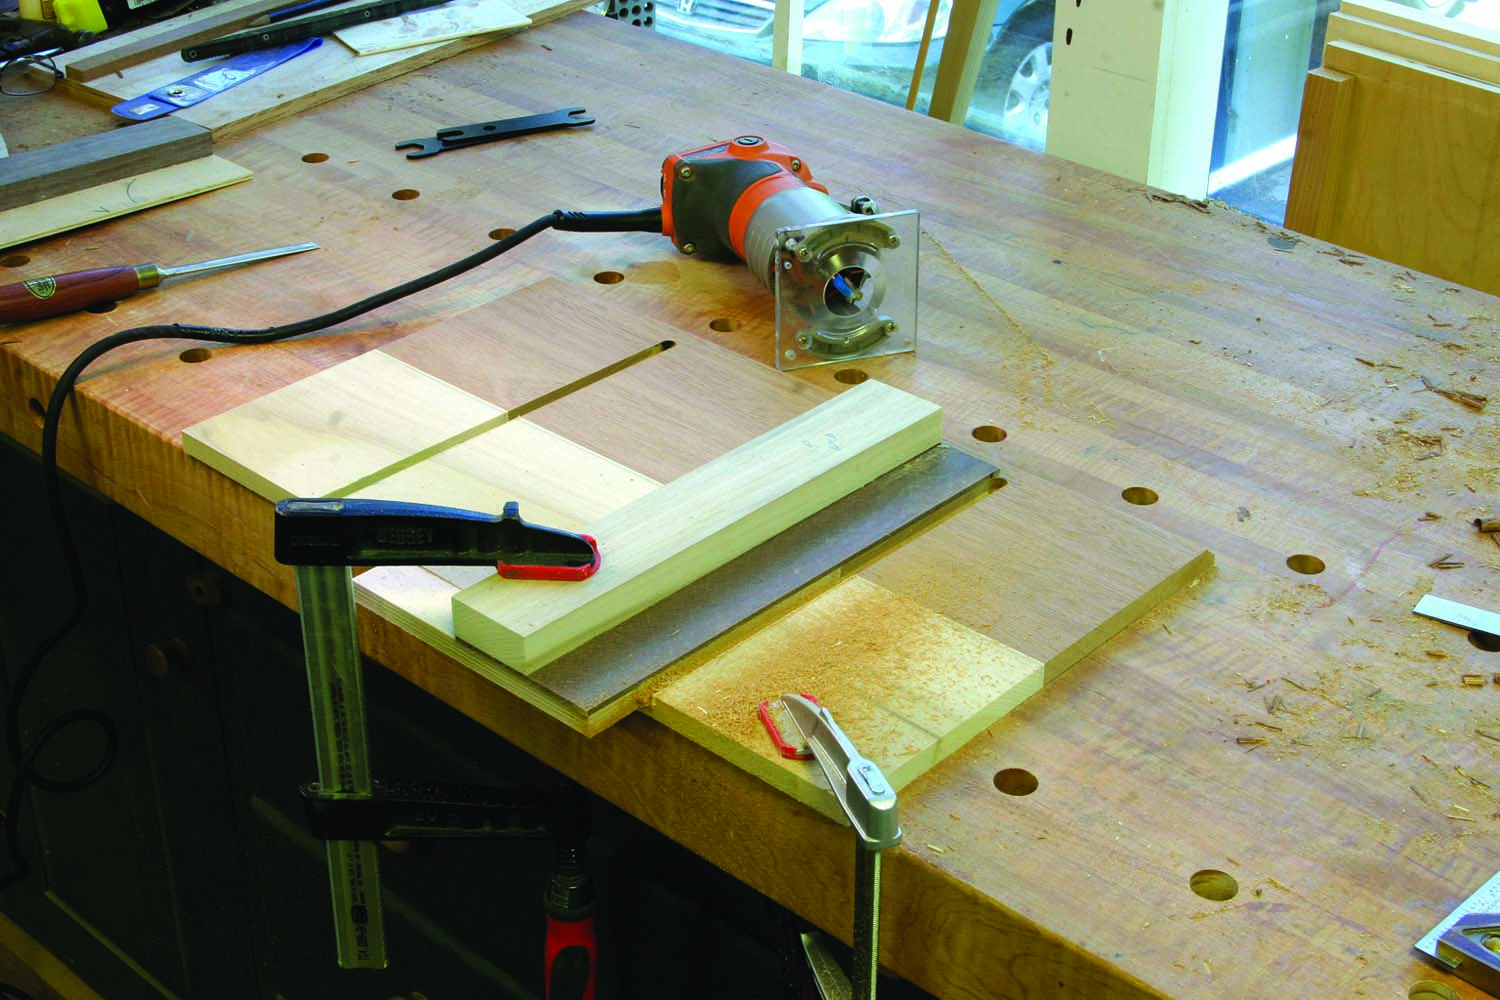
Save your fingers. A dado stack and a long workpiece quickly becomes two small, ready-to-use loper dividers, given a bit of creativity.
The front rail and loper dividers are next. Mill your rail and cut the two mortises for the dividers. The dividers are small pieces, so take extra care when working with them. I find it best to cut the full-width tenons using a dado stack. Form a tenon on both ends of a longer workpiece, skip down 11⁄4” (the finished length of the dividers) then cut a second tenon as shown in the photo above. Use a handsaw to free the parts then do any fitting work with a rasp.
Next, add glue to your rail and writing surface mortises and on the loper-divider tenons, then slip the dividers into your rail. A thin bead of glue along the back edge of the rail secures it to the desk frame. Fit the divider tenons to the writing surface, use clamps to pull them snug, then clamp the rail to the frame.
After the glue dries, remove the clamps and attach the drawer guides to the frame rails. A dab of glue and a couple #8 x 11⁄4” wood screws per guide do the trick.
So Many Small Dados
Note: Gallery parts, except for the gallery dividers, are made up of pieces 1⁄4” in thickness or less. These parts can be sawn from 4/4 stock, so you may want to get parts roughed out ahead of time. Also, many pieces can be a mix of primary and secondary woods, as the entire surface of each doesn’t show in the finished desk.
Dual-action clamping. Because the desk front pieces need to be pulled both down and back, you’ll need a lot of clamps to get the pieces tight to your desk.
Mill the gallery base to thickness and width. The fit between the desk sides should be snug yet easily removed for work. Carefully measure and fit its length, then mould the front edge. Lay out the dado locations then rout the 103⁄4“-long dados for the dividers.
Use a square to transfer the dado location to the top (this is more accurate than measuring). With the marks transferred, rout the gallery divider dados in the top. Keep the ends of the dados about 1⁄2” from the front edge. This is a good time to cut a 5⁄8” x 1⁄4” rabbet along the underside of the top’s back edge, which hides any routed dados and provides a recess for the desk back.
Mill the two gallery dividers to size and draw the curved design (see the pattern on page 28) on your workpieces. Cut and smooth the profile, and notch the front edge at the top and bottom to step out of the dados. Fit the dividers to the gallery base while it’s installed in the desk – the desk’s top should be loose if not removed. Find and mark the locations for the gallery shelf dividers. Again for accuracy, cut a scrap to the height of the dado in the desk sides, then use that pattern to mark each side of the two dividers. Repeat these steps for the upper shelves. Create the 1⁄8“-deep dados using the appropriate router jig and bit.
Inside, the beginning. Rout the 3⁄8″-wide x 1⁄4″-deep dados, staying 1⁄2″ back from the edge even though the dividers fit tight to the moulding work.
Next, mill and fit the gallery shelves to your project. You want a snug fit, but remember that each of these pieces is installed and removed a number of times. Fit them so they easily slip in. Keep the shelves wider than needed, notch the ends to fit the dados then mark the final width and trim to fit.
The center, lower shelf has a dado in its top face for a small divider that splits the upper section into two drawers. With that dado in place, again use a square to transfer the position to the bottom face of the shelf above. Cut and fit the divider between the shelves. Also, the upper shelves all have 3⁄16“-wide dados for the letter dividers that fit into the bottom face of the top. Cut, fit and install the letter dividers. They sit flush with the upper gallery shelves and even with the gallery dividers at the top.
Wrap Up the Interior
For the best accuracy. Slip the gallery base into the desk with the top in place, then use a square to transfer the dado locations to the underside of your top.
All that’s left inside the desk – save the drawers – are the small valances. You can make these individually, but I decided to make a block shaped to the final design, then rip each valance off using my band saw. See the simple steps in the photos below.
Fit the pieces using a shooting board and plane – the easiest and safest method here. Number the location of each valance so you can later re-install them where they are fit.
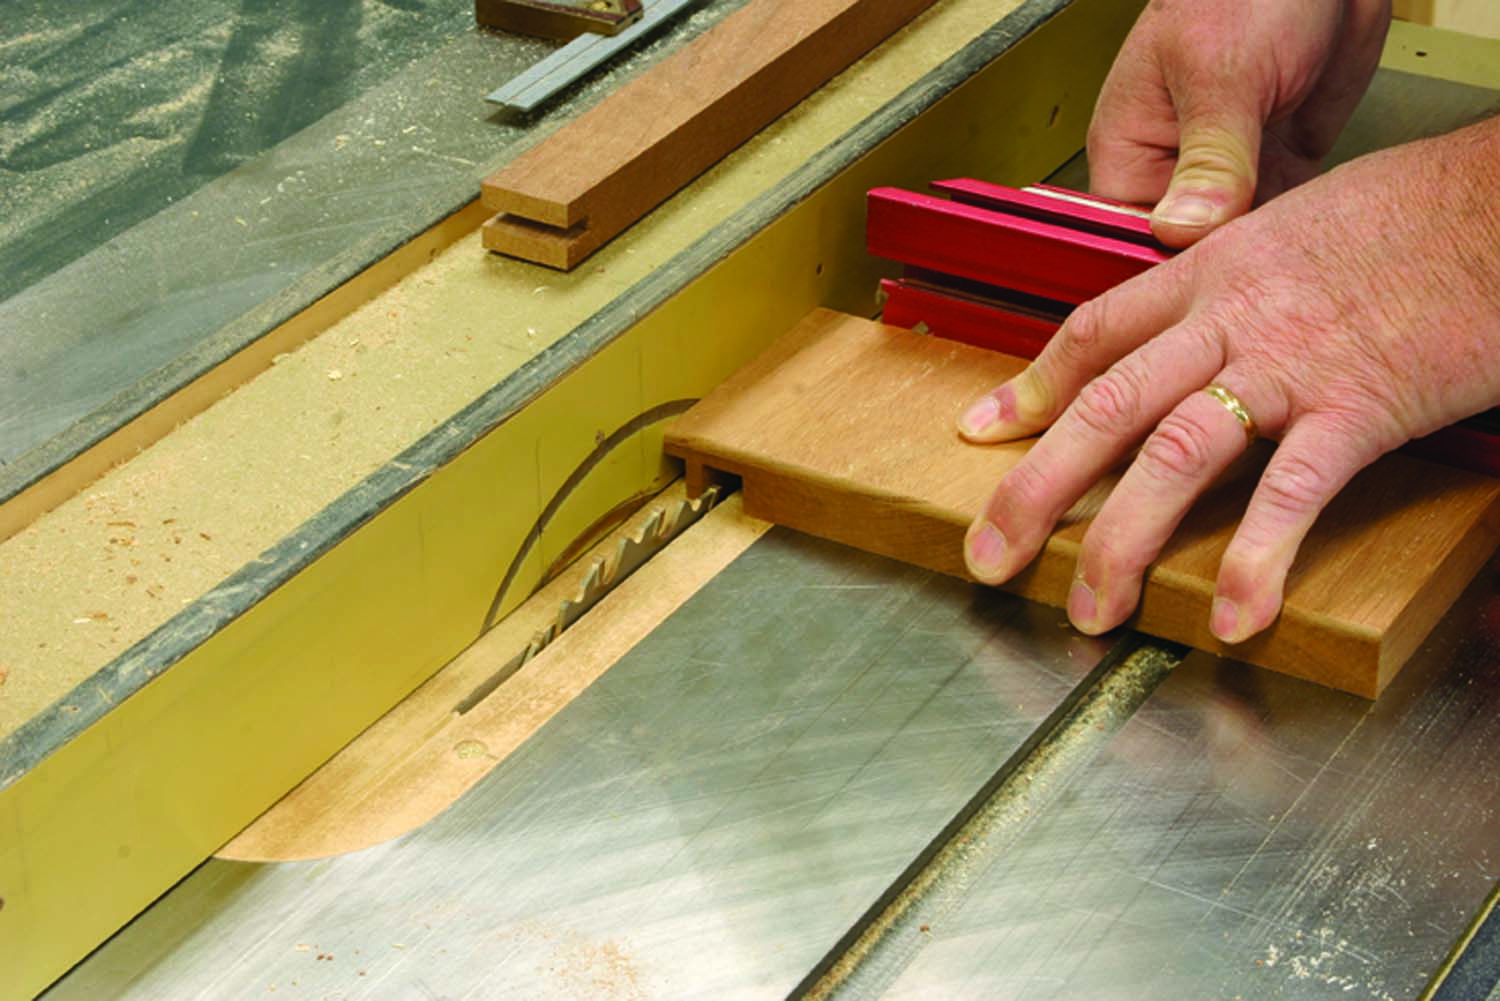
Dead-on cuts. A sacrificial fence and your regular table saw blade allow you to repeat the many cuts needed to fit the gallery pieces into their dados.
Before you can glue the valances between the letter dividers, the interior fittings need to be pulled and prepared for finish. Number the pieces as they come out. Because the desk’s top doesn’t need to be removed again (barring catastrophe), now is the time to glue up those full-blind dovetails. Sand all the parts, then re-install them. Because all the dividers fit tight against the backboards, I didn’t glue them in.
Now, add a thin bead of glue to the valances’ top edges, then slip them in place. The fit should be snug enough to hold the small pieces until the glue sets.
Mouldings, Lopers & Lid
Again for accuracy. After the 3⁄16″-wide letter dividers are routed in the upper shelves, transfer the layout to the underside of the top using a small square.
The desk is attached to the base using shop-made wooden clips that seat in slots cut in the rails around the perimeter. I use a plate joiner set for a #20 biscuit and make two cuts to form a 1⁄4” slot width. Make hardwood clips, then countersink and drill for #8 x 11⁄4” wood screws. Place two clips at the front and back of the assembly, and one on each end. Clips hook into the slots and are screwed into the upper section’s frame.
Make transition moulding that fits 3⁄32” back from the edge of the lower section (to create a shadow line), miter the corners then attach the moulding to the upper and lower sections with brads.
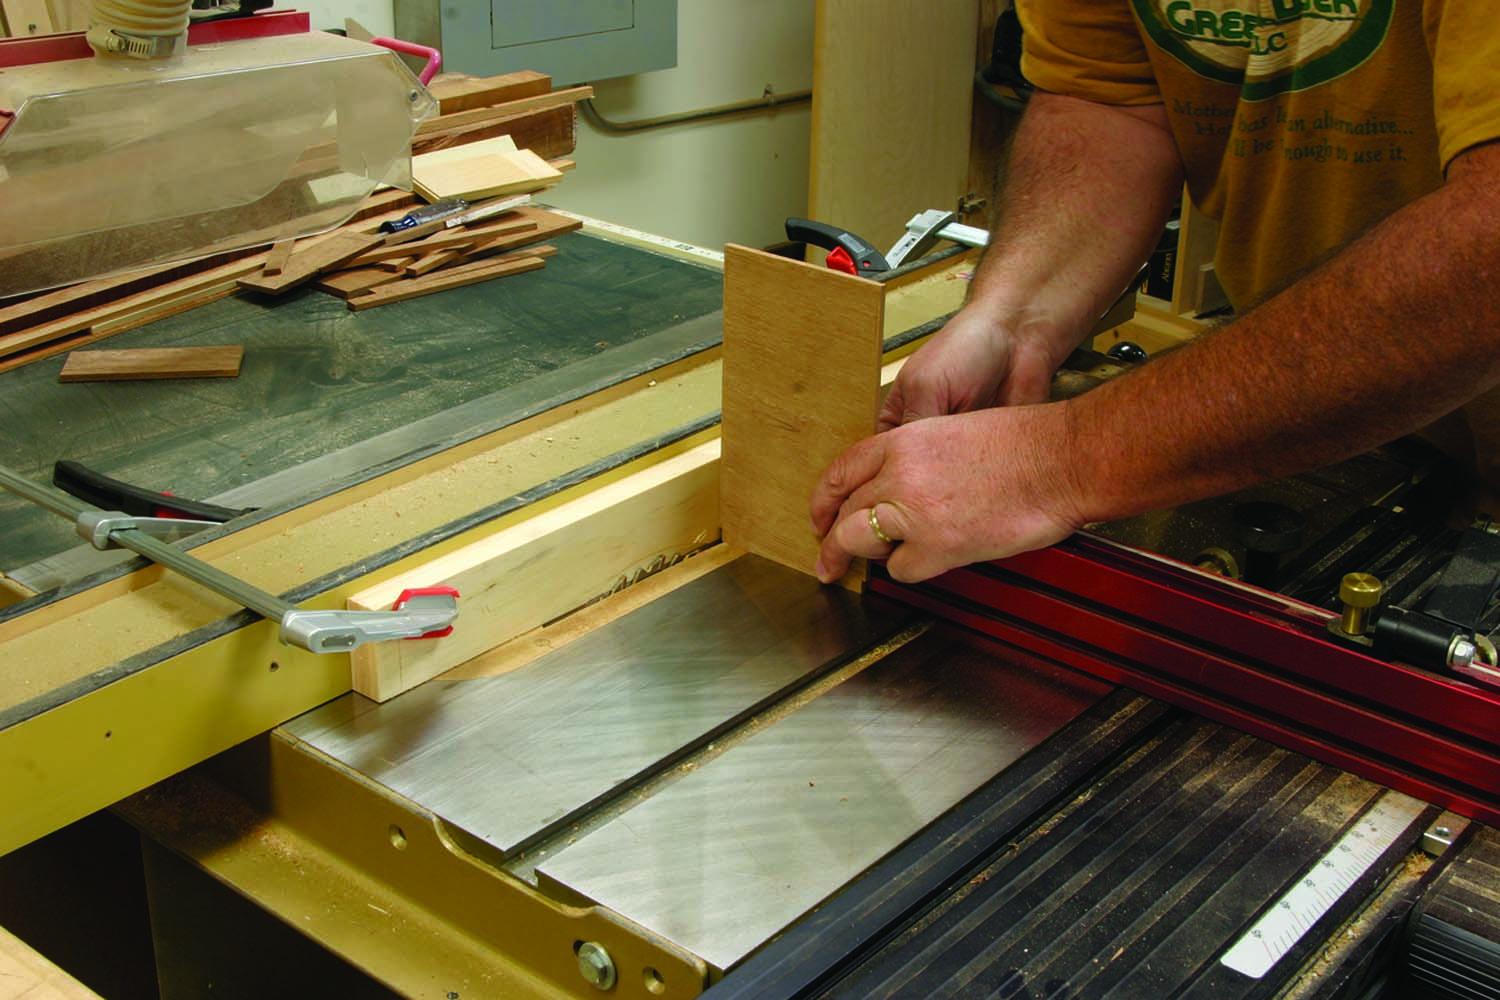
All from one block. Clamp two 7⁄8″ x 21⁄4″ x 21⁄2″-long pieces in a handscrew and drill a centered 11⁄4″-diameter hole. Set your table saw fence at 9⁄16″, raise the blade to a scant 3⁄8″ then make a pass with each edge against the fence to form the shoulders of the valance. Use a nickel to lay out the curves at the edges, then cut and shape those profiles. Band saw the block (using a push block) into thin pieces then fit them to your desk. 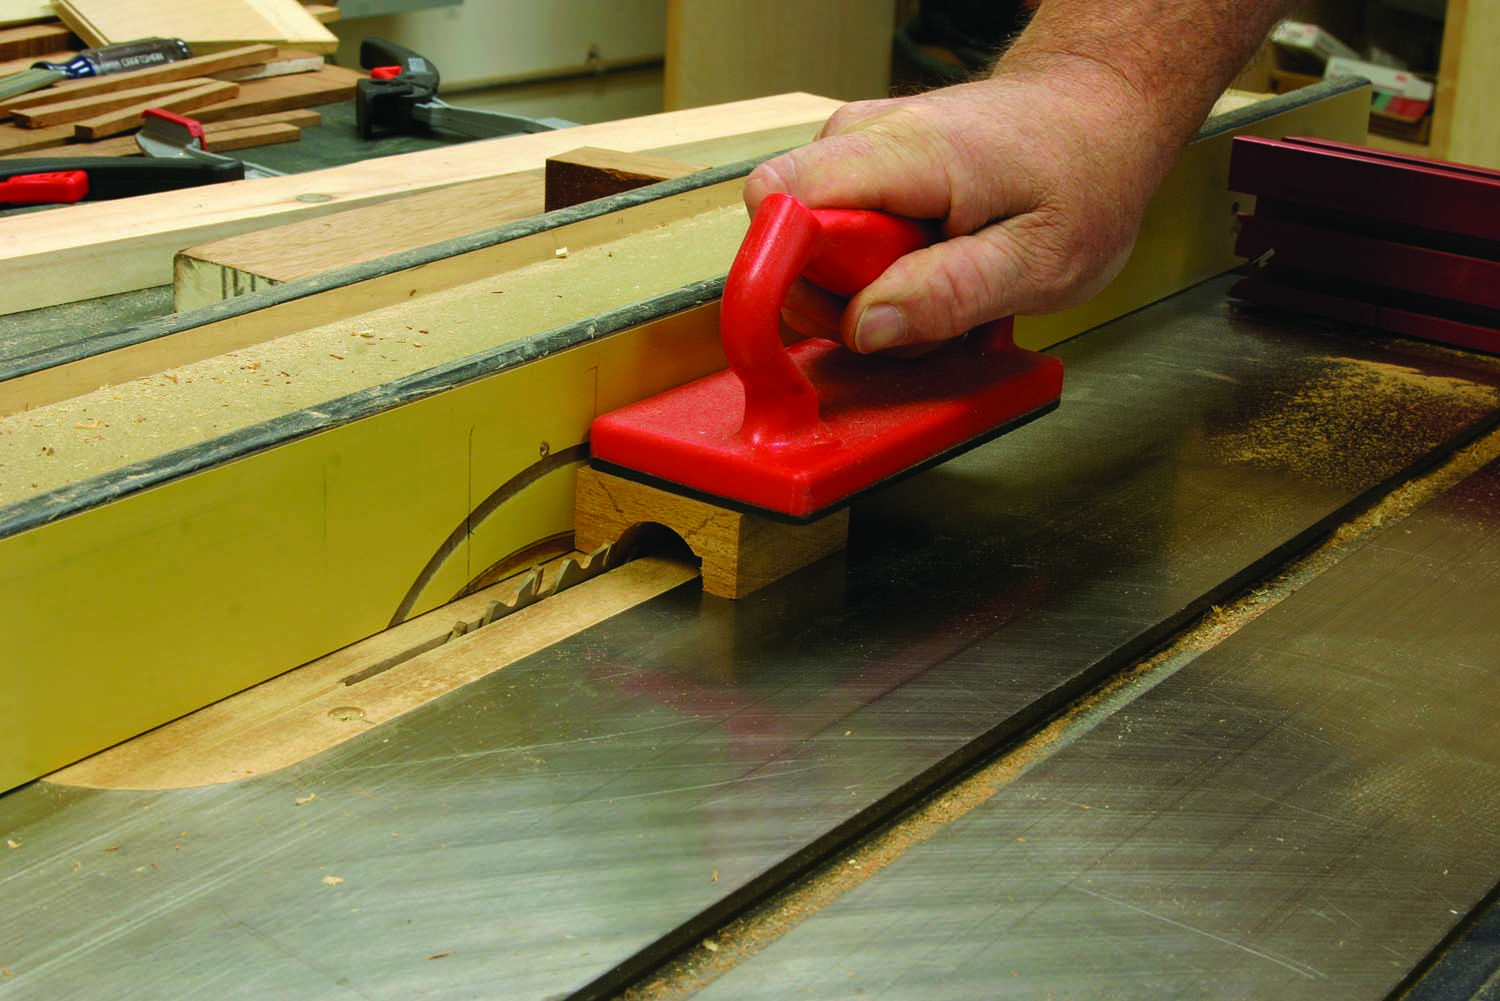

Mill a couple loper pieces then use a tenon jig to cut a 3⁄8“-wide groove in one end of each. The insert is made at the table saw similar to how we made the loper dividers. Begin with a 3″-long piece of stock that’s about 5” in width. Form a 1⁄4” rabbet on one end of the stock. Set your fence at about 1″ and make a cut with your stock against the fence. Continue to adjust the fence closer to the blade until you have a tenon that fits your groove. Flip the stock over and use a push stick to cut the insert at 7⁄8” wide. Cut the stock into two short pieces to fit the ends of the lopers. Glue the pieces in then trim the edges flush.
To stop the lopers from pulling completely out of the desk, drill a 1⁄4” hole that’s centered 10″ back from the insert end and 1⁄2” down from the top edge. When the desk is finished, glue a short length of dowel in the hole. The dowel contacts the rear of the loper divider and stops the loper’s travel.
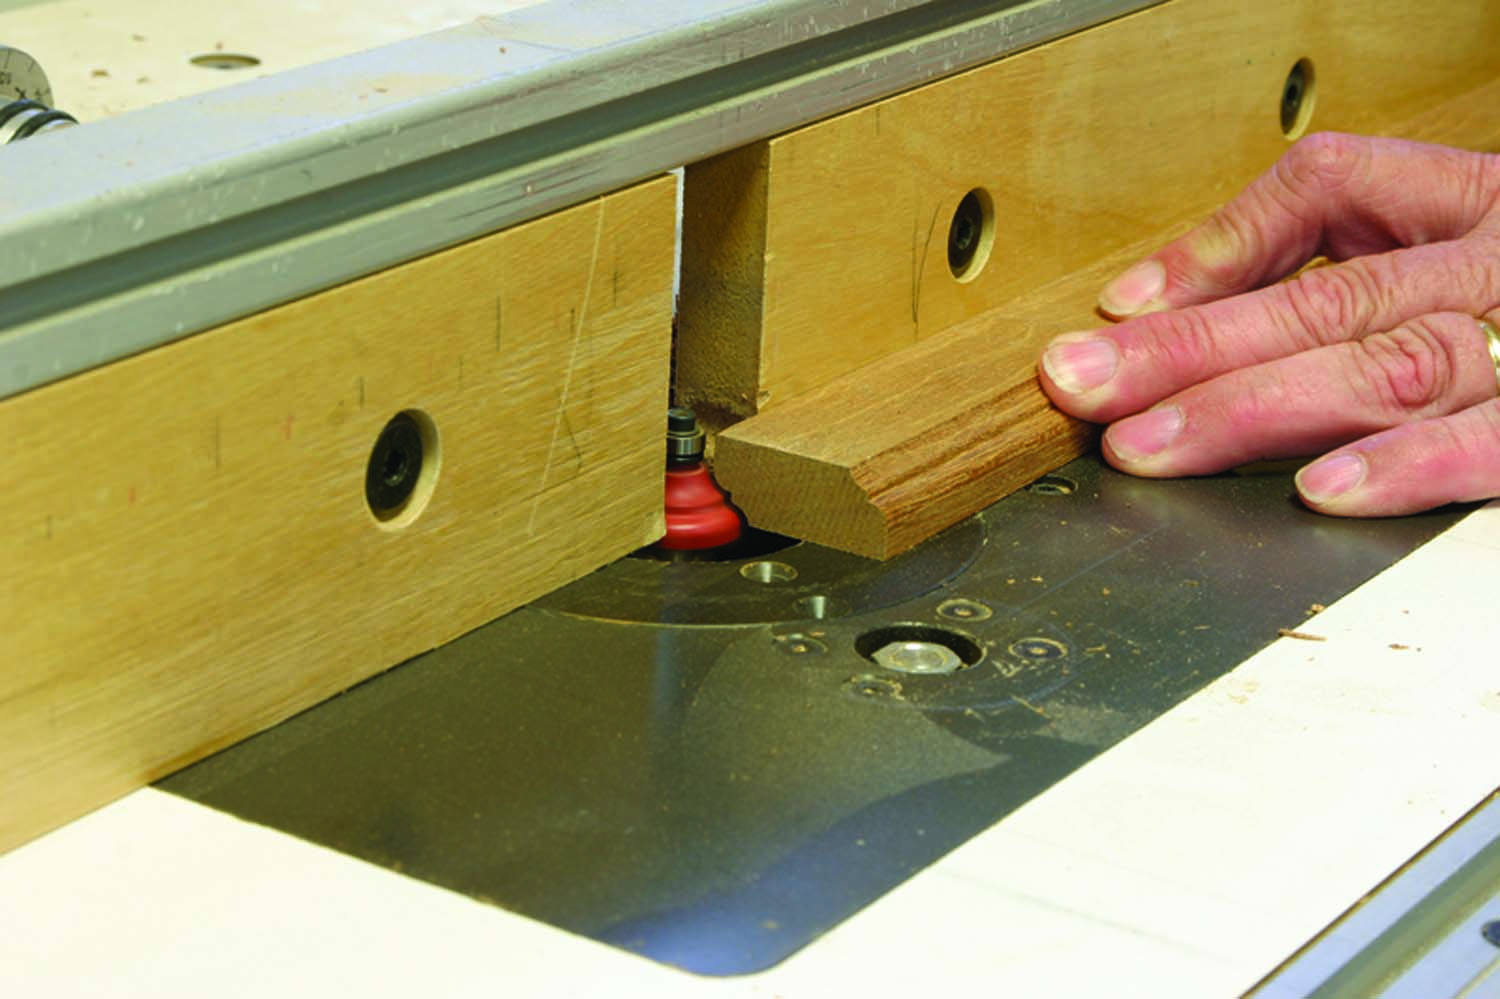
For added support. To get the most out of narrow cutoffs, rout edge profiles on alternate faces. The extra flat surface makes ripping the stock easier.
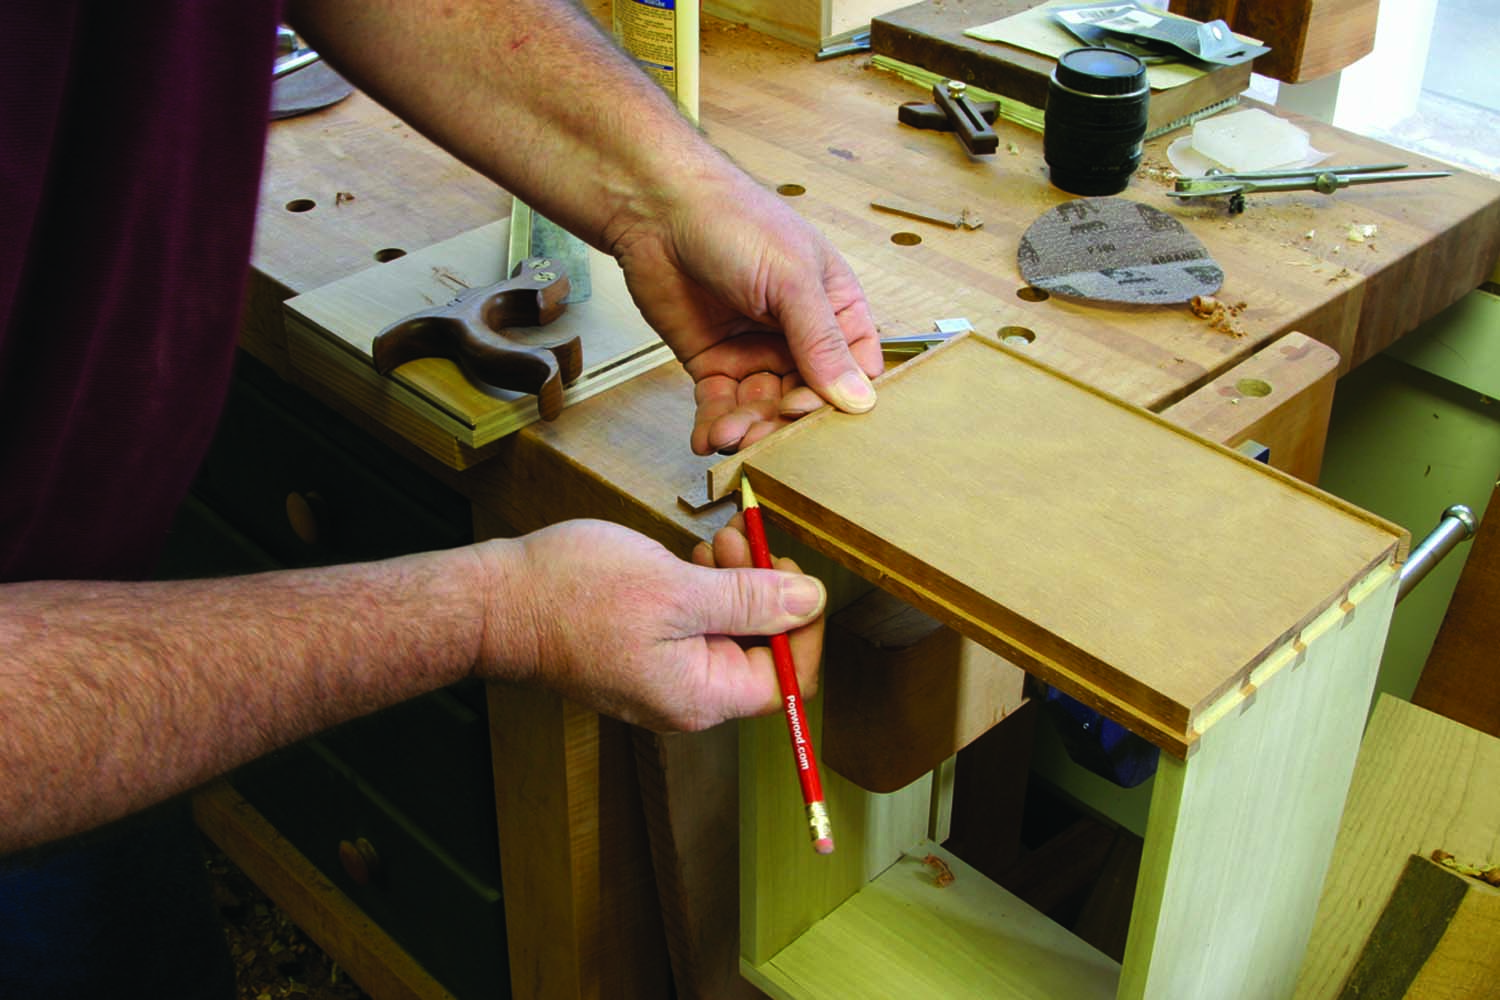
The desk lid is simple to make, but takes a bit of work to fit to the desk. The width of the lid is taken from the desk sides. Measure up the slope of the desk from the point at the notch in the front to a 1⁄4” onto the beveled front edge of the top. The length of the lid is equal to the distance between the sides plus 5⁄8“.
With the panel sized, profile the edges using a router and bearing-guided 3⁄16” roundover bit. On the back face, cut a 1⁄2“-deep x 3⁄8“-wide rabbet on the top edge and on the two ends. I do this with a two-step table saw cut. You can use a router – but if you do, be careful not to slip around the corners and rout the bottom edge as you begin and end the cut.
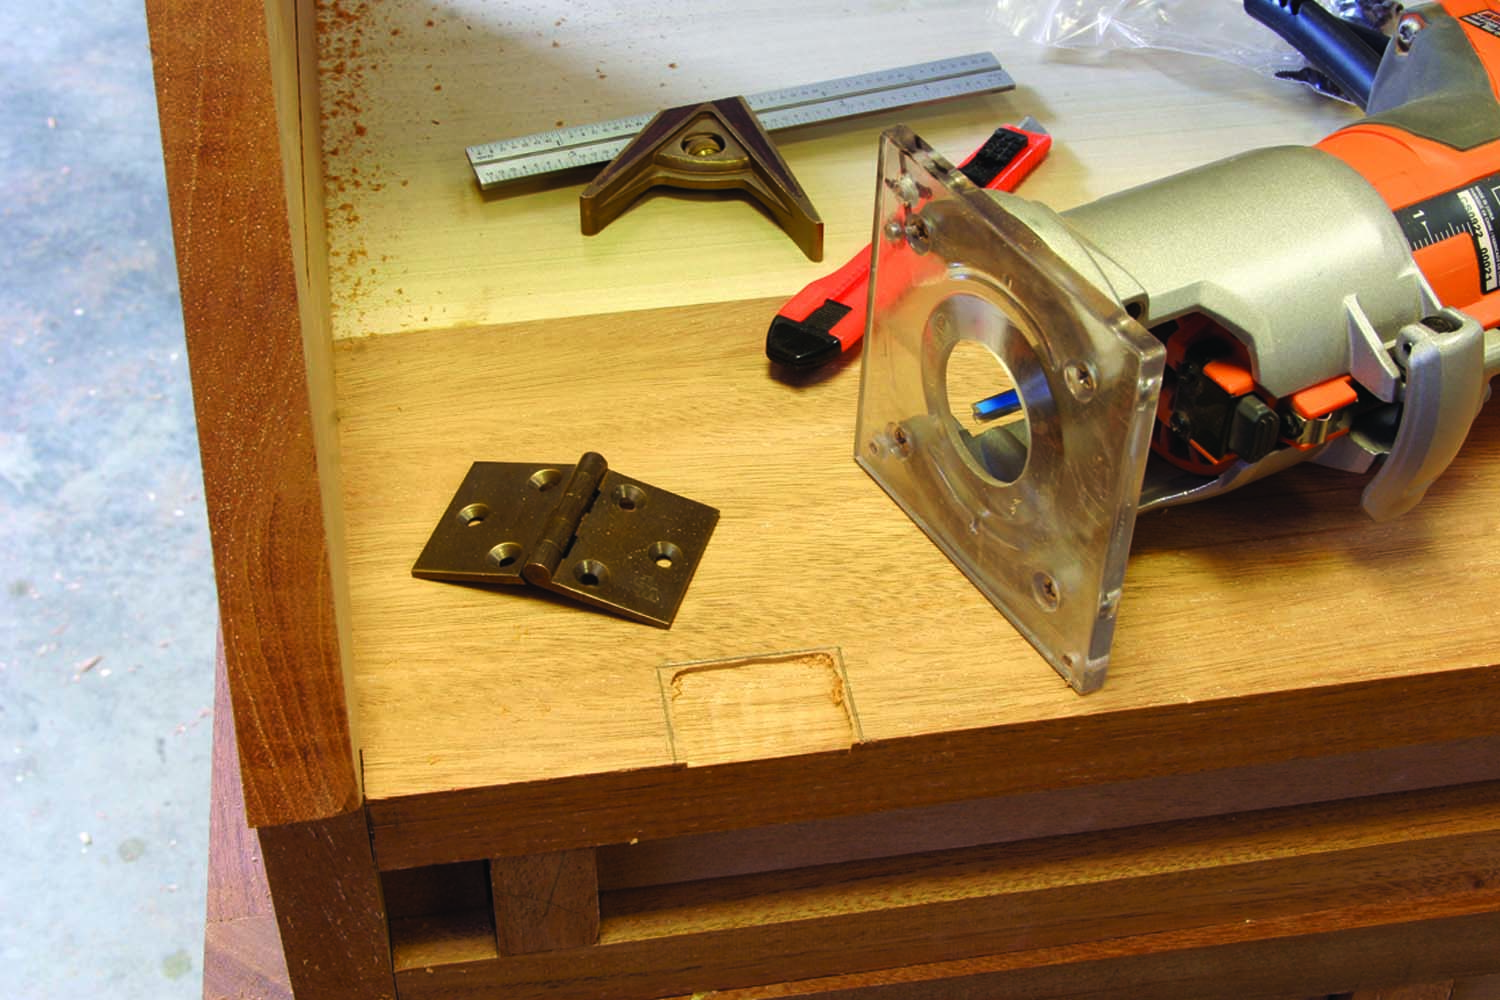
Lay the lid on the extended lopers and mark the hinge locations on the writing surface and the lid. Mark the hinges so the entire leaf is inlaid, leaving the knuckle free.
Install the hinges using a single screw in all leaves, then check the fit of the lid to the desk looking for a gap at the lid/desk side intersection. You may need to slide the leaves farther into the writing surface and/or desk lid. Make any adjustments, then install the balance of the screws.
An extra step pays dividends. Because end grain colors darker than face grain, cover one end of each loper with a face-grain insert made at the table saw.
Once you have the lid fitting tight to the desk side, check the fit around the edge. If needed, adjust the fit using a shoulder plane to get it right. Finish work on the lid by installing a lock, escutcheon and catch (remove all but the escutcheon before finishing).
Drawers of the Period
Edge bead made simple. Use a router table with a straight bit to create a rabbet for the thin bead. It’s especially important to use a backer when routing these edges to prevent tear-out.
The desk drawers incorporate two 18th-century construction techniques: Small drawers have an applied bottom; the larger drawers use a bottom that is slipped into grooves in the sides and front. (All the joinery is dovetails).
For each bank of drawers, keep the grain running continuously across the drawer fronts. To do this, rip stock to width, then draw an undulating pencil line along the length to keep the fronts in order as they’re cut from the stock.
Knife the edges. Score around the hinge layout to prevent tear-out. Use a router and small-diameter straight bit to remove the majority of the waste, then finish the shoulder cuts with a chisel then chisel out any remaining waste.
Drawer fronts for the applied-bottom drawers have a 1⁄4” x 3⁄8” rabbet along the bottom edge – the drawer bottom is attached from below yet hides behind the drawer front. The sides and the back are cut to appropriate lengths and the widths match the fronts, less the rabbet. Join, fit and assemble the drawer boxes then cut and fit bottoms to the individual drawers. The bottoms are attached using glue at the front and pins around the perimeter.
The drawers for the base are constructed with the drawer backs 3⁄4” narrower than the sides and fronts. A 1⁄4” x 1⁄4” groove is cut into the front and sides. The drawer bottoms, which begin as 5⁄8“-thick stock, are sized to the grooves and beveled on three sides to fit those grooves. After the joinery is complete and the boxes are assembled, each front is rabbeted for an added bead detail.
Beading for the two drawer fronts is strips of 1⁄8“-thick x 1⁄2“-wide primary wood. A thin bead of glue and 23-gauge pins hold the bead in place.
The Finish & Back
Details make the difference. Miter the corners of the beading using a bench hook and handsaw, then round the top edge with #150-grit sandpaper.
The upper-section back, which is two half-lapped boards, is left unfinished, as are the drawer boxes. The completed desk got a single coat of boiled linseed oil to highlight the figured grain in the desk lid and drawer fronts. (If the figure were not there, I’d skip this step.) After the oil was fully dry, I sprayed (without the drawers in place) a couple coats of blonde shellac. Also, coat the drawer fronts making sure to catch all edges. Then I sanded the entire piece with #400-grit sandpaper.
To warm the finish, I slipped the drawers into the desk then applied a few coats of orange shellac, sanding after each coat. After a few more coats of blonde shellac, I had a nice build and had filled and leveled much of the grain. After a final #400-grit sanding, I applied two layers of pre-catalyzed lacquer. Then I installed all hardware, nailed the back in place and moved the desk out of the shop.
As I again opened the file on our papers from MESDA and reread the information on this desk, I discovered that the term “Lady’s Desk” is what these small desks were called by Hepplewhite and Sheraton. However, desks of this size were used by both men and women, and were generally placed in the bedroom. That tells me these desks were built for families of means. I’m not “of means” enough to put this in my bedroom, but I’ll surely find a place of honor in my home. PWM

VIDEO: Learn to taper legs at a jointer.
VIDEO: Increase your dovetail accuracy.
Here are some supplies and tools we find essential in our everyday work around the shop. We may receive a commission from sales referred by our links; however, we have carefully selected these products for their usefulness and quality.