We may receive a commission when you use our affiliate links. However, this does not impact our recommendations.
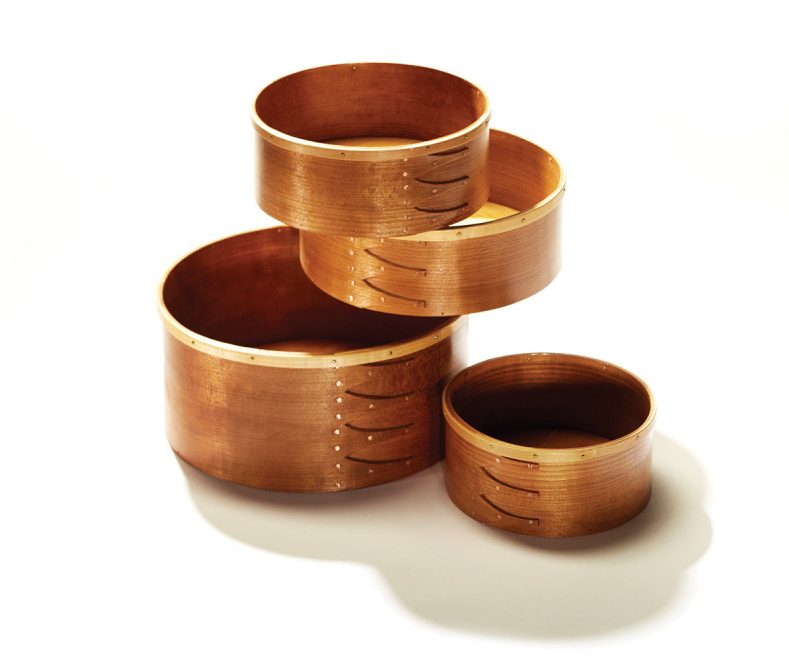
A rim and box in contrasting species is an elegant eye-catcher.
Open boxes, as useful as they are attractive, were not made to hold sweets for the table. Instead, they were for something that makes me wince: expectoration of chewing tobacco. These round open boxes with rims were filled with fresh wood shavings for chewing brethren and visitors, to keep the tobacco users from fouling the pristine floors.
That we hardly ever see this form except in picture books attests to the aversion that such a use fosters. My refusal to name it in the historic way is my hope to change this aversion; “round open box” will do quite nicely to describe this graceful and useful box.
I remember seeing this form with its attractive rim at Hancock Shaker Village, in Hancock, Mass., 25 years ago. And we know they were made at the Mt. Lebanon Shaker Village, in New Lebanon, N.Y., by Daniel Crossman.
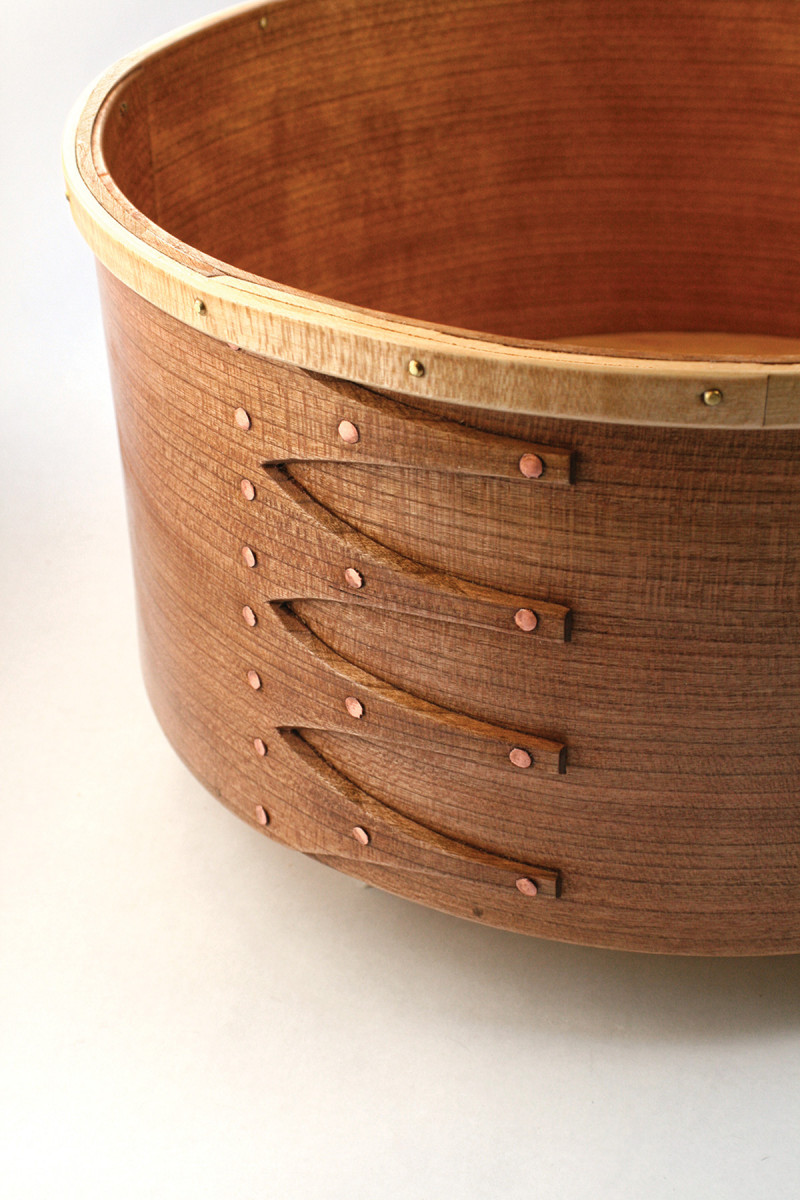
Finger & rim detail. The rim is the defining feature on a round Shaker box; it’s accentuated by brass escutcheon pins and a maple band to contrast with the cherry of the box band. Note how the rim starts in the curve of the top finger and is feathered at the end for a smooth curve.
The pattern of the finger lap and construction are in the oval box tradition, but the rim is different. Added for strength needed on an object intended for floor use, the rim is a pleasing finishing touch on a box without a lid or a handle. The inside end of this rim band is not feathered; rather it is fitted into the edge of the top finger curve. The band can be ended straight and feathered, or have a single narrow finger. The fastenings are brass escutcheon pins snipped and peened on the inside.
Renaming this historic form for new use in the contemporary home is a fitting way to re-introduce this Shaker classic.
Proportions
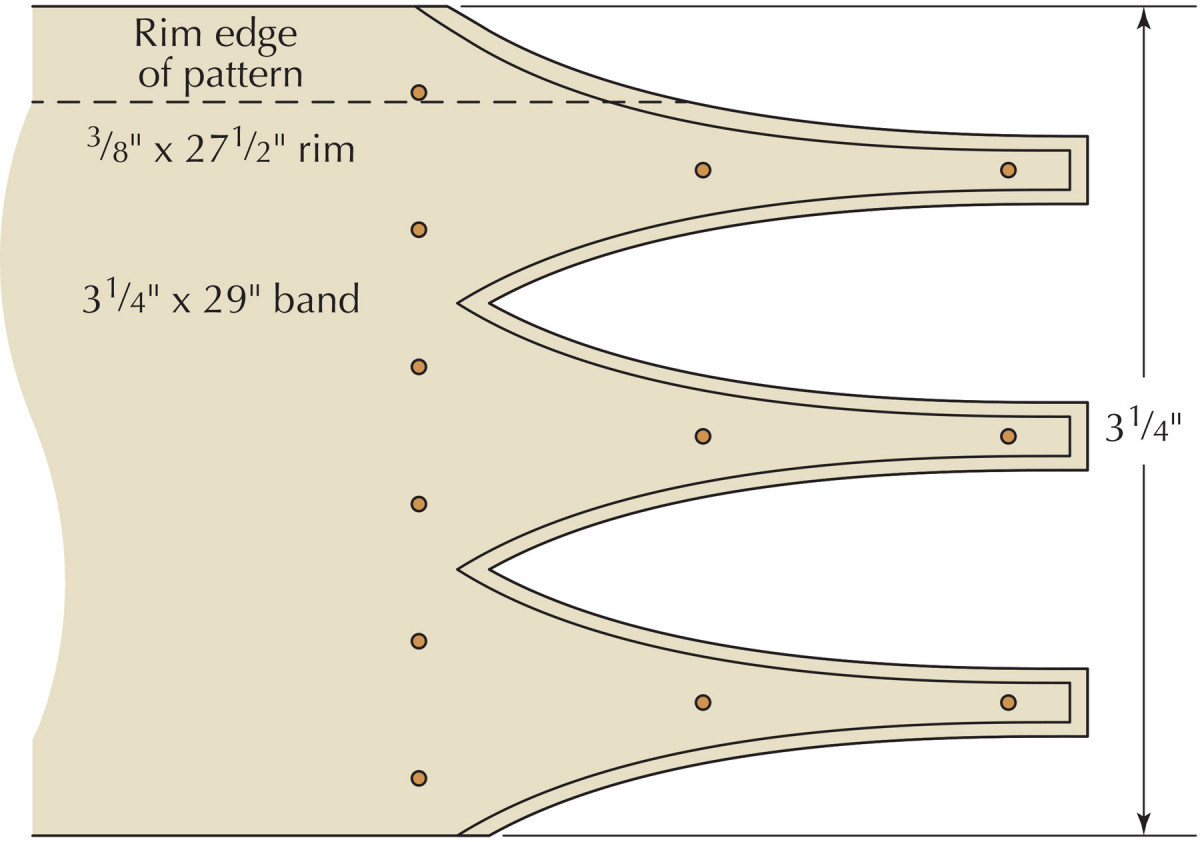
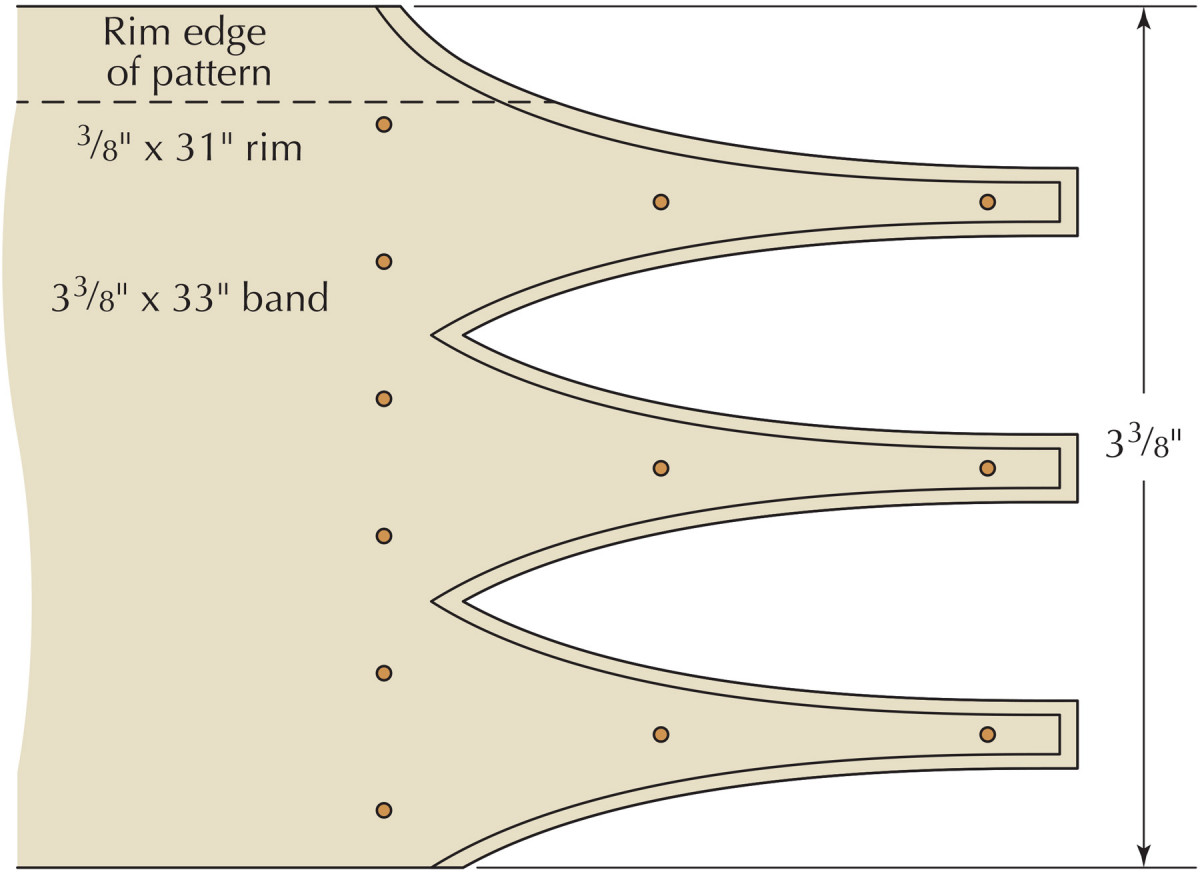
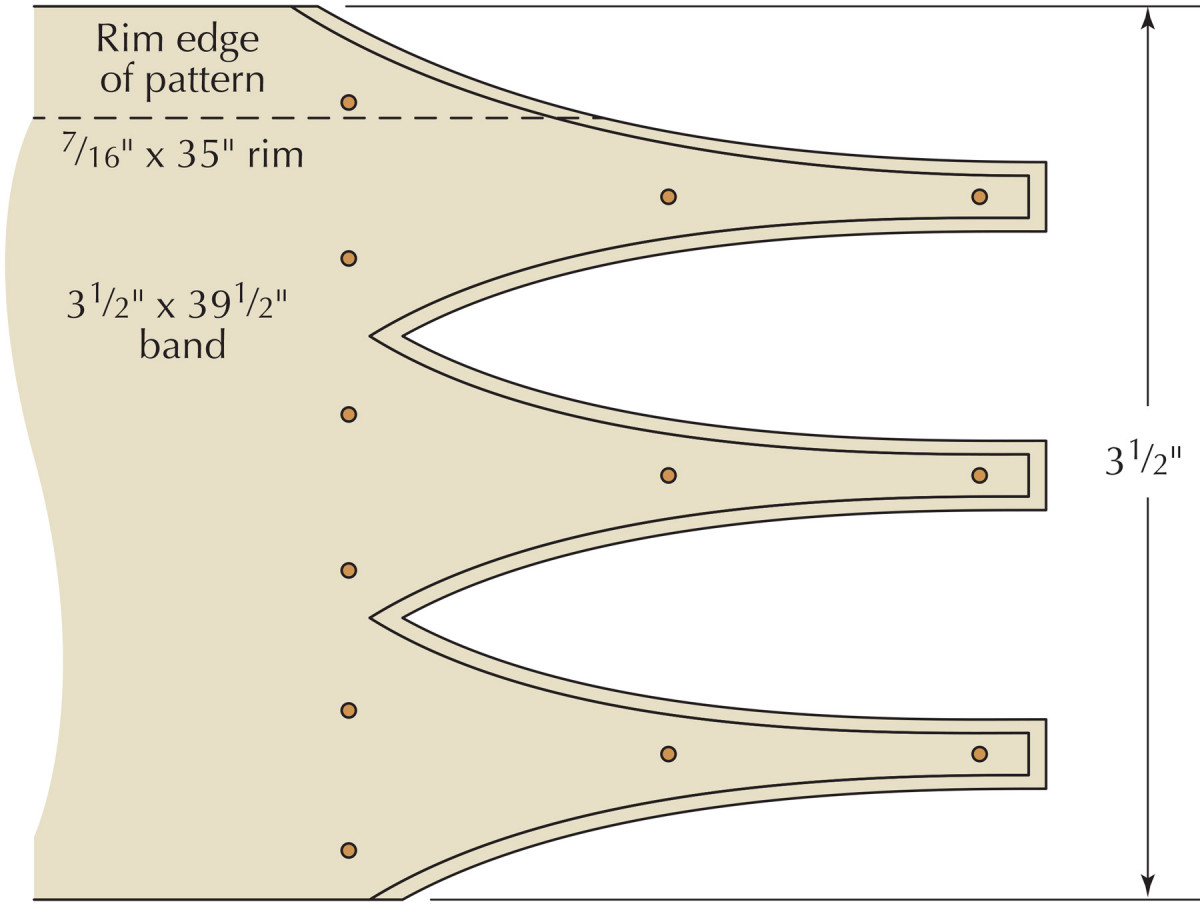
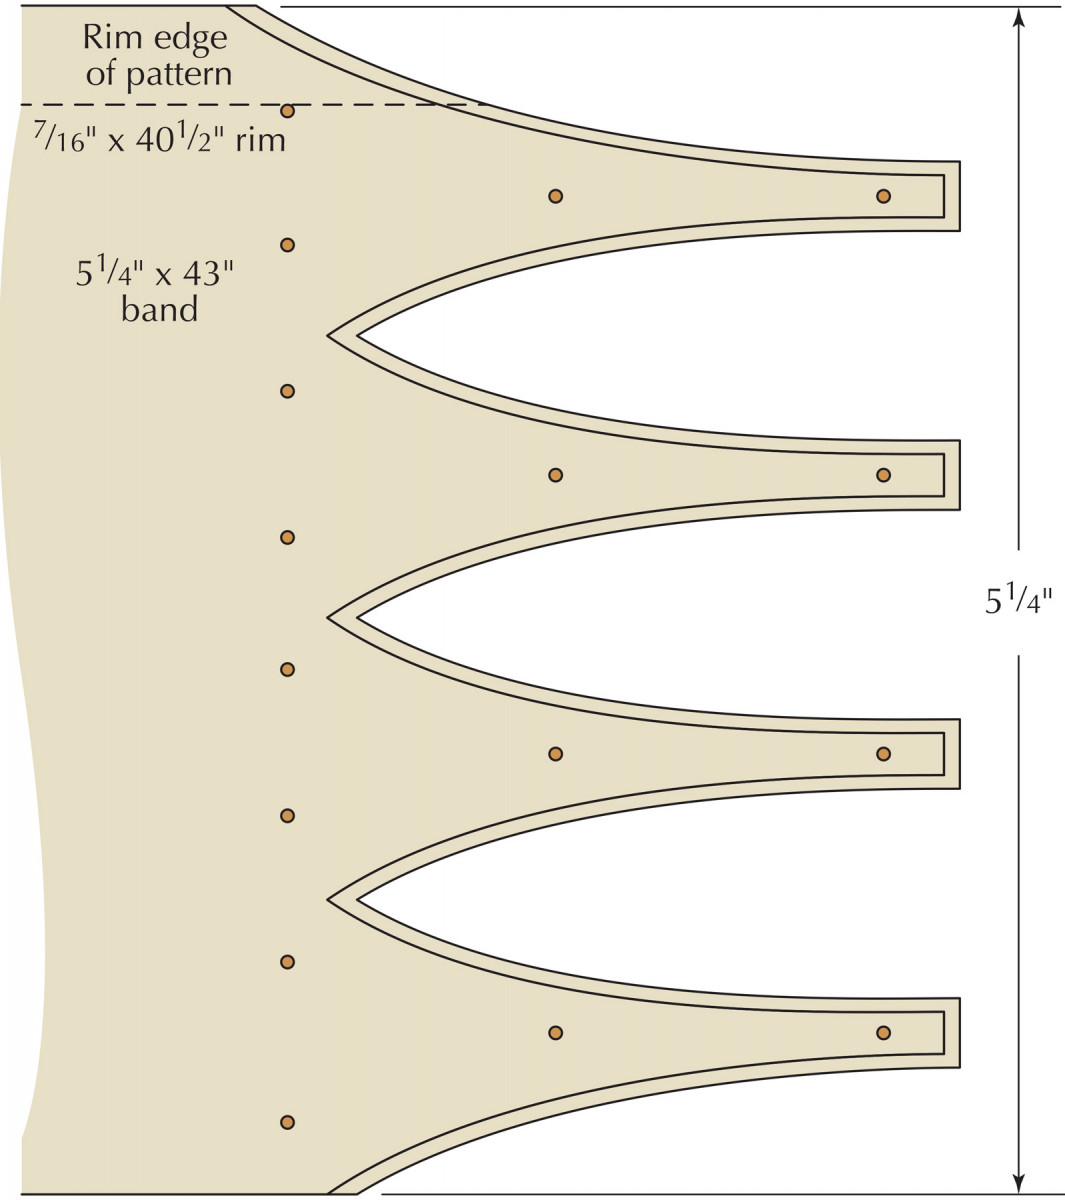
No. 11 • No. 22 • No. 33 • No. 44
Diameter 7″ • 8 1⁄4” • 9 1⁄2” • 11″
Band (l, w) 3 1⁄4” x 29″ • 3 3⁄8” x 33″ • 3 1⁄2” x 39 1⁄2” • 5 1⁄4” x 43″
Band thickness 5⁄64“-3⁄32” • 3⁄32“-7⁄64” • 7⁄64“-1⁄8” 7• ⁄64“-1⁄8“
Rim 3⁄8” x 2 71⁄2” • 3⁄8” x 31″ • 7⁄16” x 35″ • 7⁄16” x 40 1⁄2“
Fingers 3; 2 1⁄4” long • 3; 2 3⁄8” long • 3; 2 1⁄2” long • 4; 2 5⁄8” long
Circumference 22 1⁄2” • 26 1⁄4” • 30 1⁄4” • 34 3⁄4“
Tack Size #21⁄4 #21⁄4 #21⁄4 or #21⁄2 #21⁄4 or #21⁄2
Source Grasselli1 Wilson2 Myers3 Sprigg4
Sources:
1Steve Grasselli, oval box craftsman, Syracuse, N.Y., from example in Hancock Shaker Village collection.
2John Wilson, the Home Shop, Charlotte, Mich., provides an intermediate size in a nesting series.
3D. Clifford Myers, “Oval Boxes” in “Simple Gifts, 25 Authentic Shaker Craft Projects,” by the Editors of Garden Way Publishing, Storey Communications 1990.
4June Sprigg, description of object #53 (not photographed) in “Shaker Design,” Whitney Museum of American Art 1986, p. 185.
The Project in Four Sizes
The “Proportions” table (below) provides three examples (Nos. 1, 3 and 4) from the literature based on historic standards, as well as one size (No. 2) to complete a set for those disposed to graduated nestings. Nos. 1, 2 and 3 will constitute such a set. The largest round, No. 4, has taller sides that fit its proportions.
Fingers & Bands
 The finger shape and length are similar to those of oval boxes of a similar size with one modification: The top finger begins 3⁄16” farther back (as shown in the drawings on the next page) to provide the starting point for a rim. Without this, the smaller sizes in particular appear crowded once the rim is in place.
 The critical dimension in any bent-wood project is the band thickness. The ease of bending, and even the success in completing the project, depends on it. The thinner the wood the easier and more reliable the bend, but the thicker it is the stronger the project. In both cases the visual appearance is affected.
 The historic range is from 5⁄64” for the 7″-diameter No. 1 box, to 1⁄8” for the 91⁄2“-diameter No. 3 example (see “Proportions”). (Note: An average band thickness of 1⁄10” would work for all four sizes; use #21⁄4 copper tacks to secure a band of that thickness.)
Note that the top finger begins 3⁄16″ farther back than the others. The inside end of the rim will tuck into this space, so be sure not to turn your pattern upside down. (See “Add the rim” on page 32.)
Box makers understand what a wide range this is, with two different lengths of copper tacks required, depending on thickness.
Bending & Tacking
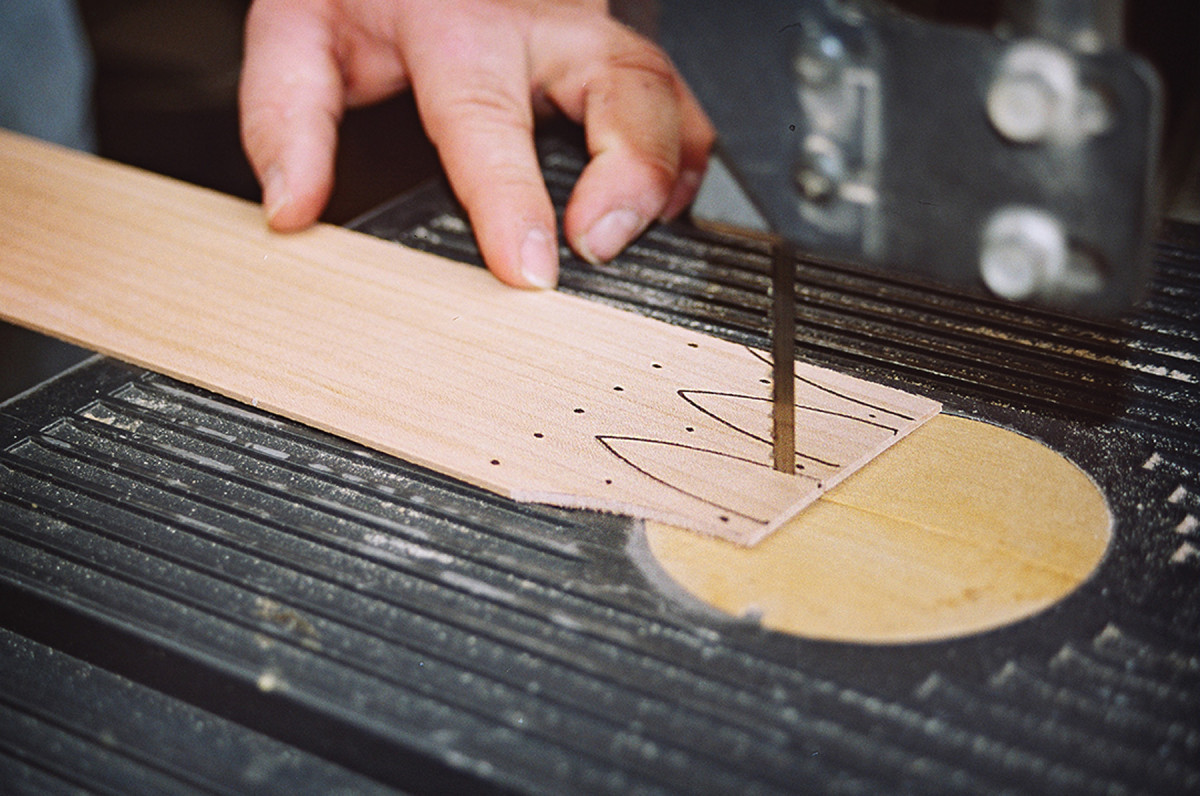
Fingers. Use a band saw to remove the waste and cut to rough dimensions. Now drill holes in the marked locations for the copper tacks.
Shaker bentwood boxes have the inside end of the band’s thickness feathered about 2″ so it will blend smoothly. The outside end is cut in distinctive fingers with graceful curved edges that are Gothic in appearance.
After choosing which size box you wish to make, prep your material. Then follow the “Finger Patterns” (below) for the finger shape and trim the cut edges with a knife to create a slight bevel.
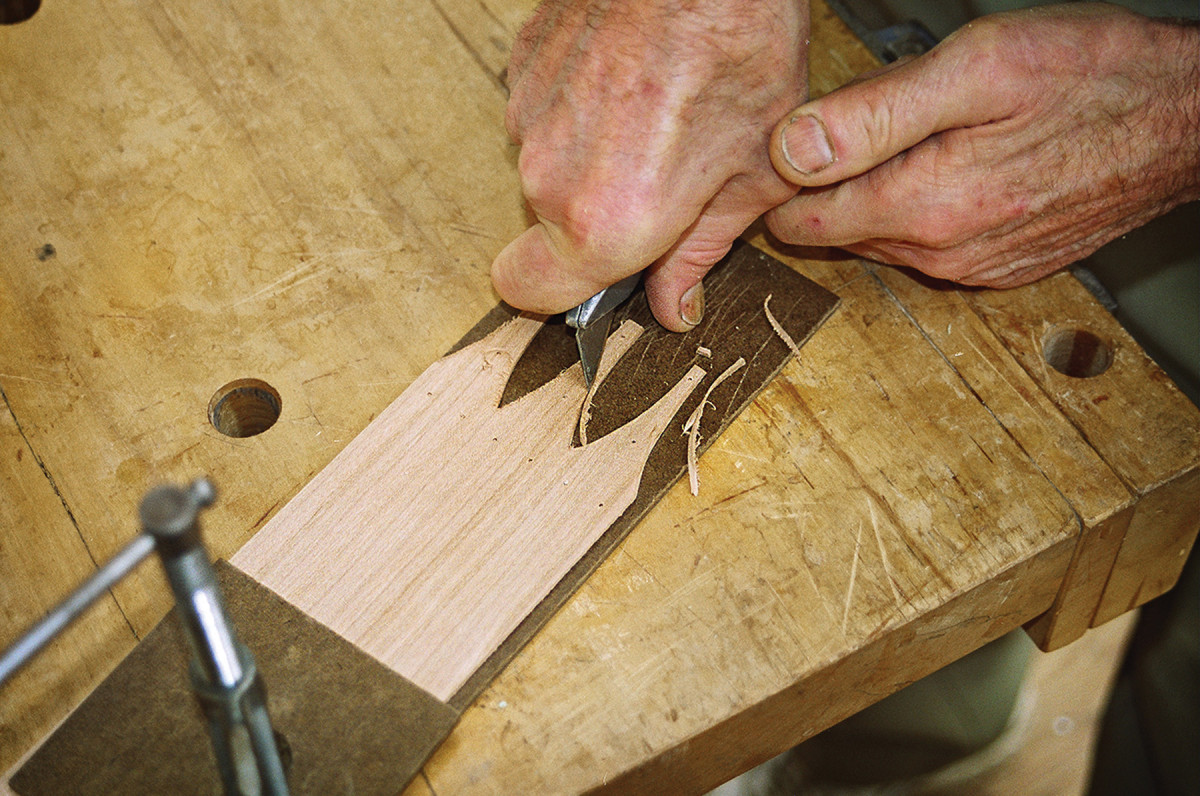
Carving. I use a utility knife with a fixed, heavy-duty blade to trim the fingers to final shape, and to cut a slight bevel on the edges.
Drill 1⁄16” pilot holes for the tacks in the locations marked on the pattern, then thin the finger end about 1″ back on a sander to reduce the tips to about half-thickness; that will allow the ends to conform to the curved surface.
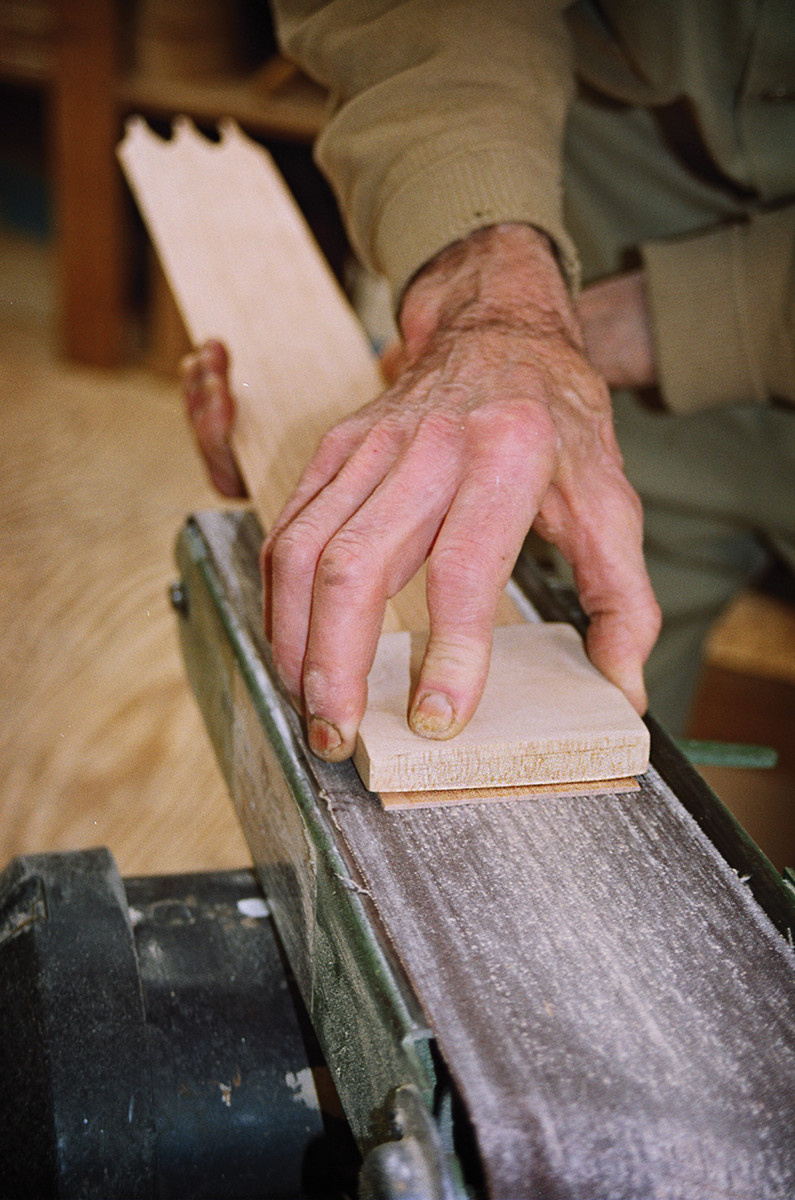
Feather. Use a belt sander to thin the band stock on the straight end about 2″ back to help you more easily bend a fair curve.
Feather the band’s inside straight end and outside end back about 2″ to almost a knife edge. Shape the rim’s inside end to nestle into the band’s finger.
Now mark the circumference length on the band. Measure this from the feathered inside end and make a pencil mark near the finger end. After soaking and bending, this marks where the wrapped band will end.
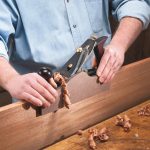
In hot water. My copper water tray sits on a hot plate, with wood blocks under each end for stability. A full boil is not necessary; 180° F will soften the lignin sufficiently for bending in about 10-20 minutes.
But before you soak the wood, you must prepare a form and shapers for your selected size of round box. The form is simply a 1″-thick foam (or wood) core, cut in a circle the diameter of the box.
Shapers, sometimes called followers or formers, are round wood corks, 3⁄4” thick with a 10° beveled edge and two to four 1″-diameter holes for ventilation and finger holds. You’ll need two shapers for each box.
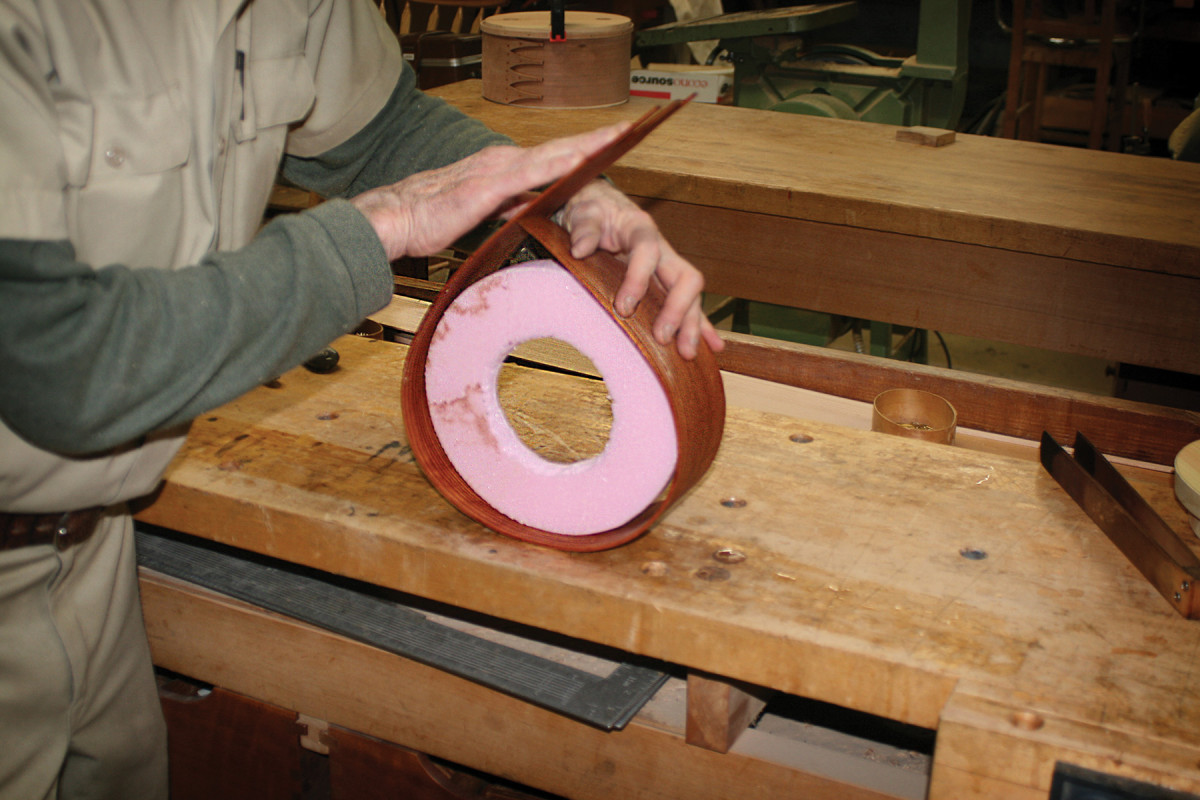
Bending. Remove the band from the hot water and bend it around the form. You’re aiming only for the approximate shape, so don’t fuss with wrapping it tightly.
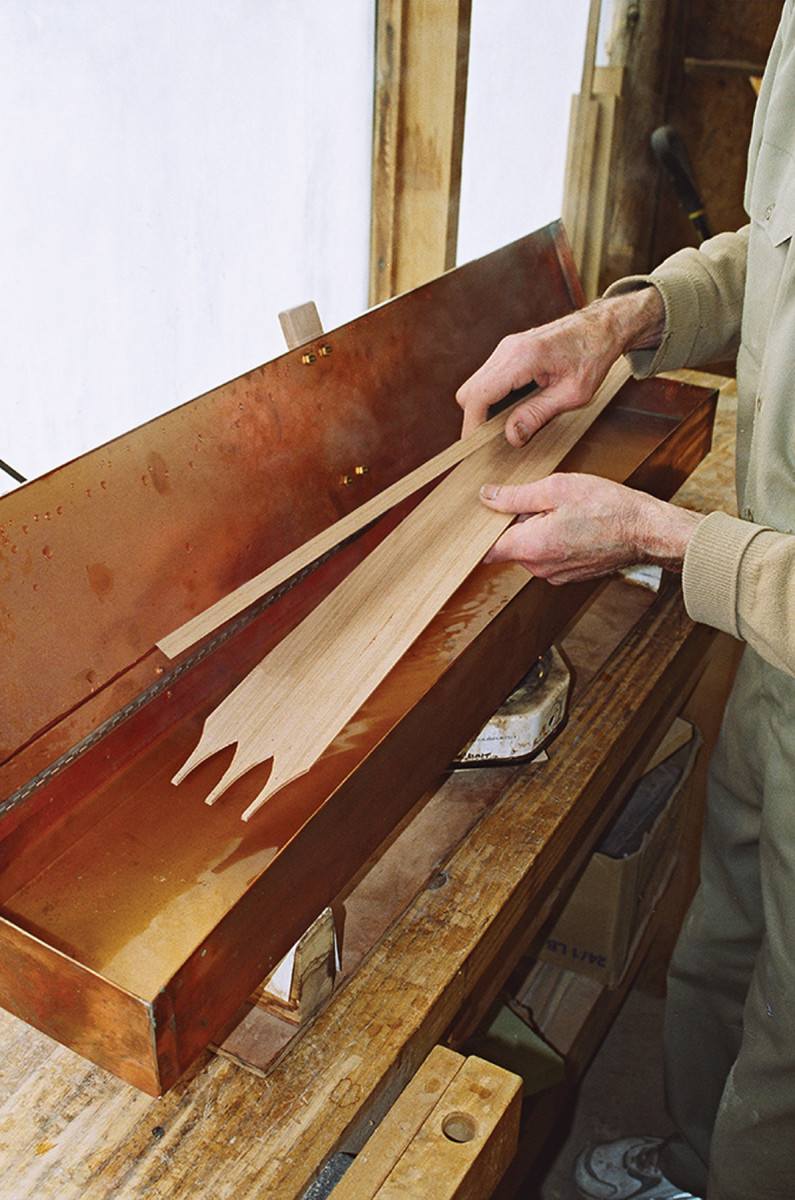
You are now ready to soak the band and rim in water to make them pliable. Both water and heat affect the flexibility of the wood. You’re probably familiar with how soaking makes wood limber, but heat above 180° F makes lignin soft, which is effective, either alone as in some musical instrument construction, or in combination with soaking. Both hot water and steam-bending are effective for this purpose, with a soaking time of only 10 to 20 minutes. Soaking the pieces in the bathtub also works, but the time is hours, not minutes long (a final rinse with a teakettle of boiling water might help).
Forms & Construction
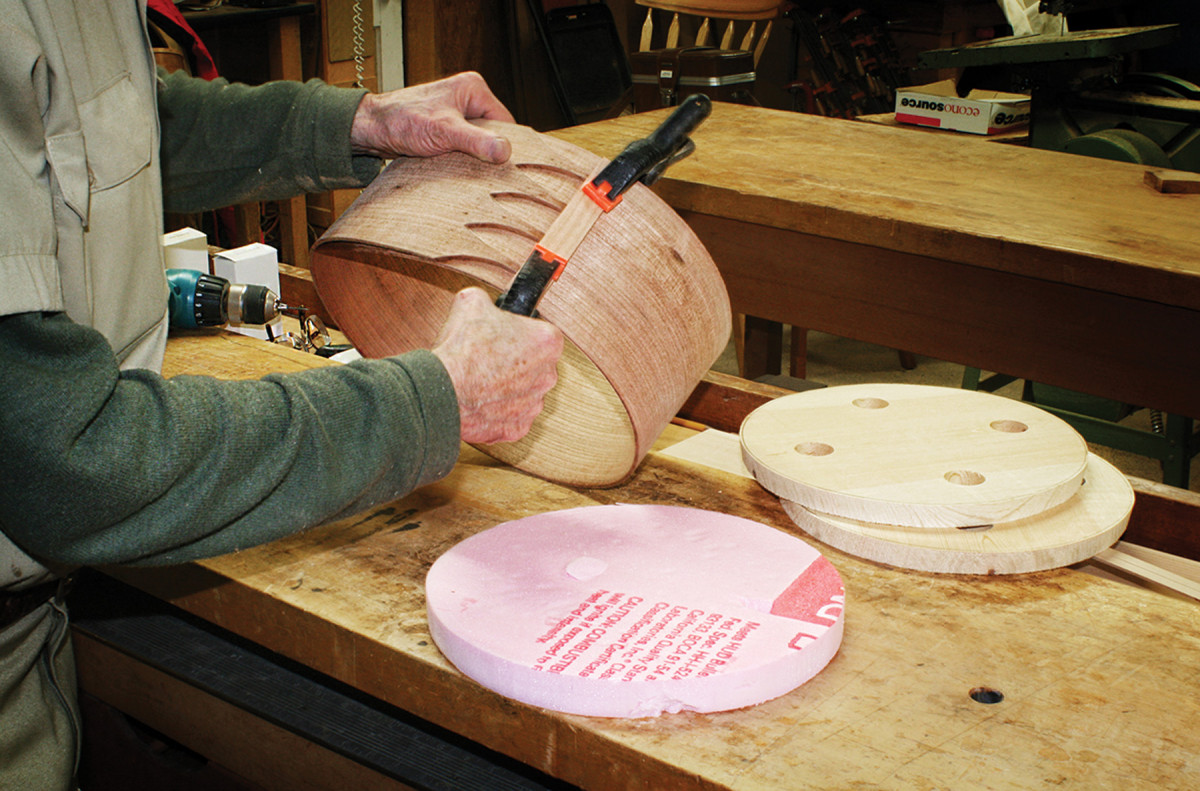
The right size. Remove the form, then match the feathered end to the penciled circumference mark. Use a scrap of wood and spring clamps to hold the fingers in place.
Bending the band around the form will yield an approximate shape. Have the form at the ready as you remove the band from the water. Bend it around the form while hot.
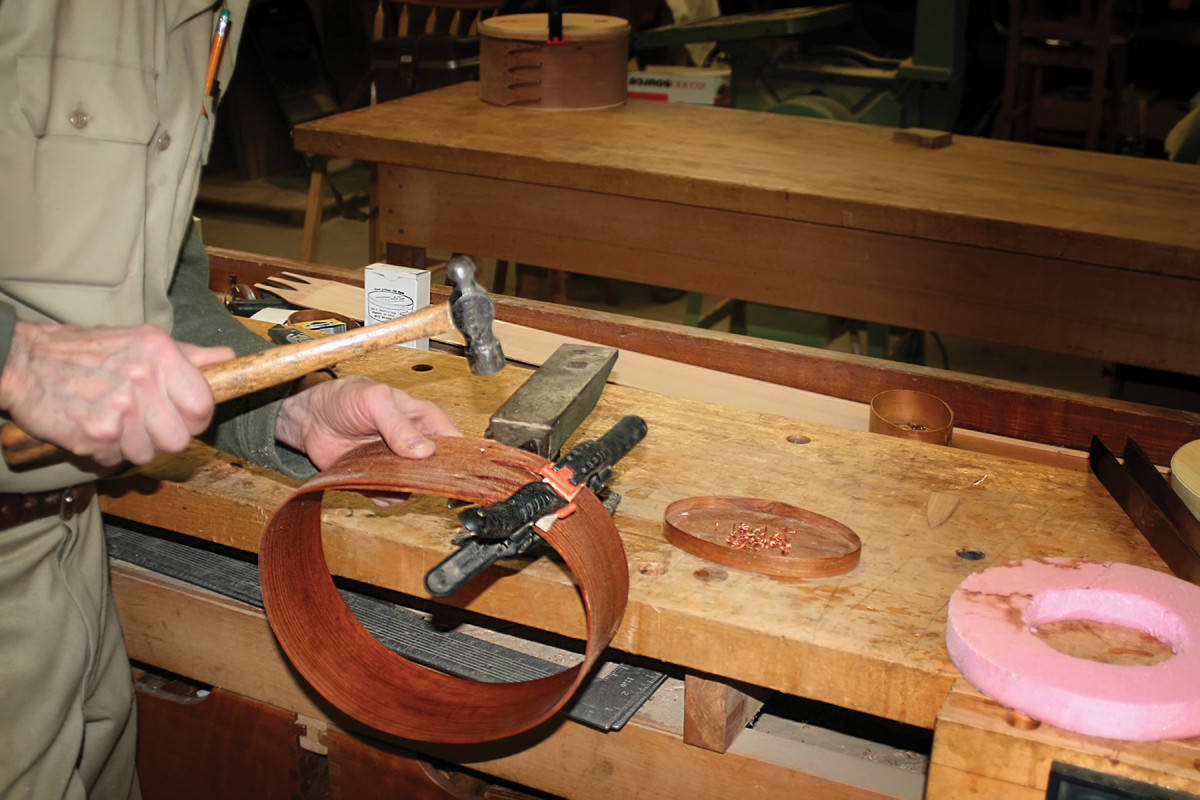
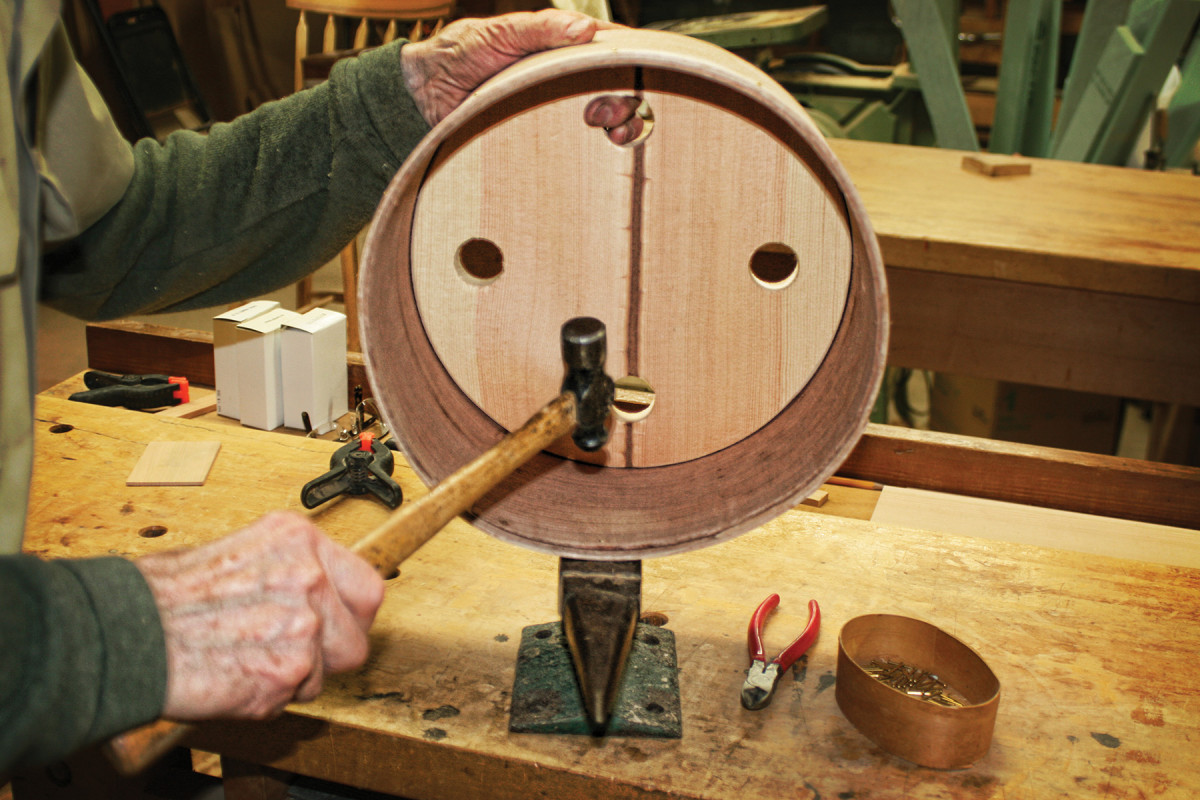
Clinched tacks. Copper tack heads are part of the characteristic look of any Shaker box. Hammer the tacks in place, then clinch the backs on the wet band to make a permanent fastening. If you don’t have an anvil, a short length of iron pipe makes an effective surface for driving and clinching. Insert shapers in both sides.
Remove the form and match the feathered end to the pencil-marked circumference line. A scrap wood and spring-clamp arrangement for holding the finger tips will help as you move to the anvil to tack and clinch the fingers.
Now insert the wood shapers at the top and bottom.
Rims & Pins
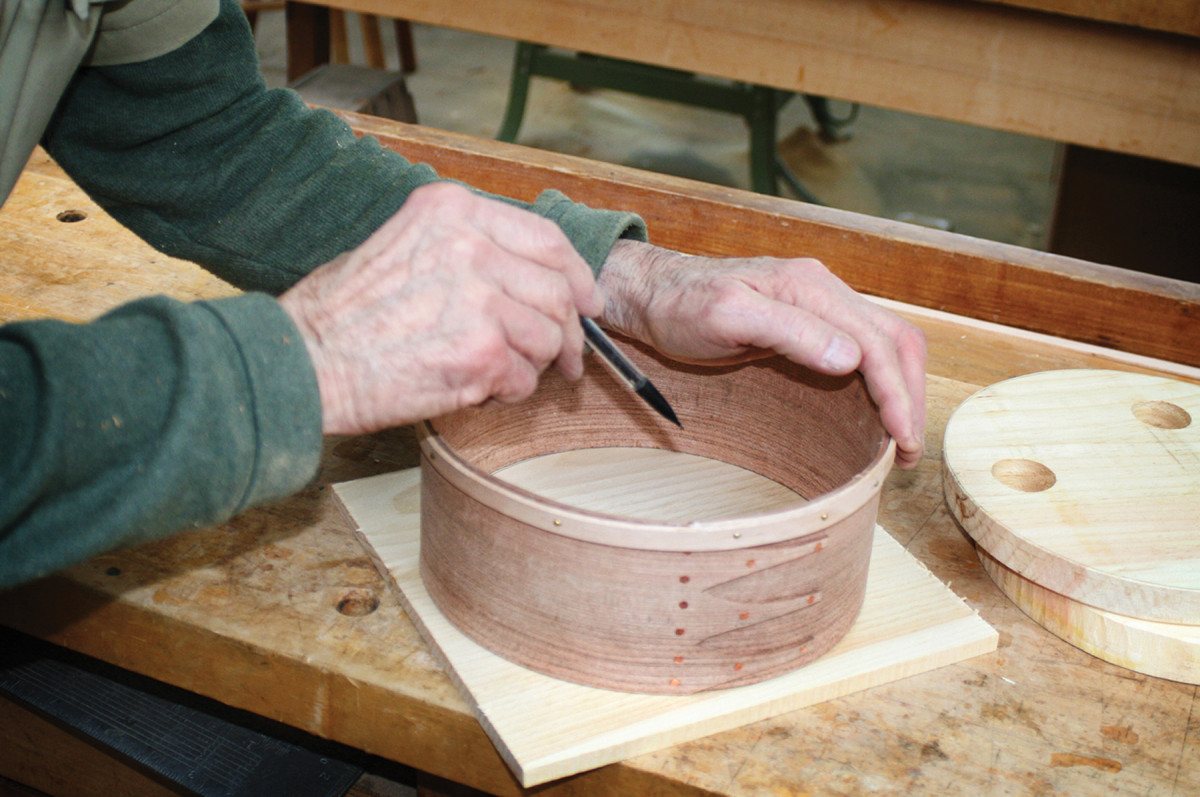
Add the rim. The rim gets tucked into the curve of the top finger and ends with a 4″ lap that will project about 1″ beyond the fingers. After bending the rim in place, remove the top shaper and hold the rim in place (a spring clamp might help) as you drill 1⁄16″-diameter pilot holes every 3″ for the escutcheon pins (with three holes 2″ apart at the lap).
With your escutcheon pins at the ready, bend the rim around the top of the band. It begins by neatly tucking into the curve of the top finger. Add a drop of glue under the feathered end before driving the escutcheon pins.
Escutcheon pins have a small half-round head and owe their origin to medieval heraldry objects displayed on a shield (escutcheon) attached with roundhead nails. They are sold in the trim hardware section of stores in various gauge sizes such as the #16, which is 1⁄16” diameter, and in various lengths from 1⁄2” long. Any length will work, but be sure to buy solid brass rather than brass-plated steel.
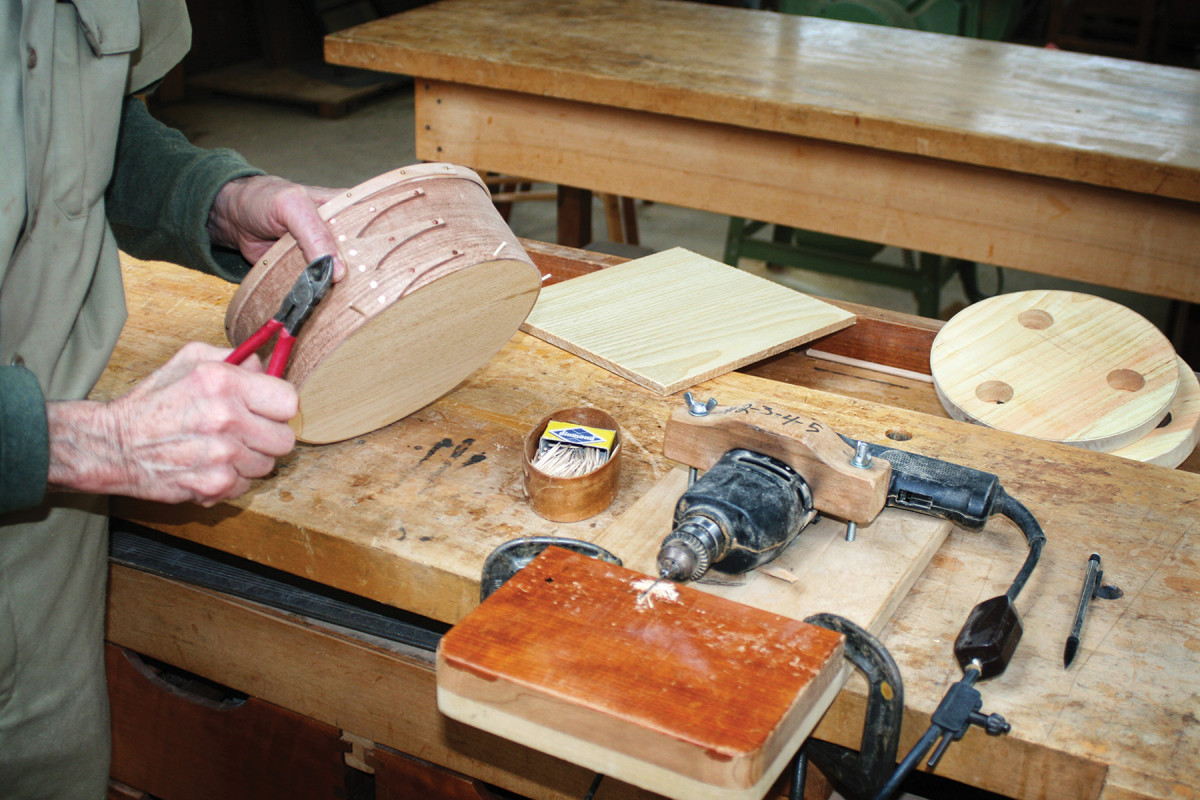
Snip, file & peen. Snip the end of the escutcheon pins as close as possible, then file them close to flush before peening.
The escutcheon pins are among the defining features of this project. The question remains how to work them. They are too thick to clinch and too long to peen. So – after removing the top form – drill 1⁄16” pilot holes every 3″ along the rim band, with the final three 2″ apart at the feathered end.
Drive pins through the wet band and snip them off inside as close as possible to the wood – closer than diagonal cutters will typically allow. So you’ll likely need to file the ends nearly flush after clipping.
Mark a circle. Once the band and rim are thoroughly dry, the box will hold its round shape. So you can use it as the template for marking the bottom board.
Then tap the snipped pins on an anvil or on the inside with a ball peen hammer to slightly peen them.
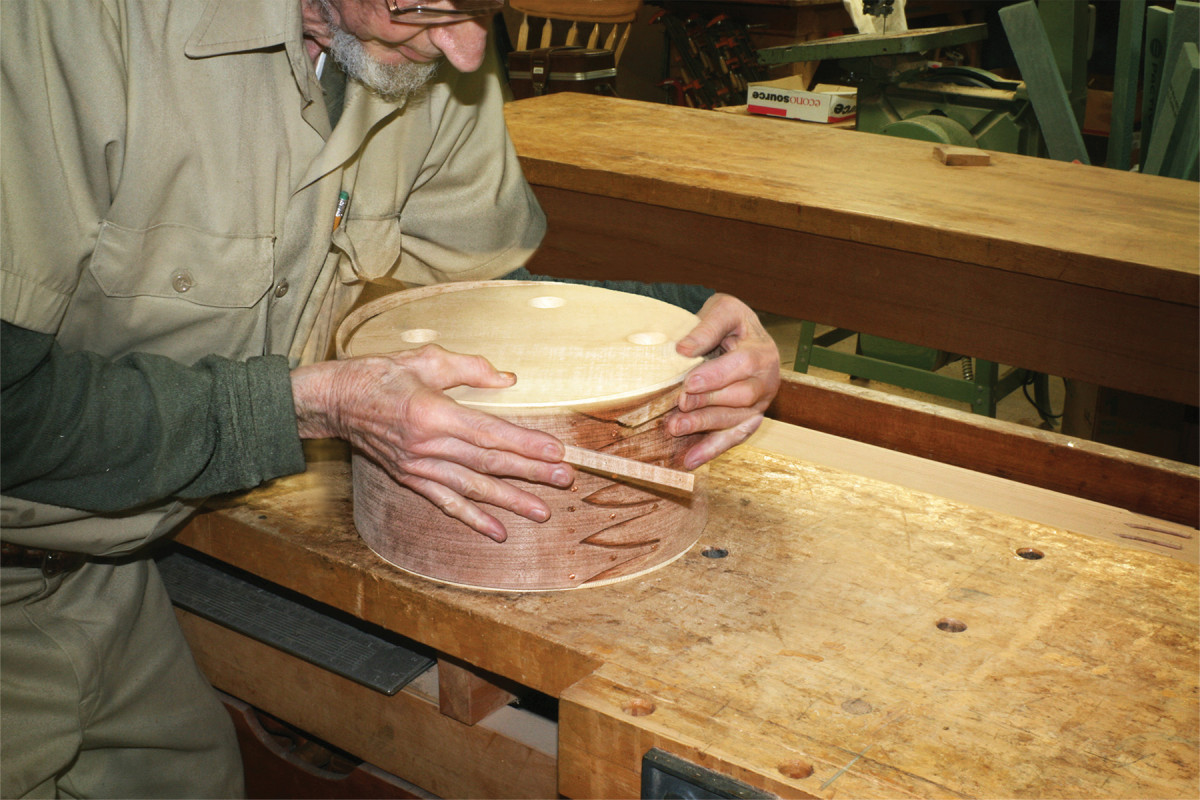
Reinsert the top form and set the box aside to dry for a few days.
After the box is dry, a drop of glue and spring clamp may be needed to close any gap where the rim begins in the top finger curve.
Bottom Boards
Secure the bottom. I use toothpicks to secure the bottom, drilling 5⁄64″ pilot holes every 2″-3″ around the box, centered in the thickness of the bottom. After tapping the toothpicks in place, I use side cutters to snip them off, then sand smooth.
Traditionally, Shaker box bottom boards were 3⁄8“-thick quartersawn white pine (quartersawing minimizes dimensional change with humidity). If you prefer a hardwood bottom, it is better to use a veneered plywood board for dimensional stability to avoid future gaps and breaks. I find that 5-ply 1⁄4“-thick birch plywood works well and complements whatever species you select for side bands.
Mark the shape of the round bottom from the dry band itself using a sharp pencil, then cut it at the band saw.
Sand up to your lines, giving the edge a 2° bevel angled toward the interior; this will make the bottom wedge into place for a tight fit.
You have a variety of choices to fasten the bottom, from wood pegs (drill 5⁄64“-diameter pilot holes), to copper shoe pegs, to #16 brass escutcheon pins (the latter two both require 1⁄16“-diameter pilot holes).
Finishing
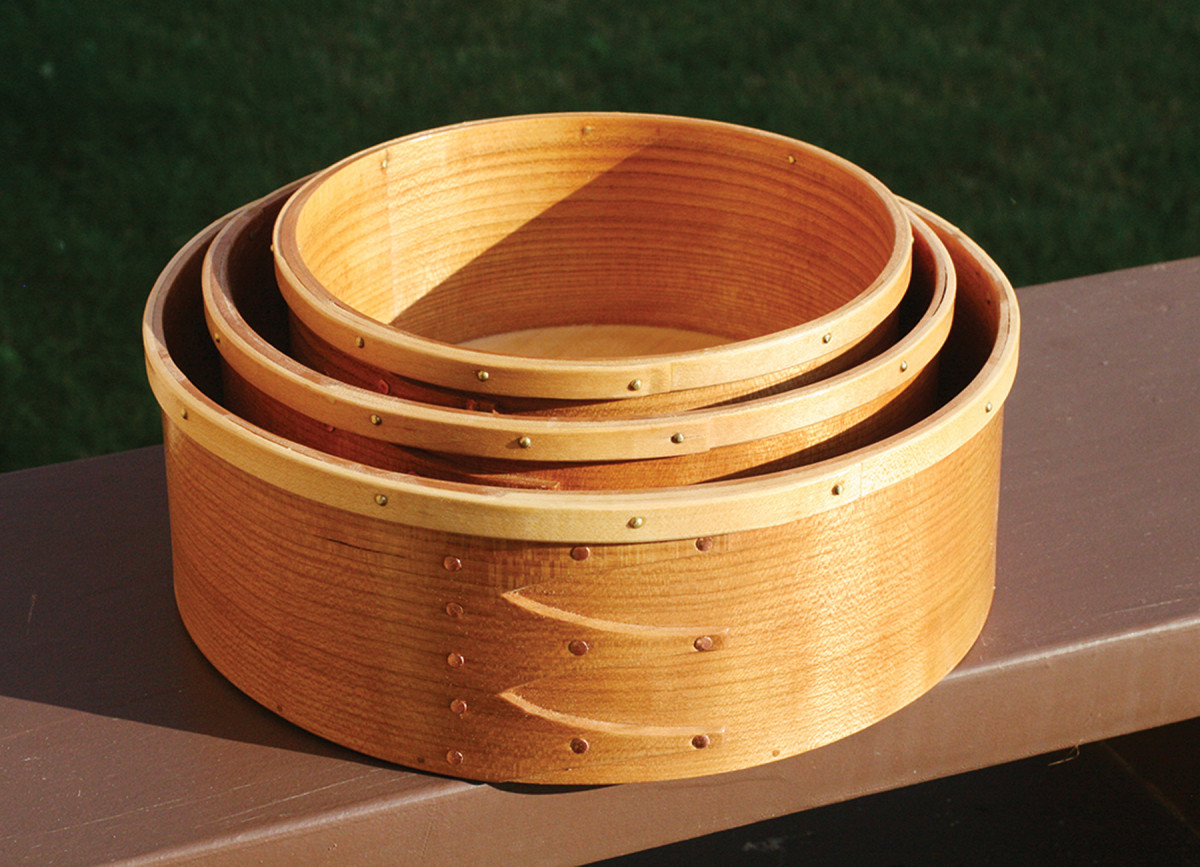
Nesting set. Three open boxes (these are Nos. 1, 2 and 3 sizes) constitute a set.
Round open boxes with rims can be finished similarly to lidded boxes of their day, with milk paint, a colored wash coat or a clear finish. The choice is yours.
My preference is an oil-based polyurethane varnish because it adds warmth to the wood tone and is durable for the range of uses that the project invites. And, because these boxes have no lids, I finish inside and out. (Finishing the inside of a lidded box traps finish odors, sometimes for years to come. So those I leave unfinished on the interior.)
Use a wipe-on poly or make your own from standard varnish thinned 4:1 with a VMP Naphtha thinner. Keep the project and finish warm (75° F) so thin coats go on easily. Rub the final coat with a brown paper bag to burnish the surface smooth.
This finished project is nothing to spit at. Display it proudly.
Here are some supplies and tools we find essential in our everyday work around the shop. We may receive a commission from sales referred by our links; however, we have carefully selected these products for their usefulness and quality.