


We may receive a commission when you use our affiliate links. However, this does not impact our recommendations.

Old tool chests typically have two weak spots: the bottom and the hinges.
The bottom gets rotted out because tool chests end up in unfriendly, poorly drained areas. That’s why many tool chest bottoms are merely nailed on – so they can easily be replaced.
The hinges usually fail because the screws come loose. Many tool chests are made from pine and the lids get a lot of abuse. When examining old tool chests I see a lot of repairs to the screws: Small screws have been replaced with too-big screws. Screw holes have been plugged with dowels and then redrilled. Both of these solutions are not ideal.
A few chests I’ve examined have a novel and stout way of making sure the lid does not come loose. I’ve used this technique on a few chests and am a fan. It takes a little longer, but the lid will last.
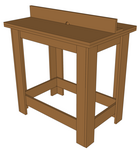
This week I’m finishing up a tool chest that is a joint project with Jameel Abraham at Benchcrafted for an upcoming issue of Popular Woodworking Magazine. I built the chest and interior; Jameel did the very sweet lid. You can get a peek of some of the details in Jameel’s recent posts on his blog.

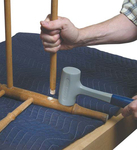
I sure as heck do not want this lid to come loose – ever. So here’s how I attached the hinges to the lid. All this is done with blacksmith-made hinges and home-center hardware (No. 12 machine screws, washers, nuts and 1/8” x 3/4” steel plate). Plus, I don’t really have a lot of metalworking tools. In other words, anyone can do it.
First I drilled the holes and countersinks in the hinge plate. If I were using wood screws, I would drive three screws into the lid. But because this assembly is so robust, I use two machine screws. I placed the hinges in place on the lid and used the holes in the hinge to drill clearance holes into the lid that are a few thousandths of an inch bigger than the machine screws. Drill all the way through the lid.
I hacksawed out two pressure plates from the 1/8” steel that matched the size of the hinge leaf, in this case 3/4” x 3”. I filed off the burrs and cleaned the ends with a file.
Again using the hinge as a template, I marked the steel plate for through-holes. I punched the center of each hole and then drilled holes in the plate with a twist bit.

Then I assembled the sandwich of steel and wood. It’s easy to over-tighten these nuts, especially on a softwood lid. So take it easy.
Tomorrow I’ll saw the machine screws to final length and file things smooth.
When final assembly times comes, I’m going to add some Locktite to the nut to keep things tight for my lifetime.
Note that this isn’t ideal for a chest where you are worried about someone loosening the hinges and stealing your tools. In this case, the thief would probably just grab the whole chest and not bother with jimmying your hinges.
— Christopher Schwarz
Here are some supplies and tools we find essential in our everyday work around the shop. We may receive a commission from sales referred by our links; however, we have carefully selected these products for their usefulness and quality.


Chris,
I hate to be “that guy” but I must say, I expected to see the hex nuts clocked. Perhaps with a flat side parallel to an edge? Half joking here and extremely thankful to come across the idea. I was considering a better way of installing H-L hinges on a newly finished cabinet for my planes. The door is half inch stock I had laying around and this feels much safer than 3/8″ wood screws. I plan on using square nuts…perhaps I’ll clock them in a diamond shape! Keep up the amazing and inspiring work you do here. Thank you.
I can’t wait to see this article. I am having trouble visualizing from the first image how this is going to attach to the chest. The placement of the screw holes and the hinge direction and the inlay border (which I assume if the top of the lid) make it look as though this lid may be inset in the chest, or perhaps has a higher rear wall and sits on the front and side walls. I can’t seem to figure this out.
Drilling and tapping the plate would be another solution for a sleek looking job.
Personally, I hate lock washers, particularly when expansion and contraction is involved.
For this application, I would use nuts with the “elastic” feature built in to them.
Lee (the saw guy)
Chris,
This is the same approach I took with my Dutch Tool Chest, although I used this method for attaching the chest handles. Worried about wood screws, soft pine and a loaded chest, I opted for machine screws also. And yes, clocking the screws is a breeze.
One nice feature of machine screws is that it is very easy to clock the screw heads!
What I used fr my ATC, and for many other projects is machine screws. A pair of 2″ long 3/16ths machine screws in the back wall of the box, and a pair of 1″ long 3/16 screws through the dust seal and lid per hinge hold very well. I never bothered tapping the wood, just drill undersize and drive the screws home.
I still need another 50 years or so to see if this method is robust, but I used the same configuration to install “cowboy saloon” style swinging hinges to the door of kitchen in my Cafe–softwood door frame and softwood door, and after 6 years of abuse, they hold up just fine.
can you give me details about the hinges in the picture at the top of the post
thanks
alan
Hey Chris,
Instead of Locktite, you might consider peening the ends of the machine screws to lock them in place.
Cheers,
Tom
From the FWIW department: In the past, I have considered filling the slot almost to the top with JB weld, leaving just enough of the slot so the screw looks right, but will not allow a screwdriver to gain enough purchase to loosen the screw. It would be too inconvenient for a would-be thief to spend time chiseling out the four screws in order to gain access. Another consideration is to tin the nut and screw where they will engage with each other and use a solid soldering copper (or iron) to melt the joint. The steel plate should insulate the wood from the heat. I have not tried this, but I believe it is worth a thought. These precautions would only keep honest people honest though, because I believe a thief would just pry the lid open anyway.