


We may receive a commission when you use our affiliate links. However, this does not impact our recommendations.

When the new premium planes from Stanley arrived, it was agony. I was in the middle of another project and had to just stare at them for a week before I could get my mitts on them.
The first tool I set up was the No. 4 smoothing plane, which I reviewed for the October 2009 issue of Popular Woodworking. I think this plane is the best of the new Stanley crop, but when I first set it up, I was grumpy.
Here’s how it went:
1. I set up the iron. No problem. The face was fairly flat and easy to get set up. The bevel readily took a keen edge just like I would expect A2 to do.
2. The chipbreaker was perfect. It mated just right with the iron.
3. I dropped the iron and chipbreaker assembly into the plane and tried to set the iron to take a shaving. I couldn’t. The adjuster knob just stopped cold before the iron would emerge from the mouth.

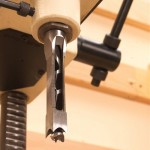
The pin here is too far up on its threaded rod. When you advance the iron, the pin jams against the larger threads before the iron emerges from the throat.
You should never force a Norris-style adjuster because there is always the possibility that you could strip the threads if the tool’s lever cap is tightened too much. So I disassembled the adjuster and found the problem.
When the plane was assembled at the factory, the pin that marries the adjuster to the chipbreaker was screwed too far onto its threaded rod. When you moved the adjuster, this pin quickly ran out of threaded rod to move on and jammed.
The solution is super-simple. Remove the adjuster from the plane (you’ll need to unscrew the brass knob below the plane’s bed to do this). Then hold the adjuster with one hand and turn the pin counterclockwise with the other hand to move the pin down the threaded rod.

Spin the pin counterclockwise to move it down the threaded rod.
Then reassemble the plane and try again.
This Stanley plane is definitely an improvement compared to the Bailey planes the company has been making recently. The iron holds a keen edge for a long time. I have some quibbles with the tool that I noted in the review (the handles are too big for my hands and the adjuster has more slop than I like). But overall, the tool is capable of all the finesse chores required of a smoothing plane without extensive tuning.
In the coming weeks I’ll be discussing some of the other Stanley tools in the line. These tools are available from woodworking retailers, including Woodcraft.
– Christopher Schwarz

Here’s the pin in working position. Much better.
Here are some supplies and tools we find essential in our everyday work around the shop. We may receive a commission from sales referred by our links; however, we have carefully selected these products for their usefulness and quality.


As it sits, the plane’s rear tote still looks like it was shaped by a hatchet. Long gone is the sinuous profile and comfy fit. Instead, we’re stuck with another tote with all the finesse of a 2×4 treated to a couple of passes with a roundover bit. Sheesh, and they call these puppies "premium" planes.
Call me skeptical.
I don’t understand the reason these planes are not advertised in STANLEY’S web page.