


We may receive a commission when you use our affiliate links. However, this does not impact our recommendations.
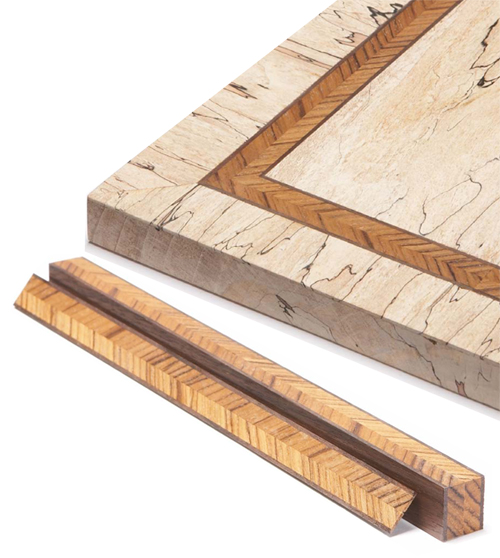
What is a herringbone inlay? An inlay is a thin piece of wood that’s sawn from a thicker blank. A herringbone blank has four parts: on the inside, two pieces whose grain patterns face in opposite, diagonal directions (the herringbone); on the outside, two thin pieces that form a border.
Q: I’d like to use my own wood to make herringbone inlay, but how do I go about it?
A: Making your own inlay isn’t tough—you just need a well-tuned tablesaw and a good combination or general-purpose blade. A herringbone inlay is one of the simplest inlay styles to make once you understand how it’s put together (see “What Is Herringbone Inlay?” below). It’s called herringbone, as you might guess, because the pattern looks like the bones of a fish.
Starting with the right material is important. Look for a board with pronounced, straight figure for the inner pieces and a board of contrasting color for the outer, border pieces. Mill both boards 3/4-in. thick.
Begin by cutting the board for the inner pieces into 1/4-in.-wide strips (Photo 1). Use a stop block to ensure that each piece is exactly the same width. It’s best to make a hinged stop block and flip it out of the way before you make the cut. This way, the strips will fall off the board after they’re cut. (They’d get trapped if the stop block isn’t hinged.) Add a hold-down and clamp the board to your miter gauge to make sure that the board doesn’t shift as you cut it.
Make the border pieces by sawing 1/16-in.-thick strips (Photo 2). Use a zero-clearance throat plate with a splitter to eliminate binding and burning. Guide the board with a large block. Add a tab to the end of the block to help push the board through the cut.
Glue the blanks (Photo 3). You can make them as long as you want by butting pieces end-to-end. Clamp the blanks between 2 to 3-in.-wide boards (Photo 4). Once the glue is dry, plane or sand the top of each blank so it has a level surface, then glue each blank to the edge of a wider, sacrificial board that’s exactly the same length as the blank. Rip the blanks into 1/16-in. thick strips, using the same setup you used for the border pieces.

Photo 1: To make the herringbone blank, crosscut a board into 1/4-in.-wide strips. Cut the strips at 45 degrees to create a diagonal grain pattern.
Photo 2: Make the border pieces by ripping a board into 1/16-in.-thick strips.
Photo 3: Glue the blank together. Stand the inner pieces with their grain running in opposite directions to make the herringbone pattern.
Photo 4: Clamp the pieces between two wider boards, to even out the pressure. After the glue is dry, saw the blank into 1/16-in. thick pieces to make the inlay.
Here are some supplies and tools we find essential in our everyday work around the shop. We may receive a commission from sales referred by our links; however, we have carefully selected these products for their usefulness and quality.


