


We may receive a commission when you use our affiliate links. However, this does not impact our recommendations.
 I once worked with a guy who maintained that white oak wasn’t suited for furniture and that whiskey barrels are a far better use for this wood. Looking at the pile of wood in the photo you might be inclined to agree with that, and there are days when I find myself leaning in that direction. I’m working on a project for an upcoming issue of Popular Woodworking Magazine, a reproduction of a piece originally made by The Craftsman Workshops in the early 1900s.
A lot of Arts & Crafts style furniture doesn’t need many wide pieces of material. For the Morris chair I built a few years ago, the arms were the only parts that were long and wide. This time around, the situation is decidedly different. I’m making a large cabinet with a single frame and panel door and the sides are also frames and panels. The stiles and rails are wide, but I still need to come up with three good size panels. The panels are split top and bottom, and I want the grain to match vertically from panel to panel. For the door I need a panel about 20 inches wide and 48 inches long. For the two side panels I need pieces about 10 inches wide and 60 inches long.
 Deciding which piece of wood goes where usually gets glossed over in a magazine article. The process is reduced to a couple of lines, but there is a lot more to it than that. It’s one of the most important parts of any project, in any wood. In this photo I’m in the midst of finding the door panel. I need three pieces to make the width. My rough lumber was about eight feet long, so I cut five pieces in half and headed to the jointer and planer. One piece had a knot in the middle of it and was put back on the pile. The three on the left have a similar appearance, but boring figure. The three piled up on the right are ugly and destined for hidden parts of the case. The three in the middle just might work.
 The first thing to do when trying to match quartersawn white oak is lower your expectations. Original pieces are a good guide; the nature of the wood means you can only get so close. These three pieces have similar figure and color, the trick is how to arrange them for the best appearance. A perfect match isn’t possible with the material at hand, but I can get close, at least as close as an original piece would be. I left these about 1/16″ thicker than the finished panel so that after gluing I can take one more pass on each side through our planer, and I haven’t jointed the edges or ripped the pieces to width. If I didn’t have access to a wide planer, I would take each piece down to finished thickness before gluing them together.
 This arrangement looked better to me, and I’ve used a lumber crayon and drawn two legs of a triangle across the assembly to keep track of the orientation. Now it’s off to the jointer and the table saw. When I make the final passes on the the edges at the jointer I run one edge with the marks in to the fence and the matching edge with the marks away from the fence. That will compensate for any deviation from square in the fence setting. You often read about arranging boards so that they will be easy to plane, but twenty years from now I want to look at that panel and say “that looks good”, not “that sure is ugly but it was easy to plane.” Making nice furniture is supposed to be a challenge.

click on the image for a larger version
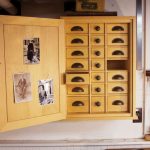
The final arrangement is still a compromise, but I think it’s acceptable. My plan is to color the finished piece with aniline dye coated with amber shellac. The similarities in the the pattern of the rays and even coloring ought to make up for the less than perfect match. Quartersawn white oak is a unique wood. It doesn’t look like other woods and the process of milling it is different as well. Maybe that’s why I like it, the rules are different.
The finished panel will eventually show up in a future issue of Popular Woodworking Magazine and if you’re not a subscriber, you can correct that condition at this link. If you’d like to see previous projects I’ve made, check out “Classic Arts & Crafts Furniture” in our store.
Here are some supplies and tools we find essential in our everyday work around the shop. We may receive a commission from sales referred by our links; however, we have carefully selected these products for their usefulness and quality.


Cutting the boards in half first can actually make this more difficult. I’ve had better luck grain matching white oak by starting out with long boards. Face joint them on both sides to see what the grain looks like and then flip them face to face, edge to edge, end to end, and slide them up and down along their length until you find the right combination. Sometimes taking one board and cutting it in half (or somewhere else on it’s length) so that the right or left edge can be folded back along itself gives the best results. Then mark out the panels and cut them to rough length. Then thickness them making sure you keep your “show face” untouched by the thickness planner. Sure you may end up with odd length cut offs, but as Robert Lang mentioned, some pieces are too plain or ugly to use anyway except in secondary rolls. My expectations for usable yield of visible wood from white oak is maybe 50%… if I’m lucky!
Thanks for sharing. I personally like quarter cut white oak, regardless of grain matching. I take the time to match red oak. But not white. That’s part of the appeal to me. I do prefer the finish to be natural. It is also well suited for smaller projects that need a busier grain to show. Arts and crafts jewelry and spice boxes, for example. Thanks again and best wishes. Ron
Robert, I certainly have struggled with this too, but I love the look of quartersawn oak. So it is worth it. I do appreciate you talking on the subject as I seldom see much guidance. You are the master. Thanks for sharing.
Quartered oak, be it red or white, presents the same grain-matching challenge. Consecutive boards sawn from the same log give you a reasonable chance of success, but as you have discovered, the loss of material from the saw-kerf and subsequent jointing and planing can cause dramatic pattern shift. While riven green stock might theoretically reduce this, by the time the wood is dry and planed flat you are likely to have the same result. The answer lies in veneering. Veneer of the same species, same grain orientation, and acclimated in the shop can be successfully laid over solid wood, and the resulting panel then raised or fielded as you would with a solid panel. Warping can be eliminated by veneering both faces of the panel. Think of it as a really thin lamination. Using Unibond instead of a water-based glue further reduces the likelihood of warpage.