We may receive a commission when you use our affiliate links. However, this does not impact our recommendations.

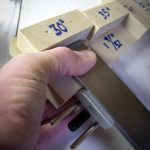
The two boards for the table top prior to glue-up and before sending them through the power planer.
My recent dining table project build allowed me the perfect opportunity to dig into my stash of exceptionally wide – and wonderful – air-dried black walnut lumber. In that pile are boards up to 26″ wide. In the past I’ve dealt with some stock that’s wider than any planer I have access to by knocking down high spots on one side with a handplane, then running in through a C-arm drum sander. The sander can handle 18″ at a time, and the open end of the “C” allows the wider board to pass through. For each pass, the board has to be turned so the part that didn’t pass under the sander would get its pass. It’s a somewhat tedious process, needless to say.
For my table project, I selected two boards that I could bookmatch because they were sequentially slabbed off the log. Each board was just shy of 20″ wide. One remarkable thing about much of my air-dried walnut is how nearly flat it is. The boards for the table project only required a bit of dressing on one side, which I did by hand using a jointer plane. But rather than send them through the drum sander some 20 or more times I decided to try running them through the 20″ capacity power planer we have in the Popular Woodworking Magazine shop.

An extra guide to help keep the board running straight through the planer.
Thing is, in all my nearly 30 years of woodworking, I’d never actually fully tested the claimed capacity of a power planer. Could the machine actually handle 19-3/4″ wide stock? Would the motor bog down, even with light passes? How do you control the board so it runs straight under the cutterhead? You know how some boards tend to move at an angle when planing. Our planer was made by Yorkcraft, which was part of Wilke Machinery, better known for its Bridgewood brand. I’m sure most of you know that planers have a raised lip at the edges of feed tables below the cutterhead. On some planers this lip is tall enough to guide a board so it doesn’t stray from passing under the planer knives. On our Yorkcraft this raised edge was nominal, 1/8″ at best. So rather than relying on this lip I fashioned some crude guides that I clamped on the infeed side of the table. While I didn’t have much table to work with for clamping, I did manage get these guides secured.

Guides in place on each side of the infeed table.
Now I was ready to see just how well this planer could handle “THE BIG GULP.” With the side I flattened by hand down on the planer table, I snuck up on setting the cutterhead height so as not to overtax the machine. While doing this my boards were passing through the machine just as I wanted. On the third pass I was removing material and after two passes of about 1/32″ the side was cleaned up. On each pass there was a tiny edge that was not being machined. It was at most 1/8″ wide. After each pass I used a hand plane to remove it so as not to cause any unexpected problems. With one side surfaced I turned the board and sent the other side through and it was nice and smooth. During the planing the machine didn’t bog down, and thankfully, our Onieda dust collector managed to suck up all the chips flying off these 20″ board.
Want to learn more about preparing stock for your next woodworking project? For $1.99 you can download an article from Popular Woodworking Magazine by Glen Huey called “The Right Way to Prepare Lumber.”
We also offer in our online store a full length DVD on using handplanes called “Handplane Basics- A Better Way to Use Bench Planes.”
Here are some supplies and tools we find essential in our everyday work around the shop. We may receive a commission from sales referred by our links; however, we have carefully selected these products for their usefulness and quality.