


We may receive a commission when you use our affiliate links. However, this does not impact our recommendations.
 I’ve looked at, photographed and cut many dovetails throughout my days as a woodworker, book author and magazine editor. I’ve written on this blog at least once in the past that the angle used for dovetail layout is in no way consistent in antique furniture construction – you can find almost any slope or angle if you take the time to examine a handful of pieces. So when I hear someone say that dovetails have to be laid out using a 1:6 ratio or a 1:8 ratio, the hair on the back of my neck stands up. And if that’s not enough, you hear others, myself included, talk about dovetails using the degree angle, such as 12 degrees. (I don’t, however, tell you that you have to use 12 degrees; that’s just what I use.)
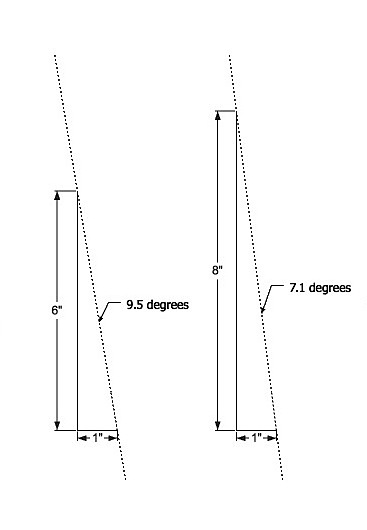
From where does all this jibber jabbin’ come? Why do some woodworkers talk ratio while others use degree-speak? Couldn’t we pick one method and use it? Here’s my take on this; no, it’s not fact based or found in a 100-year-old book. The left-hand photo shows the “ratio” method to layout the angle of your dovetails. (I used SketchUp to draw and show the angles.)
A 1:6 ratio – that’s one unit horizontal with six matching units drawn vertical – lays out as a 9.5 degree angle.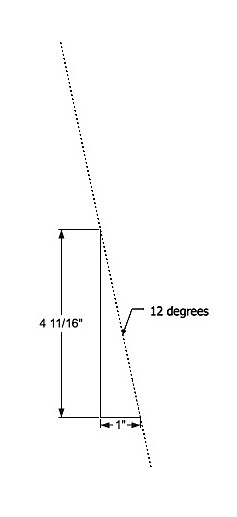 A 1:8 ratio – one unit horizontal with eight matching units drawn vertical – is an angle of 7.1 degrees. I doubt woodworkers in the last century had as strong a passion for being precise as woodworkers today. In fact, my guess is that most 18th- and 19th-century woodworkers simply picked up a saw and went at it. Today there are those among us who would spend time to adjust a bevel gauge to get exactly the 9.5 or 7.1 degree setting.
Here’s the question: Before you read the degree angle of slope created with a 1:6 or 1:8 layout, did you know the exact angle? I bet not. It’s easier to remember the ratio than it is the degrees, so that’s what we do.
In my DVD “Building a Carolina Cellarette” I use a 12-degree angle (and I show you a router setup for dead-flat tail sockets on your pin board). Not because I want to buck the system, but because I like the look and I’m confident that my joinery will hold. I guess I could talk about the ratio, but I don’t think even I could remember the number given a long enough time between dovetailing sessions. Would a 1:4 11/16 ratio be easy to remember? How about 1:4.6875? 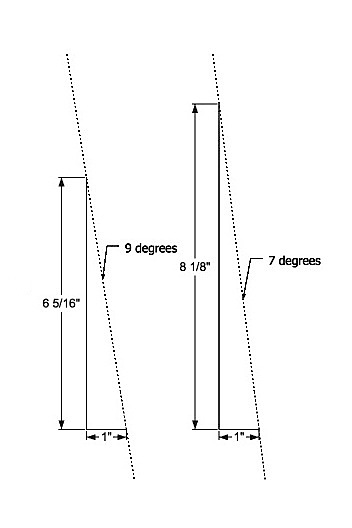 Don’t think so. What if I simply push the unit dimension to 1:5? What happens then? My degree angle slides from 12 degrees to 11.3 degrees. Would the earth fall off its axis? The answer is, of course, no!
What if we turn all the information into degree angles? You’re not going to remember 9.5 as easy as you might the 1:6 ratio, so let’s tweak that to a 9-degree angle. How would that change your layout? As you can see to the left, that moves the vertical leg from 6 to 6 5/16 units. (If we use inches as our measurement, this makes things a bit easier to grasp.)
If we then tweak 7.1 degrees to straight-up 7 degrees, that changes the vertical leg to 8 1/8 units (inches). Does that help? Probably not.
Does it matter? Probably not. What’s important is that you don’t get the slope so steep that your tails break off and your joint caves. Or that you don’t get the slope too straight that your tails slip from the pins, or that your joint has to rely only on glue for its strength. Between those two extremes anything goes. There are, as you may know, woodworkers out there who don’t take the time to do any layout work at all. With saw in hand, they simply cut dovetails.
So which is it. Do you fall into the ratio camp, or are you a woodworker that uses degrees? Or are you brash enough – some might say reckless enough – to pick up your saw and get busy?
Looking for more on dovetails? Chuck Bender DVD “Dovetailing Apprenticeship” is a great first step. And if you’re searching for couple of ways to get the work knocked out quicker, I highly recommend my DVD “Cheating at Hand-cut Dovetails.”
Here are some supplies and tools we find essential in our everyday work around the shop. We may receive a commission from sales referred by our links; however, we have carefully selected these products for their usefulness and quality.


In historic works do multiple pieces from a single woodworker use the same-ish angle? In other words did woodworkers tend to change their dovetails to match some element of the piece or did they just use the same angle all the time out of habit/having made a fixed gauge.
After having cut thousands of dovetails, I now just pick up my adjustable Shinwa bevel and eyeball a pleasing angle, suitable for the piece, mark the pins, and saw. The only decision I make is: do I want a thin and delicate look or fatter and sturdier look? That will vary, of course, depending on what I’m making.
This might be another topic for an interesting discussion, but I also don’t use plans. I get an idea and just start working – the plans evolve in my head as I go. Drawing plans would be a time-consuming waste of time for me, as I make changes to the design as I go. That’s probably a bit radical.
Thanks so much for answering my questions about all this.
Now on to the problem when people say hardwood but mean hard wood. Yellow pine is a hard wood but balsa is a hardwood. Maybe we should just say dense wood.
Like our host, Mr. Huey, I have looked at a lot of furniture and have come to the conclusion that there were no rules. There seem to be regional styles. The English love tiny pins. I have lots of pictures of pins that look to be thinner than any saw kerf I can make. And they are still in holding 200 years later. And the French and the Germans make these big clunky dovetails that also seem to last hundreds of years.
I recently took pictures of a chest on chest where the dovetails on the upper chest have microscopic pins and the lower chest has bold dovetails, 30° to 35°, maybe 40°. They only exception is a small drawer in the upper chest with a carved shell on the front, that had the bold dovetails of the lower chest. One shop, two craftsmen with different styles and all the drawers are still whole.
Similar variations on carcass dovetails. All over the place. Bold and tiny pins. And all the ones I see are still standing.
And if you are using walnut or oak drawer fronts with pine or poplar secondary woods, do you make 1:6 or 1:8 or 1:7 as a compromise.
I wonder if there was much thought that went into dovetails or they just made what they were taught. People banging out furniture without the luxury of contemplating what the “right” dovetail slope is. We believe there must be a reason when historically there might not be one. It’s just sawing wood.
Roy Underhill has a tool chest, 150 years old and made of white pine, that has dovetails with a 1: 2.5 angle. They look very exaggerated to the modern eye, but not one of the dovetails has a broken corner. Also, the tails are on the sides of the chest, rather than the front and back. The chest is completely intact. So all of the “rules” are violated (soft wood, steep angle, placement of tails, etc). A good approach is to lay out a tail, stand back, and decide if you like the appearance. Also, if the pin slots match your available chisel width. With those two in hand, you are good to go.
When asked what angle or degree are my dovetails I answer, “I have no idea!”. I layout the dovetail to please my eye with a bevel and mark them. I am more concerned if they are the same and if the tails fit the pins. I would guess thay are somewhere around 1:8 or 10 degrees or whatever.
This sounds like an craftsman’s approach versus an engineer’s approach. A pre-industrial craftsman would eyeball it via the ratio. An industrial engineer would use a degree in the plans to hand to a worker.
A quick check of a router bit manufacturer’s site shows 8,10, and 14 degree bits. 14 appears to be the most common for router dovetail jigs.
I use a 1:6 guide. It’s easy and consistent, and I like the way it looks.
I use the Veritas saddle square for layout (1:8). Doesn’t matter. When I’m done sawing, the angles are quite random.
This is one of the problems with learning via reading vs. learning at the elbow of an experienced worker. The angle is a judgment call, and an old hand teaching an apprentice can say “somewhere between here and here” or “a bit steeper with this wood, a bit shallower with this”.
But when we start writing these things down, we want a more precise definition and turn to numbers of some sort. General guidelines become rules, and we lose sight of what is really important when we insist on following rules. Especially if we don’t know the experience, training or prejudices of the guy who wrote it down in the first place.
It doesn’t take much research in looking at old pieces to see that today’s “rules” were rarely followed, or much experimentation in the shop to see that the exact angle doesn’t much matter.
I was taught to use 1:7 ratio and found that to be the most pleasing to my eye. For my own pieces I generally use saddle squares (store made or shop made). Only in softer soft woods do I generally go to 1:6.
It does matter!. My guess is that skilled cabinet makers “read” the wood, probably without even thinking about it, and cut the tails to suit the strength of the material. Though historic examples show variations they are usualy pretty consistent in each piece of furniture.
They had no protractors so set their sliding bevels using a layout square what is now often called a roofing square 1″ along one axis and 7″ along the other gives us a 1 in 7 slope or grade. Hence use of degrees is not consistent with our history and has come in to use because many machines have angles in degrees marked on them. As an (almost) exclusive hand tool user I find the use of degrees a royal pain in the bum.
Hayward, about 1950, tells us that some measured but some cut by eye.His simple wooden templet would have been knocked up in a minute to suit the job he had in hand so I doubt if many survived.
I was taught that 1:6 is for soft wood, and 1:8 for hard wood. And for me it wasn’t really much dithering about with degrees and bevel gauges… I made two blocks of wood, one with 1:6 sides and one with 1:8, both with a rabbet so i can put it against my workpiece comfortably, marked the lines with pencil, cut the tails first, used that to mark the pins… I guess you could use other ratios for design reasons, but in this instance I never really saw the use in questioning what I was taught…
That is definitely the problem I ran into when I first started woodworking. I read what I could on dovetails from many sources and it is mind boggling. I got more confused and almost gave up trying to even think about doing dovetails. I had to step back and figure out the ratio/degree jargon. I finally just said pick any one and go with it. I chose the ratio method due to its simplicity and the fact that my geometry was awfully lousy. My dad told me that my grandfather just marked the depth and just cut away and scribed the pins from the tails that he cut. Simple and effective. Not mathematically precise, but your eyes can get a close balance to get the job done.