We may receive a commission when you use our affiliate links. However, this does not impact our recommendations.
We’ve all been there: You reach for your saw in the middle of a project, and before you start the cut, you drag your finger along the teeth and say to yourself, “Meh…they’re sharp enough.” But you soon find out they are anything but.
Wouldn’t it be nice if you could sharpen your own saws and never have to settle for the misery of a dull saw again? With a small investment of time and money, you can.
So let’s jump right into the four critical steps to sharpening any handsaw: setting, jointing, filing and stoning.
Setting
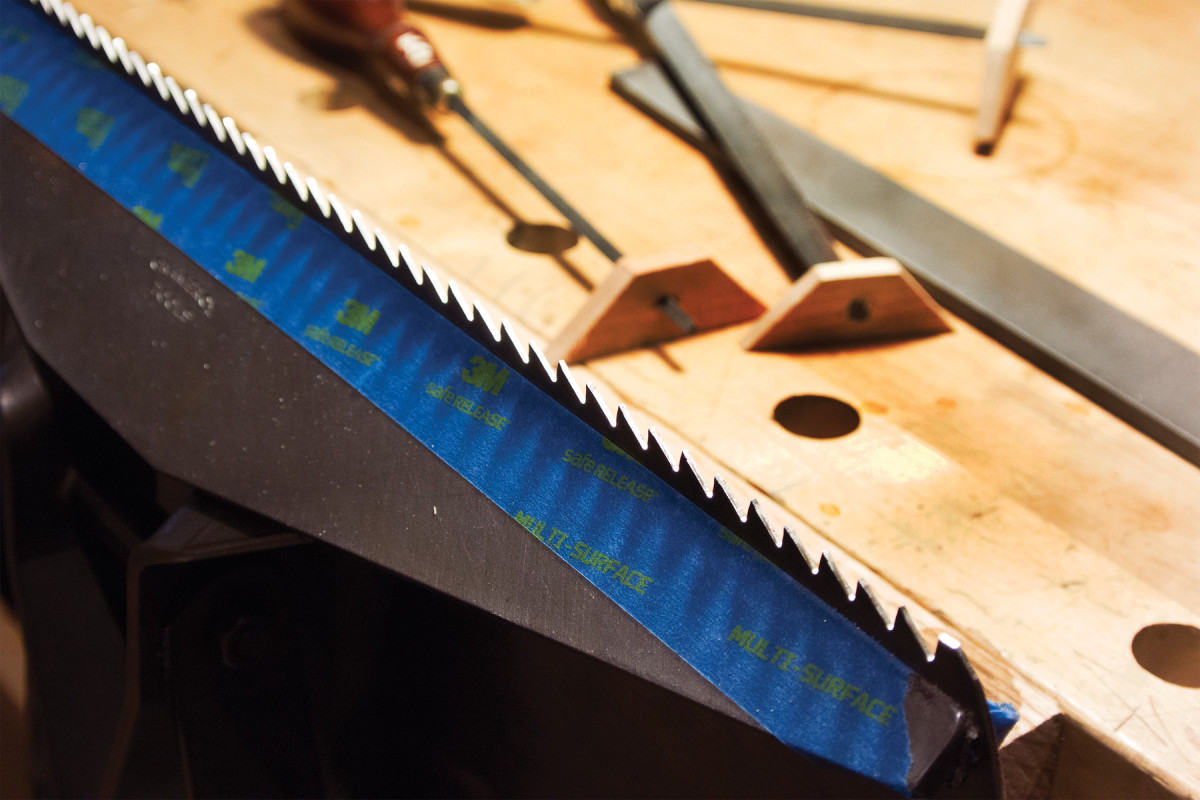
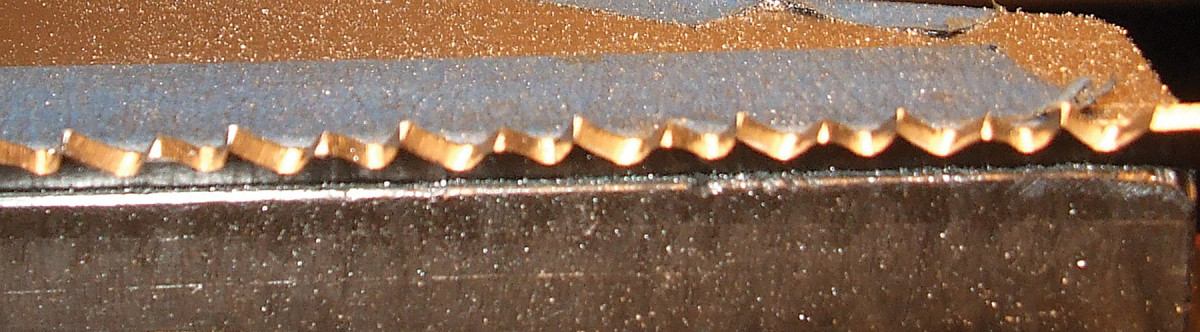
Rip teeth vs. crosscut teeth. Rip teeth (left) are shaped like tiny chisels and are shaped and sharpened by filing square across the blade. Crosscut teeth are shaped more like knives and are formed by filing at an angle to the blade.
A saw’s set – the right and left projection of the teeth from the saw plate – determines the width of the kerf and prevents the saw from binding in the cut.
Setting the teeth might not always be needed, so the first step is to evaluate.
To test your saw’s set, make a cut in a piece of wood whose species, thickness and moisture content is typical of your work. If the saw binds (gets stuck in the cut), it requires setting. If the blade is loose in the kerf, however, then it may be over-set, which can be corrected in the final step of stoning.
Most saw set tools adjust to allow setting different sizes of teeth and types of work. I recommend adjusting your tool to create the slightest amount of set for a backsaw, and only a touch more for a handsaw. Ignore the numbers on the tool; they are there only to confuse you.
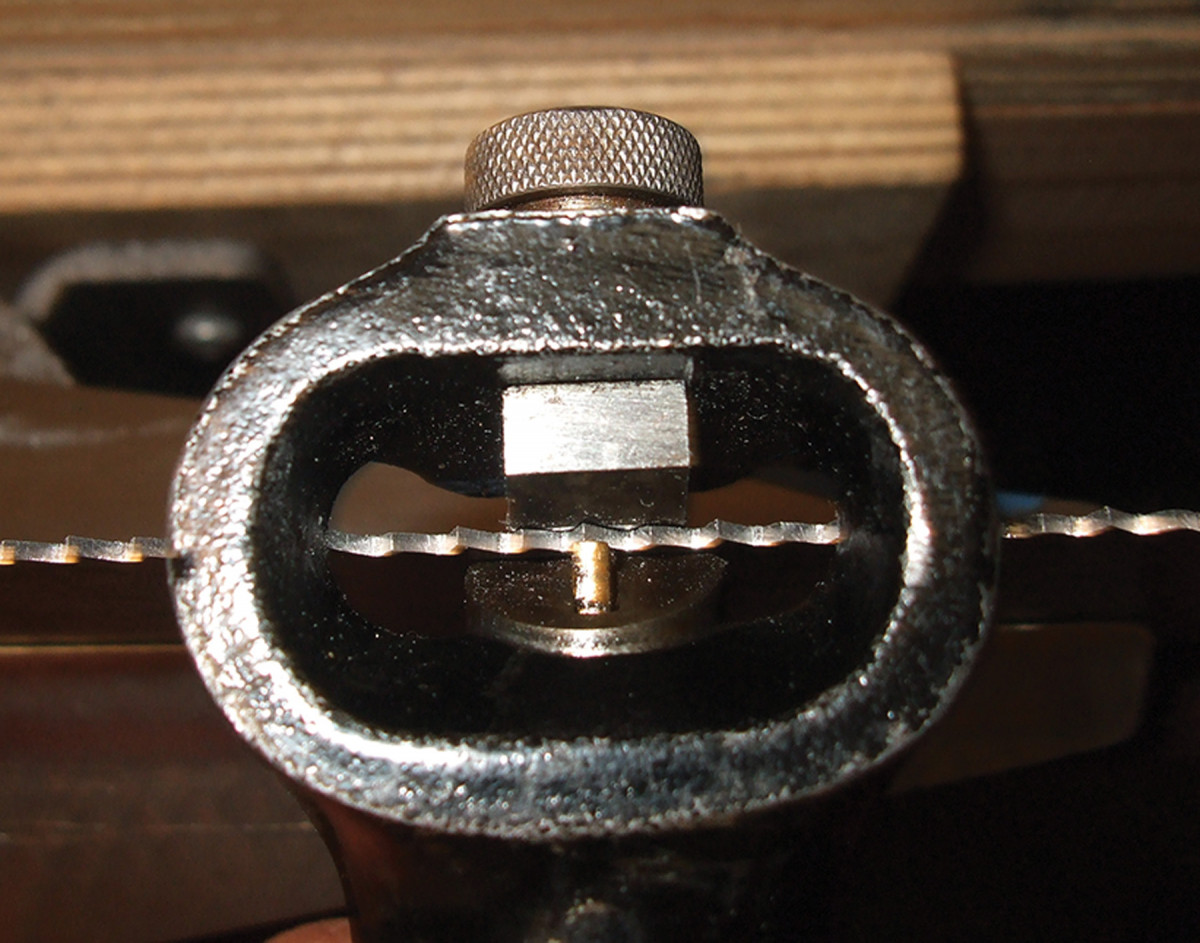
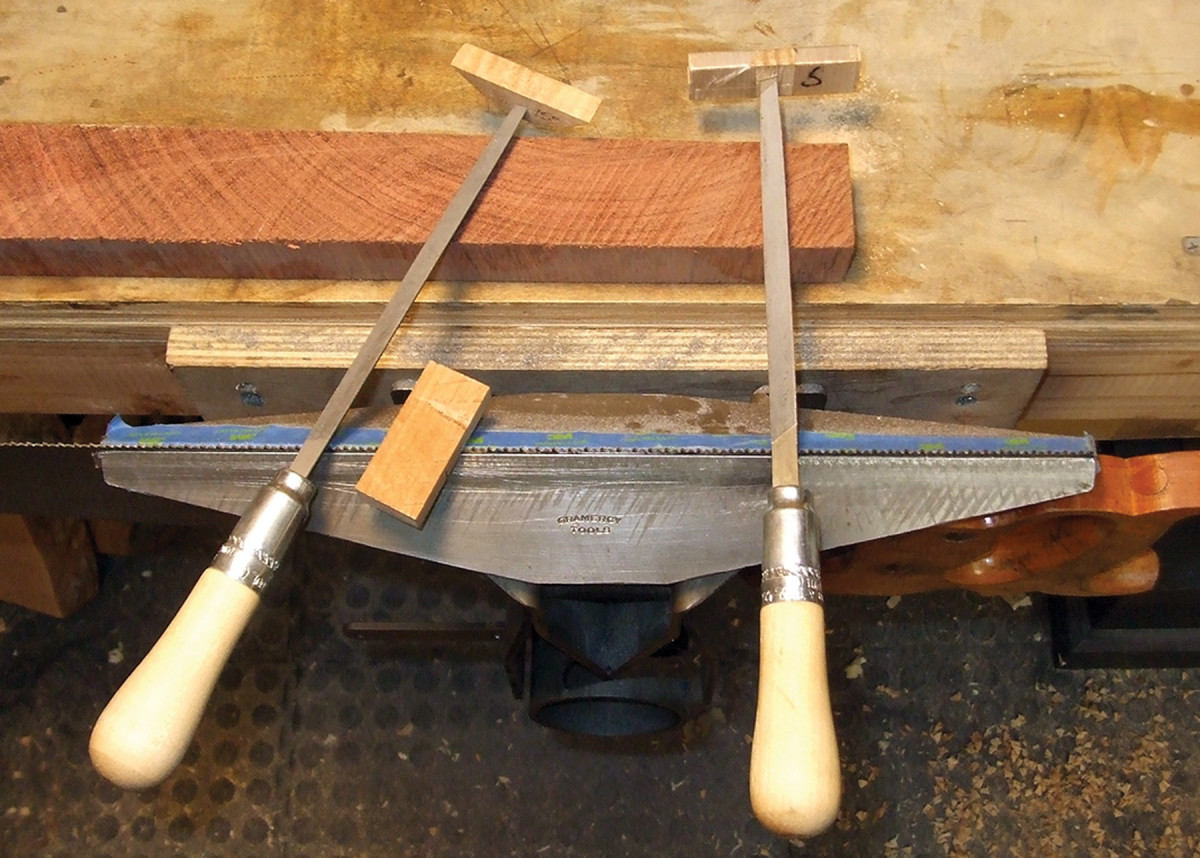
Set. Slip the saw set over the saw blade, rest it firmly on the toothline, align the hammer with a sawtooth, then squeeze.
If your saw requires setting, begin by clamping the saw in a vise with the toothline about 2″ above the jaws. Starting at the heel of the saw, identify the first tooth set away from you. Place the saw set so the center of the hammer (the steel mechanism that bends the tooth over the anvil) aligns with the point of the tooth. Make sure the casting rests solidly on the toothline and squeeze the tool firmly. You will see the tooth bend ever so slightly away from you. Skip the next tooth and move on to the next tooth set away from you. Set it as you did before, and repeat down the entire length of the saw. Now flip the saw around in the vise and set the teeth you skipped on the first pass.
Jointing
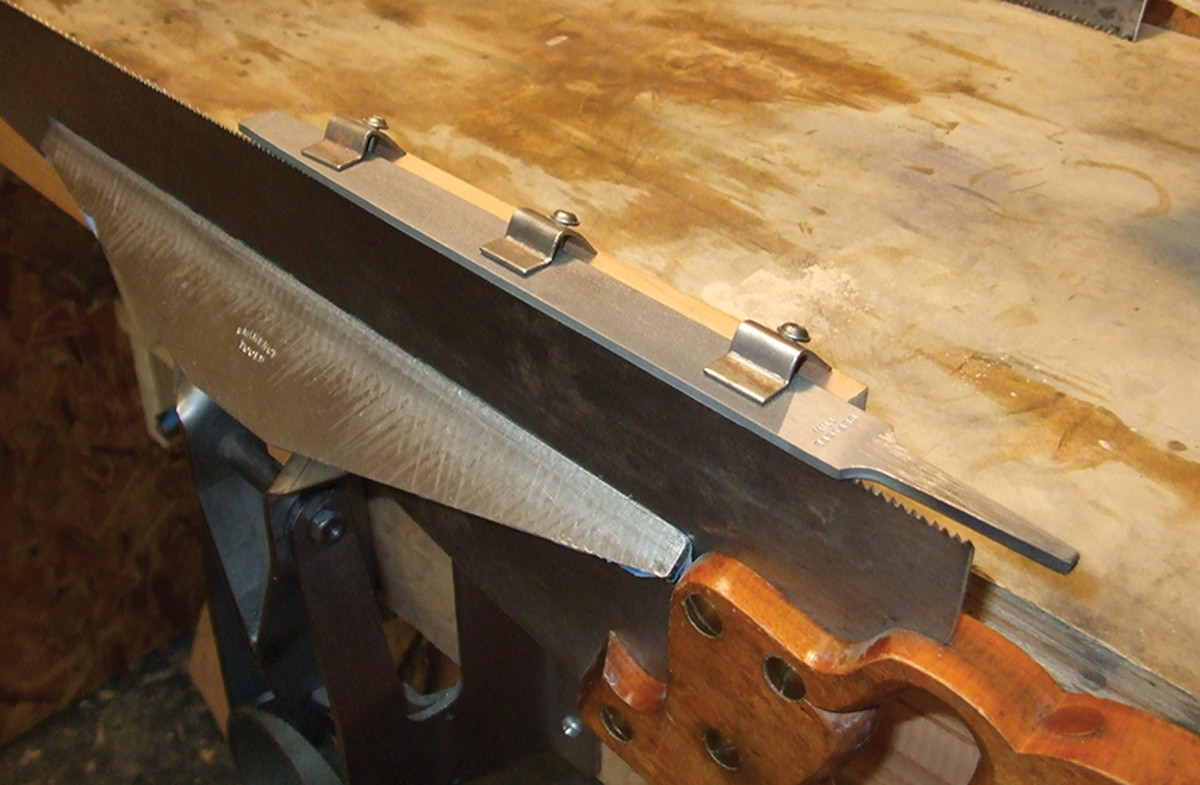
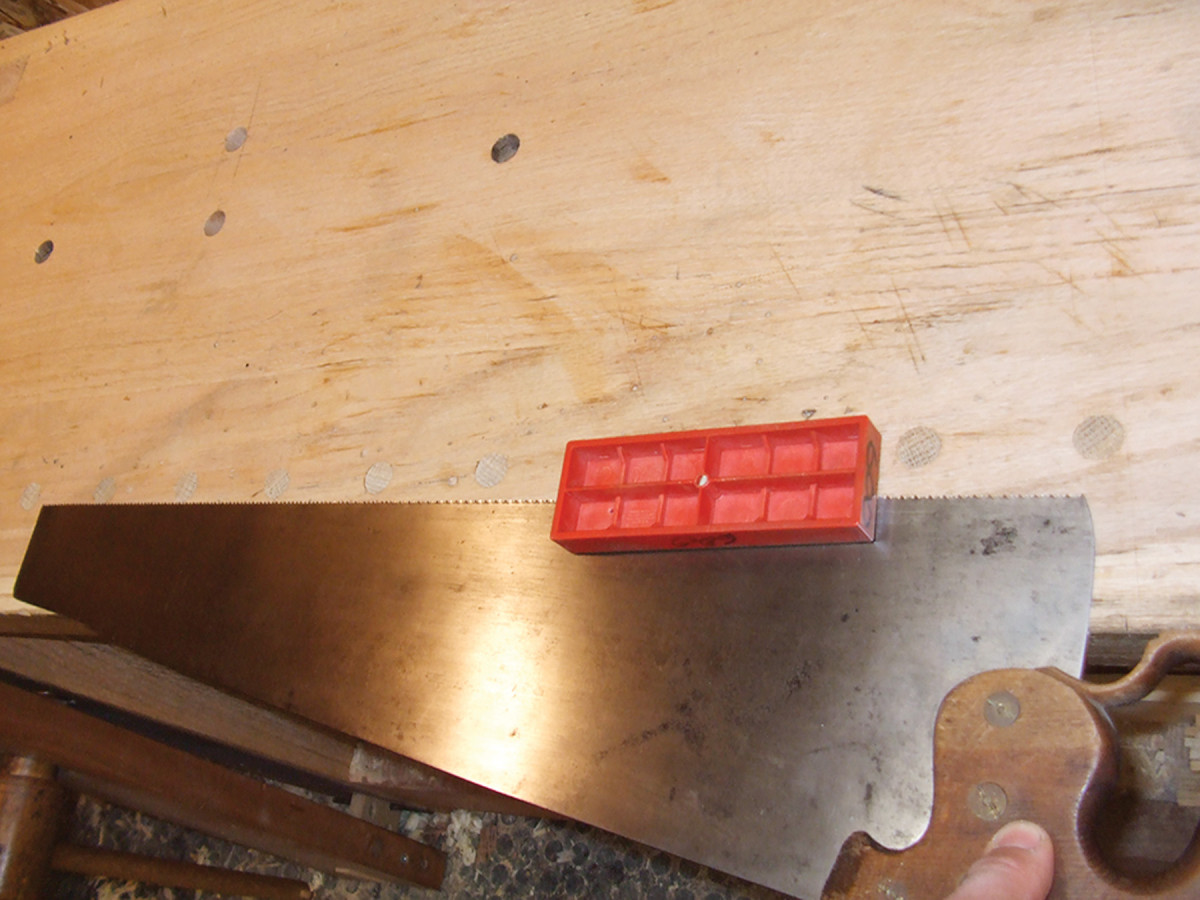
Joint. A file (held here in a shop-made saw jointing guide) levels the teeth to one another and creates a flat top on each. (You can purchase a similar jointing guide; search for “card scraper jointing guide” online.)
Jointing a saw every time you sharpen it ensures that the teeth are all the same height. It also creates a flat facet at the very point of each tooth that will guide your work in the filing step.
To begin jointing, keep the saw firmly in the vise with about 2″ of the blade above the jaws. Grasp the mill file with both hands and rest it on the toothline at the heel. Run the file down the toothline toward the toe of the saw, using moderate pressure, until you see a flat facet on the point of each tooth. Two to four passes of the file should be sufficient for most saws.
It is critical that you keep the file perpendicular to the side of the saw blade as you joint the teeth. You can use a card scraper jointing guide or a block of wood to aid in this process.
Before you move on to filing the teeth, attach a rake-angle guide to the tip of the file to create consistent geometry on the cutting face of each tooth. Most rip-filed saws have a tooth rake of 5° to 10°, and most crosscuts have 15°.
A rake guide is a small block of wood, or a commercially made affair with moving parts, knurling and scales galore, that slips over the tip of the file to create a visual reference for the rake angle as you file. If you make your own, you’ll need several for each size of file and rake angle you typically use.
Saw Filing Tools
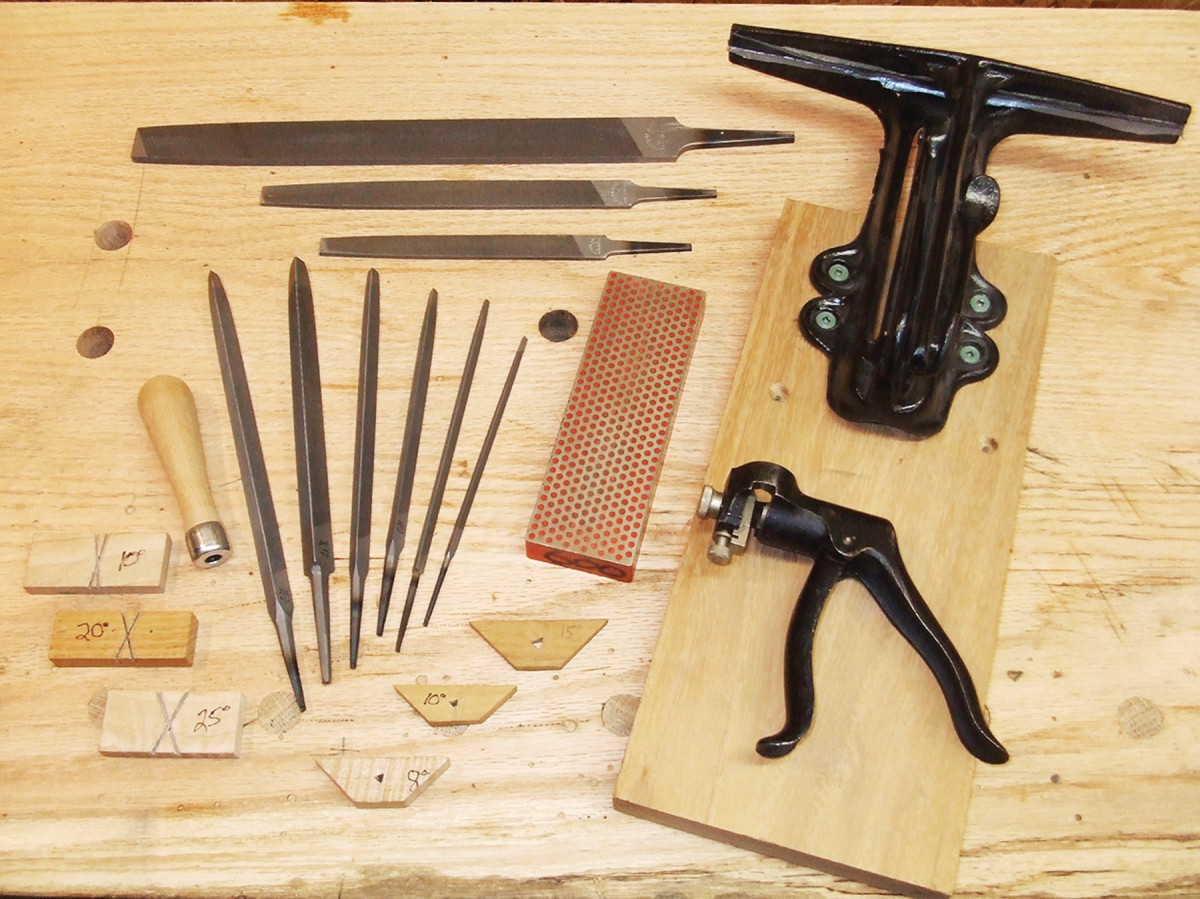 Taper saw files (with handle): Match the tooth spacing of your saw to the proper-size file. Always use the properly sized handle.
■ 12-15 ppi: 4″ or 5″ double extra slim taper (xx-slim)
■ 10-11 ppi: 6″ double extra slim taper (xx-slim)
■ 9 ppi: 6″ extra slim taper (x-slim)
■ 8 ppi: 6″ slim taper
■ 5-7 ppi: 7″ slim taper
■ 3.5-4.5 ppi: 7″ regular taper
Mill file: bastard cut, 6″ to 8″ for backsaws, 10″ to 12″ for handsaws.
Saw set: any brand or style, though there are no quality new saw sets made today.
Saw vise: Shop-made of wood for the thrifty, Gramercy Saw Vise for the demanding, or vintage cast iron for the nostalgic. I file for two to four hours every day and there is no equal to my Gramercy.
Sharpening stone: 6″ x 2″ #600-grit diamond stone or fine India stone for handsaws, 1″ x 4″ stone for backsaws.
Saw filing guide: I prefer shop-made wooden guides for rake and bevel angles because they are free when made from scraps, light and endlessly customizable. That said, the new guides available from Blackburn Tools or Veritas are very helpful to students.
— MC
Rip Saw Filing
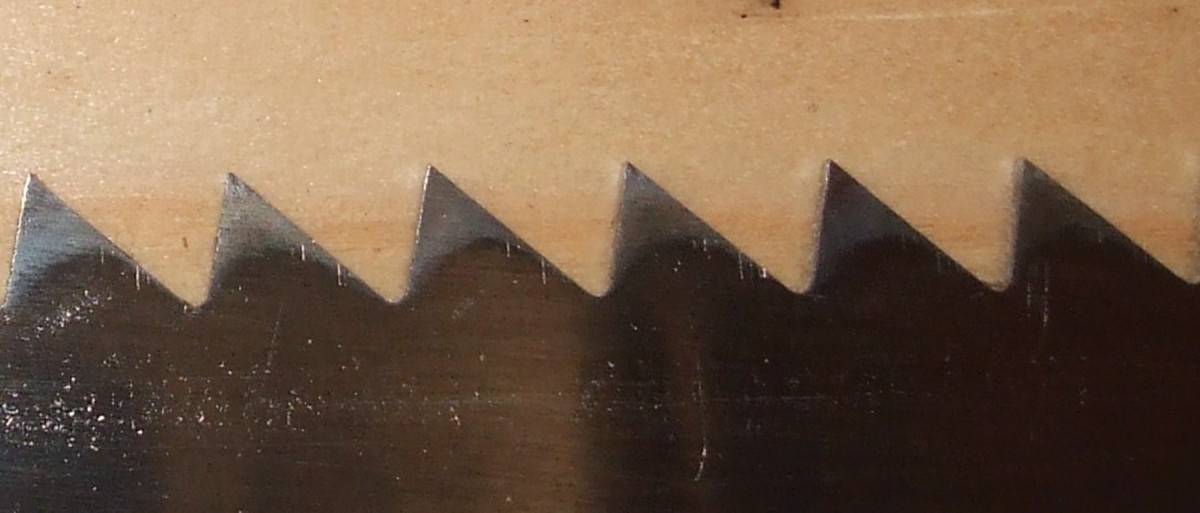
Rip-tooth geometry. A ripsaw is filed to form a row of tiny scrapers. The moment the flat formed by jointing is filed away, the saw is sharp.
The goal in this step is to file each tooth until the flat created by jointing disappears – and not a stroke more. The moment the flat disappears is the moment that the tooth is sharp and remains exactly the same height as the rest of the teeth. (Were you to continue filing, the tooth would stay sharp, but get shorter than the others, rendering it useless.)
Clamp the saw in the vise with the heel on your right and the bottom of the gullets 1⁄16” above the jaws. Place the saw file in the first gullet. Ensure the file is seated fully in the bottom of the gullet. Hold the file perpendicular to the side of the saw blade (level with the floor) and to the toothline as viewed from above. Use the full length of the file and push it across the saw with gentle pressure.
Beginning filers have a tendency to use short, heavy, chattering strokes. Light, full, even strokes are the mark of an accomplished and precise saw filer. When you push the file across the saw you should see bright, fresh steel exposed on three surfaces: the cutting face of the tooth to the right of the file, the gullet and the back face of the tooth on the left of the file.
Continue filing across the tooth while watching the flat on the right of the file. Stop filing the precise moment that the flat on the right of the file disappears. Move to the next gullet and continue the same process down the entire length of the saw on every tooth.
Terminology
 There is much confusion around terms associated with saw filing. It is important to use standardized and accurate language when teaching or learning a new skill, especially one as ancient as saw filing. These are the historically accurate and best terms to use.
Spacing: The American standard measure of tooth points per inch (ppi) on any saw that determines its coarseness or fineness. (The English standard uses teeth per inch (tpi), which is equal to points per inch minus one. So 6 ppi equals 5 tpi.) Tooth spacing is often incorrectly referred to as “pitch” by modern saw manufacturers.
Rake: The amount that the front cutting face of a saw tooth leans back from perpendicular relative to the toothline. Measured in degrees from the perpendicular. Also traditionally referred to as “pitch.”
Bevel: The interior acute angle on the face and point of a saw tooth that creates a cutting edge for cross-grain cuts. Also commonly referred to as “fleam.”
Gullet: The V-shaped space between two neighboring saw teeth where the sawdust collects in use.
— MC
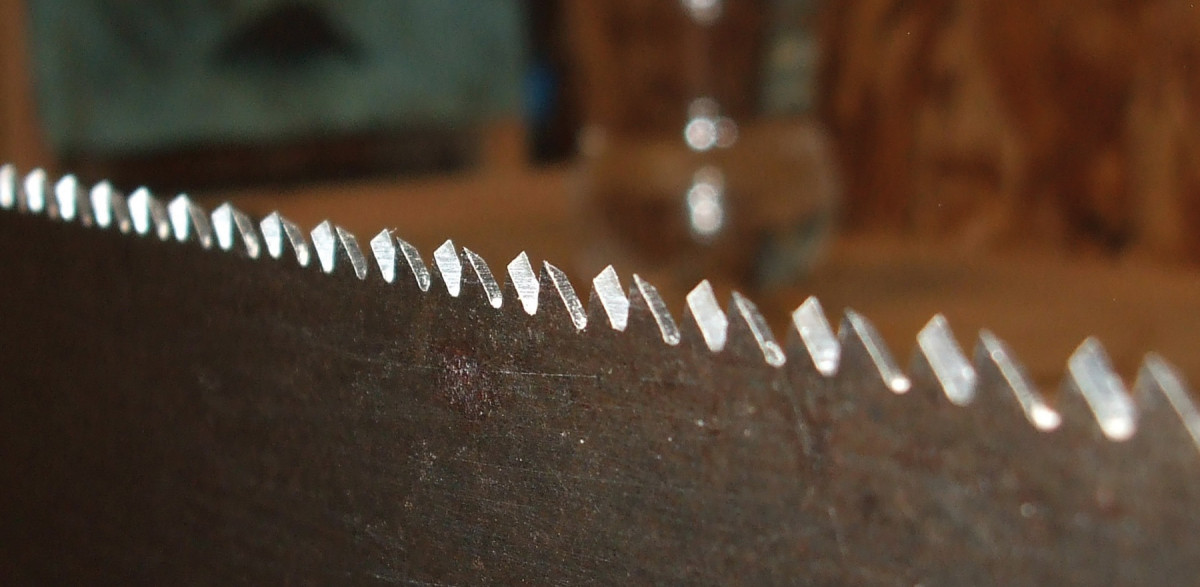
Crosscut Saw Filing
Watch the angle. The angle at which you push the file across the teeth affects the saw’s cutting geometry.
After jointing the saw, reclamp it, again with the bottom of the gullets about 1⁄16” above the vise jaws, and place the saw file in between the first pair of teeth at the heel, with a tooth set toward you on the right of the file and a tooth set away from you to the left. This may be either the first or second gullet on the toothline.
With the file resting in the gullet and using your index finger on the file where it rests on the saw, press the file firmly down into the gullet. The file should rotate away from a perpendicular line from the saw as viewed from above, usually 15° to 25° for most crosscut saws. This is the bevel angle of the teeth. Filing at this angle creates the knife edge that allows the saw teeth to cut across the grain of wood fibers.
Take your first stroke with the file fully seated in gullet while carefully maintaining the bevel angle, and watch the flat on both teeth to the right and the left of the file. The goal is to file until you have simultaneously reduced the width of the flat on both teeth by half.
Crosscut tooth geometry. Jointing crosscut saw teeth creates triangular flats at the point of each tooth. These reflect light and help guide the sharpening process.
Skip the next gullet and move to the following gullet with a tooth set toward you on the right of the file. Now repeat the process of filing while maintaining the bevel angle and watching both teeth on either side of the file. Reduce the flats on both teeth by half and stop. Skip the next gullet and repeat as you make your way down the saw.
As you progress, notice the pattern of every pair of teeth filed in one direction with every other gullet not yet filed.
Once you have filed each pair of teeth in one direction down the length of the saw, return to the heel.
Now you’ll remove the flats left from the previous step to bring all the teeth to a sharp edge. Place the file in the first gullet at the heel you skipped earlier. The tooth set away from you should be on the left of the file and the tooth set toward you should be on the right.
As before, press the file down into the gullet and notice how the file’s angle rotates to away from perpendicular – but in the opposite direction as before. This angle should be the same relative angle from perpendicular as before, (15°-25°). This final angle filed into each tooth will create the second and complementary interior bevel and complete the crosscut geometry.
As before, while maintaining a consistent bevel angle, push the file through the gullet and watch both flats on either side of the file. Keep the file seated in the gullet and ensure that you are removing metal from the face of each tooth in addition to the gullet. Ideally, you want each flat to disappear at the same moment. This ensures that each tooth is sharp and of equal height.
Continue to the next unfiled gullet and repeat filing each pair of teeth until you complete the saw.
On Doing It ‘Wrong’
There are warnings in classic saw filing texts about sharpening entirely from one side. While I am usually deferent to wisdom of the past, I deviate from it here. Why? I honestly don’t recall; it’s simply the way I learned to file a saw. Many others today also file all from one side. You should be aware of this debate if you plan on sharpening your own saws. Here are the major objections:
1) Filing from one side of the saw dulls the file faster because you have to file into the teeth leaning toward you, which causes more wear on the file teeth.
The gullet edge of the file is what wears out first and destroys a file. I find the extra wear to the face edges rather irrelevant; they stay intact long after the file is useless, regardless of how you file teeth.
2) Filing from one side of a saw alone puts all of the filing burrs on the opposite side of the saw teeth and will cause the cut to steer to that side when the saw is used.
I have filed hundreds of saws. The only case in which I’ve found the above to be true is in dovetail saws and similar saws spaced 14 ppi or finer. The fine teeth can be affected by the burr, but an extra stoning pass or two on the burr side of the teeth is a simple remedy. On saws with teeth coarser than 14 ppi, I’ve found they are large enough to overcome any problems a burr might create.
3) You cannot create saw teeth with independently shaped back bevels (sloped gullets) by filing from one side of the saw.
I would say this is mostly true. But for 95 percent of woodworkers, I don’t think independent back bevels on the teeth make a difference. For most work, the benefit is negligible. Can you gain a small advantage in your work with independently shaped back bevels? Sure. But to me, it’s like the difference between a Corvette and a Ferrari.
So with all of these objections, you may be wondering why don’t I just flip the saw, file from either side and avoid the controversy? For that matter, why do some people cut the pins of their dovetails first? Or use sandpaper after smoothing with a handplane? Or do any of the seemingly strange things that any of us do a million times a day?
Like most things in life, I simply have no idea. But I do know my method works.
— MC
Stoning
Stoning. To remove burrs left by the filing, and to remove set, make no more than four passes down each side of the teeth with a fine India stone or #600-grit diamond stone.
The final step in sharpening a saw is to stone it. Place the tool flat on your bench with the handle overhanging the edge. With a fine India stone or #600-grit diamond stone, use light pressure as you run the stone along the teeth down the length of the saw to even the set and remove the burrs created by filing. Flip the saw over and repeat. One pass per side is sufficient. (If the saw was over-set to begin with, take more strokes as required.) No more than four strokes per side is recommended. (This step is also known as “side jointing.”)
You may find that in a test cut after sharpening a fine rip-filed saw (14 ppi and up), it steers to one side. This is a common result from a burr on the teeth left from filing only from one side. To remedy this, take an extra stoning pass on the side toward which the saw is steering. This will remove the burr and even the cut in the kerf.
Sure, like everything, saw filing takes a bit of practice to get good at it, but it doesn’t take too much time or effort to become at least competent. Take the time to learn how to sharpen your own saws, and you’ll be amazed at how much better they work – and how much time and money you’ll save over sending them out for sharpening.
Here are some supplies and tools we find essential in our everyday work around the shop. We may receive a commission from sales referred by our links; however, we have carefully selected these products for their usefulness and quality.