We may receive a commission when you use our affiliate links. However, this does not impact our recommendations.
Why Should Understand How Wood Fails
Tear-out is ugly, but how does it happen? Ground-breaking research that began in the 1950s by Norman C. Franz showed how wood fails when you cut it with hand tools or power tools. Using a movie camera and a milling machine, Franz made amazing photos that pointed out how certain cuts produce torn grain. Franz defined three types of cuts, and only one type causes tearing. As you study the drawings below, the most important thing to remember about tear-out relates to the line that the cutter is traveling on. If the wood fails above this line, no tear-out happens. If it fails below the line, you get tear-out.
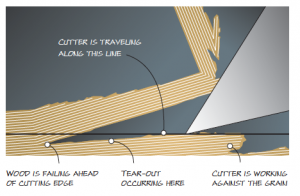 A “Type I” Cut Against the Grain = Tear-out
A “Type I” cut occurs when the wood fails ahead of the tool’s cutting edge. If the tool is cutting against the grain of the board, then the cut goes deeper than intended when the shaving is levered upwards by the tool. Because the failure occurs below the line the cutter is traveling on, you get tear-out.
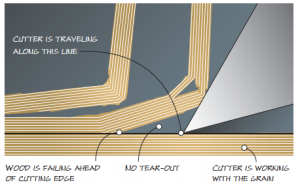 A “Type I” Cut With the Grain = No Tear-out
When you have a “Type I” cut and are working with the grain of the board, the wood is levered up ahead of the tool’s cutting edge, but no tear-out occurs because the wood fails above the line the cutter is traveling on.
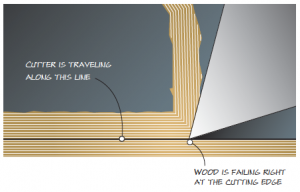 A “Type II” Cut = No Tear-out
When you have a “Type II” cut (either with the grain or against it) the wood fails right at the cutting edge. And No tear-out occurs. You can encourage a “Type II” cut in a plane by using a sharp tool, a high angle of attack or a tight mouth aperture.
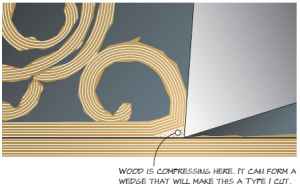 A “Type III” Cut Can Cause a “Type I” Cut
A “Type III” cut occurs when the wood fibers are compressed mightily at the cutting edge by a very high angle of attack. This compressed wood can become a problem. It can compress to the point where it becomes a wedge and levers up the wood fibers ahead of the cutting edge, causing torn grain.
Download the free PDF:
Guide_to_Tearout
– From Leonard Lee’s “The Complete Guide to Sharpening” and R. Bruce Hoadley’s “Understanding Wood”; Illustrations by Mary Jane Favorite
Here are some supplies and tools we find essential in our everyday work around the shop. We may receive a commission from sales referred by our links; however, we have carefully selected these products for their usefulness and quality.


It’s unfortunate that most of these pictures focus on increasing the angle at the point of the cut instead of using a double iron to mitigate tearout. It leads most beginners to thinking they need to go up the ladder with higher and higher angles at the point of cut to control tearout.
At some point, PWW needs to have a thorough examination of the bailey plane design (as well as that of older double iron woodies) and describe to amateurs how to use the plane properly. The reputation that it has as a cheap plane that is out of the water in figured and difficult woods is inaccurate, it can plane anything (even with its thin iron) that we’ll use in the US or europe, and leave a brighter surface than a high angle plane.
The kato and kawai study that came after this (and that had an industry focus on creating a machine that would use a double iron) is an improvement on what’s written above.
This is great information for handplane users. For a little more depth look here. http://newbritainboy.wordpress.com/
Thanks for the Handy Guides AND the PDF format option for saving and printing. Great reference material. Thank you-Steve