We may receive a commission when you use our affiliate links. However, this does not impact our recommendations.
In my furniture repair shop, I repair a lot of chairs. I’ve seen many DIY mistakes over the years that didn’t need to happen. Repairing a chair with loose joints is a relatively easy project to tackle with a bit of knowledge. I’m sharing my top 5 chair repair mistakes to avoid, so you can learn how to repair the chairs in your home.
Eventually, every chair becomes loose over time from the weight of people sitting on them and the shifting their weight around. It’s not difficult to fix if you do it right the first time. I’ve seen DIY repairs that were so poorly done that the chair was damaged beyond repair. This list and video will give you the knowledge and confidence to repair your chairs the right way.
1) Adding Screws or Nails to Chairs
It might seem logical that adding a screw or nail will hold the loose parts of a chair together. This is a big mistake. Why? When the chair is used, the parts move slightly and when there’s resistance between the metal and the wood, the metal damages the wood. Over time, this wears down the parts and makes the next repair more difficult. Pulling out a finishing nail in a piece of furniture is impossible without doing damage to it.
Glue is the right tool for the job if it is used properly. You’ll learn more about that below.
2) Not Taking the Chair Joints Apart

Can you just squeeze some glue on part of the joint and push it back together? No, it won’t hold. I’ve seen many attempts at this and it just doesn’t work. The joints in the chair need to be taken apart for several reasons:
- The old glue needs to be cleaned off, as typical woodworking glue (PVA) will only stick to bare wood. If there’s old glue on the joint, the new glue won’t hold.
- Adding glue to a small portion of the joint that may be exposed isn’t enough gluing surface to secure the joint.
- If the joint has been rubbing, there’s likely dust inside, which will inhibit the glue from sticking.
3) Not Applying Glue Properly
 A little dab won’t do it. Glue needs to be applied to the sides of the mortice (the hole) and the sides of the tenon (the part that goes into the hole). Don’t apply glue to the bottom of the mortice or the end of the tenon as these parts don’t touch. Applying glue on every part of the mating surfaces ensures there’s enough glue to bond properly. This is how to maximize the holding power of the joint.
I suggest using the back of an artist brush to roll the glue inside the mortice. This ensures you get good glue coverage on the side walls of the joint. I use the brush end for the tenons. Don’t be tempted to use your fingers to spread the glue, as the oils on your skin can compromise the strength of the glue.
4) Using Polyurethane Glue for Chair Repairs
It’s important to use the right glue for the job. Polyurethane glue is great for outdoor projects, but I don’t use it on chairs. When you have a gap in a chair joint, it might seem like a good idea to use a foaming type of glue, but the foam doesn’t offer any strength where the gap is.
I use seven types of glue in my furniture repair shop, but they’re not all suited for repairing chairs.
Use:
- PVA Glue (commonly referred to as Carpenter’s Glue, Yellow Glue, Cabinetmaker’s Glue, etc.)
- Hide Glue for antiques as it can be “reversed” for future repairs
- Epoxy for joints where there are gaps as PVA and Hide Glue won’t hold when there’s a gap
Don’t Use:
- Polyurethane
- CA Glue
- Construction Adhesive (…yes, I have a video showing a failed repair with this)
- Contact Cement
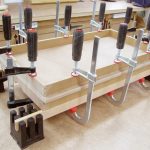
5) Not Clamping the Glued Parts
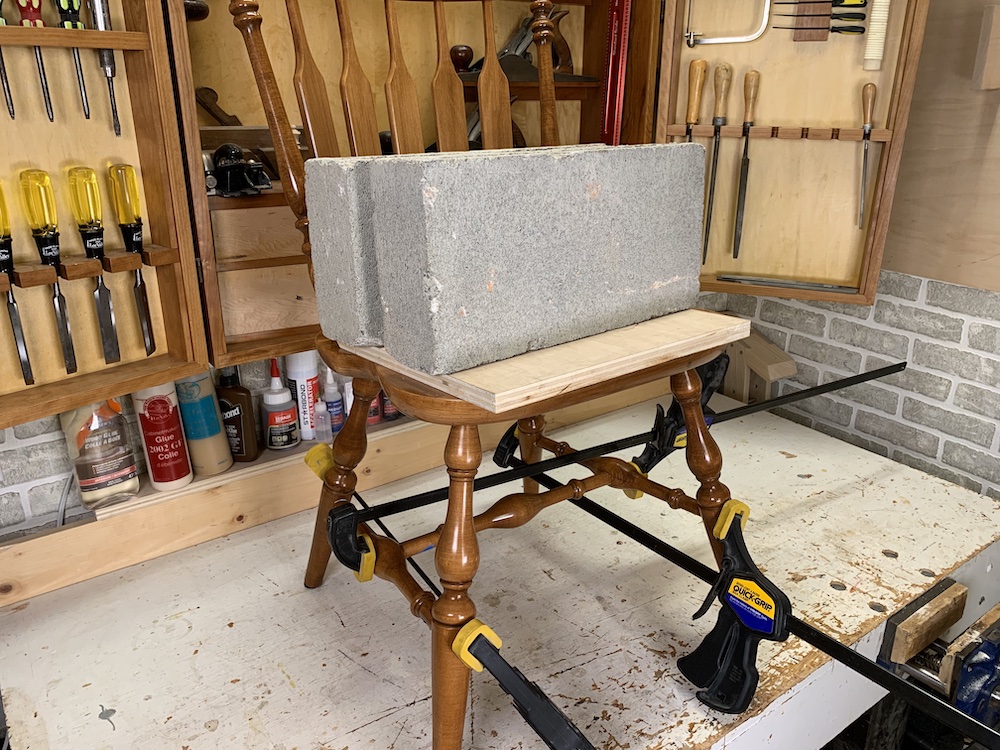 Adding glue without adding clamps is like trying to bake a cake with only half of the ingredients. It just doesn’t work. PVA glue and hide glue need clamping pressure for the glue to hold properly. The pressure keeps the wood together as the glue absorbs and cures. You can test this if you glue two boards together, side by side. What you’ll find is that a clamped glue joint won’t break under pressure, but an unclamped glue joint will.
I prefer to use trigger clamps, as they have padded ends that allow clamping when the legs of a chair are on slight angles. I also use weight on the chair seat to add pressure where the legs join the seat.
Recommendation
These tips will help you be successful in your next chair repair project. Repairing furniture can be rewarding and a great learning experience for building woodworking skills. You can learn more about furniture repair skills and techniques on my Fixing Furniture YouTube Channel where we’re building a supportive community about furniture repairs.
Watch more: Fixing Furniture YouTube Channel
 Scott Bennett is the owner of Wooden It Be Nice, a family-owned and operated furniture repair business. He is also the creator of the Fixing Furniture YouTube channel and the Home Improvement Woodworking channel.
Here are some supplies and tools we find essential in our everyday work around the shop. We may receive a commission from sales referred by our links; however, we have carefully selected these products for their usefulness and quality.