


We may receive a commission when you use our affiliate links. However, this does not impact our recommendations.
So what is SketchUp and why should woodworkers use it? Simply put, SketchUp is a 3D sketching, modeling, rendering and design documentation tool. However, SketchUp is much more powerful than this simple description implies. SketchUp derives its name for a task it does quite well, drawing sketches.
SketchUp comes in two versions: SketchUp Pro and SketchUp Make. The major difference between the two is in their ability to save/open/export/import files from/to other CAD applications such as AutoCAD and TurboCAD (and of course, their price). SketchUp Pro is richly supported in exporting and importing features, sells for $590 and is used commercially. SketchUp Make is free and targeted at the general public to encourage its use and the sharing of creative 3D models. Both are available for download directly from the SketchUp site sketchup.com. I use both versions because I teach SketchUp and write Ruby script plugins.
SketchUp Make is all the non-professional woodworker needs to create dimensioned shop drawings, cut lists and photorealistic renderings. Moreover, SketchUp Make is easy to learn due to its intuitive user interface.
To get an idea of the power of SketchUp, look at the completed drawing of a six-pane oak hutch I designed and crafted and rendered without texturing.
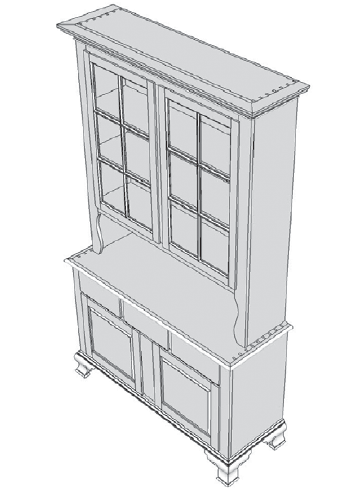
This image is shown in perspective view, but SketchUp allows you to switch between parallel projection and perspective view with a single mouse click.
Another nice feature is the X-ray capability; the image below shows the hutch base only in X-ray view.
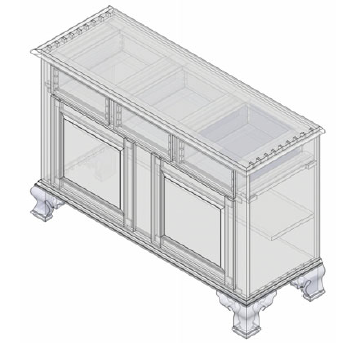
Selecting the X-ray view is essentially displaying a line drawing. However, SketchUp weights the line drawing so that you get a feeling of depth. Notice that you can see the construction within the unit. X-ray view also aids in the design of a piece by allowing you to attach geometry to inside intersections, making connections to parts that are difficult to reach.
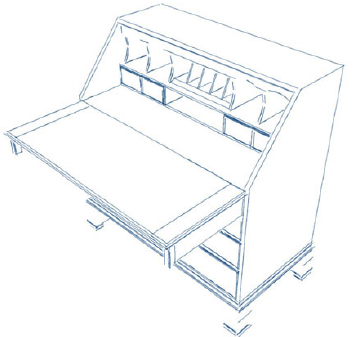
Sometimes we need a cross section of a model, called “sectioning” in engineering drawing parlance. To section the hutch base all I have to do is define a sectioning plane and move it into position as shown below.
This is a section in the vertical front plane, but sections can be made in any plane, including complex sections, by simply rotating the sectioning plane in one or two axes. Sections can be saved as a view and can be dimensioned just like any other view.
One thing you may notice if you look at this section in detail is that you can see inside the pieces that make up the structure. For example, you can see inside the draw bottoms and runners. This is because SketchUp is a surface modeler, not a solid modeler.
SketchUp’s native curve features are limited to circles or arcs that are portions of a circle. At first blush you may think this very limiting because it is impossible to draw cabriole legs, for example, with just circular curves. But that couldn’t be further from the truth. If you are an experienced user of high-end tools such as AutoCAD, you must learn to let SketchUp provide a more intuitive and simpler way. If I had to describe SketchUp in one word it would be intuitive. The way it works is more natural and akin to the way people draw when they draw by hand. This requires AutoCAD, and other CAD tool users, to come down the learning curve a bit and re-climb it. But once you do, you will find SketchUp is more comfortable and faster.
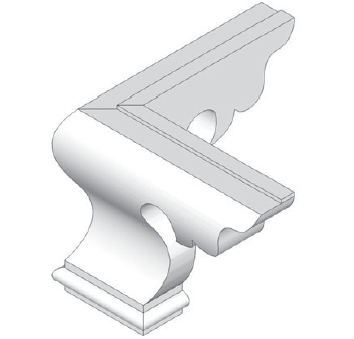
See the above ogee bracket foot I designed for the six-pane oak hutch. The curves are produced using a free plugin that provides a variety of Bézier-spline curve tools, much like French curves when drawing by hand. Ruby script plugins are an ingenious feature of SketchUp, which I will get to later.
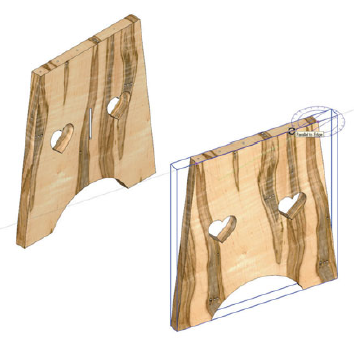
One example of SketchUp’s more intuitive approach can be demonstrated by rotating a part. In the image blow you can see that I simply selected the part (outlined in blue), grabbed the Rotate tool and began rotating.
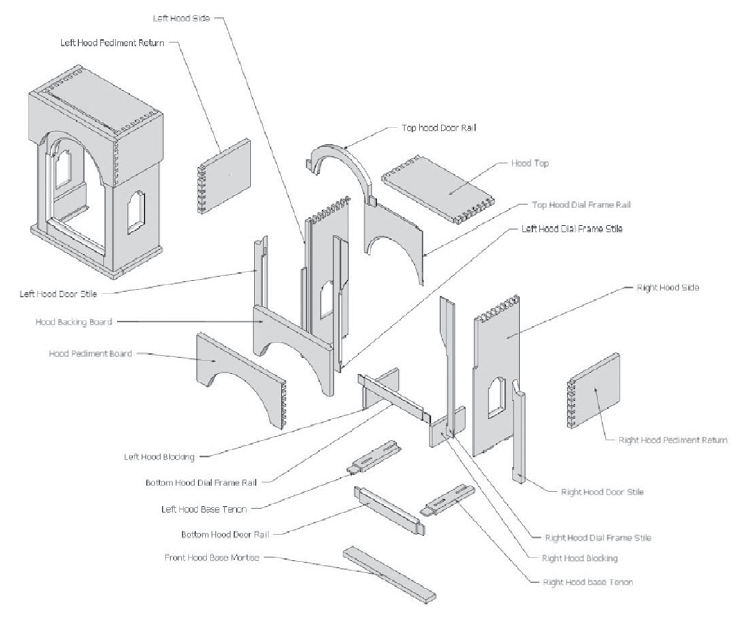
SketchUp’s presentation style, simple dimensioning and inference engine make it easy to create exploded and dimensioned views. Below is an exploded view of a grandfather clock’s hood. Notice the assembled hood on the left of the image and the exploded hood on the right. Each component, or part, is labeled with the component name. The modeler doesn’t need to type the component name in; simply click with the labeling tool.
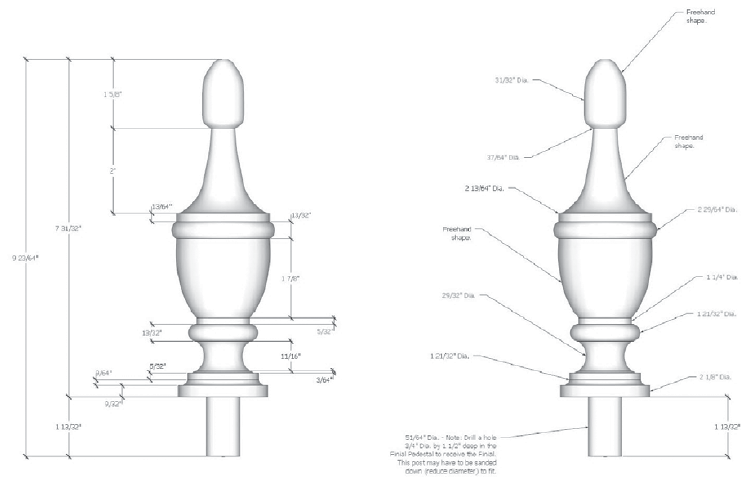
Dimensioning is equally easy. Below is a dimensioned view of a trundle bed finial that is turned on the lathe. This view can be printed at a 1:1 scale (full scale) so the turner can set calipers with it. The dimensioning tool, like the labeling tool, requires no input from the modeler. Simply click on two points representing the dimension line and place the dimension. Note that the labeling tool can also be used to add notes to the drawing.
These are just a few features to give you an understanding of how great a tool SketchUp can be for your woodworking design. Another great thing about SketchUp is that it allows plugins that enhance its feature set, and there is a worldwide community out there generating free, downloadable, plugins called Ruby scripts. Almost any feature you want to add can be found on the web. I find new scripts on the Internet every few weeks. Ruby scripts can be found in a number of places. The SketchUp team maintains a warehouse of extensions that can be accessed through a SketchUp tool icon. In addition, this same warehouse can be used to access thousands of SketchUp models or to contribute your own models to the warehouse. There are many other places on the internet where you can access Ruby script plugins too numerous to mention here, but a simple Google search will uncover them.
By now I hope I’ve impressed upon you just how robust and powerful a tool SketchUp can be for woodworking. I find the presentation style of the rendered drawings are much more readable and pleasing than the staid presentations of more expensive solids modelers.
 This article was excerpted from Joe Zeh’s new book “SketchUp: A Design Guide for Woodworkers,” available now at ShopWoodworking.com.
Here are some supplies and tools we find essential in our everyday work around the shop. We may receive a commission from sales referred by our links; however, we have carefully selected these products for their usefulness and quality.


Joe,
I just started using Sketchup last week and really like it. It is much more intuitive to use than any other CAD type program I’ve tried. But I’m worried…
Can you help clarify what aspects and features of Sketchup that you talk about in this post are supported in the free Sketchup Make version? (i.e. exploded views, printing limitations, cut list generation, etc…) I’m still in my 30 day “Pro” trial that comes with the free installation and so it is hard to tell what is free and what I’ll lose when my 30 day trial is over. (Even the Sketchup website is not very clear about what differentiate the two outside of the import/export features.)
Is your book aimed more at Sketchup Make users or Sketchup Pro users?
Thanks!
Pick up a pencil and grab a sheet of paper, proceed to draw. Done.
If you can’t draw it with your hand, you probably lack the manual and mental dexterity to build it.
Step away from the computer and into the woodshop.