We may receive a commission when you use our affiliate links. However, this does not impact our recommendations.
Whether a hobby or a small business, it’s a woodworker’s dream job.
As a craftsman, I’ve always enjoyed building stuff. But the pivotal point that led me into woodworking happened long before I stood at a table saw or picked up a hand plane. And that point is clearly ingrained in my memory. I was 12 years old and my grandpa and I harvested a pecan tree from his yard. Instead of cutting the trunk into firewood, grandpa hired a sawmill to come out and turn it into lumber.
1. Milling your own lumber can open up a world of materials that you may not have access to at the lumberyard, like this 24-inch wide cherry log.
It was at that point that I, at 12 years old, had an earth-shattering realization that wood literally grew from trees. I know, I was a 12-year old genius. It was that day that triggered my fascination with the material we use for our woodworking. And I’ve noticed in the past few of years, the number of people that are starting to share this interest with me are growing. The number of people becoming interested in harvesting and milling their own lumber has increased. And if it’s piqued your interest at all, the good news is that it’s not as complicated as you might fear.
2. Don’t think that a sawing log needs to be arrow-straight. Small, odd pieces such as this walnut crotch can yield some beautiful, specialty pieces.
There are a number of reasons why I would argue that someone should consider milling their own lumber instead of hitting up a lumber yard.
First, and maybe the most obvious, is the cost. Milling your own lumber can produce quality material for a fraction of the price of a lumber dealer. In fact, if you purchase your own mill, like I have, you can actually make a profit off of it by selling lumber to other woodworkers and by offering to mill other people’s logs.
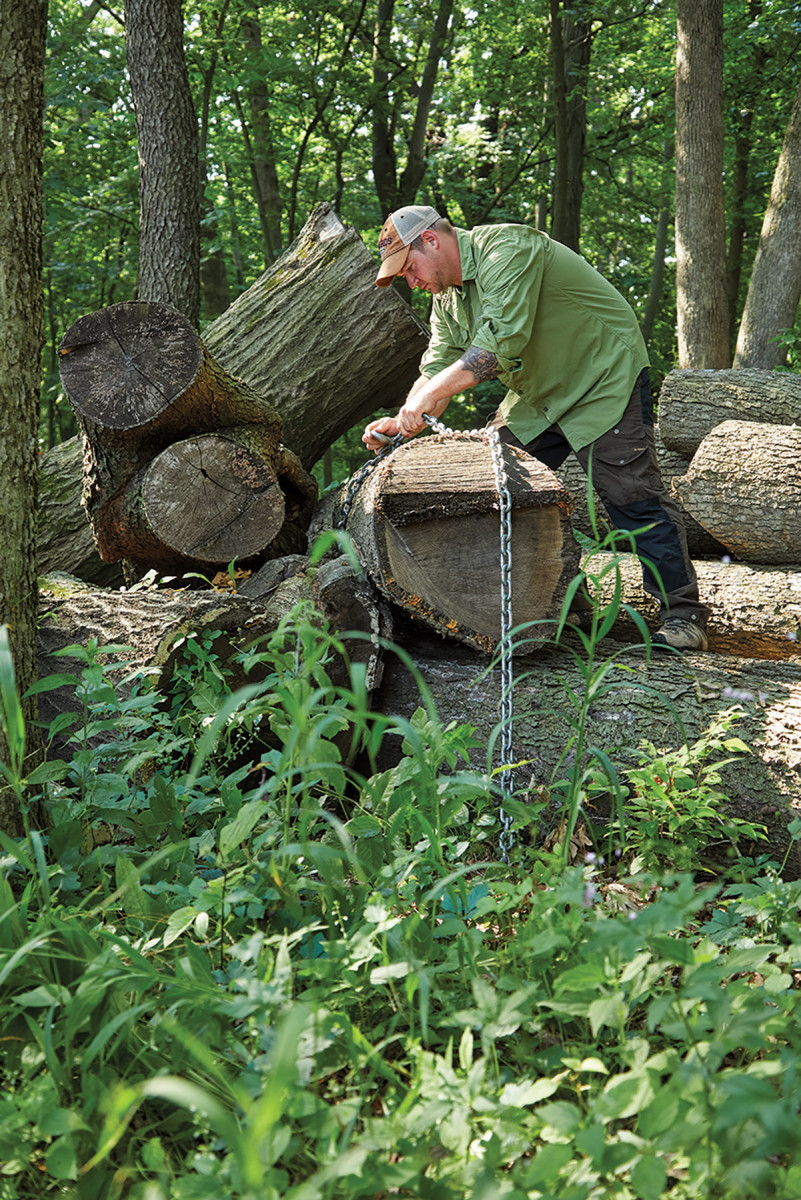
3. Pulling logs out of a burn pile can be a great way to score some valuable logs. A handful of log chains, a truck, and a winch have served me well.
The second reason I enjoy milling my own lumber, and you will as well, is that you have control of the material through the entire process. This means you select how you want the lumber cut and are in control as it’s drying. In my experience you’ll end up with stock that is much higher quality than you can readily buy.
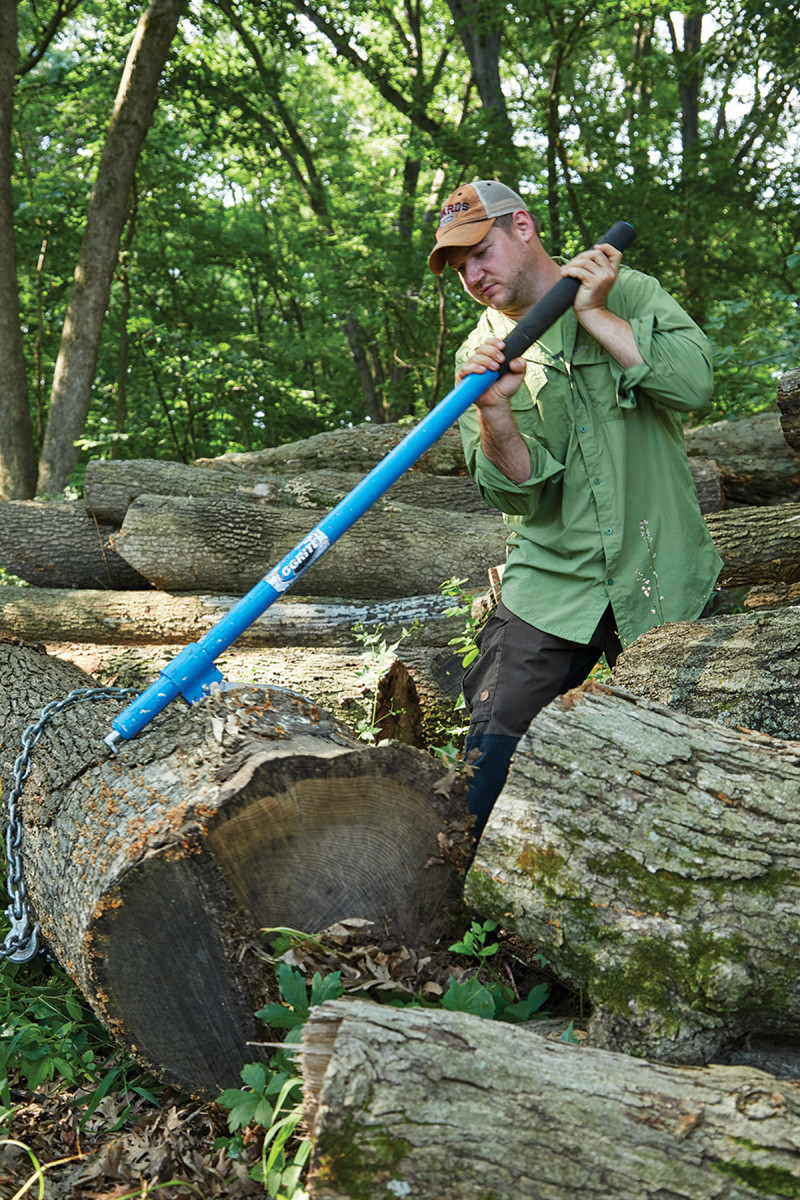
4. A log cant (or log peavy) is invaluable in safely moving and rolling logs. Utilizing leverage, you can move a several thousand pound log with minimal effort.
Finally, I take great satisfaction in turning urban trees into lumber that can be used for a project instead of going to the dump or fire pit. On this same note, you’ll also have access to some unusual species that are almost impossible to buy commercially.
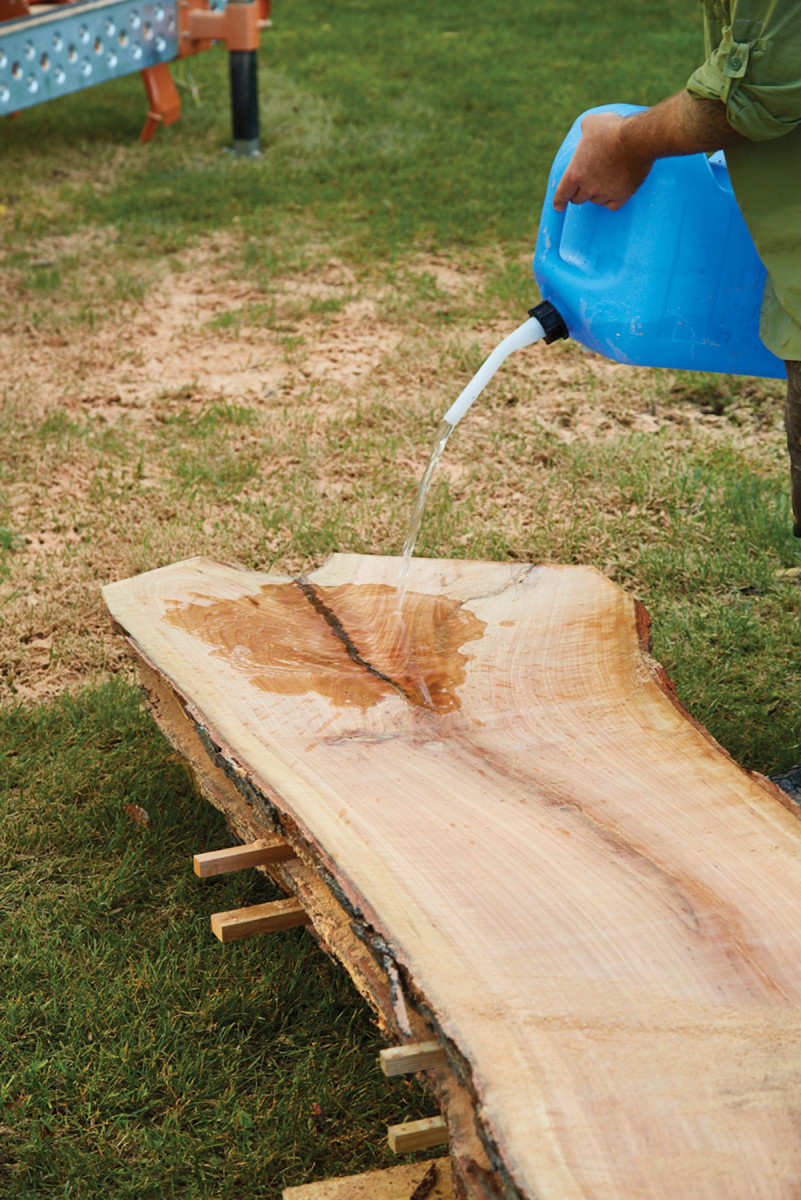
5. Fresh off the mill, you flood the lumber surface with water. This will wash away a majority of the sawdust, and also show you the grain of the wood.
All of this is not to say that you have to go out and buy a sawmill to mill your own lumber. A quick internet search will usually yield a number of local sawyers that will come out and mill your logs on site. However, if you do take the dive into purchasing a sawmill, you’ll wonder why you waited this long to buy one. Now of course, this all starts by getting your hands on some logs.
Finding and Picking Logs
5. Fresh off the mill, you flood the lumber surface with water. This will wash away a majority of the sawdust, and also show you the grain of the wood.
When it comes to picking up logs (or hoarding them, as my wife says), I’ve found a few different sources that work well for me. As a rule of thumb, there are always free logs available, and I don’t pay for them.
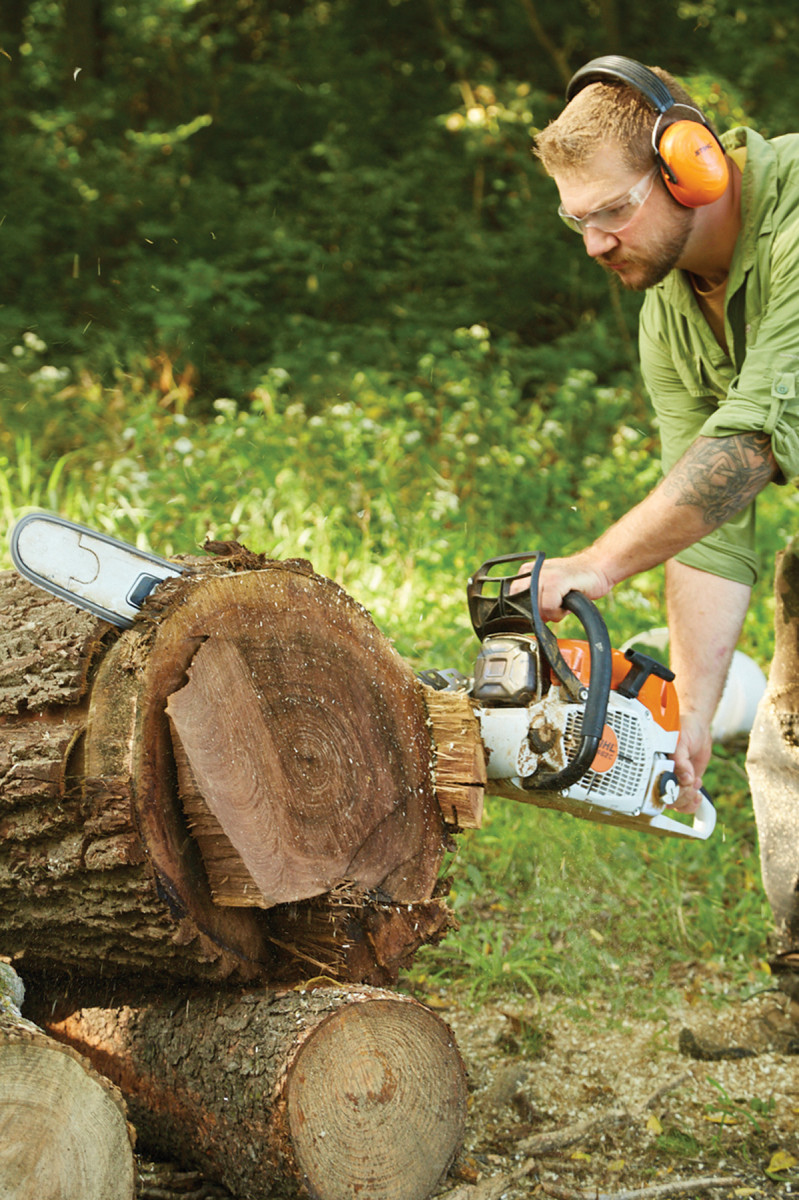
7. Trimming the end of a log when it first arrives gives me a clean, check-free end.
The first, is harvesting the trees myself. This works well if you own property or have access to property with millable trees. Plus, you have the ability to selectively harvest and manage the timber stand. This allows the trees to reach their full potential before harvesting.
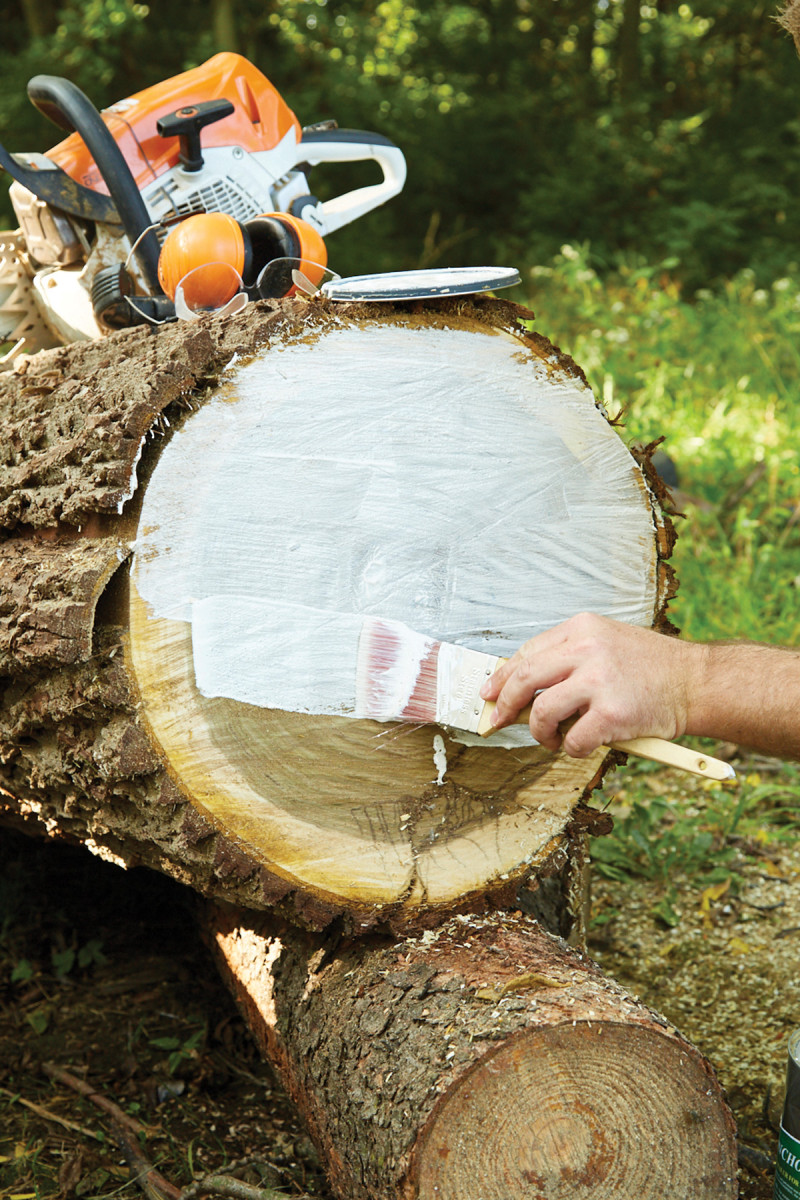
8. Quickly after trimming, I seal the endgrain with a wood sealer to help the wood dry more evenly and limit additional checking.
Probably my most consistent source of logs are a handful of arborists that I work with. If they get to a job site and have a nice log, they’ll usually give me a call. The crews I work with take trees down year-round, and it’s often less work (therefore cheaper) for them to have me come take a log, rather than dispose of it.
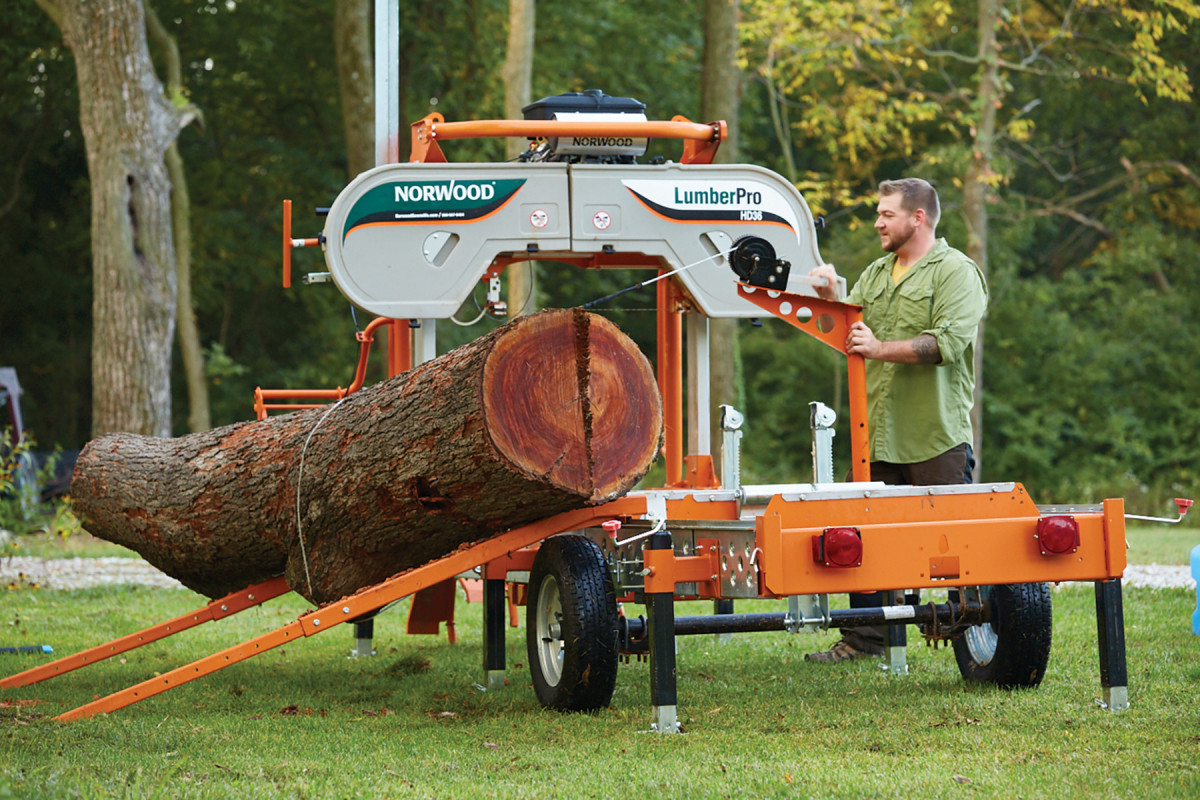
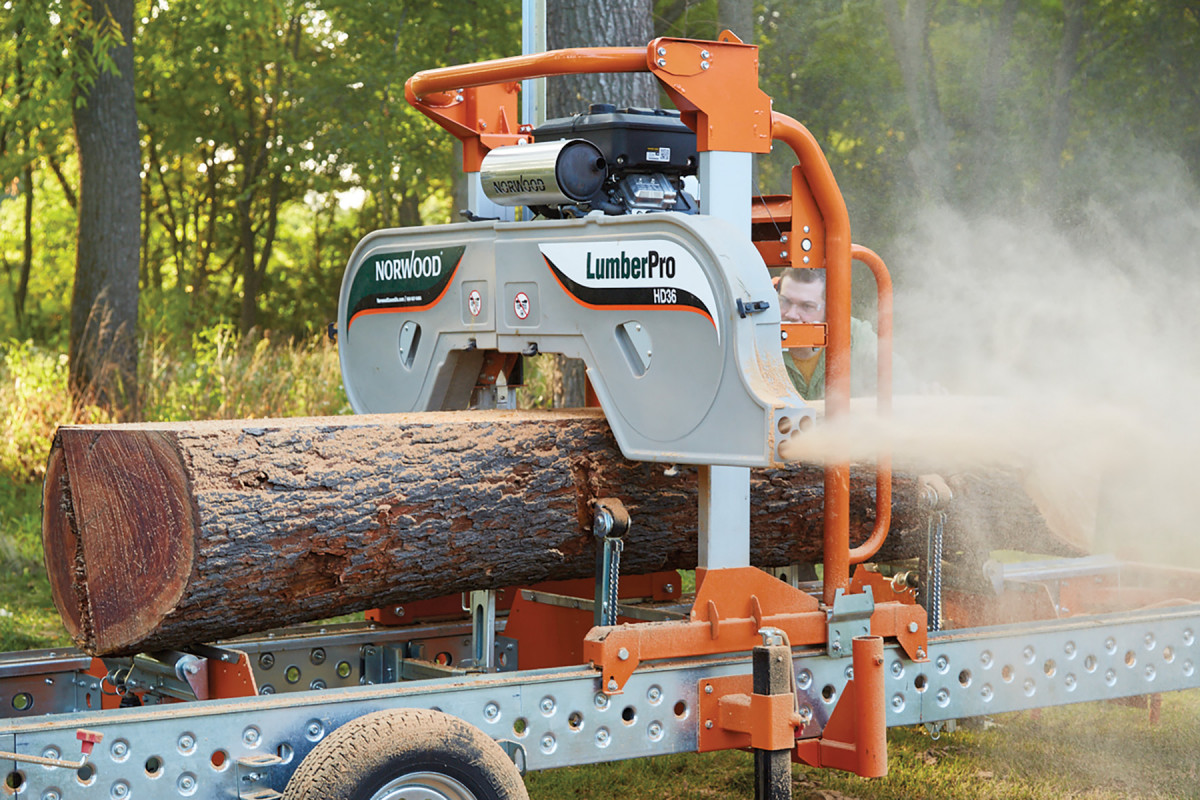
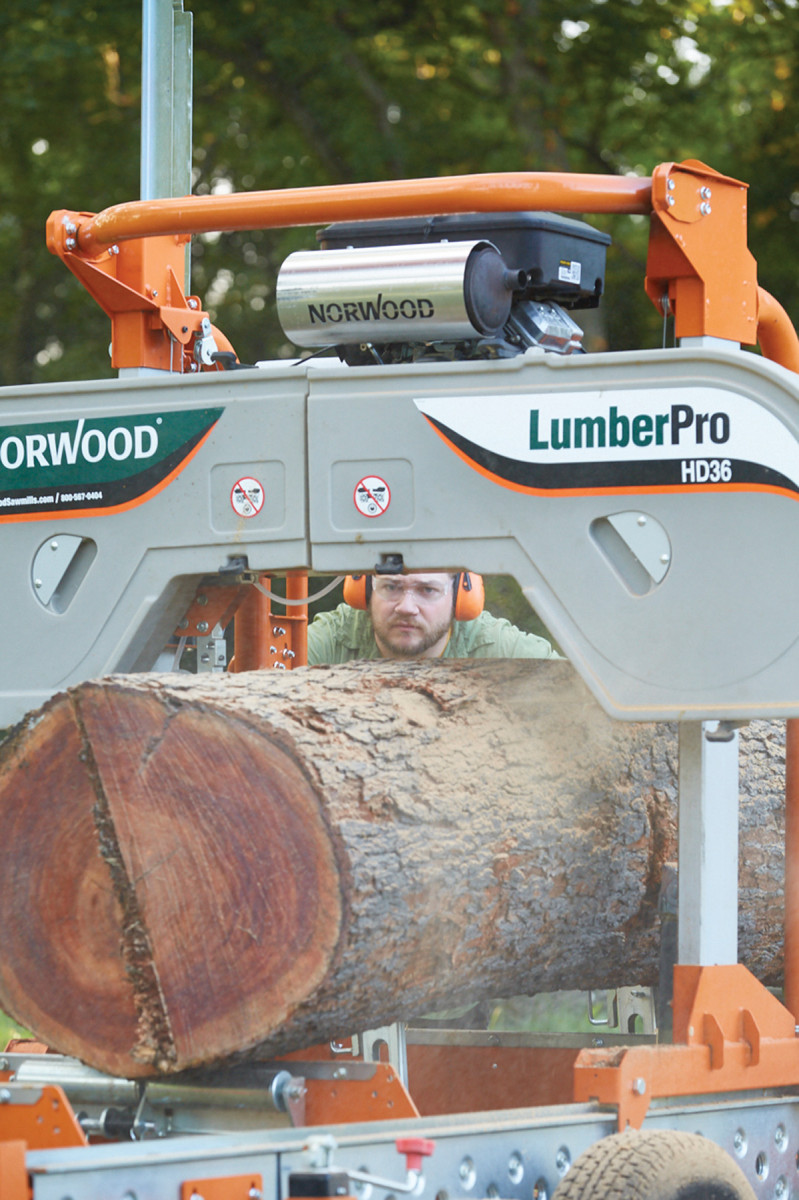
9. My Norwood HD36 uses ramps and a winch to roll logs up onto the bunks.
Another source for free logs comes from land clearing companies. These guys are usually spending a week at a site clearing land for large commercial spaces or residential developments. This method can be rather hectic, but fruitful. What I mean by that, is you’ll often have a number of good sawing logs in one spot, but there will be a narrow window to get in, get the logs you want off of a log pile before it gets dosed in diesel fuel and burned.
Finally, don’t overlook online classified ads. Often times a homeowner will list a freshly felled (or fallen) tree for free if you want to come and cut a section of it. (Stay away from the “free if you take it down” ads). I always make sure to ask if it’s okay if I take just the trunk, and if there’s access for me to get the mill up to it. Even if the homeowner is trying to sell the log, I’ll touch base and leave them my contact info. Most of the time they don’t get a buyer and they get to a point they just want it out of the yard.
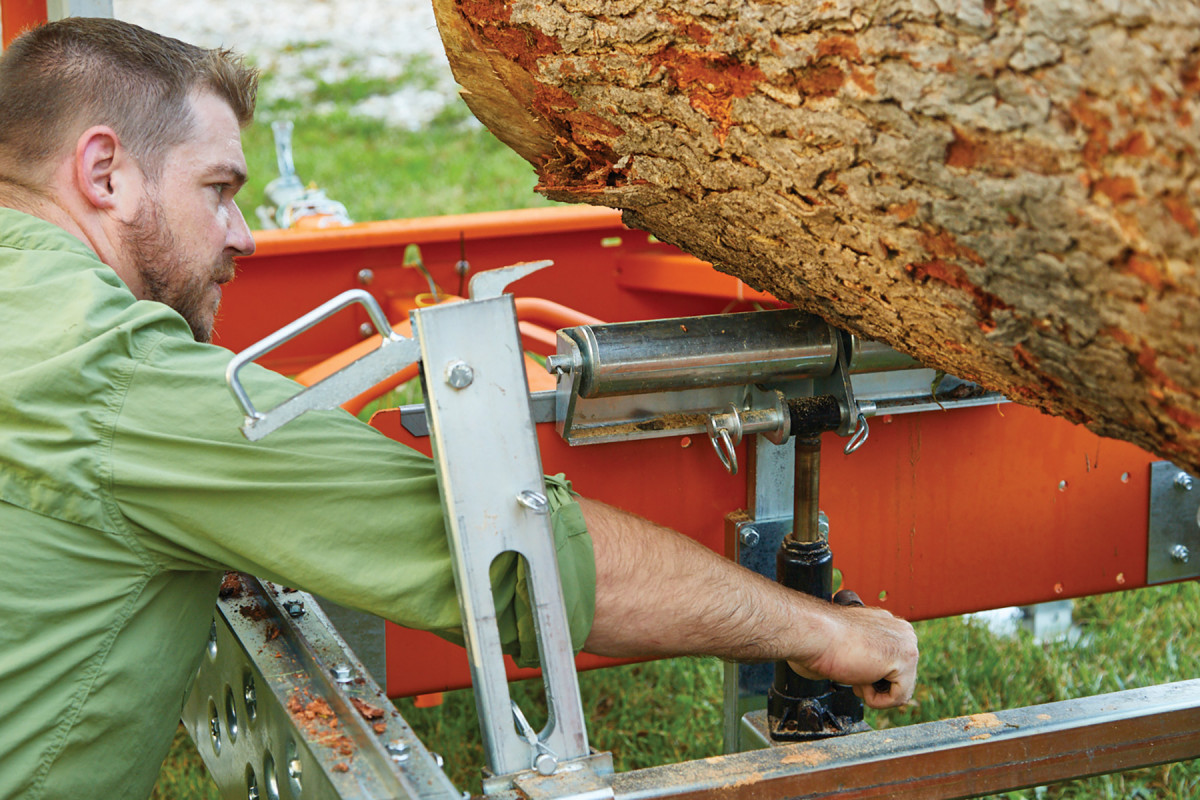
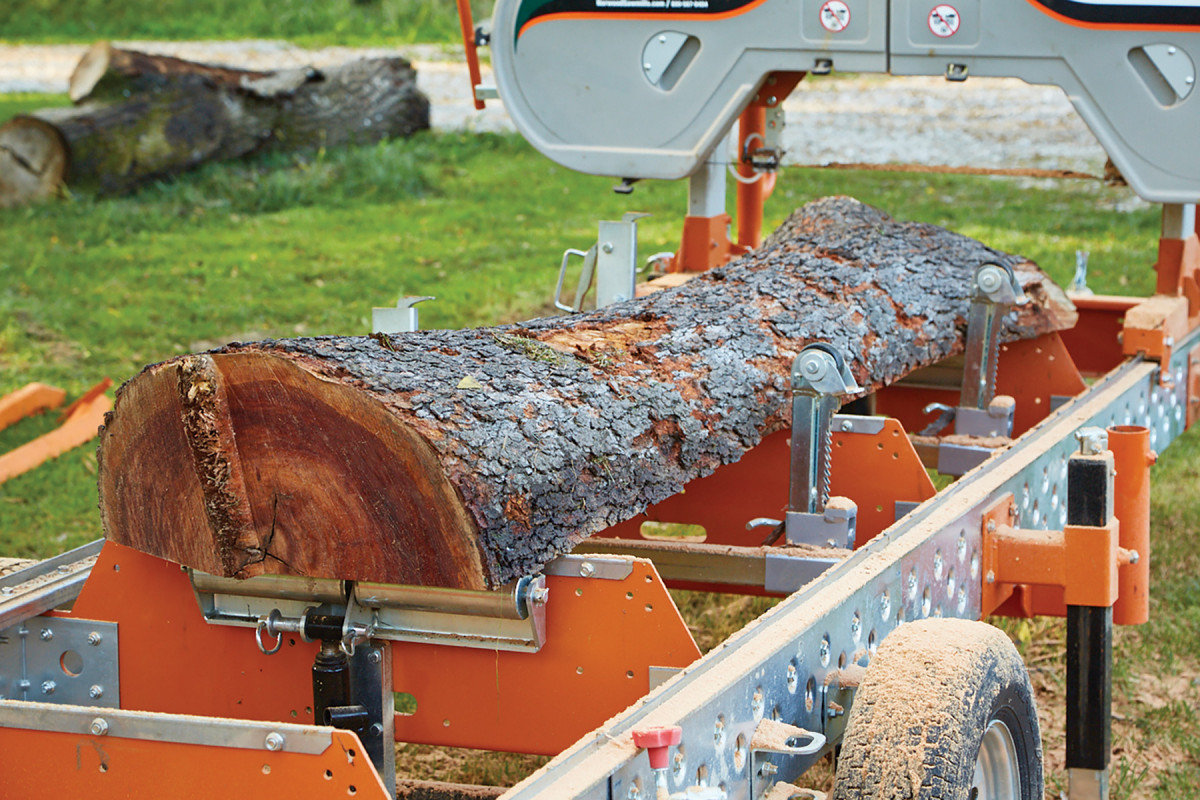
10. The toe boards are used to level the log on the mill.
Now, while I never turn down free logs, there are a few things I look for. First, I make sure it fits on my mill. My Norwood HD36 has a 36“-diameter capacity. So, I’m focusing on logs in the 16-36“ range. As far as length goes, I shoot for the 4‘-13‘ range. And don’t think that a tree has to be arrow straight either. While I stay away from limb wood, trunks with crotches, splits, and other so-called “defects” can make some beautiful lumber.
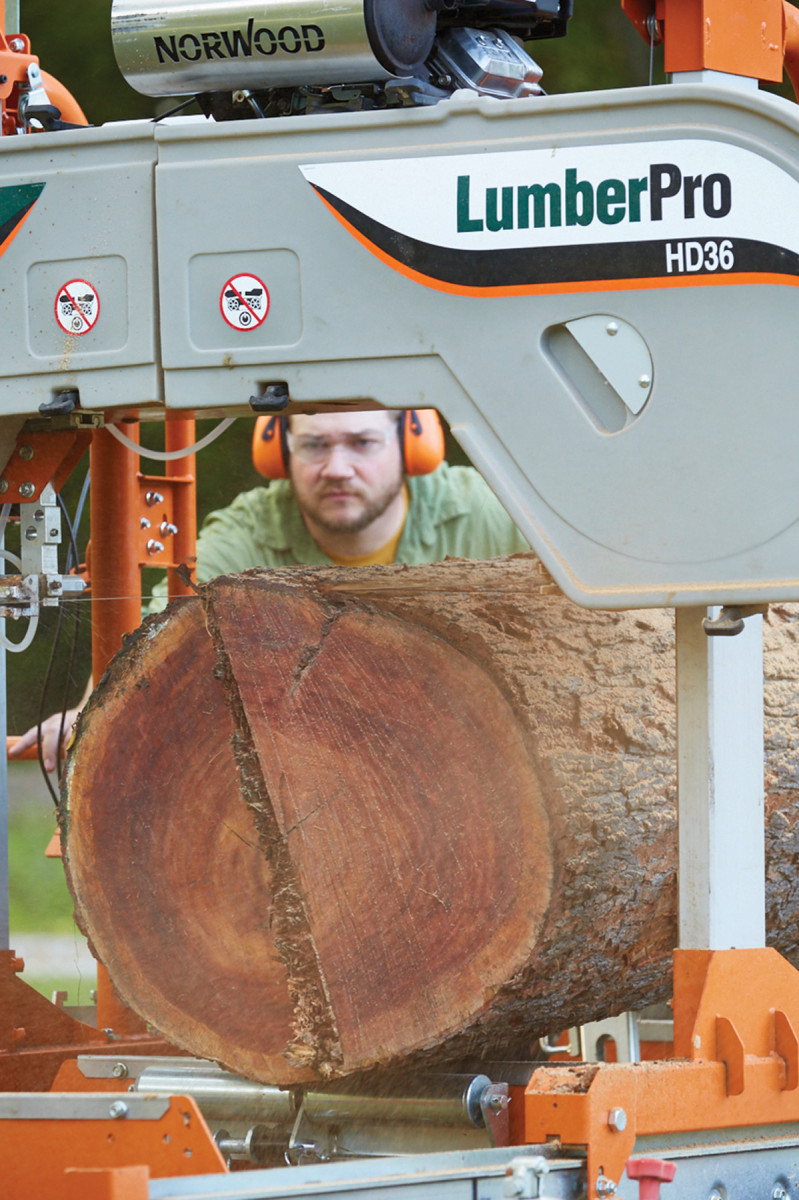
11. The first bark cut gives you a reference surface for measuring out your cuts.
When it comes to what species to look for, that really depends on where you are in. Here in the Midwest, I get mainly ash (a lot, thanks to the current ash-borer situation), red and white oak, hickory, elm, maple, walnut and the occasional cherry. But don’t discount a wood just because you’ve never seen it in a big-box store. Some of my favorites to mill are sycamore, linden (basswood), and apple.
Once you’ve identified some logs that you’re planning on milling, now comes the first party trick—picking them up. Now, I admit. I cheat. My mill is portable, so I can cut them on site and throw the boards in my truck. You can hire a portable mill to do this as well.
However, if you are looking to pick up the logs I would suggest renting a trailer and a skid loader and loading up a handful of logs in an afternoon. Sometimes, arborists will have one on site, as will clearing companies. A small handmade gift is a good way to thank them for loading the logs for you. Otherwise, if you have a trailer you can use ramps and a winch to roll the logs over the side using a process called parbuckling. For a more dedicated log loading rig, take a look at some log arch videos on YouTube (Matt Cremona has a great one on his channel).
 Cost to mill
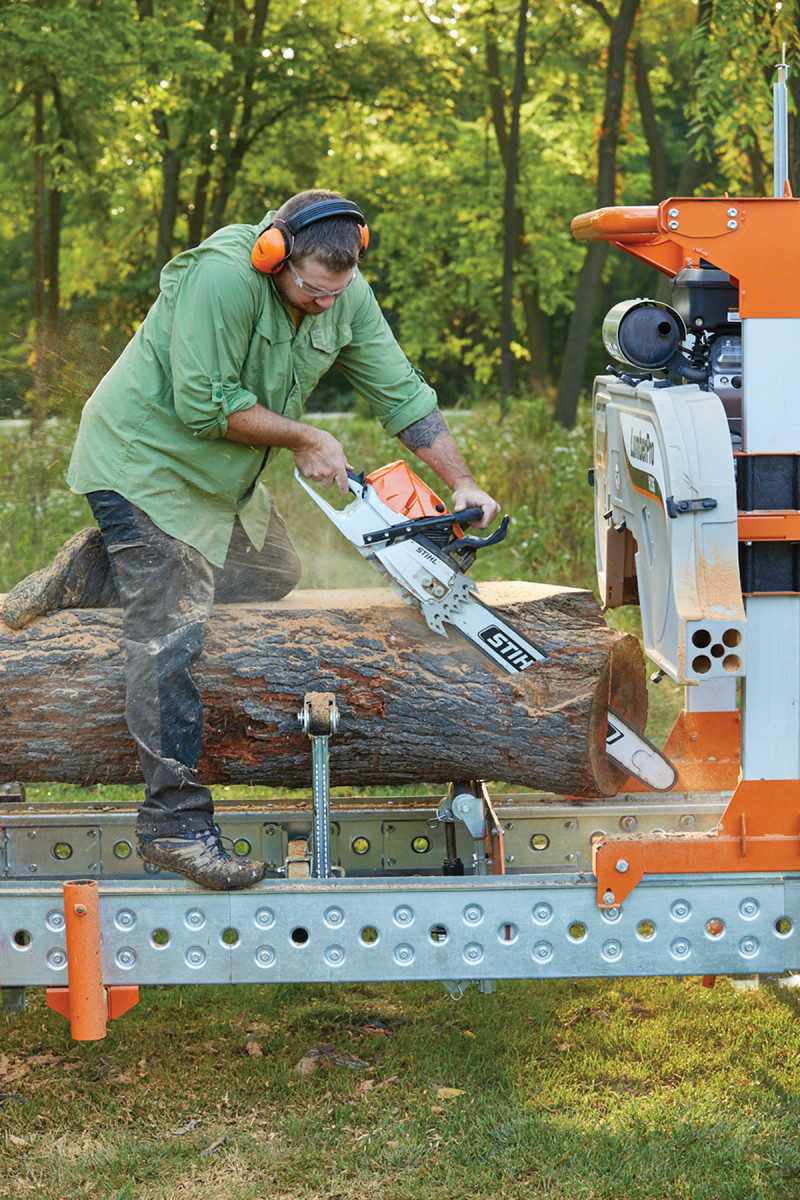
■ Chainsaw Price: $200 – $1500 This is necessary for cutting logs to length, trimming them on the mill, etc.
I often get asked “how much does getting a mill setup run?”. The largest expense, obviously, is the mill itself. Mills, depending on the size, can cost between $2,000 for a small mill, up to $75,000 for a fully hydraulic mill. My Norwood HD36, starts at about $8,500 and can handle a log up to 36″. There’s a few other accessories that you’ll want to have.
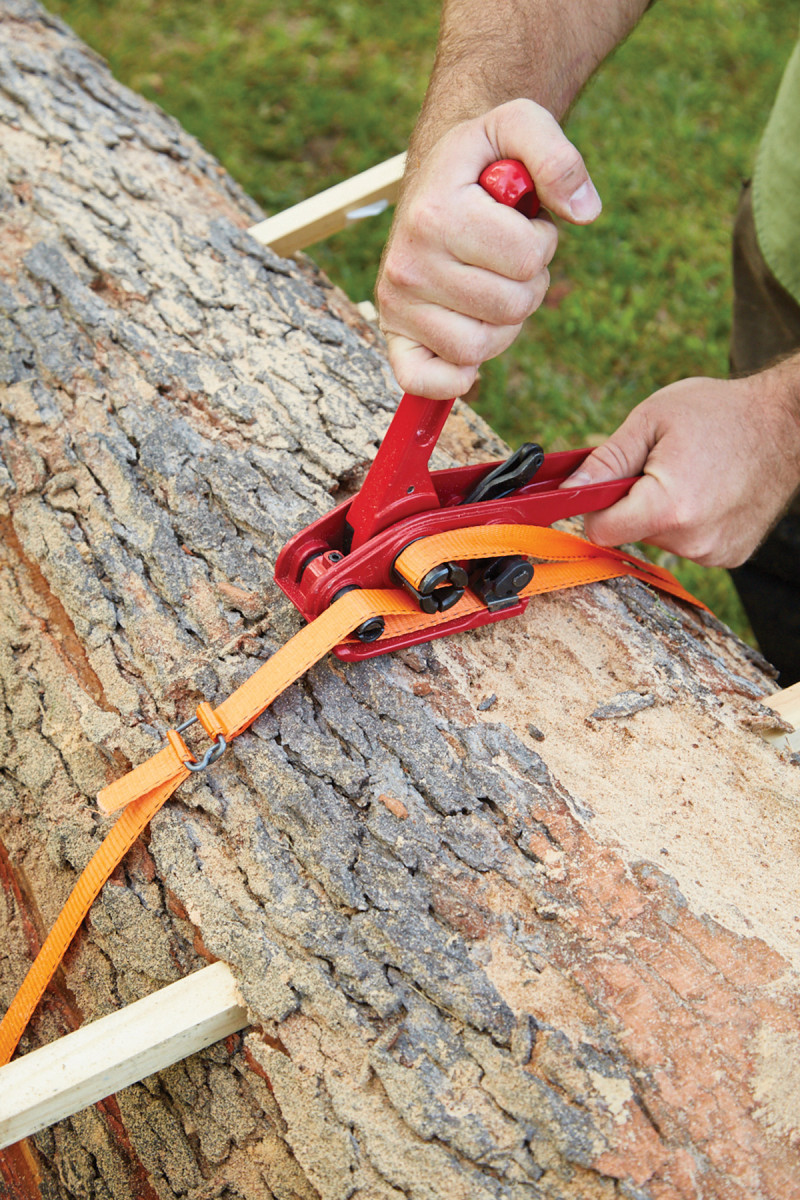
■ PALLET BANDING KIT Price: $100 Finally, in order to keep boards flat as they dry, I suggest getting ahold of a pallet banding kit. I purchased a setup off Amazon and use poly strapping with wire buckles. You’ll need strapping, buckles and a tensioner.
Putting the equipment costs aside, it’s fairly easy to breakdown the milling into a cost-per-log. A new blade runs about $25, and lasts about 4 hardwood logs (give or take, depending on the species, size and if there’s metal in it).
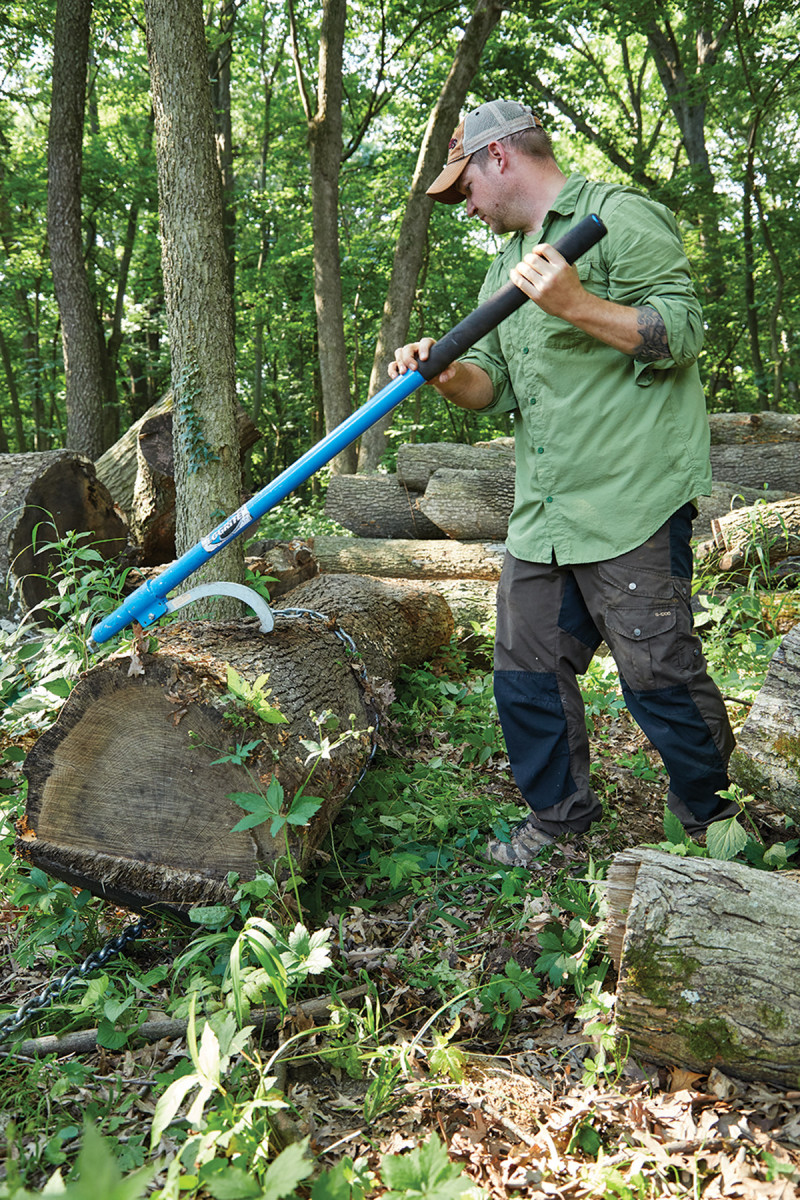
■ CANT HOOK Price: $115 This item is an invaluable tool when it comes to moving logs around. The metal hook bites into logs and allows you to easily roll a log using leverage. I use a Logrite 60” that will grip logs up to 36″-diameter.
Taking fuel and blade lubrication into account, it costs about $8 to mill a log. On average, to hire a portable mill to cut a log, it will run about $75 per hour.
Prepping Logs for Milling
12. After the first cut, board thickness can be set.
After getting your newly stashed logs back home, there’s probably going to be a little bit of work to do. Occasionally, logs will get dropped off at my place from an arborist. The first thing I do is inspect the logs and run through a mental checklist. Are there any nubby bits that are going get caught while I’m trying to roll it? Are the ends clean, or are they chewed up from a chain saw (or already cracked from drying)? How is the log size? Is it too long, or do any crotch sections need trimmed to fit on the mill?
If any of these things need addressed with a chain saw, I take care of it at this point before sealing all of the end grain (and trust me, it’s easier to seal the end of the log instead of the individual ends of boards). Sealing the end grain reduces cracking as the lumber is drying. I use Anchor seal 2 as a sealer, however a few coats of old glue or latex paint will work as well. If the ends have started to already crack (if the log’s been sitting in a trailer), I’ll trim the ends to remove the cracking prior to sealing.
13. After setting board thickness, you can make cuts down until you’ve reached the pith (middle) of the tree.
A portable mill, like my Norwood, will come with some form of log loading attachment. Some may be hydraulic, others manual. You can see my setup here. It consists of a pair of ramps that attach to the side of the mill. Then, an attached winch is used to roll the log up the ramps. Remember earlier when I talked about parbuckling? This is essentially a parbuckling setup. The winch cable goes over the log and then under it. The hook on the end attaches back to the frame of the mill. Now, it’s time to crank the log up. The thing about a setup like this is that even some of the heaviest logs can easily be cranked up the ramps. I’ve loaded ash and oak logs that are over 4,000 lbs. without any worry.
14. With half to one-third the log left, I’ll flip the log over, lower the toe boards, and allow the log to rest flat on the bunks.
As well as the loading ramps work, however, if I’m milling at home, I find it a little easier to use a tractor or skid loader to load logs. If you choose this rout, however, be careful not to drop the logs down or bump the mill in any way, as that can cause unnecessary stress on the mill.
Once the log is onto the mill deck, this is where you’re going to start making some decisions that affect what type of lumber you’ll get out of the log.
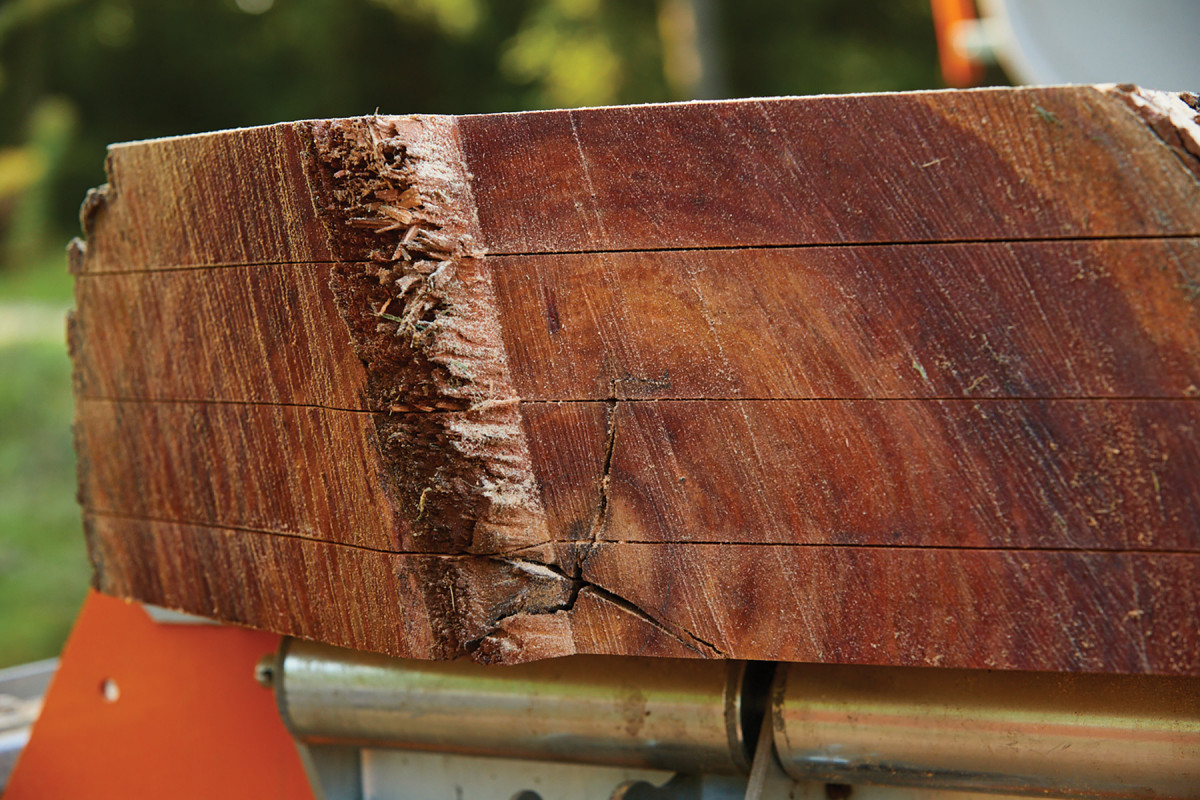
15. The final cuts of the log will, hopefully, yield the pith of the tree in one board. The pith of the tree will nearly always crack (see the bottom board, here).
First, the log needs to be positioned in relation to the cutting head and mill bunks (bed). Almost every log will taper, some more than others. To get the best yield and grain pattern out of a log, you’ll need to raise up the small end of the log. This can be done with jacks, or toe boards, like you see here. The goal is to raise the small end of the log so that the heart of the tree (the pith) is level with the bunks. This will leave the heart in one board when you’re done cutting.
The second decision to make is the orientation that the log is going to be cut in. In my mind, the two main ways to saw a log are for graded lumber or the best character. Because I don’t sell commercially, I rarely saw for grade. Part of the appeal of wood to me is each tree’s uniqueness and story. So, I saw for character in almost all instances. This means that making sure any character marks (such as crotch sections) are horizontal so every board will have some form of character. Sawing for grade and how the grading system works is an entirely other article.
There are some instances where I may rotate the log and forgo the “best” character cut to avoid some actual defects like cracks or rot, but those are extreme cases. Once the log is positioned where you want it, it can be clamped down. The key here is to make sure the log is tight against the log rests and held tightly in the log clamps/dogs. Even though a large hardwood log can be several thousand pounds, a twelve-foot band saw blade exerts a tremendous amount of force. Vibration and the blade can cause logs to want to roll, so make sure it’s clamped down tight.
Making the Cuts
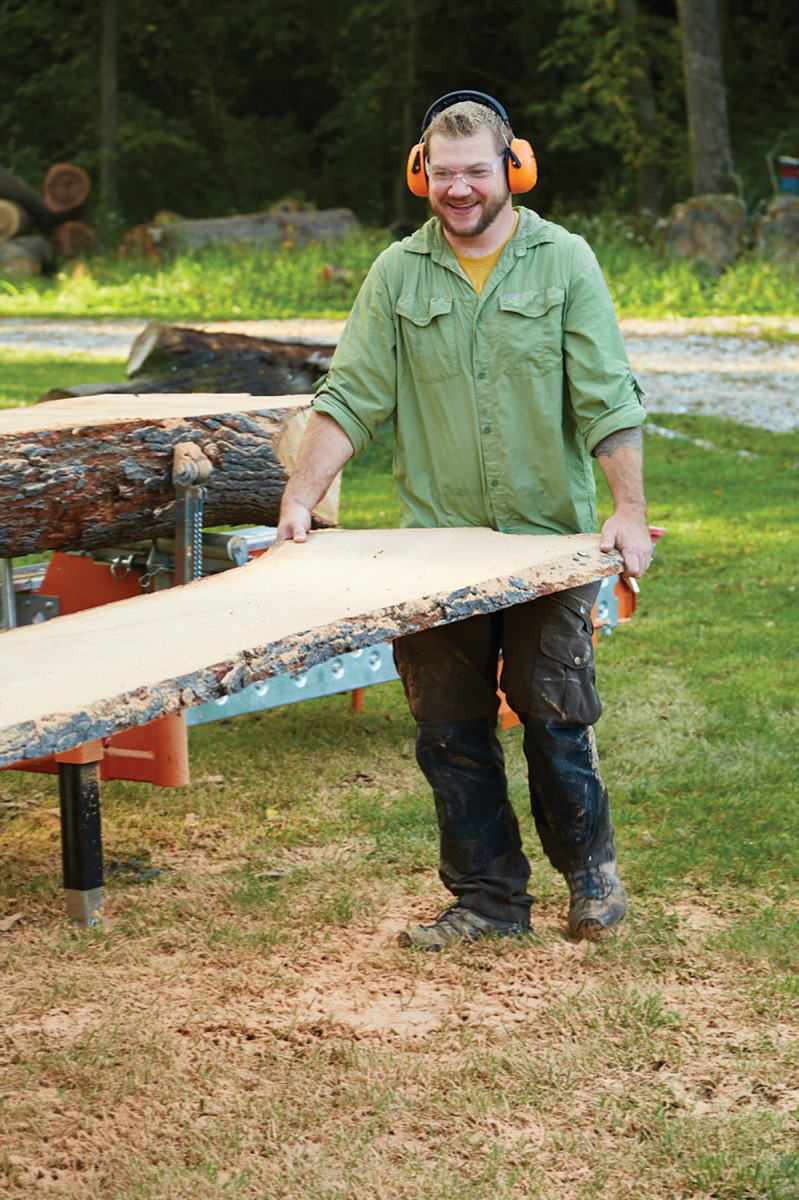
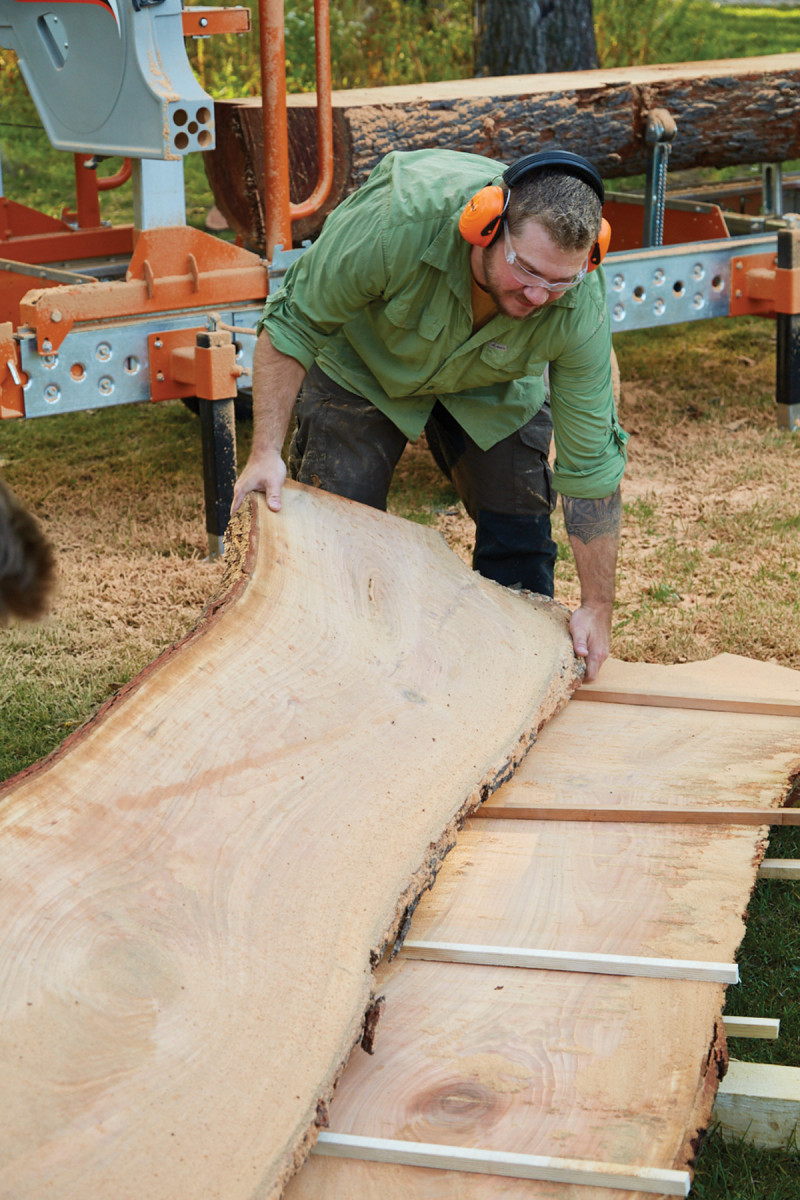
16-17. Having a helper available to help unload the sawmill will make the work go much faster. Unload the slabs onto a staging area where you can place stickers between the layers.
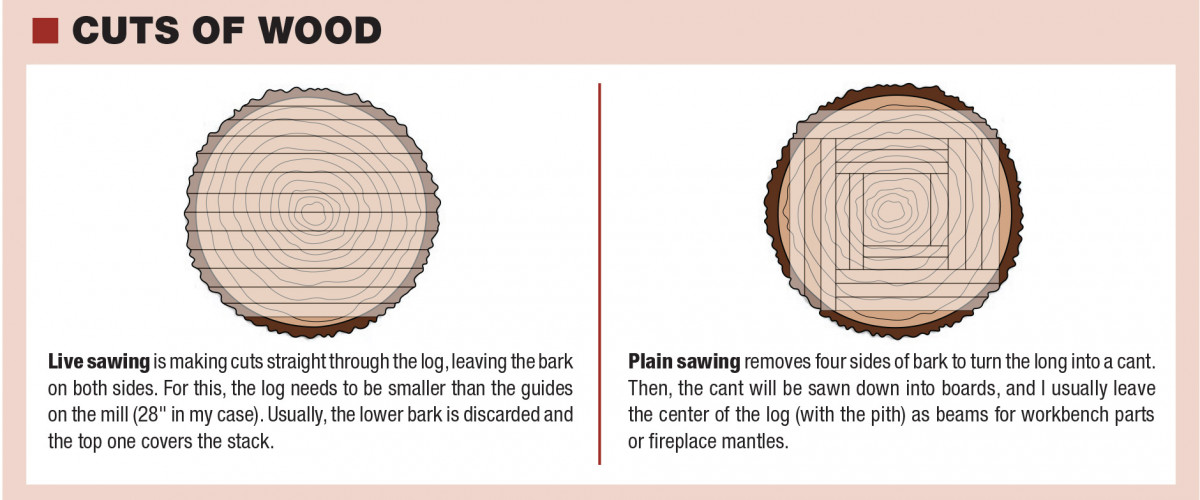
The final decision to make before you fire up the mill (or have the sawyer do it) is to decide what cut of lumber you want out of your log. That is, what grain pattern do you want to see on your boards? The bar at the side of the page shows the three common types of grain patterns in a board: plain, rift, and quarter sawn. Depending on what you’re planning on doing with the lumber will help you decide how to cut it.
When I’m sawing for my personal lumber yard, I mainly “live saw”. This means I cut the log into slices, leaving the bark on both sides. Then, as I pull the lumber off the mill, I can “rebuild” the log so that it can dry (more on that later). There are three reasons I like this sawing method. First, it’s fast. There’s no need to turn the log into a cant and alternate between sawing and flipping the cant. It’s a load it up and cut process (I do flip the log once, generally).
 Second, I hardly ever have a plan for a log when I cut it. By live sawing a log, I am left with stock that is (roughly) 1/3 quarter sawn, 1/3 rift sawn and 1/3 plain sawn. This means that when I use the lumber down the road, I have different grain pattern options to choose from. I eluded to the final reason that I like this pattern earlier—I find it easier to dry.
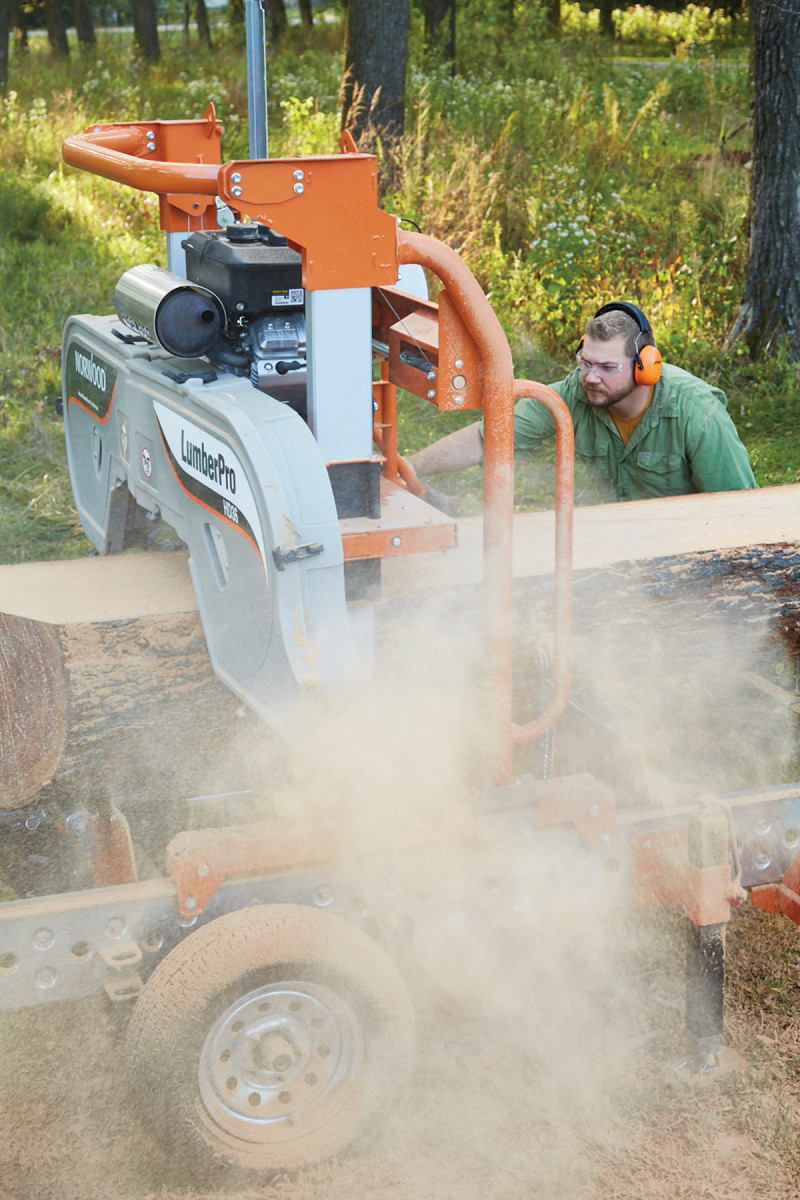
Making the cuts into the log is where all of the hard work (at least, up until this point; there’s more to come!) pays off. The first cut is to remove the top cap of bark (called the slab) from the log. With this cut, I usually aim to get into the sapwood of the tree (just below the bark) and get at least 6“-8“ of flat, clean wood. If you’re live-sawing and going to re-stack the log, save the bark cap. If not, it can be discarded. On my Norwood, I have a scale I can zero out based on this first cut. Then, I can lower the head (using the scale as a gauge) to make the next cut. Here again is where I hedge my bets. Without having a plan for the lumber, I always cut 8/4 (2“-thick) boards. That way, if a project calls for thinner stock, I can always resaw the material. It’s easy to make it thinner. Not so easy to make it thicker. Just note that the thicker boards will be heavier—it’s always beneficial to have an extra set of hands available to help unload boards off the mill.
18. For final air drying, prepare an area with good airflow and set up a level base (I use cinder blocks).
As you’re making cuts and flitches are coming off (a flitch is a board with live edge on two sides, sorry, it’s not called a “slab”), make sure to be aware of how the log and the saw are handling. A sharp blade should be almost effortless to push through a cut. If you’re getting excess vibration, wavy cuts, or the engine is bogging down, then the odds are it’s time to put a new blade on.
In addition, pay attention to how the flitch or board is acting as it’s being cut. Often, stresses in the tree will reveal themselves at this point. The board or flitch will start curling up, or even left or right. This is the stress being released from the log. After noting a stress indicator like this, the best bet is to rotate the log and try to keep the pith as centered as possible in the material that is left. This will help “ease” the tension out of the log and distribute it across the boards.
As you make cuts down towards the pith, I like to stop just shy of that “middle” cut. Then, I’ll flip the log 180° so the flat side is facing down (lower the toe board) and finish out the cuts. If you’ve done everything correctly, and leveled the log, you’ll end up with one final board on the sawmill bed that has the pith down the center of it. The pith of the tree will always crack, so you can either let it crack, or saw it out. The material on both sides of the pith will be perfectly quarter sawn and make great leg blanks.
Now We Wait

19. Make sure stickers are placed in line each above the previous layer, and make sure they’re the same thickness.
Congratulations. You just milled your first log. Now you have the task of not screwing it up. And I know that seems like an odd statement, because the hard part is over, right? Not quite. There have been thousands of board feet of beautiful lumber that have been flat out ruined by improper drying.
Before I get into what I do to dry my lumber, let’s lay out some facts. Fresh cut lumber, even if it’s in a tree that was felled a year ago, will be wet. If it’s stacked without airflow, it will mold. And finally, different species of wood dry differently. Do your research on the species you’re cutting.
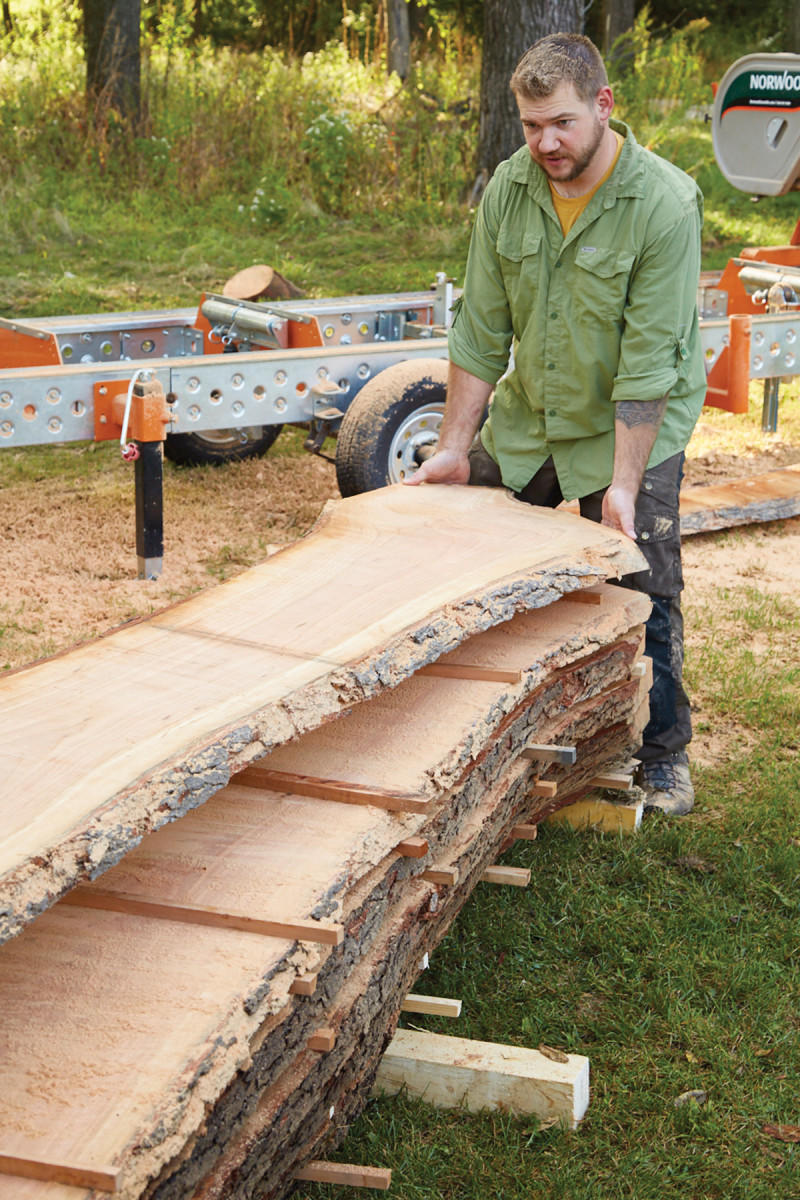
20. When stacking the boards, I’ll reassemble the log in the same order it came off the mill, into log form.
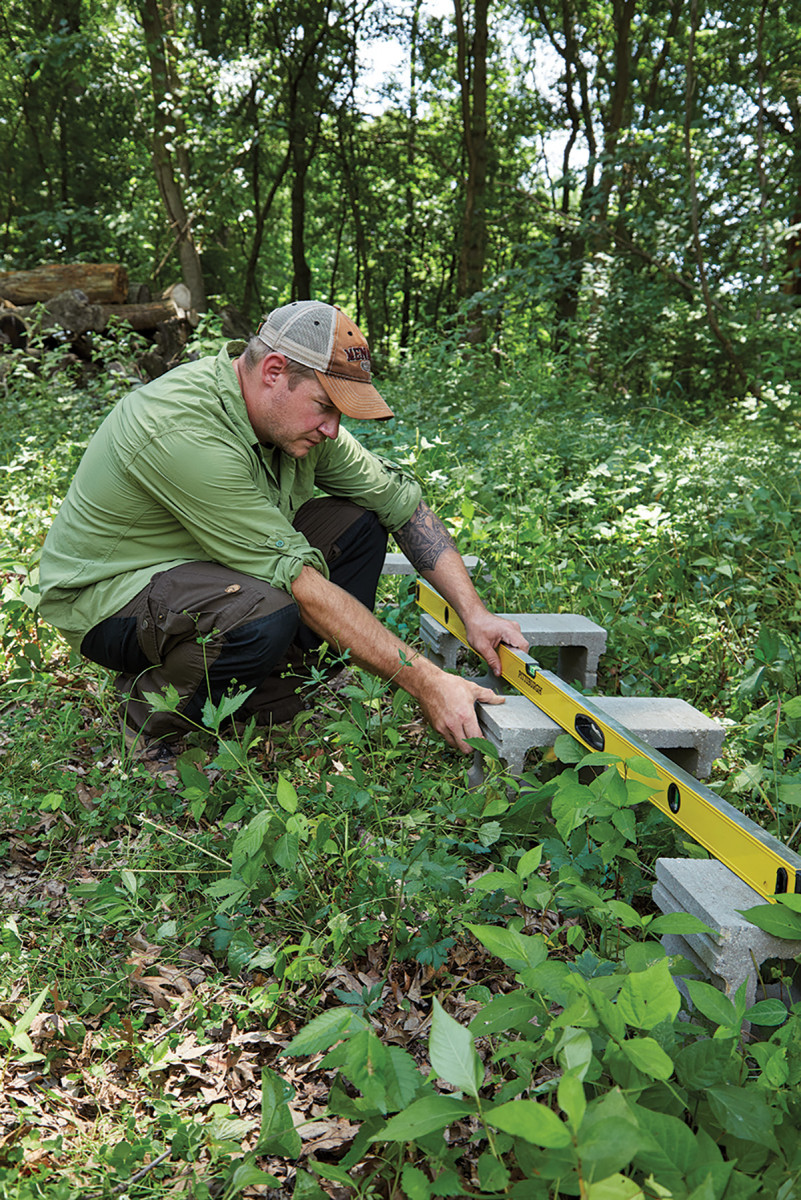
The three keys to drying lumber successfully are: good airflow, a level base, and protection from the elements. Let’s start from the ground up.
When you’ve finished cutting your lumber, you need somewhere to stack it. Imagine drying lumber as a low-temperature version of steam bending. The lumber will dry to the shape of what it’s stacked on. That means it’s best to have a flat and level base. As you can see in the photos below, I like to build a good foundation with cinder blocks. Then, I can run a level or an extension ladder across the blocks to verify they’re flat and coplanar. Some blocks will need shimmed or dug out to keep everything level.
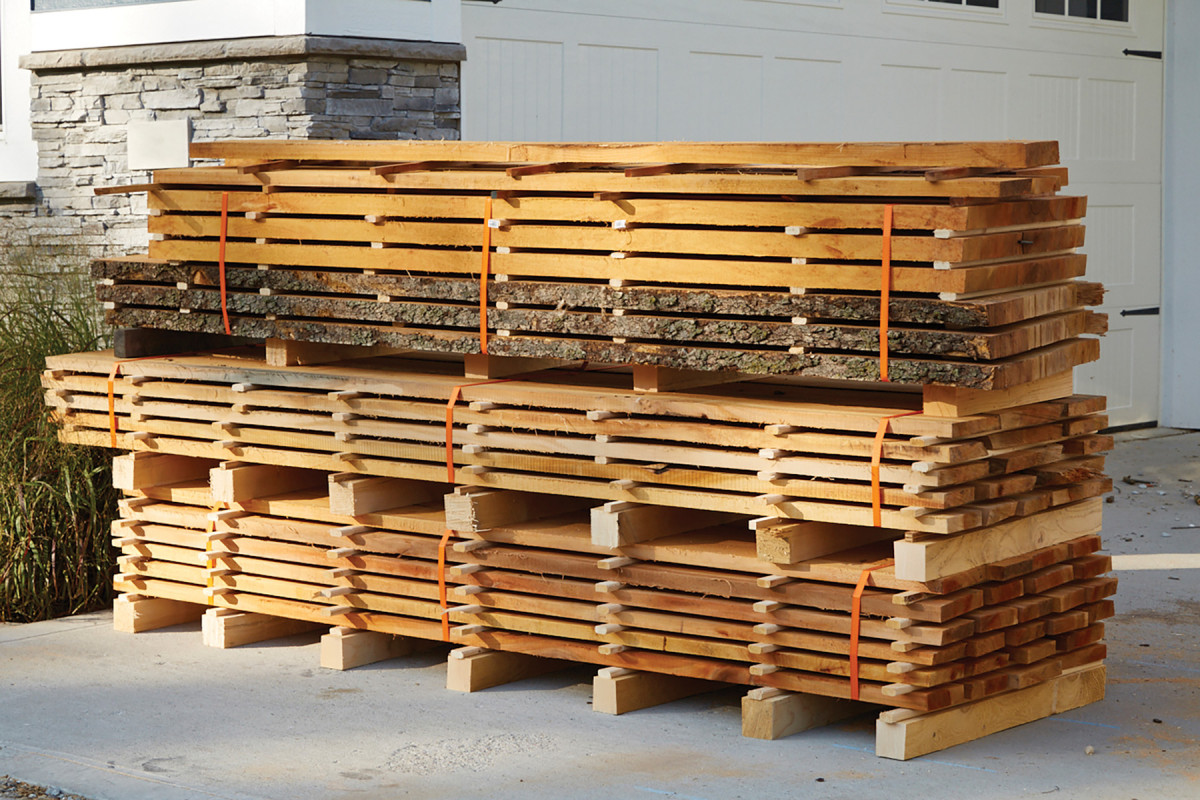
Next up is airflow. This is the easiest one in my opinion. The key here is to stack the lumber where it will receive a good breeze, and ideally be out of the sun. Good airflow actually starts on the mill. As I’m removing flitches off the mill, I scrape or brush off all excess sawdust that can hold moisture. Then, when I go to stack them on the cinder blocks, I will make sure that there is a kiln-dried sticker (a 1×1 spacer) between each layer, directly over the cinder blocks. This allows air to flow through the stack. Some sawyers will saw wet stickers from lumber as they’re milling. However, this has the potential to trap moisture between the wet sticker and the wet slab, causing mold stains. Best bet: use kiln dried wood as stickers.
Finally, the third key is to keep the stack out of the elements (sun and rain). When live sawing a log and restacking it back into log form, the bark that was left on the log (and bark cap) become the rain protection. This can be seen here and is called the “European drying” method. The shape of the log will shed water naturally. When sawing edged lumber, however, it’s best to cover the stack with a tarp, a sheet of plywood, or some corrugated metal.
21. During drying, I band the bundles and label the boards with tags that list the species and when it was milled. The story behind a log can often be a powerful selling point.
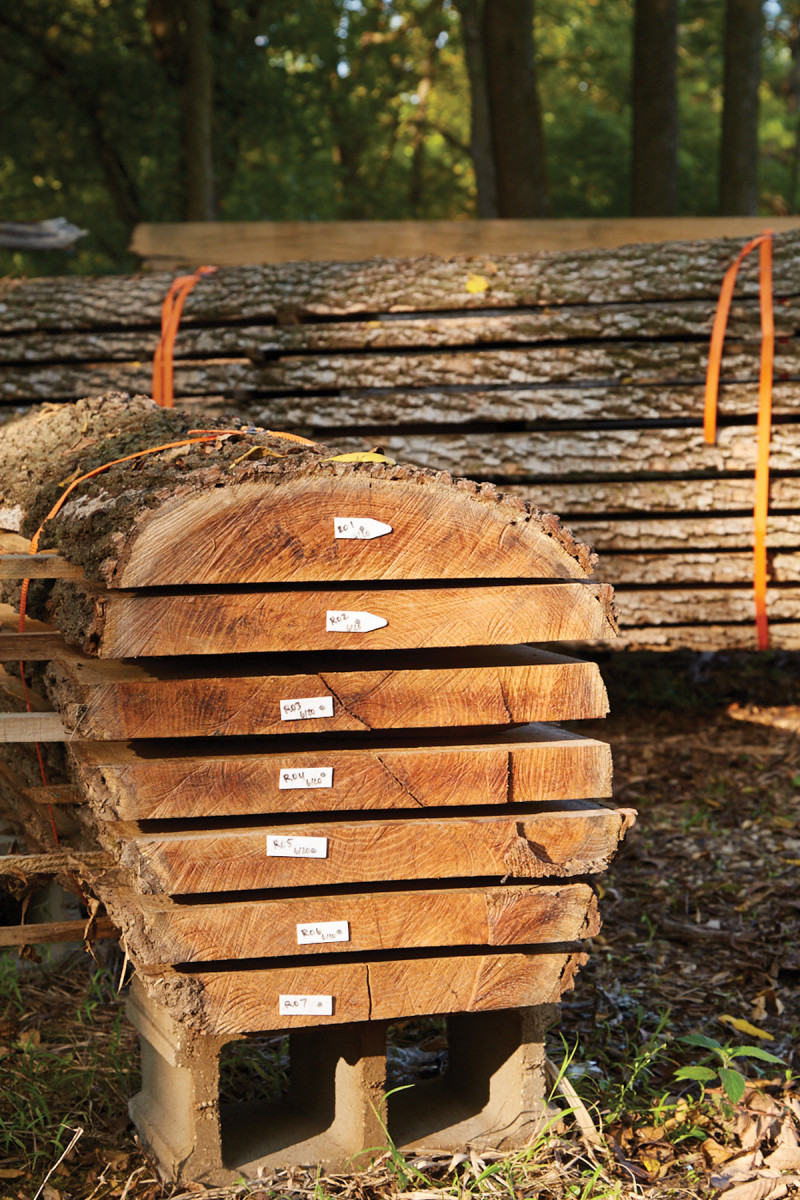
As a side note, I do two other things to my stacks of lumber as they’re drying. First, is I use a pallet bander to strap the entire log, or stack of lumber, together. Not only does this make it easier to move it with my tractor, but it also helps add some pressure to hold the lumber flat. I also nail on (using aluminum nails to avoid iron stains) a small plastic tag with an ID number on the end of each flitch. Then, I inventory each of those numbers in a spread sheet, so I know the size of each piece, along with where the tree grew and when I harvested it. I’ve found many buyers love hearing the story and history of the tree and how it came to be in my, and ultimately their, hands.
Are you ready for the hardest part? You wait. Depending on the species of tree, you’ll wait a while. The rule of thumb is about 1 year per inch of thickness. However, after about 12-16 months of air drying, I will start pulling these flitches into the basement to finish drying. Usually, in Iowa, we can count on about 13% moisture content for air dried stock. You could get lower if you go into a kiln, but personally, I will almost always opt for a air-dried stock over kiln dried. It works better by hand (in my opinion), and I’ve never ran into an instance where (correctly) air dried stock has caused any issues.
22. For edged lumber, I will stack winder bundles and make sure the base has plenty of support to avoid warping.
With all of this being said, milling your own lumber isn’t for everyone. It takes a bit of work and some space. If you are seriously considering a mill, you’ll also want a healthy serving of “bring it on” attitude. However, I think you’ll quickly realize that there’s the opportunity to make a little extra money, and most people ask themselves why they didn’t get one sooner. Plus, when you pull that first piece of lumber off the mill and recognize the endless possibilities… well, that’s what we call “saw dust in the blood”. And once you have sawdust in your blood, I don’t think you’ll ever look back.
Logan Wittmer is Woodsmith’s assistant editor and an aspiring sawyer.
Here are some supplies and tools we find essential in our everyday work around the shop. We may receive a commission from sales referred by our links; however, we have carefully selected these products for their usefulness and quality.