We may receive a commission when you use our affiliate links. However, this does not impact our recommendations.
 Tips and techniques for beautiful bowties
Furniture made from thick wood slabs, with gorgeous grain and natural edges, at once rustic and refined, has remained popular ever since George Nakashima first introduced it to U.S. woodworkers in the 1950s. Better yet, woodworkers of almost all skill levels can build something with a natural-edged slab.
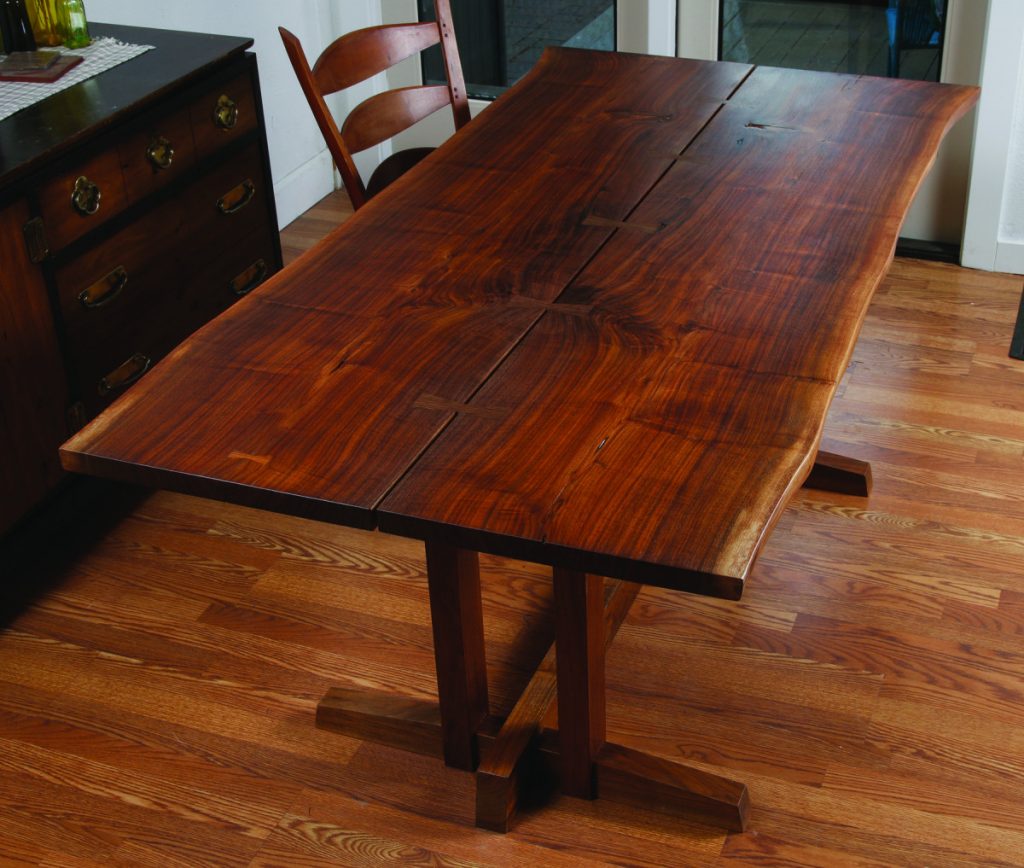
Both structural and decorative, butterfly keys add a soulful touch to natural slabs.
If you can get your hands on a beautiful slab and find a way to smooth its faces—buying time on an industrial sander or using one of many homeshop methods—you can find a way to showcase your unique find.
While I prefer the thick furniture bases Nakashima favored, which root these tree sections to the earth, others place slabs on welded steel bases, reclaimed industrial equipment, or stylish hairpin legs that simply bolt on.
Enter the Butterfly Key
The main calling card of these beautiful log sections is their close connection to the tree, and natural defects are embraced. Large splits, however, can make big slabs unstable. Nakashima had the perfect answer here too—butterfly-shaped inlays that bridge gaps and splits—a soulful, handmade touch that is both decorative and structural.
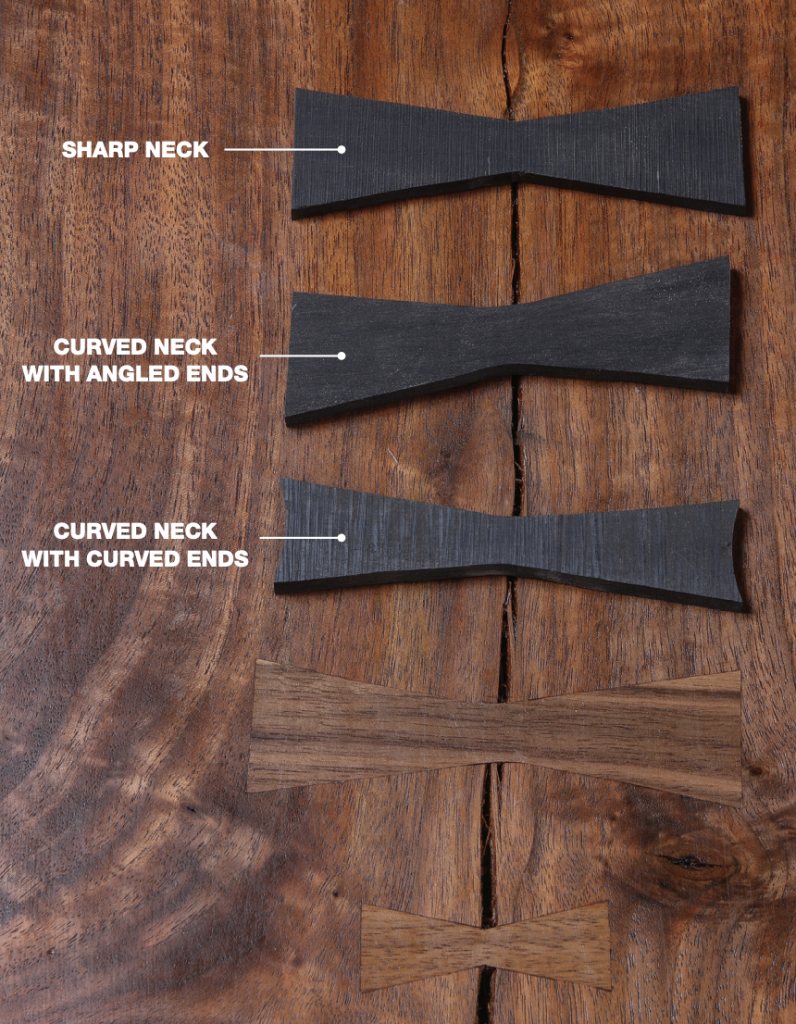
Because the inlay is shaped and traced onto the wood, which is then excavated to house it, butterfly keys can be almost any shape or size, and vary from key to key. That means you can, and should, design them to suit the job at hand—as Nakashima did—long and thin for wide gaps, short and fat for long cracks, and so on. Vary the angles and elements beyond the classic profile, and you can make an already unique slab completely yours.
While the inlay process is simple in concept, it can be tricky in practice. And the stakes are high: Mess it up, and you get obvious gaps.
Side Taper is the Secret
Stealing a page from the master, I add a slight bevel to the sides of my keys—roughly 1 degree or so, depending on the hardness of the woods—which makes the inlay process more forgiving. Stray a little with your knife or chisel, and the key fills the gaps as you drive it into place. The wood in the slab compresses a little to accommodate the slightly over-sized key.
The question is how to add that bevel in a consistent way. If you bandsaw your keys, as most do, you can impart the slight bevel as you smooth the edges on a hard sanding block. That works OK, but I’ve worked out a more consistent approach.
If you’ve got a benchtop sander something like mine—an oscillating edge/belt spindle sander, one of the best values in woodworking, in my humble opinion—you can create a new twist on the butterfly key and get perfectly beveled edges in the process.
What makes this sander great for this task is the access it allows to the round drums at both ends of the belt, and also its tilting table. By tilting the table a smidge—or shimming a piece of thin MDF or plywood on a table that doesn’t tilt—and using both ends of the belt to smooth the keys, you get perfectly tapered edges and a gently rounded neck, which I find more graceful than the sharp junction on the classic key. As for the rest of the process, I’ve got some helpful advice there as well.
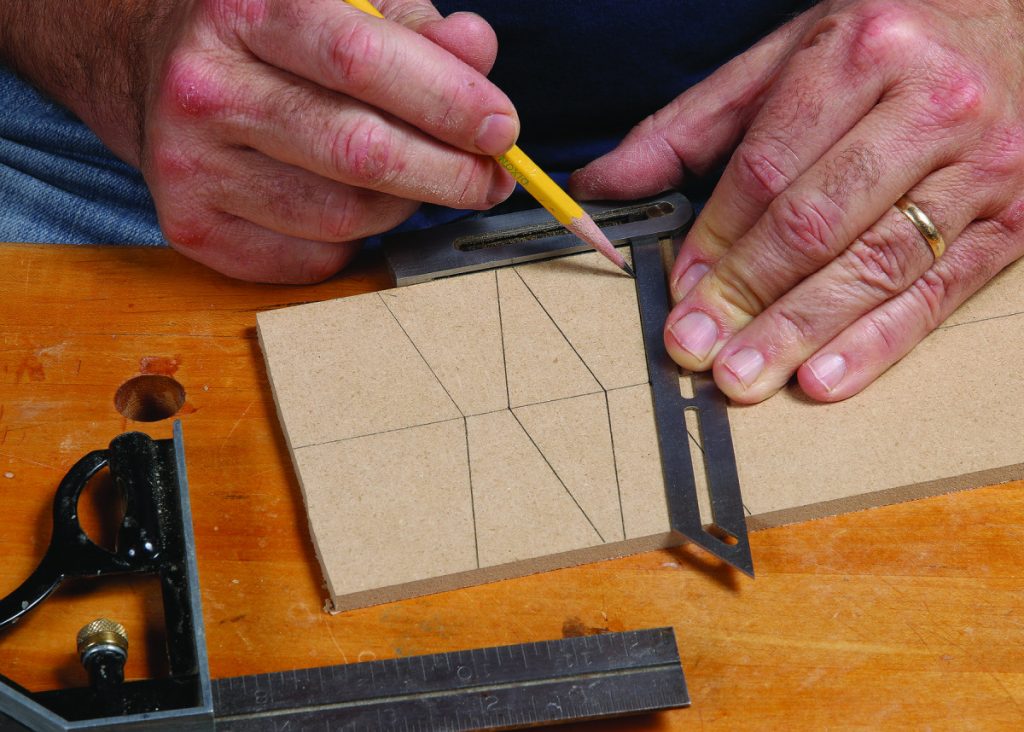
To lay out key templates in 1/4″ MDF, use a protractor or bevel gauge to carry 10° lines to a center line.
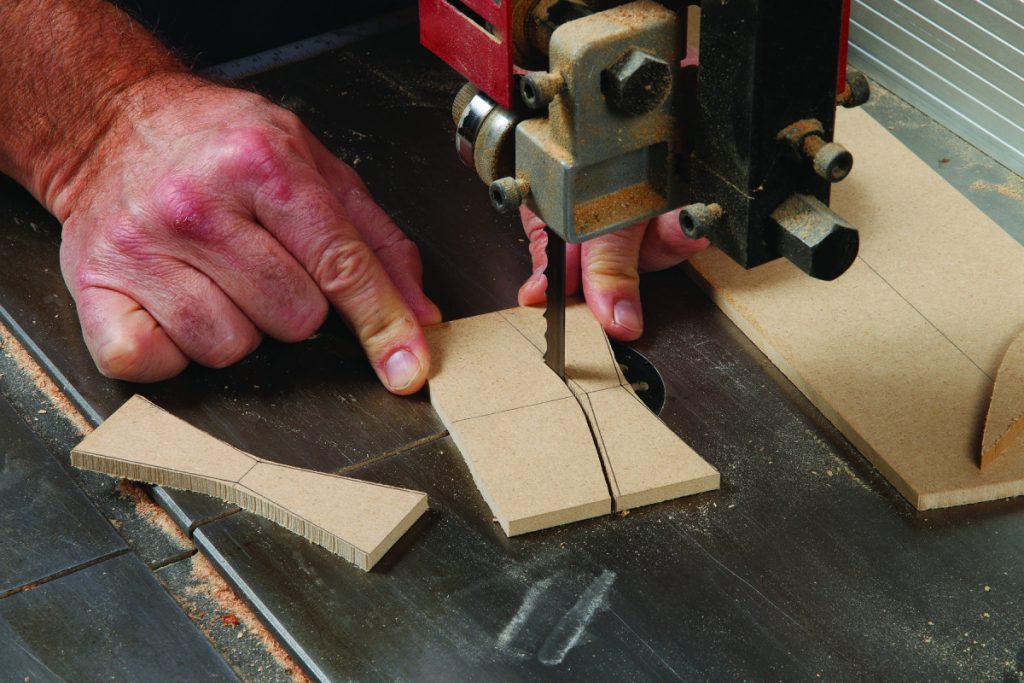
Bandsaw just outside the lines, creating a gentle curve at the middle of each key.

Smooth the edges on both ends of a stationary belt sander like the Ridgid’s benchtop model. Use a light touch and gently ease up to the neck from both directions, to create a smooth curve there.
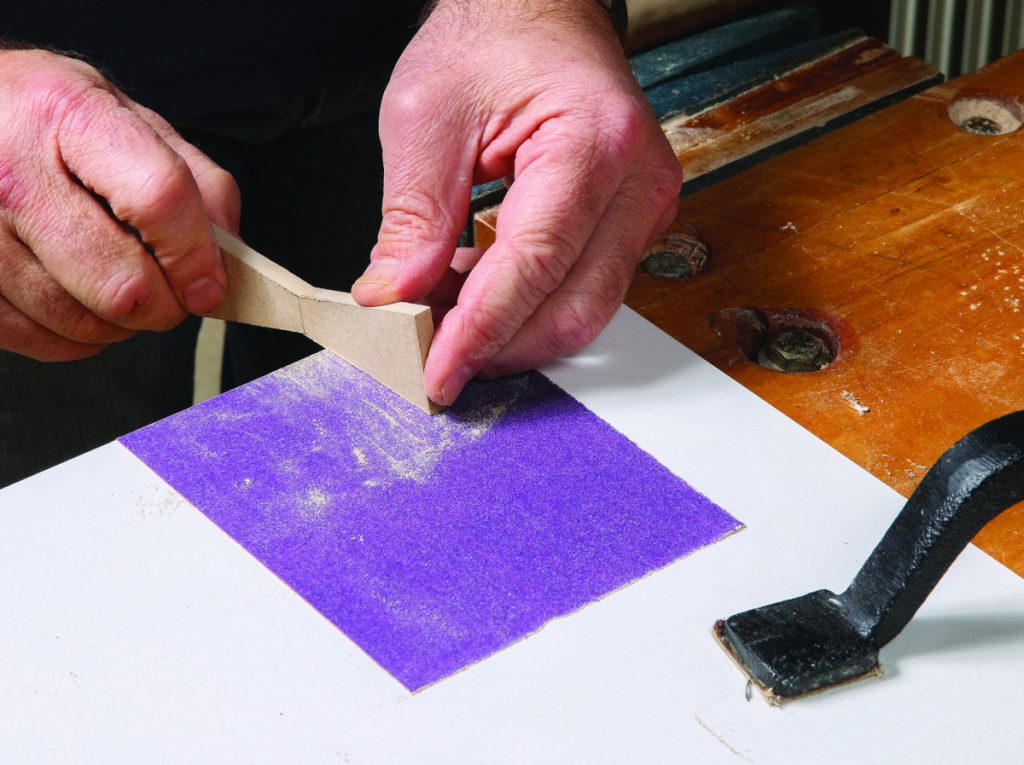
No sander? In that case, bandsaw your key templates to a sharp junction at the center—the traditional style—and smooth their edges on a hard sanding block. When sanding the actual keys, angle them slightly to bevel the edges roughly 1°.
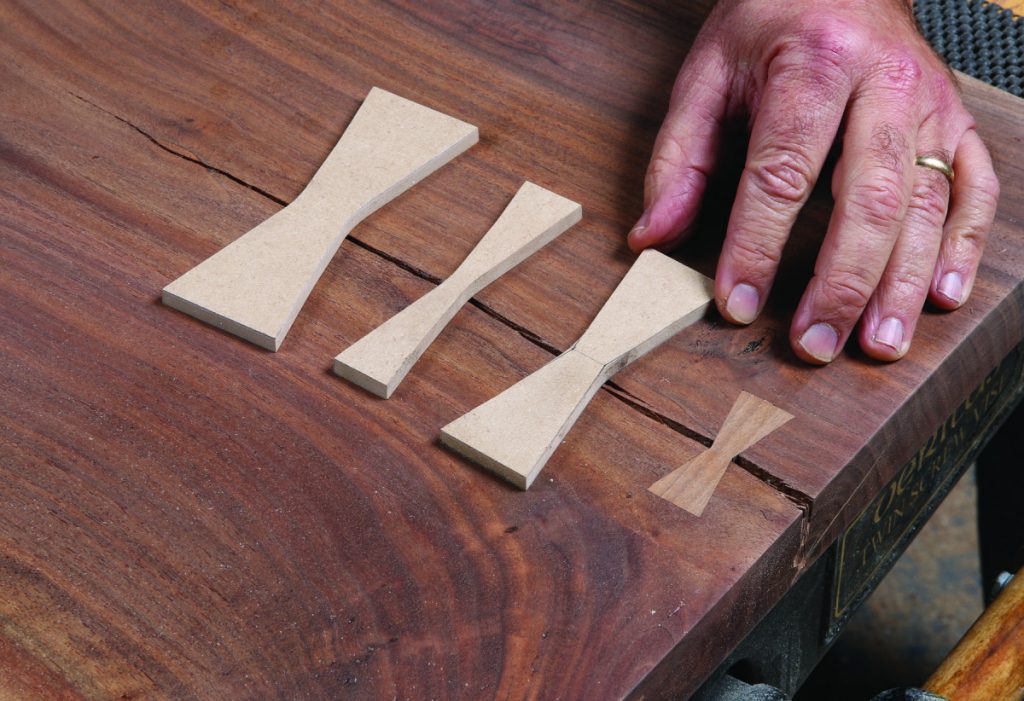
Make templates of various sizes and styles and lay them on the slab to preview the look and placement.
Beautiful Butterflies, Step by Step
For a start, here are some key dimensions and angles that work well. To create the mechanical strength you need, keys should be at least 1/4″ thick, or 3/8″ for big splits in big slabs. Some woodworkers inlay much thicker keys, but I find that to be overkill, and not worth the increased difficulty. If the split goes through the entire slab, I just add a similar key on the back side. As for the dovetail-shaped angles, I find that anything between 8 and 10° looks and works great.
For the side bevels along the edges, 1° is a good target. For very hard woods like maple, or less-forgiving are-as of a slab with knots or wild figure, I ease up on the bevel angles a little, maybe closer to 0.5°. In those cases, I place a flat block over the key as I bang it into place, to help keep it from cracking or splintering upward. In softer slabs like fir or pine, a 2° bevel works well, and hides even more of your subtle mistakes.
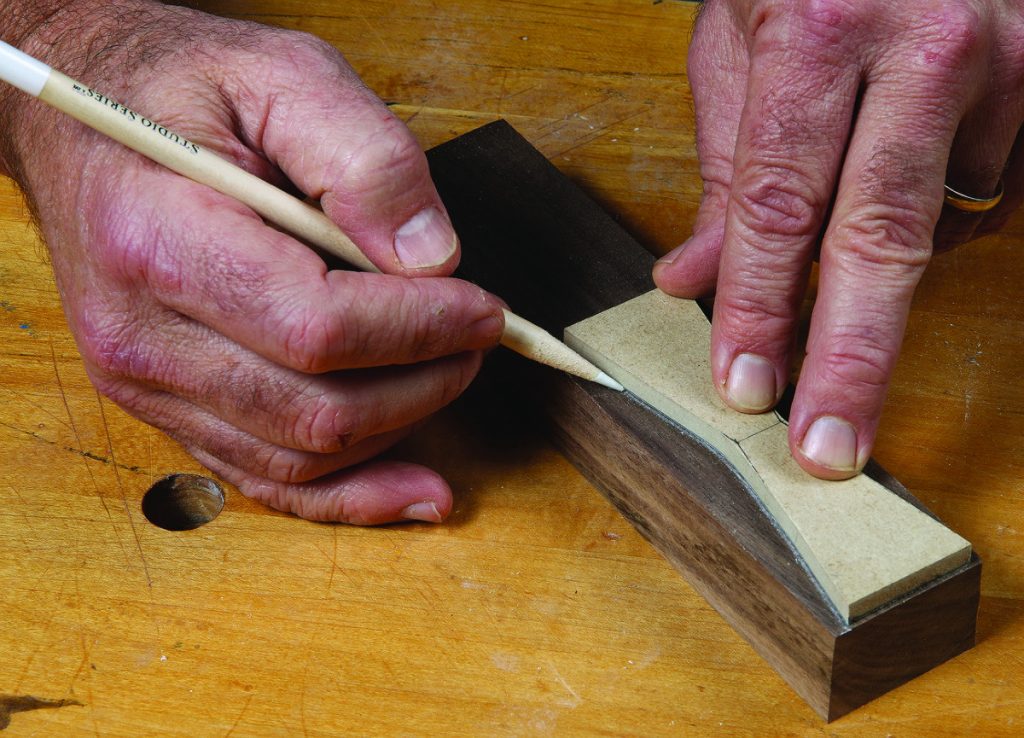
Trace templates onto key stock. Use the same species as the slab, or a harder wood if you want contrast. I’m using a soft white pencil here for maximum visibility on this dark walnut.
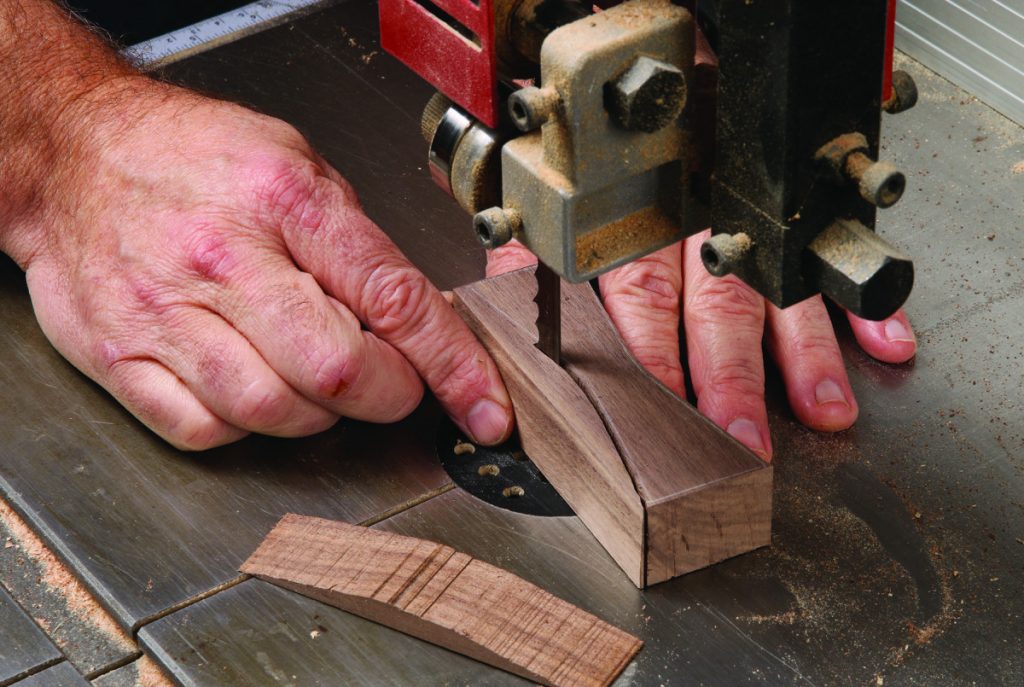
Bandsaw close to the lines and rip to thickness.
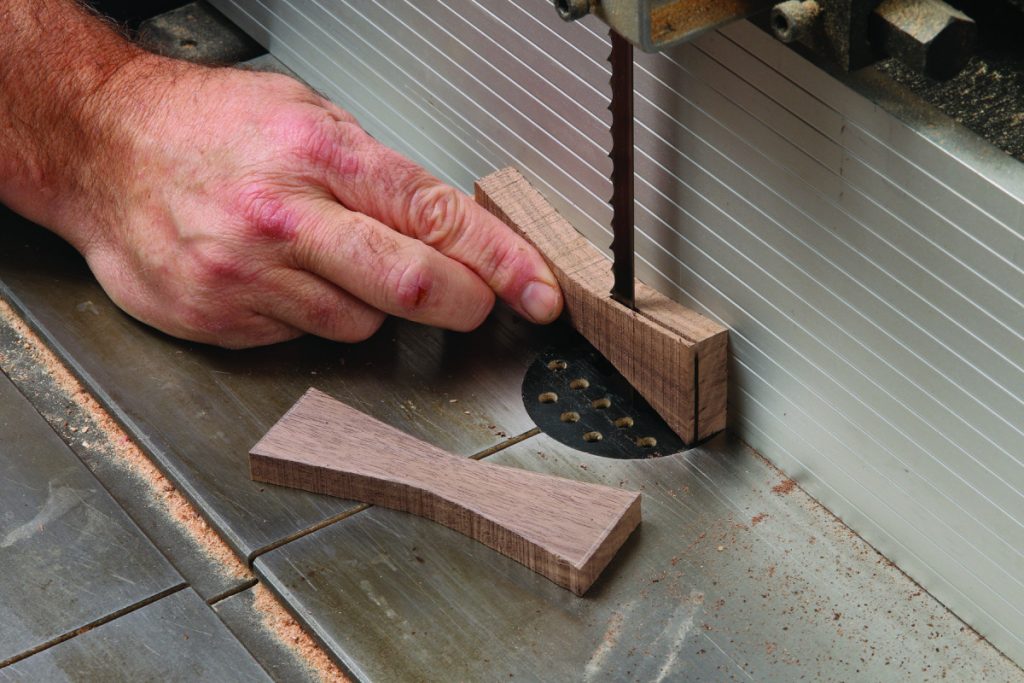
I make my keys 3/8″ thick in most cases—plenty strong yet not too difficult to inlay cleanly

Head back to the belt sander and tilt the table a hair. 1° works well for most woods. Go a little less for harder species and up to 2° for soft woods like pine and fir.
As for which woods to use, I like the simple elegance of keys made from the same species as the tabletop, but contrast can be lovely too. If you’re mixing woods, choose a harder wood for the key, so the slab gives way as you drive it in, not the key itself.
I always use a marking knife to trace my keys. It’s a little harder to control than the sharp pencil that some prefer, but the knife hugs the inlay much more closely and leaves a line I can drop my chisel into for the final paring cuts.
Where some simply hold down the inlay while tracing it, I don’t trust my shaky hands to keep it stable, and gaps in my furniture keep me up at night. So I use a few blobs of hot glue to lock down each key for tracing.
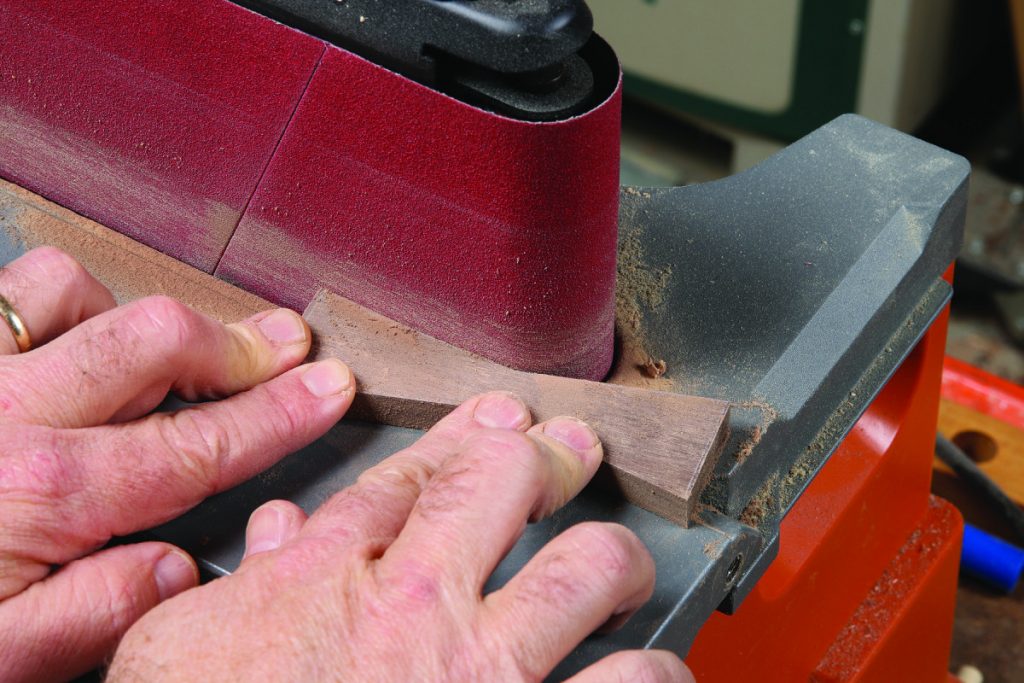
Sand the edges as before, using both ends of the belt to create a smoothly rounded neck in the middle. Hold down the key on the tilted table to be sure the edges are beveled evenly.
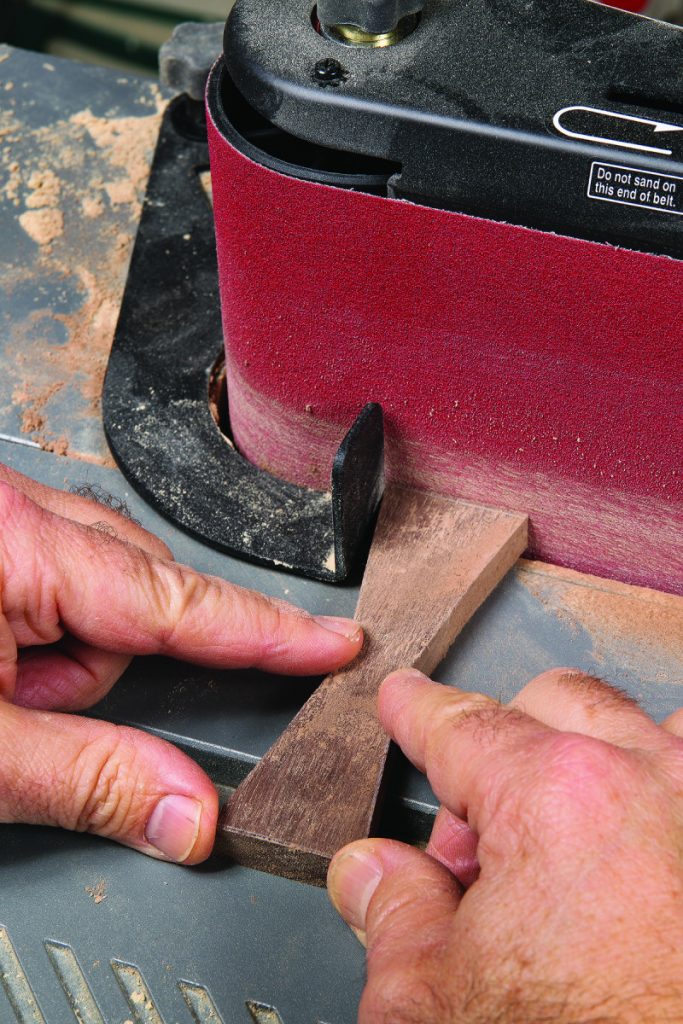
The ends get beveled too. For safety and accuracy, work against a stop.
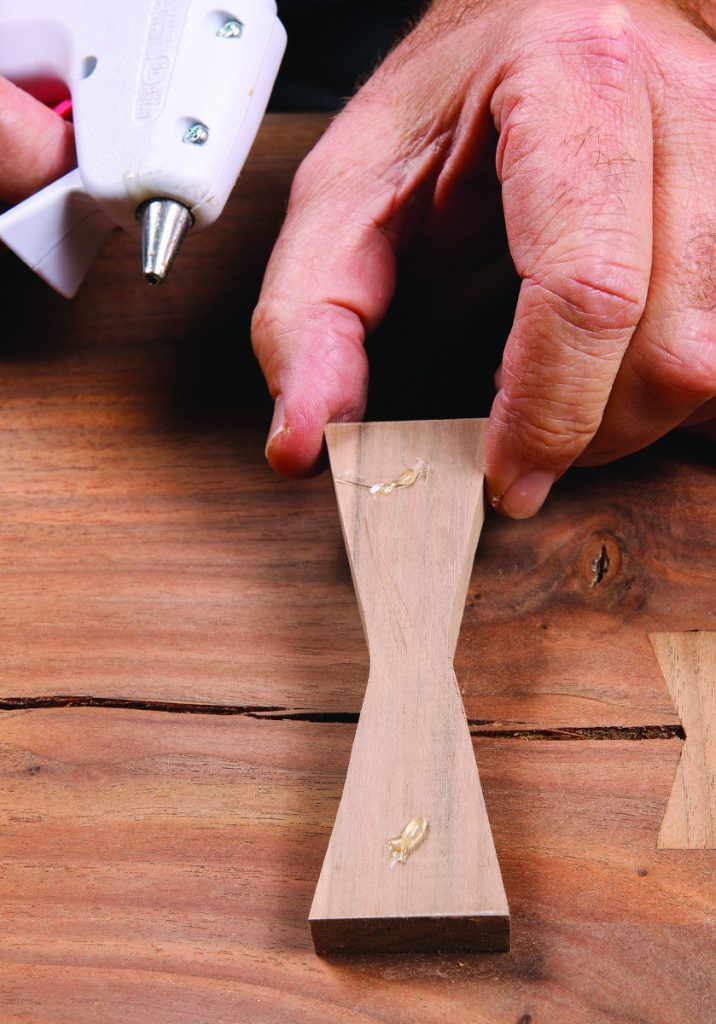
Apply a few dabs of hot glue, flip the key, and press it down firmly. It will hold tight for tracing and pop off easily afterward. Be sure to number your keys (and mortises), as each one is slightly unique.
Use the flat side of your marking knife to trace the straight edges of the key, starting with light passes to establish the line without wandering. Then flip the knife and use the bevel side to hug the curved areas closely.
The rest of the process is pretty typical for all types of inlay: you rout to establish the depth of the pocket, and chop to the line with chisels. It’s all covered in the photos.
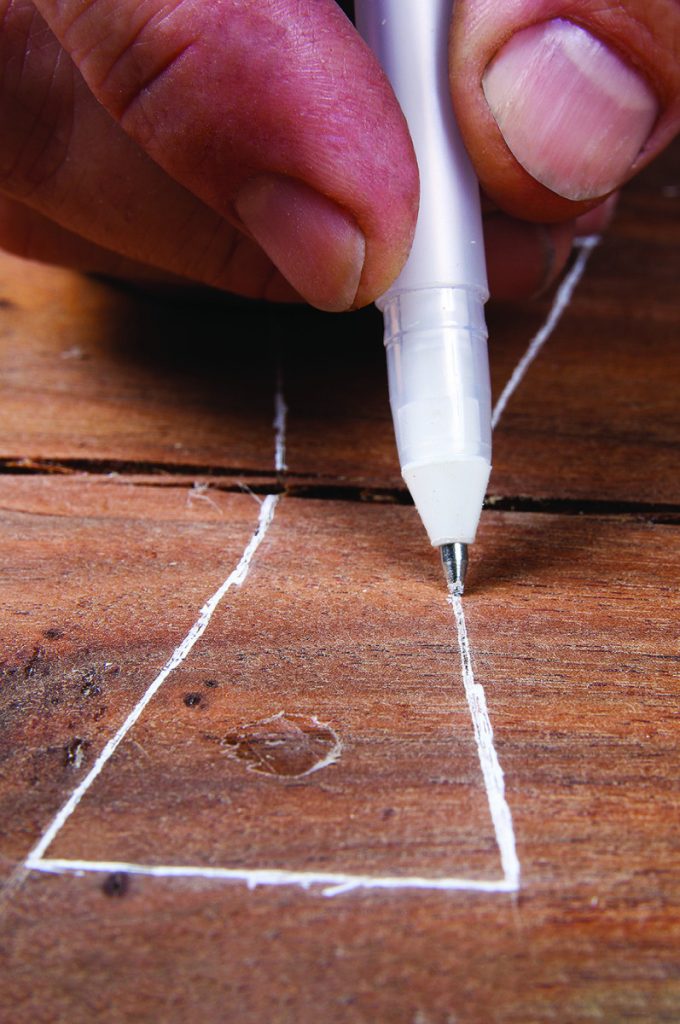
Visibility trick. In dark woods like this walnut, I trace my knife lines with a white gel pen, which surrounds and highlights the thin scored line.
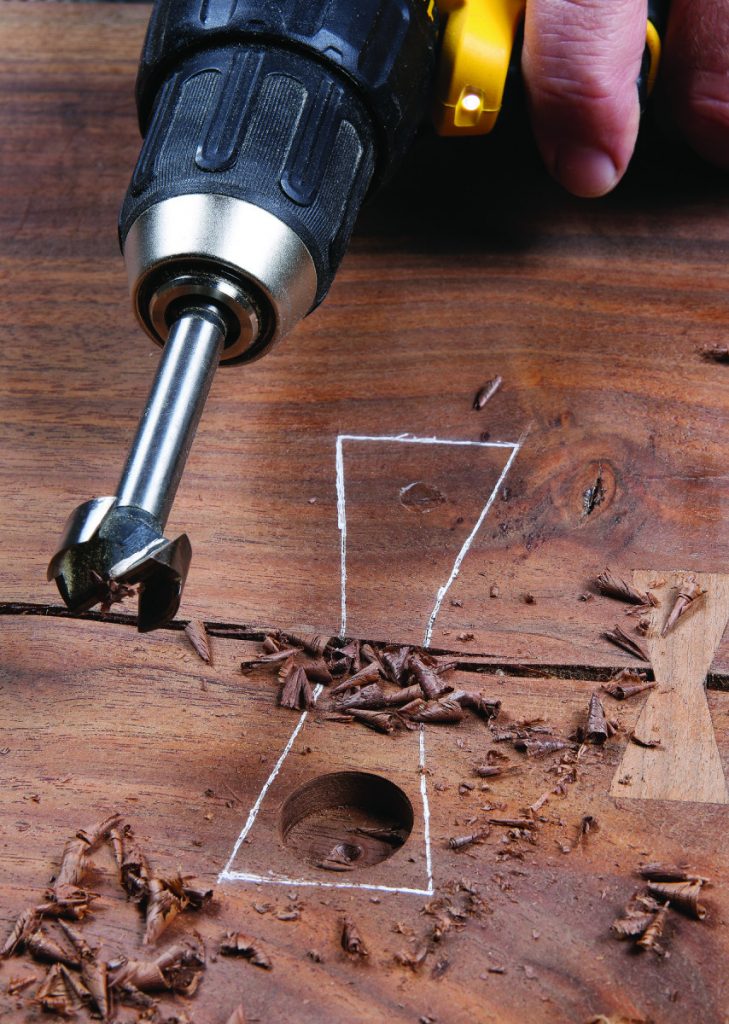
For fixed-base routers, drill a big flat-bottom starter hole with a Forstner bit, slightly less than your router-bit depth.

Set the bit depth to roughly 1/16″ less than the thickness of the key and use the starter hole to tilt the spinning bit to full depth. Rout in easy overlapping passes in a counter-
clockwise direction, bracing the base with your free hand to keep the router from jumping suddenly. Then switch to a climb cut to rout close to layout lines without goin over.
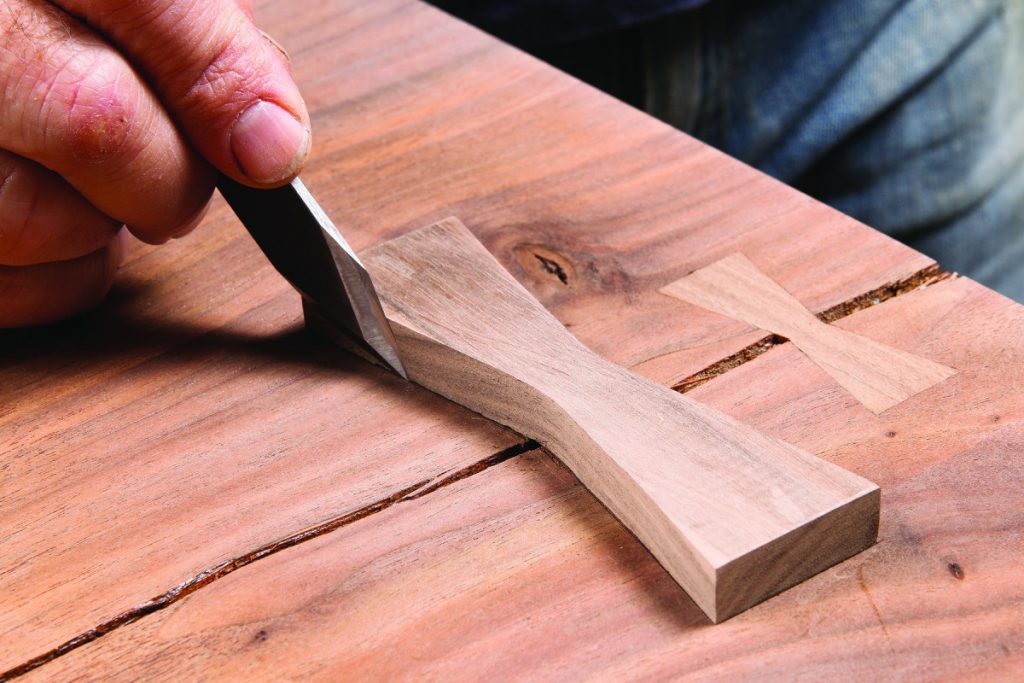
Careful chisel work is the key. Using a 1/2″ chisel for good control, you’ll be able to set the tip directly in the scribe mark in most spots. The router will leave extra material in the corners, however, so nibble up the mark in those spots, placing the chisel in the line for only the last thin paring cuts.
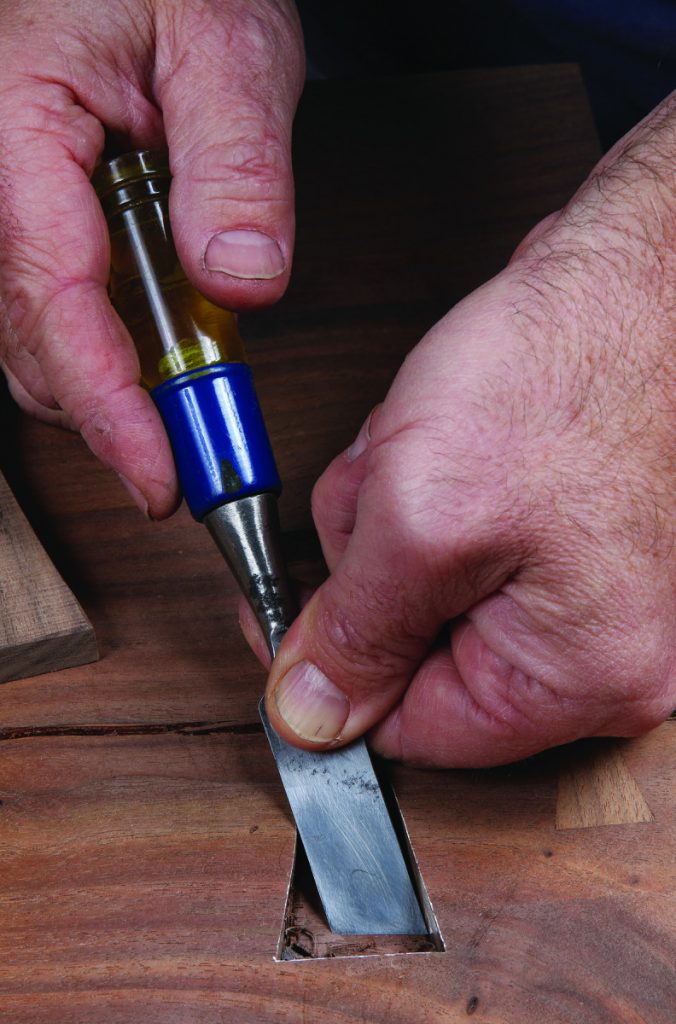
An angled chisel is very helpful for removing the last bits of taste in the tight corners. Take a last look at all of the mortise walls and make sure they are square (or back-beveled slightly) so they allow the key to seat fully.
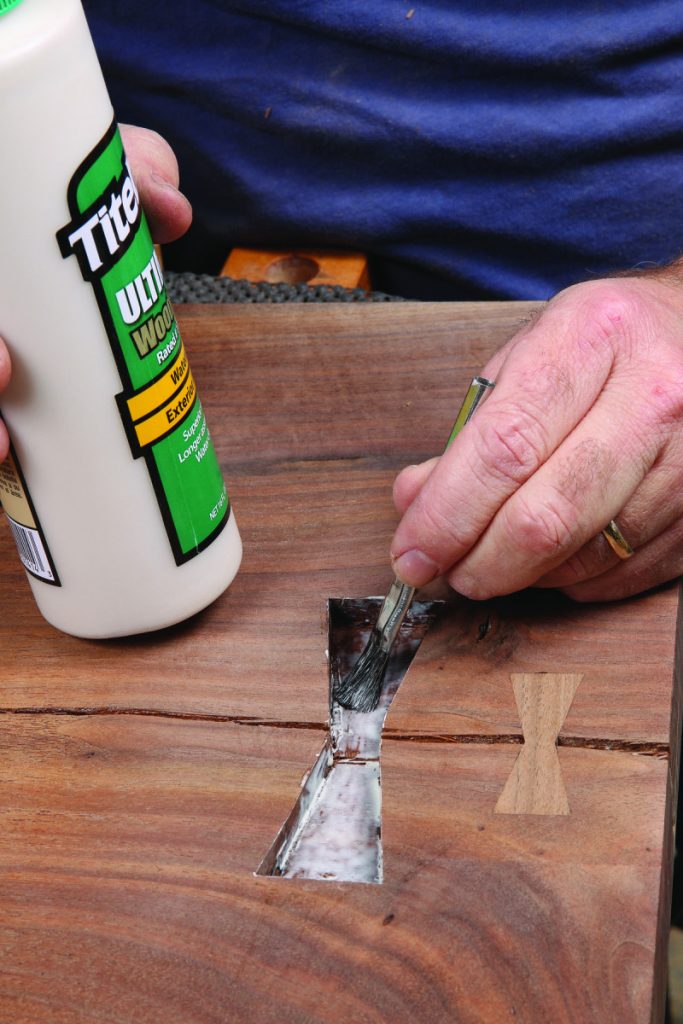
Glue goes in the mortise only. Spread it around onto all surfaces with a small brush. You can wet the key slightly with glue, but most of it will just squeegee off and become troublesome squeezeout.
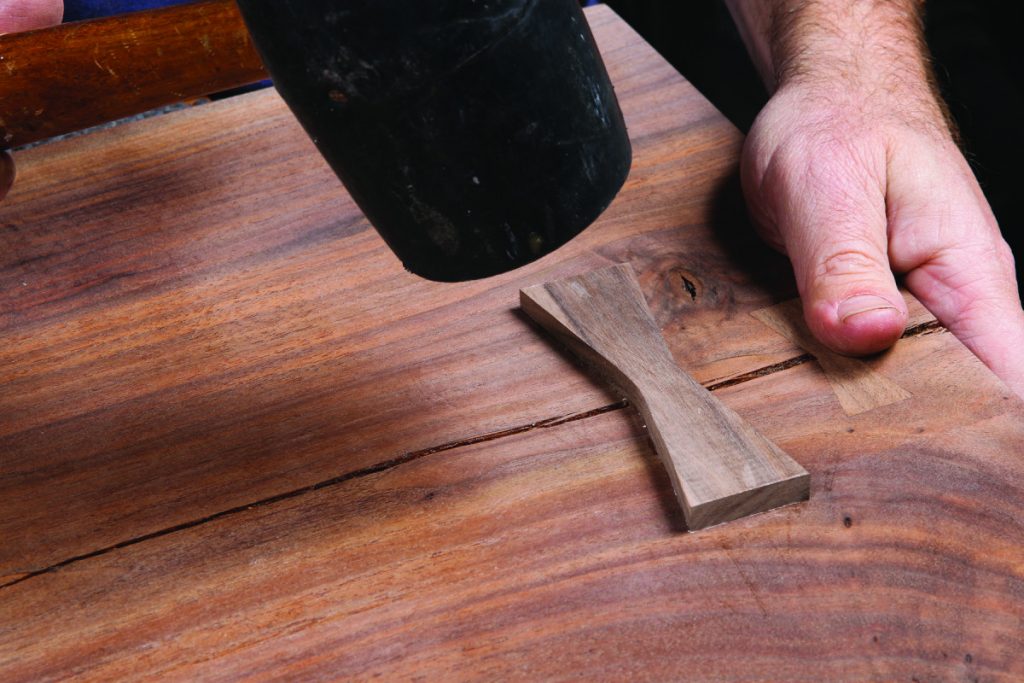
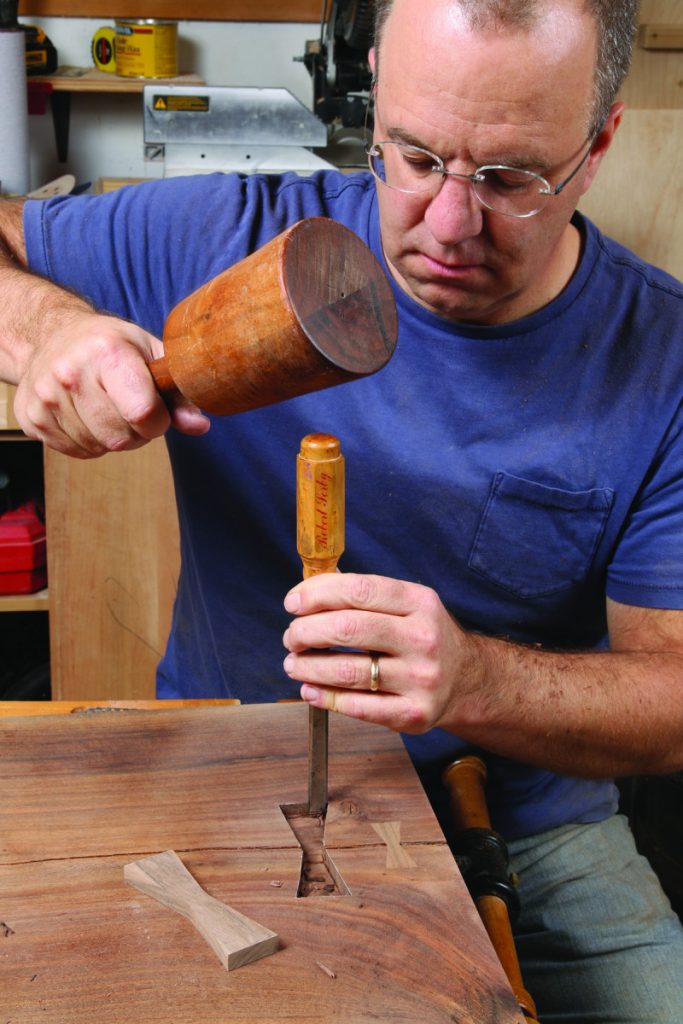
Drive the key evenly. After chamfering the bottom edges with a sanding block, I use a rubber mallet for most woods, but when driving keys into harder woods, I sometimes place a hard block on top to prevent the key from splintering or splitting as it goes in.
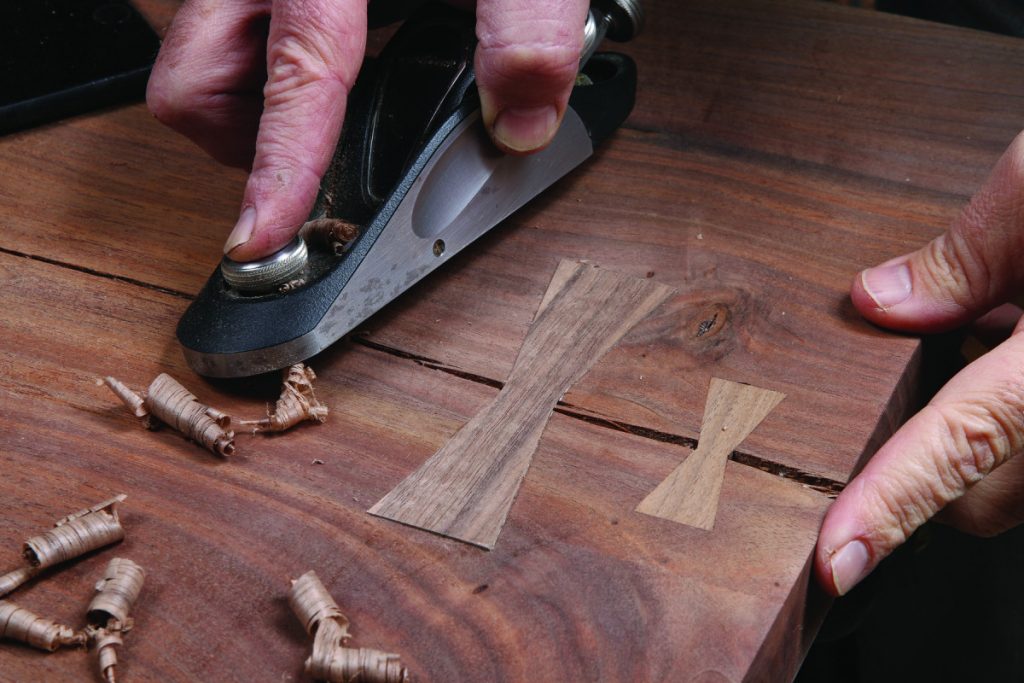
Plane and sand keys flush. Switch planing directions to avoid tearout, and feel free to plane across the grain as needed.
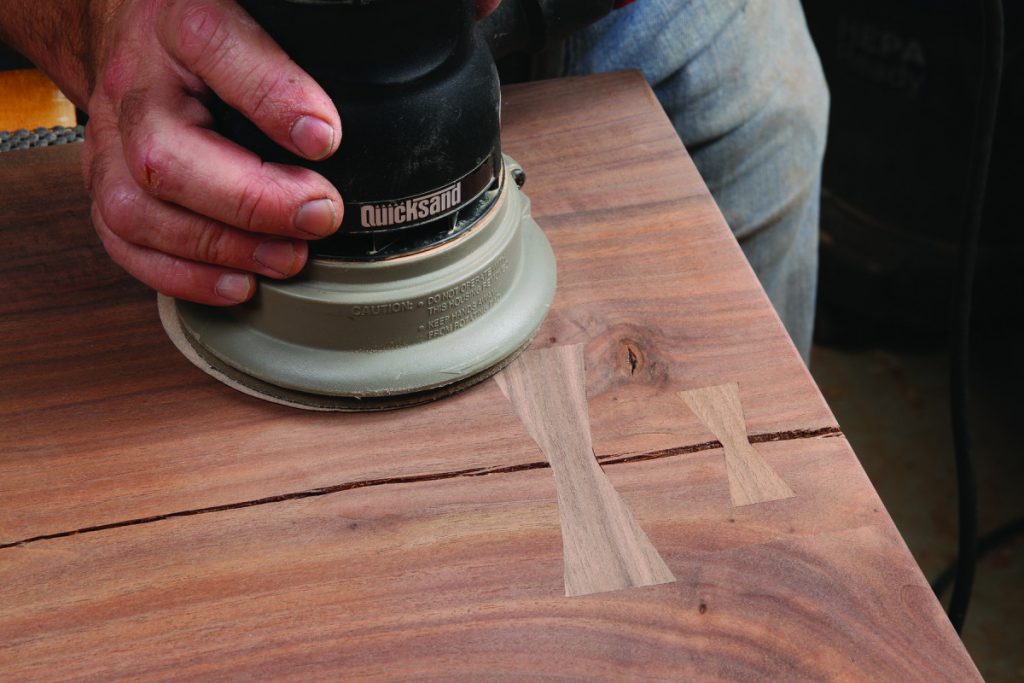
Stop when flush or almost so and finish the job with a random-orbit sander.
You’ll be proud of the results, and your slab will be stable for decades to come. Don’t be afraid to vary woods and designs. For example, these ebony keys would contrast nicely with most slabs.
By the way, I don’t like filling defects with epoxy—tinted or otherwise. Wood moves and will eventually pop out some of that hard plastic filler. I strip the bark off the edges too, for the same reason: It’s bound to work itself loose over the years.
Asa Christiana is the former editor of Fine Woodworking magazine, now living and working in Portland, Oregon. His 2017 book Build Stuff with Wood is a guide for true beginners. You can find him on Instagram @buildstuffwithasa
Here are some supplies and tools we find essential in our everyday work around the shop. We may receive a commission from sales referred by our links; however, we have carefully selected these products for their usefulness and quality.