We may receive a commission when you use our affiliate links. However, this does not impact our recommendations.

Walnut Entertainment Center
A 19th-century wardrobe fills a 21st-century need
|
An antique wardrobe from a 19th-century German settlement in Iowa was the inspiration for this piece. Its most striking element is a radiused cove that gently curves around the corners giving it an air of stately elegance. Its structure is simple yet solid and its cavernous interior can be put to many uses besides storing clothes. With an eye on the 21st century we added some modern upgrades to this timeless design so it could be used as an entertainment center. This cabinet is deep enough to house a 32-in. TV and the pocket doors slide back into the cabinet for unobstructed viewing. A plywood insert holds the electronic gear and can be altered or replaced for other uses. Simple frame-and-panel construction and applied moldings make this wardrobe surprisingly easy to build, despite its large scale. The ability to make haunched mortise-and-tenon joints for the doors and familiarity with Euro-style hardware is helpful in building this project. Otherwise, dadoes, rabbets and butt joints are the toughest joinery you'll encounter. Expect to pay about $1,200 for building materials and another $200 for the hardware. Choosing Your MaterialWe built our wardrobe from unsteamed walnut ordered through Hearne Hardwoods, Inc. (see Sources, p. 37) (Kilndried walnut is usually steamed, a process that eliminates all the wonderful color variations natural to walnut). By ordering wood from a specialty supplier like Hearne we were able to obtain wide stock (10 in. or better) that came from a single tree. The grain in a wide board runs from quarter- or rift sawn on the edges (perfect for stiles and rails), to flatsawn in the middle (ideal for panels). Wood from a single tree ensures a good color and grain match. Be sure to sticker the wood in your shop and let it acclimate for a couple of weeks before milling. Now, spread out the lumber and begin to organize your boards. Save the best pieces for the doors which will be the central focus of the cabinet, at least while the TV is off. (We special ordered “bees-wing” walnut from Goby Walnut Products for our door panels, see Sources, p. 37.) Boards that contain any quarter- to rift sawn pieces are good for door and panel frames (Photo 1). With an eye on grain patterns and color, decide where the remaining boards will be used and mark them accordingly. Making the Sides
The sides are simple frame-and-panel structures made with tongue-and-groove joinery. The panels fit into grooves cut into the stiles and rails with a dado blade. Set your fence so the groove is centered exactly on the edge of the frame. This is important because each stile must be flipped end-for-end to cut the deeper groove for the rails (Photo 2). The tongues on the rails are cut on a crosscut sled making multiple passes over a blade. Final fitting should be done with a rabbet plane. Glue up and thickness plane the panel stock. Cut the panels to size allowing for adequate seasonal movement across the width (in our northern climate we allowed for 1⁄4 in.). Raise the panels by cutting a wide rabbet with a router and straight bit (Photo 3). After dry fitting the side frame-and panel assembly, disassemble and finish sand the panels and the inside edges of the frames. Pre-finish the rabbets to keep the seasonal movement of the panels from revealing any unfinished edges. Glue up the side panels and check for square. The CarcassThe bottom shelf carries all the weight of the insert and its contents. That’s a lot of weight for one shelf! We used a torsion box for the bottom shelf because it’s both lightweight and strong (see Practical Design, p. 79). A torsion box works the same way as framing in the floor of a house. It takes advantage of the weight-carrying capacity of a board put on edge (like floor joists). The torsion box consists of two plywood shelves with vertical dividers (Fig. A). The cabinet sides, face frame and back complete the box. The upper shelf and torsion box are cut from inexpensive plywood. Cut dadoes for the torsion box and the upper shelf. Dry fit the entire carcass assembly and drill countersunk pilot holes for the top shelf and the bottom portion of the torsion box where the base molding will cover the screws. Final assembly of the carcass begins with the torsion box, which is glued and screwed together. The top shelf and the completed torsion box are joined to the cabinet sides with glue and screws. Use clamps for the top half of the torsion box. The Face FrameThis cabinet depends on a face frame and a plywood back to prevent racking. The face frame is made 1⁄8-in. wider than the carcass and is joined with biscuits. Dry fit the assembly and make precise layout marks for the rails. Glue up the face frame, making sure it is square. Lay the glued up carcass on saw horses and attach the face frame (Photo 4). Use a flush trim bit and a router to remove the overhang on the face frame. A pleasing design feature of the wardrobe is the stopped radius on its corners (Fig. A). With the carcass still on its back, use a 3⁄4-in. round-over bit taking several passes to reach the full depth of cut. Set up stop blocks to limit the cut to within 1⁄2 in. of the crown and base moldings. The DoorsThe frames are joined using haunched mortise and tenons. The panels are raised in the same way as the side panels(Photo 3). Assemble the doors and cut them to fit the openings with 3⁄32-in.margins on all sides. The MoldingsThe applied moldings really make this piece come alive. If possible, cut each molding from a single board with the long front piece cut out of the middle and the sides cut from the ends. All the moldings use a simple butt joint at the corners. Shape the CoveIf you’ve never done anything like this before, glue up some stock from scrap wood to use as a trial run before you cut into that expensive walnut. Mill cove stock from 12/4 lumber to 25⁄8 in. Rough cut the sides and front to length and width plus 1 in. Set up your tablesaw for cutting the cove (Photo 5). It is best to have the pith side of the board at the back of the cove (Fig. B). This ensures a stable molding with a straight grain pattern. That said, we found the pith side of our stock full of defects forcing us to orient the grain the opposite way. (If plan A doesn’t work, switch to plan B!) Mark the top edge of each piece and always have that edge against the fence to ensure proper orientation while machining (Photo 6). Use a gooseneck scraper followed by sandpaper to remove saw marks from the cove. Rip the cove to final width, then set the saw at 45 degrees to make the back cuts (Fig. B). Secure the front cove with a couple screws driven in from the back of the face frame. Make clean, square end cuts on the side coves. Butt them against the front cove and secure with screws. Scribe and cut the front cove (Photos 7 and 8). The cove’s radiused corner is a dramatic element in this piece. It looks difficult to execute but in reality it’s surprisingly straightforward. Permanently attach the cove with screws and glue. Use a little epoxy mixed with very fine walnut dust at the butt joint to help stabilize the joint. With a template and router, form the convex radius on top of the cove first. This will help guide you in shaping the concave radius of the cove. To make the template, swing a 3-in. arc on a piece of scrap that’s large enough to support your router. Now cut out the profile on a bandsaw. Use the template to scribe the radius on the top of the cove. Rough-cut the outline with a jig saw or a coping saw. Tack the template onto the top of the cove and use a router with a top bearing flush bit to finish cut the profile. Shape the inside radius of the cove as shown in Photo 9. The Crowning TouchThe crown is made up of the cove with a cap on top and a bead below (Fig. C). Screw the cap molding onto the top of the cove. The butt joint on the cap should line up with the butt joint on the cove. Cut the radius on the cap in the same manner as the cove, using a 33⁄4-in. template and router. Make the bead using a 3⁄16-in. roundover bit and a router table. Secure to the bottom of the cove with glue and nails and shape the radius with a file. Tip: To protect the surrounding surfaces from any slips with the file, tape down some very thin pieces of scrap wood. Base MoldingLike the crown, all three pieces of the base should be cut from a single plank of walnut. Chamfer the top edges and mount to the cabinet with screws. Scribe, cut and mount the base as you did the cove. Radius the corner of the base with a 7⁄8-in. round-over bit using blocks of 7⁄8-in. wood on either side of the base for support. Use a sharp chisel and a flat file to radius the chamfer. Bracket Feet
|
Click on any image to see a larger version.
1. Rip wide boards for frame-andpanel parts. Use the straight-grained wood at the edges for frames and save the remaining flatsawn wood for panels.
2. Use stop blocks to limit the length of the deeper grooves at each end of the stiles where the tongues of the rails will fit. Use a dado blade to cut panel grooves in the stiles and rails. Raise the blade and make the deeper grooves for the rails.
3. Cut the wide rabbet on the edges of the panels with a router and a straight bit. Score the outline of the panel field on the tablesaw to prevent tear out.To support the router and secure the panel, tack pieces of wood the same thickness as the panel onto some plywood. Use straightedges as guides and hold-downs.
4. Glue and clamp the face frame to the carcass using cauls to help distribute the clamping pressure. Square the cabinet to the face frame. Keep the center of the side frame from flexing under clamp pressure by mounting a support block that fits between the stiles at the mid-point of the panel. Tack the face frame down at each corner to keep it properly aligned during glue up. Place the nails where the moldings will cover them.
5. Determine the proper angle for the auxiliary fence by using a layout jig. Set the height of the saw blade equal to the depth of the cove and open the layout jig to the width of the cove (Fig. B). Set the jig over the raised blade at an angle that just allows the blade to clear the inside edges of the jig. Scribe a reference line on your tablesaw and set the auxiliary fence parallel to that line.
6. Cut the cove molding by passing thick stock over the saw blade at an angle (a 50-tooth combination blade works well). Use an auxiliary fence clamped to the table and take only 1⁄16 in. at a time. Protect your fingers with a push block and use a featherboard to hold the cove against the fence. Make a very light final pass and use a slow, steady feed rate to ensure the smoothest cut possible.
7. Scribe the side cove profiles onto the back of the front cove then remove the front cove for cutting.
8. Cut the profile in the front cove on the waste side of the line. Excess length will be removed during final shaping, but a cove that’s cut too short can’t be salvaged!
9. Shape the radius with a large half-round rasp to remove most of the material.The radius begins at the butt joint and wraps around the front. Switch to a finer file, scraper or sandpaper as you approach the desired shape (Photo 10).
10. Use a template to guide you in forming the concave radius of the cove. Make the template by tracing the cove onto a piece of scrap. Cut out the profile, leaving a small fillet as a reference point.
11. Fasten the partially assembled hardware mounting boxes to the upper and lower corners inside the carcass. Complete the boxes by running a small bead of glue on the exposed plywood edges and nailing on the face piece.
12. Use scrap wood to hold the completed pocket door hardware assembly a minimum of 3⁄4-in. off the bottom of the cabinet.
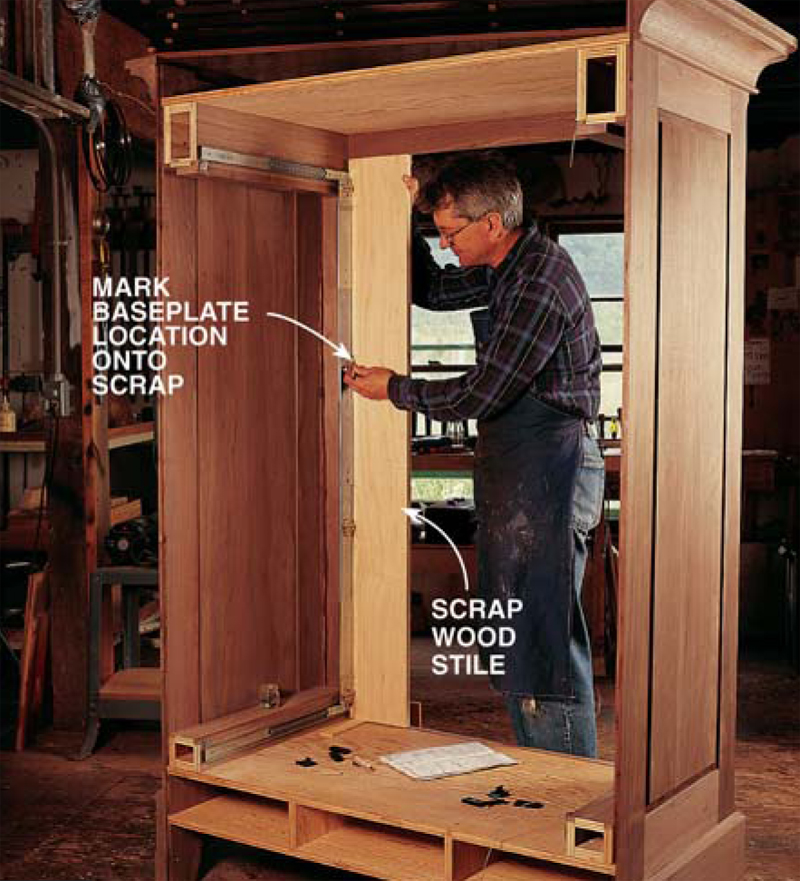
13. To ensure proper placement of the hinges cut a piece of scrap to Figure A.
Face Frame and Side Frames
Figure B.
Figure C.
TV Storage Insert
|


Here are some supplies and tools we find essential in our everyday work around the shop. We may receive a commission from sales referred by our links; however, we have carefully selected these products for their usefulness and quality.