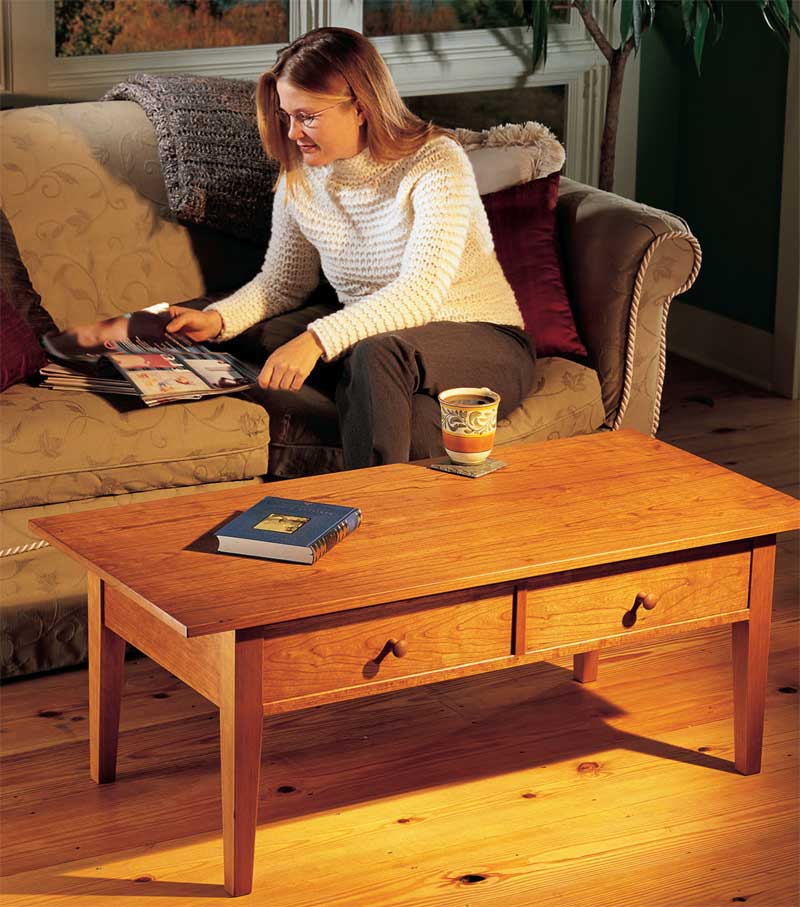
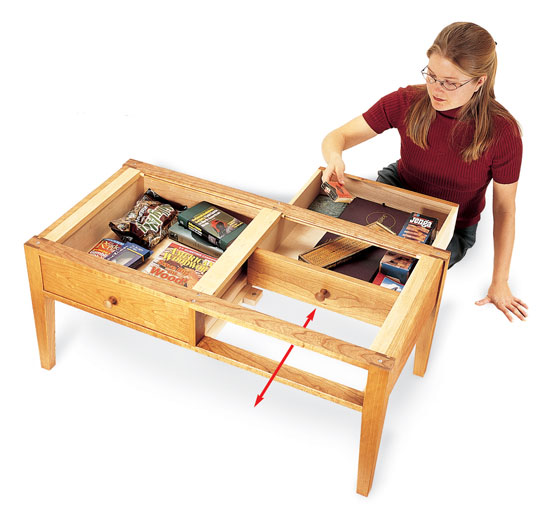
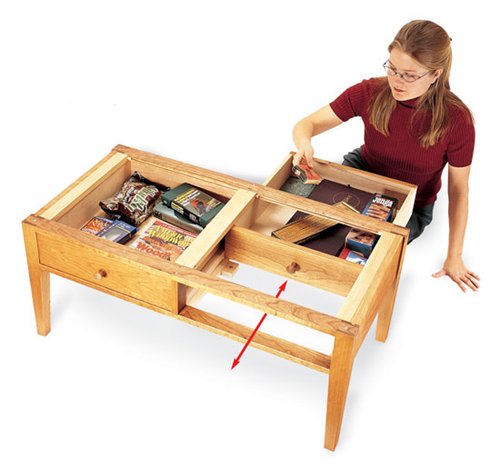
| A coffee table isn’t just for coffee. It displays interesting reading and serves the Saturday night pizza. It hosts Scrabble games, labors under kids’ crafts and gives you a place to rest your feet. It’s a real workhorse that has to be well built and versatile.
Our table is rock-solid, featuring mortise-and-tenon joints, splines, and dovetailed drawers. It’s also easy to build, because simple, shop-made jigs ensure perfect-fitting joints. Its two drawers act like four, because they open from both sides. A standard dovetail jig is all you need to make them. Rare-earth magnets work like magic as two-way drawer stops (see Sources,
below).
This table requires only 25 bd. ft. of
4/4 stock and 9 lineal ft. of rough-cut
2-in.-square stock. If you don’t have a
jointer and planer,buy turning squares
and rip them down to make the legs
(see Sources, below). Buy 3/4-in.-
thick boards for everything else but the
drawer sides. Get 1/2-in.-thick boards
for them and a 2 ft. by 4 ft. piece of
1/4-in. plywood for the drawer bottoms.
We built our table from cherry,
and used birch for internal parts and
drawer sides. Our cost, including onehalf
sheet of 3/4-in. birch plywood for
the jigs and clamping cauls, came to
about $250.
The only must-have power tools for
this project are a tablesaw and a plunge
router equipped with an edge guide.
You’ll also need a drill, a coping saw, a
sharp 1/4-in. chisel, glue and the usual
assortment of clamps, including four
4-ft. pipe clamps.
Start at the Top
I always make the top of a table right off
the bat, for two reasons. First, it’s the
most important part, visually, so it
deserves the best-looking boards. Make the aprons, rails and drawer fronts from
the leftovers.
Second, you can start finishing the
top early, so the finish will have plenty
of time to cure.This is especially important
if you plan to build up layers of
finish for long-lasting protection. Be
sure to apply equal layers to both sides
of the top, to keep it stable.
I like to use hide glue when I work
with cherry,because of its dark color. Its
long open time also makes it easy to
fine-tune the joints between the top
boards (Photo 1). Wait 24 hours before
you remove the clamps.Hide glue takes
a long time to dry.
Cut the top (A) to size, smooth it
and soften all the edges. I use a router
with a 1/8-in. round-over bit for this,
but sandpaper and a block will work. If
you have children, you may also want to
round the four corners for safety.
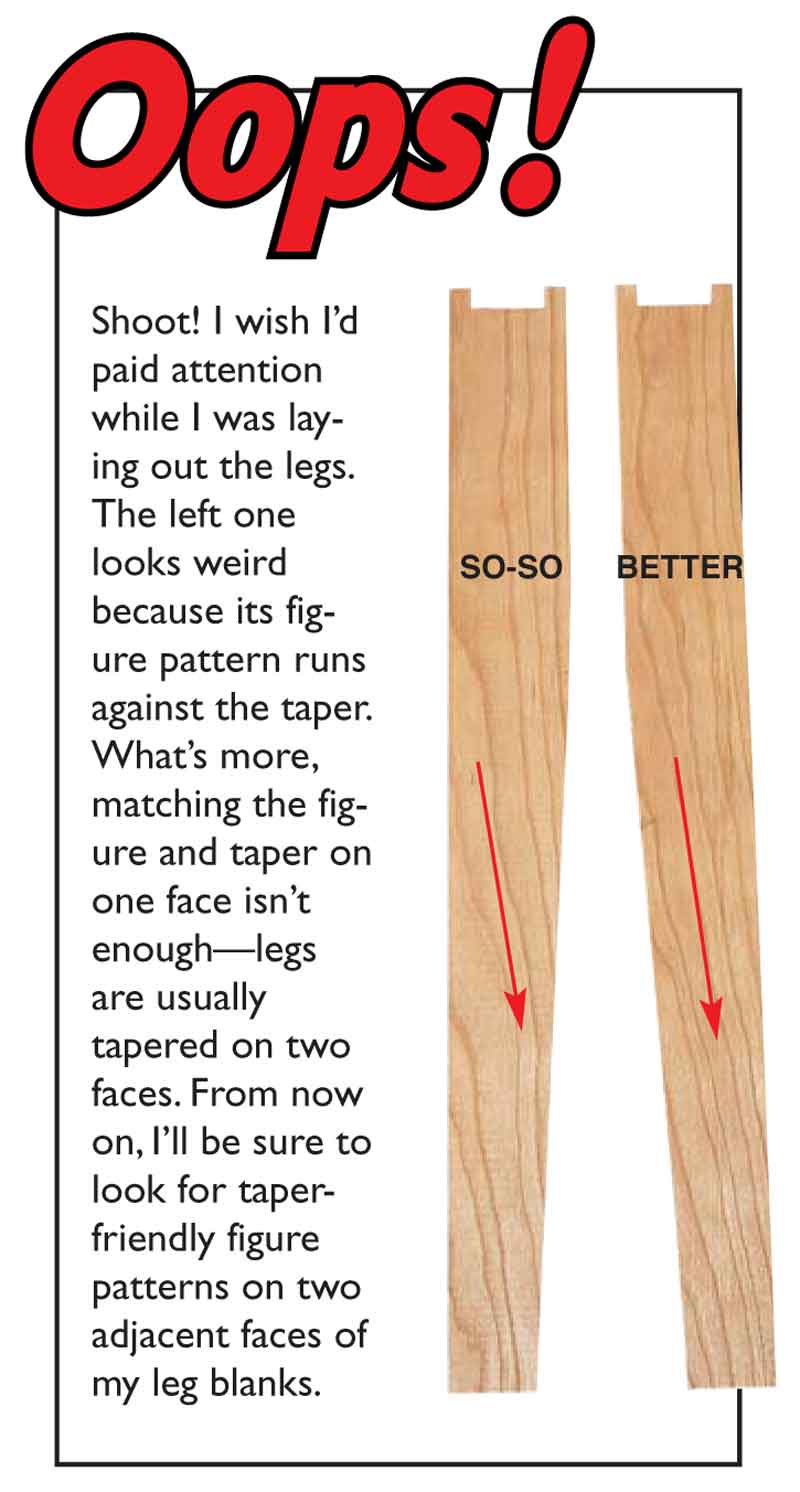
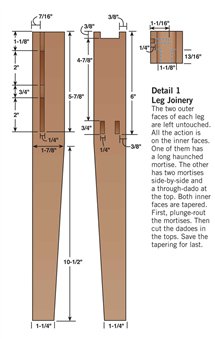
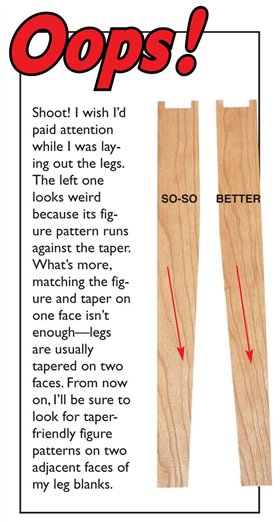
Size Up the Legs
The four legs (B) are mortised, dadoed
and tapered (Fig. A, Detail 1), but
they’re not identical. Be sure to make
two opposing pairs, one left- and one
right-sided. Mark your blanks carefully,
so you don’t mess up! You’ll need
all three jigs (Figs. B, D and E) to complete
the legs; I find it easiest to make
them as I go.
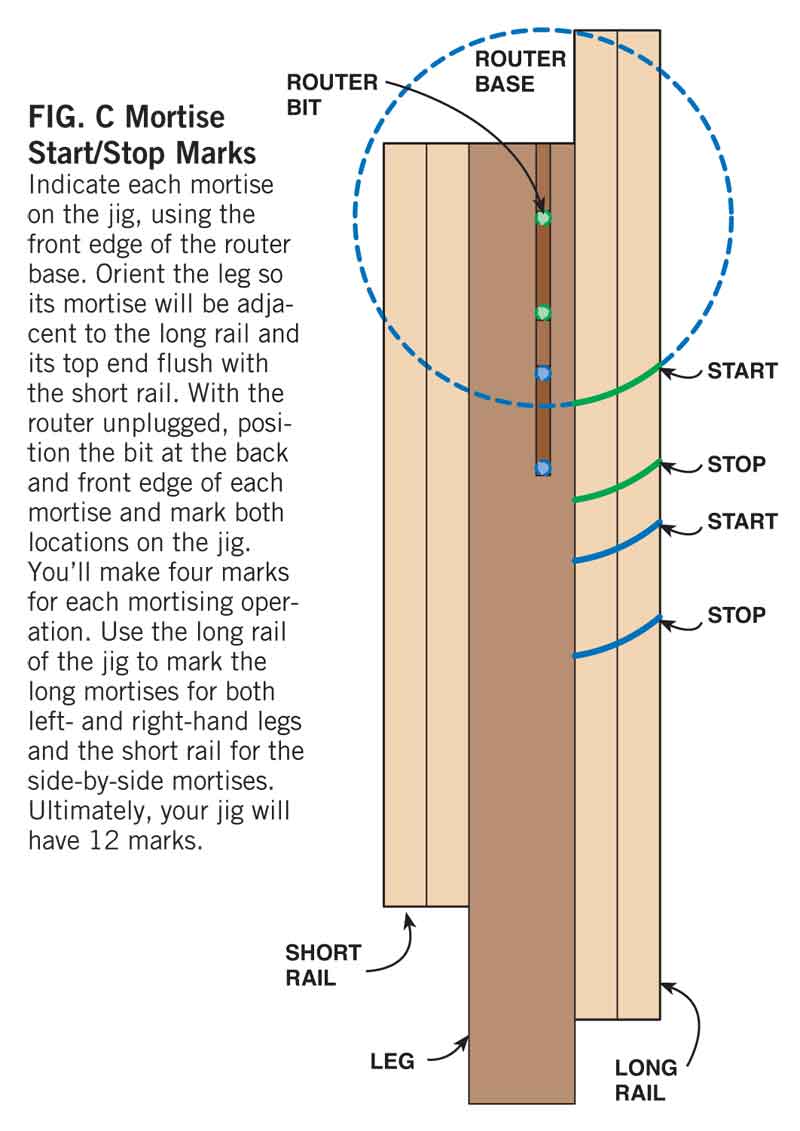
Plunge-Rout the Mortises
Use one of the leg blanks for sizing
when you build the mortising jig (Fig.
B). Make sure the leg fits snugly
between the rails of the jig and is perfectly
flush with them at the top.
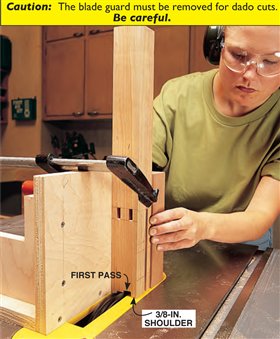
Plunge-rout mortises for the aprons
(Photo 2 and Fig. A, Detail 1), after
marking the start/stop points (Fig.C).
All four mortises are cut with the edge
guide at the same setting. Create the
groove for the haunched tenons (Fig.F)
by routing the first couple passes full
length.Then use the start/stop marks to
finish plunging the individual mortises.
Next, plunge side-by-side mortises
for the lower rails (Fig. A, Detail 1).
Both of them are cut from the same
edge guide setting. After cutting the
first mortise, flip the leg end-for-end to
cut the second. Each mortise has its
own pair of start/stop marks.
By flipping the leg, the side-by-side
mortises will be perfectly centered and
their outer shoulders will be identical.
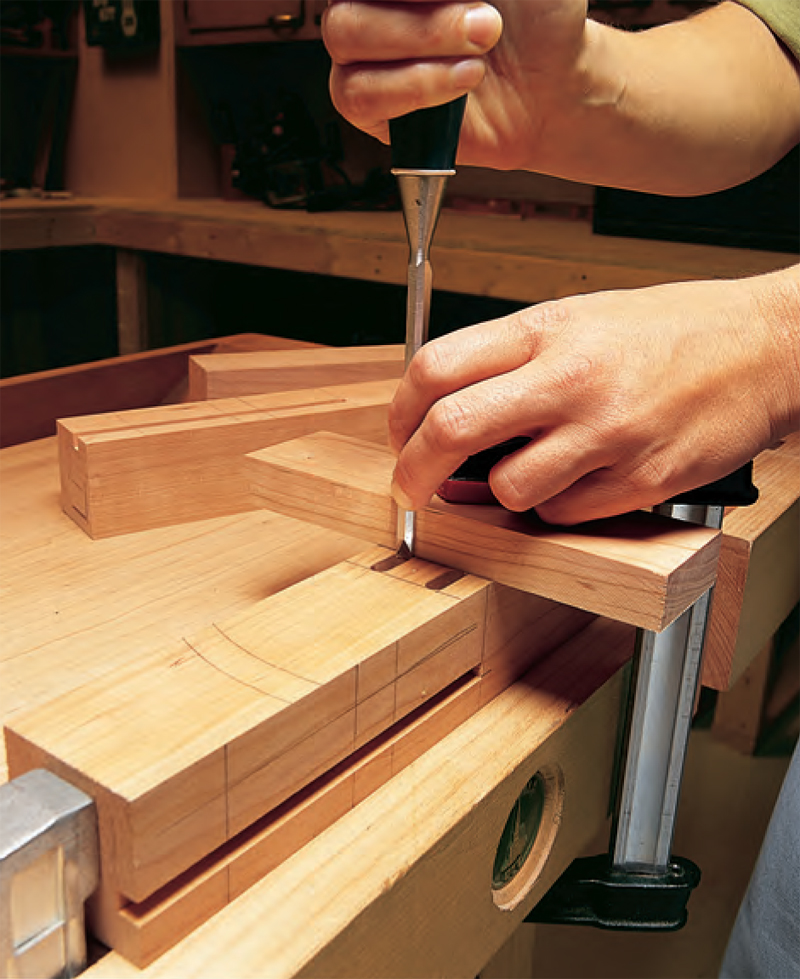
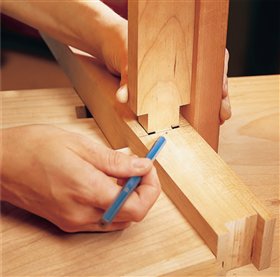
After routing, square the ends of the
mortises (Photo 3).
Cut Dadoes and Tapers
The top rail joins the leg in a lapped
joint (Fig. H). The leg has a centered
through-dado on its top end. To cut
this dado safely on the tablesaw, clamp
the leg in the tenoning jig (Fig.D) and
make two passes (Photo 4). Be sure to
dado the face with the side-by-side
mortises.
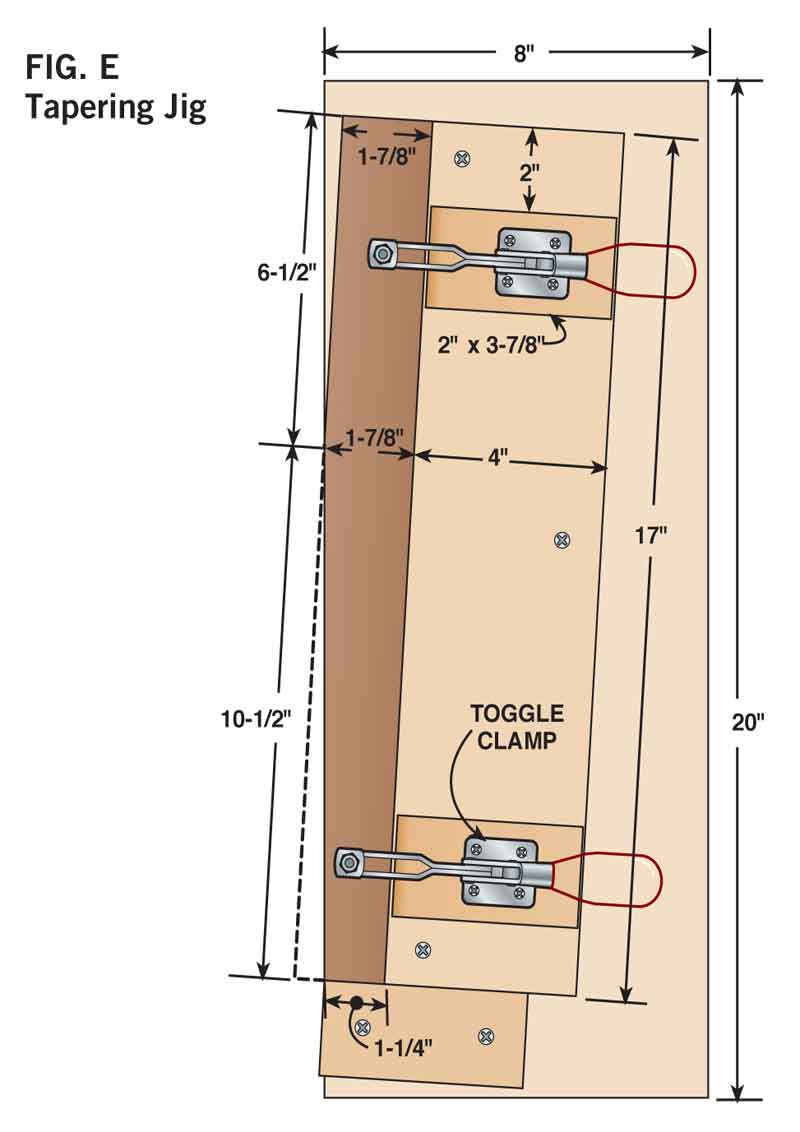
Building the tapering jig (Fig. E),
takes longer than using it to taper the
legs! Orient the leg so you can clamp it
flat on the jig for both tapering cuts
(Photo 5).
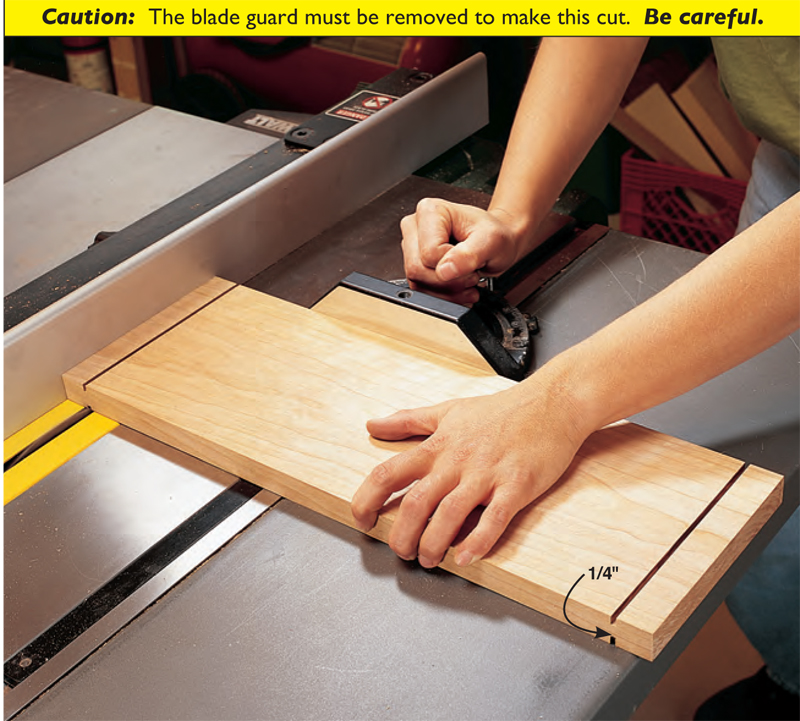
Make the Aprons
When you machine the apron blanks
(C),make an extra one.Use it for testing
when you set the blade and fence on
your tablesaw.Cut the tenon shoulders
first, using the miter gauge and rip fence
(Photo 6). Be careful when you set the
blade height. A cut that’s too deep will
weaken the tenon.
This cut establishes the tenon’s
length. Be sure to include the width of
the saw kerf when you set the rip fence
(with a standard 1/8-in. kerf blade, setting
the fence at 7/8-in. results in a 1-in.-
long tenon).
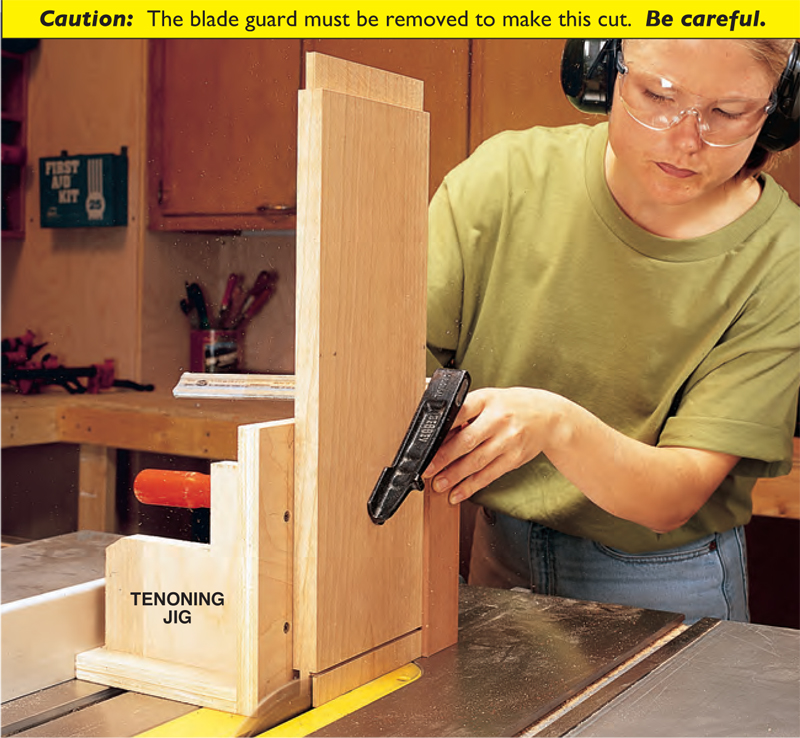
Next, set the blade and fence for cutting
the tenon cheeks,using a test piece
with correct shoulder cuts. Test the fit,
using one of the mortised legs.
In this operation, the fence setting is
most important because it determines
the thickness of the tenon (Photo 7).
The blade height isn’t as critical.Being
a bit too deep won’t weaken the tenon.
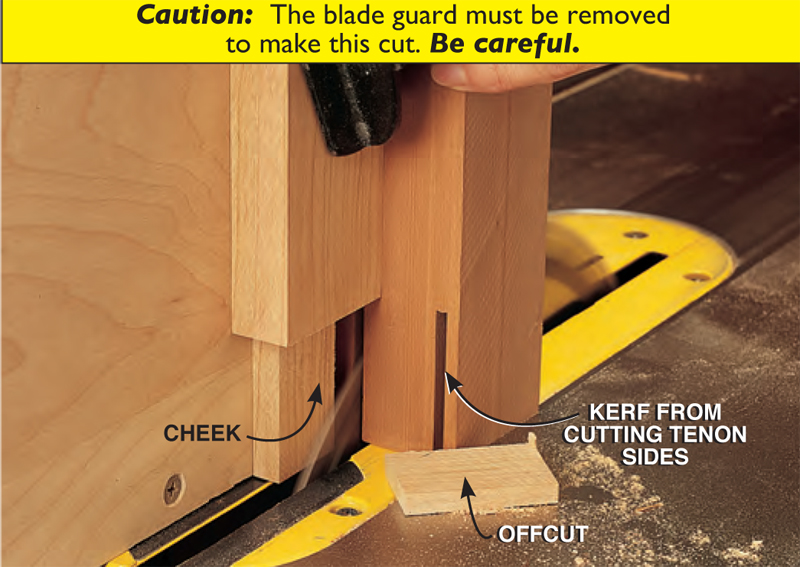
After the cheeks are cut, saw individual
tenons from the full-length
blanks (Photo 8 and Fig. F). Cut the
ends straight, so they fit the mortises.
The haunches don’t have to be precisely
cut, as long as they’re short enough to
allow the joint to close.
Glue the Legs and
Aprons Together
Finish-sand the legs and aprons.Then
soften the outside bottom edge of both
aprons with the 1/8-in. round-over bit.
Soften the edges of the legs too, except
for the ones on the face with the sideby-
side mortises, where the front rails
will be attached.
Glue and clamp each side assembly
(Photo 9). Be sure the top of the apron
is flush with the tops of the legs.
Remove squeezed-out glue, before it
hardens,with a damp cloth.
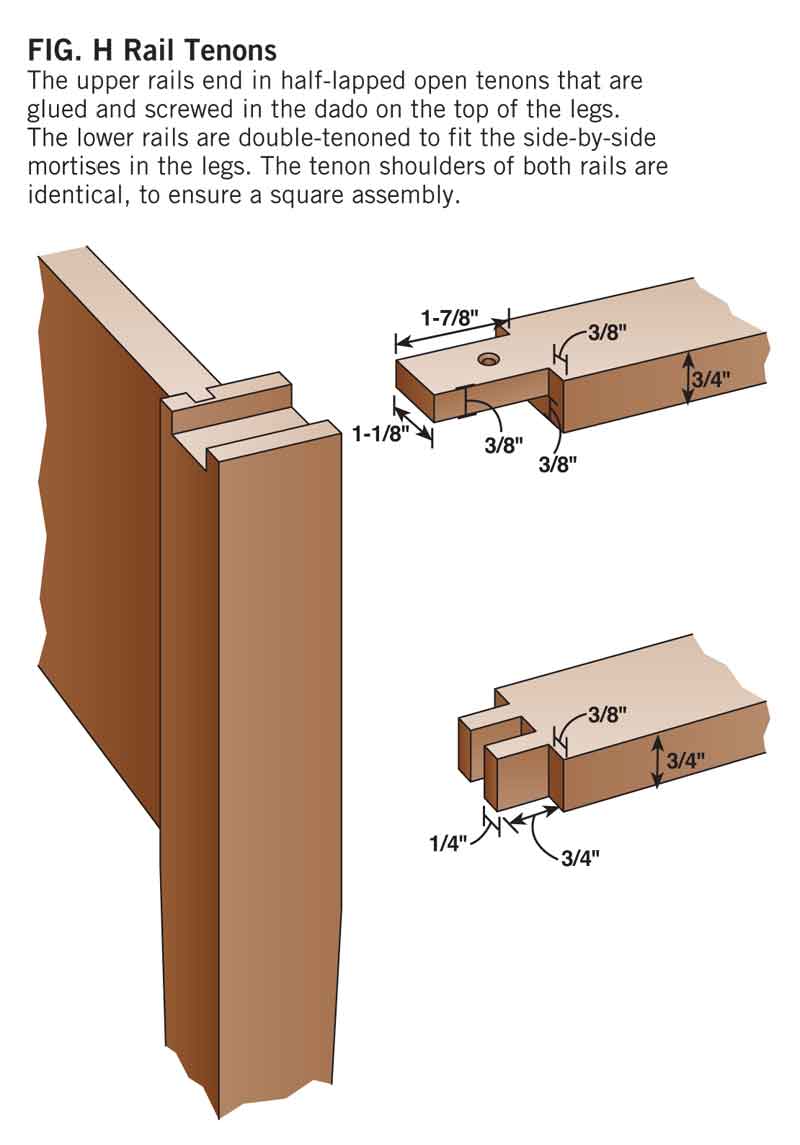
Make the Rails Together
Machine the rail blanks (D and E),
along with extra blanks for the drawer
dividers (F) and to use for test cuts.
Although the upper and lower rail joints
are different (Fig.H) and the lower rails end up being shorter, the four rail
blanks must be identical, and cut square
on both ends.
First, cut dadoes for the drawer
dividers across the inside faces of all
four rails (Fig. G). These dadoes must
be carefully sized to fit the dividers and
precisely centered on the rails. Equip
your miter gauge with a fence and stop
block to make these cuts.
After cutting the dadoes, separate
the rails into pairs and cut the tenon
shoulders (Photo 10). Make a third
shoulder cut on the inside faces (the
ones with the dadoes for the dividers) of
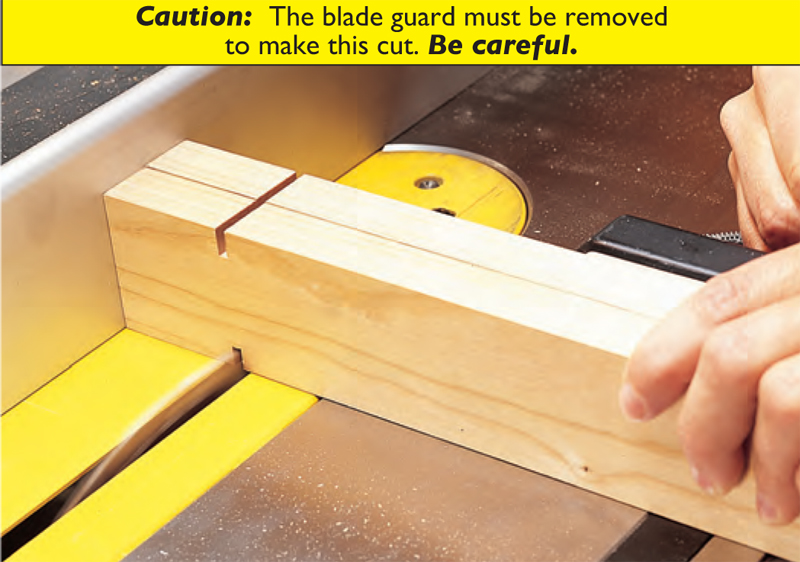
the two upper rails (Photo 11).
Next, remove the waste from the
tenon sides. Clamp a test piece on the
tenoning jig, with its face against the
stop block. Raise the blade, set the fence
and cut the outer side of the tenon.
Then rotate the test piece 180 degrees
and cut the other side.
Test the tenon’s fit in the leg-top
dadoes. Adjust the fence, if necessary,
and finish cutting the tenons on all
four rails.
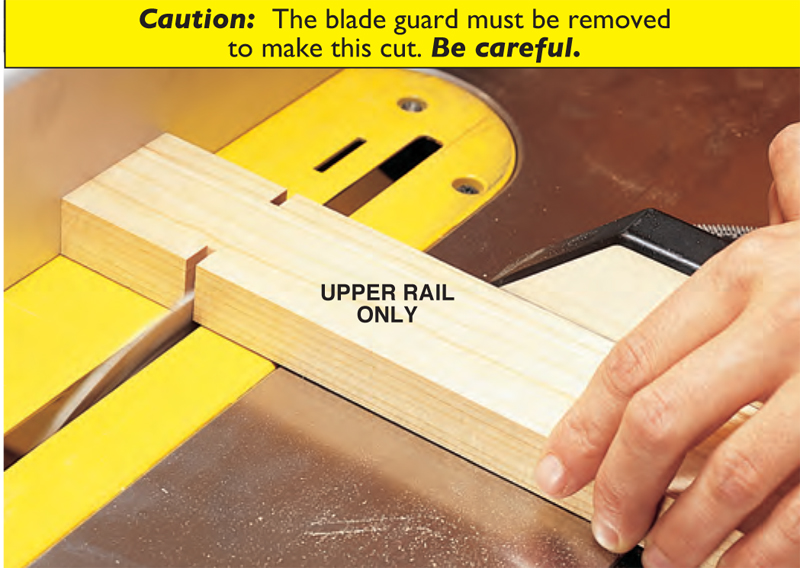
Finish the Rail Joints Separately
Re-mount the upper rails in the tenoning jig and
cut their half-lap tenon cheeks (Photo 12).
Shorten the lower rails so the tenons extend
only 3/4 in.Then mark these tenons so you can cut
them into the side-by-side tenons (Photo 13). Cut
their inner shoulders using the tenoning jig, rotating
the rail between cuts. Remove the waste
between the tenons with additional passes over the
saw blade.
Dado the Rails and
Drawer Dividers
Cut shallow 1/4-in.-wide dadoes in the back of all
four rails (Fig. G). These dadoes will be used to
align and attach the drawer supports, so they must
be accurately centered. Cut them on the tablesaw,
using your regular ripping blade. Set the fence
and make a pass dead center.Then reset the fence
1/16-in. off-center and make two more passes,
first one face, then the other, against the rip fence.
Dado the back edges of the drawer dividers,
too. Rather than dadoing each short divider, it’s
safest to dado a long blank and cut the dividers
from it.
After drilling countersunk pilot holes for screws
in the rails, dry-assemble the base on a flat surface.
Clamp it together and test the drawer openings
with a gauge block (Photo 14).
Glue the Base Together
Hide glue is a good choice for this job. Its long open
time gives you the opportunity to check the drawer
openings and measure diagonals to make sure
everything is square before you drive the screws
(Photo 15). Be sure to work on a flat surface.
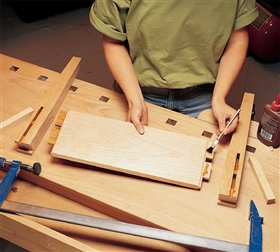
Cut the drawer supports (G and J) to length
and dado their ends to match the dadoes on the
rails, using the tenoning jig. Then make the splines
(H and L).Apply glue, slide the supports in place
and insert the spline.Make sure the support stays
flush with both rails when you add the clamps
(Photo 16).
The ends of the center drawer guide (K) are
also dadoed. Splines keep it flush with the dividers
(Photo 17). Glue the outer drawer guides (M)
flush with the inner leg faces. Install the upper
center drawer support last.
Drill countersunk pilot holes through all three
upper supports for fastening the top with screws,
dead center (Fig. A). Then drill slightly larger
diameter holes in the upper rails so the top has
freedom to move with changes in humidity.
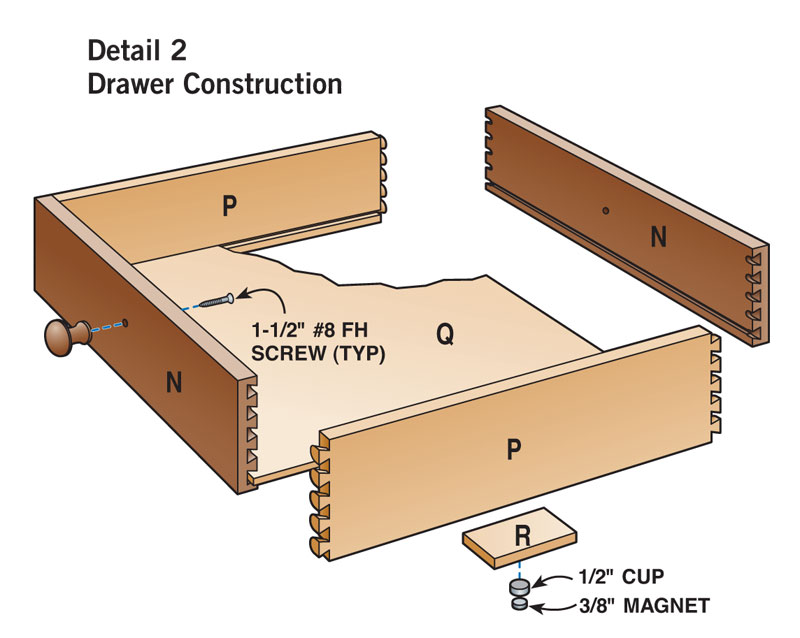
Make and Install
the Drawers
We used a dovetail jig and standard
bit to make our drawers (Photo 18).
Their finished length is 3/8-in. shorter
than the pass-through openings, so
they’ll sit 3/16-in. back from both
fronts. This reveal matches the ones
between the legs and aprons. The
length of your drawer sides (P) may
vary from ours, depending on the
length of the dovetail your jig makes.
For a good fit, the drawers should
be up to 1/16-in. narrower, but only
1/32-in. shorter than the front openings.
Center the dadoes for the drawer
bottoms (Q) in the lowest dovetail
socket of the drawer fronts and on the
corresponding tails of the sides.Then
they’ll be hidden when the drawer is
assembled.
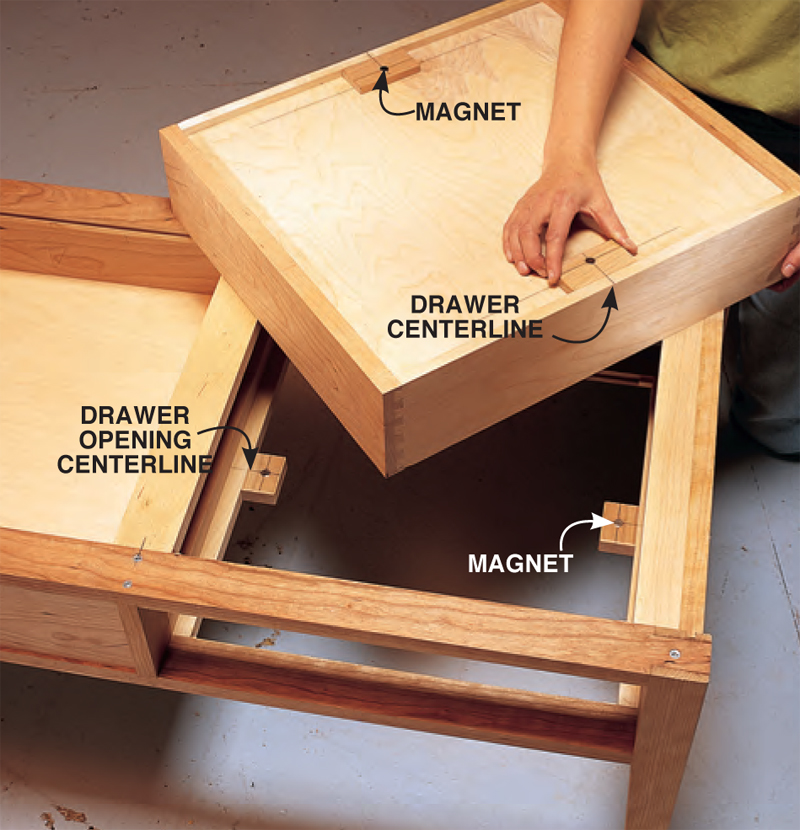
Rare-earth magnets (see Sources, below) act as two-way drawer stops.
Mount them in pairs (one on the
drawer bottom, the other on the
frame), on both sides of each drawer.
They’re self-aligning, so they’ve got to
be precisely located, end-to-end and
side-to-side.
Install each magnet in a block (R
and S). Mount the blocks temporarily
until you get them in just the right
spots. Then glue them in place.
The rare-earth magnets we’ve chosen
are strong enough to work great
even when the drawer is loaded down
with ten pounds of magazines.However,
you should keep magnetic
media, including credit cards and
videocassette tapes out of the drawers.
The magnets will damage them.
Finals
If applying a finish always seems like
a chore, cherry is a great wood to
work with. Even the simplest wipe-on
oil finish will make it look great. For
durability, choose one with urethane
resins. A brushed-on polyurethane
varnish will stand up even longer.
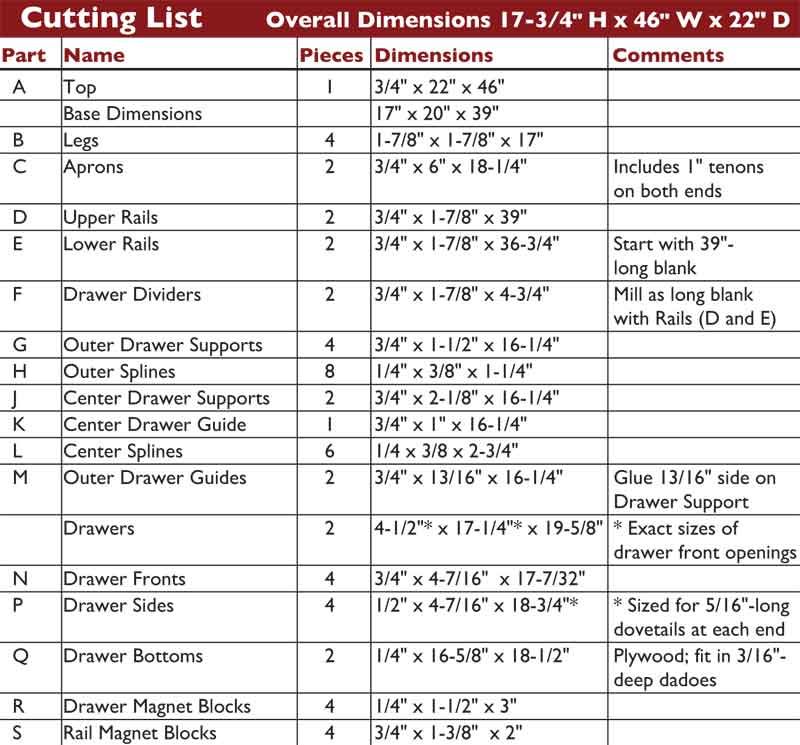
Cutting List
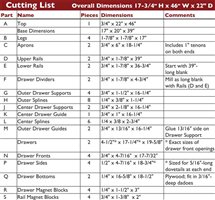
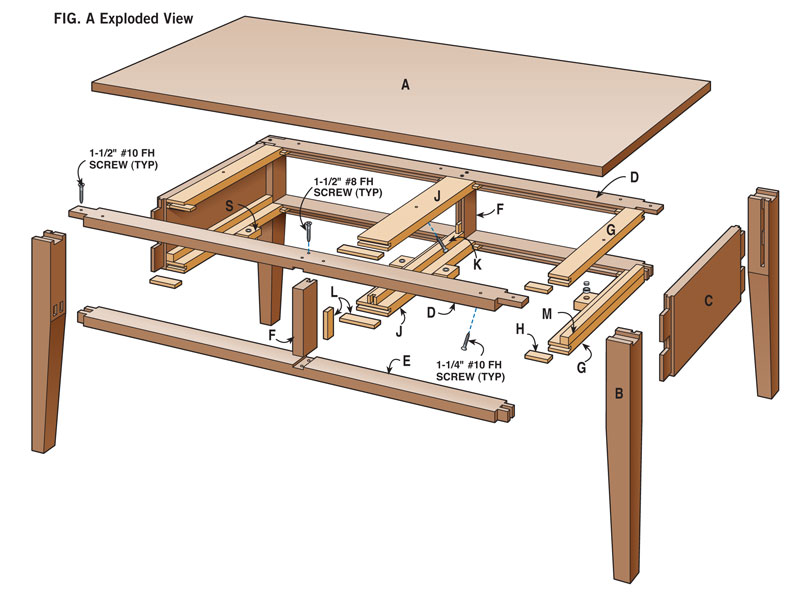
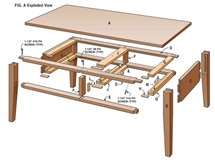
Fig. A: Exploded View
Detail 1: Leg Joinery
Detail 2: Drawer Construction
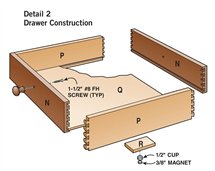
Fig. B: Jig for Plunge-Routing Mortises
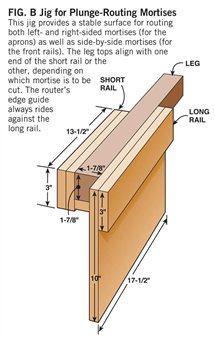
Fig. C: Mortise Start/Stop Marks
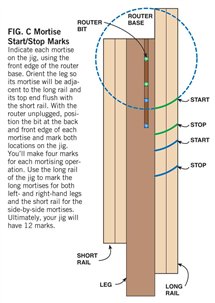
Fig. D: Tenoning Jig
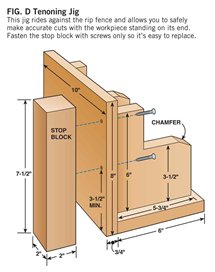
Fig. E: Tapering Jig

Fig. F: Haunched Apron Tenons
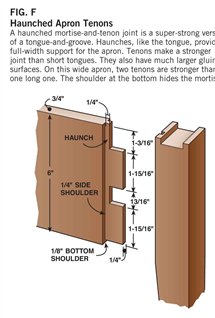
Fig. G: Rail Dadoes
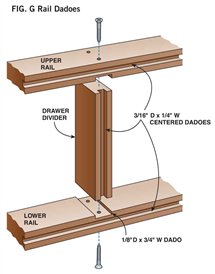
Fig. H: Rail Tenons

Sources
Note: Product availability and prices are subject to change.
Adams Wood Products, adamswoodproducts.com, 423-587-2942, Cherry Turning Squares,
2-15/16″ square x 22″ long
ASQ3322-3.
Lee Valley Tools, leevalley.com, 800-267-8767, Toggle clamps
#88F05.01;
Rare-earth magnets,
4 sets req’d,
3/8″ disc #99K32.03, 1/2″ cup #99K32.52.
Smith Design and Woodworks, niceknobs.com, 908-832-2723, Drawer Knobs
SO-118. |
|
You may also like…
Shaker Table
Arts & Crafts Bedside Table
Walnut Coffee Table
Click any image to view a larger version.
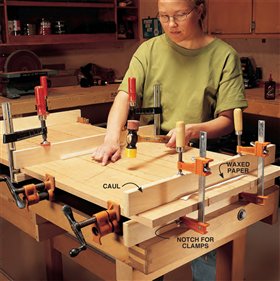
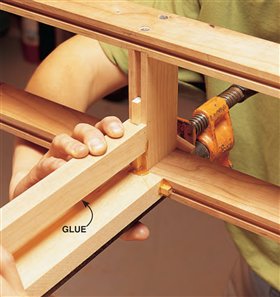
1. Use your best boards for the top. Choose ’em and use ’em right away,
so you don’t get caught short later. Cauls above and below keep the boards aligned
and flat during glue-up. Use a non-marring mallet to make minor adjustments.
Oops!
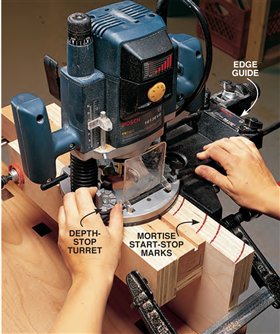
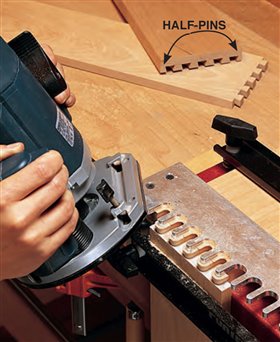
2. Plunge-rout the mortises, using the router’s
depth-stop turret to increase the depth of each pass. If
you have a variable-speed router, you’ll get a smoother
cut if you slow it down by about a third. Start/stop marks
let you cut the mortises without stop blocks.
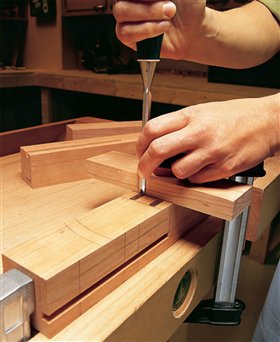
3. Square the ends of the mortises, using a block
clamped on the layout line to guide the chisel.
4. Center a wide dado in the top of each leg, using a
shop-made tenoning jig. Make two passes, one on
each opposing face, so the shoulders are the same thickness.

5. Taper the two mortised faces. Clamp the leg
with one mortised face toward the blade and the other
face down on the tapering jig. After cutting
the first taper, rotate the leg clockwise to cut the
second taper.
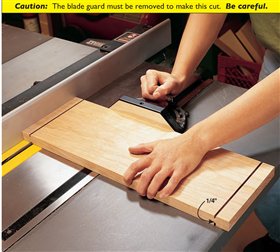
6. Cut shoulders in the aprons with the blade set to leave 1/4-in.
remaining in the center. You can use both the miter gauge and rip fence for
this operation because you’re not making a through cut.

7. Cut apron tenon cheeks using the tenoning jig. Set the blade height to
score the tenon shoulder. Then adjust the tenon’s thickness with the rip fence.
Make two passes, one on each side of the apron.
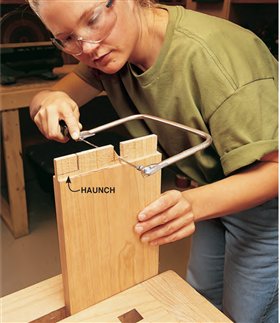
8. Finish sawing the tenons with a coping saw or on
the bandsaw. Be careful with your layout to make sure the
haunches are properly located.
9. Glue the side assemblies. Brush hide glue on the walls of the mortises
and on the tenon cheeks. Use blocks to distribute the pressure when you
clamp things together.

10.Cut the rails’ tenon shoulders simultaneously. Gang
them together in pairs, one upper and one lower, and make
sure they’re precisely mated when you make the cuts.

11. Cut half-lap shoulders on the inside faces of both
upper rails. Use the same setup you just used to cut the
tenon shoulders.

12. Cut half-lap cheeks on the inside faces of the upper
rails, using the tenoning jig. Orient the rail so the offcut falls
out of harm’s way.
13. Mark the inside shoulders of the two lower-rail
tenons right from the mortises on the leg, after shortening
the rail’s long tenon.
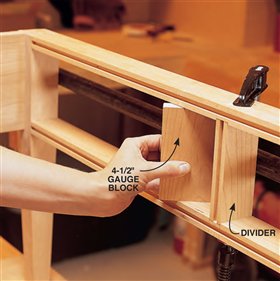
14. Fit the drawer dividers while the base is clamped
together in a dry assembly. A shop-made gauge block
that measures the width of the drawer opening lets you
know when the dividers are the right length.
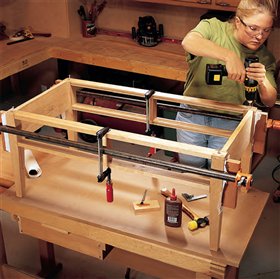
15. Screw the upper rails to the legs when you glue up the base.
These open joints benefit from the mechanical assistance of screws.
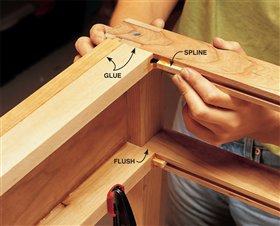
16. Wooden splines perfectly align the runners and rails, just
like a tongue-and-groove joint.
17. Slip the center drawer guide over the
splines, and glue it to the dividers and the lower rail.
18. Dovetail the drawers, using a
standard jig. They’re sized so you’ll
end up with half-pins at the top and
bottom of the drawer fronts.
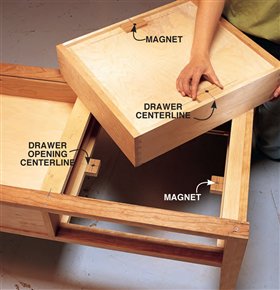
19. Carefully positioned rare-earth magnets stop
the drawers dead center, so you can shut them from
either side. |