


We may receive a commission when you use our affiliate links. However, this does not impact our recommendations.
Turned Post Bed
By Tim Johnson
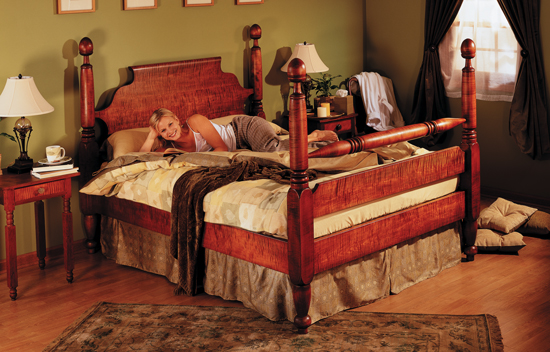
| Here’s how to maintain a positive attitude the next time you hear the phrase “Honey, would you please make the bed?” Forget about the sheets and pillowcases. Head down to the workshop, glue up some timbers and make this bed! It’s a big project that’ll wear you out, but you’ll have a great place to catch some ZZZZ’s when You’re done.
We’ve kept the best of the old, a simple design that contains only six different components, and updated it with modern hardware. We’ve also simplified the joinery. You’ll be able to make all of the joints quickly and accurately with a router and shop-made jigs. However, a simple design doesn’t make this an easy project. It will test your skill and your wallet. There aren’t a lot of parts, but they’re all big–mess one up and you’re out some real dough. You must be proficient at turning–or know someone who is. You’ll need a tablesaw, a guide bushing-equipped plunge router and several bits, a chisel, a hand plane or a belt sander, 1-in and 1-14-in. Forstner bits and a four 6-ft-long pipe clamps.
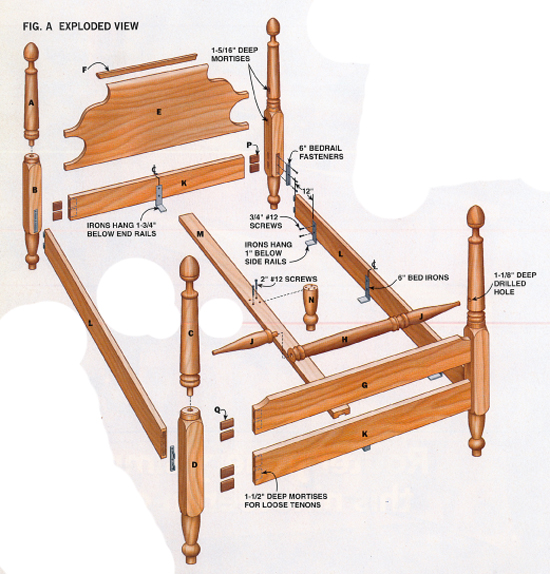
MaterialsYou can make the entire bed from 6/4 material (6/4 lumber is rough sawn at or slightly over 1 1/2-in thick). We used curly soft maple (see Sources, page 69). You’ll need 50 board feet (bd.ft.)for the rails, headboard and footboard. Make the blanks for the four posts and the turned blanket rail at the foot of the bed by stacking three pieces and gluing them together. Each blank for these big turnings contains about 10 bd.ft., so you’ll need a minimum of 50 bd.ft. for them. Plan to buy about 130 bd.ft. for this project. The extra 30 bd.ft. allows you to make a practice leg and accounts for waste, which is inevitable. Consider using 16/4 material for the bedposts. It’ll cost a couple hundred dollars more, but you’ll save yourself time and trouble because you won’t have to glue up the blanks. Besides, every time you look at the posts on your finished bed, you’ll be glad you spent the money because you won’t see any glue lines. Mail-order suppliers often stock 16/4 maple and cherry (see Soures, below). We’ve used steel bedrail fasteners (see Sources, below), mounted in routed mortises, instead of traditional bed bolts, which are notoriously hard to install. When these fasteners are properly fit (see Fig. A, Detail 1), you should be able to seat or loosen the siderails with the tap of a small mallet. They make assembling or disassembling the bed a snap. This design accommodates queen-size mattress/box spring combinations of different thicknesses. The 14-in.-thick set we used sits 25in. above the floor, although there’s nothing magic about that height. If you plan to buy a new mattress set, buy it before you build. Today’s sets are often much thicker then 14 in. You can adjust the size or location of the bed irons so your mattress sits at a comfortable height. Bed irons are available in lengths from 3 in. to 12 in. (see Sources, below). The irons may extend far below the side and end rails. A bedskirt will hide them from view.
Mortising the post blanks and railsWe’ve used loose tenon joints because they’re much easier to fit than traditional mortises and tenons. Cut identical mortises with a router in both pieces to be joined. Then mill a length of stock the same width and thickness as the mortises. Round the ends with a 1/4-in. round-over bit and cut it into pieces, each one slightly shorter than the combined depth of the two mortises. Voila! You’re ready for assembly.
Turning the postsYou only need four tools to turn the bedposts: two gouges, one for roughing the square blanks into cylinders and another for detail work, a parting tool and a skew.
Turning the posts and blanket railTurning a big chunk of wood down to small diameters requires a cautious approach. When you shape the tops of the posts, operate your lathe at a slow speed (500 rpm max.), use sharp tools and make light cuts. Don’t turn all the way down to a small diameter in one shot. It makes the blank susceptible to spiraling, chattering or breaking. Leave the wood as big as you can as long as you can.
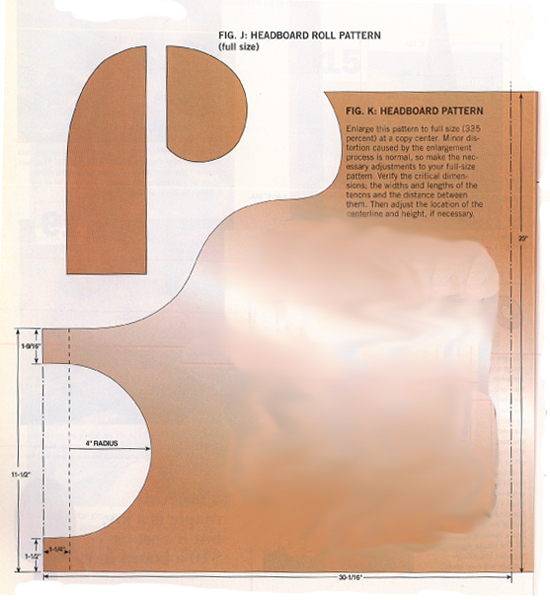
Making the headboardThe headboard blank is huge and its thickness is critical. Because the headboard’s tenons aren’t shouldered, they have to fit the mortises in the posts precisely. It’s best to leave the blank a little thick so you can fit these joints. For the same reason, it’s a good idea to make the upper tenons a bit wider than the mortises (see Fig. K, below). The headboard’s wide, gently rolled top is easy to make. The trick is an additional piece, shaped separately and glued to the back.
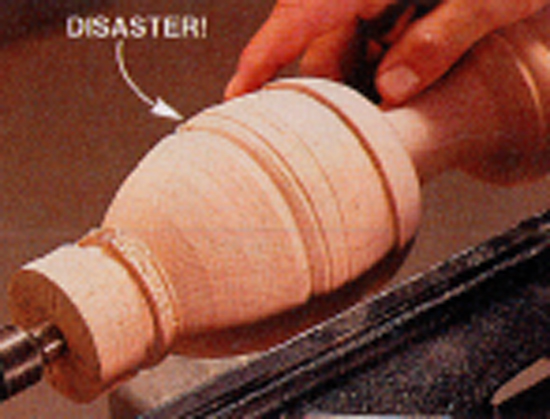
Bring out the figure!– Use two applications of water-soluble dye. After the first coat is dry, sand it off. Although removed from the surface, dye will remain lodged in the figure which, just like end grain, is porous. When you put on the second coat of dye, the figure stands out because it has two coats of dye while the rest of the surface has only one. – Apply a wash coat of dewaxed shellac. This seals the dyed surface and really brings the figure to life. – Enhance the color, add depth to the finish, and accentuate shapes with an oil-base glaze. – Allow adequate drying time, then apply your favorite topcoat. Oops!
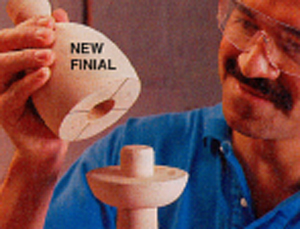
I caught the back edge of the gouge and WHAM! You can see what happened. I didn’t have enough material for another post. Fortunately, I realized I could save this one by using the same technique that worked so well to join the bedpost sections. I scrounged around, found an offcut from one of the posts and turned it into a new finial. I left the top end big so there was plenty of support when I routed the hole in its bottom. Then I turned the end of the damaged finial into a tenon and cut the rest off. The pieces went back together beautifully—nobody will ever know! Sources(Note: Product availability and costs are subject to change since original publication date.) 6/4 and 16/4 soft maple (plain and figured) and cherry: Hearne Hardwoods (888) 814-0007 Groff and Groff Lumber, Inc. (800) 279-4441 5/8” x 6” Bedrail Fastener Set, #28597; $13 (1 set required). Rockler Woodworking and Hardware (800) 279-4441, www.rockler.com 6′ Bed Irons, #H-550; $6 each (8 required). Horton Brasses, (800) 754-9127 Router Bits Large pattern bit (for headboard), #8809;$24. Small pattern bit (for post holes), #6506; $15. Up-cut spiral (for mortising), #7468; $35. MLCS (800) 533-9298.
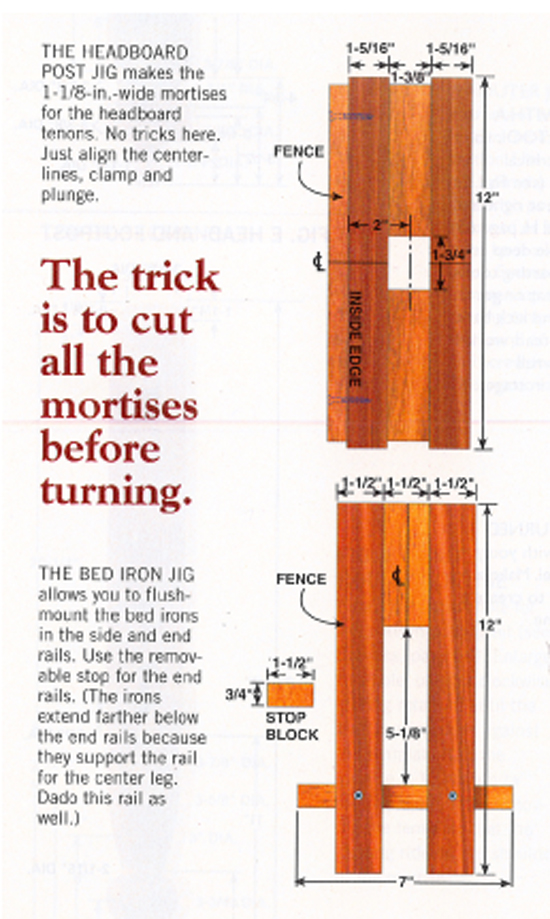
The Headboard Post Jig
Fig. A: Exploded View
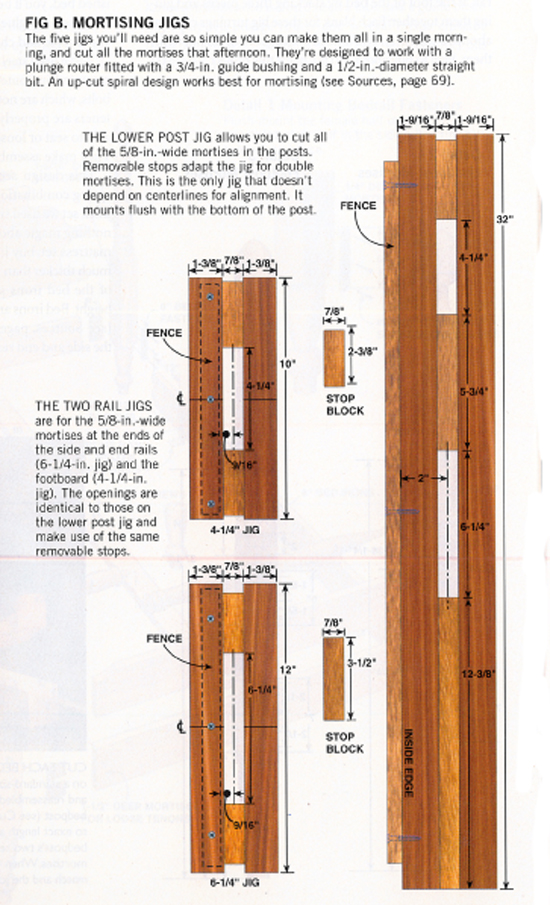
Fig. B: Mortising Jigs
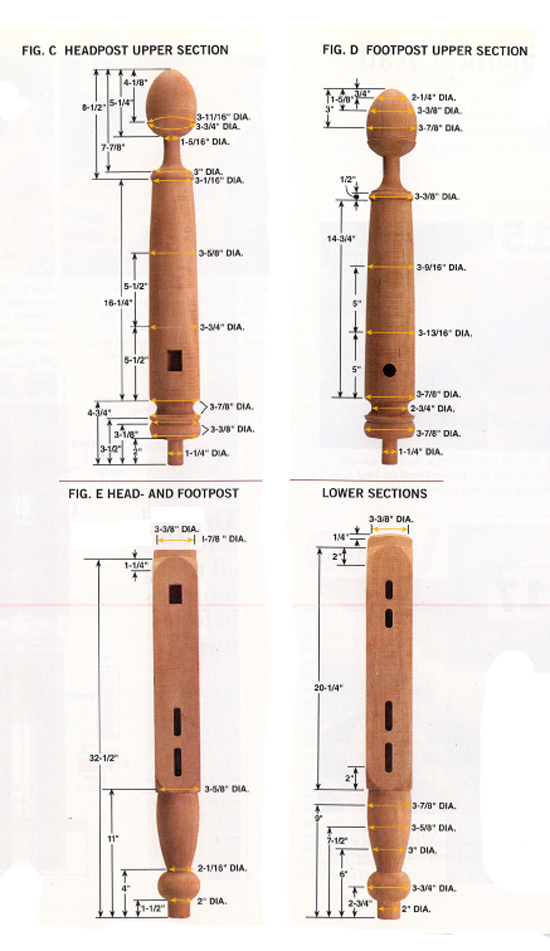
Figs. C & D & E: Headpost/Footpost Upper/Lower Sections
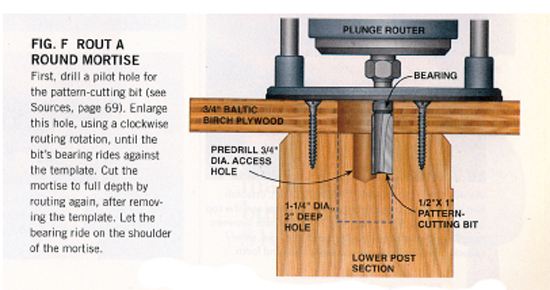
Fig. F: Rout a Round Mortise
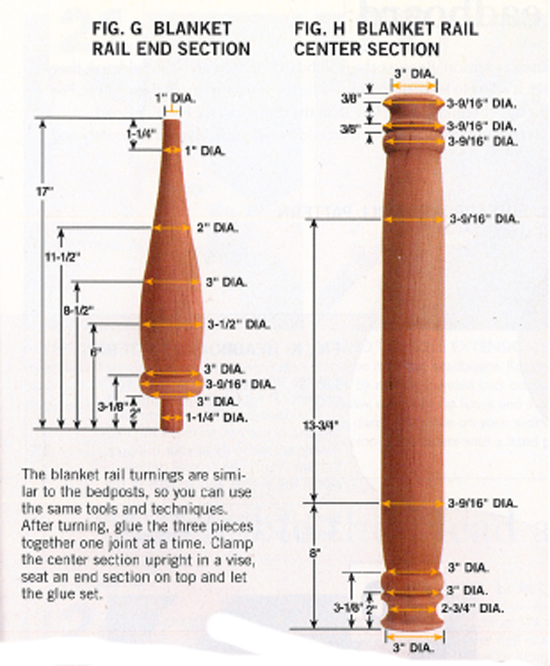
Figs. G & H: Blanket Rail End/Center Sections
Fig. J & K: Headboard Roll Pattern/Headboard Pattern
Fig. L: Allowing for Seasonal Movement
This story originally appeared in American Woodworker February 2001, issue #85.
|
Click any image to view a larger version.
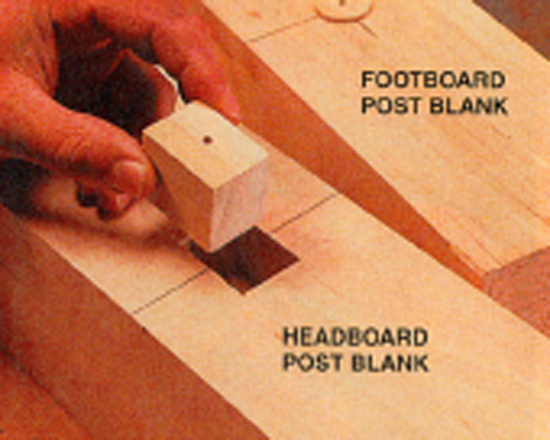
1. Cut each bedpost blank in two so both pieces fit on a standard-size lathe. Because it’s made to be cut apart and reassembled, the blank is longer than the finished bedpost (see Cutting List, page 69). Cut the section blanks to exact length and square the ends. Keep the faces of each bedpost’s two section blanks aligned when cutting the mortises. When you put them back together, the grain will match and the joint won’t show.
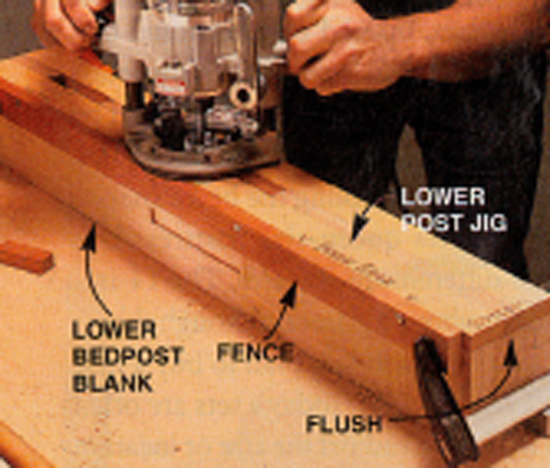
2. Rout mortises in the lower sections of the bedpost blanks. Use a simple jig, referenced from the inside edge of the post (see Fig. B, below). This jig works for the shallow, full-length mortises for the metal bedrail fasteners and for the two deep, half-length mortises for the loose tenons that join the posts, end rails and footboard. It’s reversible, so it works on all the posts–just flip it over and remount the fence.
3. Sliding stop blocks make it easy to cut two adjacent mortises. Plunge the first mortise with the block pressed against one end of the opening. Slide it snug against the other end and plunge the second mortise. In the joints between the posts and end rails, because of cross-grain movement, two small mortises and tenons are better then one big one.
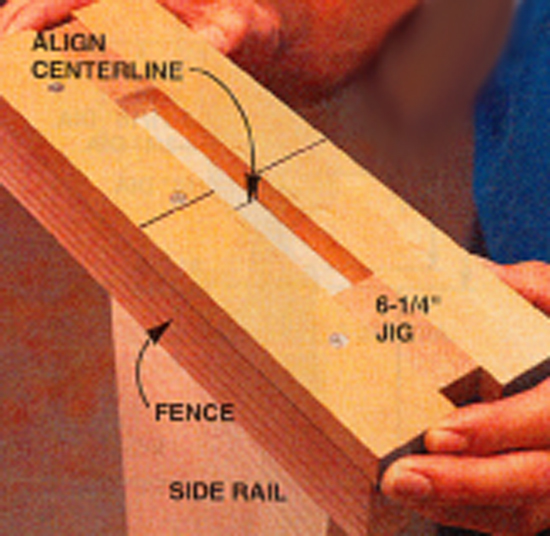
4. Use the 6-1/4-in. rail-mortising jig (see Fig. B, below) to cut the shallow, full-length mortises in the side rails for bedrail fasteners. Its fence makes it easy to position. Just align the centerline on the jig with one drawn on the end of the rail.
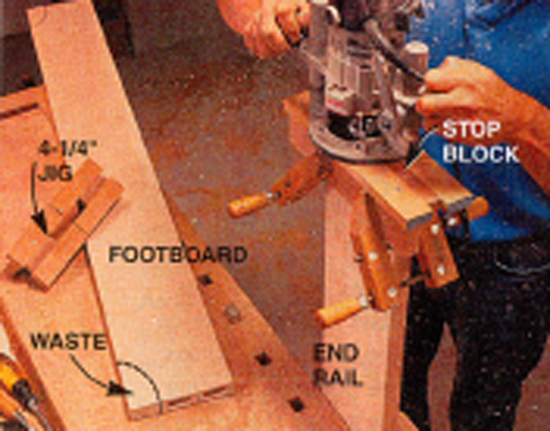
5. Rout double mortises for loose tenons in the end rails and footboard. Because the openings in the two rail jigs are identical to those on the lower post jig, you can use the same sliding stop blocks.
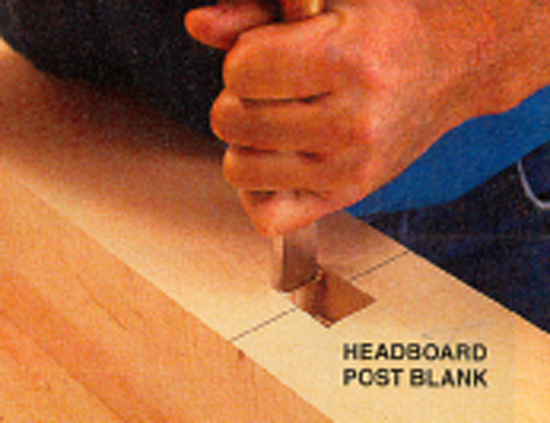
6. Square the corners of the mortises cut with the headboard post jig. These mortises are for the headboard tenons. These tenons have no shoulders, so the mortises must be neat. Use a sharp chisel and cut into each corner from both sides.
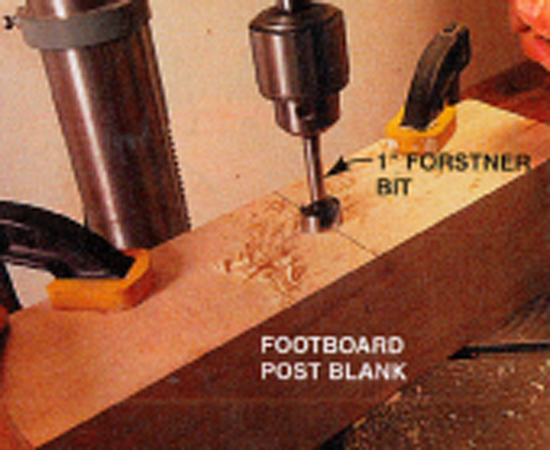
7. Drill a centered hole for the blanket rail in the upper section of each footboard blank.
8. Plug the holes, without glue, in the upper post section blanks before you begin turning. After the posts are turned, insert screws and pull out the plugs.
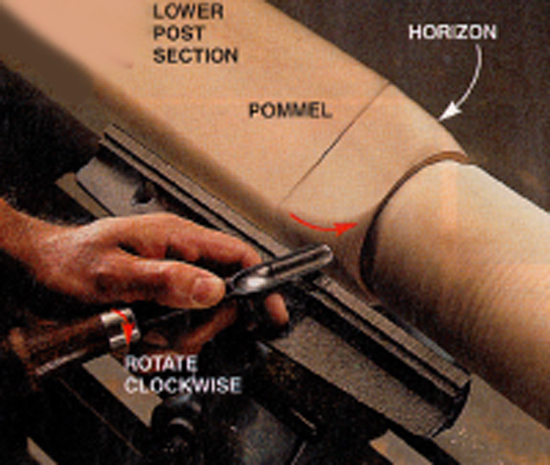
9. Round the pommel on the lower post section with a detail gouge. Make a series of rolling cuts. Start at the reference line, and work across the pommel, rotating the gouge clockwise as you cut into the center. To see the rounded shape you’re making, watch the horizon of the blank as you make the cut.
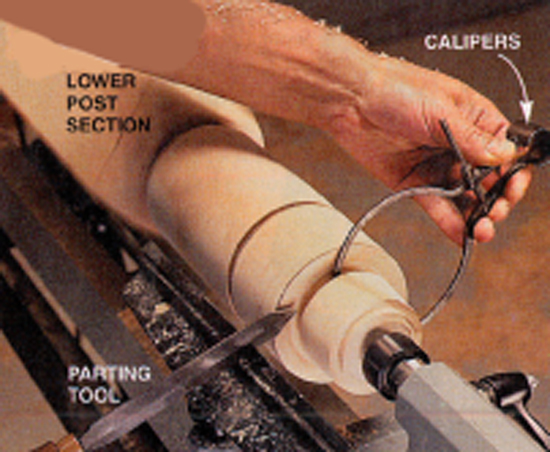
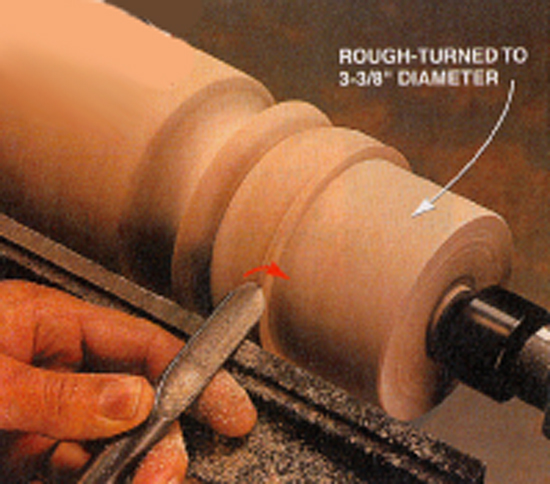
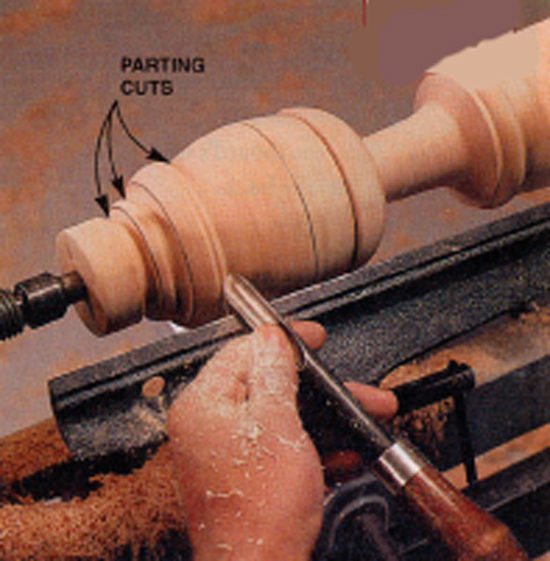
10. Cut in with a parting tool to establish critical diameters (see Figs. C through E, G and H, below). Don’t make deep cuts with the parting tool–it’ll overheat or get jammed and kick back at you. Instead, work down to small diameters in stages.
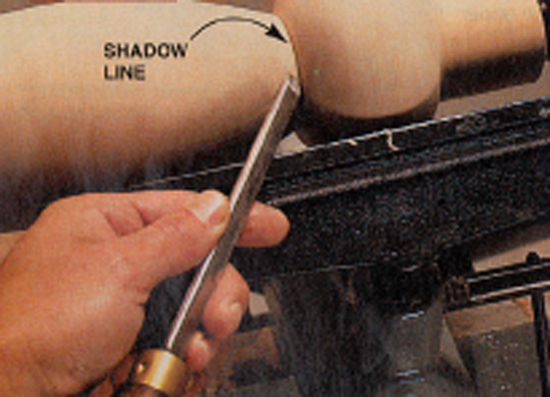
11. Define turned shapes with your skew chisel. Make a light V-cut to create a shadow line.
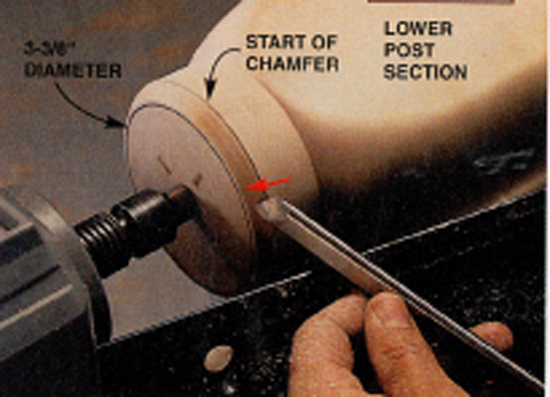
12. Chamfer the top of each lower post section with the skew chisel. The chamfer helps disguise the joint with the upper section. After truing the face of the post, mark the small diameter of the chamfer on it. Then, using the long point of the skew, make slicing cuts to this line.
13. A router jig guarantees a centered hole in the lower post section. Use the hole left from the lathe center to position a Forstner or spur bit. It must have a long lead point. Secure it with a hammer tap. Slip the routing template over the barrel of the bit and screw it down. Then remove the bit.
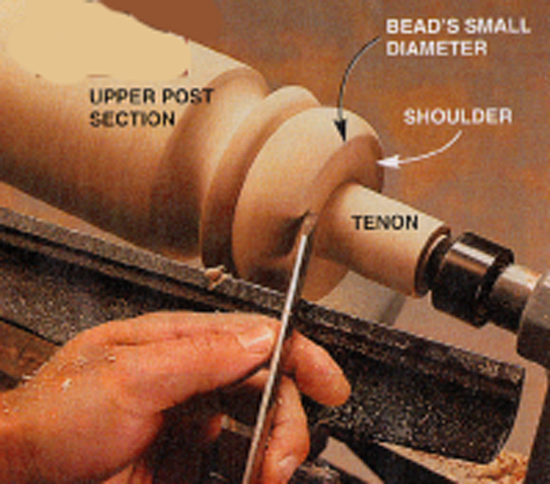
14. Turn a tenon at the bottom of each upper post section. Undercutting its shoulder assures solid contact and a tight fit with the lower section. Hide the joint by matching the small diameters of the bead on the upper section and the chamfer on the lower section (Photo 15).
15. Stop turning the tenon at the small diameter shared by the bead and chamfer. Round the bead down to the surface. Then finish turning the tenon.
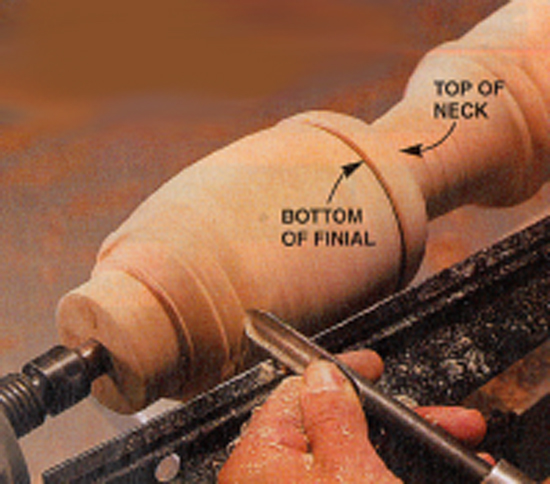
16. Work the top down in stages. First, establish two reference points; the bottom of the finial and the top of the neck (see Fig. C, below). Then alternate between roughing out the neck and the top of the finial, slowly reducing the diameters as you work back and forth.
17. Work downhill, from larger to smaller diameter to shape the neck. Make a series of light passes and blend the shape with the already-established diameter at the top.
18. Shape the finial. Map out its profile with parting cuts made to critical diameters (see Fig. D, below). Then just “connect the dots.” You’ve finished turning the profile when the parting cuts disappear. If you want all of the finials to be identical, us a a template.
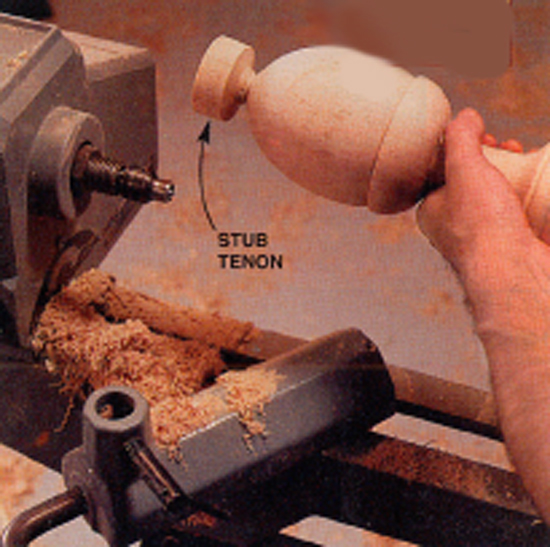
19. Leave a stub tenon at the tip. Saw it off and finish shaping the finial by sanding. The upper section blanks include the extra length you need for this tenon and for mounting on the lathe.
20. Rout the headboard’s profile using a pattern-cutting bit (see Sources, below) with a top-mounted bearing and a template. After cutting the blank to exact width and length, attach the template and saw away most of the waste with a igsaw—this piece is too big to horse around on your bandsaw. Rout one side, flip and realign the template. Then do the other side. Use the same template for the curves on the footboard.
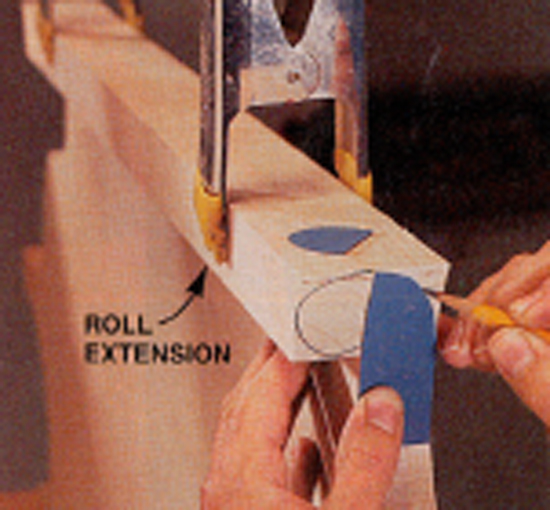
21. After dry-clamping the roll extension (Part F, Fig. A, below), ontp the back of the headboard, draw the rolled shape on both ends of the assembly.
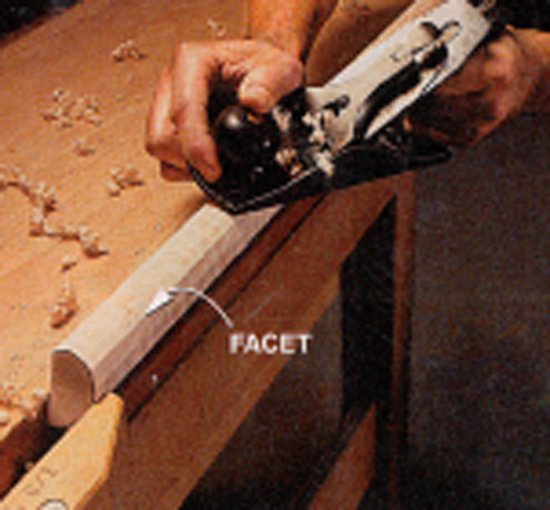
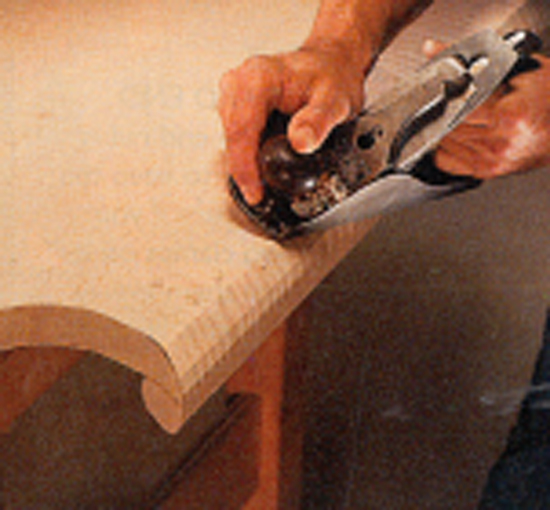
22. Round the roll extension before you glue it to the headboard. Rough out its shape by making beveled cuts on the tablesaw, using the rip fence and a push stick. Then clamp the piece on your workbench and remove the facets with a hand plane.
23. Shape the roll. First glue on the extension. Then cut away the waste at the front of the headboard. Run it through the tablesaw carefully, face-side down, to make these beveled cuts. Plane down the facets and sand everything smooth.
24. Align the mortises when you glue the two sections of the headboard posts. An offcut from the headboard blank works great as an alignment tool because it’s the right thickness to simulate the tenons. You don’t need to clamp this glue-up–once the pieces are seated and aligned, gravity does the job.
25. Glue the headboard end together. The end rail is wide enough to keep the assembly square if you center two clamps on it and tighten them evenly, a little at a time. Here’s a tip to keep the headboard centered: Before gluing, draw lines 1-1/4-in from the ends of the headboard’s lower tenons. Then make sure it enters the posts at these lines when the bed is clamped together (inset photo).
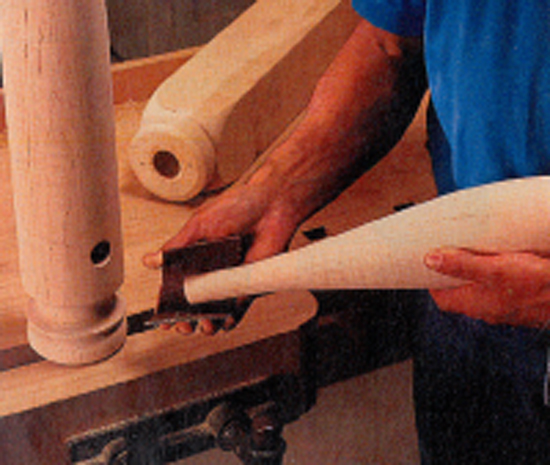
26. Fit the blanket rail ends to the holes in the posts. Turn them slightly oversized so you can finesse the fit with sandpaper.
27. Mark the footboard posts for gluing. First glue the three pieces of the blanket rail together. Then dry clamp the entire assembly. Gently rotate the upper post sections to align the blanket rail with the footboard. Mark both sections of each post. Glue the posts separately, then glue the entire footboard assembly. Use four long clamps, two on each rail.
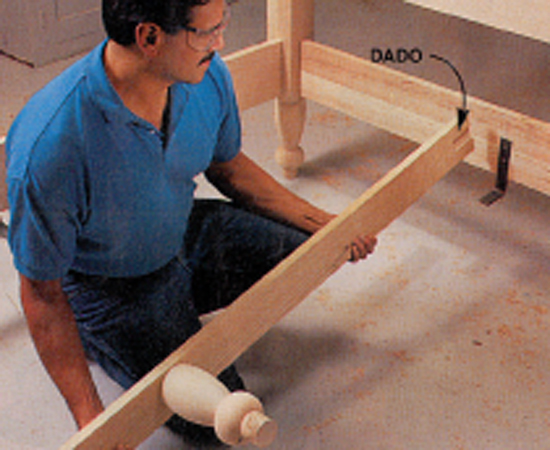
28. Mount the bed irons after cutting dadoes in the side rails with the bed iron jig.
29. A center leg supports the box spring. I used the bottom end of the practice leg I turned. Dadoes on the ends of the rail keep it on the bed hangers. |


Here are some supplies and tools we find essential in our everyday work around the shop. We may receive a commission from sales referred by our links; however, we have carefully selected these products for their usefulness and quality.


