Through many years studying and building 18th-century furniture,
I’ve learned that this era produced countless fine examples of good
design. One example is the arched-top door. Often called a tombstone
door because its shape resembles a grave marker, the panel on this type
of door is curved at the top and is capped by a matching curved rail.
The overall effect is quite elegant, as shown at left.
Fortunately,
you don’t have to be a period furniture maker to incorporate tombstone
doors into your work. The design looks right at home with modern
furniture, or it can work with paneling or kitchen cabinets. In fact,
you can use tombstone doors wherever you want to dress up an otherwise
plain cabinet.
Eighteenth-century cabinetmakers used a variety of
tombstone designs in their work. Fig. C shows four basic doors,
illustrating simple to elaborate designs. I’ll show you how I make a
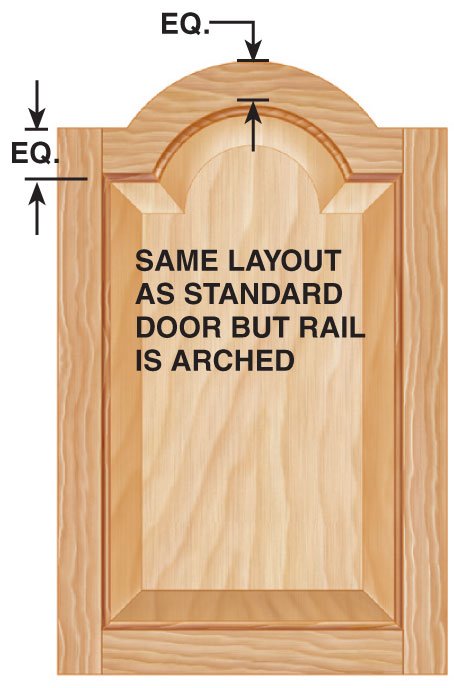
standard arched-top door as shown in Figs. A and B.
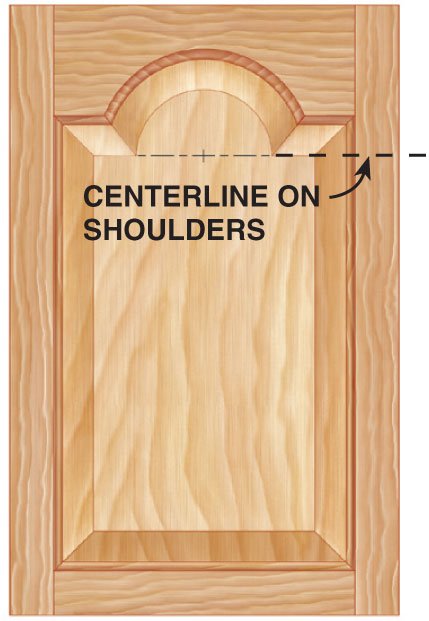
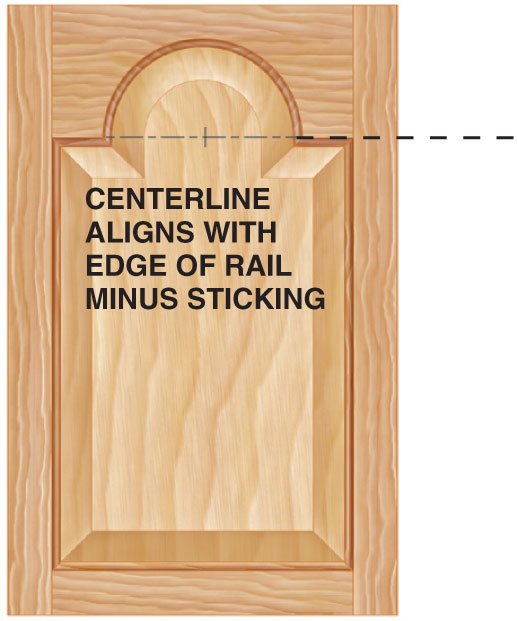
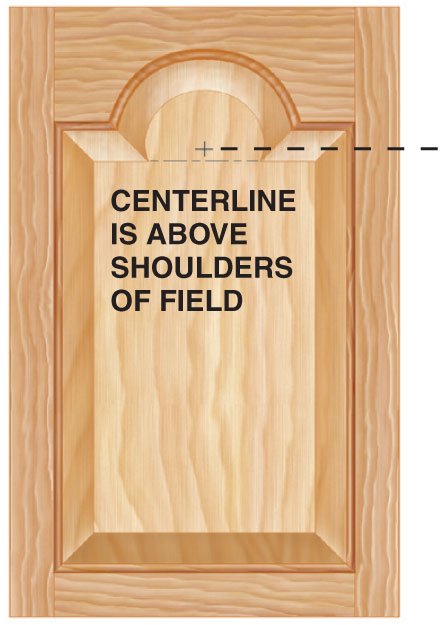
Lay out the top rail
Figure C shows four traditional types of doors, with different arch
configurations. I’ll be making the most common type, the standard,
where the centerline of the arch is aligned with the shoulders of the
field. The other types of doors are made like the standard door, but
with differing layouts.
Planning an arched-top door begins with the
top rail. The panel is then made to fit. Make a full-size drawing of
the top rail for each different width of door. Follow the steps in Fig.
D. When you know the dimensions of the top rail, you can make the
remainder of your cutting list.
Prepare your stock
As with any door, it’s very important that the stock be well-dried
and stable. I store it in the shop for a couple of weeks to let it
settle before working with it.
I mill the frame parts to 7/8 in.
thickness for a stout, traditional-looking door. Cut the stiles 2 in.
extra-long for ease in gluing up the door. This results in “horns” that
will be trimmed off later (Fig. A).
Cut the mortise and
tenon joints for the frame. I chop the mortises in the stiles using a
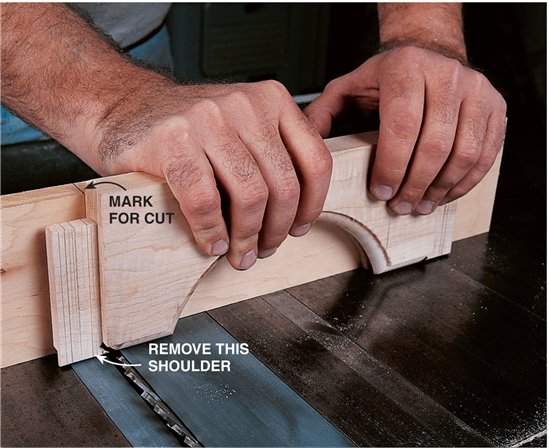
hollow-chisel mortiser, and saw the tenons on my tablesaw. When cutting
the tenons on the top and bottom rails, cut only the face-side
shoulders (see Photo 1).
Shape the frame
Draw the curve on the top rail, saw to shape (Photo 1) and sand the shape smooth (Photo 2).
On traditional frame-and-panel doors like these, I prefer a molded
inside edge on the frame, called “sticking.” Rout the molded edge on
your top rail, bottom rail and stiles, using a 3/32-in. roundover bit
in your router table (Photo 3). Use a starter pin in your router
table for the curved top rail, and a straight fence for the other
parts. Then groove the frame members to receive the panel (Photo 4), using a piloted slot cutter. Miter the molded edge on both rails and stiles (Photo 5),
and cut the back-side shoulders on the tenons. Use a tablesaw to cut
the unwanted molded edge from the ends of the stiles.
Shape the panel
Dry-assemble the frame to make sure everything’s OK.
Then measure for the panel by adding 1/4 in. to the opening
size all around. Because the grooves are 5/16-in.-deep,
this gives the panel a little room to expand.
Mill the panel stock to 5/8-in. thick. Because wide
boards can cup, I try to assemble the panels into the door
on the same day I plane them. Using your full-size drawing
of the top rail, set a compass to the radius of the top
rail curve, plus 1/4 in. for the tongue on the panel. Lay
out the curve and shoulders of the arch on the panel
(Photo 6) and cut to shape (Photo 7). Smooth the cut surfaces
to fair the curve, but don’t sand the edge—it will be
housed in the groove.
Raise the panel
I use a shaper and a cutter with guide bearings to raise the beveled edges on the panel (Photo 8).
You could also use a large router in a sturdy router table. To control
the mass of chips and to keep my fingers safe, I built two jigs: one
for the curved edges (Photo 8) and another for the straight edges (Photo 9).
An acrylic shield on the top of each jig (hard to see in photo) keeps
the chips contained. I plug a dust collection hose into the back of the
jig.
Make a few test cuts and adjust the thickness of the tongue on
the panel to 1/4 in. You can make several passes if you need to, but
with a sharp cutter you can usually make the bevel in one pass. Start
curved cuts against a pin in the table and use a fence for straight
cuts.
Carve the corners
The inside corners of arched-top doors are distinctive and they must
be carved by hand. First, lay out the straight and curved sides of each
corner, following the shoulders already cut (Photo 10). Chop the waste with a bench chisel, staying 1/16-in. away from your lines. Then, pare the waste away across the grain (Photo 11). Check your progress with an adjustable square set to the shoulder depth.
Now, cut to the line at the shoulders. For the curved section, a 1/2-in. gouge with a No. 2 sweep usually works well (Photo 12).
For smaller doors, try one with a No. 3 sweep. With the shoulders cut,
mark the bevel with a knife, connecting the inner and outer corners of
the curve (Photo 13). Finish carving the corner using left- and
right-skew chisels (see Sources) Be sure your chisels are razor sharp
and make light cuts to avoid tearing the grain.
Assembly
Finish-sand all the parts. Completely finish the panel before
assembly. This helps to avoid any unfinished parts being revealed when
the panel shrinks a bit in the frame. It’s also just plain easier to
work on the panel when it’s not in the frame.
Assemble the frame around the panel (Photo 15),
brushing glue on both the tenons and in the mortises. Be careful not to
let glue get in the panel grooves or on the panel, and work on a flat
surface so the door stays flat.
When the glue is dry, cut off the projecting horns and plane the edges of the door. Now they’re ready to hang.
Source
(Note: Product availability and costs are subject to change since original publication date.)
Garrett Wade, 800-221-2942, Left- and right-skew chisels.
Fig. A: Tombstone Door
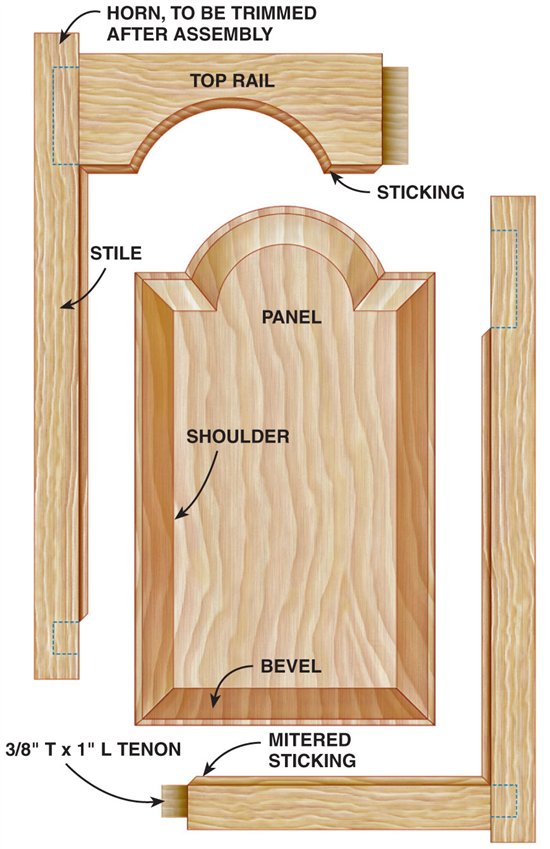
Fig. B: Door Details
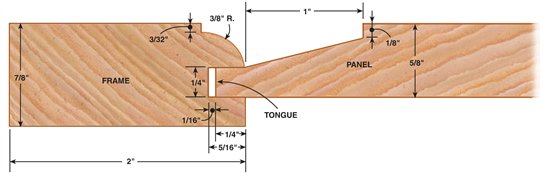
Fig. C: Arch-Top Door Designs
Standard
Straight-Sided
Pinched
Arch-Top Rail
Fig. D: Laying Out the Top Rail
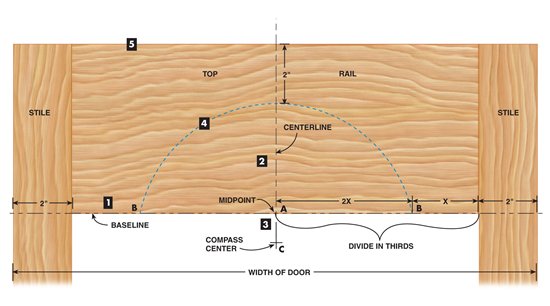
Determine the arch of the upper rail.
1. On a piece of paper, draw a baseline and mark on it the overall width of the
door. Then, to determine the length of the rail, mark the positions of the two stiles.
2. Draw the centerline of the rail. Divide
each half of the rail into thirds and mark points B on the baseline.
3. Line AC extends below the baseline by the width of the
panel bevel (in this case 1 in.). Point C is the center of the arch.
4. From point C, swing an arc with a radius equal to the distance
BC. This is the rail arch.
5. Draw the top of the rail. Make the distance between it and the top of the arch the same as the
width of the stiles.
This story originally appeared in American Woodworker April 1999, issue #72.
|
|
Click any image to view a larger version.
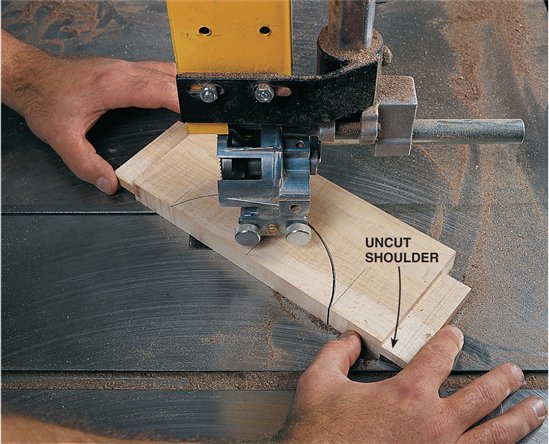
1. Bandsaw the curve in the top rail, after cutting the
tenons. Saw on the waste side of your layout line. Only one shoulder of
the tenon is cut at this stage.
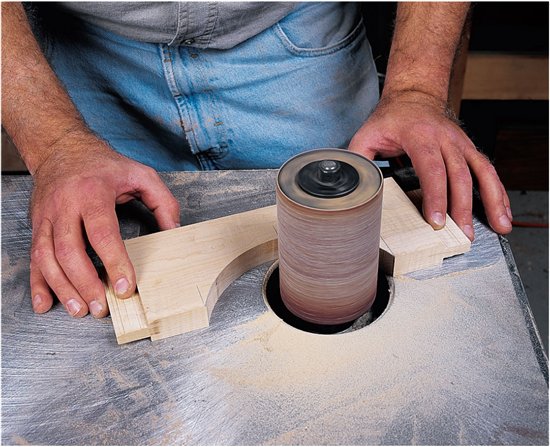
2. Sand the curve smooth and to your layout line using a
spindle sander or sanding drum in a drill press. Be sure it’s a fair
curve without dips or flat spots.
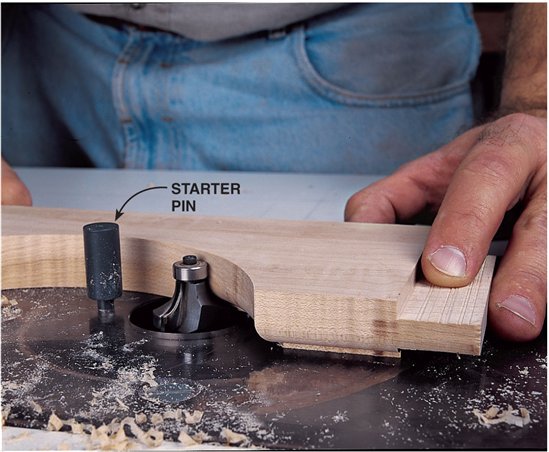
3. Rout the molded edge on all frame parts, using a
roundover bit in a router table. A pin helps start the cut on the
curved rail. Use a fence on the straight parts.
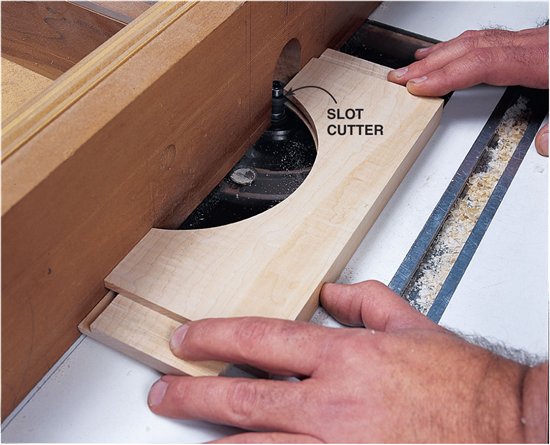
4. Cut a groove for the panel in all the frame parts, using a
ball-bearing piloted-slot cutter in the router table. Again, use a
fence for straight edges, and start the curved edges against a pin.
5. Miter the molded edge on the frame parts. To align the
cut, screw a wood fence to your miter gauge, and mark the end of the
cut. Align the shoulder of the tenon with this mark. After mitering,
cut the second shoulder on the tenon.
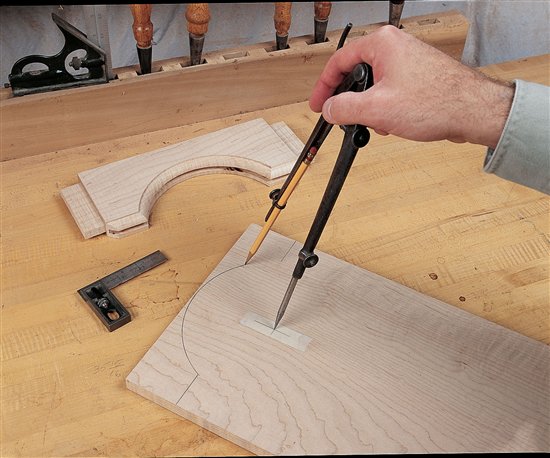
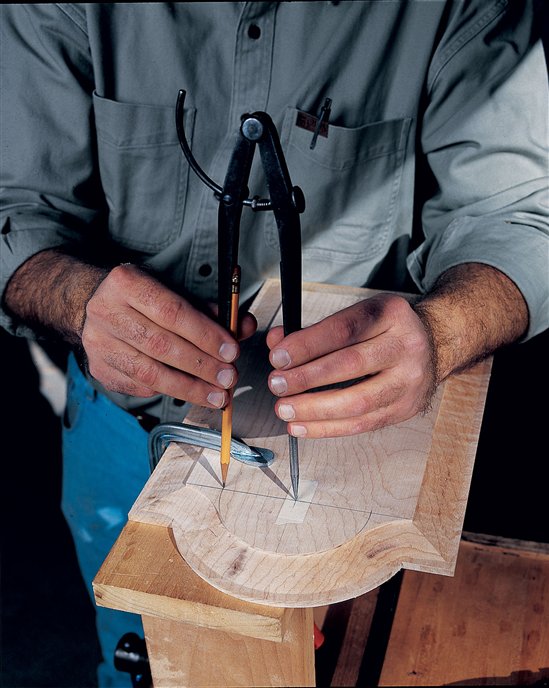
6. Mark out the panel for cutting the arch. Masking tape
protects the surface when you use the compass. Lay out the shoulders
with a small square.
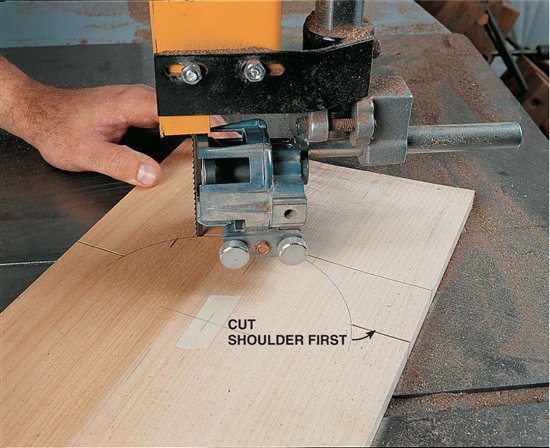
7. Bandsaw the arch in the top of the panel, staying on the
waste side of the line. Smooth the curve with a file so it has no dips
or flat spots.
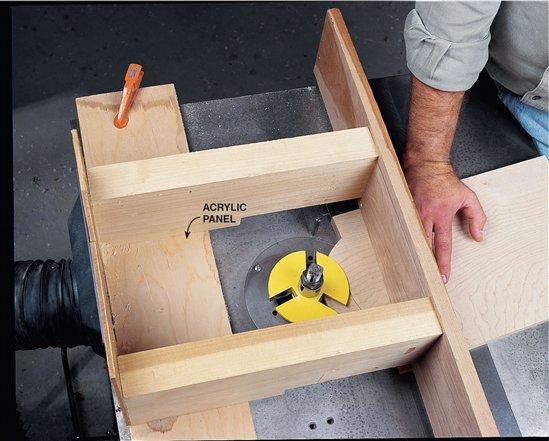
8. Raise the curved edge of the panel on a shaper or powerful
router table, using a cutter with a guide bushing or pilot bearing. A
wooden jig with an acrylic top makes the cut safer and allows you to
collect the chips.

9. Raise the straight edge of the panel with a similar jig,
but use a fence instead of the guide bushing or pilot bearing.
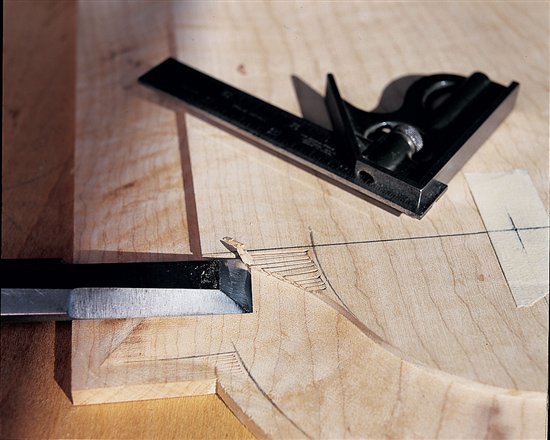
10. Mark the inside corners that the panel-raising bit
couldn’t reach, by extending the shoulder using a compass and small
square.
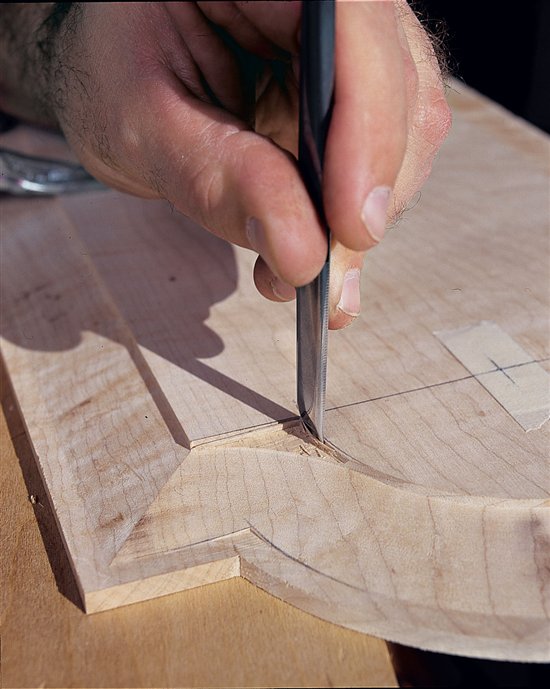
11. Chop the waste from the inside corners by making a series
of chopping cuts to the depth of the shoulder, then paring horizontally
to remove the waste. Stay inside your layout lines.
12. Pare the shoulders using a straight bench chisel for the
straight sections and a gouge with a shallow sweep (No. 2) for the
curved parts.
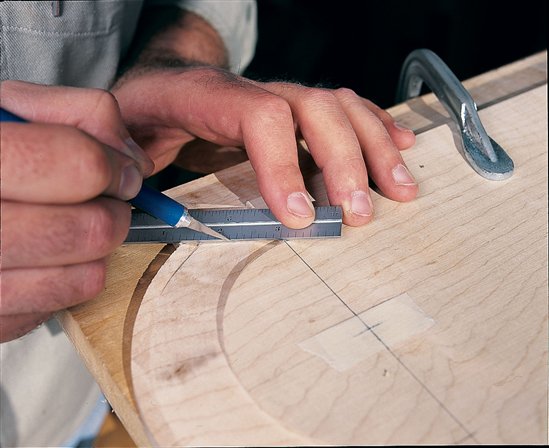
13. Score the miter line with a sharp razor knife, following a small straightedge laid from the inner to the outer corner.
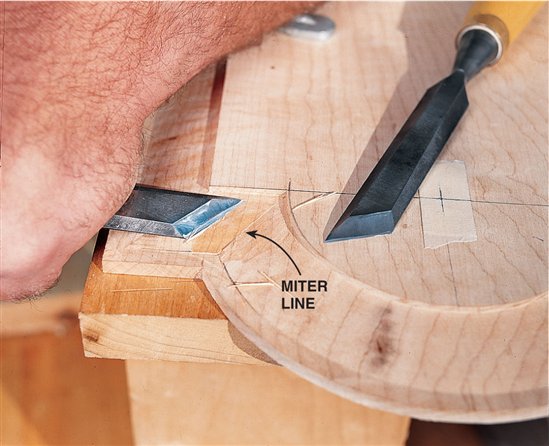
14. Carve the bevels up to the miter line, using a pair of
left- and right-skew chisels. The tools must be very sharp and the
paring cuts light to keep from tearing the grain.
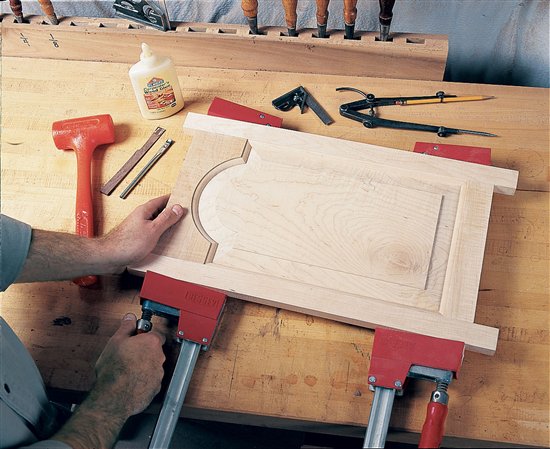
15. Put it all together. Spread glue in mortises and on
tenons and clamp the frame around the panel. Work on a flat surface and
place the clamp heads on the midline of each rail to keep the doors
flat. |


