|
Sometimes you just fall in love with a special kind of wood. For
me, that wood is quartersawn sycamore, but I’ve never had a
chance to build something big that would really show it off.
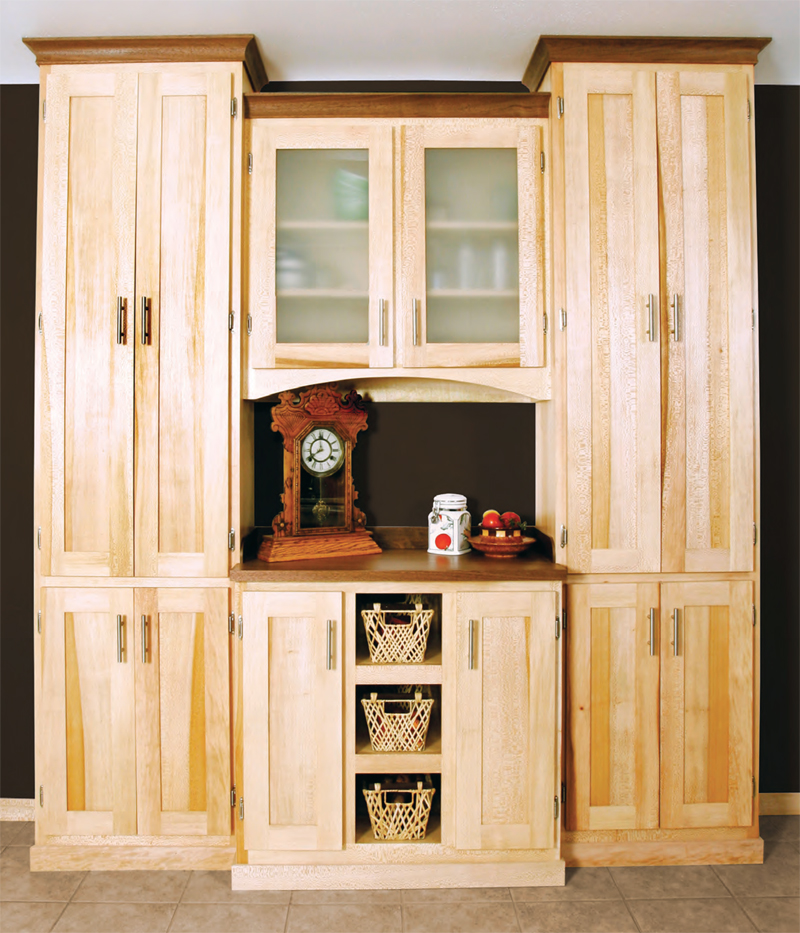
When my wife and I needed a new pantry for our kitchen, we found
that commercial units were way too expensive, not very well crafted
and used boring wood. I volunteered to make it myself. Out of sycamore,
of course.
For ease of construction, I designed a pantry composed of four
separate units. They’re standard plywood boxes with face frames and
overlay doors. The problem was, I didn’t want to spend big bucks on
custom-made quartersawn sycamore plywood. I considered buying
some sycamore veneer and gluing it to a substrate myself, but then, I
thought, it might not match the solid wood in the face frames.
My solution was to make my own thick veneer and design the
boxes so I could mill all the parts on my 6-in. jointer, 14-in. bandsaw
and 12-in. planer. It worked great, although I needed lots of clamps!
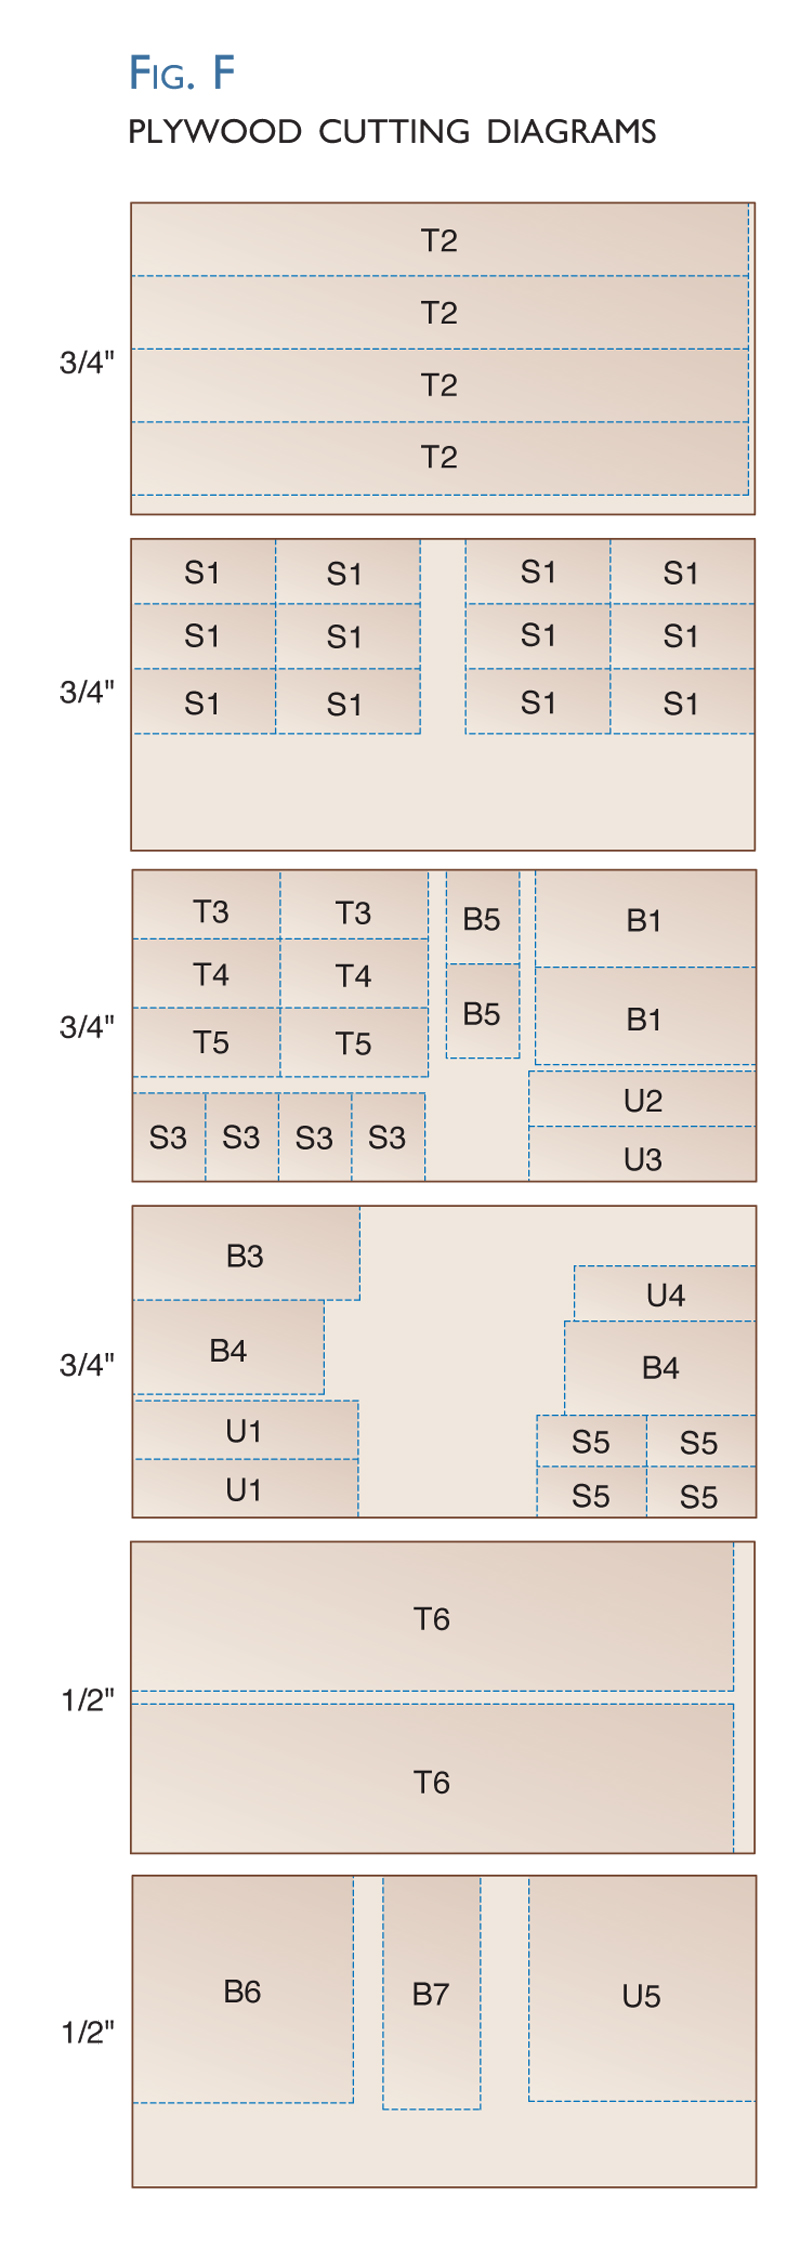
To build this pantry, you’ll need about 60 bd. ft. of 4/4 quartersawn
sycamore or a similar light-colored species, 10 bd. ft. of
clear walnut, two sheets of 1/2-in. birch plywood and four sheets
of 3/4-in. birch plywood. I prefer high-quality multi-ply plywood
for casework. It has several more laminations than standard birch
plywood, fewer voids, holds fasteners better and is generally more
stable, flat and uniform.
Veneer the side units
1) Select seven 6-in. wide, 8-ft. long sycamore boards for resawing
into veneer. Look for boards with the most interesting
grain patterns. Plane the boards to 3/4 in. thick, then resaw them down the middle (Photo 1). Mark pieces from the
same board so you can bookmatch them later.
2) Cut the side unit’s plywood parts (T2 to T6).
3) Glue a pair of the veneers (T1) to the cabinet’s sides
(T2). You may have to joint these pieces first to make a tight
seam. Use twelve pairs of cauls to glue each side (Photo 2).
4) Use a flush-trim router bit to even the veneer with the
plywood’s edges. Run the glue-up through a planer until the
veneer is 3/16 in. thick, making the final side 7/8-in. thick
(Photo 3). Trim the sides to final length.
Veneer the base cabinet
5) Cut the plywood parts (B1 and B3 to B6). This cabinet
projects only 3 in. beyond the tall cabinets, so there’s no
need to veneer the entire sides. You only need a 4 in. strip
of veneer (B2, Fig. A). This veneer is let into a wide rabbet,
which you can make on the tablesaw using a dado set (Photo
4). Clean up the rabbet with a block plane, if necessary.
6) Cut the veneer to size and plane it as thick as the rabbet
is deep. Glue one piece to each side (Photo 5).
Join and assemble
7) Cut the plywood parts for the upper unit (U1 to U4).
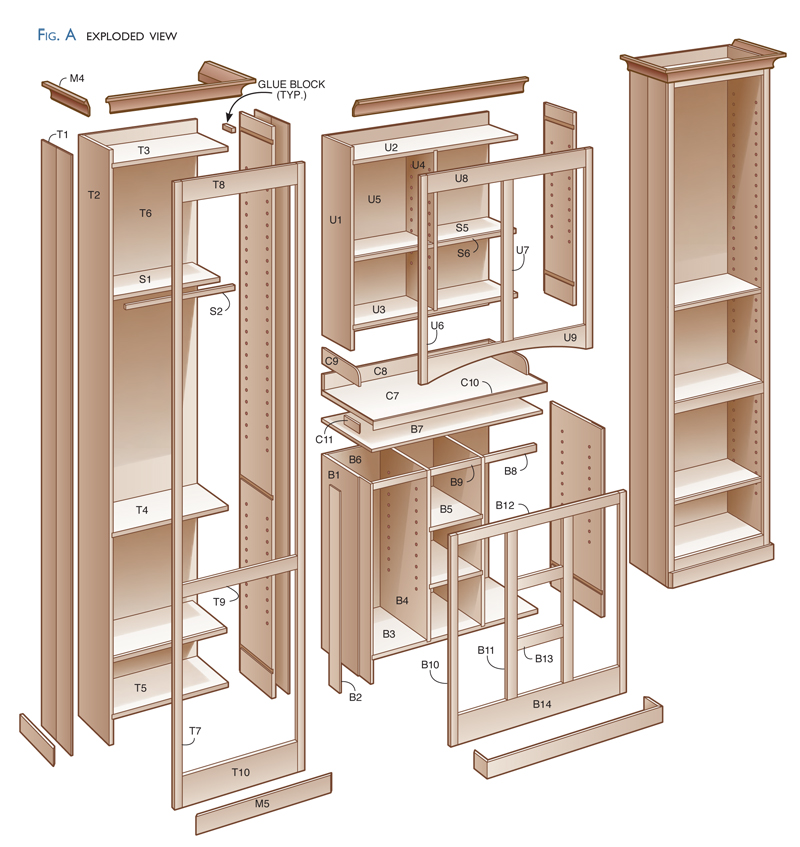
8) Rout dadoes and rabbets in all the cabinet’s sides (Fig. C,
D and E). Although the back for each cabinet is 1/2 in. thick,
make its rabbets 5/8-in. wide. This allows for a 1/8-in. flange
behind the back that can be scribed and trimmed later, so each
cabinet can follow the contour of the wall when it is installed.
9) Glue and clamp the tops, fixed shelves and bottoms
to the sides of all four cabinets. Drill holes for shelf supports
before installing the backs, for easier access. For the upper
unit, offset the holes in the divider (U4) by about 1/2 in. to the
left or right or they will run into each other.
10) Install the backs with nails around the perimeter.
Run screws into the top, fixed shelf and bottom. This strong
joinery, combined with the back’s substantial thickness, means that you won’t have to install unsightly nailing strips
to secure the cabinets to the wall.
Apply the face frames
11) Mill the face frame parts from the rest of your
sycamore boards. Attach the rails to the stiles with biscuits,
pocket screws or dowels.
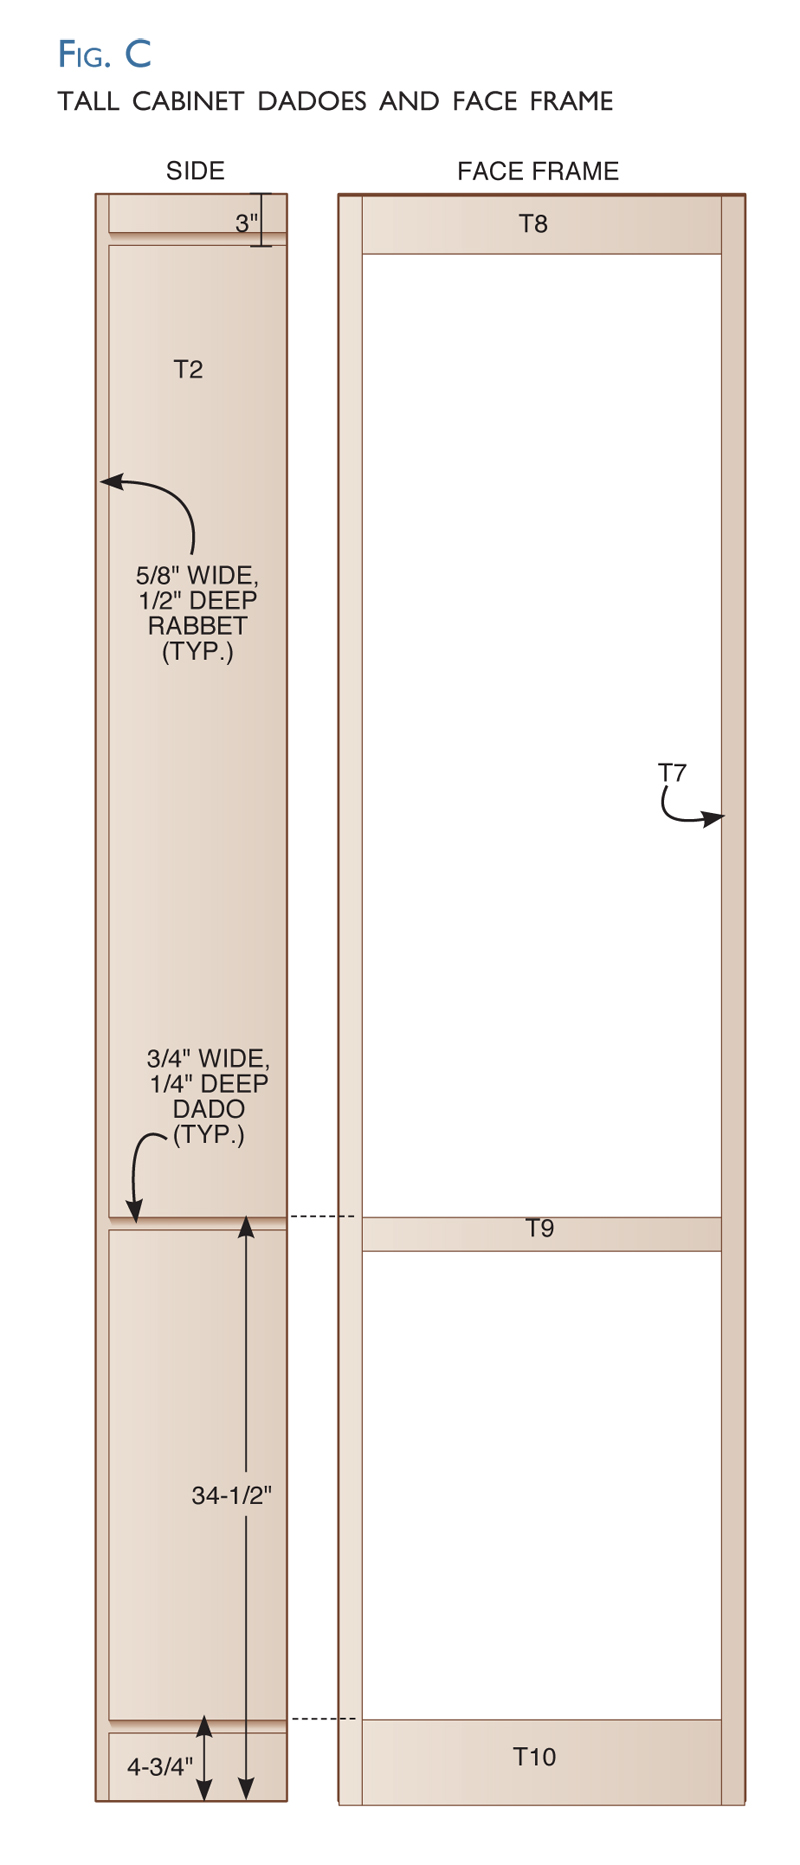
The frames should be flush with the outside faces of the
cabinets, and the top edge of both the bottom and fixed
shelf need to line up with the top edge of the appropriate
rails (Figs. C and D). Note that the face frame for the base
cabinet is taller than the cabinet sides, to allow room for a
subtop (B7).
12) Sand the face frames and clean out the corners with a
chisel. Install the face frames with glue, finish nails and clamps
(Photo 6). Fill the holes with birch-tinted putty.
13) Reinforce each cabinet’s joints with many small glue blocks
(Fig. A). Use more blocks behind the face frames, where they join
the cabinets.
14) On the base unit, install cleats (B8 and B9) to support the
subtop. Cut the subtop to size but don’t attach it yet. It’s a lot easier
to install this cabinet without the subtop in place.
15) Make sycamore-edged shelves for all the cabinets. Trim the
shelves 1/8-in. shorter than the distance between each cabinet’s sides.
Make the doors
16) Both the paneled and glass doors are constructed essentially
the same way (Fig. B). Mill all the rails and stiles to size, then
rout or dado a groove down the center of each part’s inside edge.
17) Rout or dado tenons on the ends of each rail. Resaw bookmatched
panels (T13, T16, and B17) from 3/4-in. thick boards
and plane them to fit into the grooves. Apply finish to the panels
before installing them.
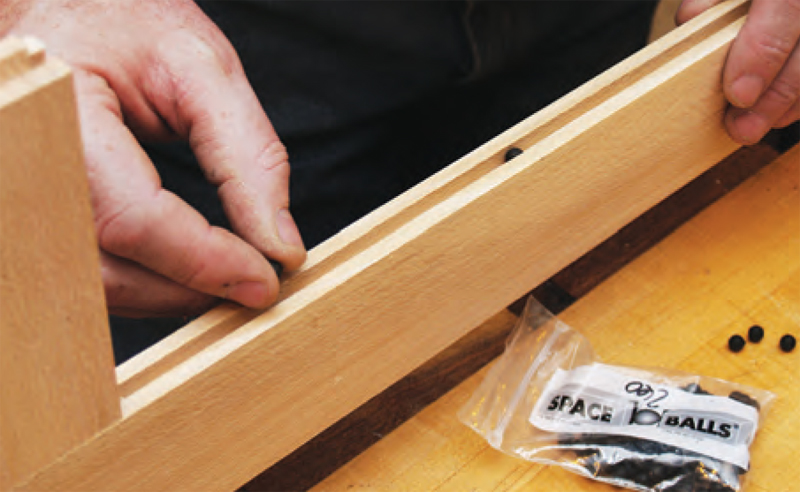
18) Glue the doors together (Photo 7). Use Space Balls to
prevent the panels from rattling in the winter when they shrink
in width (See Sources, below).
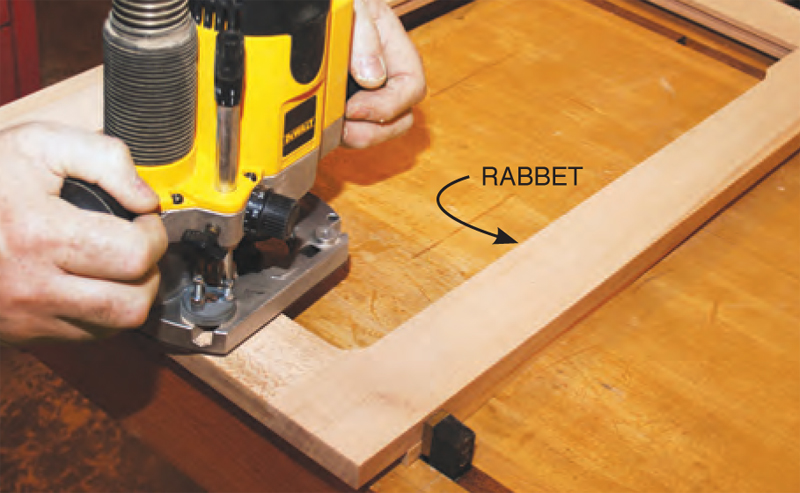
19) Rout a rabbet around the backside of the two glass
doors using a bearing-guided rabbeting bit (Photo 8). Square
the corners with a chisel. After applying a finish to the doors,
install the glass. Use wooden retaining strips or a silicone
bead to hold it in place.
Install the cabinets
20) Sand all the components to 220 grit and apply a clear
polyurethane finish.
21) Position the cabinets in your room. Determine the highest
spot on your floor and place the cabinet that sits here first. Shim
the remaining cabinets to align with this one. Attach the cabinets
to the wall with screws driven through the backs and into your
wall’s studs.
22) Add pulls to the doors (see Sources). Install the doors with
full overlay hinges (Photo 9).
23) Make the crown molding, then fit it to the cabinets. Finish the molding as
loose pieces, then pin-nail it to the cabinets, butted to the ceiling.
24) Add the base molding.
Make the countertop
25) Glue the countertop (C7) from boards that are 4-in. or so
wide, alternating heart and bark sides, to ensure that the top stays flat.
26) Install the subtop in the base unit. Trim the top to the
exact width of the base unit. Screw and glue the countertop to
the cleats (B8, B9). Install the backsplash (C8) and side pieces
(C9). These hold the top down and allow for the top to expand
and contract. Add the front and return trim (C10 and C11).
Sources
(Note: Product availability and costs are subject to change since original publication date.)
Space Balls, spaceballs.com, 800-543-4259, Space
Balls #260P.
Amerock hardware, Amerock.com, Overlay
hinge, self closing, #BP3429-G10; Stainless steel
bar pull, 3" centers, #BP19010-SS; available at
Ace Hardware.
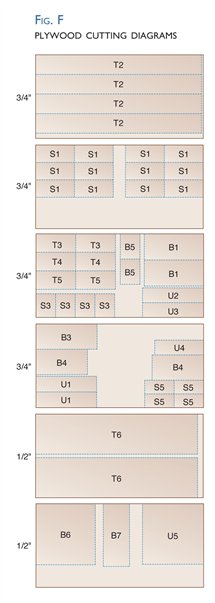
Cutting List
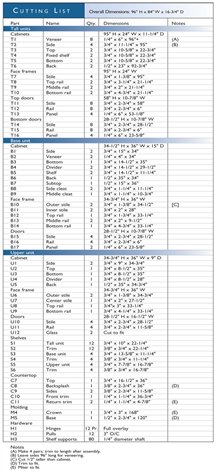
Fig. A: Exploded View

Fig. B: Backside of Doors

Fig. C: Tall Cabinet Dadoes and Face Frame

Fig. D: Base Cabinet Dadoes and Face Frame
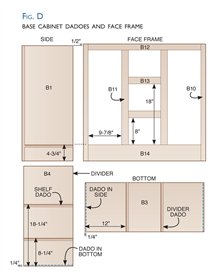
Fig. E: Upper Cabinet Dadoes and Face Frame

Fig. F: Plywood Cutting Diagrams
This story originally appeared in American Woodworker November 2007, issue #132.
November 2007, issue #132
Purchase this back issue.
|
|
Click any image to view a larger version.
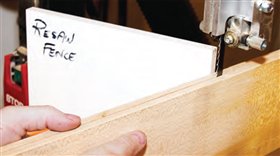
1. This pantry really shows off the distinctive figure of quartersawn
sycamore. To make thick veneer from sycamore boards, re-saw
the best pieces down the middle.
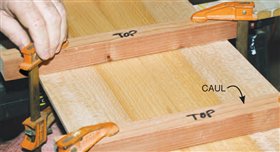
2. For the sides of the tall outer cabinets, glue the veneer to a plywood
substrate, using curved cauls to distribute pressure. Run
the panels through a planer to clean up the bandsawn surfaces.
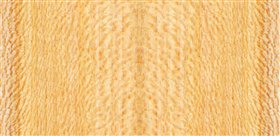
3. Here’s one bookmatched panel, close up. When sycamore is
quartersawn, you can clearly see its numerous ray cells scattered
all over the surface. They give the wood an almost textured look.
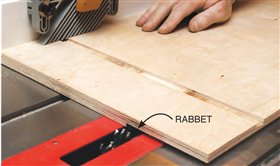
4. The sides of the middle base cabinet are veneered, too, but
not all the way across. Only a few inches of the sides project
beyond the tall outer cabinets. Cut a wide rabbet to receive a
4-in. strip of veneer.
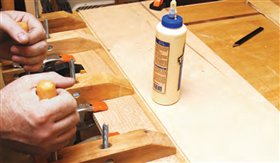
5. Glue the veneer onto the rabbet. This side is too wide to
run through the planer after glue-up, so thickness-plane the
veneer beforehand.
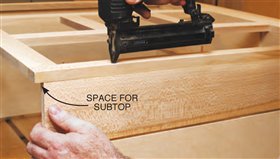
6. Pin-nail solid sycamore face frames to the cabinet sides. The
center base unit’s face frame extends above the cabinet’s
sides. This hides the front edge of a plywood subtop.
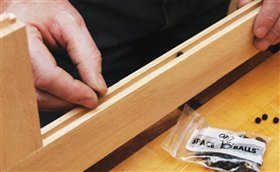
7. Build the door frames with extra-deep grooves so the solidwood
panels can expand in summer. Place soft-sponge Space
Balls in the grooves to prevent the panels from rattling around
in winter.

8. Build the glass doors in the upper cabinet the same way as the
paneled doors. To make the glass easy to install from the back,
turn the grooves into rabbets with a router.

9. Hang the doors after the cabinets are installed, to make sure
they’re perfectly level. Support the doors on a ledger strip to
line them up.
|