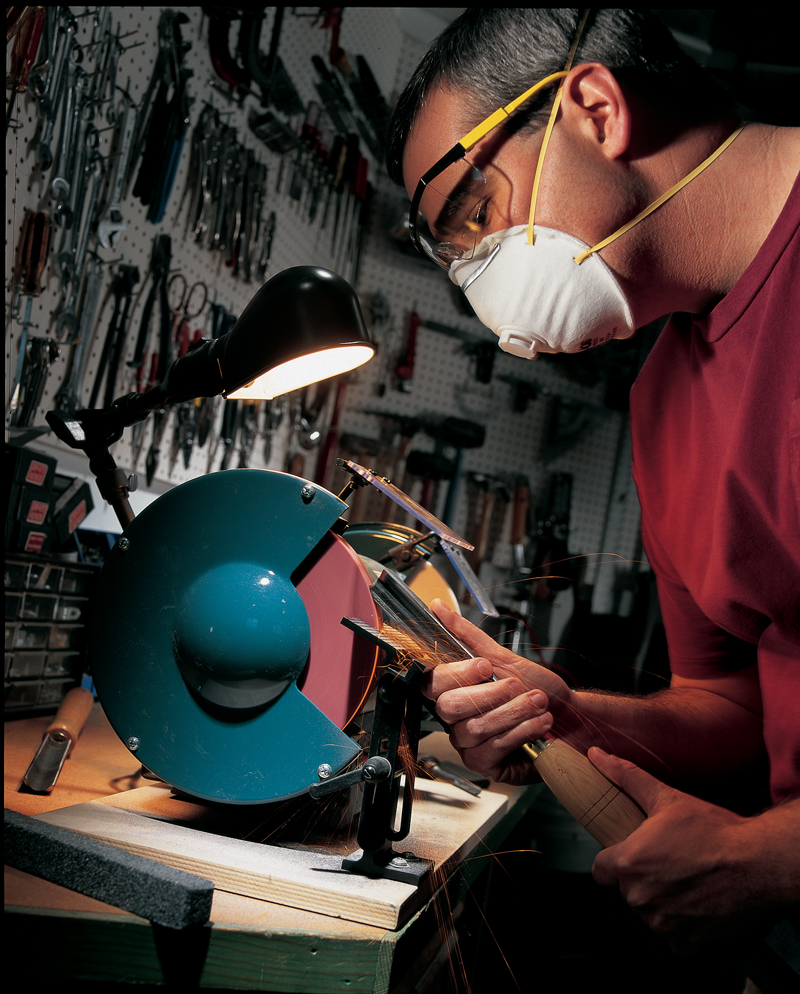
Perhaps no other aspect of lathe
work is a bigger stumbling block
to new turners than the process
of shaping and sharpening the
tools. Even new tools often
require reshaping and tuning to
make them truly serviceable. A
poorly shaped or dull tool is hard
to control and leaves a damaged
surface that requires extensive
sanding. On the other hand, a
sharp tool, ground properly for
its intended use, is almost effortless
to handle and leaves a fine
finish on the wood. The following
is my suggested strategy for a
sharp and user-friendly spindleroughing
gouge and detailing
gouge—two of the most common
turning tools.
Sharpening equipment
Here’s what you’ll need:
• A slow speed (1,725 or 1,800 rpm) wheel grinder with 8-in.-dia.wheels.
The tool rests must be rock solid,with no flex whatsoever. If your rests are
flimsy or too small, consider adding an aftermarket support (see Sources, below).
• A 1-in. wide, 60-grit wheel of friable (easily crumbled) aluminum oxide
(white,pink or blue) in a J or K hardness.Although 60 grit may be too coarse
for carving tools, chisels and plane irons, it is a good choice for the heavier
turning tools. It removes material more efficiently and grinds cooler than
finer grits, while still leaving a fine edge on the tool. In addition, have a
coarser wheel (36 or 46 grit) on the other side of the grinder for those times
when heavy stock removal is necessary.
• A dressing tool is essential. Use it to true (make the wheel round), clean,
sharpen and level the wheel.Gray dressing sticks, star-wheel and diamond
dressers are the choices.
Each leaves a different surface on the wheel,but any one can fit the needs of
most woodturners.
• You also need a medium India slipstone for refining the ground edge and
for maintaining a sharp edge between trips to the grinder. See Sources,page
23, for a mail-order source for all of the equipment.
Types of gouges
Turners use three basic gouges: the
spindle roughing gouge, the detailing
gouge and the bowl gouge (Photo 1). In
this article,we’ll cover how to sharpen
the first two. Sharpening bowl gouges is
a subject all to itself,which we’ll cover in
a future issue.
The spindle-roughing gouge is used
for between-center work to remove the
corners from square stock, turn cylinders,
tapers and long shallow curves. It
is a poor choice for detailing or bowl
work because it does not maneuver
well in tight turns and is subject to
breakage at its tang.
The detailing gouge (sometimes
called a spindle, shallow or fingernail
gouge) is a workhorse for between-center work, readily suited to concave and convex details, and sometimes used in bowl work for fine detailing.
General grinding strategy
1. Begin by dressing the wheel. A level
and sharp grinding wheel is essential to
proper grinding. Keep your dressing
tool beside the grinder and use it frequently
to remove build-up of metal
(glazing) and to maintain the flatness of
the wheel. For safety, protect your eyes
and lungs with safety glasses or a face
shield and dust mask.Position the tool
rest as close to the wheel as possible.
2. Shape the tool first. Set the tool rest
at 90 degrees to the coarse wheel and
begin shaping. See Figs.A and B (below) for suggested shapes and
bevel angles of the spindle-roughing
gouge and the detailing gouge.
3. Begin the sharpening process. Set
the tool rest at the desired angle for the
finished bevel on your 60-grit wheel.
Always begin at the heel (Photo 5).The
process proceeds in stages until the
entire bevel is in full contact with the
wheel. In reality, you are grinding the
bevel and not the edge.As experienced
turners say, “If you grind the bevel
properly the edge will take care of
itself!”
4. Use light pressure, be slow and deliberate
and maintain a relaxed grip (and
attitude!).Maintain a solid stance with
elbows against your body.Use only the
force required to eliminate any tool
bouncing.
5. Leave the tool on the stone, checking
your progress only occasionally. Use
the spark trail as the indicator of where
you are grinding.When sparks begin to
lightly run over the top of the tool, stop
grinding in that area—otherwise you
will burn away the steel and produce a
“saw-toothed” edge.
6. Avoid heating the tool to such a temperature
that you see temper colors
developing (yellows, purples, and
blues). Such overheating does not harm
high-speed steels (usually so stamped
on the tool or its handle),but bluing an
edge on a high-carbon tool creates a
tool too soft for turning wood.A clean
and sharp wheel, light pressure and
even movement should not overheat the steel.With carbon-steel tools that
must be heavily ground, are thin or
delicate (like the points on skew chisels),
quench the tool in water often to
keep the steel temperature low. For
high-speed steel tools,do not quench in
water.Quenching these tools may create
micro cracks that affect the quality
of the edge. For these tools, simply do
heavy grinding in stages, allowing the
tool to air cool between sessions.
7. The objective of sharpening is to
produce a keen edge with a bevel that is
single-faceted with a slight hollow
grind.
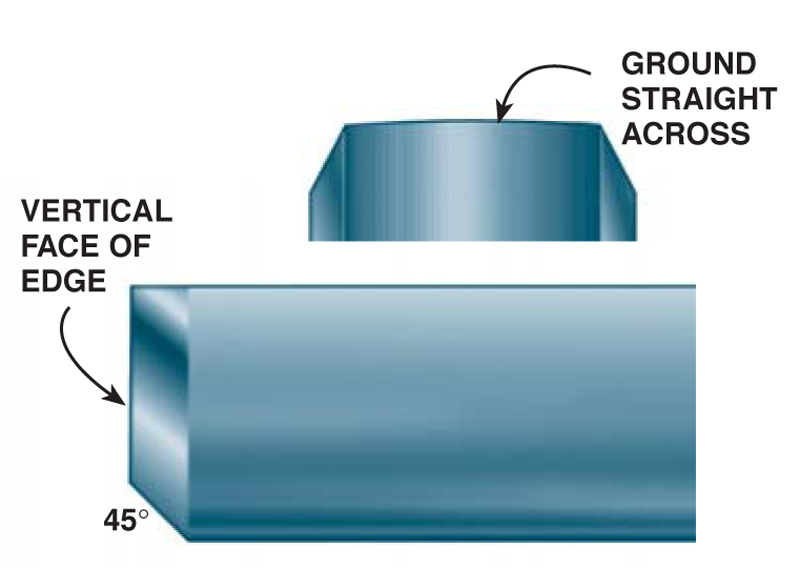
The Spindle-Roughing Gouge
Probably the easiest gouge to grind is
the spindle-roughing gouge. Shape the
tool as recommended in Fig. A. After
setting the rest to 45 degrees, start at the
back of the bevel (heel) and rotate the tool side to side along the full length of
its edge. Grinding is complete when
the full bevel is in contact with the
wheel and sparks appear over the top of
the edge (Photos 5 – 7).
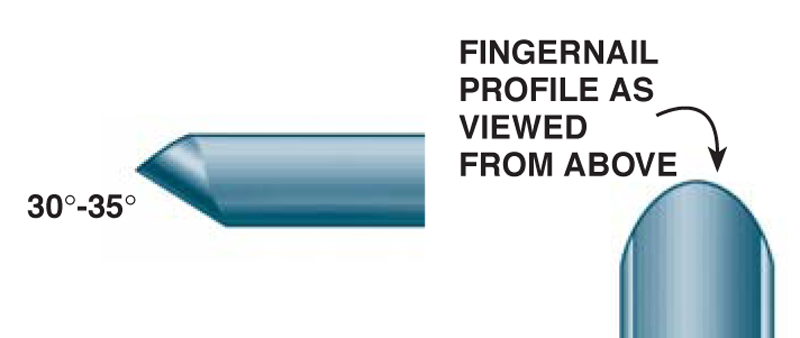
The Detail Gouge
If you sharpened this tool with the same
technique used for the roughing gouge,
you would produce a spear-pointed
shape, instead of the desired fingernail shape (Fig. B), because most of these
gouges are thinner on the sides and
thicker in the middle. Set the tool rest to
30 to 35 degrees, and follow photos 8
through 10.Start at the heel of the bevel, with the flute upright. Do each half of
the tool by pushing upwards with a
slight twist.When each half has been
ground, blend them together in the
middle of the tool.
Is it sharp?
Here’s how to tell if your tool is
sharp:
• By sight: If you can see the edge,
there is no edge! A sharp edge
reflects no light, but simply disappears
into a black line. Angle the
tool edge under your shop lamp to
see if you pick up any glints of light.
• By effort to remove wood:A
sharp edge, with the tool at the
proper angle, makes turning wood
feel effortless. A dull tool requires
more pressure to make the cut.
• By sound: A sharp tool makes a
hissing sound (reminds me of a
sharp hand plane) while a dull tool
sounds flat or makes a scraping
sound.
• By shavings: A sharp tool makes
curls and ribbons (even if short at
times).A dull tool makes very short
chips or even dust.
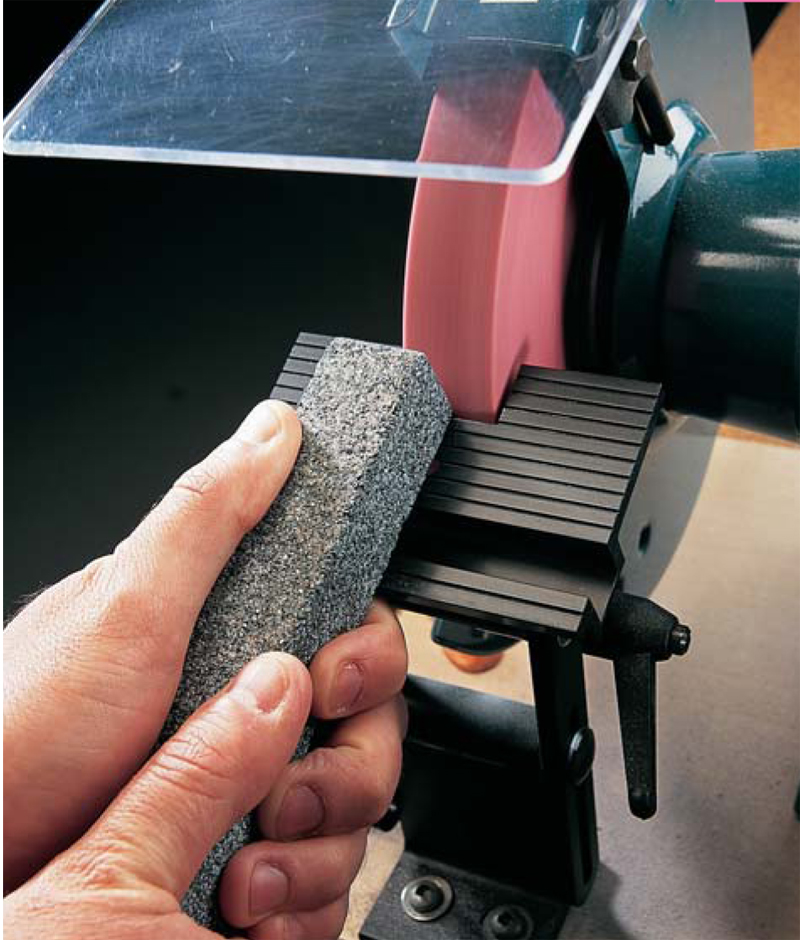
To hone or not to hone?
Not every turner hones their tools,
either after grinding or when in use.
Over the years I have found honing
helpful in several regards: To refine
an edge for a finishing cut; and to
maintain a sharp edge, rather than
returning to the grinder at the first
hints of dullness.Honing only works
on properly ground tools. Bevels
that are multi-faceted or lack a hollow
grind are difficult or impossible
to hone. For gouges I use the flat
side of my India slipstone to hone
the ground bevel, and finish with
the curved edge of the slipstone in
the flute of the gouge (see Fig. D).
Take great care not to round over
the edge when honing. Hone the
bevel and flute of the gouge and
never the edge itself.
Sources
(Note: Product availability and costs are subject to change since original publication date.)
Gouges and sharpening equipment
are available from many
mail-order sources.
For example:
Woodcraft, woodcraft.com, 800-225-1153,
8-in., slow-speed grinder, #127255;
60-grit aluminum oxide white wheel,
#01W48;
36-grit aluminum oxide blue wheel,
#129760;
Grinding tool rest, #03B35;
Dressing stick, #11N51;
Diamond wheel dresser, #124670;
Medium India slipstone, #07B05.
Fig. A
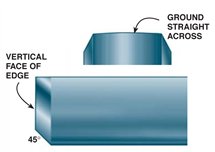
The spindle-roughing gouge is
generally ground straight across (as viewed from
above), with a vertical or near-vertical edge (as
viewed from the side) and with a 45-degree
bevel angle.
Fig. B

The detailing gouge is commonly
formed into a fingernail shape (as
viewed from above) and with a 30- to
35-degree bevel angle.
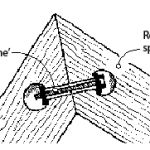
Fig. C
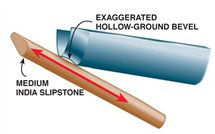
Hone the bevel of a gouge with the flat
side of the slipstone.The hollow ground edge
makes for a built-in honing jig: Simply touch
the heel of the bevel with the stone.Then
lower the stone until you feel the area just
below the edge.Maintain contact with those
two points and progress along the bevel until
the entire edge has been honed.
Fig. D
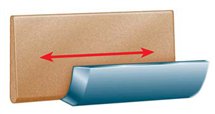
Hone the flute of the gouge by using
the curved edge of the slipstone. Hold the
stone completely flat inside the flute and
progress along the edge until the full length
has been honed.
This story originally appeared in American Woodworker June 2000, issue #80.

Purchase this back issue. |
|
Click any image to view a larger version.
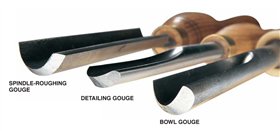
1. The three basic types of gouges are the spindle-roughing gouge
(English style), the detailing gouge and the bowl gouge.

2. A properly dressed wheel is essential. Hold
the dressing tool
firmly and move
side to side across
the wheel until it is
flat and clean of all
metal particles.
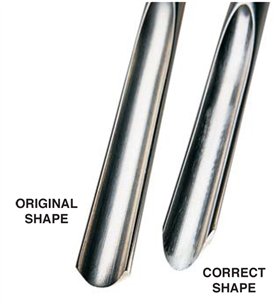
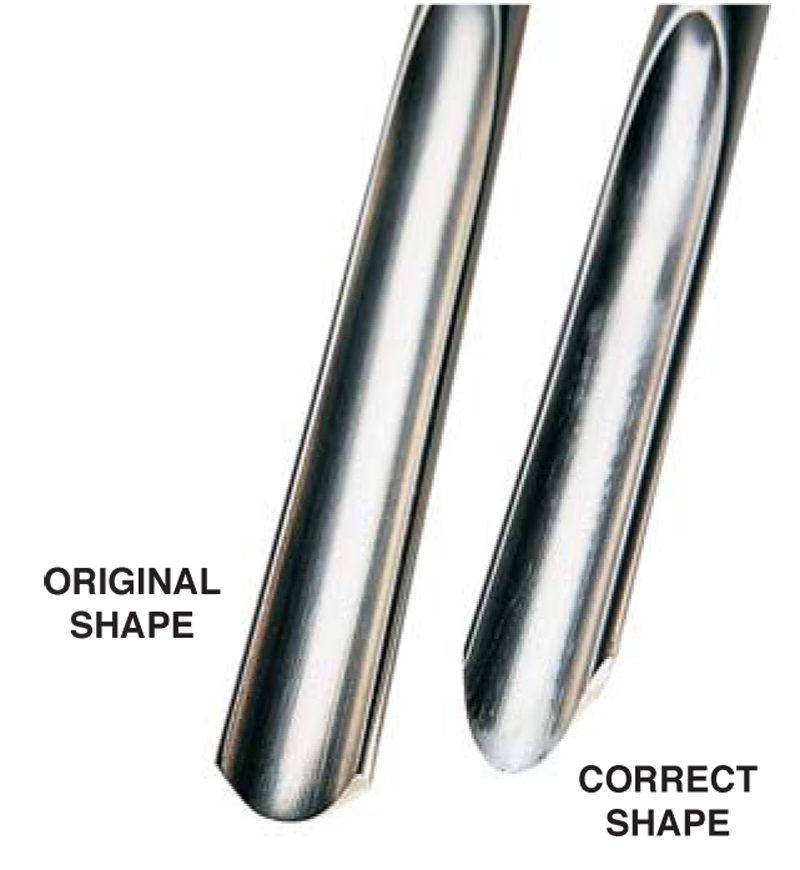
3. The first step in sharpening any gouge is
to create the shape of the tool. Detailing
gouges, for example, come from the factory
square, triangular or slightly domed (left).
The correct shape is like a fingernail (right).
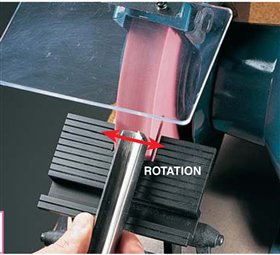
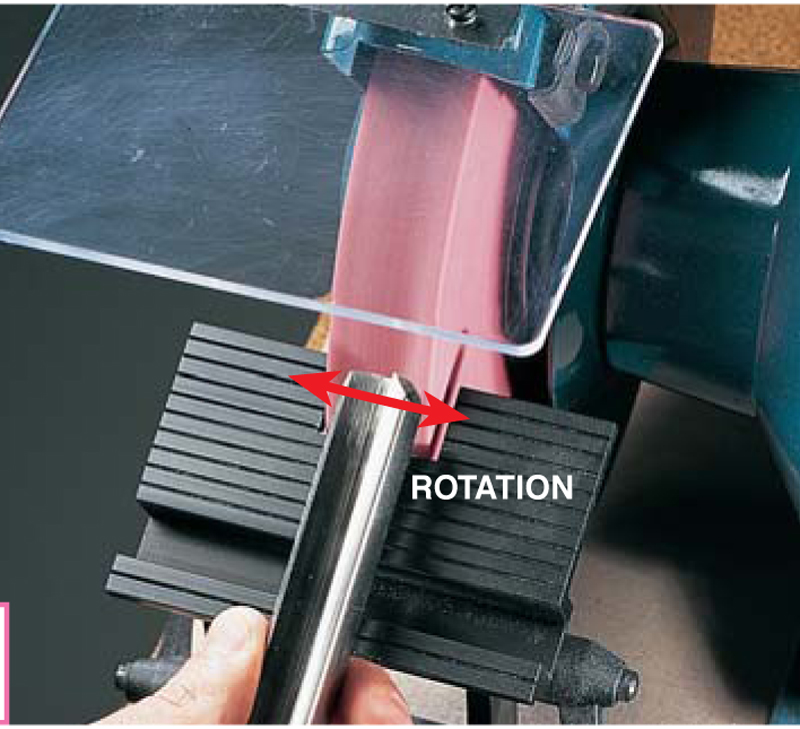
4. Rotate the tool slowly along the full
length of the edge, progressing until the entire
bevel is in contact with the wheel. Maintain a
comfortable grip, keep the tool rest set to 45
degrees and the heel of the bevel resting on
the wheel.
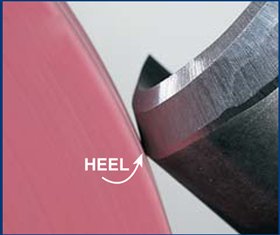
5. As seen from
the side, the
roughing
gouge’s first
contact should
be at the back
of the bevel
(heel).
6. As the rotation
continues, the
mid-section of
the tool is
ground.
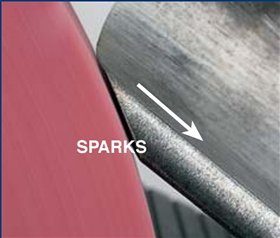
7. The bevel is
now in full
contact with
the wheel and
sparks are just
beginning to
appear over
the top of the
edge.
8. Start with
the gouge in
the middle
of the stone
with the heel
of the bevel
touching the
wheel.

9. Grind the
left half of
the tool by
slowly
pushing the
tool up the
stone and
rotating to
the left.
Reverse this
action to return the tool to the starting
position.
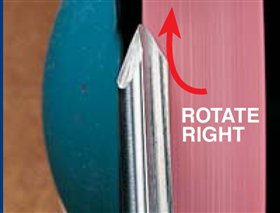
10. Grind the
right half of
the tool by
slowly
pushing the
tool up the
stone and
rotating to
the right.
Then
reverse this movement to return the
tool to the starting position.This
sequence may have to be repeated
several times to achieve a sharp edge.
When the bevel is in complete contact
with the wheel and sparks just begin to
trail over the top of the tool, you’re
done.
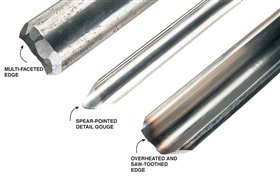
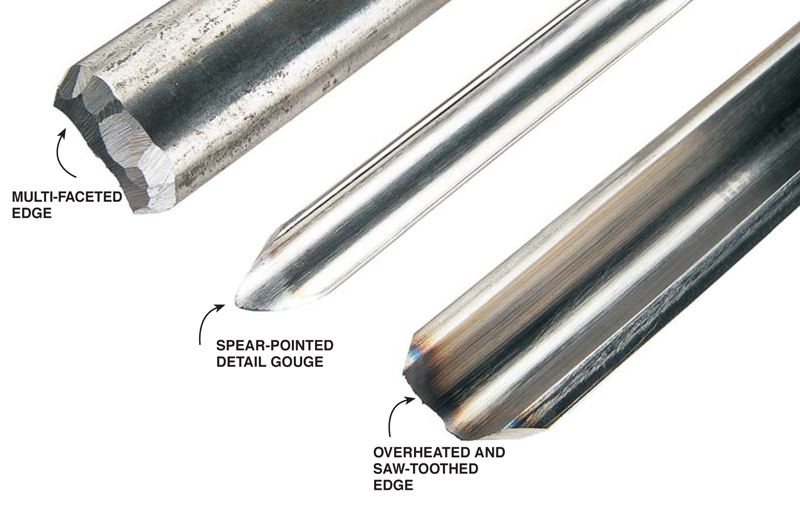
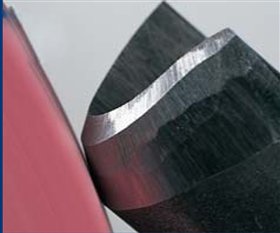
11. Gouge grinding pitfalls. Rookie attempts at grinding
often produce these problems, from
left to right:
1. Multi-faceted gouge (uneven
movements and pressure,
removing tool too frequently
from wheel to examine and
attempting to return to same
place).
2. Spear-pointed detailing gouge
(failing to grind to the shape of
the edge).
3.Tool bluing (dull or loaded
grinding wheel, excessive
pressure, grinding in one place
too long), and a saw-toothed edge
(over grinding of the edge, usually
indicated by a stream of sparks
over the top of the tool). |