|
Here’s one technique every budding furniture maker should know: how
to make a framed top with thick, shop-made veneer. A mitered frame adds
a polished, professional look to a project, in the same way that a
picture frame sets off a work of art. It also offers many practical
benefits:
• A frame can make a 3/4 in. or thinner top look much thicker, because the framing members can be thicker than the central panel.
• A frame puts long grain on all four sides of a top,
so every side looks the same when the top is finished. In a solid-wood
top, the ends often appear darker, particularly if they’re stained.
• A frame may be made from a contrasting wood, adding drama to a top’s appearance.
• A frame may surround veneer laid in a pattern, such as a diamond shape.
• A frame is more durable than thin edging, and can be shaped with a molding.
Generally, a framed top is built around a plywood panel (see “Why
Not Use Solid Wood?”, below). You can use commercial plywood, of
course, but you also have an opportunity to make your own. Why would
you want to? Using commercial plywood, you might run into three
problems. First, you may only need a small piece, and buying a full
sheet can be expensive. Second, you may not be able to find plywood of
the same species as the solid wood in the rest of your project, or the
plywood’s grain or color won’t match the solid wood. And third, with
commercial veneer as thin as it is, you always run the risk of sanding
through it, particularly when you level the frame with the plywood.
All of these problems can be solved by making your own plywood,
using shop-made veneer. Sure, this takes extra time, but not a lot of
extra expense. The top will match the rest of your project, because
you’ll make it from the same batch of solid wood. The veneer can be up
to 1/8 in. thick, so there’s virtually no chance you’ll sand through
it. Thick veneer is much more durable than thin, commercial veneer. For
hard-wearing surfaces, it will hold up much better to scratches and
dents.
Make The Veneer
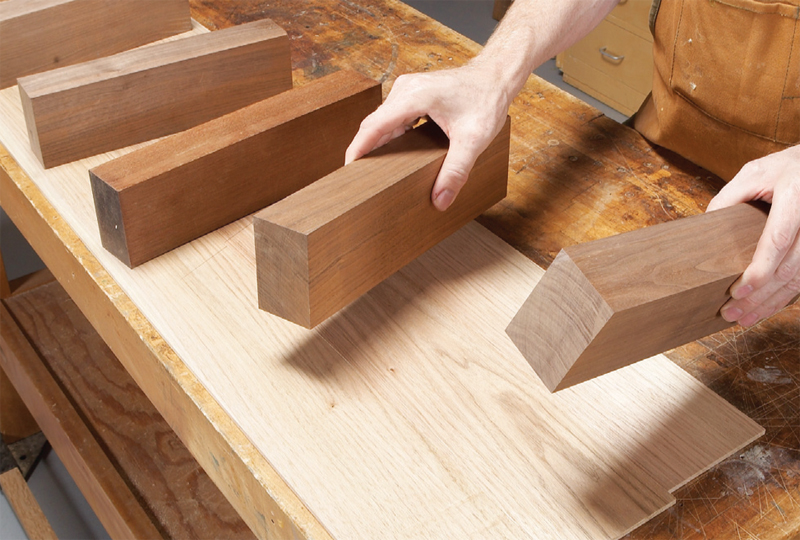
1. Begin by milling the wood into boards with parallel faces and
edges. If you’re using 4/4 (1 in.) lumber planed 7/8 in. thick, you
should get three or four veneer pieces from each board. Crosscut the
boards 2 in. longer than the final panel. Make enough veneer to cover
both sides of your top.
2. Install the widest blade your bandsaw can handle. It should be
quite coarse, with 3–4 teeth per inch. Position your fence 3/16 in.
away from the blade and make a test cut with a 12 in. long piece of
plywood, face side down. If the cut is straight, you’re good to go. If
the cut wanders, you’ll have to adjust your fence to compensate for the
blade’s drift angle.
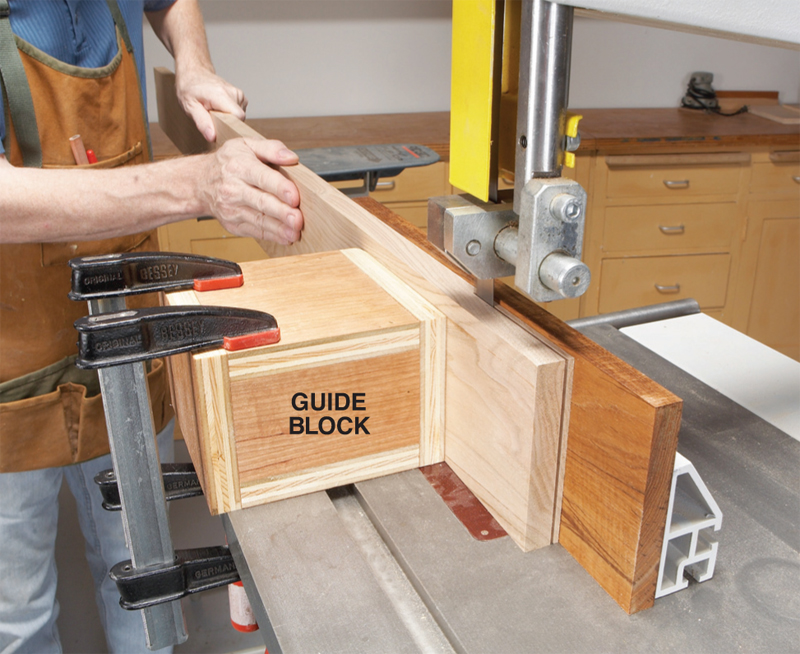
3. Make a box-style guide block to steady the boards as you saw
(Photo 1). Together with a tall fence, this device helps make the sawn
surface as smooth and straight as possible. Make the box about 6 in.
long and as tall as the boards. To position the box, temporarily clamp
one board to the fence. Push the box tight against the board and clamp
the box to the saw table. Remove the clamp holding the board to the
fence and try sliding the board in and out. It should move freely, but
not wiggle.
4. Saw the veneer. After you’ve cut one piece from each board, run
the boards through the planer to smooth the sawn surface. Re-position
the guide block box and re-saw the boards again. As the pieces come off
the saw, pile them in a stack. When you’re done, weight the stack with
plywood or blocks to keep the pieces flat.
5. The next step is to glue the veneer pieces together, making two
panels, one for each side of the top. Test the fit of the edges before
you glue– they may need to be straightened once more on the jointer.
Place the jointed or planed sides up, butt the pieces tight, and tape
them together (Photo 2).
6. Turn the pieces over and run a narrow bead of glue down each
joint (Photo 3). Lay the assembly flat on the bench and push down each
piece so that the joints are even. Scrape off the glue squeeze-out and
weight the panel (Photo 4).
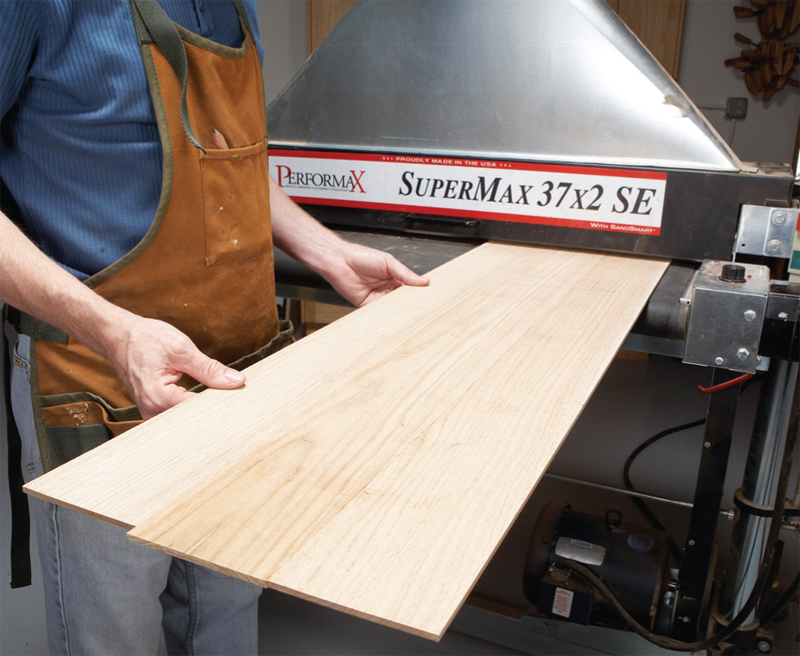
7. If your sawn surfaces are very smooth and exactly equal in
thickness from side to side, you can glue the sawn side down to the
substrate as it is. For the best bond, use epoxy (which fills gaps),
but yellow glue should also work fine. If your sawn surfaces are a bit
uneven, or unequal in thickness from side to side, you’ve got two
choices. You could use the panels as they are and epoxy them to the
substrate, or, better yet, use a drum sander to smooth both sides
(Photo 5). Sanding saves a lot of evening-up work after the top is
assembled, because the top surface will be as uniform as commercial
plywood. Sand until the panels are 1/16 to 1/8 in. thick.
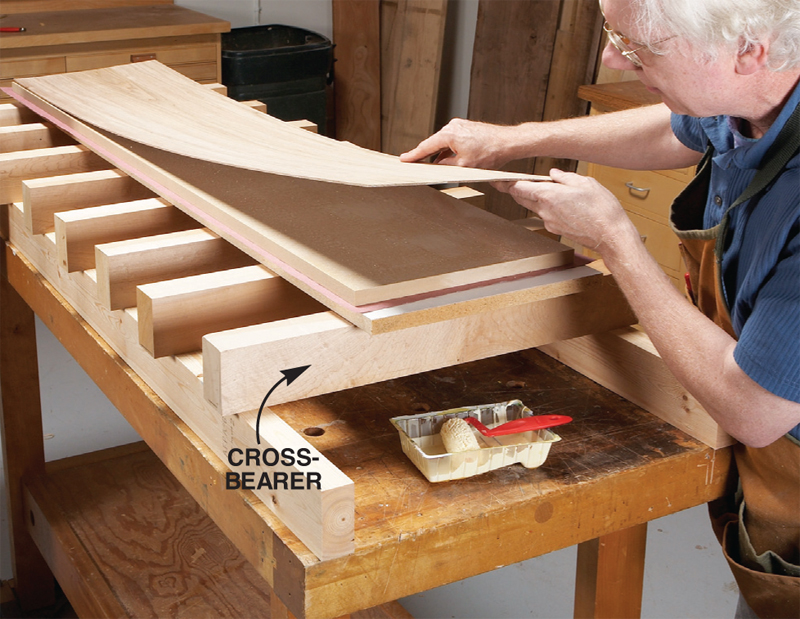
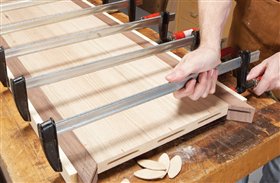
Make A Veneer Press
8. Gluing the veneer requires a fairly elaborate setup (Photo 6) and
a sufficient number of clamps, or a vacuum bag. If you make a press,
the main trick is to get adequate clamping pressure in the middle of
the panel. If the panel is less than 16 in. wide, straight, stout
crossbearers work fine. If the panel is over 16 in. wide, make a slight
crown on the side of the bearer that pushes on the caul, so the bearer
flattens out from the center as you apply clamping pressure.
Alternatively, you can put shims under the center of a straight bearer.
In either case, make enough bearers to space them about 6 to 8 in.
apart.
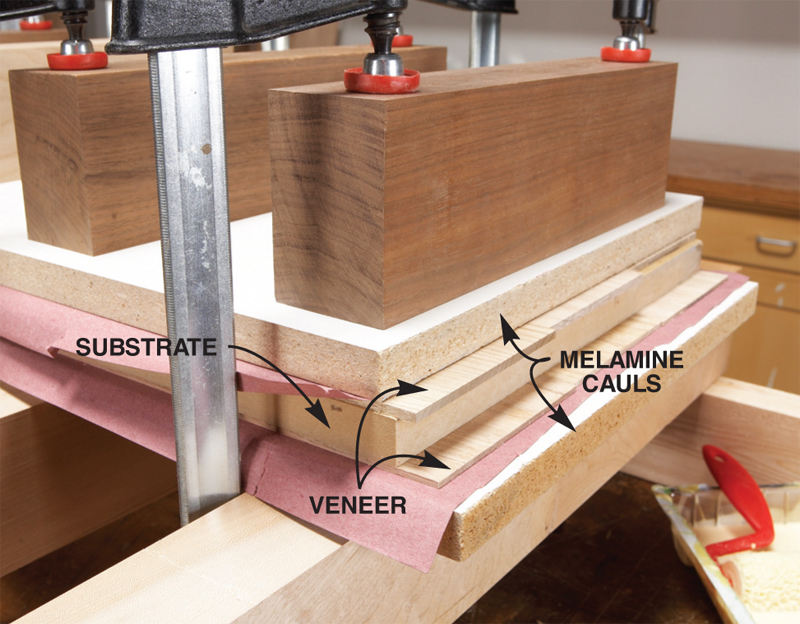
9. Medium-density fiberboard (MDF) makes an excellent substrate
because its surfaces are smooth and flat. Cut the MDF and two cauls the
same length and width as the veneer panels.
10. Use a roller to apply a thin, even layer of yellow glue to the
MDF (don’t put any glue on the veneer). If you work fast, you can glue
both panels to the substrate in one shot (Photo 7). The builder’s paper
is optional. It captures glue squeeze-out, so the veneer can’t adhere
to the cauls.
11. Allow the glue to dry overnight, then remove the clamps. Cut the panel to final size.
Fit The Edging
12. Make four pieces of edging; two of them should be about 1/4 in.
extra-wide. If the top is rectangular, the extra-wide pieces should go
on the short sides. Miter the long pieces to fit the veneered panel,
then cut biscuit slots about 12 in. apart all around the panel and
along the long pieces.
13. Cut biscuit slots in the mitered ends of the edging. You can use
smaller, shorter biscuits here or cut larger biscuits to a shorter
length. When cutting slots in miters, use a scrap piece of edging to
balance your plate joiner. Glue on the long edging (Photo 8).
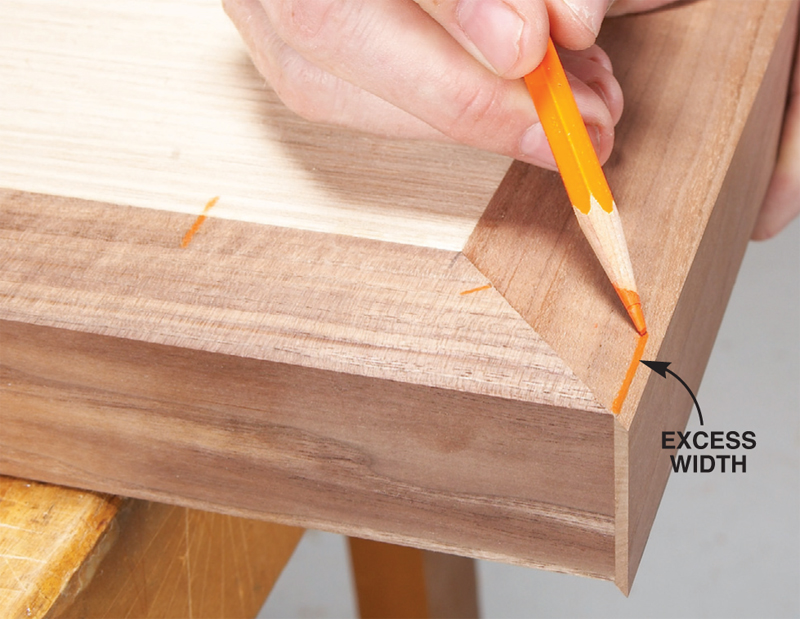
14. Miter both short pieces. If you can cut them exactly the right
length, great! That’s hard to do, though, so it’s easier to start out
with the pieces a little short (Photo 9). Here’s where the extra width
comes into play. Adjust your jointer to take a minimal cut, then joint
the inside edge of each piece (Photo 10). Test their fit after each
pass. You’ll see that they’ll gradually come closer to fitting the
opening. Because the pieces are mitered, each cut on the jointer
increases the length of their inside edges. When the pieces do fit, cut
their biscuit slots. Mark what remains of their excess width (Photo 11)
and remove this waste using the jointer. Glue the pieces.
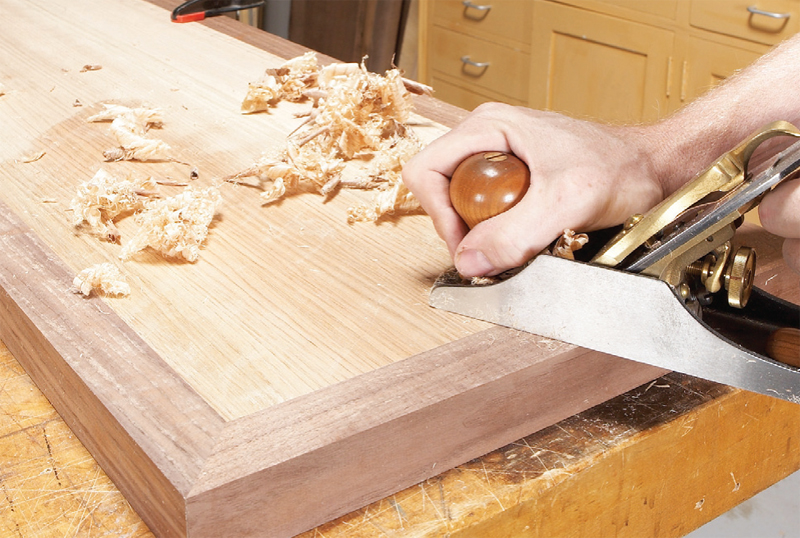
15. Having used biscuits for alignment, the edging and top should be
close to level with each other, but not perfect. Make all the pieces
flush by using a random-orbit sander, drum sander, No. 80 scraper, or a
hand plane (Photo 12). The thick veneer makes this job much less
stressful–there’s really no chance you’ll accidentally sand or cut
through it!
Why not use solid wood?
Gluing thick, mitered edging all the way around a
solid wood top is a potentially disastrous mistake. It
bucks one of the most basic rules about working with
wood: you have to allow it to expand and contract.
Ignore this rule and you run the risk of joints failing or
wood cracking. That’s why it makes sense to use plywood
rather than solid wood for a framed top.
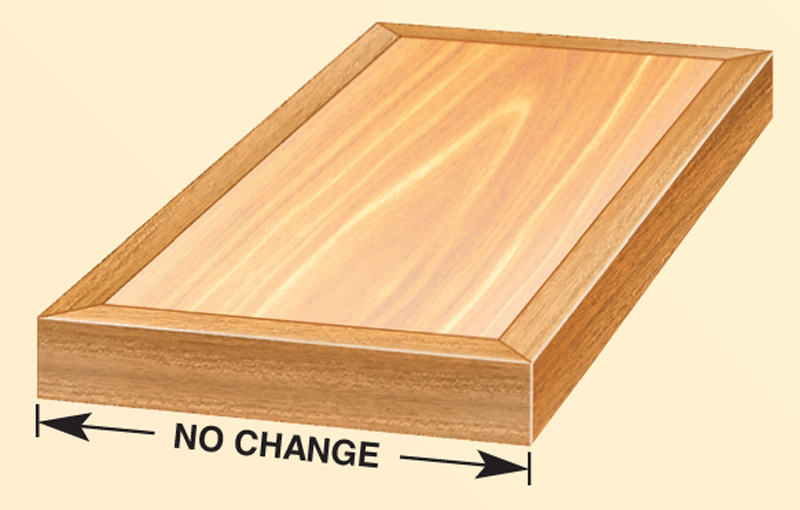
Plywood doesn’t expand or contract, for all practical
purposes. Here’s how the wood movement rule
applies in this situation:
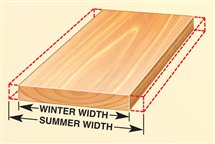
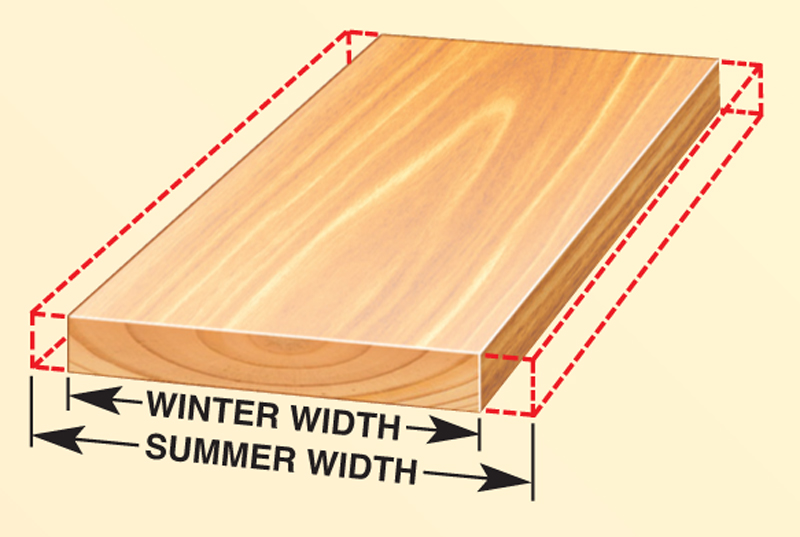
1. Let’s start with a solid top, just by itself. When
humidity increases in summer, the wood’s cells
expand and the top becomes wider. When humidity
decreases in winter, the top becomes narrower.
A 24-in.-wide oak top might shrink and swell as
much as 1/4 in. from summer to winter.
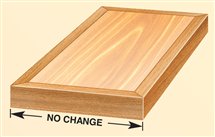
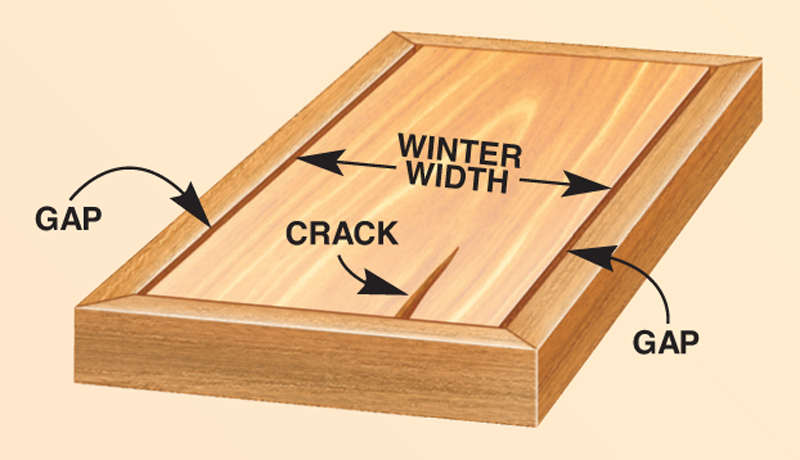
2. Now let’s add the mitered frame. Wood doesn’t
change in length from winter to summer, so the
frame’s size is fixed. The solid wood panel is
trapped inside.
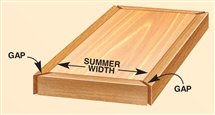
3. When the solid wood panel swells in summer, it
may force apart the frame’s miters.
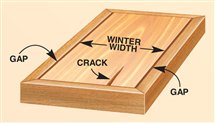
4. When the top tries to shrink in winter, something
may give. It may pull away from the frame’s
sides, or develop a crack.
This story originally appeared in American Woodworker September 2008, issue #137.
September 2008, issue #137
Purchase this back issue.
|
|
Click any image to view a larger version.

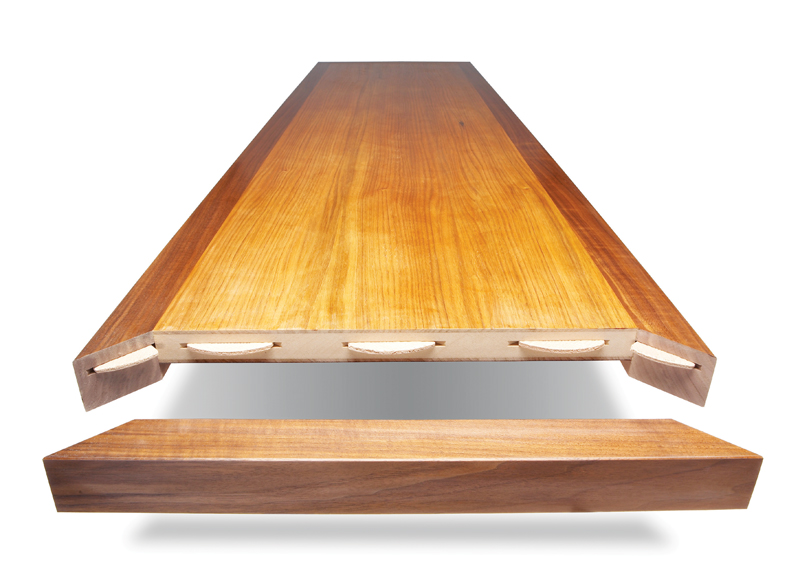
1. You can use standard plywood for a framed top or make your own extra-thick shop-made veneer. Begin by resawing solid wood into 3/16 in. thick pieces.
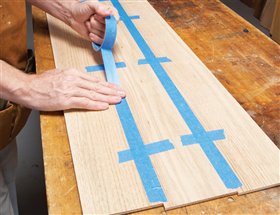
2. Joint the edges of the veneer pieces and tape them together. Apply the short pieces of tape first, across the joints, to pull the joints tight.
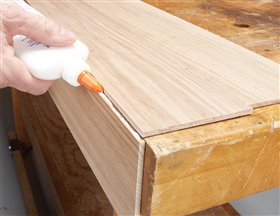
3. Turn over the taped-together panel and let one piece hang over the edge of the bench. Run a small bead of glue down the joint and fold it back together. Repeat this process for the other joint.

4. Place blocks or weights on the veneer to hold the pieces flat while the glue dries. Make a second panel, too. Your shop-made plywood should have a veneer on both sides.
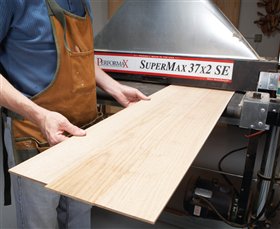
5. For the best results, run both sides of the panel through a drum sander. Keep sanding until the panel is smooth and even–an ideal surface for gluing to a substrate.

6. Assemble a shop-made veneer press and go through a dry run. The lower half of the press consists of a series of stout cross-bearers supported by two boards that run the length of the bench.

7. Here's a closer view. A melamine caul, covered by builder's paper, sits on the crossbearers. Next come the veneer panels and substrate, topped by another caul and set of crossbearers.
8. Cut miters on the long edging pieces, but leave the short pieces uncut. Glue the long pieces to the center panel.
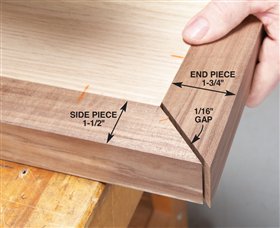
9. Fitting the end pieces is a three-step process. Note that they are a 1/4 in. wider than the long edging pieces, for now. First, miter the short pieces so they're about 1/16 in. too short.
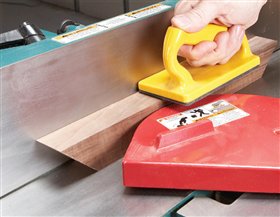
10. Next, joint the inside edge of the short piece. This edge becomes longer with each pass, "lengthening" the piece, in effect. Stop jointing when the piece fits perfectly.
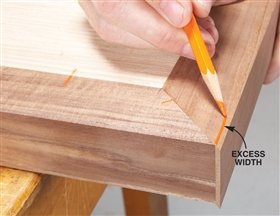
11. Draw a line on the short piece indicating its excess width. Joint the piece's outside edge to make the piece narrower. Cut biscuit slots and glue it to the top.

12. Even the edging with the top. You could run the top through the drum sander, but planing or scraping by hand is more satisfying. With thick veneer, there's no danger of cutting through.
|