We may receive a commission when you use our affiliate links. However, this does not impact our recommendations.
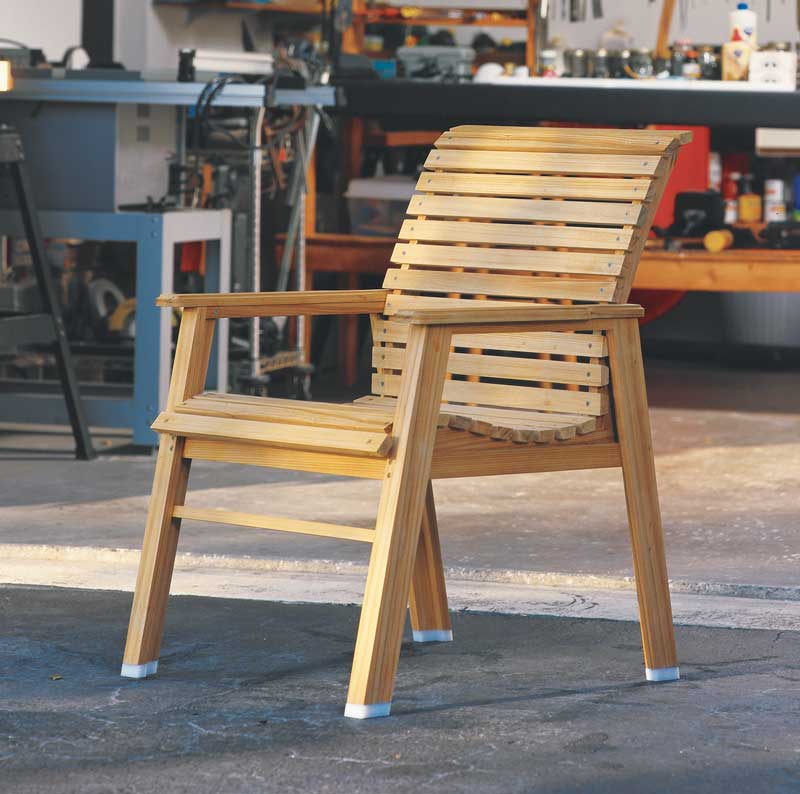
A curved seat and back make this chair extra-comfortable.
With a set of outdoor chairs like this on your patio or deck, you and your guests can enjoy the open air in comfort and style. This chair is comfortable (the seat contours were patterned after a Mercedes Benz seat!), and so simple to build you can put one together in a weekend. You’ll need only basic tools: a tablesaw (or radial-arm saw), bandsaw, drill press and router.
Because I live on the coast of Florida, I designed my patio chair to stand up to the ravages of salt-laden air, hot sun and heavy rain. And I didn’t want a patio-full of chairs that required heavy maintenance. You can enjoy these without worrying about scraping and painting every year.
One of the tricks to building a low-maintenance chair is to select the right wood. I made these chairs from vertical-grain cypress. The grain pattern is visually appealing, and cypress holds up extremely well outdoors, without any finish. Other suitable woods are teak, mahogany and cedar. Another secret to a longlasting chair is to select the right hardware. I used square-drive stainless steel screws, which won’t rust or stain the wood. Also, be sure to use a weather-resistant glue. I’ve had good luck with Titebond II, a yellow glue that’s easy to work with and holds up well in moist conditions. Alternative glues are resorcinol, epoxy and plastic resin. (For more on glues, see AW #34, Oct. ’93). Finally, to protect the end grain of the legs and to keep them out of any surface water, I added plastic feet.
Cutting the frame parts
Begin construction by cutting the legs. They have an L-shape in crosssection, which I made by ripping the center out of 1-1/2 by 2-1/4 in. stock, leaving a 3/4 by 1-1/2 in. recess. You could also glue together two pieces of 1-1/2 by 3/4 in. stock. Once you have the L-shaped stock, cut a 12-degree miter at both ends so the legs are 23 in. long. When cutting the miters, remember to make two right legs and two left legs!
Next, make the front and back rails, which have a 12-degree beveled top and bottom edge. Starting with 1-3/4 in. stock, bevelrip the first edge of both pieces at 12 degrees. Next, flip the boards over, reset the saw’s fence and bevel-rip the other edge of both boards. The width of the board’s face should be 1-1/2 in. Crosscut the two rails to length and keep the offcuts to use later as spacer blocks (Photo 1).
Cut the foot rail to length, then cut the arm and side rails to the rough length shown in the Cutting List. They will be cut to final length during assembly.
Frame assembly
I made a jig (Photo 1) to help assemble the sides. The jig has blocks to position the legs so the outside corners are 27-1/2 in. apart at the bottom, and the legs slope inward at 78 degrees. A horizontal block locates the side rail at the correct height (Photo 1).
Place two legs on the jig, and cut one end of an arm rail to 12 degrees. Put the arm rail in position, mark the opposite end, and make the opposing miter cut so the rail fits tightly. Drill and countersink the arm rail, then attach it with glue and 1-1/4 in. screws. To assemble the seat rail, first retrieve the two beveled pieces of scrap that you saved earlier and position them on the jig (Photo 1). These are standins for the front and back rails. Cut one end of a seat rail to 12 degrees, then cut the rail to fit between the legs as you did the arm rail. Remove the spacers.
With the two sides assembled, you’re ready to attach the front, back and foot rails. This can be awkward for one person, so get another set of hands, if you can. A piece of scrap cut to the same length as the rails will also help.
On a perfectly flat surface, clamp the two sides, the three rails and the spacer, without glue. If everything fits, glue and screw the rails in position, foot rail first (Photo 2). Be sure to drive the eight screws that go through the front and back legs and into the ends of the side rails, because they lock the joint together.
The seat supports
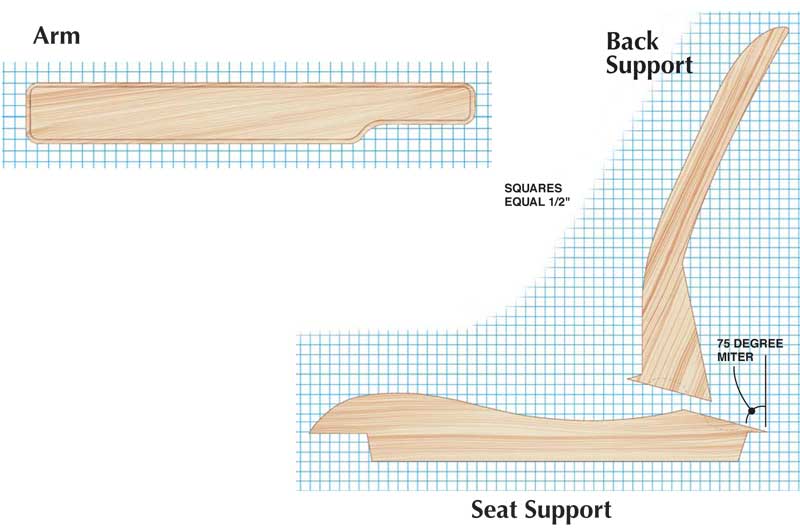
The shape of the seat supports is the key to the comfort of the chair. To get a comfortable curve, I traced the seat contour of my neighbor’s Mercedes, a seat revered for its relaxed fit. I made a full-size template of the curve from heavy card stock.
To make the blank for the seat support, make a 75-degree cut on the end of a 1×4, as shown in Fig. C. There are two ways to do this: Mark out the cut, bandsaw it roughly and then plane to the line; or make a jig to clamp down the stock at a 45- degree angle, then make the cut with a tablesaw, radial-arm saw or miter saw set at 30 degrees. Save the offcut. Attach a 1×6 to the 75- degree cut face with a biscuit, using the offcut to help you clamp the joint tight (Photo 3).
When the glue is dry, saw out the shape of the seat support on the bandsaw and smooth it. Glue and screw the seat supports to the side rails, making sure that the bottom edge of each seat support is flush with the side rail. Clamping the seat support to the frame before driving the screws will make the joint tight.
The armrests
It’s now time to tackle the armrests. First make a template for the shape of the arm out of card stock (Fig. C). Bandsaw the arms to shape and sand the edges smooth. Rout the decorative cove on the upper edges.
Secure the armrest to the arm rails with glue and screws. The arm should overhang the front leg by 1-1/2 in. (Fig. B). Once again, clamping the joint before screwing will result in a tighter joint.
The slats
To make the slats, first cut some wide boards to 21-1/2 in. Allow enough material for 23 slats per chair, plus a couple extras. To strengthen the chair, each slat has a dado that fits over the seat support. I cut these dadoes in the wide boards using a radial-arm saw, with a stop block to ensure that each dado is 3/4 in. from the board’s end (Photo 5). Once you’ve cut the dadoes, rip the wide boards into 1-1/2-in. strips and bevelrip at 12 degrees to a final width of 1-3/8 in. Trim two of the slats to 20 in.—these two fit between the legs and arms.
Drill and countersink two holes in each slat, using a simple jig to keep the holes positioned correctly (Photo 6). Drill holes in the shorter slats without the jig.
Next, install the slats. Start with the three slats in front, including the 20-in. one that goes between the legs. Use glue and screws, predrilling the seat supports for the screws. Then install a slat at the top of the back, two slats at the “crook” of the seat support, and the short one between the armrests (Photo 7). The upper edge of this slat should line up with the top of the decorative cove cut in the arms. Install the remaining slats, spacing them by eye.
Plastic feet
In Florida we get some colossal rain storms. To keep the ends of the legs from standing in water, I shod them with plastic feet. They’re made from ultra-high molecular weight (UHMW) plastic, that can be cut with normal woodworking tools. UHMW plastic is slippery, so the chairs slide easily on rough surfaces.
I cut the plastic into bevel-edged rectangles first, then cut them into L-shapes on the bandsaw, tilting the table to get the bevel on the final inside cuts. Again, make sure you have two right and two left feet. Counterbore and drill the feet, then screw them into the bottom of the legs.
Finishing
Cypress naturally weathers to a beautiful silver gray. An annual coat of a water-repellent preservative with UV inhibitors and a fungicide, like Thompson’s Wood Protector (available at home centers), will keep the wood looking its best.
Cutting List and Hardware

Fig. A: Patio Chair

Fig. B: Chair Elevation

Fig. C: Chair Parts
Click any image to view a larger version.

1. Assemble the sides on a jig to keep the legs in position. The side rails are cut to fit, using spacer blocks to stand for the front and back rails.

2. Construct the frame by attaching the front and back rails to the two side assemblies. A couple clamps and a spacer between the back legs will help.

3. Make the rough blank for the seat support from a 1×4 with a 75-degree cut and a 1×6, joined with a biscuit. An angled wedge allows you to clamp the joint tight. When the glue is dry, bandsaw the seat support to shape.

4. Screw the seat supports to the seat rail and the rear leg, checking to make sure they are parallel and 1/8 in. in from the back edge of the leg. Shape the armrests, then glue and screw them on.

5. Dado the slats before they’re ripped to width, using a stop block to ensure consistent location. Then rip the slats and bevel their edges.

6. Drill and countersink the slats, using a drill press and simple jig to get the holes properly located. Two slats must be cut short and drilled separately. One fits between the legs and one between the arms.

7. Install the slats beginning with the three in front, then the top of the back, the two in the “crook” of the seat, and the short slat between the arms. Fill in the remaining slats, spacing them by eye.
Here are some supplies and tools we find essential in our everyday work around the shop. We may receive a commission from sales referred by our links; however, we have carefully selected these products for their usefulness and quality.