


We may receive a commission when you use our affiliate links. However, this does not impact our recommendations.
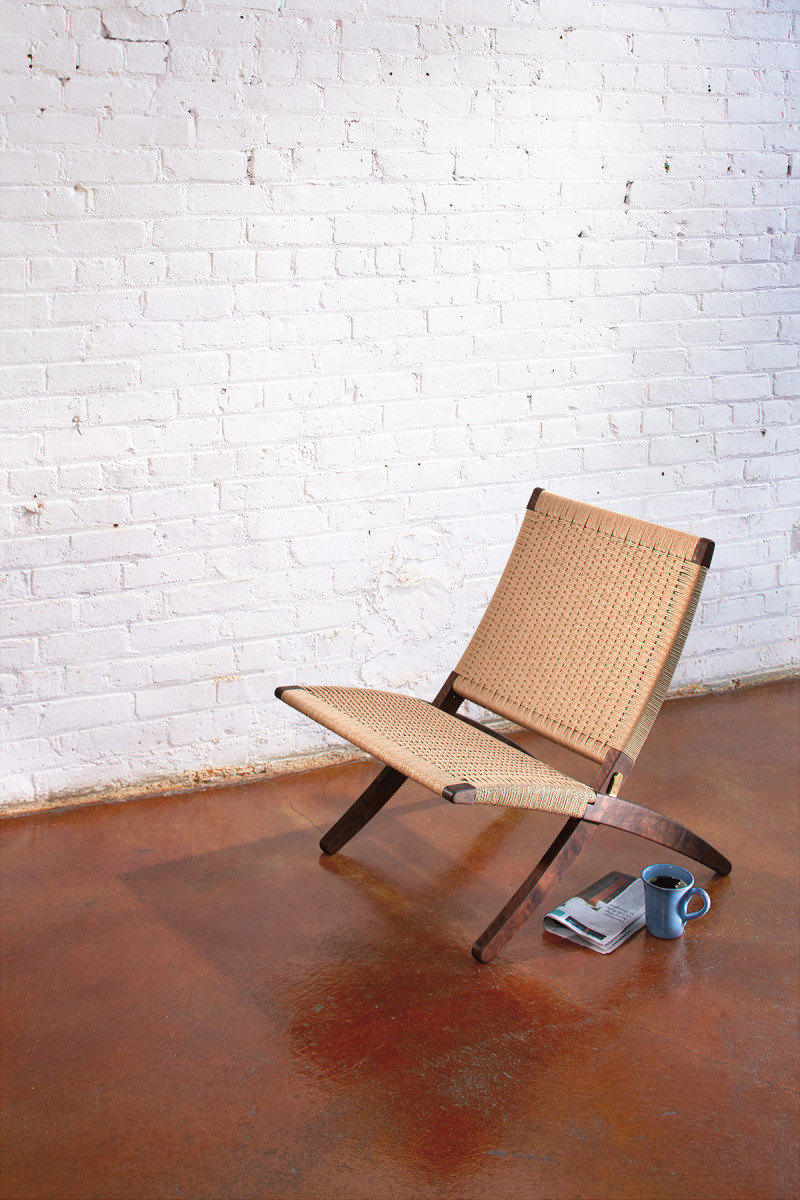
 Simple Danish ‘planflet’ weaving produces eyecatching results.
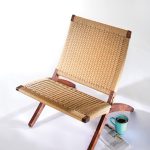
Build the chair: Modern Lounge Chair
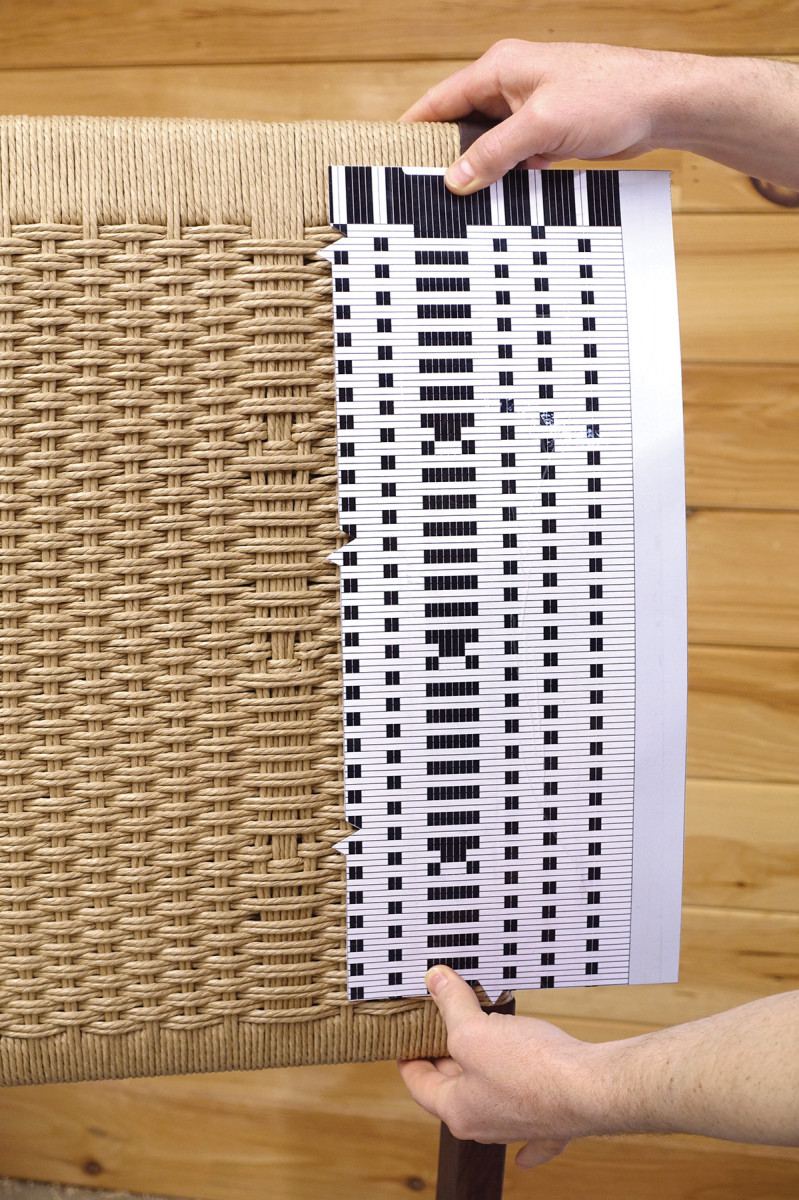
Download: Full-size patterns for planfletseat and back weaving PD
Danish paper cord is three-ply, twisted paper, a strong material that Hans Wegner used on his now-classic CH25 lounge chair – a piece that inspired my chair. Previously, I showed you how to make the frame and hardware; here, I go step by step through weaving the “planflet” (flat-weave) pattern for the seat and back – it’s a simple pattern, and easy for even a weaving novice.
Before I begin, here’s an overview. Weaving is done in two directions. The first is the “warp,” which in this case consists of double strands of cord that stretch from the front to the back rails. These are spaced apart along each rail by four or five wraps of cord around each respective rail. The second is the “weave,” which fills in the pattern. It consists of double strands of cord that travel from side to side while alternating over and under the “warp.”
I should mention that weaving is like the proverbial cat: there’s more than one way to skin it. I can think of at least four ways I’ve gone about achieving this same pattern over the years, but this is the simplest. (It is not, however, the most efficient – so after you’ve gained some experience, try other approaches!)
Get Warped
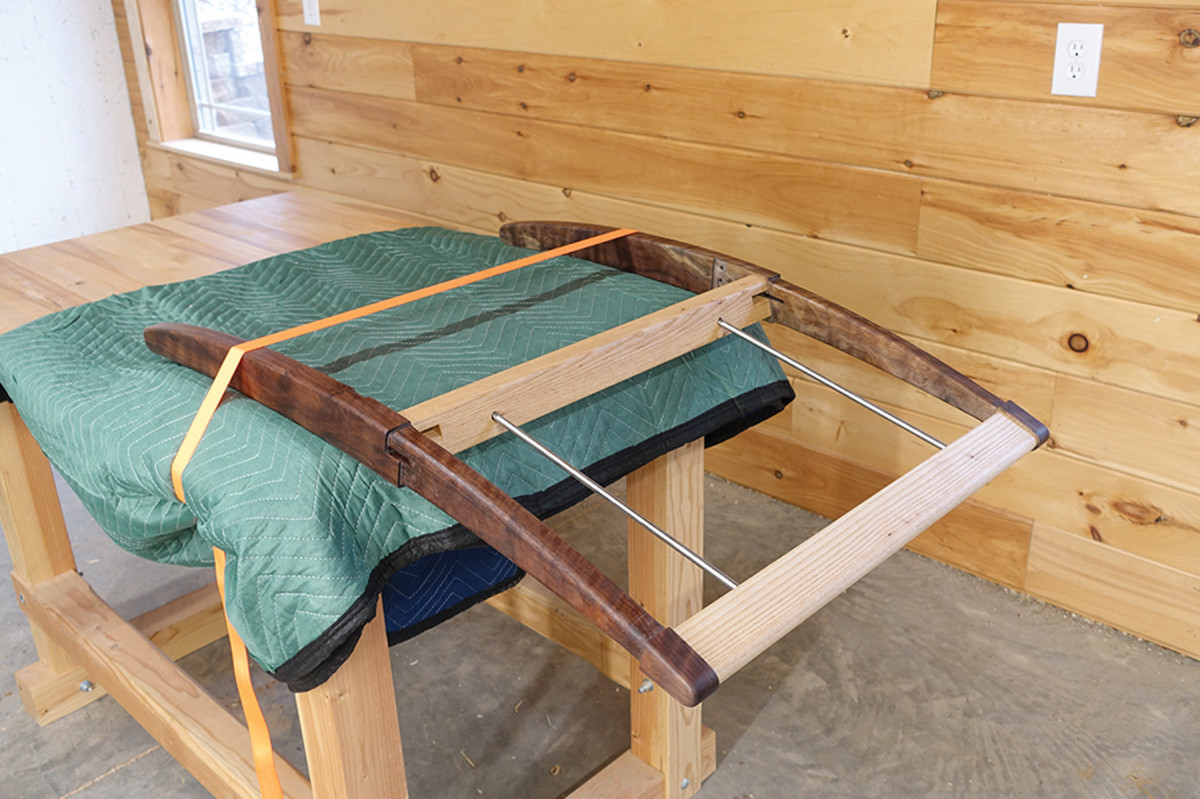
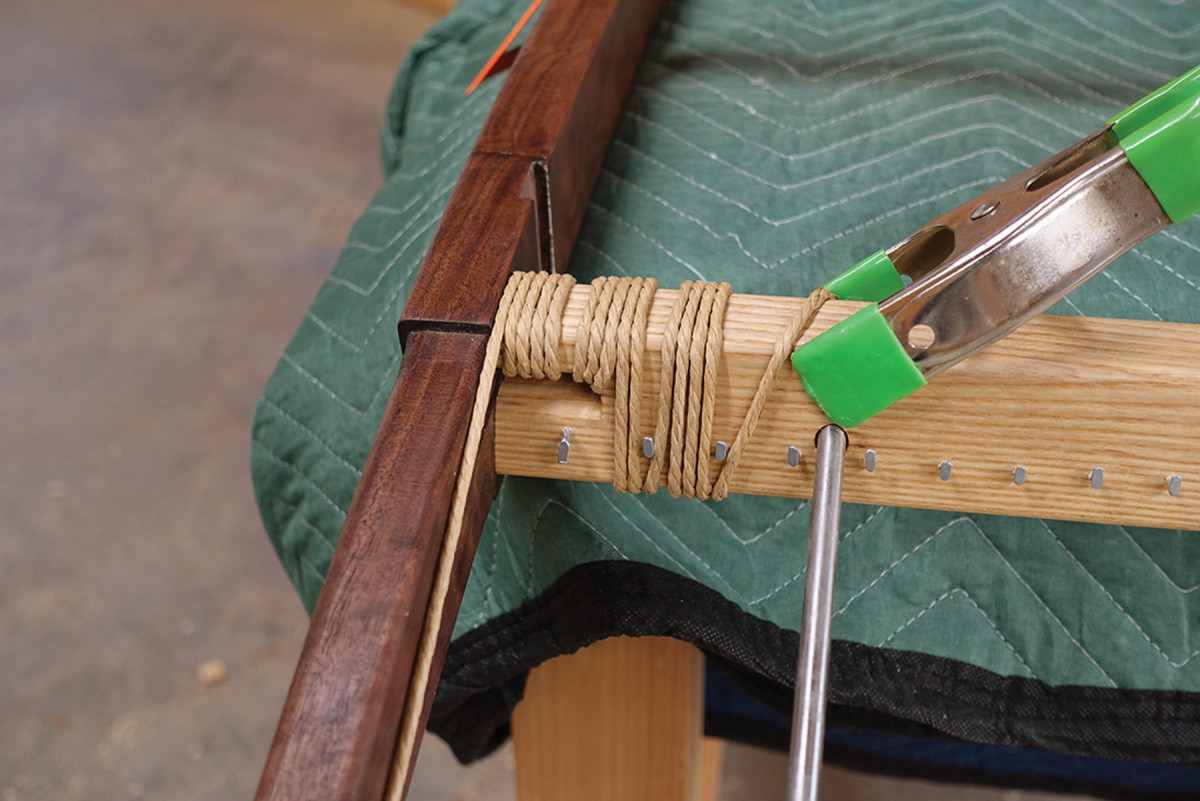
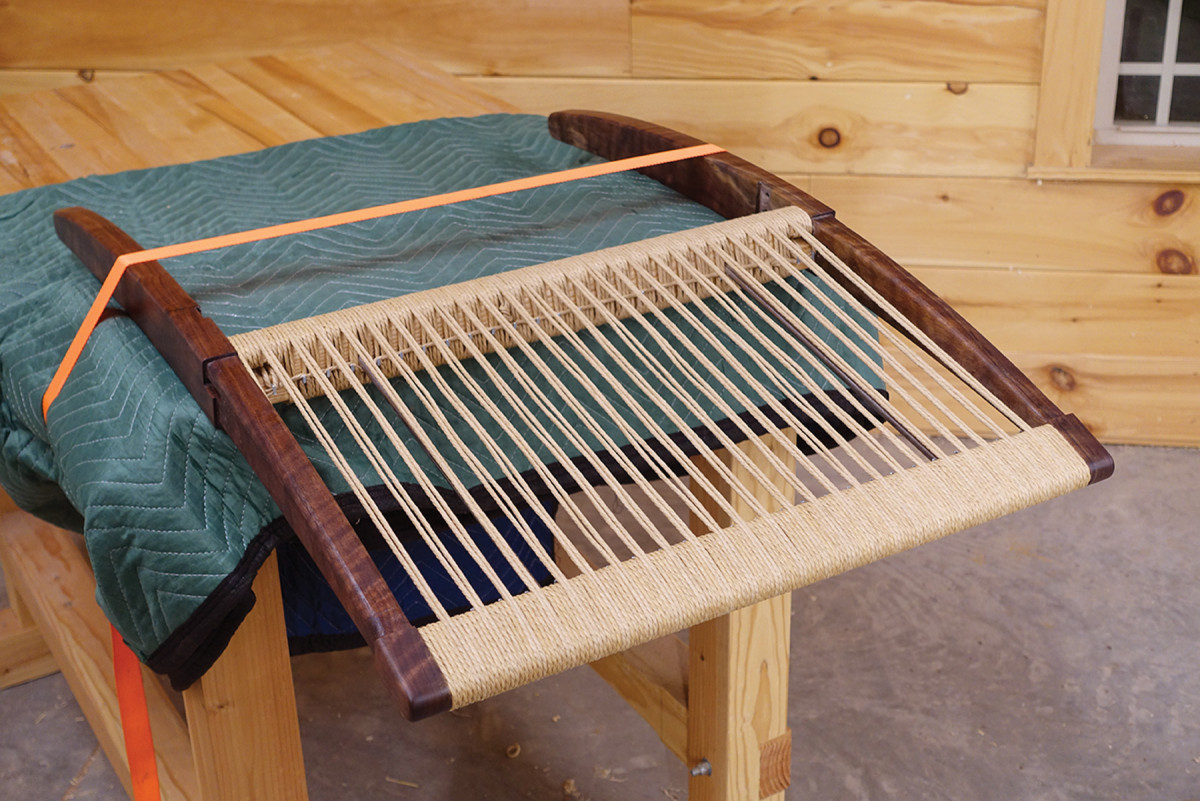
Secure & protect. For ease of weaving, cantilever the seat frame off the edge of your bench with a block underneath; Secure it with a light-duty ratchet strap.
Let’s start with the seat. To allow free access all around the frame for weaving, I cantilever it over the workbench edge while securing the legs to the benchtop with a light-duty ratchet strap. Because the legs are curved, it’s helpful to place a block of wood underneath to orient the frame at a nice working level. I use a packing blanket as a pad between them.
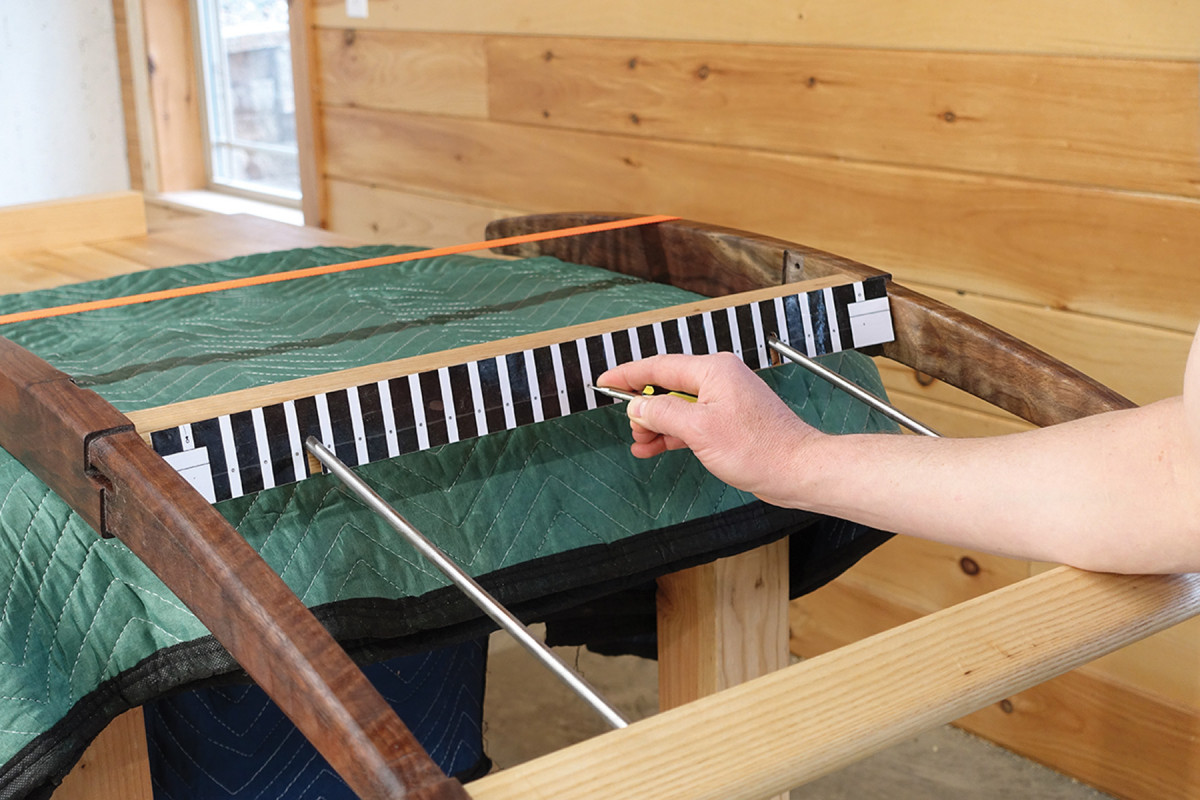
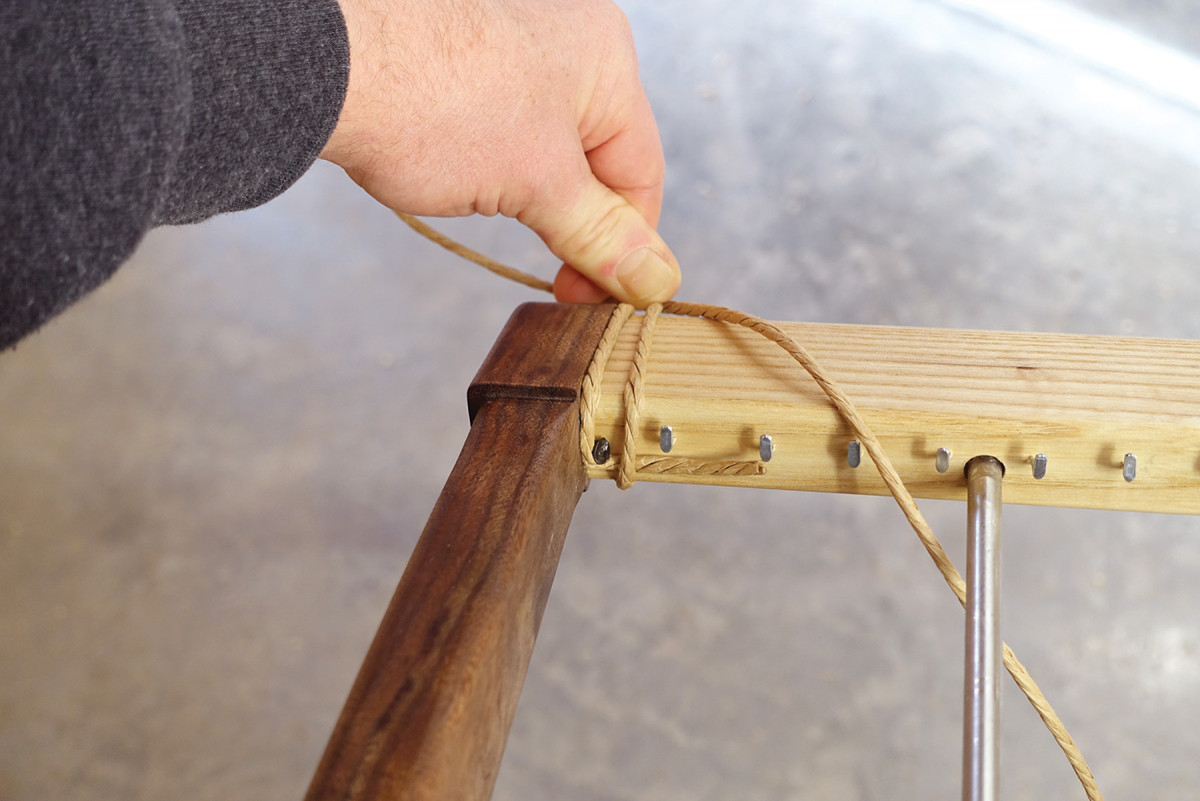
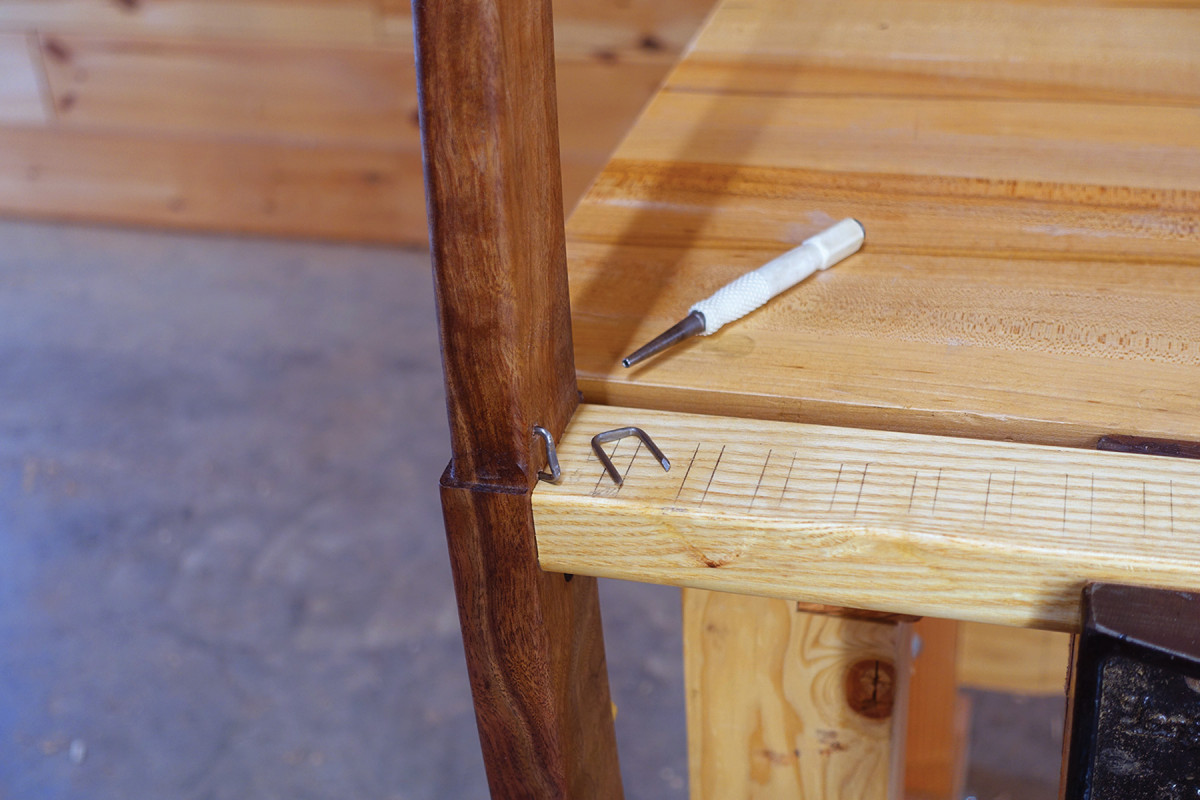
Prick. Mark the centers of each cord nail location from the warp layout pattern on the inside of the rail.
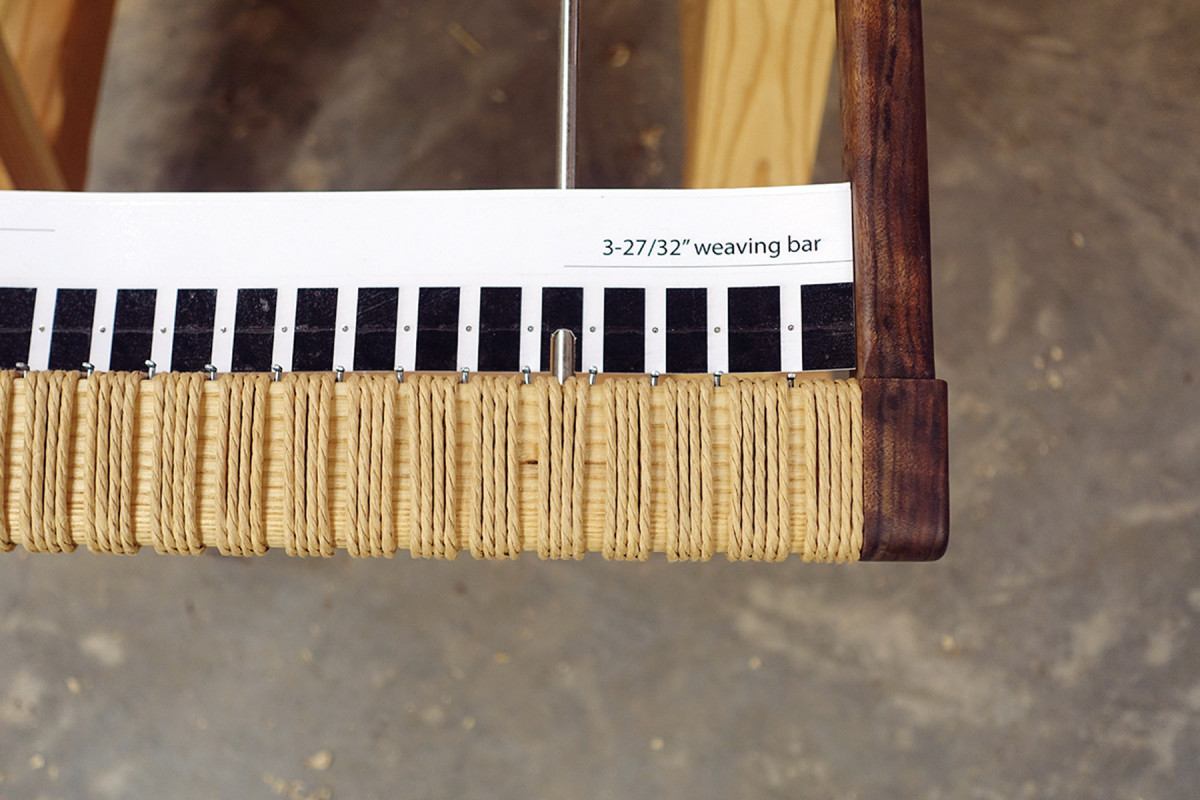
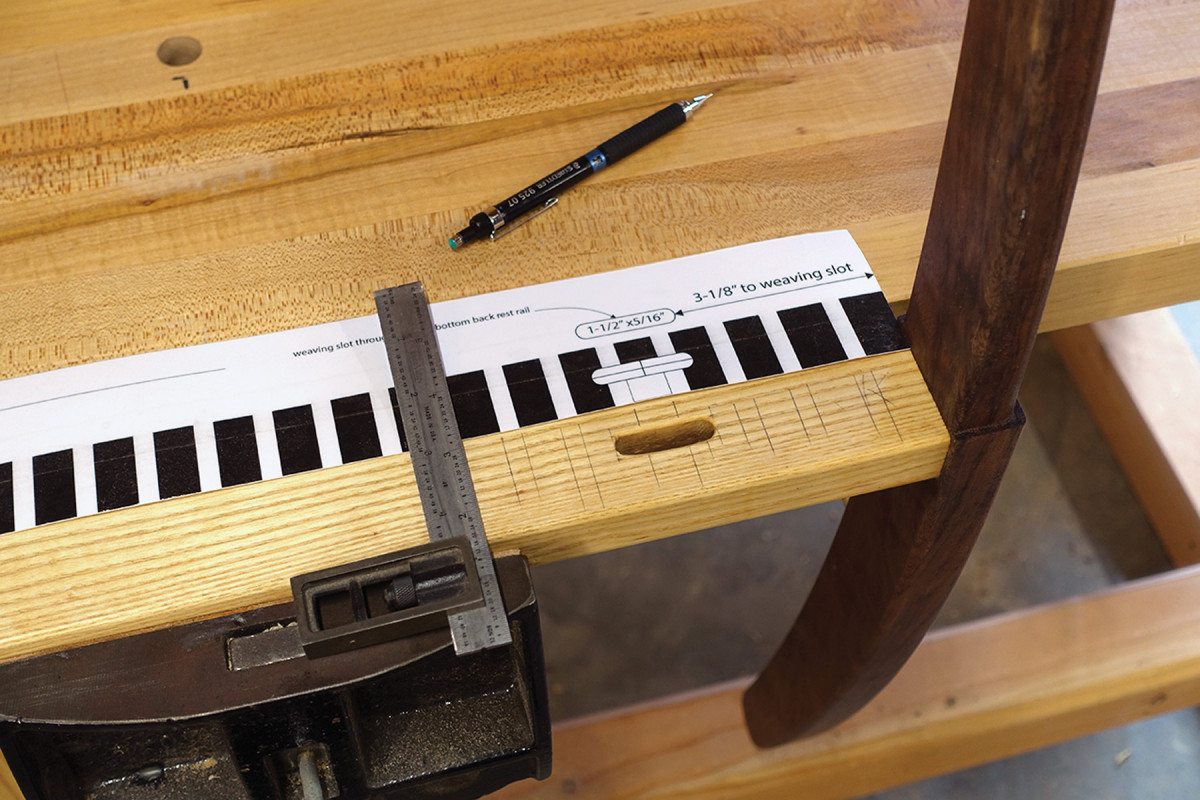
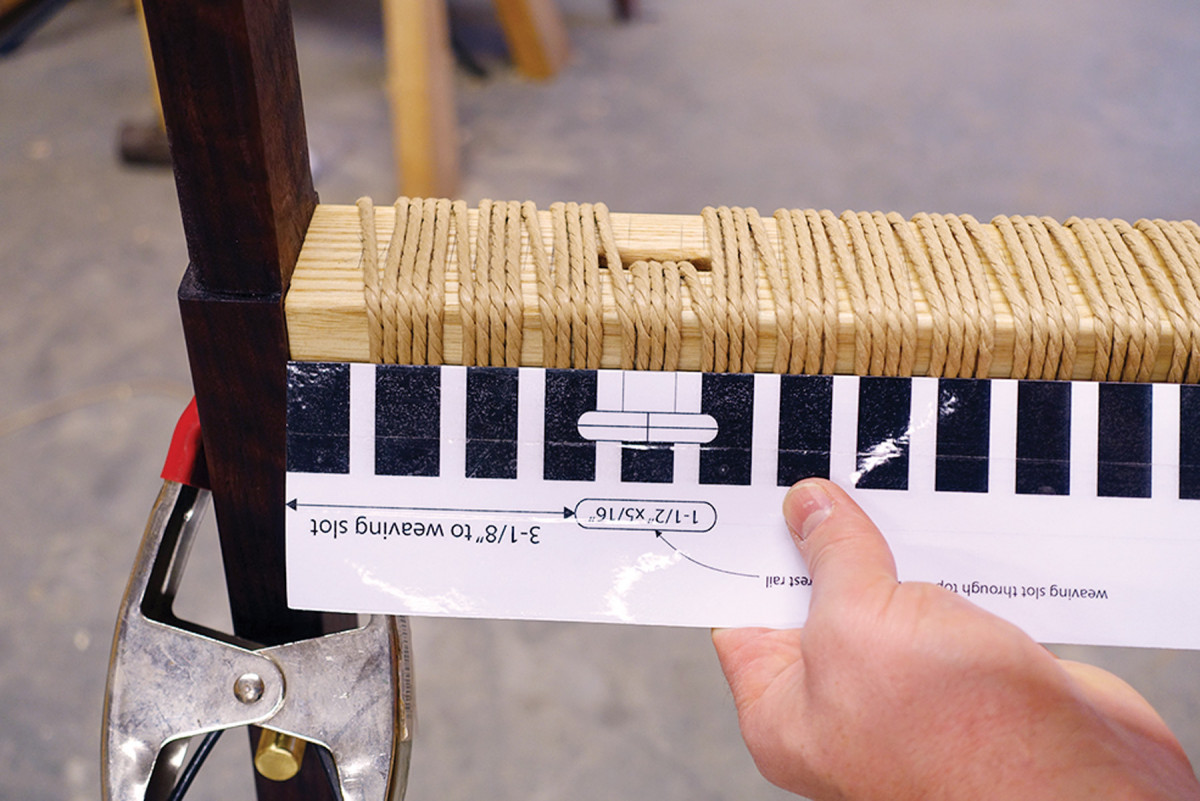
Just as in the frame build, patterns guide the way for weaving. Danish paper cord is an oddball in the measurement world. It is thicker than 1⁄8” but not quite 9⁄64“. It doesn’t have an exact metric equivalent, either. Because a typical woven rail would have well more than 100 widths of cord, even 1⁄100” per cord variation in the layout can put you considerably off.
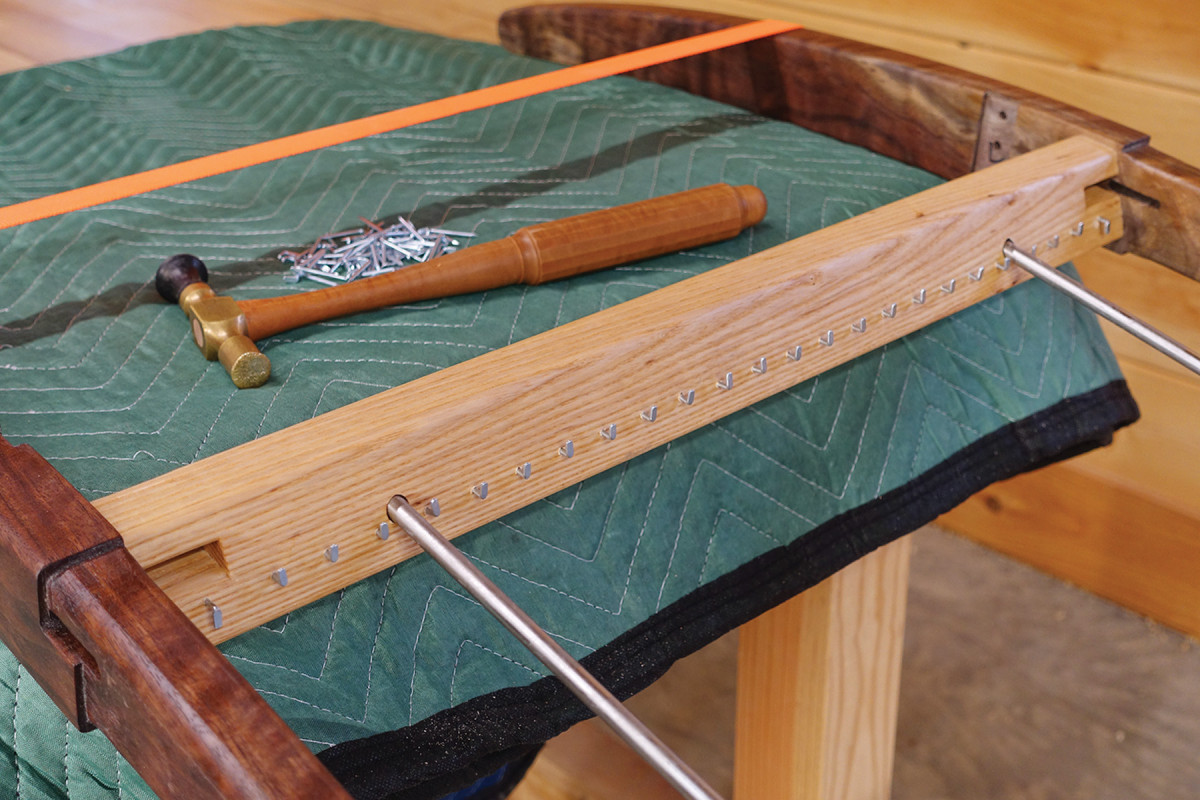
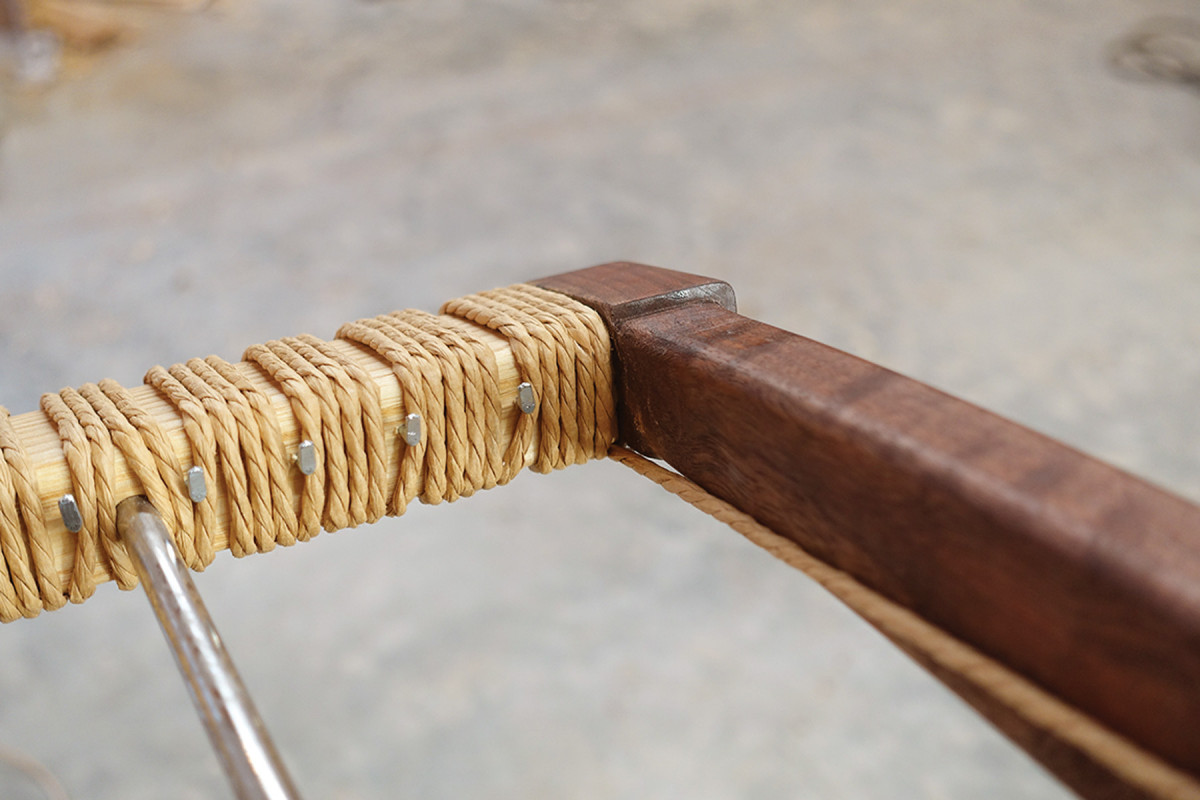
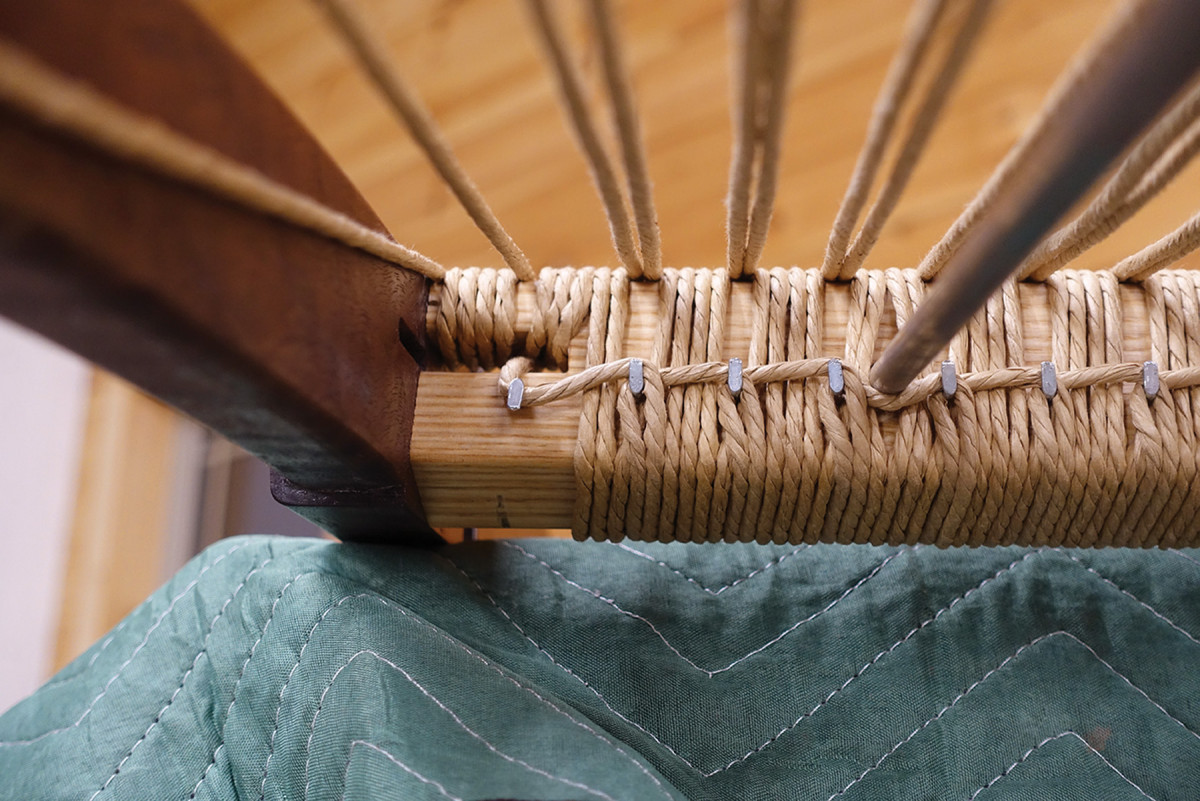
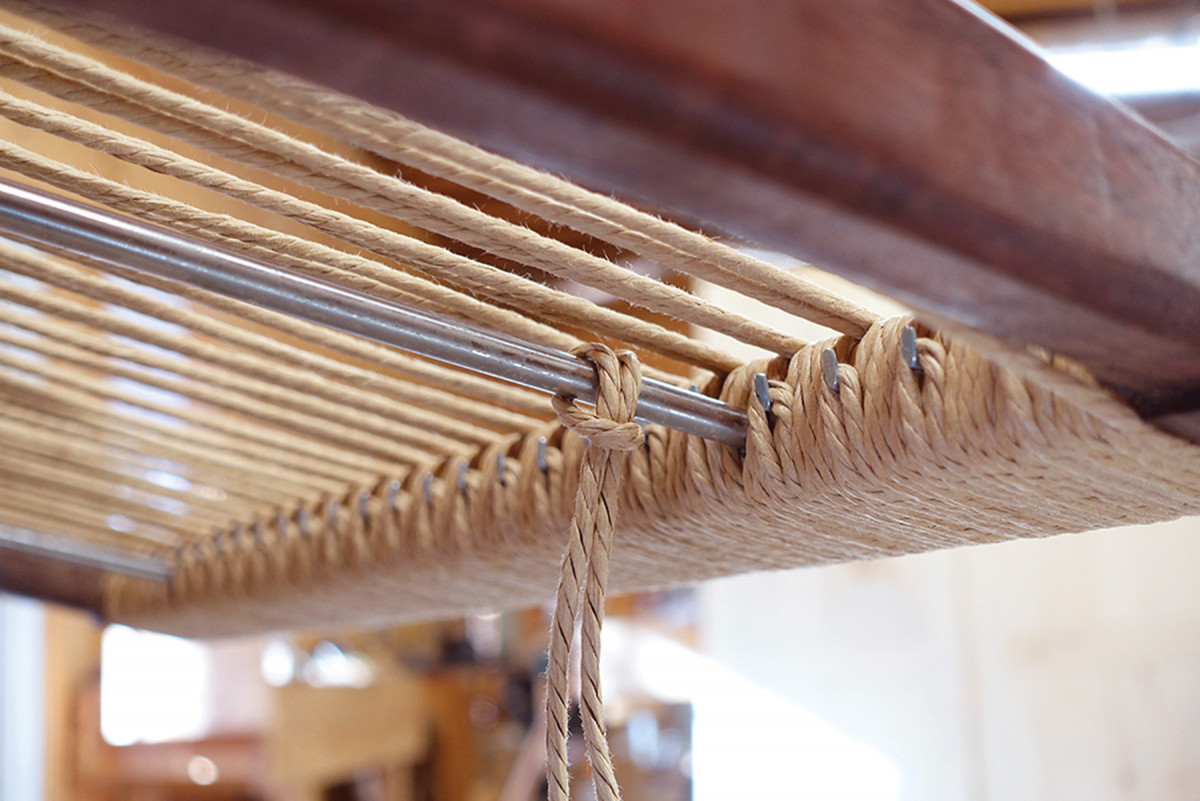
Drill & drive. Drive an L-shaped cord nail part way into 1⁄16″ pilot holes at each location. Note that the nails on the far ends of the rail are hooked downward; the rest point upward.
That said, I’ve included patterns that will help you get the warp layout right on for this build. To make a nice durable template, print them out, adhere them to posterboard with spray adhesive, apply clear packing tape over the patterns and cut them out.
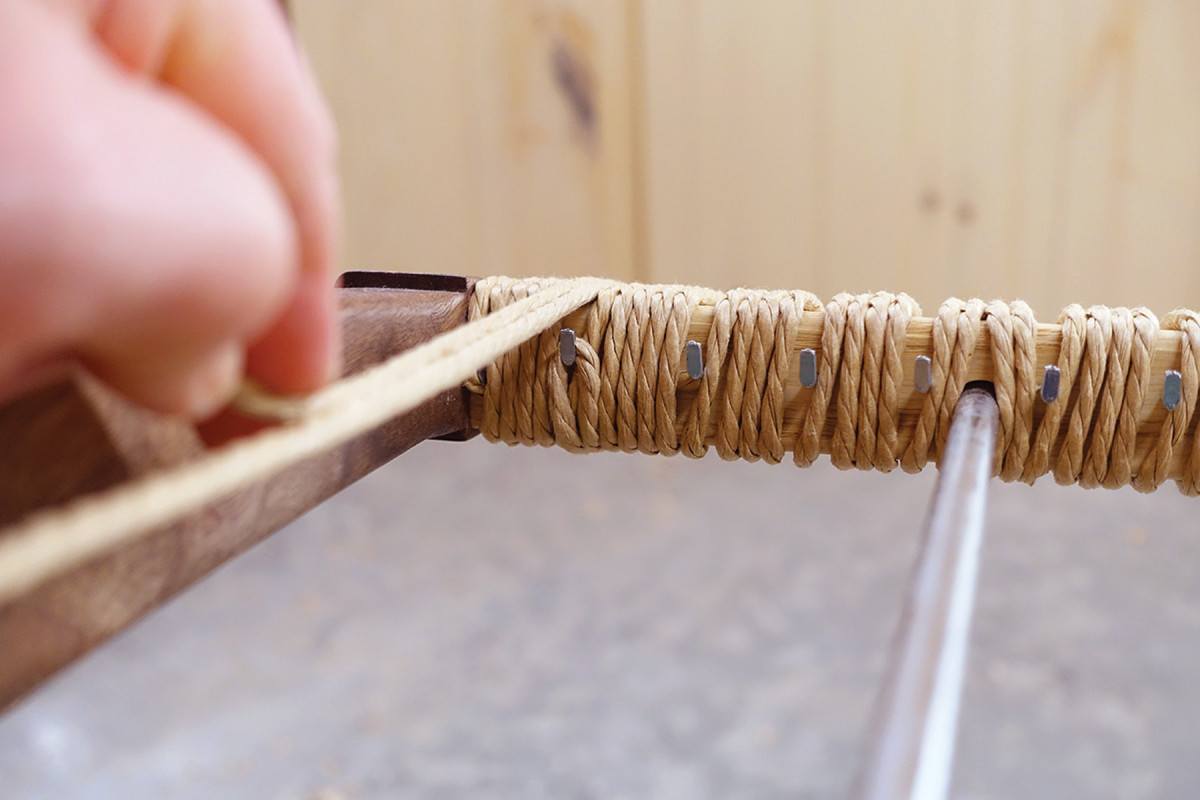
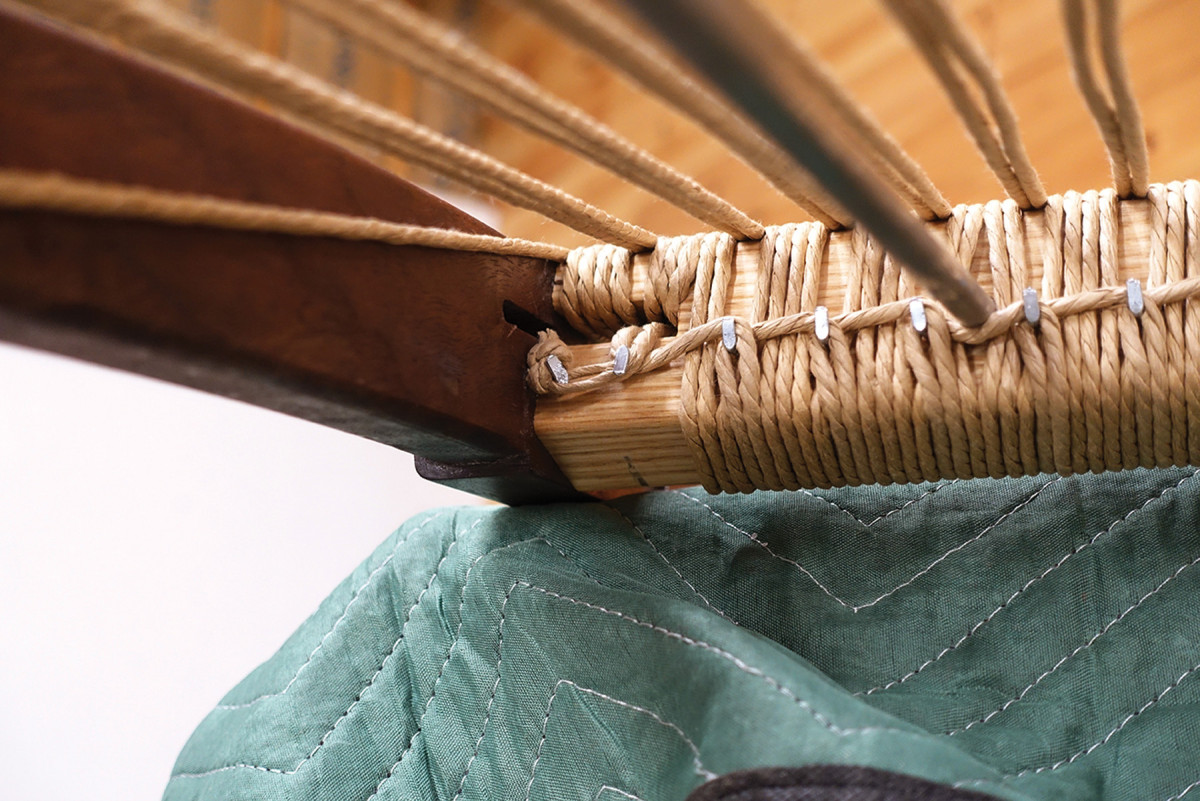
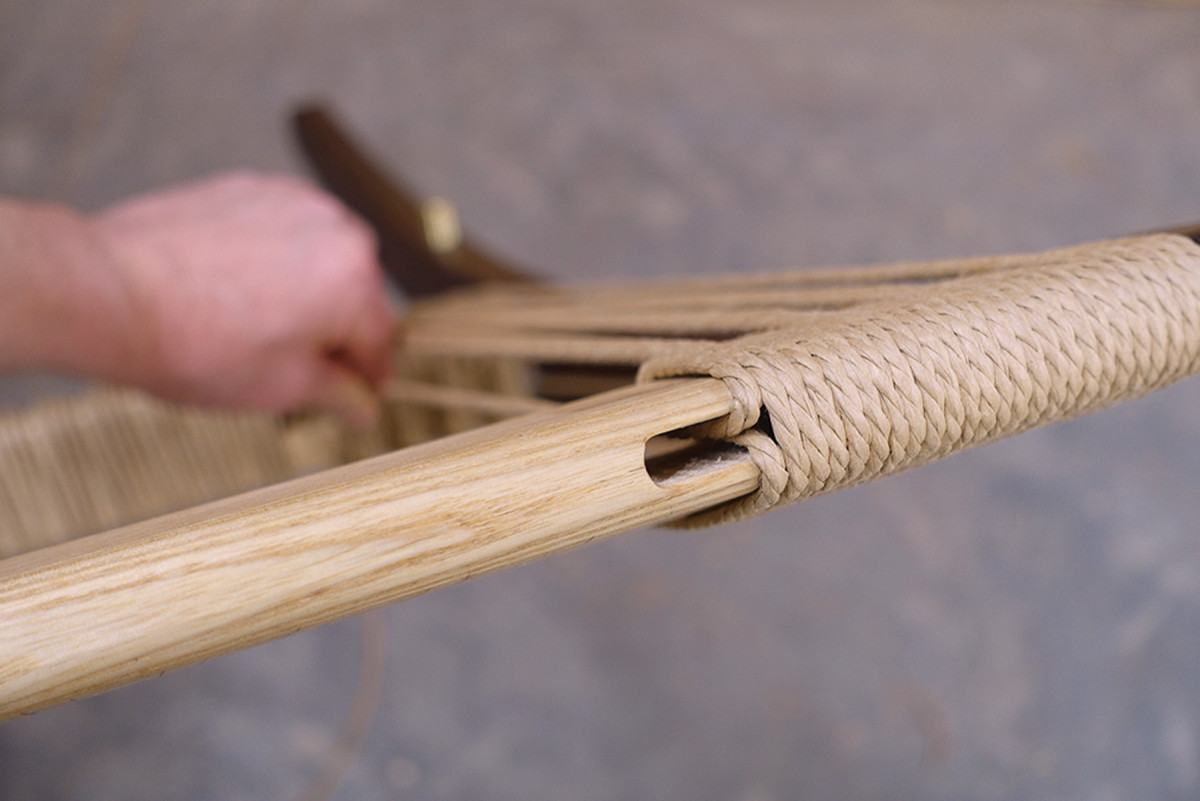
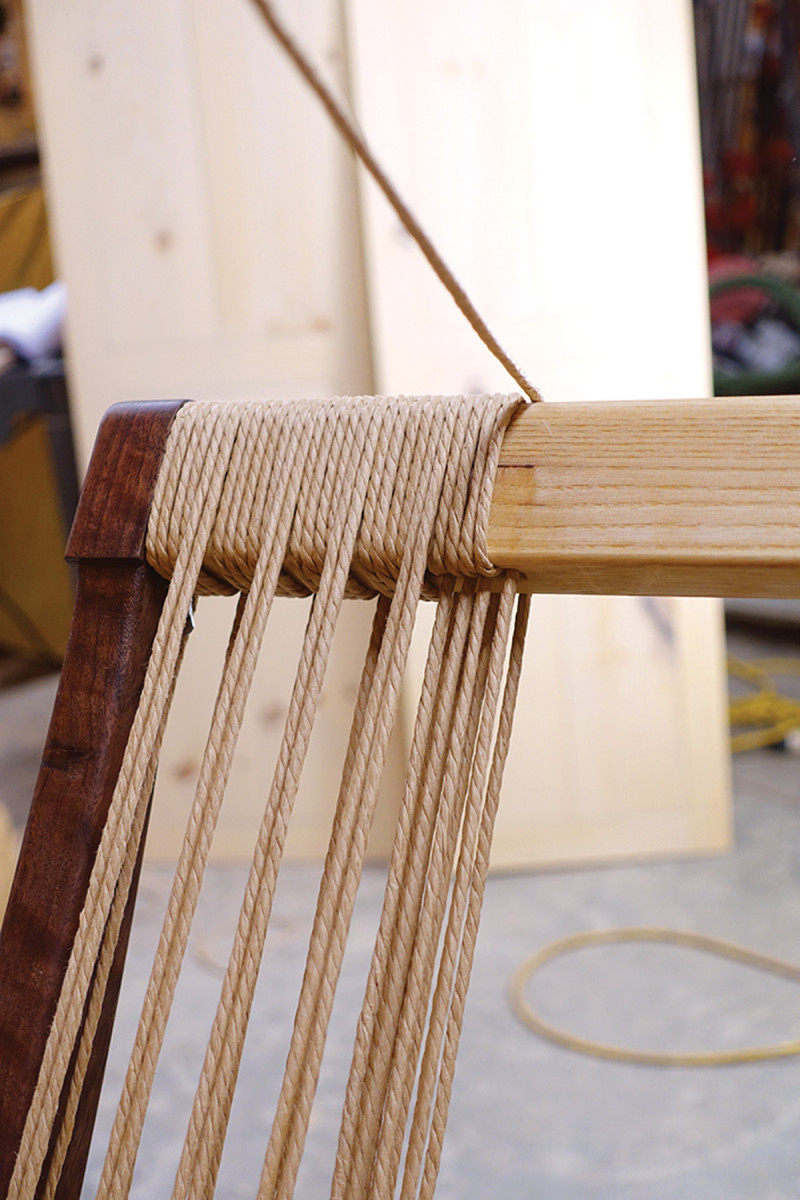
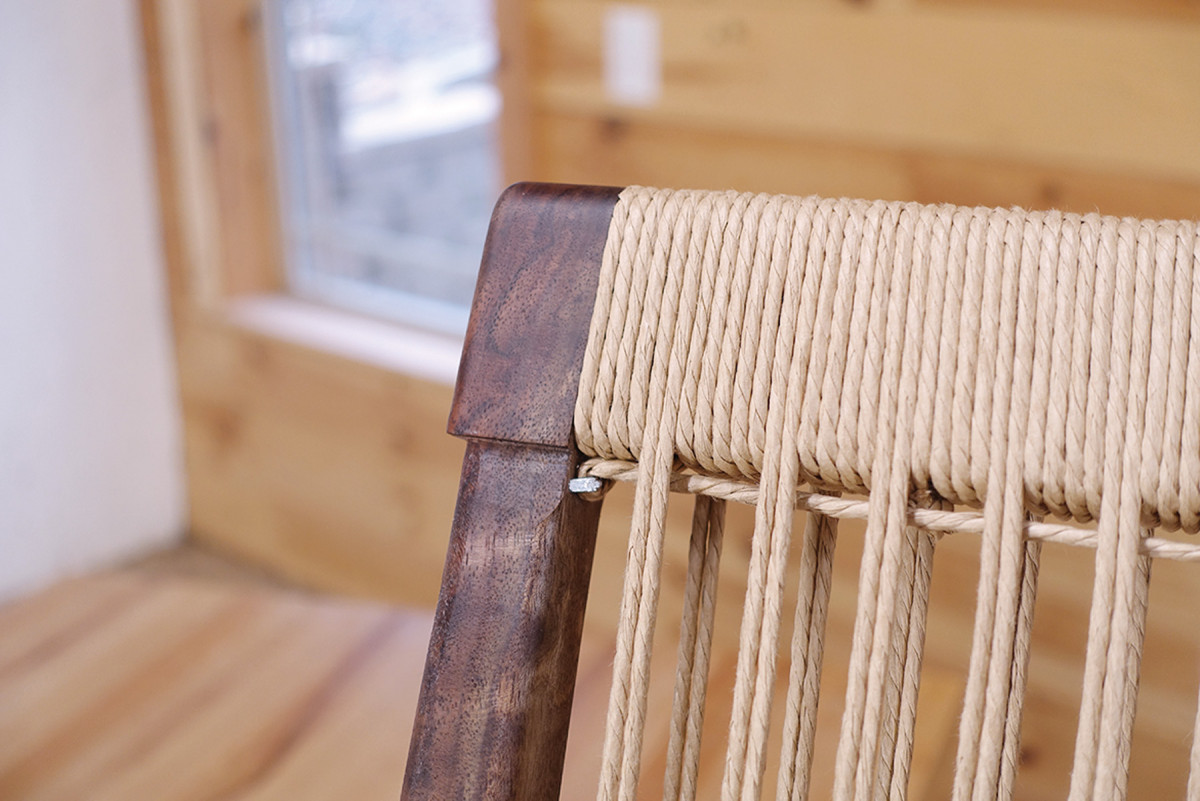
The warp cords that extend from the front rail to the back rail are hooked around L-shaped nails located on the inside of the rail.
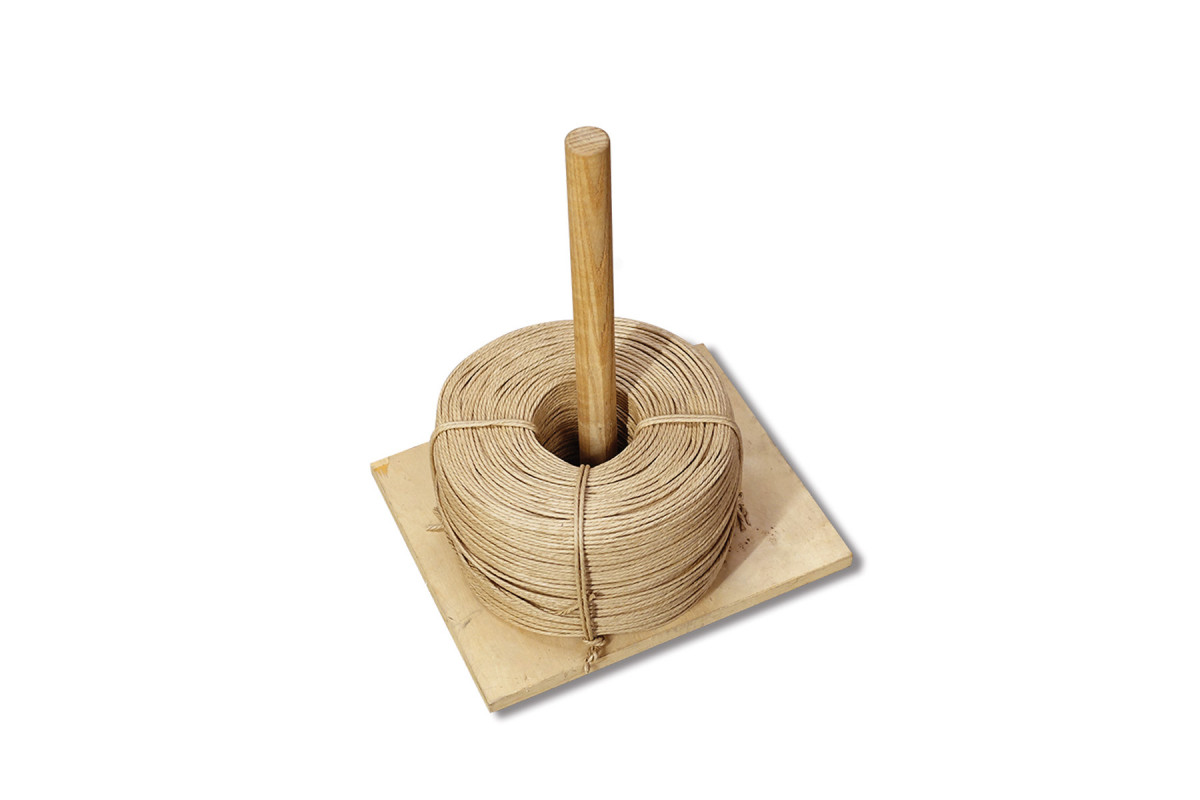
Cord management. A large spool of cord is better managed on a holder such as this. I find it’s less likely to tangle if I work the loose end of the spool from the center rather than from the outside.
Place the Front Seat Rail Warp Pattern against the inside of the rail and, with an awl, prick the center of each nail location. Now drill a 1⁄16” pilot hole for each nail. Drive the nails in partway, leaving about 3⁄8” out on the back rail and 1⁄4” out on the front rail. These can be driven in farther as needed once the seat is woven.
You’ll need a 10-pound spool of cord to complete this project (see Supplies). Spool off about 60′ to work with. I measure this by taking the cord in one hand and stretching my arms apart while holding the other end. For me, this length is approximately 6′ (equal to my height), so I do that 10 times. It’s a simple way of approximating cord length. This cord amount is helpful especially when doing the weaving portion, so that your knots will land in the right location without much waste – but more on that later.
Tack it. Place a #6 tack in the corner and hook the cord around it. Now wrap back over the loose end to hold it securely.
The first step of the warp pattern is to wrap the cord around each rail. There’s no cord going from one rail to the other at this point; that comes in the next step. To get the proper spacing, use the warp pattern; the shaded areas are where the cord is to land. Place the pattern on the rail and with a pencil mark off where these shaded areas start and stop to use as a guide.
In the front corner where you begin, place a small tack to hook your cord around for securing it to the frame. See the “Tack it” photo above. Then wrap the cord over about 1″ to 11⁄2” of the loose end to hold the cord in place.
Stay on track. Mark out the shaded areas along the rail to stay on track, or just eyeball it and check with the pattern as you go. Push the cord into place if needed.
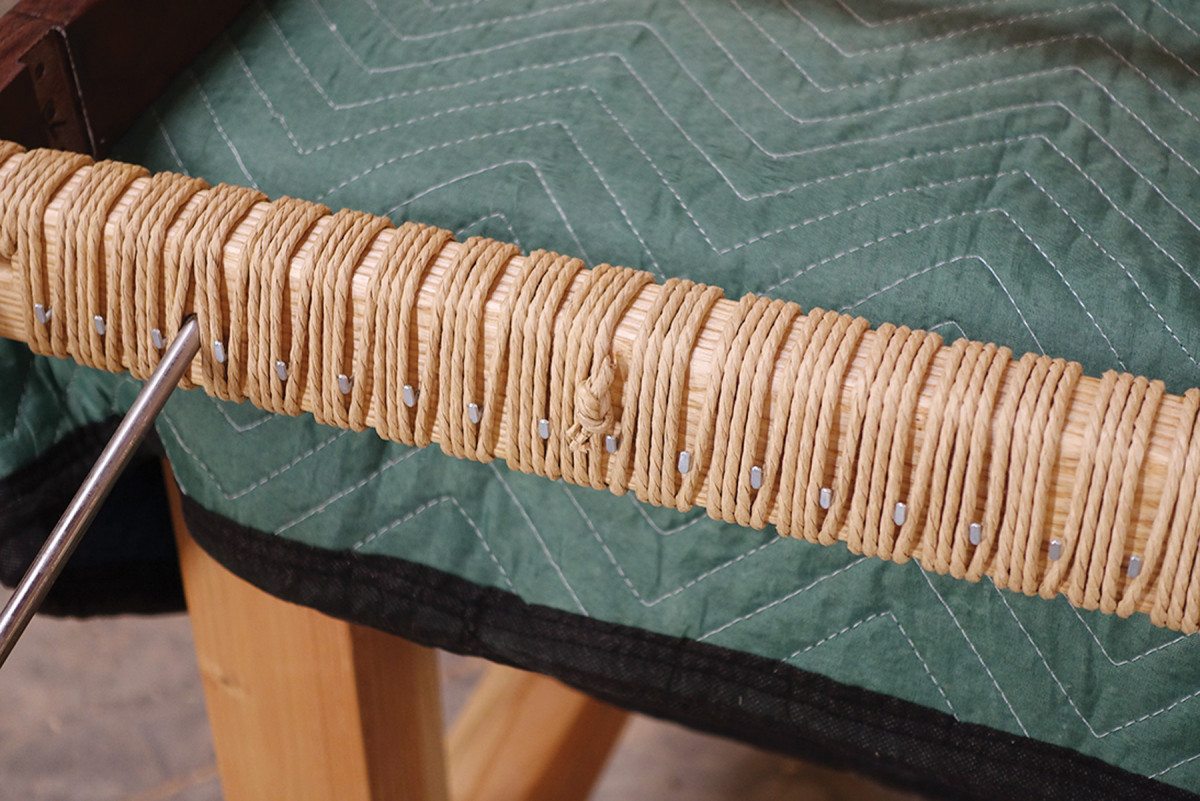
Wrap the cord around the rail five times (pull it taut, but don’t strain it) and space over approximately two cords’ width; the cord nail should land right between the space you leave (allowing room for two cords’ width to land there later). Notice in the photos above that the cord angles over to the next space just under the nail. Wrap around the rail five more times. Repeat, but wrapping only four times each as you move across from here – until you reach the last two wraps. There, you’ll again wrap five times.
Five, five, four. Wrap around the rail five times twice, then four times each until you reach the other end, where you’ll again wrap five times twice. Leave a double cord’s width in between each.
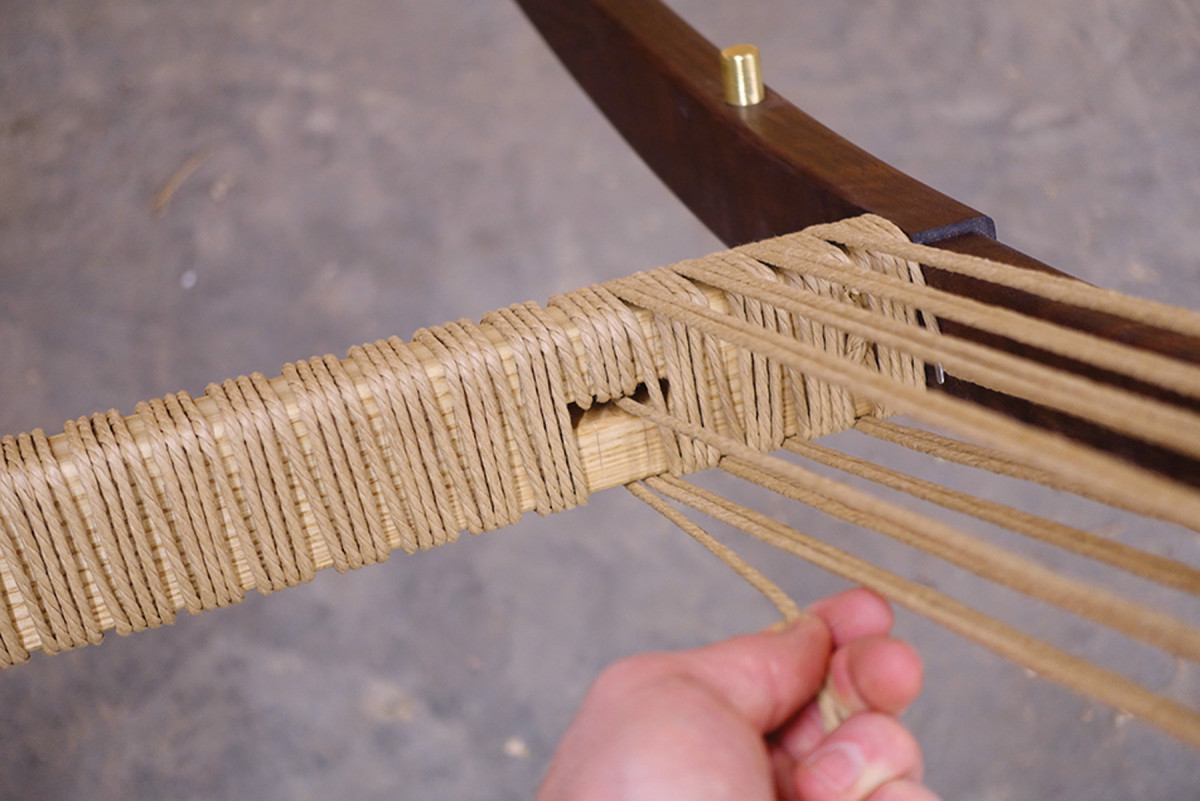
Continue the cord under and up to the back rail as shown at top right. Wrap five times through the slot, then space over two cord’s widths. The next wrap will again be a total of five, however, only three of those passes go through the slot; the remaining two wrap around the entire rail. Continue on with the same pattern to match the front rail (four passes from here until you reach the other end).
End game. On the last pass, the cord extends to the back rail to continue the same pattern there.
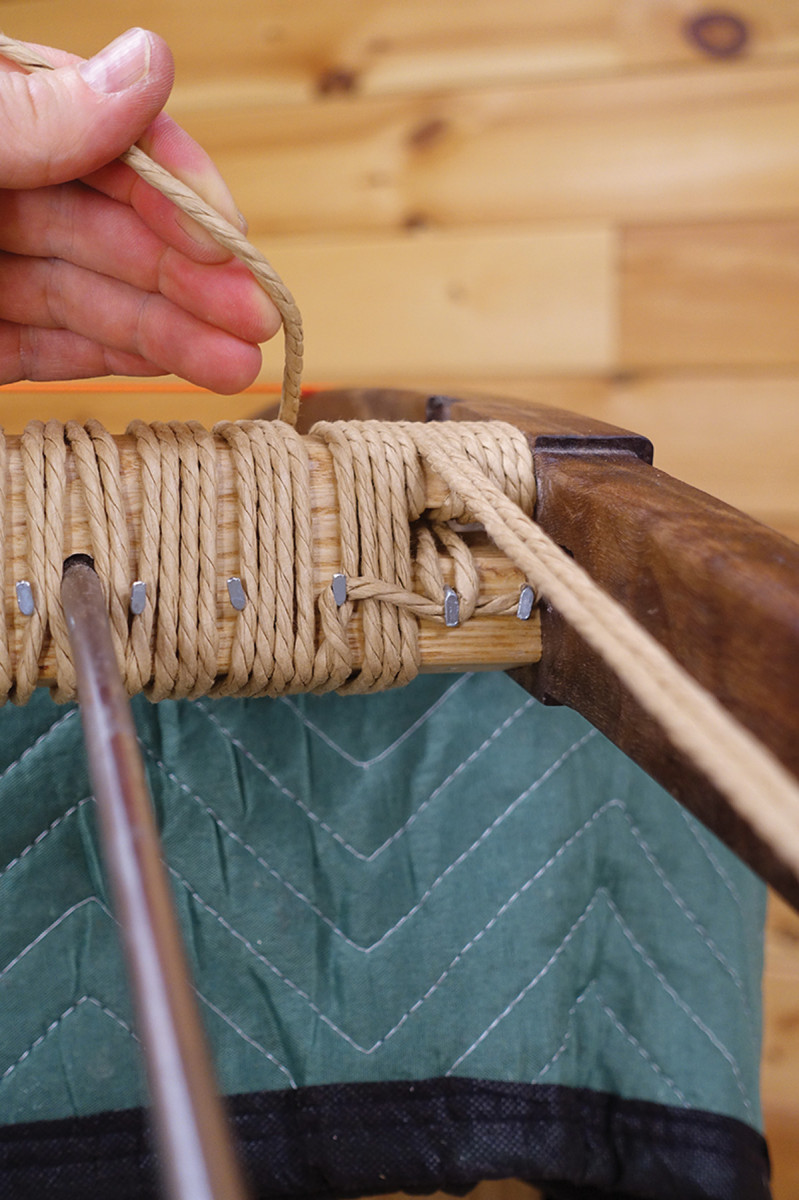
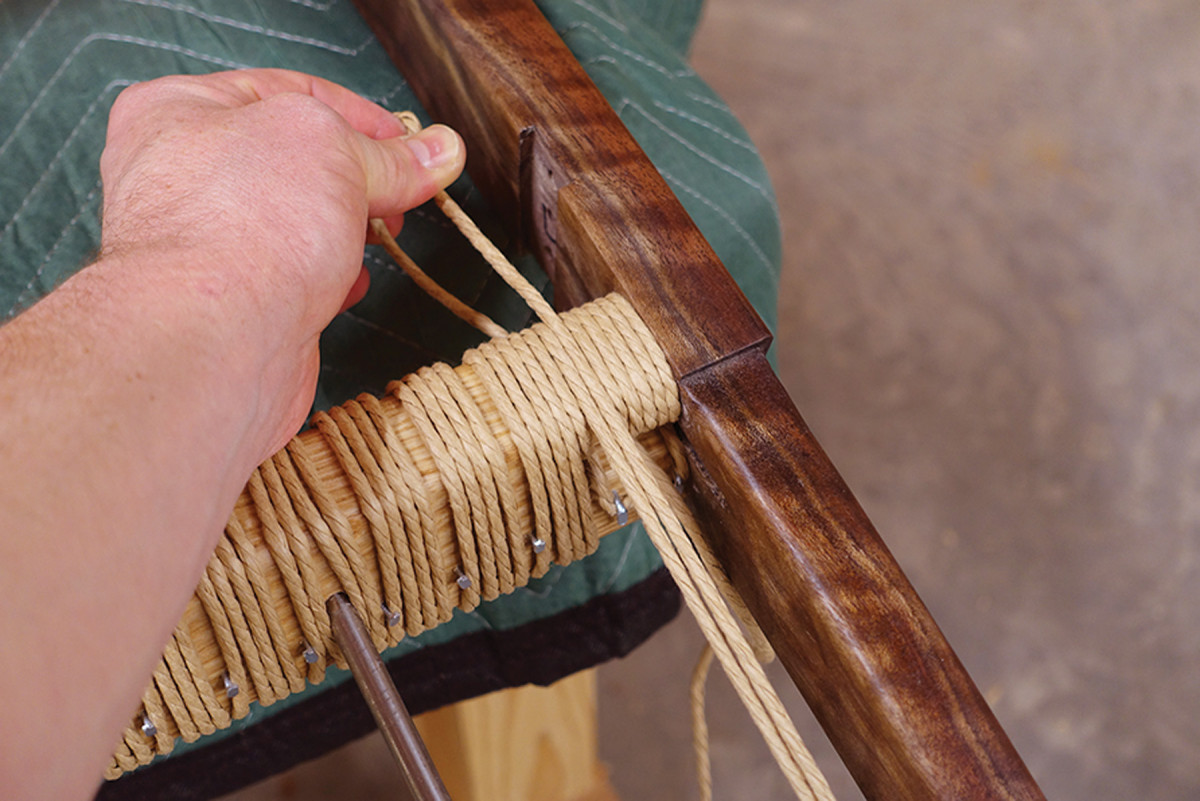
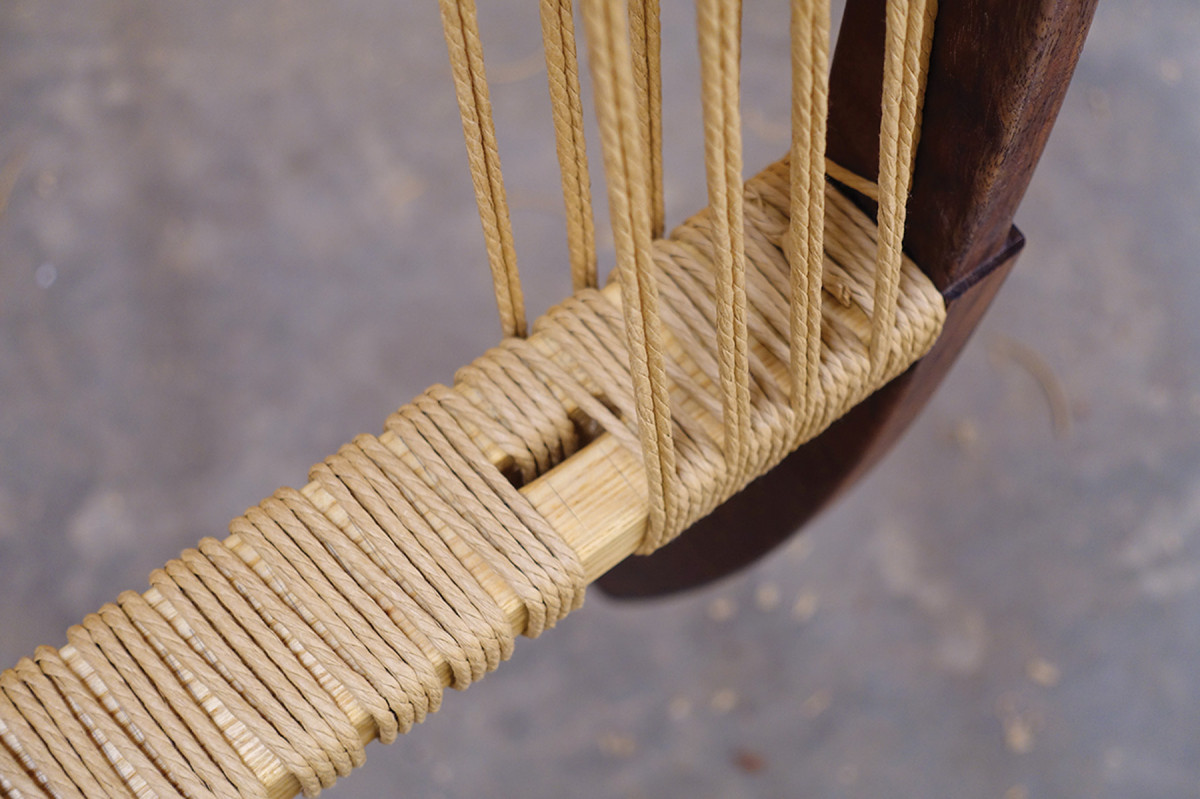
Once you’ve reached the opposite side you are ready to begin the second phase of the warp. Place a cord nail near the inside corner of the slot as shown above. Loop the cord under the nail and over to the adjacent nail, then bring the cord up and back through the slot. Bring it over the top of the rail and toward the front rail. This begins the second phase of the warp pattern.
Back-rail slot. Continue the cord under and up to the back rail. Wrap through the weaving slot as shown: five times around, space, then three times through the slot and twice around the entire rail.
With the cord coming over the top of the rail, align it so that it falls into the gaps from phase 1. At the corresponding gap on the front rail, bring it over and wrap under to the inside. Loop the cord over the nail and bring it back under and to the front. Continue over the top of the rail, falling in the remaining gap and continue to the back rail. Likewise, align the cord in the same remaining space on the back rail and bring the cord through the slot. Loop the cord back over the nail directly below the gap as before, then bring it over to the adjacent nail to the left but go over the top of this nail and down.
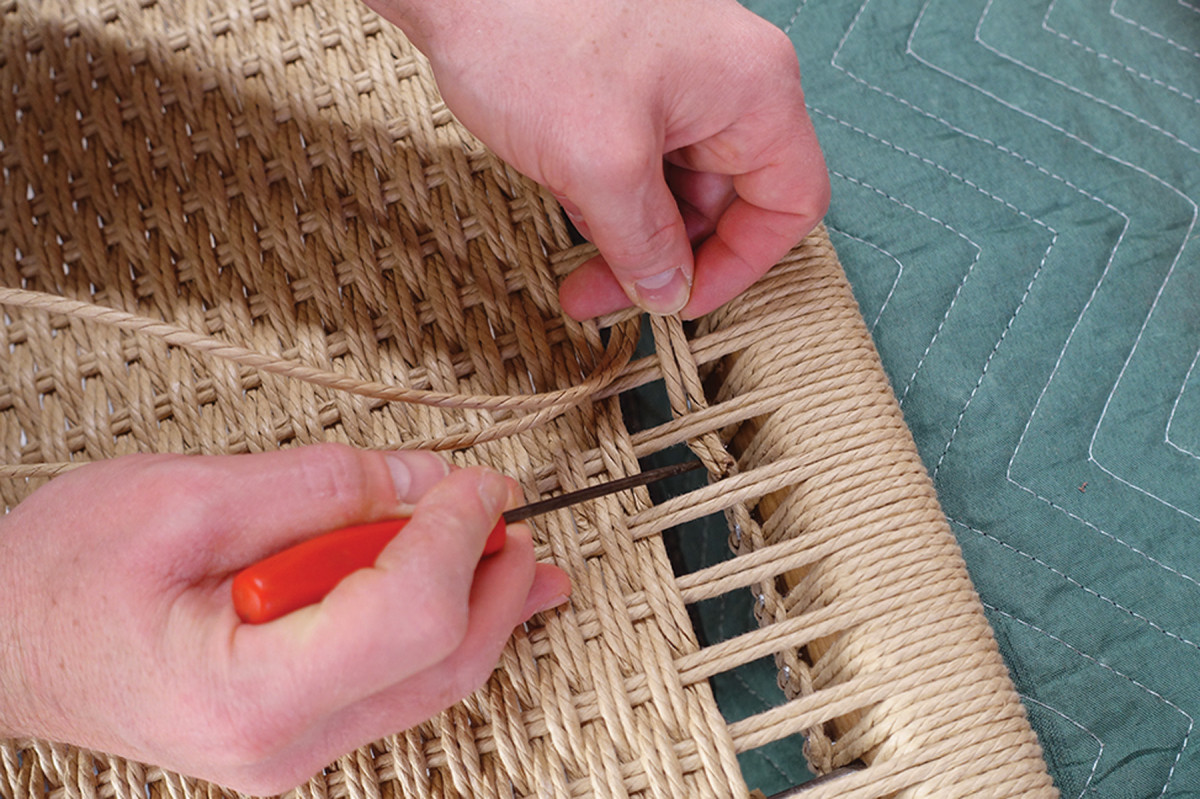
Add length. Along the way, you’ll need to add more cord. Tie a knot on the inside of a rail to keep it hidden.
Now repeat. Bring the cord back around the rear rail in the gap, over the top of the rail and to the front. Wrap around the front rail, hook on the nail and return to the rear rail. Land the cord in the remaining gap while wrapping around the rail, hook onto the nail and carry it over to the adjacent nail to the left. And keep repeating until you reach the other side.
You might notice that the cord now returns via the route it came, over and over. Therefore, you can just pull a loop of cord from the rear rail to the front rail’s nail instead of carrying the entire bundle of cord through the process. In fact, when you add more cord just work directly from the spool if you prefer. Either way works just fine.
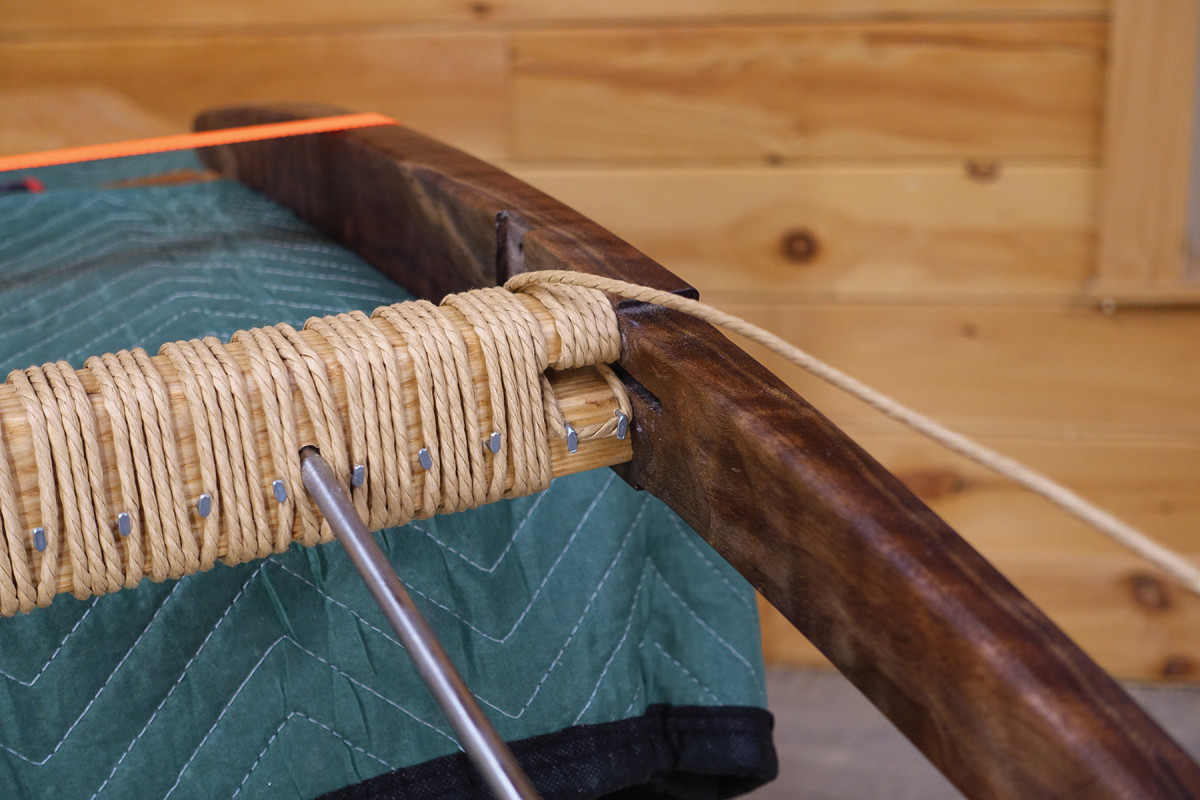
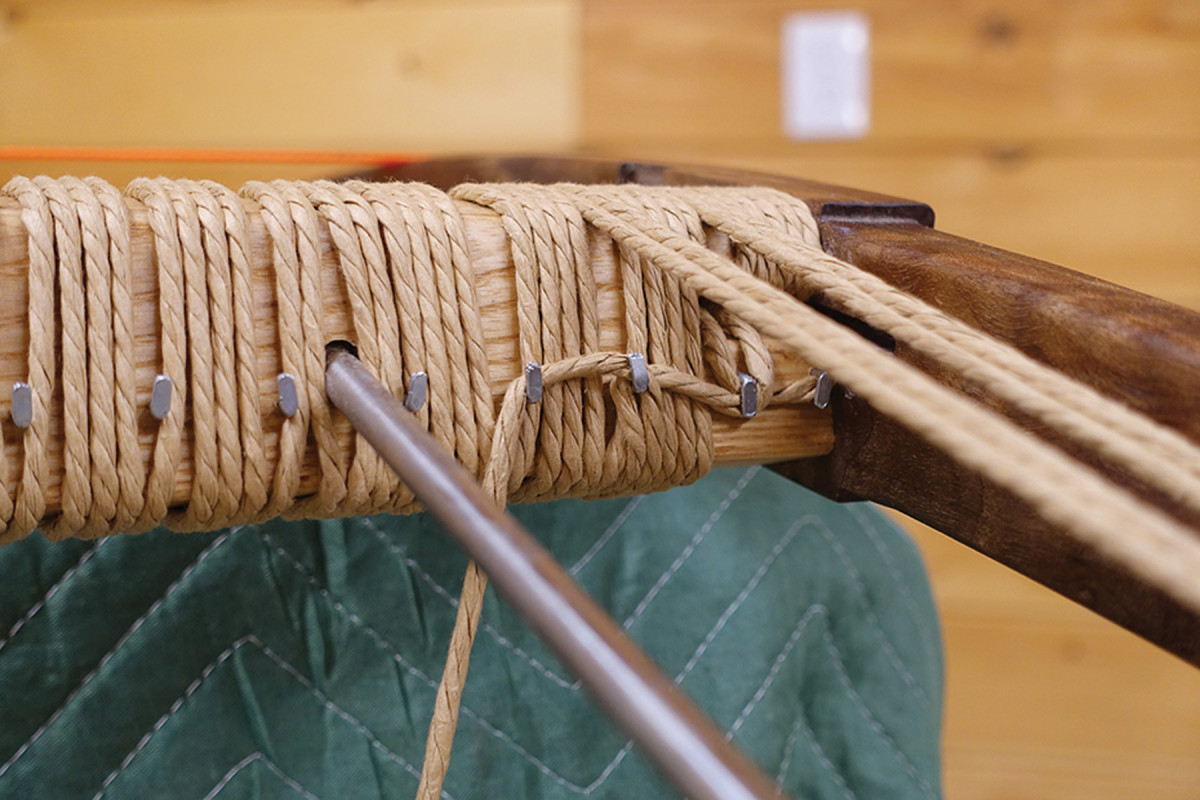
Another nail. Add a cord nail near the corner so that it can “jump over” to the adjacent nail and go back through the slot. This begins the second phase of the warp pattern.
When you reach the opposite slot, catch the nail just below it and go up and in through the slot rather than down to the underside of the rail. Complete the route to the front rail as before, but when returning come back through the slot and hook the cord on the nail directly below the slot.
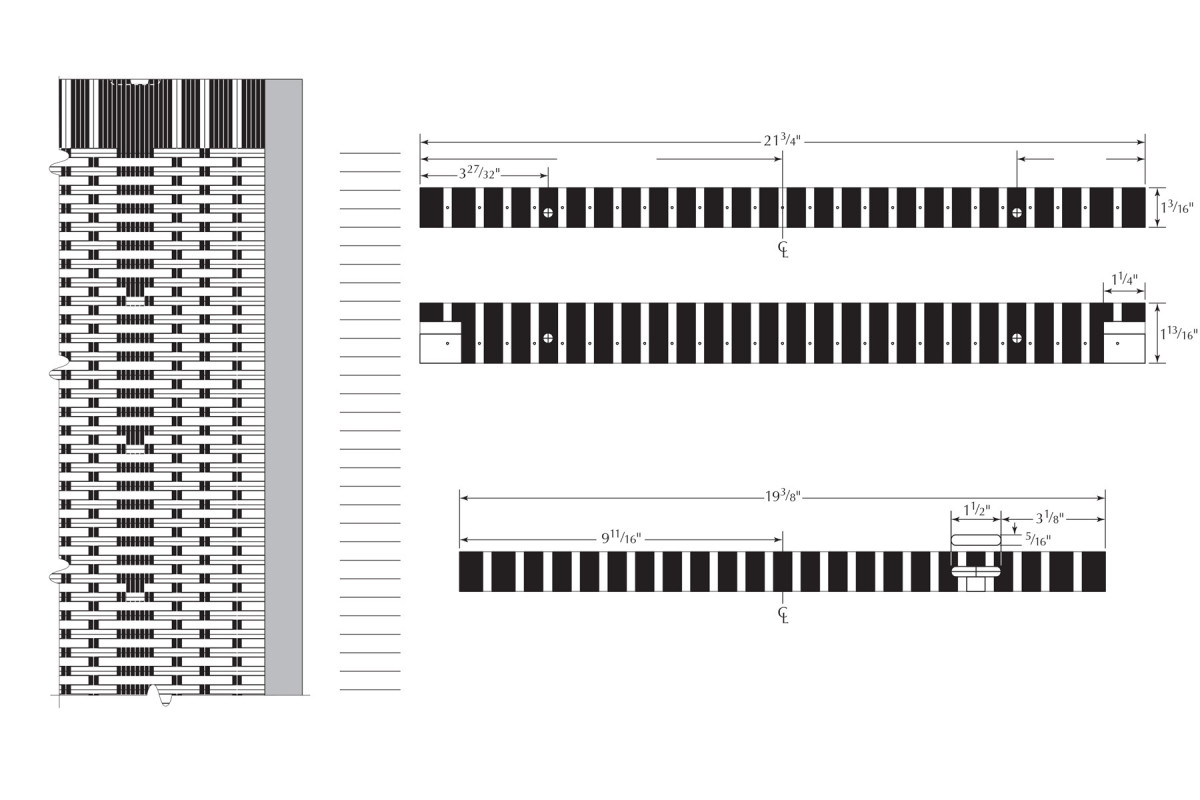
Front seat rail warp pattern (213⁄4″ – 158 cords) pattern begins with 5/2/5/2 repeat 4/2/4/2 end 2/5/2/5 Shown at quarter-size. Back seat rail warp pattern (213⁄4″ – 158 cords) pattern begins with 5/2/5/2 repeat 4/2/4/2 end 2/5/2/5 Shown at quarter-size.
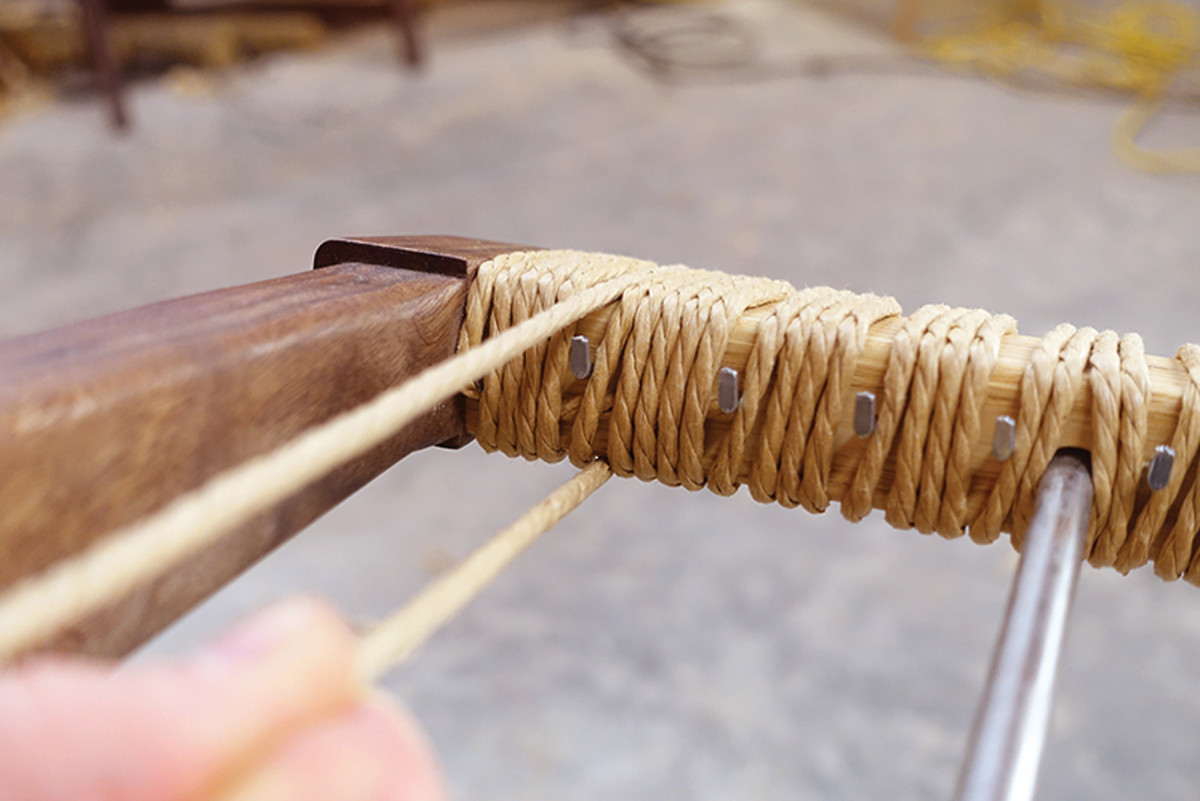
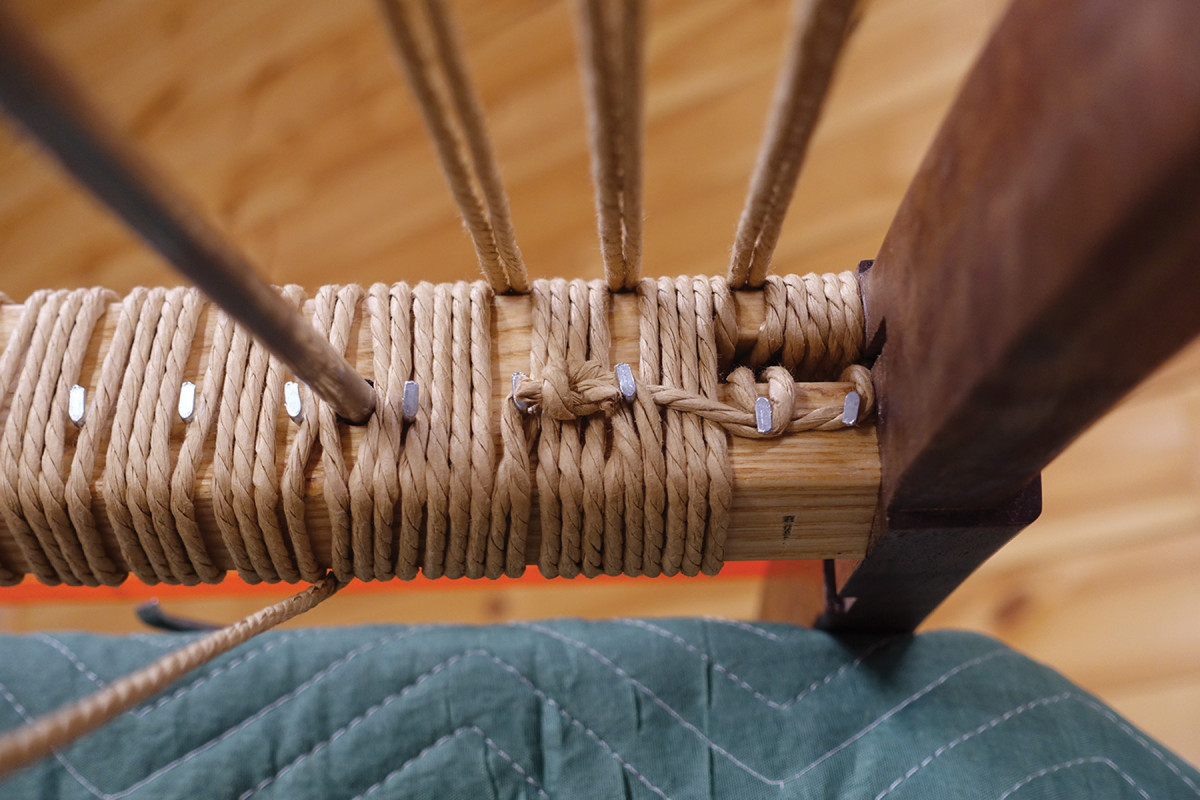
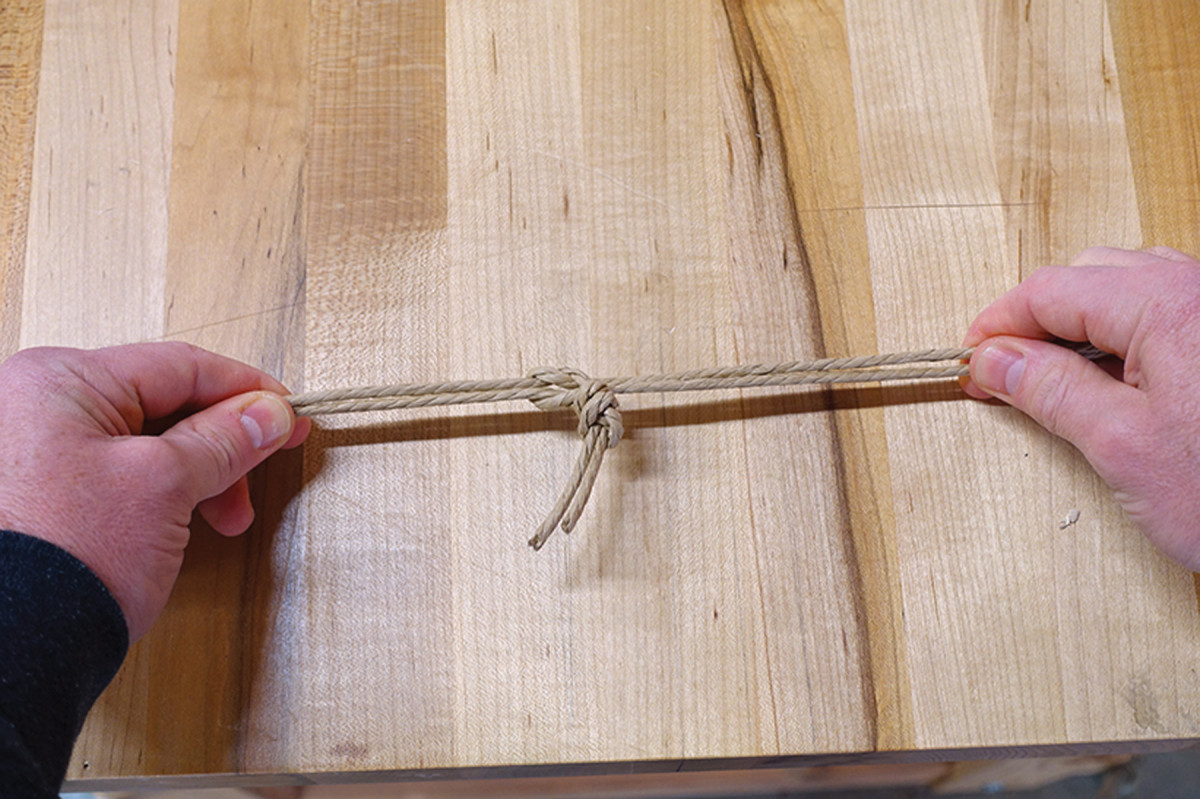
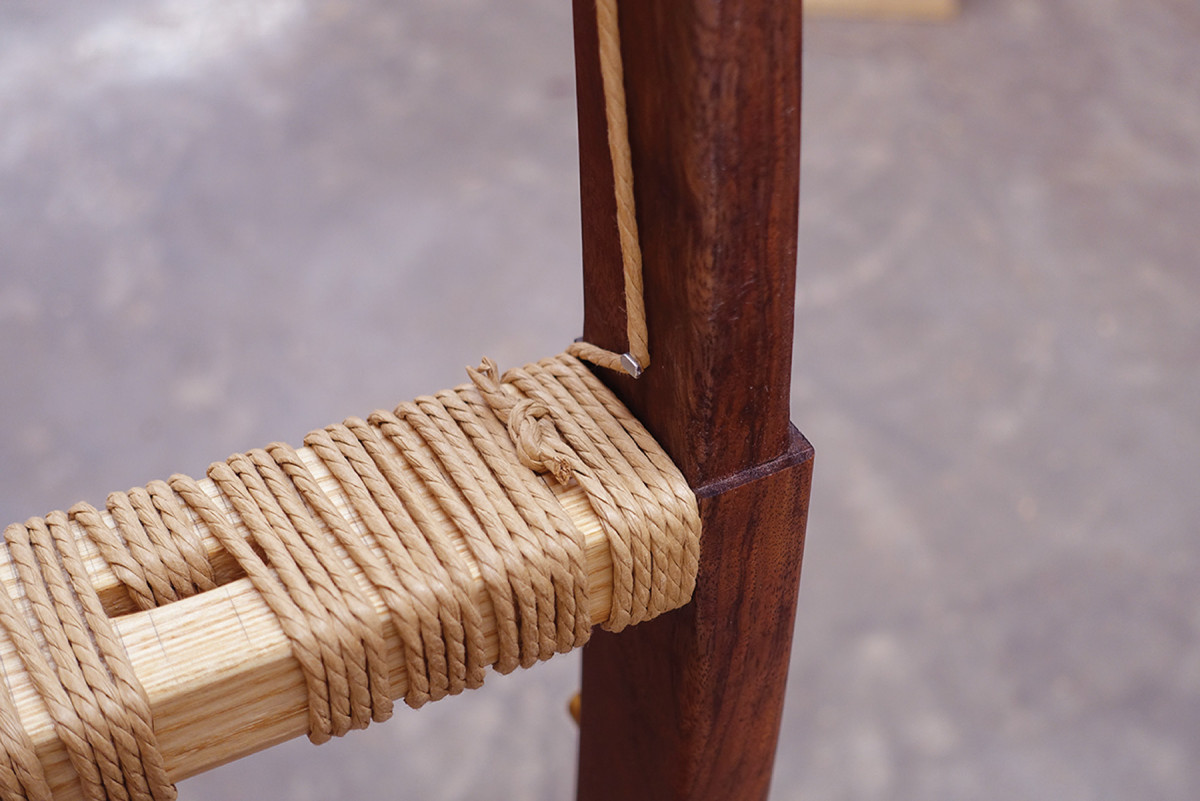
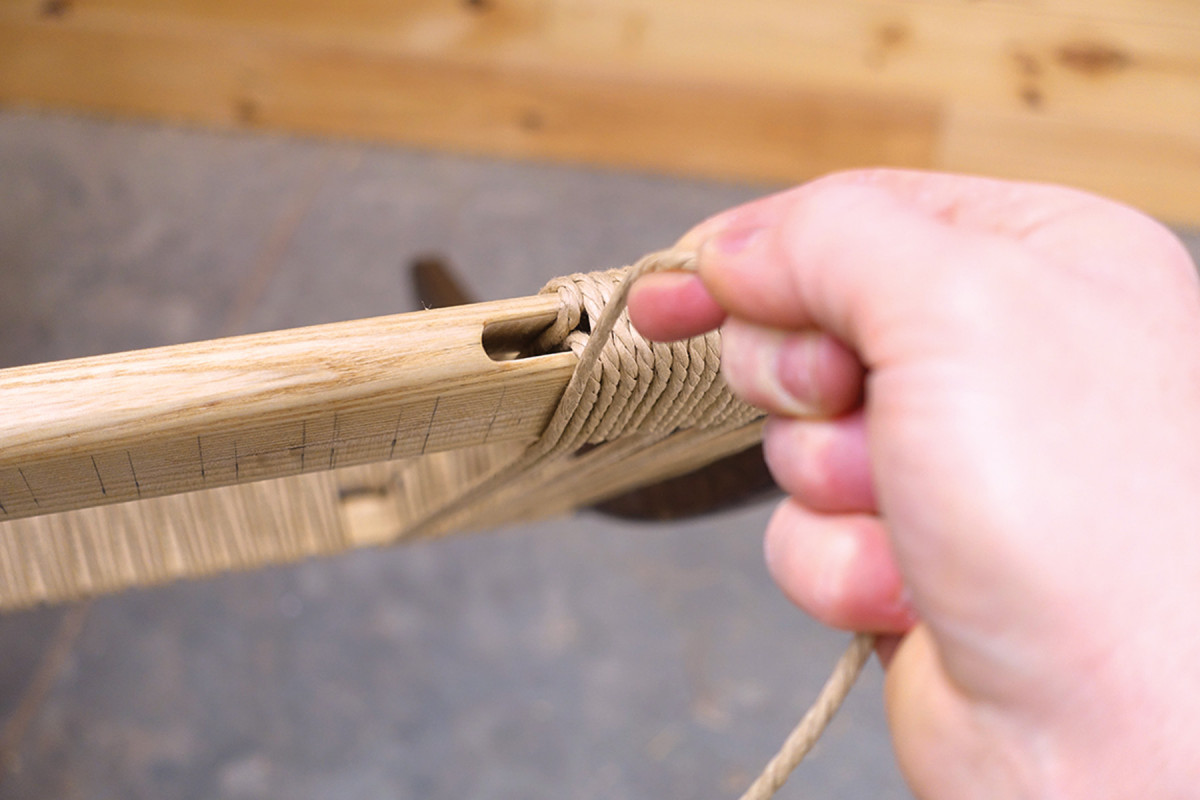
In order to secure the end of the cord, place a cord nail in the corner along the same line as the other nails. Just get it started a little ways in. Now extend the cord over to this nail and note its distance.
Tie a knot in the cord at this point. Hook the nail through two of the cord plies and drive the nail in farther to tension the cord securely.
Get Your Weave On
Move left. Loop the cord back over the nail directly below the gap as before, then bring it over to the adjacent nail to the left. Go over the top of this nail and down.
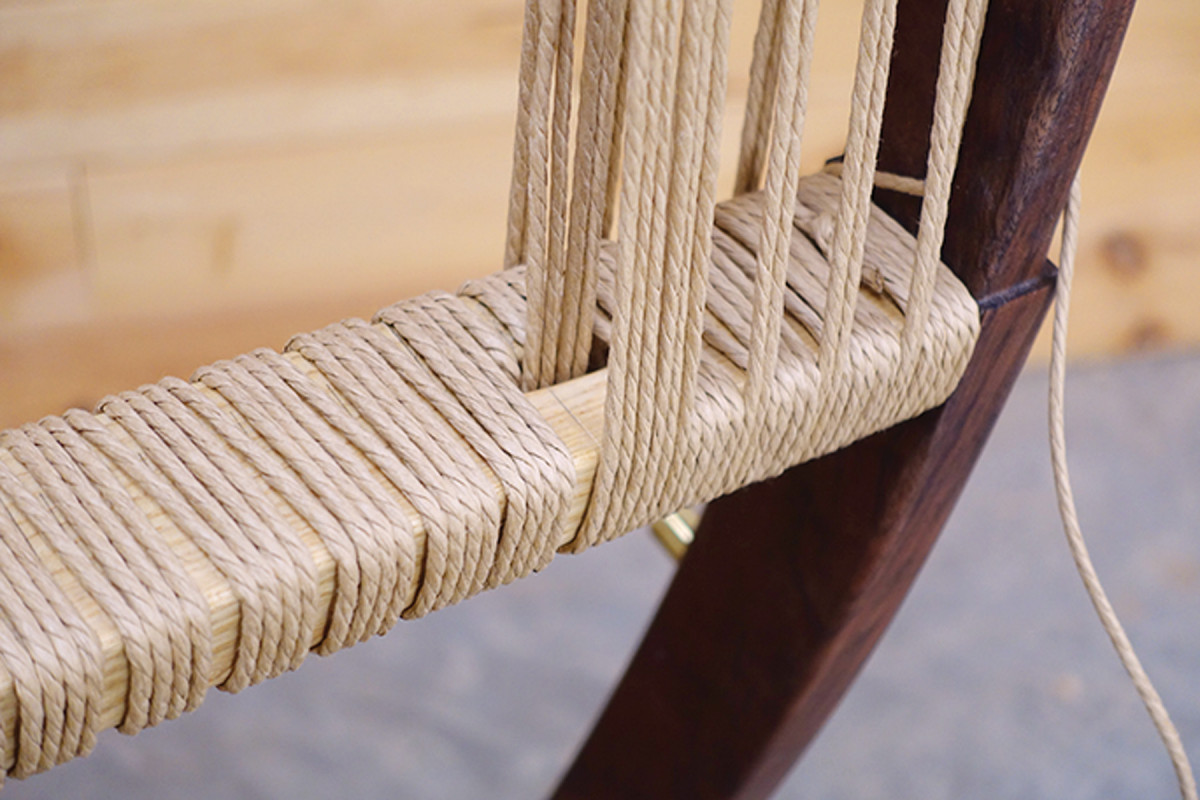
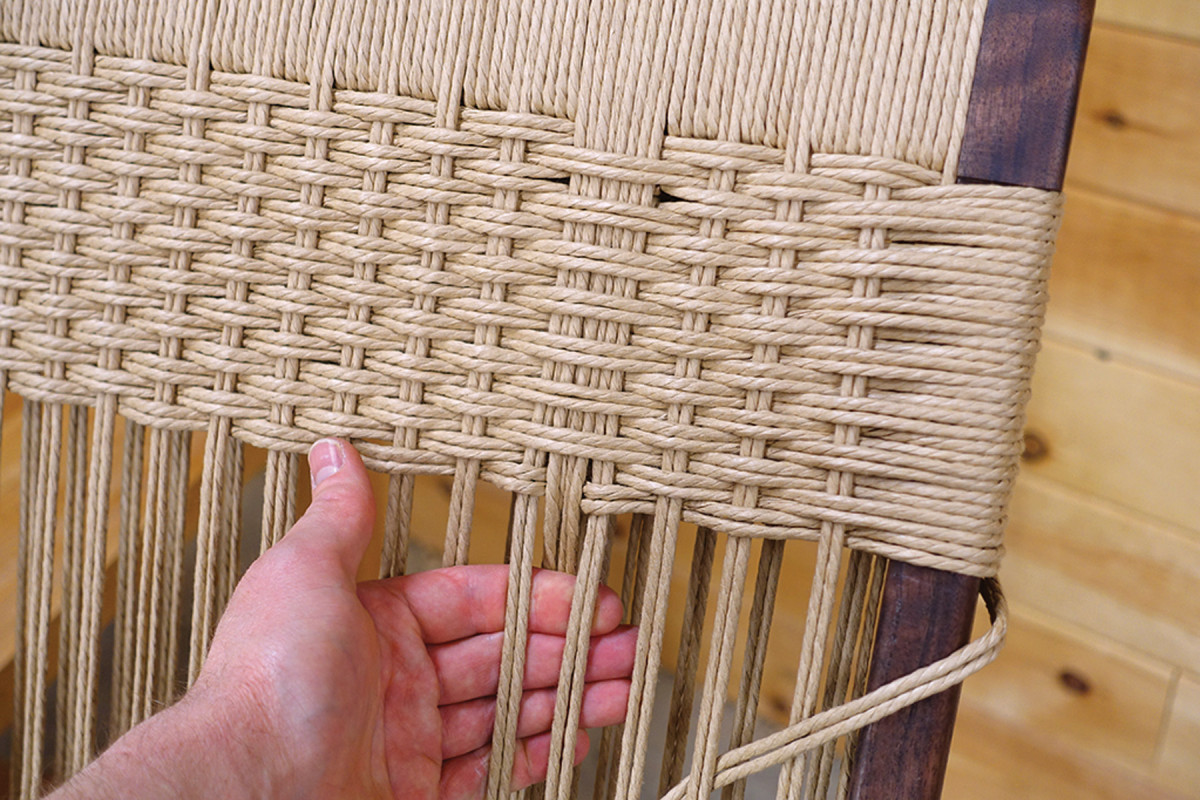
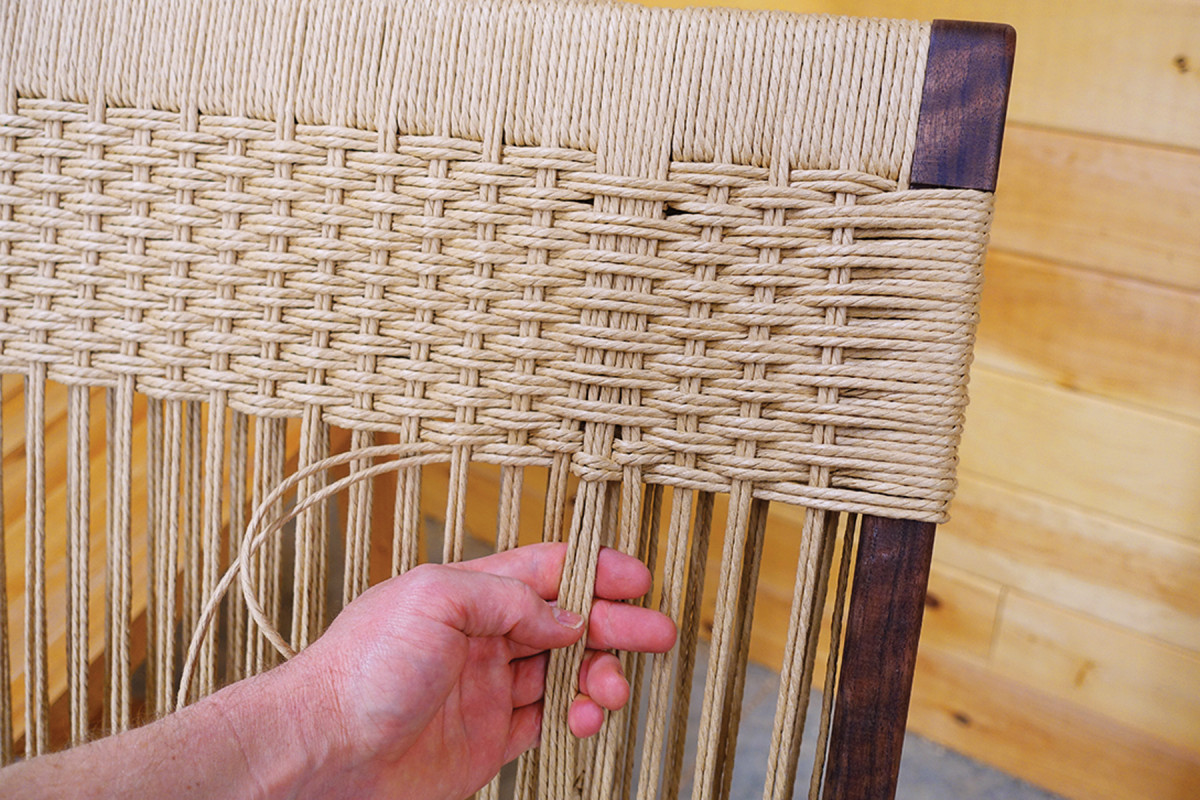
To complete the seat, you’ll weave a double strand of cord from left to right. This double strand will wrap around the weaving bars on either side of the seat as you go from side to side.
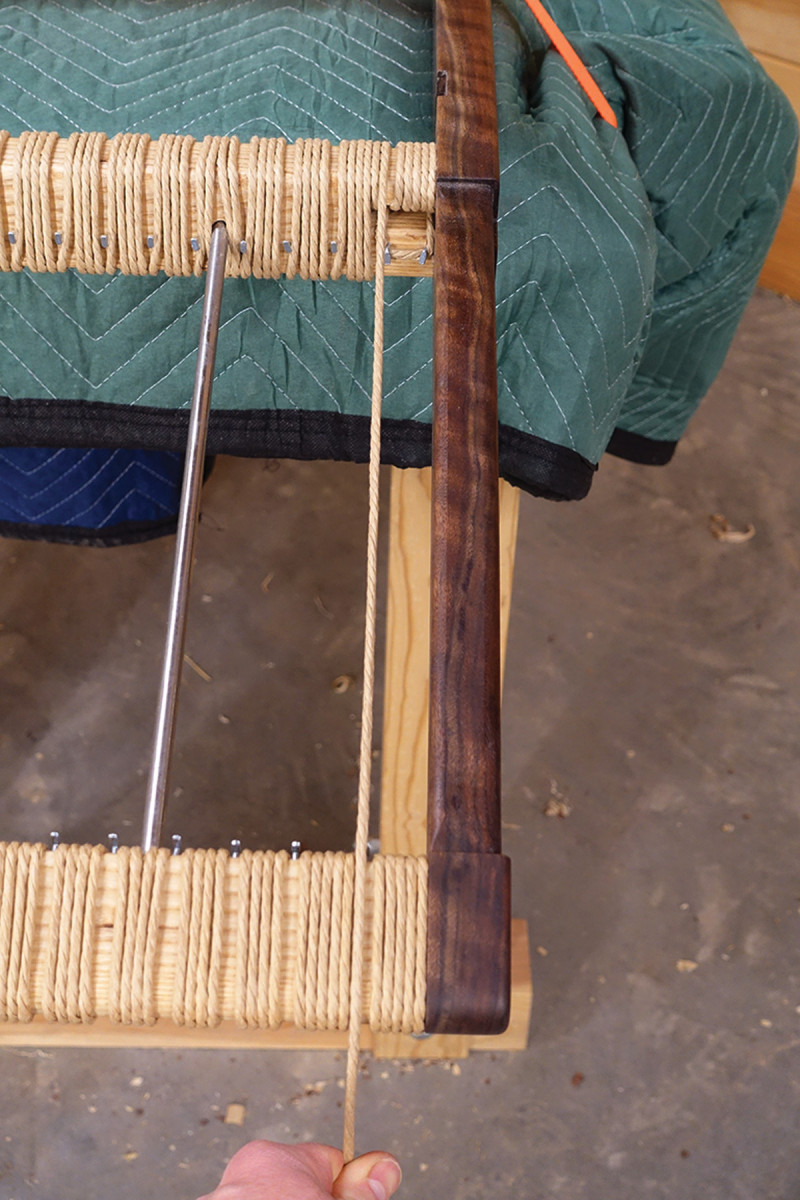
Back to front. Bring the cord from the rear rail slot to the front rail. Land in the open space between the wrap sections. Stay on the left side of the gap and make the return on the right side.
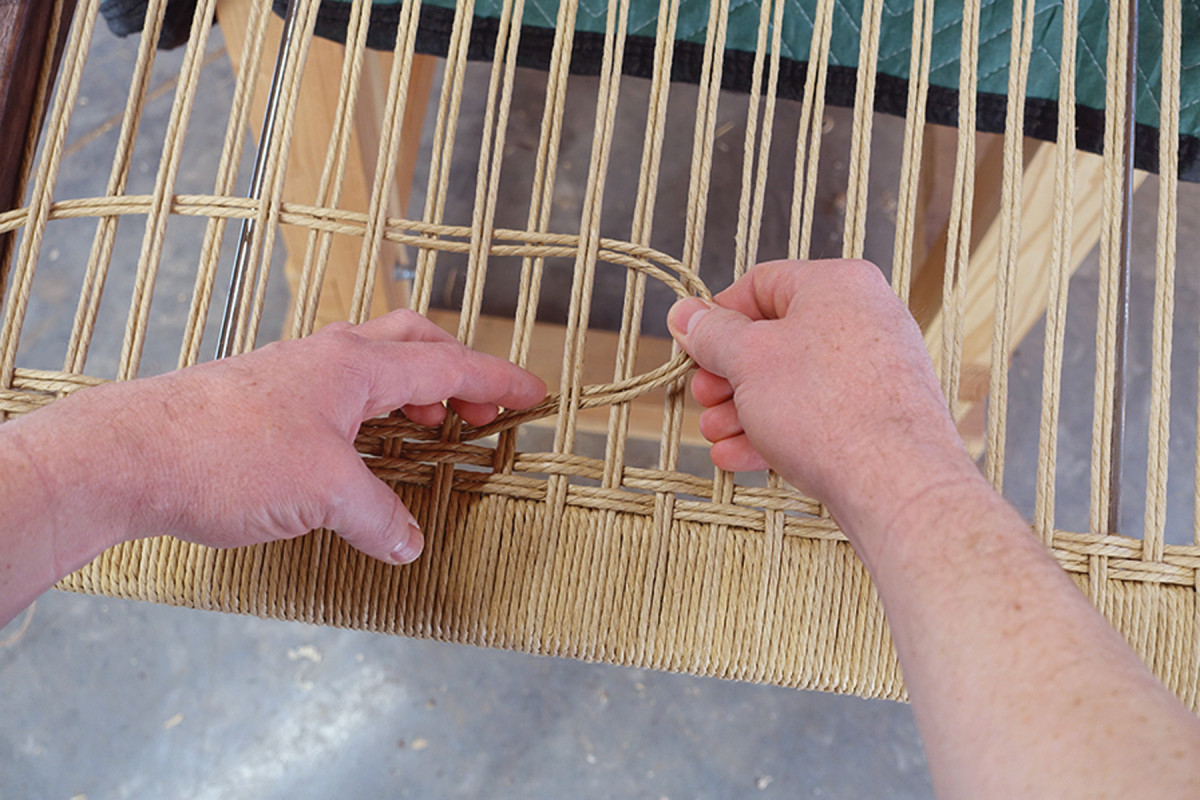
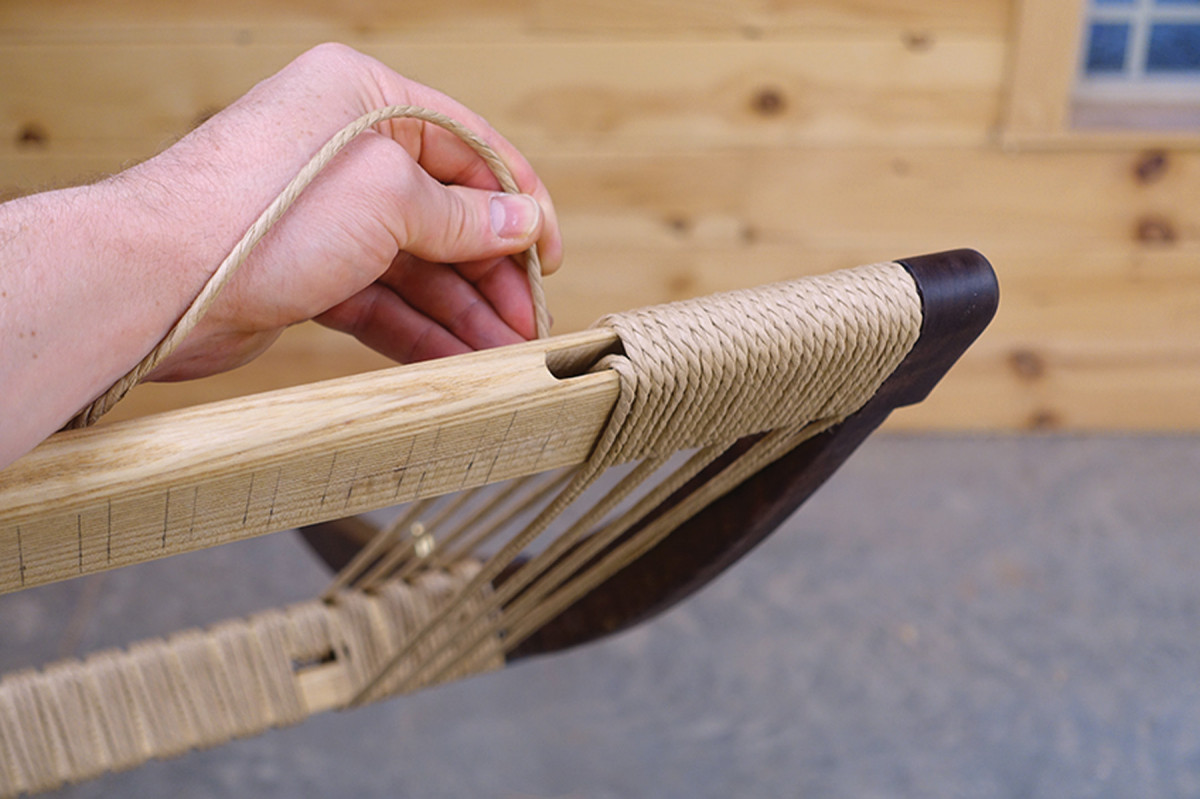
Measure off about 12 arm lengths of cord (or 72′). Bring both ends together and double it over so that there is a loop at one end. Take the loop and bring it over one of the weaving bars. Draw the two loose ends through this loop so that it is now tied around the bar.

Stay left. Do not cross over any cords when wrapping the underside of the rail. Stay to the left and return on the right side of the gap to bring the cord to the front rail.
Bring the looped cord up and around the side of the frame and over to the top of the seat. Begin by going under the first set of warp strands then alternate over and under as you weave your way to the other side. Go down around the side of the frame and wrap around the weaving bar. Now bring it back around the side of the frame and to the top of the seat. This time, go over the first set of warp strands then alternate over and under them until you reach the opposite side.
Notice that the cord is to the side of the “angled” cord that’s under the nail.
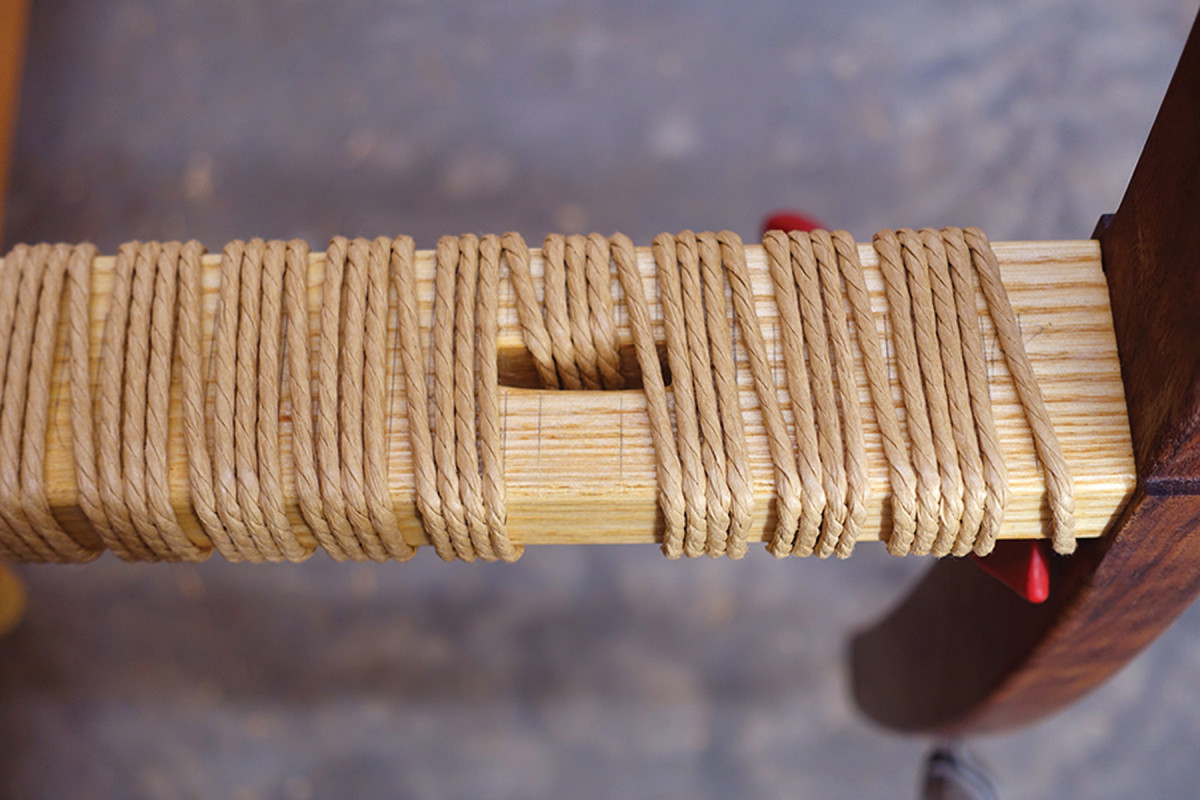
Repeat this process until you reach the back of the seat. Weave through the slot near the back of the seat with the same pattern, then finish by tying off on a cord nail under the seat (similar to how you finished the warp).
Tight Wire
Loop around. Loop the cord over the nail and return back the way you came. Make sure you are not crossing over any cords on the underside of the rail so that it stays looking neat and clean.
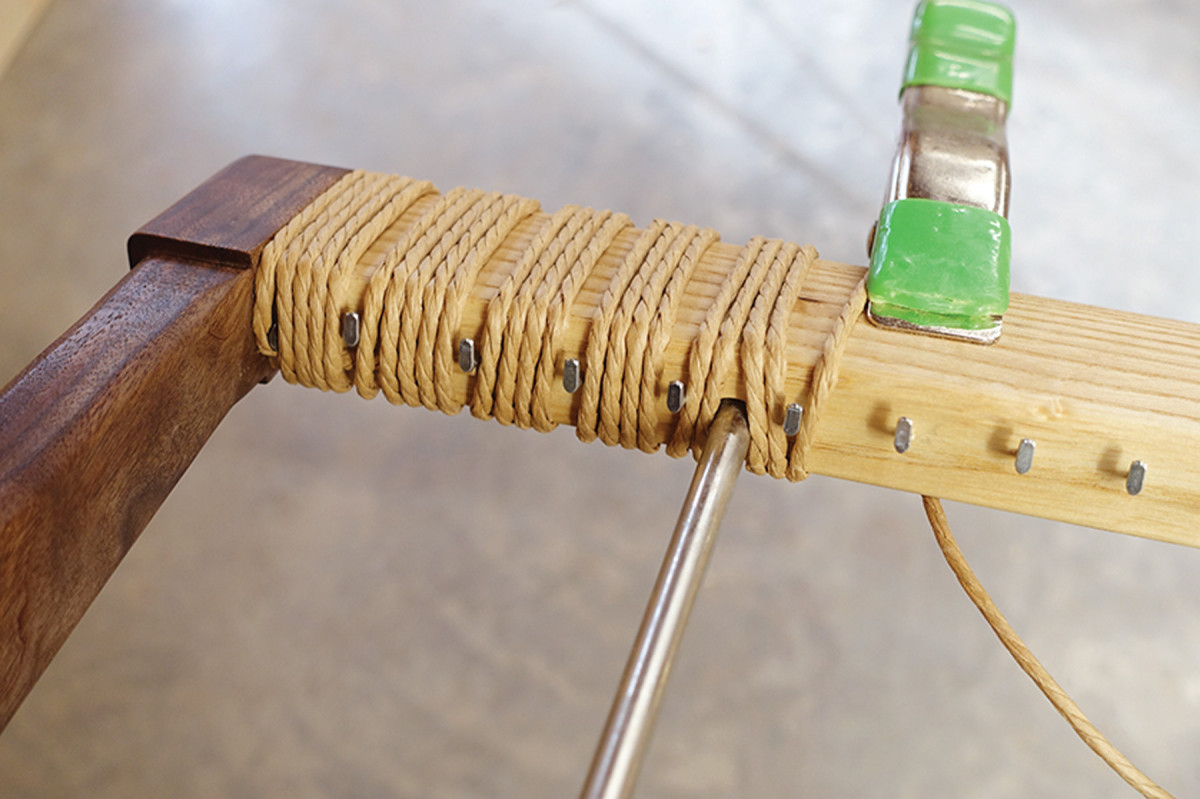
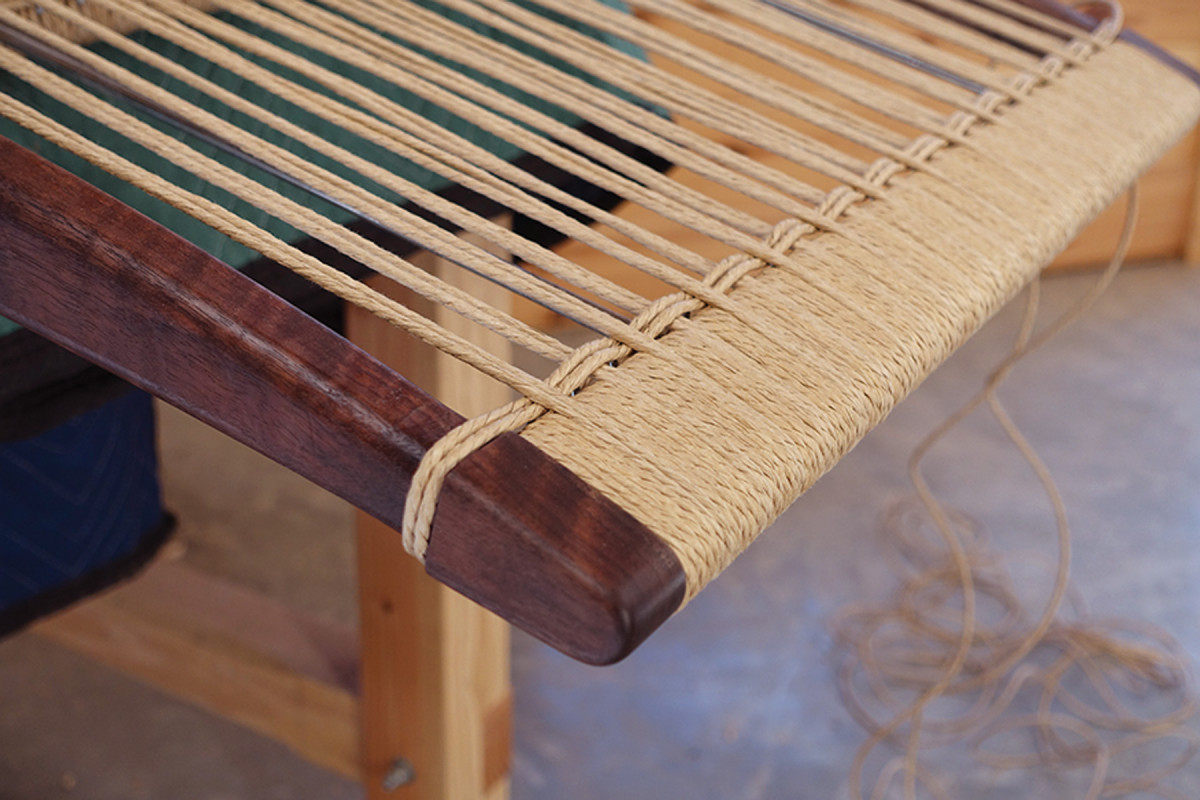
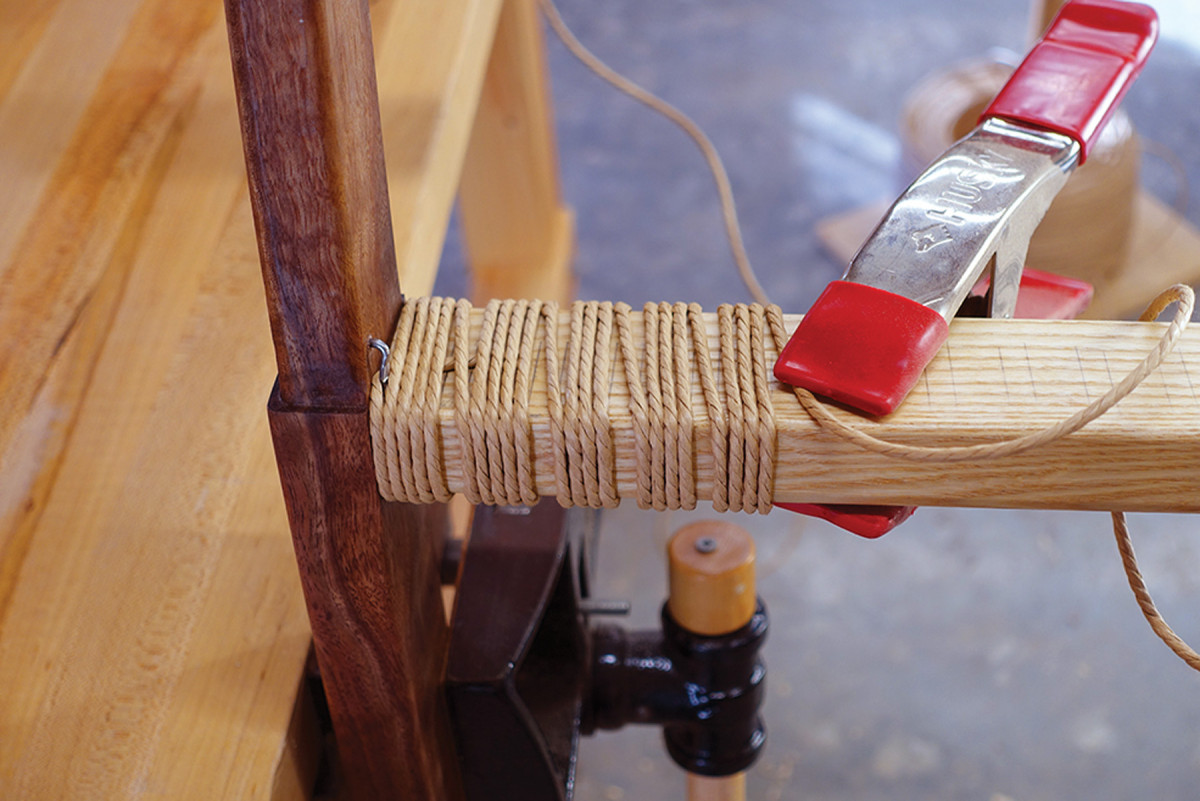
To finish off the seat, connect the two weaving bars with a wire (see Supplies). This wire keeps even tension on the cord across the seat, and allows it to have a bit of “spring.” Use a clamp to pull the bars slightly toward one another while attaching the wire. (If you don’t have a suitable clamp for this, then put the wire on before weaving.)
Now for the (Back) Rest
Back through. Drop the cord into the remaining space on the back rail and bring it back through the slot.
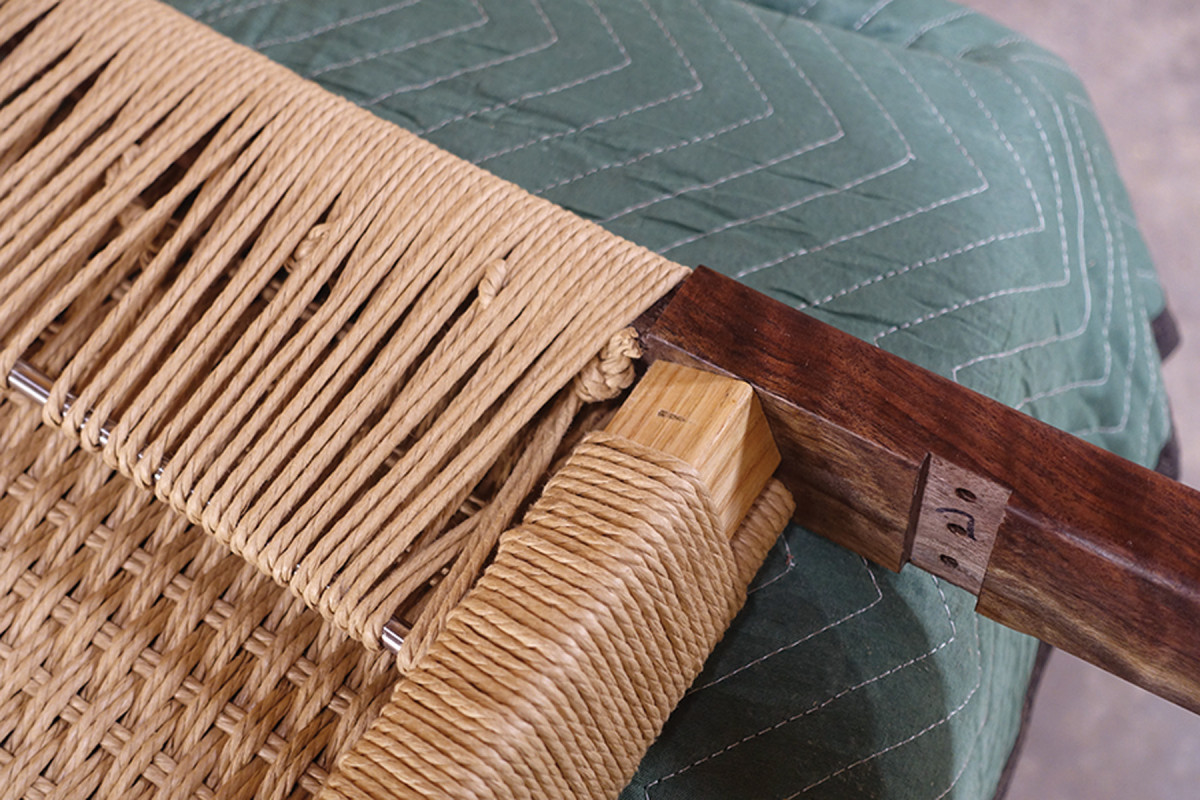
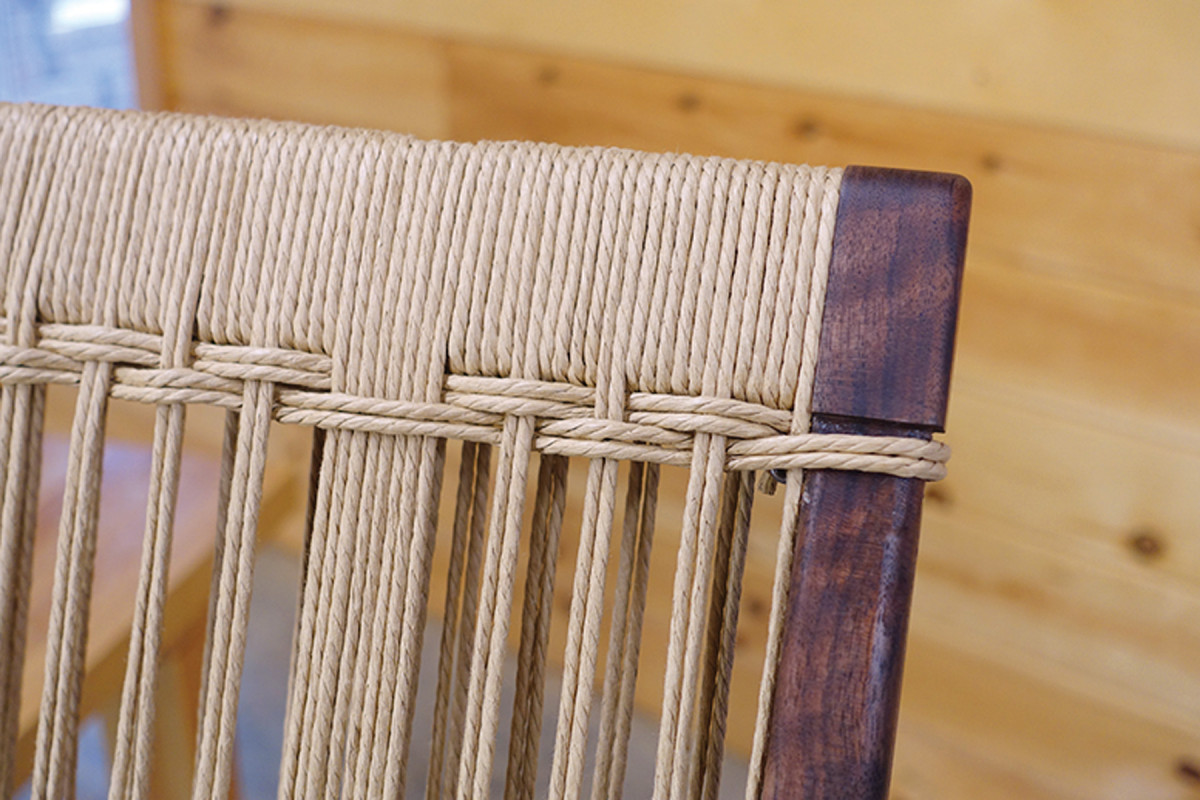
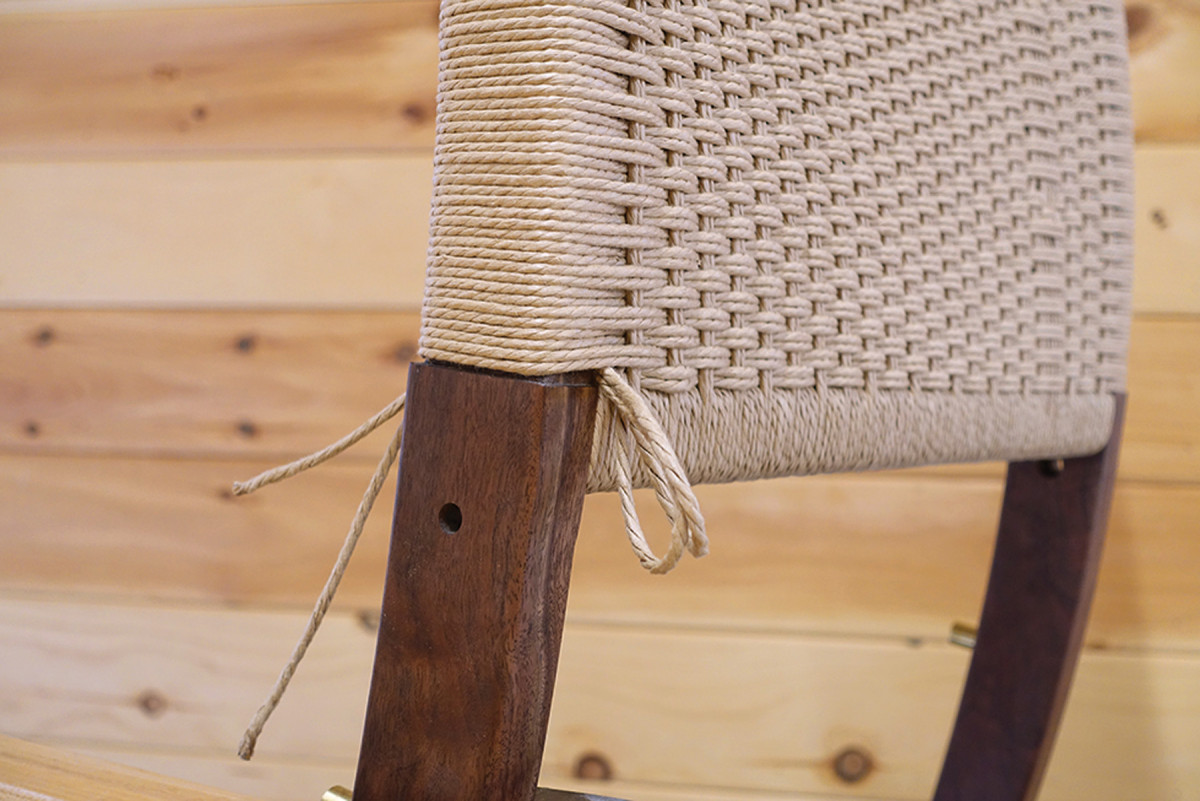
The backrest is woven on both the front and back. This makes the chair look “finished” from all directions. You’ll notice a change to the pattern on the backside that creates a vertical “strip” on one side. It brings a bit of interest to the pattern, but it also has a practical purpose, as you’ll soon find out. In Danish furniture, function is part of the form and there is no exception here.
Next nail. After returning from the front rail, bring the cord over the same nail as before and over to the adjacent nail. Repeat.
You won’t need a row of cord nails for this part – so to begin, lay out the warp spacing on the upper and lower rails with the pattern. Start by wrapping the lower rail on the left side (when viewed from the back) opposite the slot. Place a U-shaped nail (a 1⁄2” electrician’s “cable staple” works perfectly) in this corner and hook the cord through it. (Go ahead and loosely insert a staple in the top right corner as well – you’ll need it later.) Wrap over the loose end to hold it in place.
Add more cord. When you have to add more cord, tie the knot so it lands between the nails.
Wrap the backrest rails as you did the seat, and shift or angle over the cord on the top side of the rail, which is the interior side. As with the seat, the first two sections get five wraps. The remainder center sections get four wraps each until you reach the opposite side, then another two passes with five wraps. Once you reach the weaving slot at the opposite side, wrap only the front portion of the slot.
At the end. When you reach the slot, catch the nail just below it and go up and in through the slot and over, rather than down to the underside of the rail.
When you reach the opposite side, place a cord nail on the inside of the frame. Hook the cord around this nail and carry it up then over the top rail to start the warp wrap.
Tied & nailed. Secure the loose end of the cord with a knot that’s trapped under a cord nail.
Because there are no cord nails on the backrest, you’ll combine both the wrapping of the upper rail with the strands of cord that will need to extend from the top to bottom rails. Start wrapping the top rail with five wraps. On the fifth wrap, extend the cord all the way down to the bottom rail and land in the gap you left between the cord sections, then go back around the front and to the top. Make sure you are not crossing over any cord on the bottom rail.
Warped. The two phases of the warp are now complete – on to the weaving.
Do one more wrap like this to completely fill the gap. Once you return to the top rail, wrap five more times just around the top rail, then two more times down to the bottom rail, again filling in the gap in the bottom rail’s cord. You know this drill by now: The remaining sections get four wraps until you reach the opposite side, then it’s two passes of five.
The trickiest part of this pattern is the weaving slot. But all that’s happening here is that instead of just having a section of four wraps dividing the long double-warp stands on the backside, those four wraps travel from the top to the bottom rail. Thus, it will look like eight strands of cord in a row going from the top to bottom.
While that’s happening on the backside, the front side of the slot will continue the regular pattern of just four wraps divided by two double-strand sections on either side as usual. It sounds more confusing than it is; just take it one step at a time and study the photos closely.
Complete the warp pattern to the opposite side. Place a cord nail on the inside of the frame. Loop your cord around it and return to the opposite end of the rail to start the weaving portion.
Weaving Knots
Just two knots will serve for the “planflet” pattern used for this chair: a square knot for tying a single length of cord; and a double-cord knot that biases the loose ends of the knot to one side while leaving the opposite side relatively smooth. Take advantage of this when orienting your knots, especially while weaving the backrest.
Single-cord knot
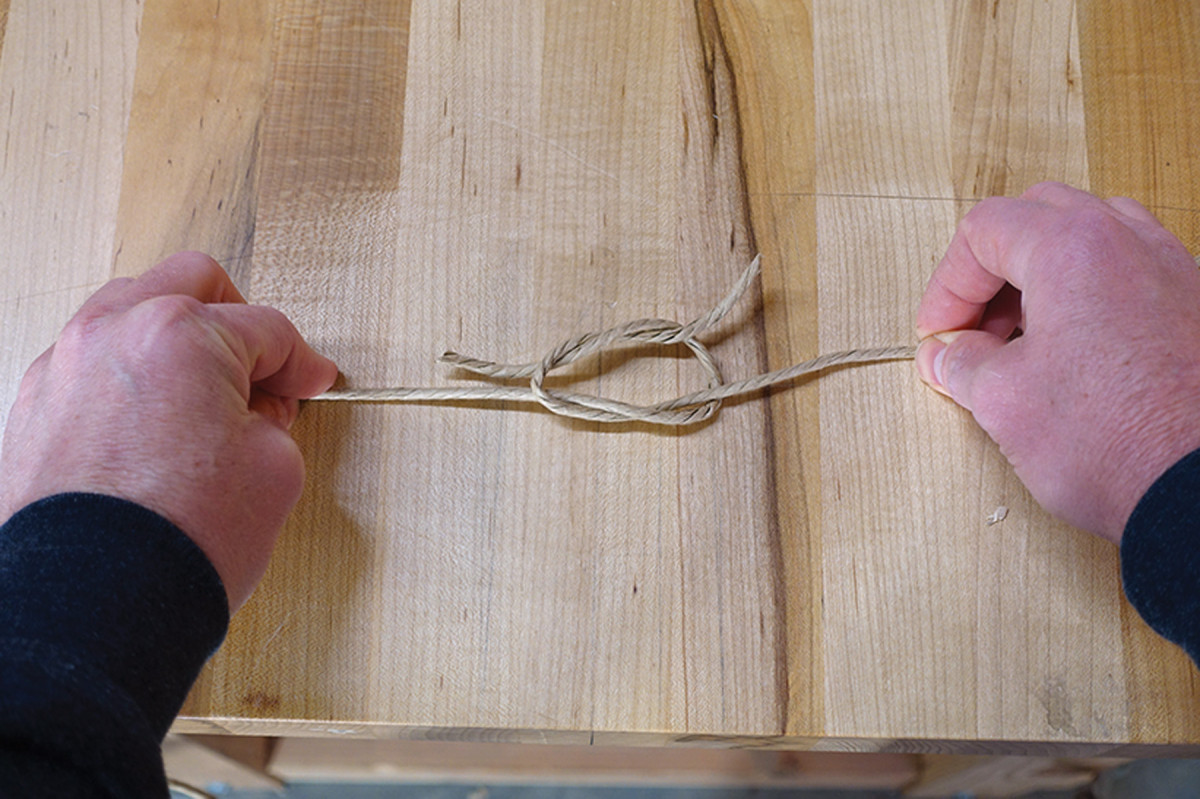
1. Form a loop on one loose end. Bring the other loose end in through this loop, around and under the two strands and back through the loop.
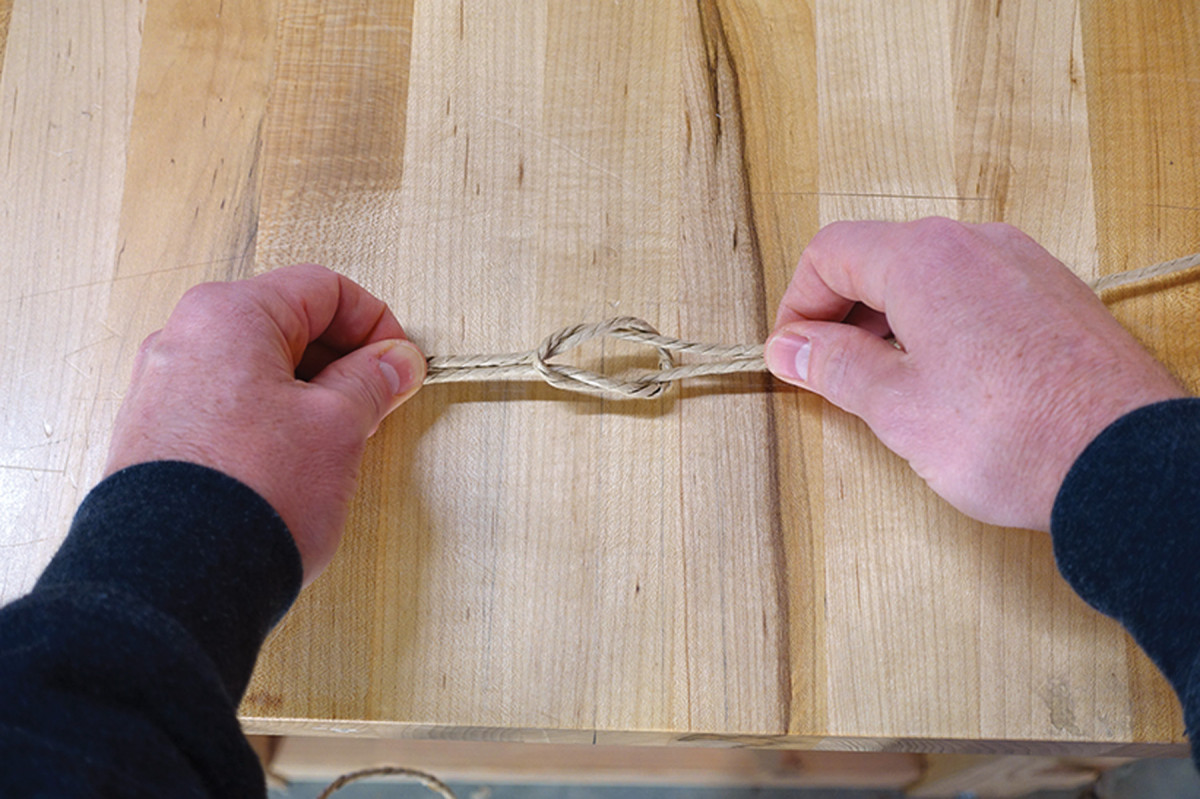
2. You now have two loops that are interlocked with each other.
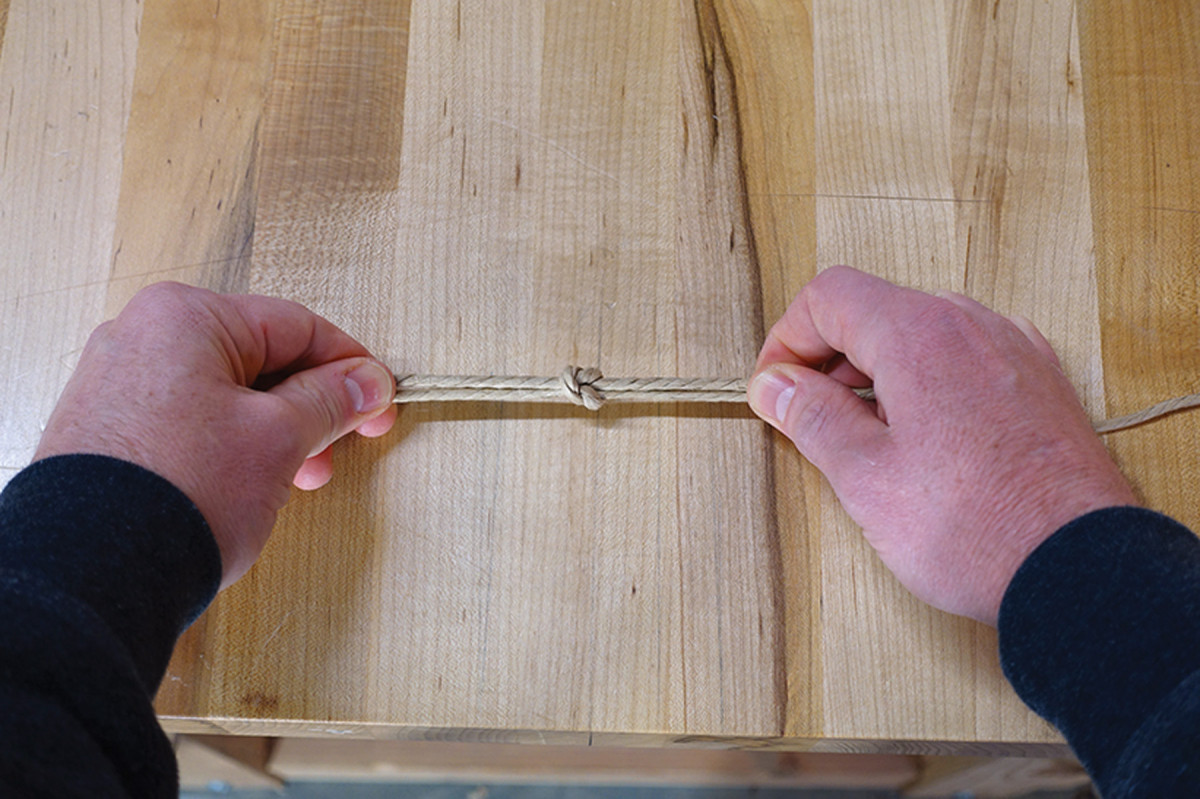
3. Draw these loops apart forming a tight knot. Trim the excess off the loose ends.
Double-cord knot
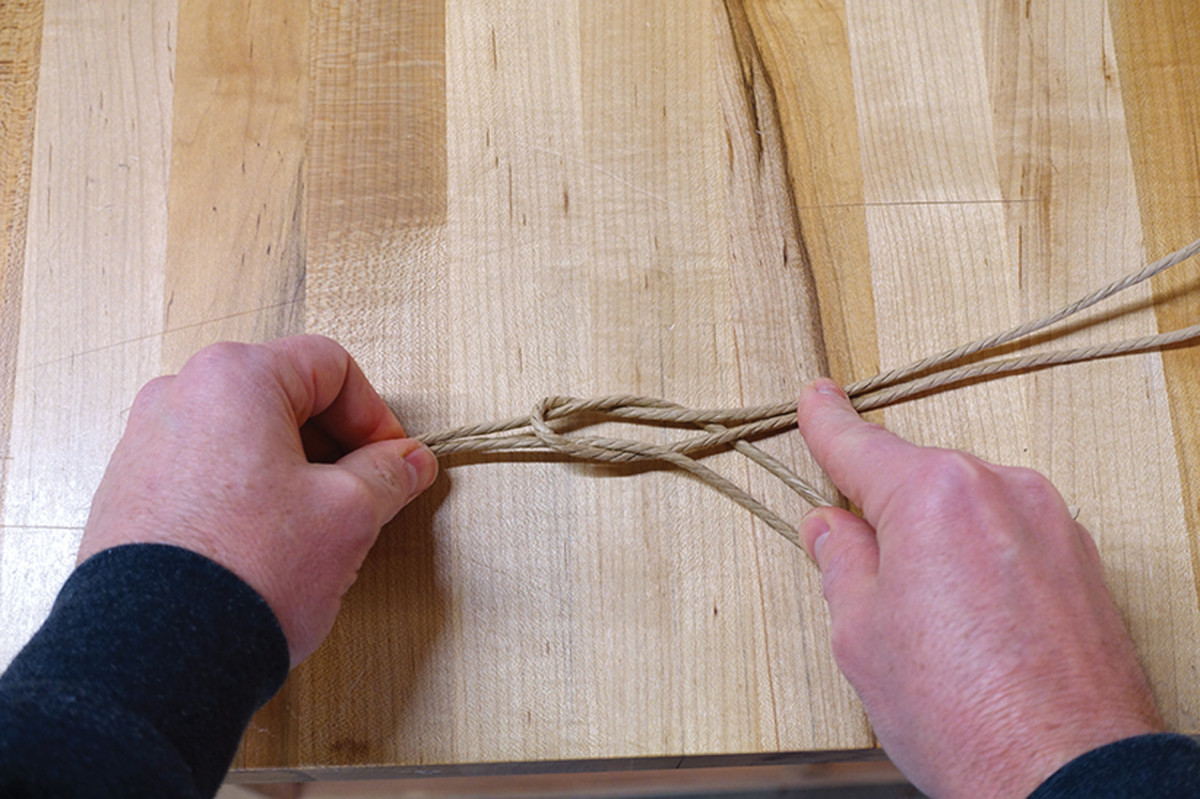
1. Pull the two loose ends through the center of the loop. Bring one end around and under the two cords of the looped portion to meet the other loose end.
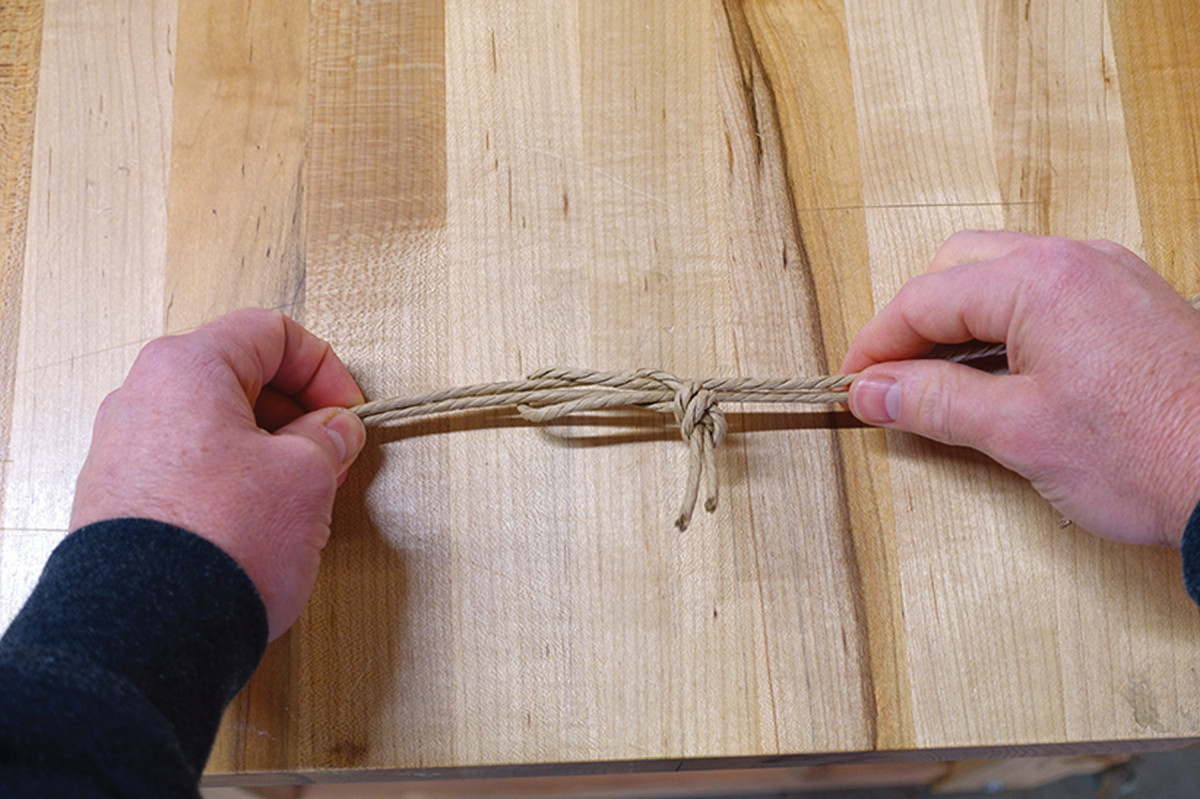
2. With both loose ends tie a single knot in the cord.
3. Draw these two double stands of cord apart until they bind together.
—CJ
Spiral Weave
Doubled up & ready. Tie a doubled length of cord to the weaving bar to secure one end for weaving.
The backrest is woven with a doubled-over length of cord, just like the seat. However, the backrest is woven in one direction. The cord weaves from right to left as it spirals around the backrest frame from top to bottom. It starts at the top back right inside corner, and runs to the lower left back inside corner.
Not too tight. Do not pull the cord tight; rather let it alternate up and down through the warp stands like a wave. Pulling it too tight will make it difficult to pack the weave close together on subsequent rows.
Weave from right to left as you did the seat, except continue around the side and to the front. Continue the over/under pattern onto the front and back around the opposite side. When the cord continues onto the back again, stagger it down to start under the previous row.
A clean weave. Pack the weave in to the adjacent row as you pull the cord though. This gives a consistency in appearance to the weave.
As you weave down the backrest, you’ll notice that the wide vertical band of cord wants to bunch together. To prevent this, there’s a small pattern change: On the 16th row down (and the 32nd and 48th rows), rather than simply going over all eight vertical cords, weave over two, under four, and over two. On the next row, do the reverse: under two, over four, and under two. The next row picks back up the regular pattern, going over all eight cords.
Tight space. An L-shaped or hooked pick tool (available in a “Pick and Probe” set for $6 at the home center) helps when working the last few rows where fingers don’t easily reach.
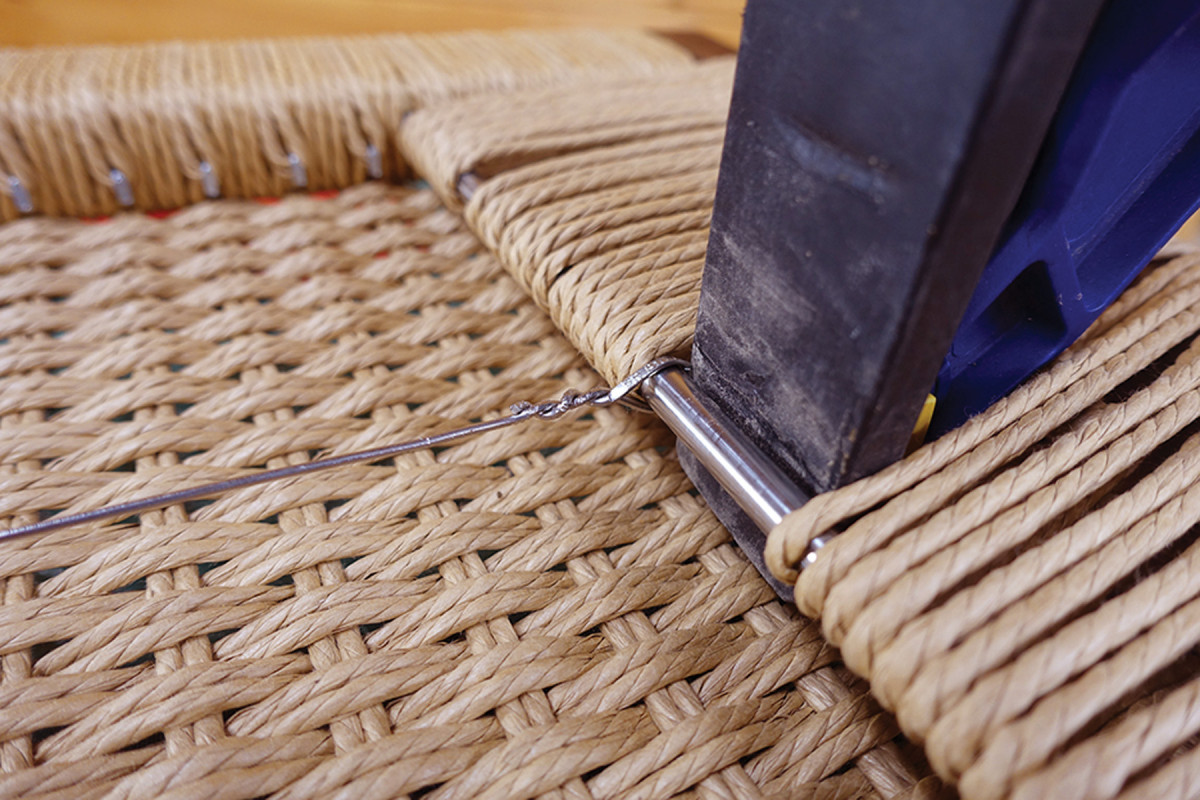
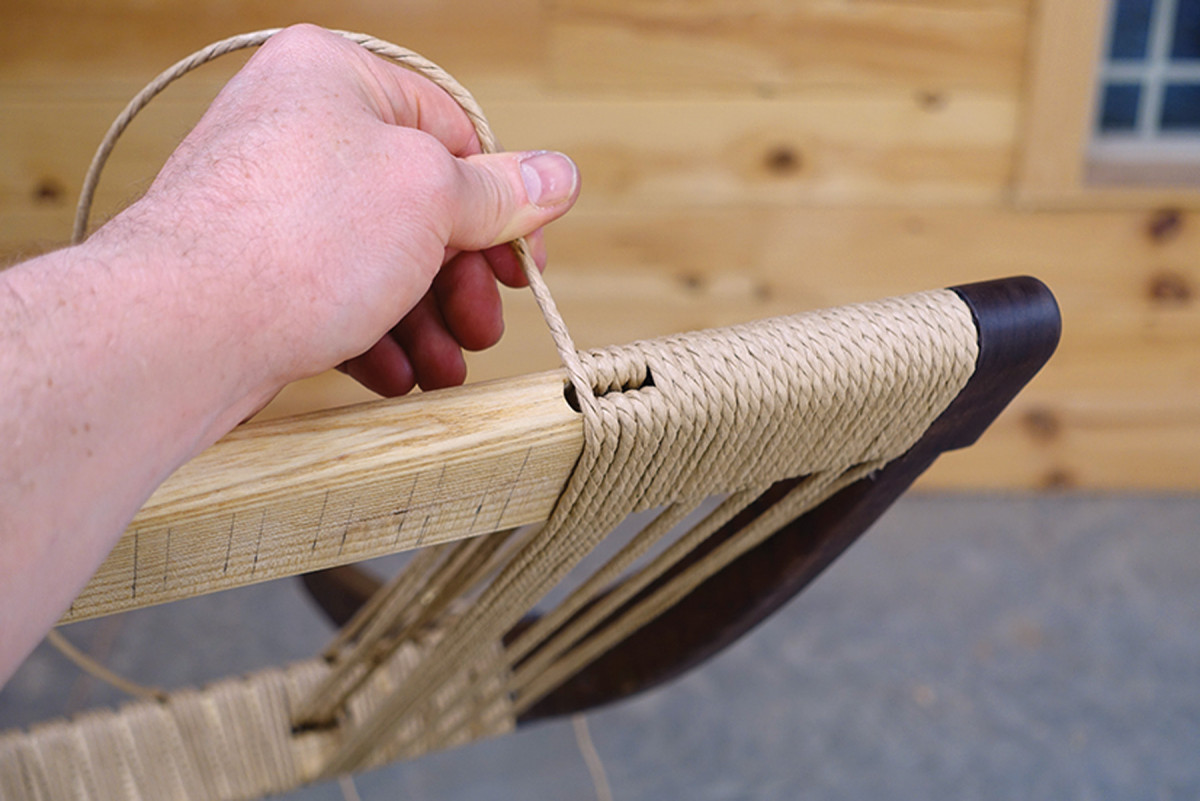
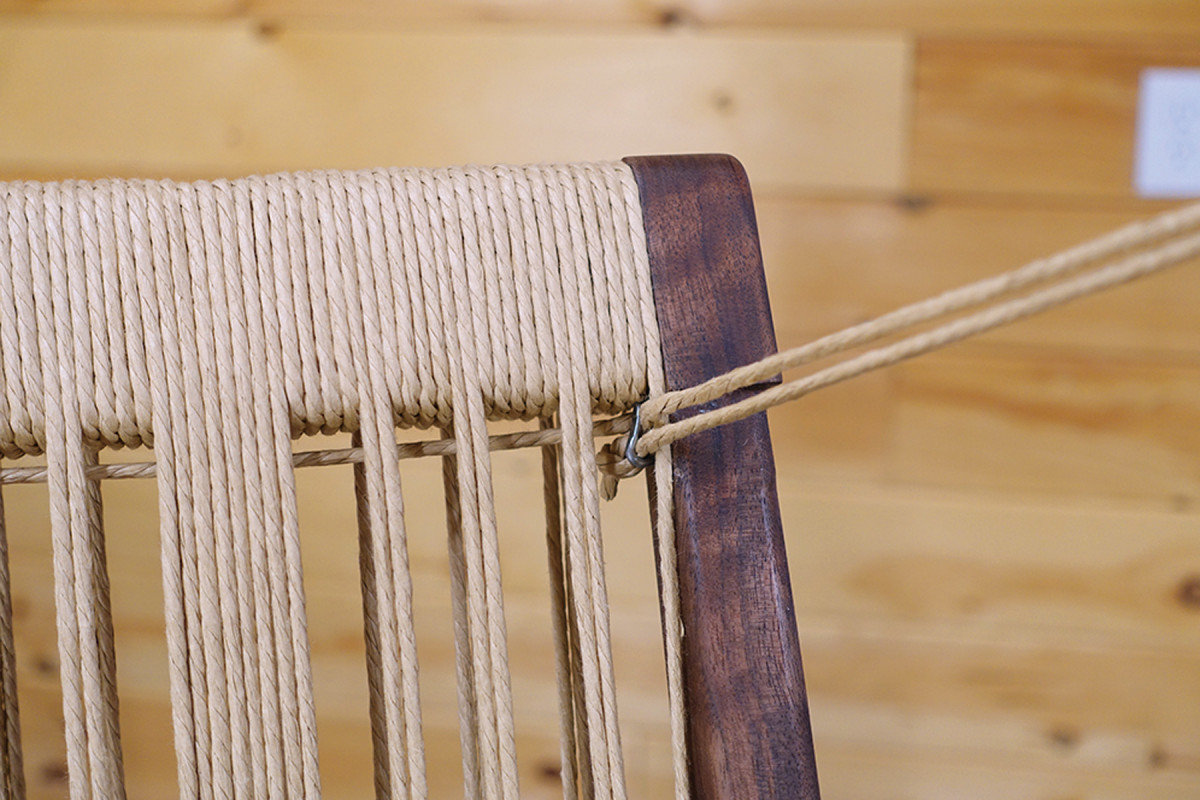
The last row is the back of the seat, and ends on the bottom left corner, where you placed the cable staple earlier. Thread the two loose ends of the cord through this staple and pull through the front to tension it. Slide a row of the cord apart and use a nail set to drive in the staple to secure the cord. Cut off any excess cord on the opposite side and tuck the loose ends back inside.

Around & through. After working up to the weaving slot at the back of the seat you’ll wrap around the bar and come back through the slot to start that section of the weave.
Knot a problem. To add more doubled cord, tie it when weaving around the bar so that the knot is hidden under the seat. Finish off the weave by making a knot in the cord and securing it with a cord nail under the seat.
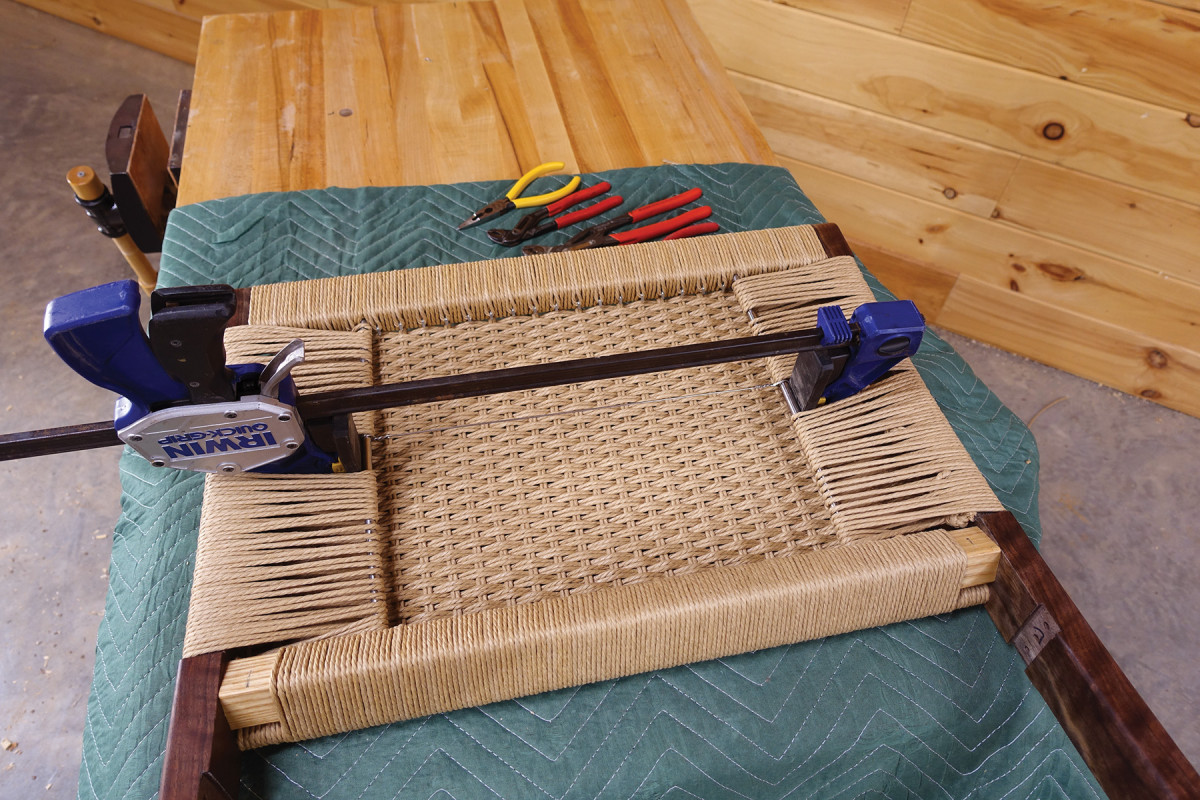
Get wired. Place a clamp across the weaving bars to provide light tension, then connect them with a piece of wire.
Once the clamp is released it will pull the wire tight and keep the seat weave tight as well.
Warp layout. Lay out the warp spacing for the wraps on the backrest lower and upper rails. Note that only one side of the slot will be wrapped in the initial pass on the lower rail.
It’s electric. An electrician’s “cable staple” works perfectly for a dual purpose. It holds the initial start of the warp wrap and the last of the cord when you finish off the weave. A nail set can help you place it in this tight spot.
Staple & wrap. The loose end of the cord is hooked though the cable staple then is wrapped over it to secure it in place. Notice that the wrap angles or shifts over on the top of the rail, which will be obscured once the back is completely woven.
Slot it. The slot is wrapped only on the front side (shown here from the backside). The large gap on the backside of the slot will be filled later as you wrap the upper rail.
Stop & confirm. Check every so often that your spacing is on track by comparing it to your pattern. (The work here is shown from the front side.)
Hooked. Place a cord nail on the inside of the frame to hook around before bringing the cord to the top rail.

Back warp. The warp pattern on the top rail combines both the wrapping of the rail and the long double strands that travel from the top to bottom rails.
Lower backrest rail. This is how the lower rail should look before you begin weaving any cord through the top rail slot.
Now slot. After the second long wraps from the top to the bottom rails, go in through the top of the slot. Bring the cord to the front of the rail and back up. Shown here is the same step from the back (top) and front (bottom).


Through & down. Bring the cord down through the top of the slot, pull it tight and continue down to the bottom rail’s slot.
And again. Go through the slot, bring the cord to the back of the rail and continue back up to the top rail again.
And again. Go through the slot, bring the cord to the back of the rail and continue back up to the top rail again.
Through & down again. Now you’re back at the beginning. Go through the top of the slot again and repeat this pattern three more times.
Over the top. After passing through the slot four times, continue with the cord wrapping around the top of the rail and down.
From the front. Here’s the view now from the front at the top (left) and bottom (right). Wrap two times from the top to the bottom rails, falling into the gap on the bottom rail as you did before. At this point, restart the regular “wrap four times” pattern.
Double it. Loop the cord through the staple and tie a knot in the loose end so that it stops. This is the beginning section of doubled-over cord for weaving.
Stagger it. The cord will have to stagger down a bit as you wrap it around to go under the previous row. There will likely be a small gap above the cord on the side rail. Push it up tight and after a few more times around, it will stay in place.
Loop to weave. Once your reach the end, loop around a cord nail and take the cord back to the opposite end of the rail to start weaving. (Here you’re looking at the top left from the back.)
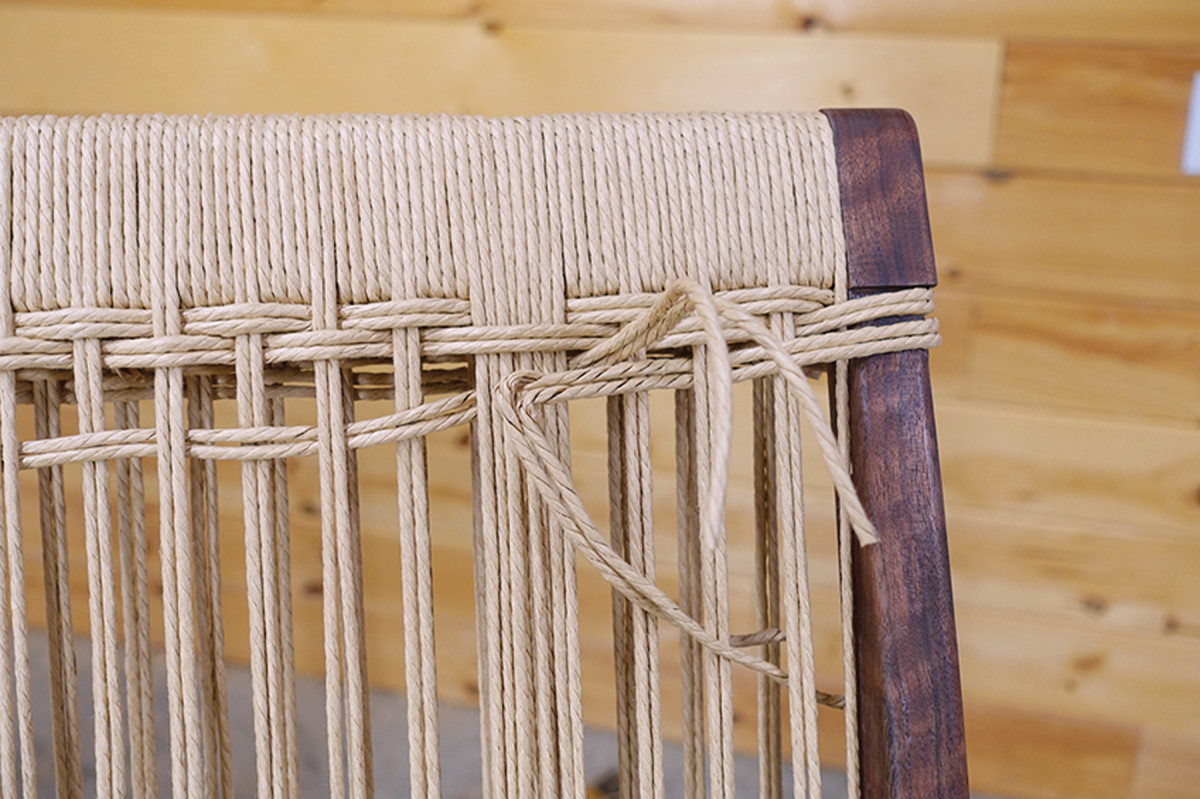
Mystery solved. When you need to tie on more cord, plan the knot to land behind the wide vertical band of cord – and now you know why that wide band is part of the pattern.
Pattern variation. Go over two, under four and over two. Wedge your hand or a strip of wood underneath to force the cord to undulate over and under neatly. This will help the next row pack in tightly.
Reverse. Now do the opposite of the previous row, before returning to the normal pattern.
Same change, different row. This pattern variation occurs two more times, at rows 32 and 48.
In your eye. Thread the eye of the staple that was installed at the beginning of the warp phase, and pull the cord ends through the opposite side.
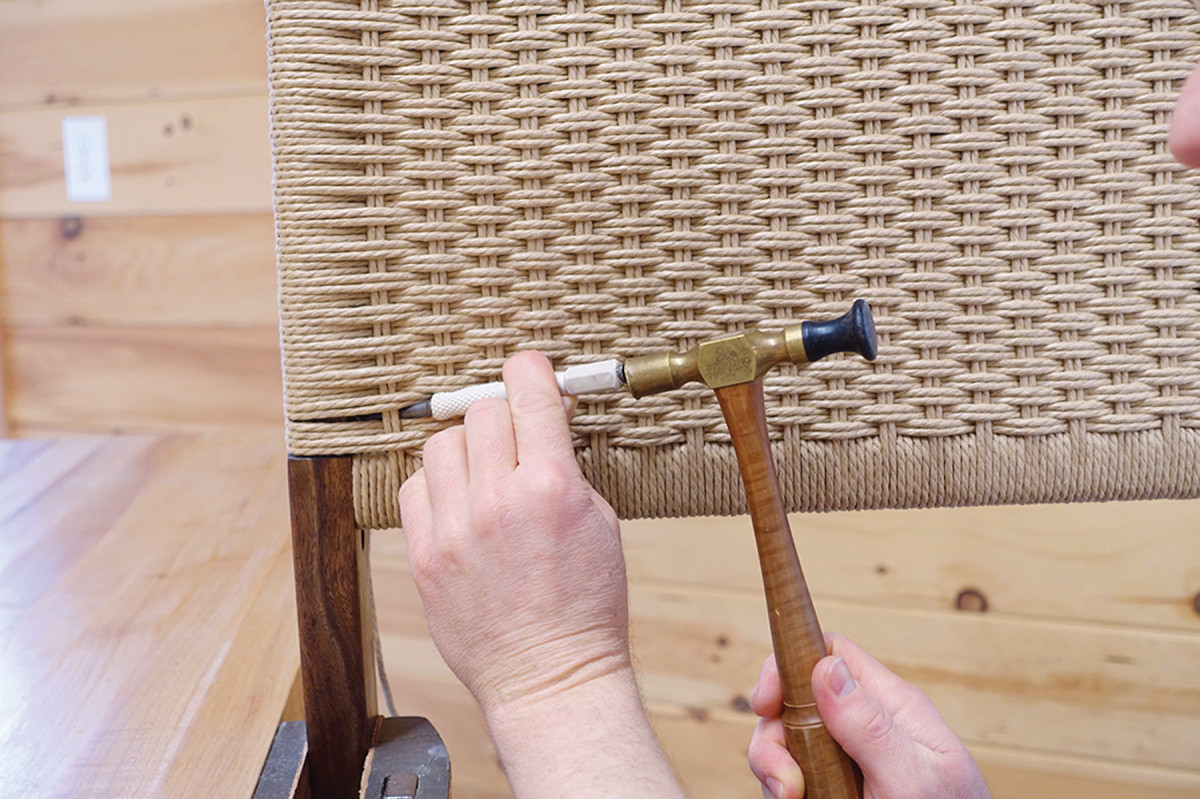
Tied off & secure. Pull the cord ends tight and drive the staple in with a nail set slipped between the cord.
All that’s left to do now is assemble the seat and backrest frames, find a sunny spot with a good book, and you’re done. Congratulations and enjoy! PWM
Caleb is a toolmaker and furniture maker in Greenville, S.C.
Here are some supplies and tools we find essential in our everyday work around the shop. We may receive a commission from sales referred by our links; however, we have carefully selected these products for their usefulness and quality.


