


We may receive a commission when you use our affiliate links. However, this does not impact our recommendations.
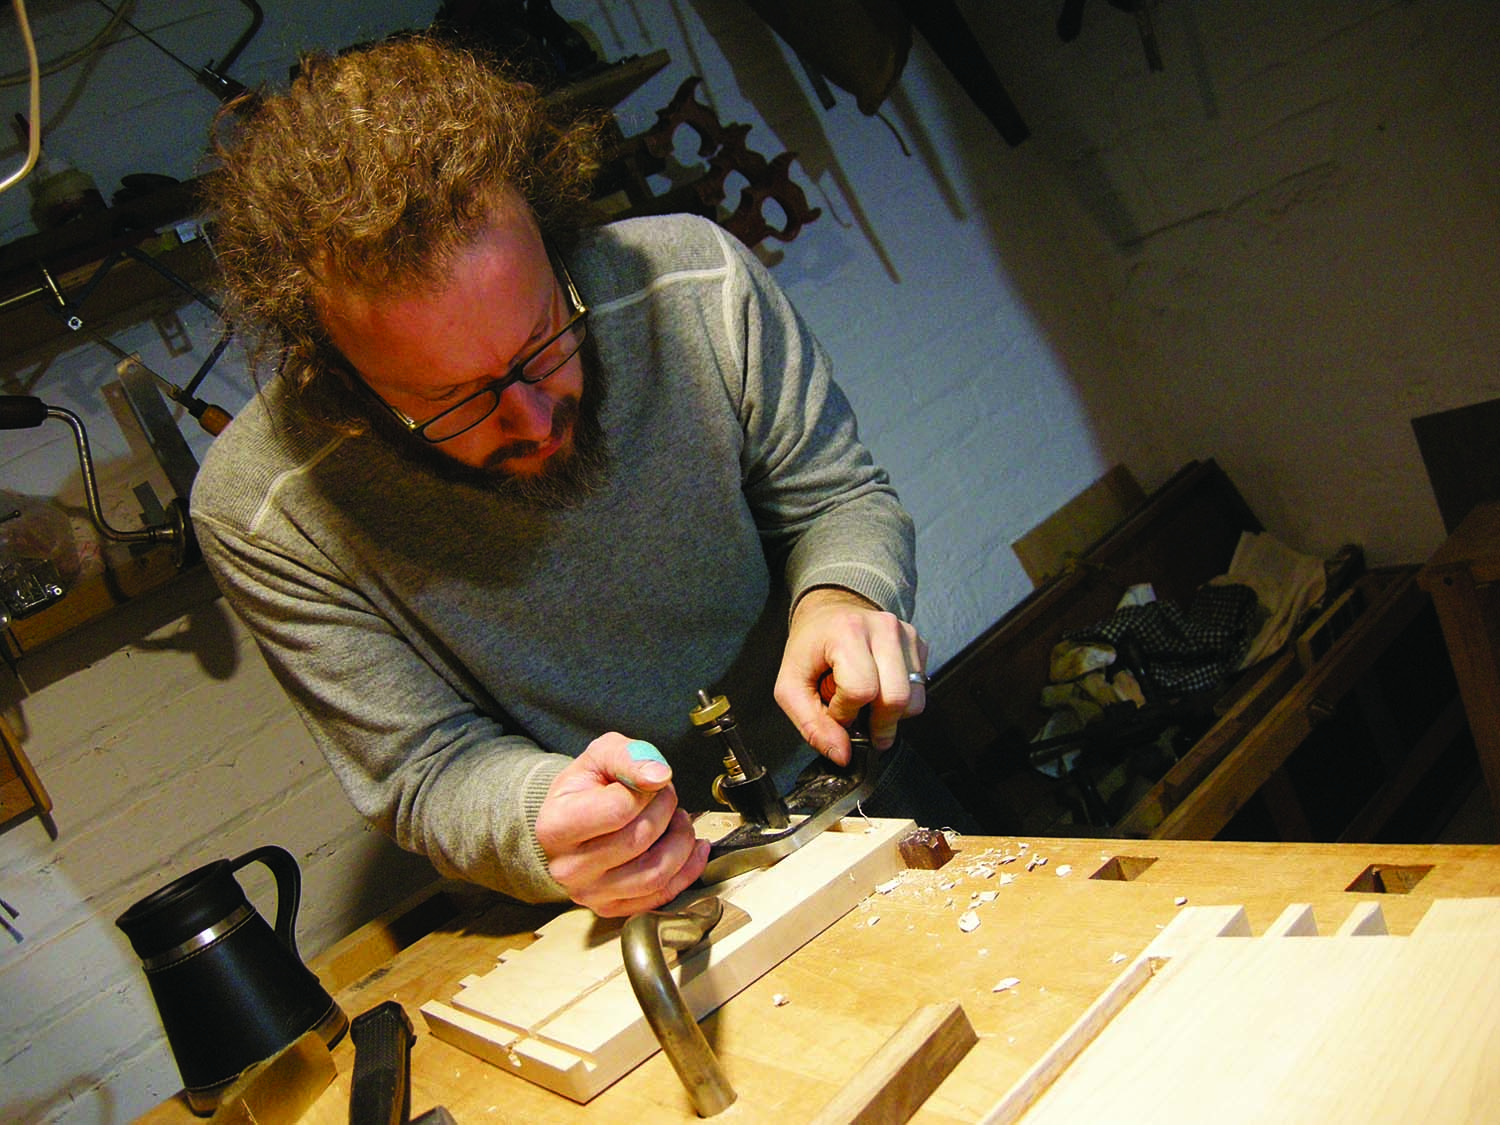
When I think of a tool chest, I think of a carpenter’s box, usually open and inviting, a little rough perhaps but clearly made by the hand. Think of Roy Underhill merrily skipping over the stream … remember the toolbox he was carrying? What I’ve come up with is a toolbox, made entirely by hand, that is both practical and traditional in construction. Well, sort of …
Do you need to carry tools? Are you going to be on a jobsite outside of your workshop? This chest will be manageable and hold most of your workshop essentials while incorporating some unique and practical design elements.
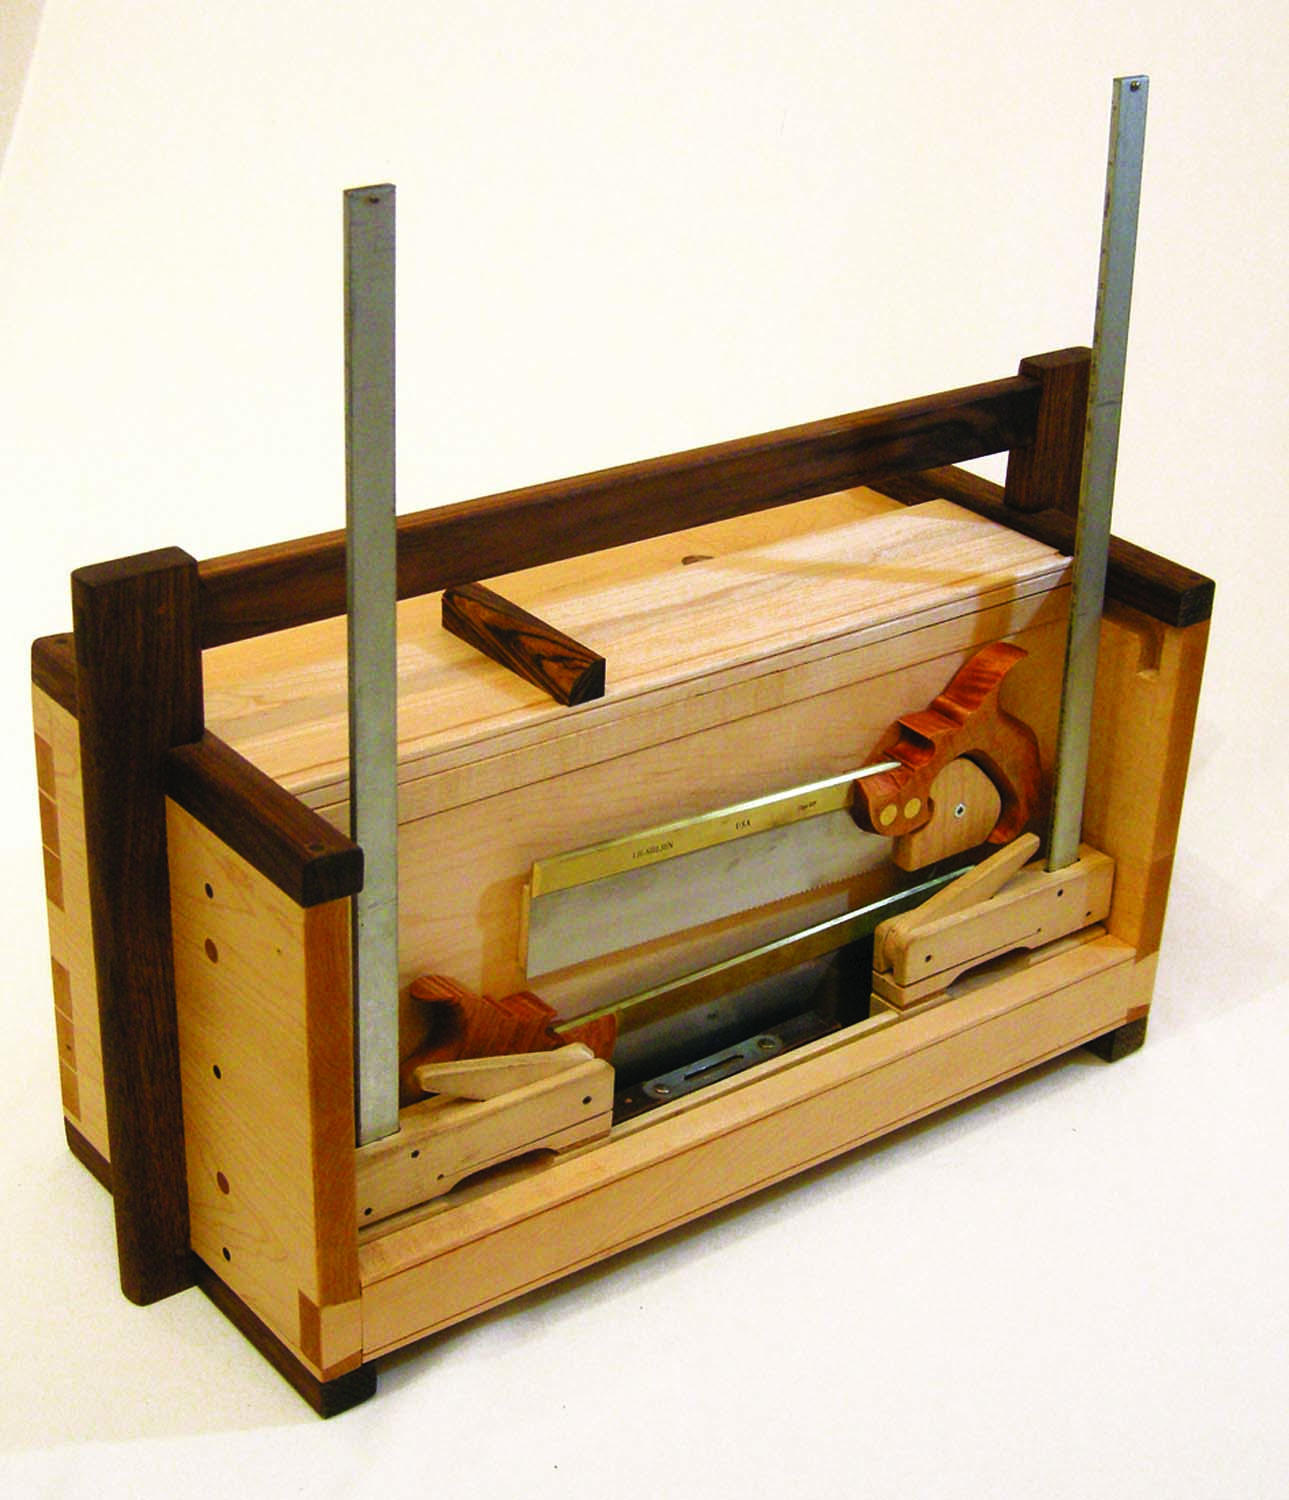
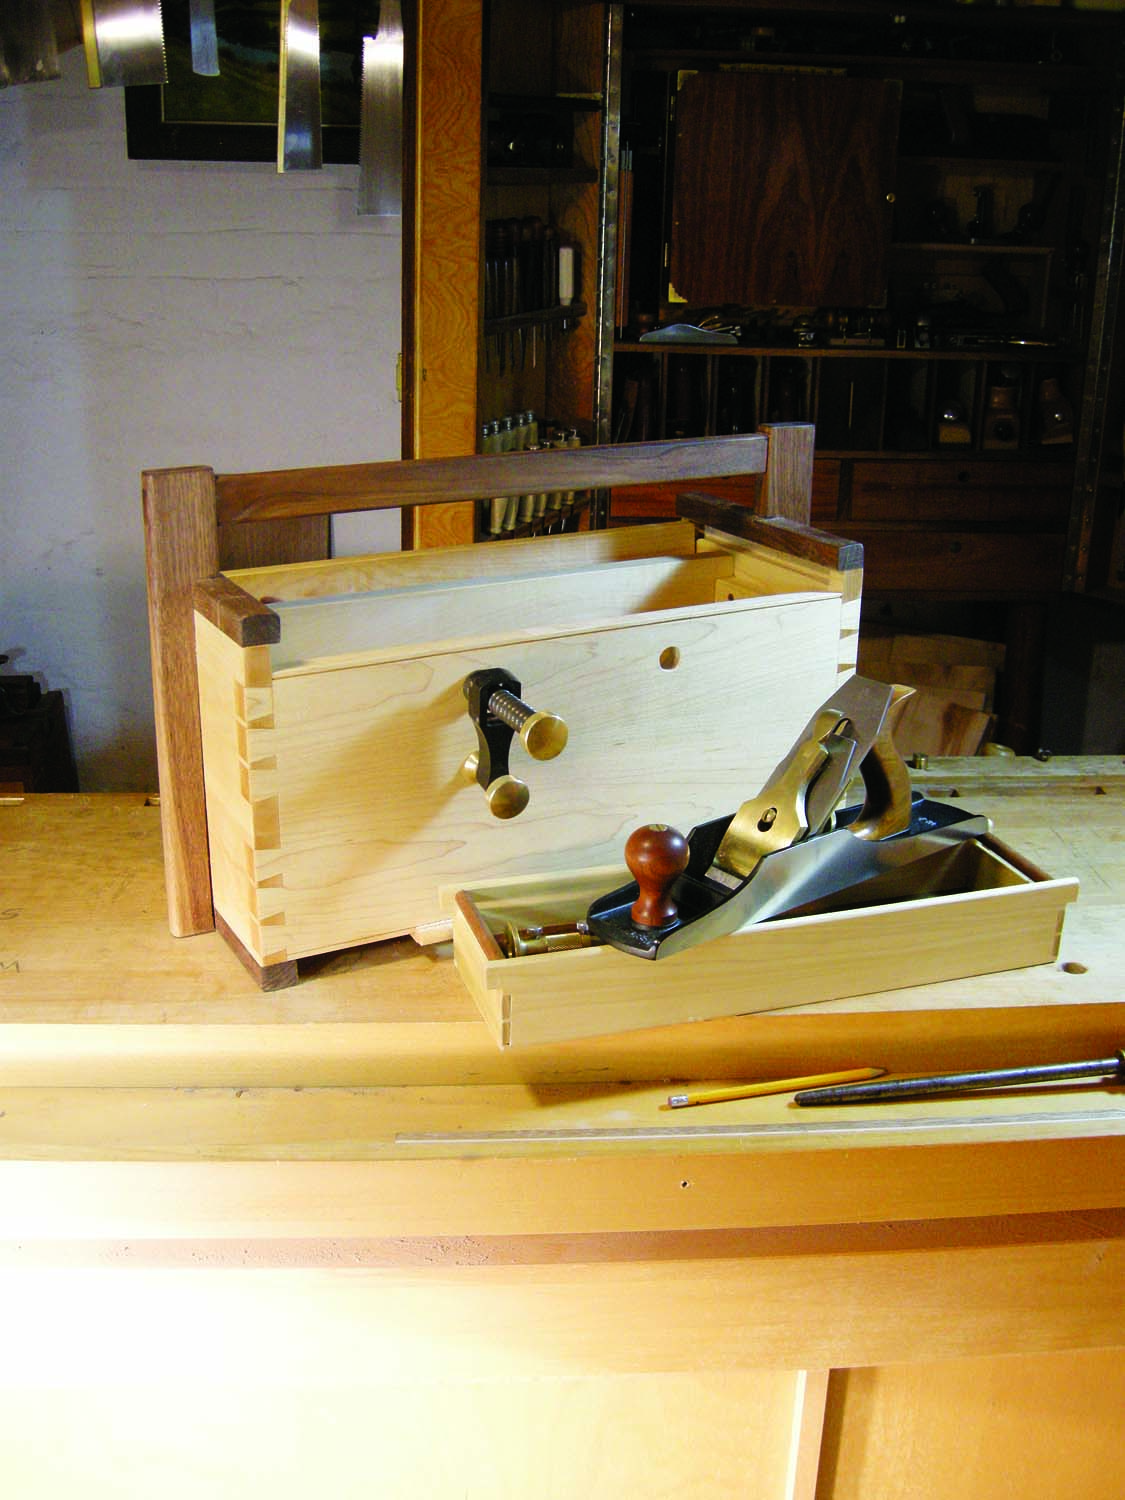
Small but mighty. This tool chest will hold a surprising amount of hand tools and features some handy “on the road” benefits. In the “open” picture above, you can see the backsaw holders, the shooting board on top and the cam clamps that are used to secure the chest to any surface.
For starters the sliding lid, (captured in dados) pushes off the back and is held open to access the interior. While in the open position the lid serves as a shield to cover your two backsaws that are safely held on the exterior back with a protective shelf underneath them. This turns into a little shelf to place things like tiny screws you’d surely lose on-site if you didn’t have such a dedicated area to toss them.
It has a built-in shooting board, and a workspace complete with surface clamp and miter hook that will get all of the applause from your fellow craftsmen on site. I don’t know how many times I’ve been installing a cabinet or perhaps some finish moulding somewhere, and a makeshift bench surface, saw hook and shooting board would have been really handy – it’s also nice to rest your arse on the edge from time to time. It’s imple in form, as a tool chest should. We’ll get started with the basic box so we can get on to some of those unique design elements.
The Carcase
Whether you’re using four wide planks or joining up some narrower widths, assemble the four main carcase components after working up your cutting list from the illustrations (yes, it’s an important part of the process!). Those pieces are the front, back and the two ends, or sides, if you will.
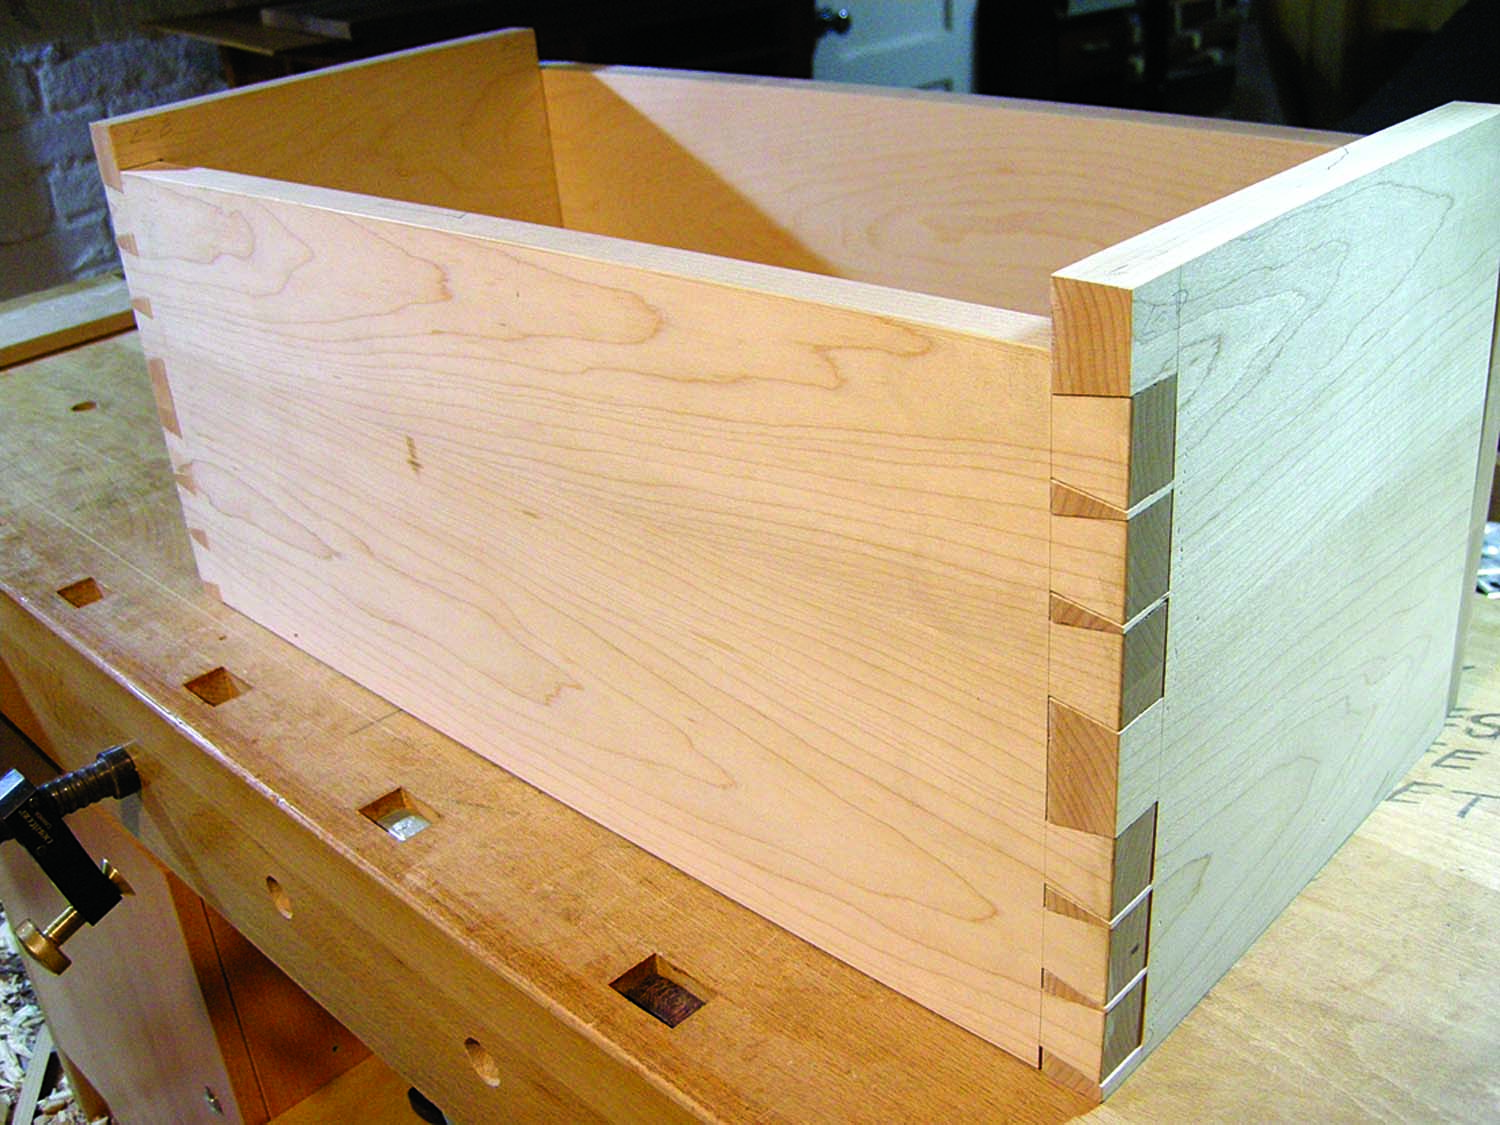
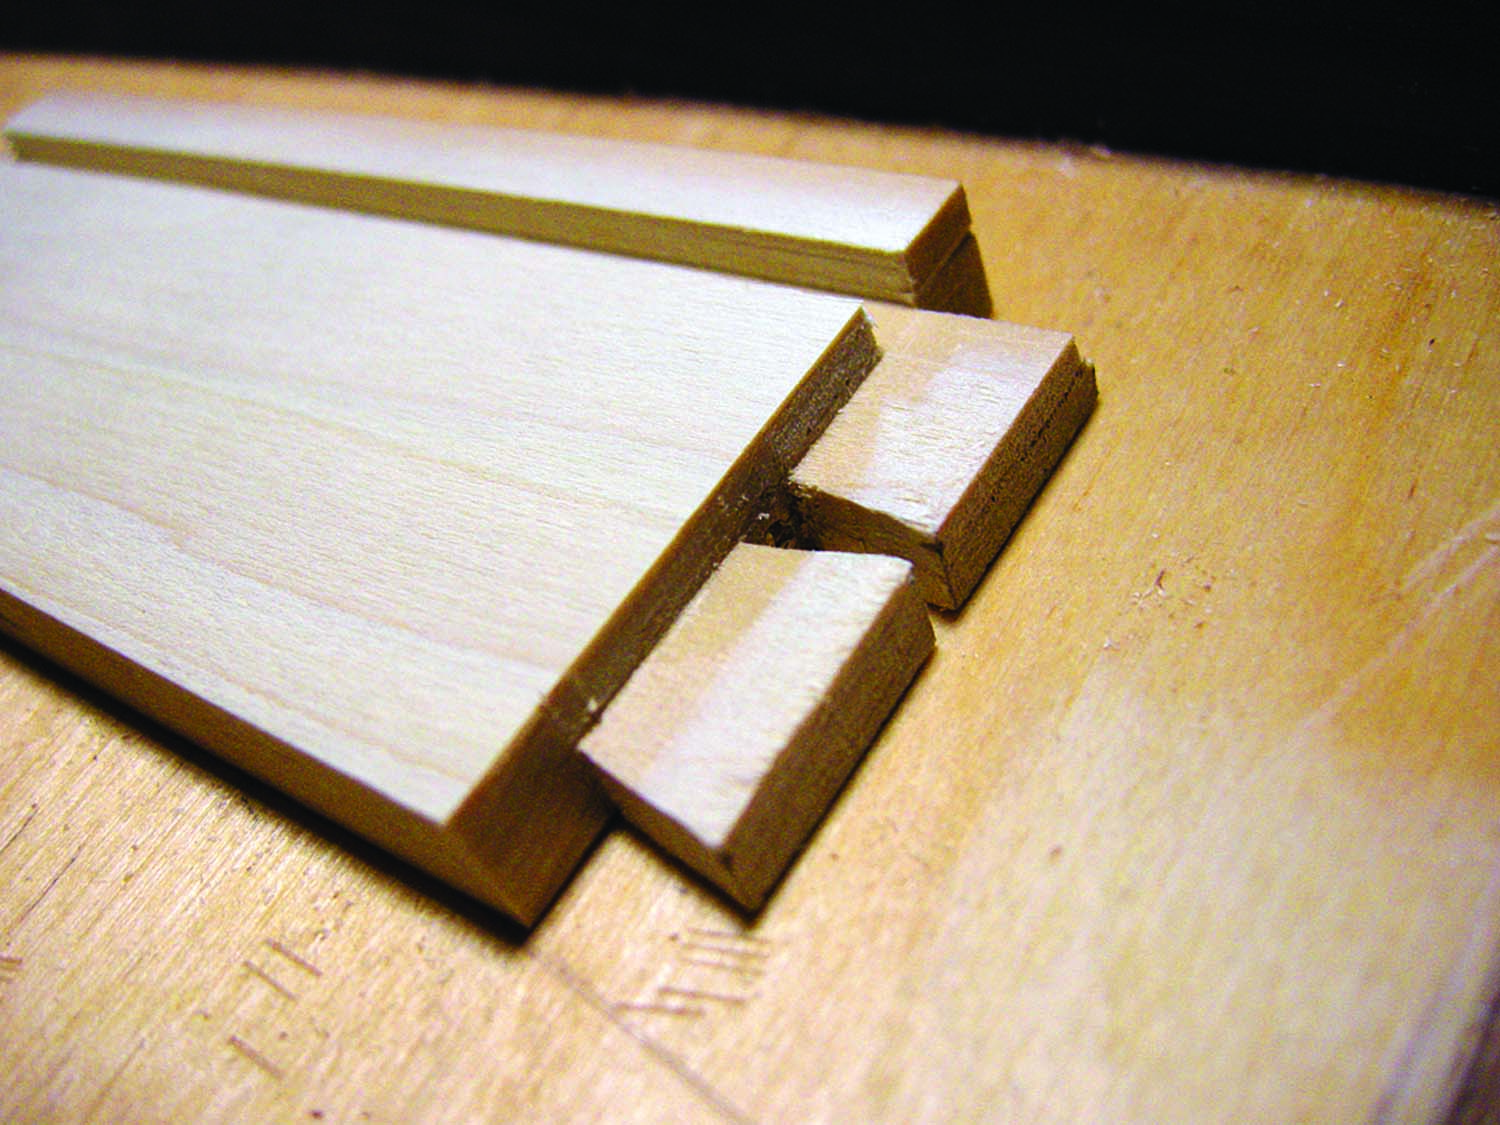
A tale of tails. This is a typical dovetail layout – but for visual interest I simply refrained from cutting out the center tail after marking.
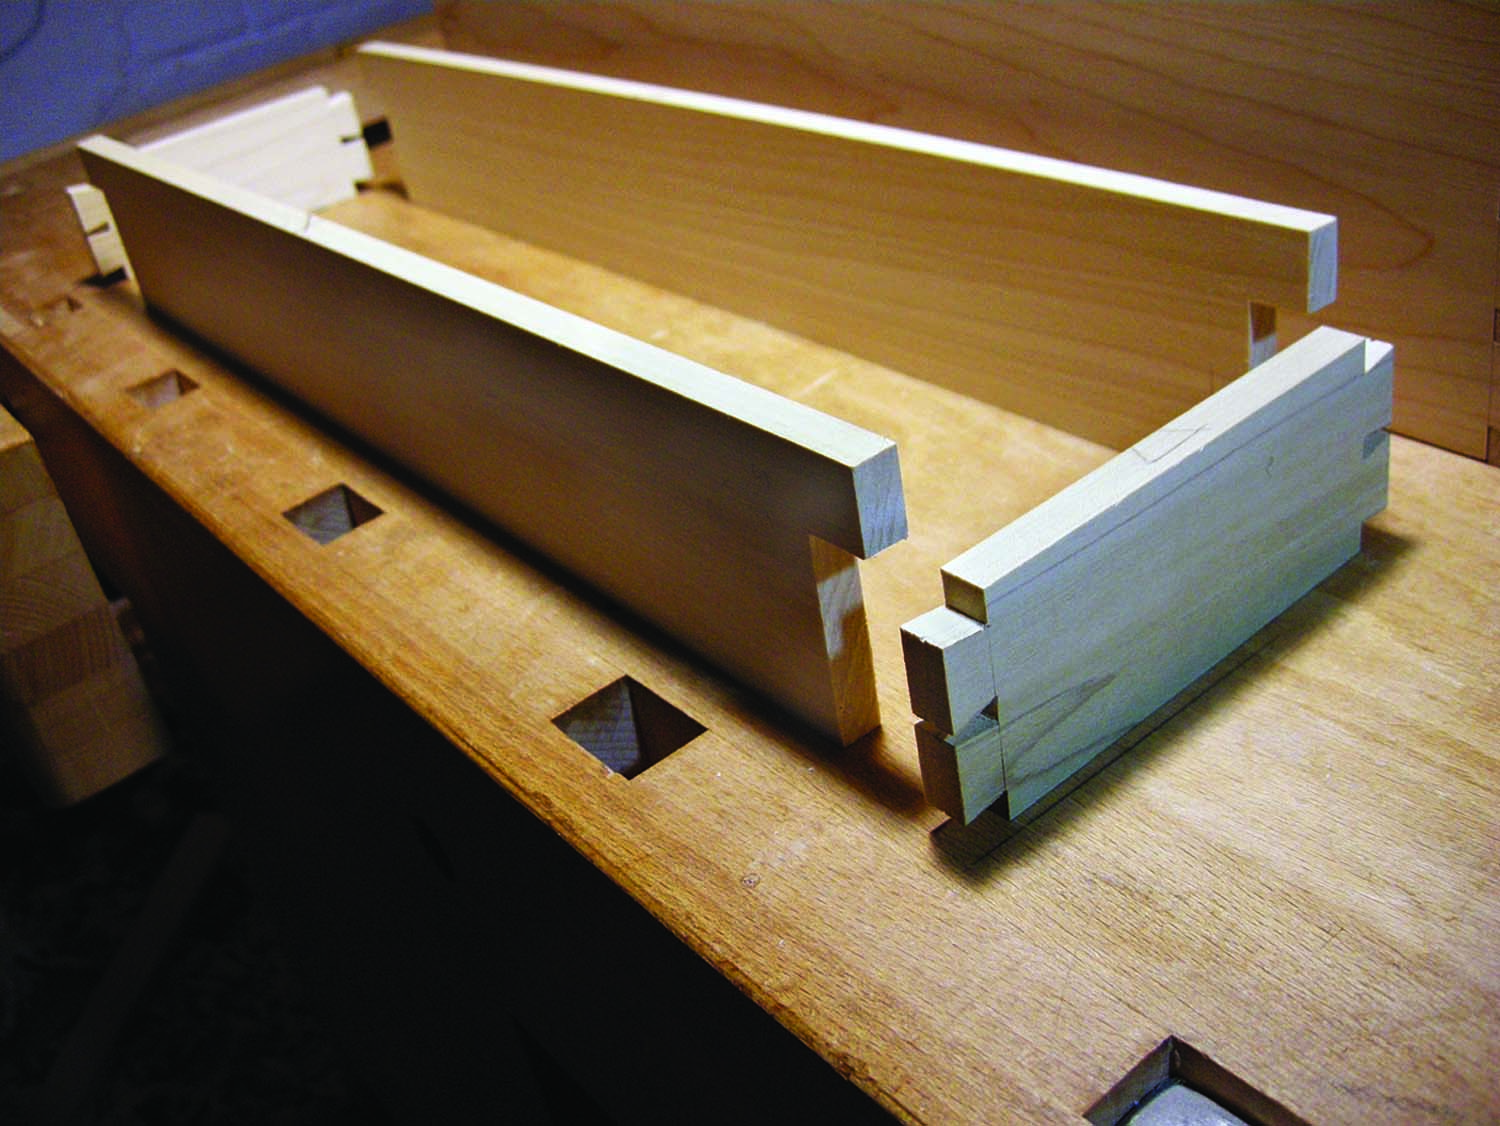
The front corner joinery will be through-dovetails; the back has a tenons housed in stopped dados. The sides will continue past the chest back, creating a kind of shelf location where two backsaws will live. Follow your through-dovetail procedure and lay out, cut and dry-fit the front to the side pieces.
To create this “staggered” or “broken” dovetail pattern, I laid out the entire width of the pieces as per normal, then simply refrained from cutting out the center tail after marking. When you scribe the tail board over to the pins, it’ll be business as usual. This break creates some visual interest and actually saves you time in construction! If all is well in dovetail land we can disassemble, mark and scribe the interior dado to house the back-panel tenon.
A bit of choice. You can use a bit and brace to remove the majority of the waste in a dado.
Once I have the bulk of the waste removed I like to take my Japanese Dozuki, (yes, I said pull saw … this is one application where a Western-style saw would not be appropriate) and by laying the saw plate in the narrow shoulder of the stopped dado, draw the saw back toward me to begin establishing the depth of the dado. Again this is just something I like to do to help with tear-out and could easily be accomplished with a wide chisel.
Once you get close to your finished depth, remove the rest of material with the mortise chisel. Clean up the bottom with the router plane and call it done. In the outside edges of the toolbox back, cut a corresponding tongue or tenon with either a skew block plane or rabbet plane. Another dry fit and we’ll cut the stopped dados for the bottom panels.
Clean up. A router plane completes the dado and cleans up the bottom.
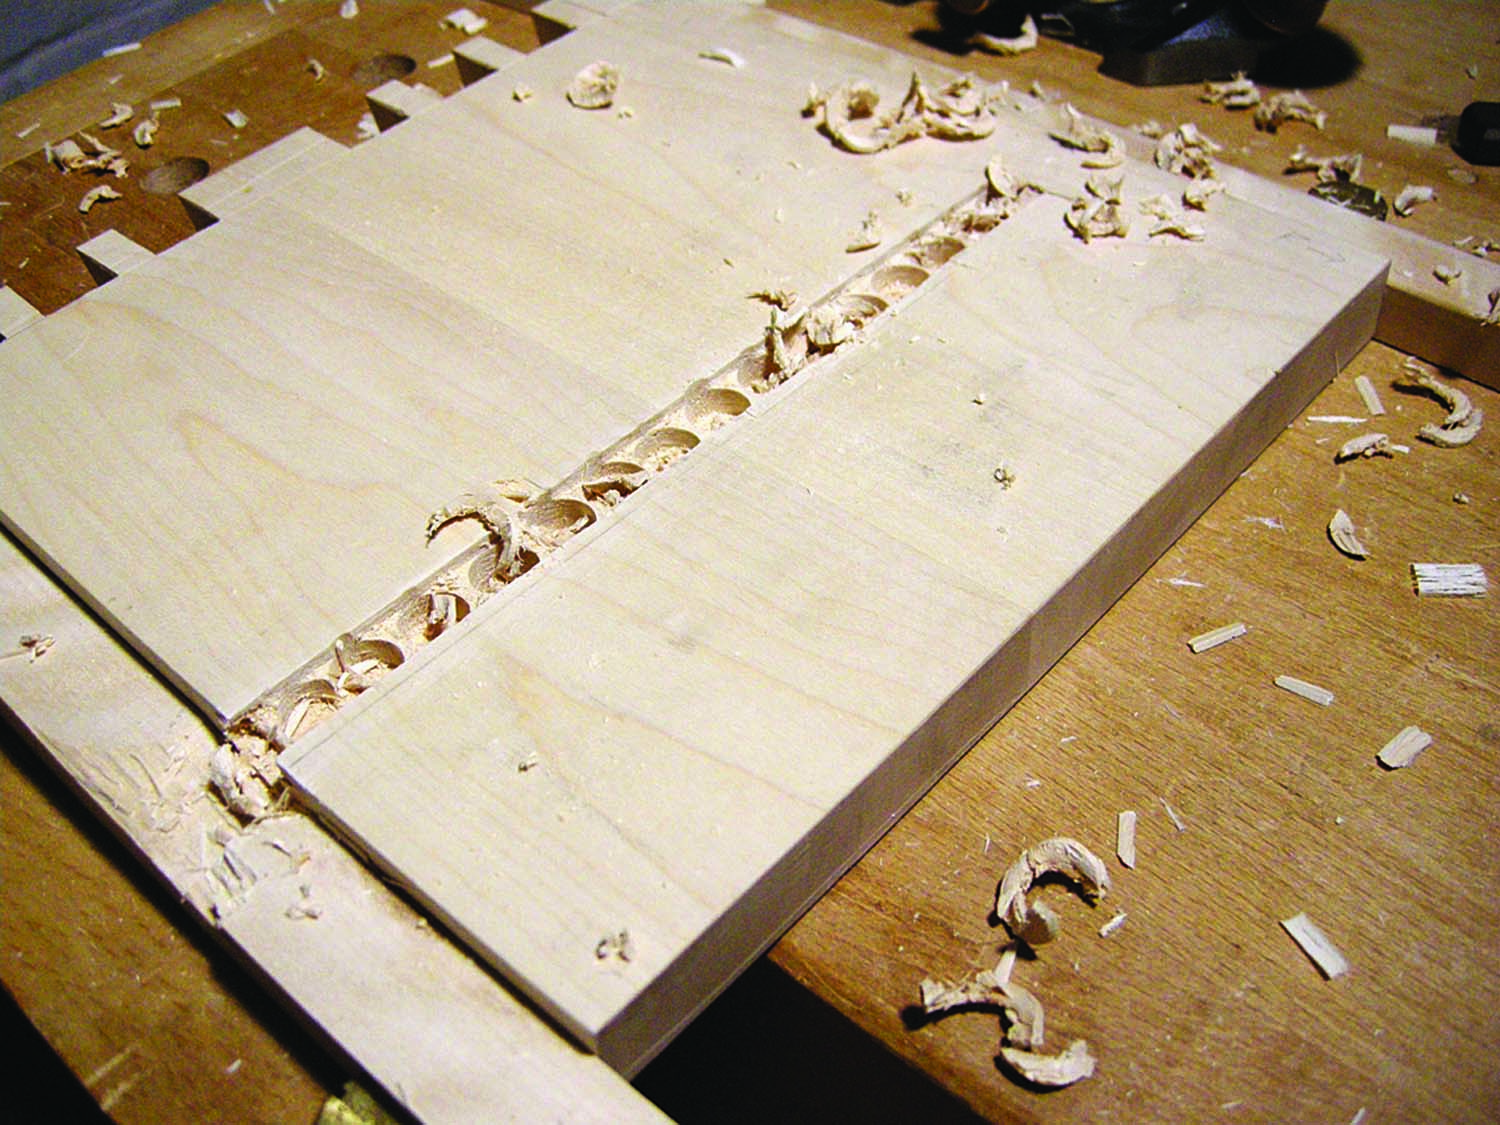
Because we’re using through-dovetails here, the bottom dado needs to be stopped so it doesn’t show up in the outside end grain. You could let it (this being a toolbox) but I’m going to take the extra steps to cut stopped dados. Lay out the dado and starting at one corner, chop out the waste by hand. This will give the end of your plow plane somewhere to go when beginning. Now with my plow plane, I can safely cut the dado.
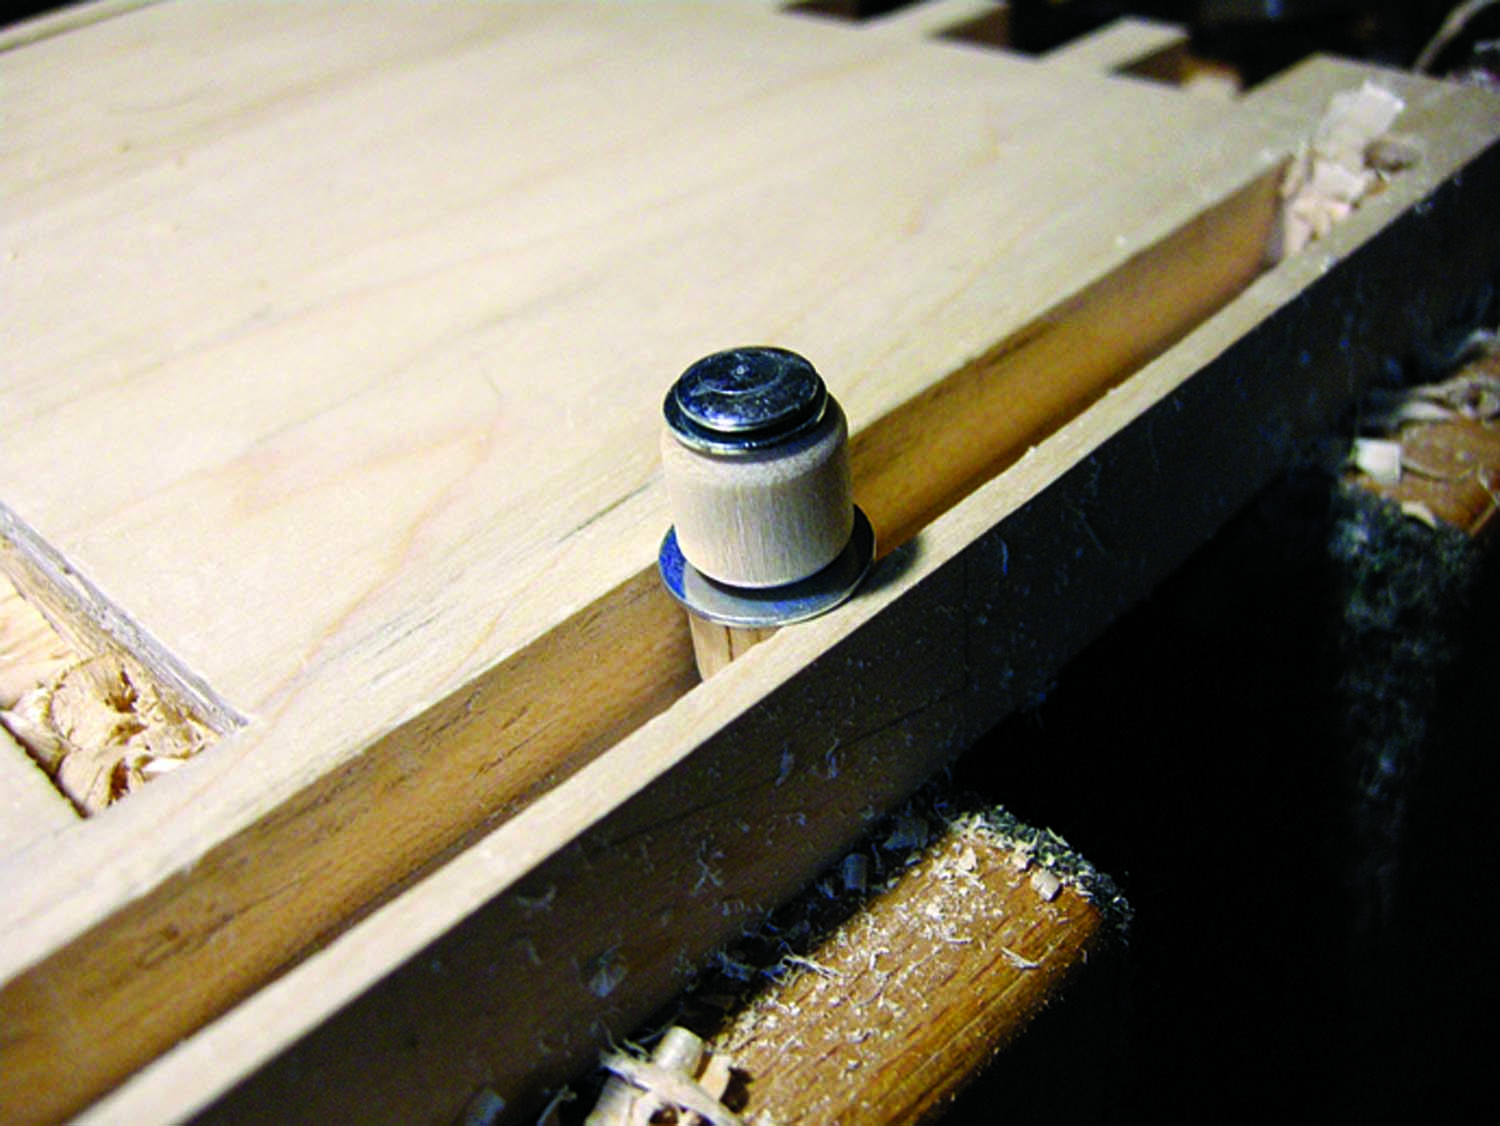
I purchased these “Roto” hinges years ago for a project and they were sold in a bag of six. I figured they’d come in handy someday and this lid design is the perfect application. Make sure the dado is deep enough to let the hinge travel its full distance. Cut the lid to size and drill the corresponding holes. A dry-fit and test-run will be next.

Roto hinge. A Roto hinge will hold the top lid in place and allow it to travel freely, holding it in place again at the back while in the open position.
Once the lid travels past the back panel it’ll swing down to rest in the vertical position.
Interior Components
Before I disassemble I’ll measure, cut and fit the interior cleats that will hold the till inside. This is also a good time to double-check the size of the bottom panel and mark out the dovetail for the back stretcher.
Assemble the pieces needed for the till. I used some poplar, and this lightweight wood will help to keep the toolbox lighter. Cut the two side pieces to length then measure and cut out the shoulders that will hang off of the interior cleats. A nice snug fit here is what we’re after. It’ll be dovetailed shortly and when we trim our tails it will be shortened ever so slightly for a perfect fit.
Dado work ahead. You can see the lid stops at this point; I will disassemble the tool chest and lengthen the ‘L’ shaped dado so, when open, the lid will be flush with the top of the sides.
I’m using through-dovetails for the till but didn’t want to go through the trouble of cutting stopped dados for the bottom. This is kind of a neat method for through dovetail construction without having to go through the steps of stopped dados.
Till parts. Till components cut with the ends already dovetailed.
Assemble the till components. The two long sides are already cut to fit; now cut the two ends to size as well. Begin on the ends with laying out and cutting the tails as you normally would do for any dovetail.
The next step is where this method differs from usual. Take the two short ends and cut the groove for the till bottom. Now before we go ahead and scribe the thickness of the ends onto the two long pieces, we’ll rip the sides off at the tails at the same depth as the newly cut dado, creating a thinner version.
Ready to move on. The end pieces are now ready for the next step.
Next, with our tails ripped and crosscut to width and the waste removed, we can go ahead and transfer this new thickness to the long sides of the till. Once scribed we’ll transfer the tails over to the pin board using our usual methods.
With the tails scribed, cut out the pins. Now we don’t have to worry about the dados showing on the outside of the till. Cut the dado to the full length of the front and back till components.
Measure and cut the till’s bottom panel. It’s also a good time to round over the top edges of the till sides and drill for the dowels which get set into the inside ends. These will act as handles and will make it much easier to pick the full till up from inside the tool chest. A dry fit and we’re ready to glue. I didn’t put any finish on mine, deciding to leave it in its natural state.
With the interior components completed I’ll measure, mark and cut out the dovetails for the back bottom stretcher.
This piece is also rabbetted using the same “no-stop rabbet” method of cutting the tail. Plow out the bottom-panel groove then rip the tail to width, essentially cutting off the groove’s shoulders. Scribe the tail to the side panels and cut the sockets. I decided to add a decorative bead to the stretcher as well as the top and bottom of the front panel.
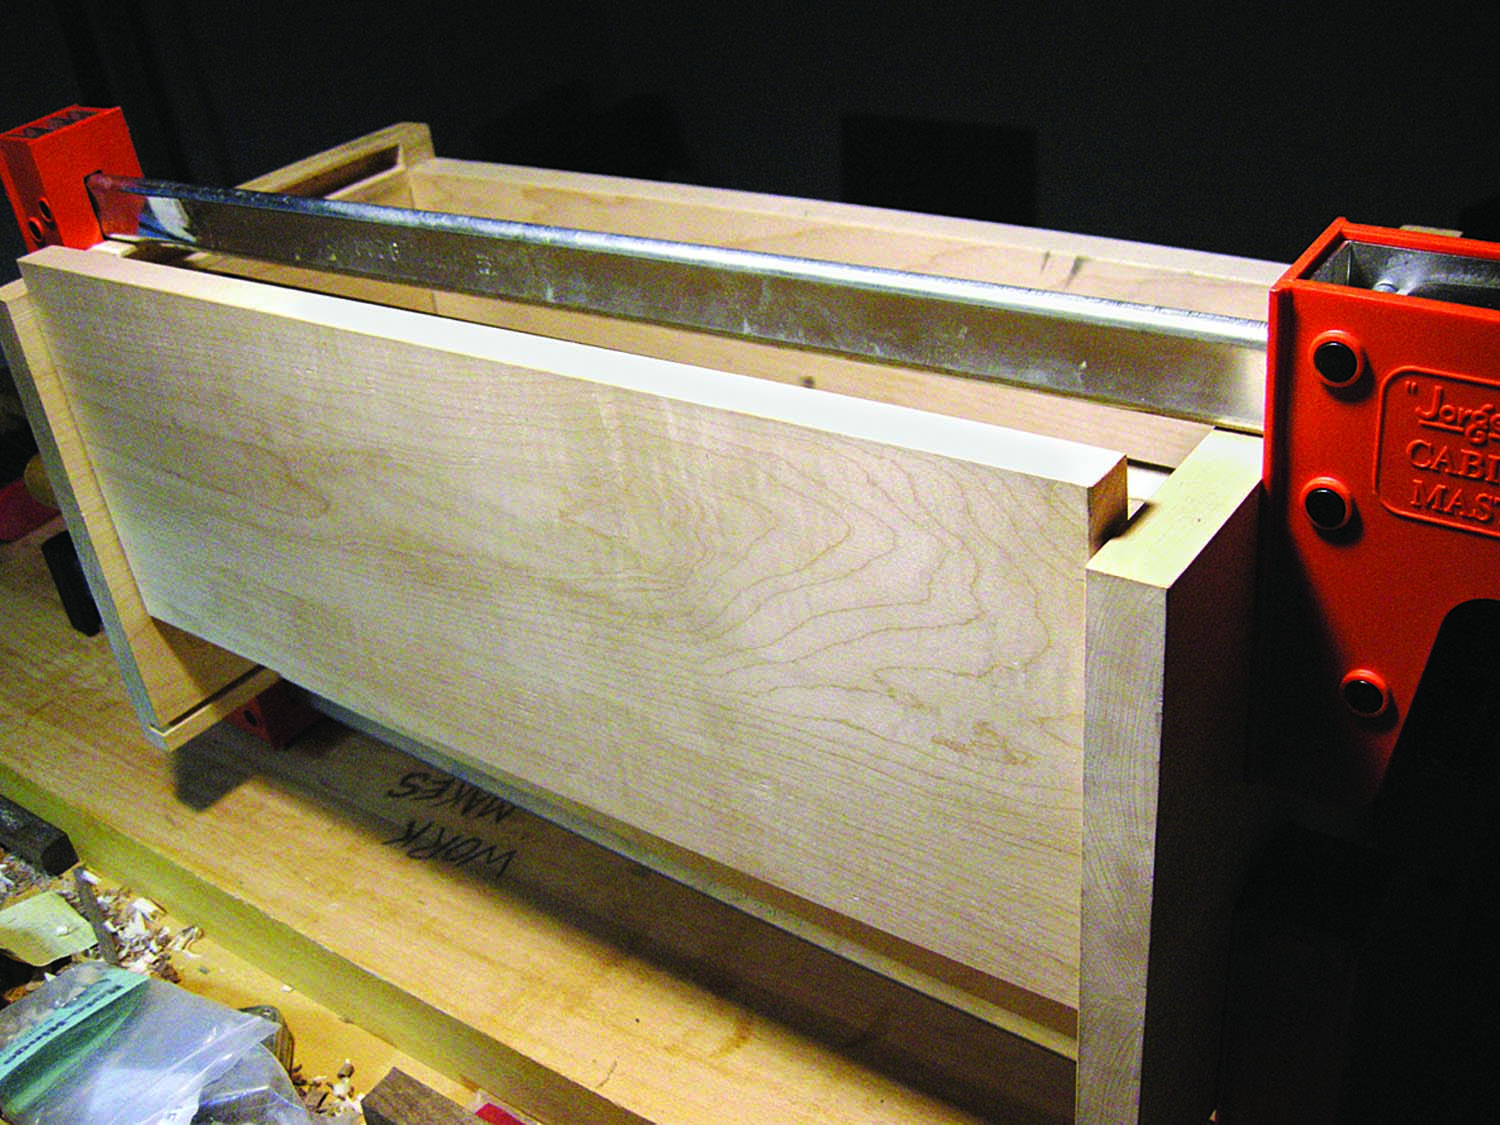
Measure and cut the bottom panels and give everything another good going over. With that, it’ll be time to spread some glue.
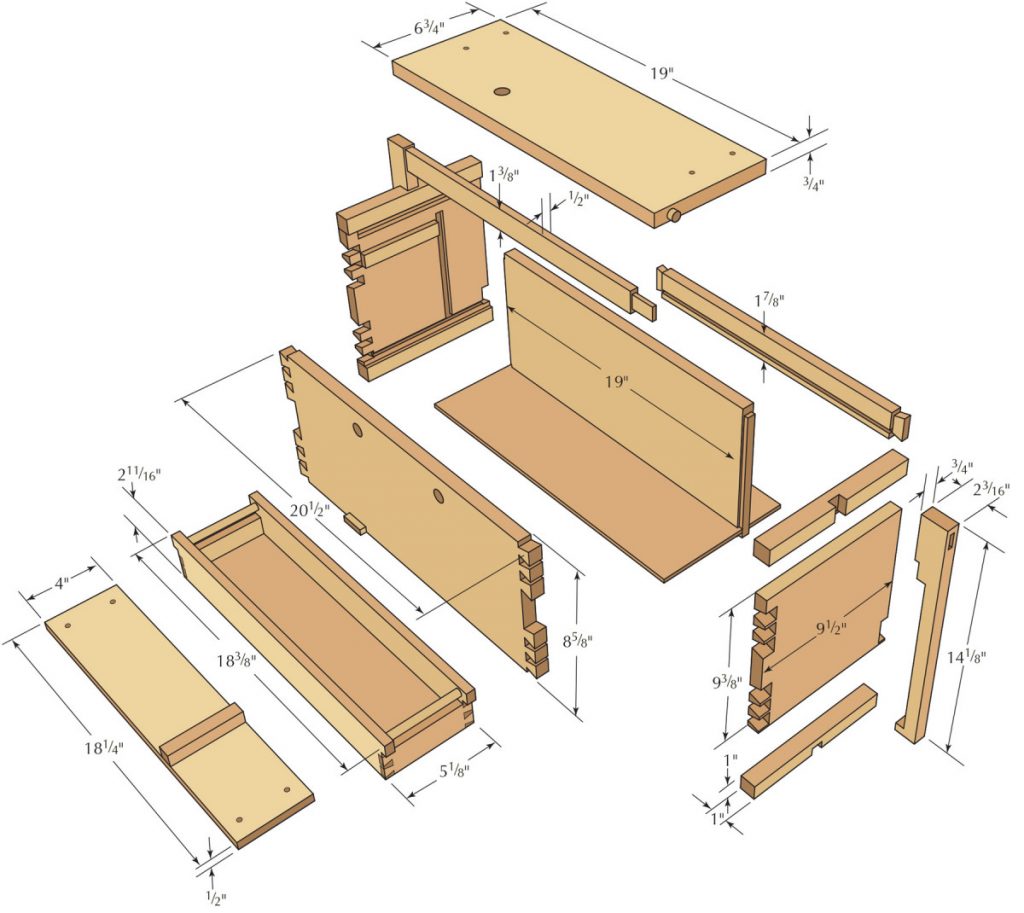
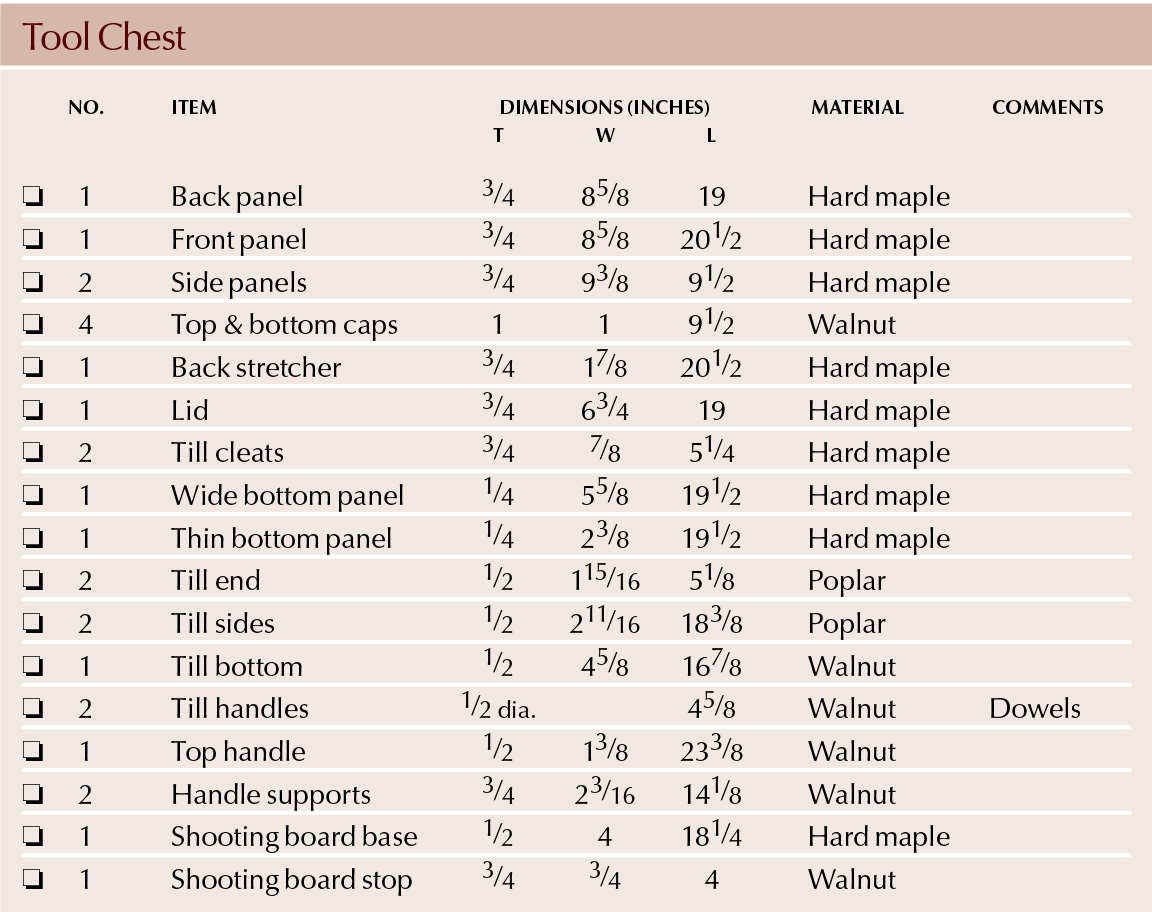
Cutting List
Exterior Frame and Handle
I used some walnut offcuts and built a kind of cradle that will capture the ends and transfer the weight through the handle, down the sides and underneath, to help pick up some of the weight of the finished toolbox.

Ready for assembly. The frame components are now ready for assembly.
With two bottom runners cut to length, I’ll cut and chisel a small open mortise that will house the stub tenon at the bottom of the two side uprights. This will be glued and screwed using some cast-bronze screws left over from my boat-building days. This type of hardware is great for any application that may see moisture, such as the bottom of a tool chest.
When all of the handle joinery is to your liking, disassemble and give everything a good going over with a smoothing plane. Glue and re-assemble. When the glue is dry, I’ll drill and install some dowels through the tenons and runners to lock everything in place for good.
Backsaw Holders
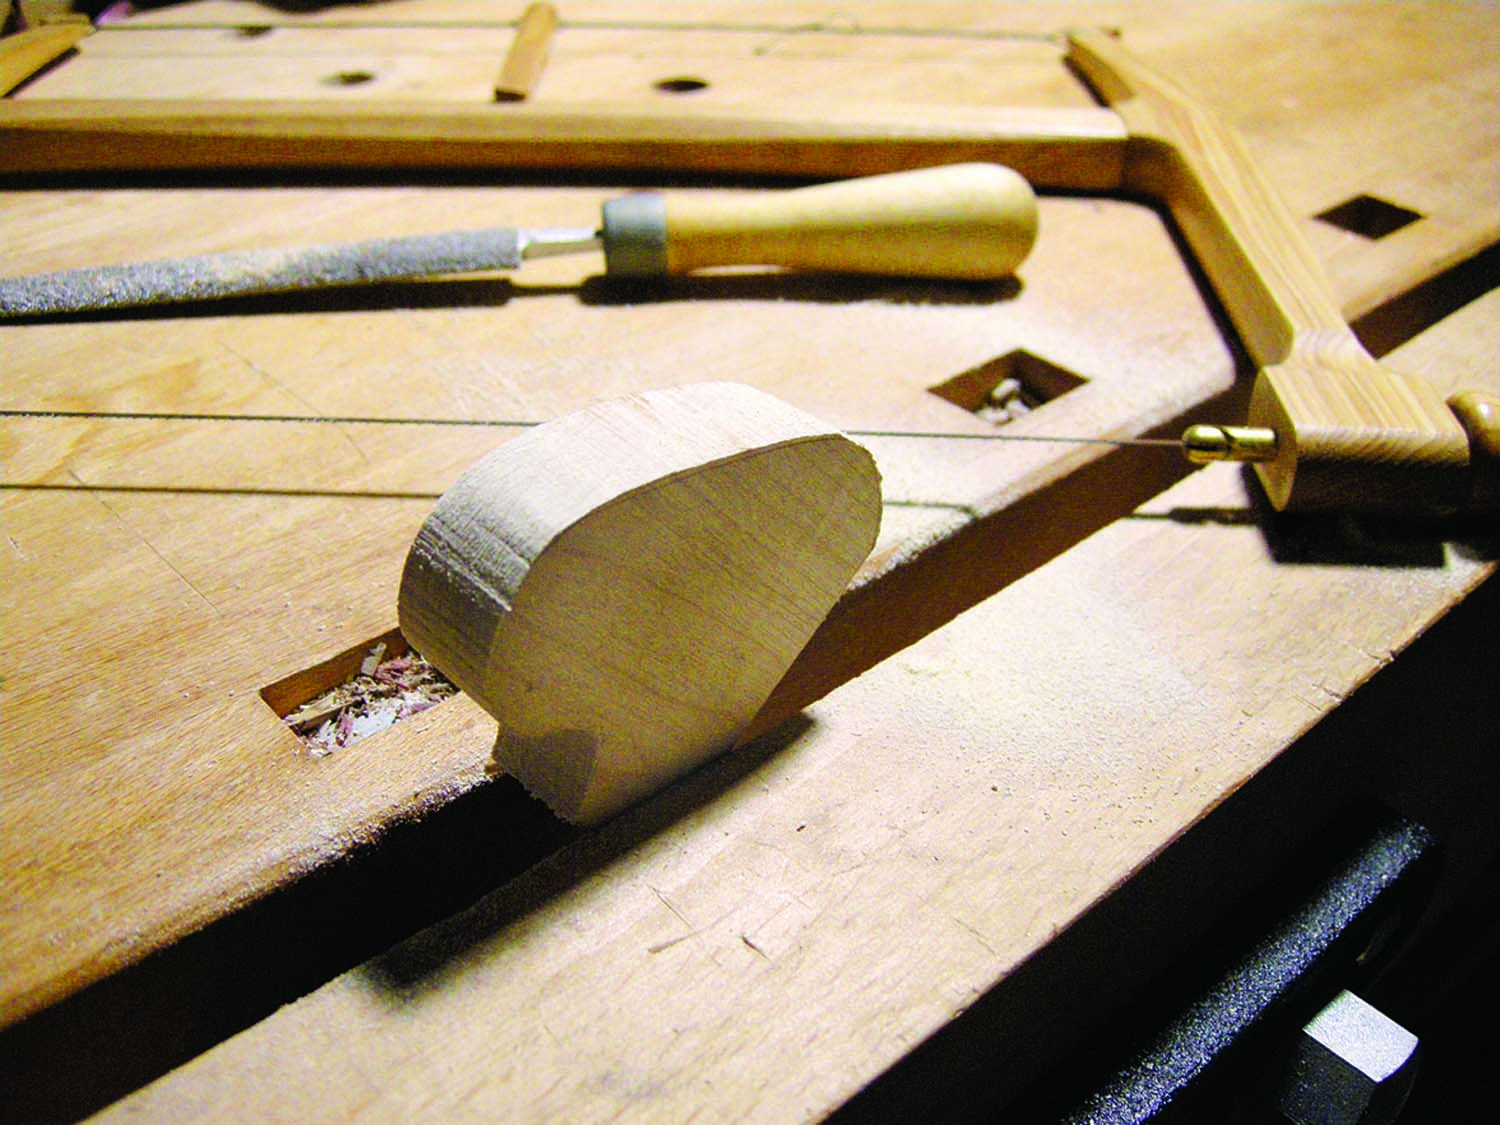
Trace. Here, I’m shaping one of two cleats that will become back saw holders. These were simply traced from my hand saws and cut out.
The backsaw holders are cut from maple scraps. I used my bowsaw to shape them and some file and rasp work to finish. These will be screwed to the back along with a small block holding two inset rare earth magnets. The backsaws simply fit over the custom-shaped cleats and grab the magnets, which holds everything in place for our adventures on down the road.
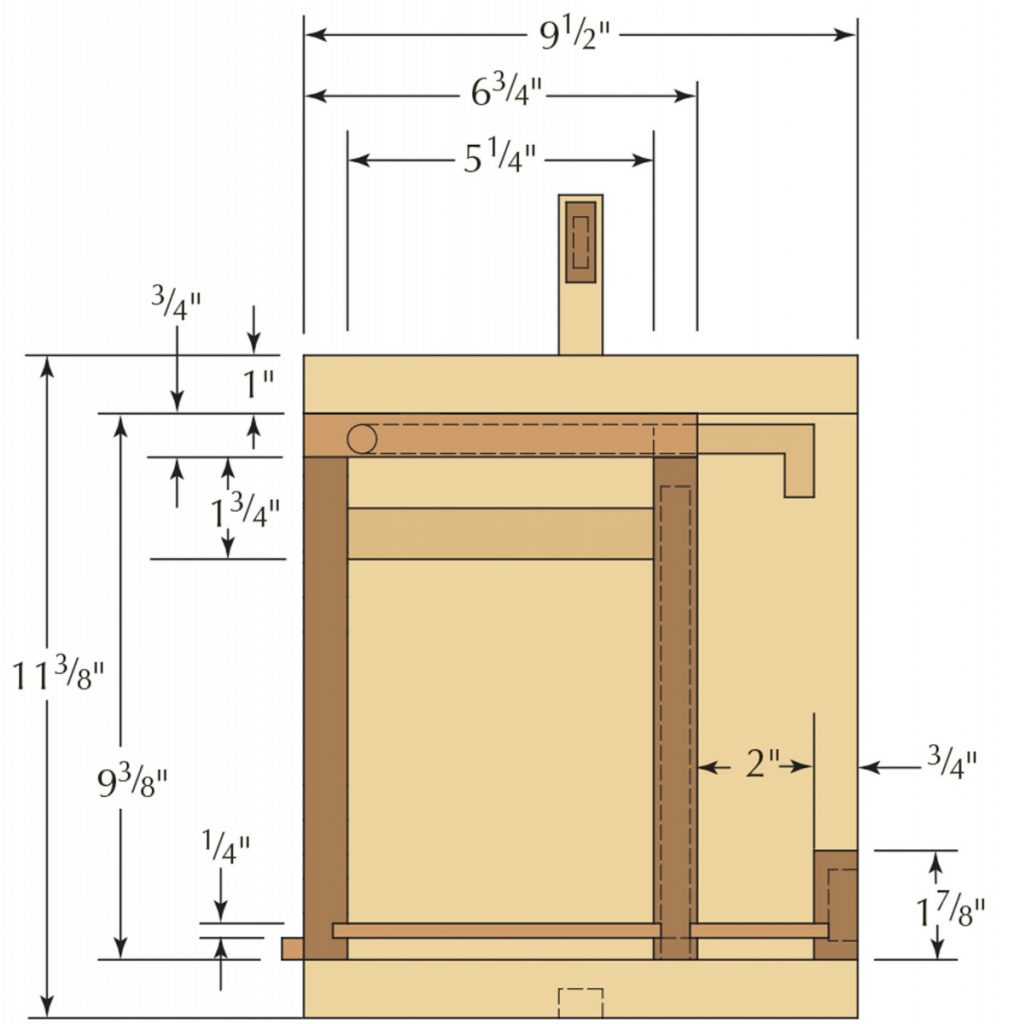
When we get to our destination, we need to hold our work. Anyone who’s been at a client’s home trying to saw a board or dress an edge on their kitchen counter or coffee table will know this is awkward to say the least. We’ll make some custom benchtop appliances suited for this scale of work.
Once at our jobsite the first thing you’ll do is clamp the tool chest to a table or countertop … this is done with our two wooden cam-clamps that will live in front of the backsaws on our rear panel. A couple of little blocks glued in place will be plenty enough to hold them while en route.
Now onto the lid and front. Drill a few 3⁄4” holes in your nice new toolbox. Don’t worry, these will turn this pretty little tool chest into an on-site, tabletop workbench! The front two holes are used in conjunction with a surface clamp, bench dog or simply, a wooden dowel.
For vertical workholding applications I also cut and shaped a little shelf or lip that provides somewhere for the end of a board to sit while clamped to the front panel. This small maple shelf receives a rabbet and is then glued and screwed.

Field jointing. With the surface clamp in one of the front holes and a 3⁄4″ dowel in the other, I can edge joint a board up to 24″ long!
On-site edge jointing? Again, no worries. Clamp your workpiece horizontally into the left-side hole and rest the opposite end on a bench dog or dowel installed in the right side. This is why we clamped our box down when we began.
What’s that? An on-the-job shooting board attachment? Cool … Measure, cut and square up a thin piece of stock suitable for a shooting board. Drill and glue four dowels into the bottom corners and when the glue is dry, cut them so they’re in the 1⁄4” ballpark. Drill four corresponding holes into the top of the lid, giving these a nice countersink. The lid serves as the plane track.
The fence is screwed in place, up from the bottom; make sure it’s perfectly square to the ramp side. When you’re not using the board it can stay put there on top; when you need the surface lid space for other work-holding needs, it can be stored on the back shelf in front of the backsaws.
A mixture of oil and varnish for the outside and we can call this first project done. Congratulations, you now have somewhere to keep your essential, on-site hand tools and a great little workbench for out-of-shop work.
Tom is a hand-tools only, Toronto-based custom furniture maker. This story was excerpted from his new book, “Made by Hand” (Popular Woodworking Books), which is available at WoodworkersBookShop.com.
Here are some supplies and tools we find essential in our everyday work around the shop. We may receive a commission from sales referred by our links; however, we have carefully selected these products for their usefulness and quality.


There are a couple of things I do not understand about your nice looking tool box.
1. I see the Roto-hinge in the drawing, but it looks like it is installed at the bottom of the front cover. How do you keep the top of the cover in place when in the closed position?
2. I do not see or understand how you use the Cam Clamps to hold your tool box down to any surface, nor do I see those in the drawings in this article.
Is there a more extensive/inclusive set of plans available? I would like to obtain a set if so, and I’ll stick those on a back burner until I gain a bit more experience before attempting a build of this toolbox.