We may receive a commission when you use our affiliate links. However, this does not impact our recommendations.
 Store office necessities in style.
This handsome little cabinet just might solve the universal problem of never having enough drawer space. Small enough to tuck under a desk, it’s also designed to stand on its own, and its wide top can easily accommodate a printer or a fax machine.
You can build this cabinet in a weekend or two, because it’s made with simple joinery. The case assembles with biscuits and pocket screws, and the drawers go together with lock rabbet joints. There’s no fussy drawer hardware to install, just cut-in hand grips and screwed-on hardwood runners to guide the drawers.
Despite its simple joinery, this cabinet is very sturdy, and it can be easily altered. Make it taller. Change the drawer sizes. Add doors. And don’t let the “office” designation fool you—switch to MDF or Baltic birch to build a great shop cabinet.
Square and flat
Both the cabinet and the drawers must be perfectly square to allow the drawers to glide freely without binding. Make sure that your lumber is milled flat; ditto for your glued-up top and sides. Draw accurate layout lines and verify that your tool set-ups are square.
Build the cabinet
1. Milling and gluing solid wood for the sides and top does take a fair amount of time, so keep in mind that you can substitute edge-banded hardwood plywood for these parts, without compromising the integrity of the cabinet.
2. Joint and plane your stock to thickness. Then select and cut boards for the top (A, Fig. A) and the sides (B).
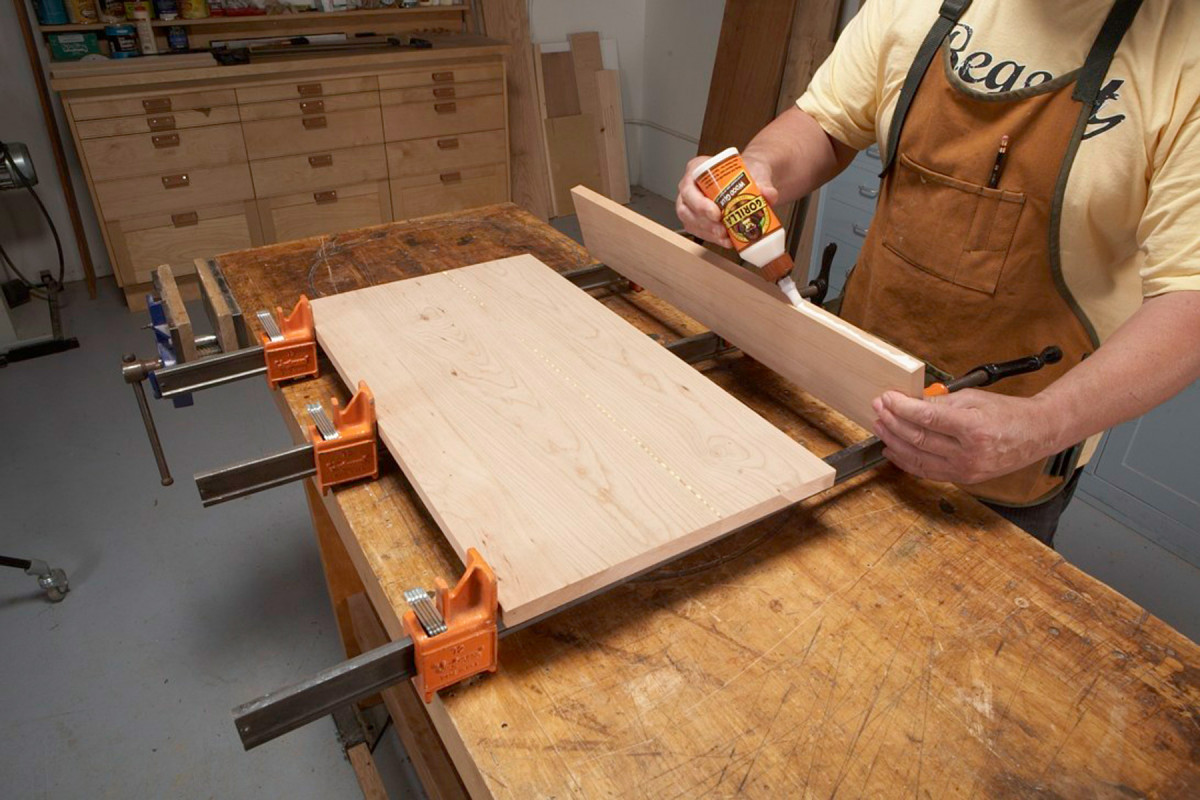
1. Glue up the panels for the sides and top. Work on a flat surface and glue the joints one at a time.
3. Glue the panels together. To keep the board faces flush, I glue the joints one at a time (Photo 1).
4. Trim the glued-up panels to final size. After trimming, stack the two sides, to make sure they’re identical in width, length and squareness.
5. Cut the side arches. Then finish-sand the sides and the top.
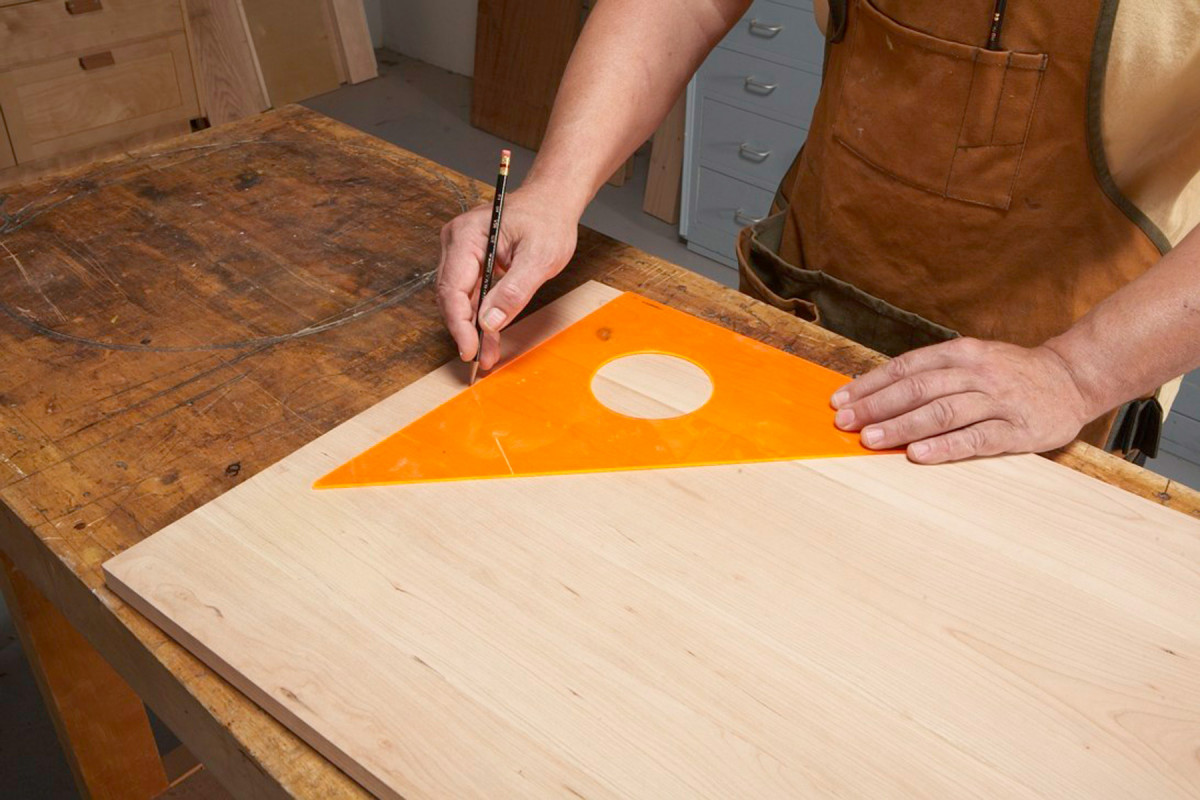
2. Mark the location of the sides’ inside edges on the top’s bottom face. Use a large square for accuracy.
6. Locate the sides on the bottom of the top (Photo 2). Make sure your layout lines are square to the front edge and parallel to one another.
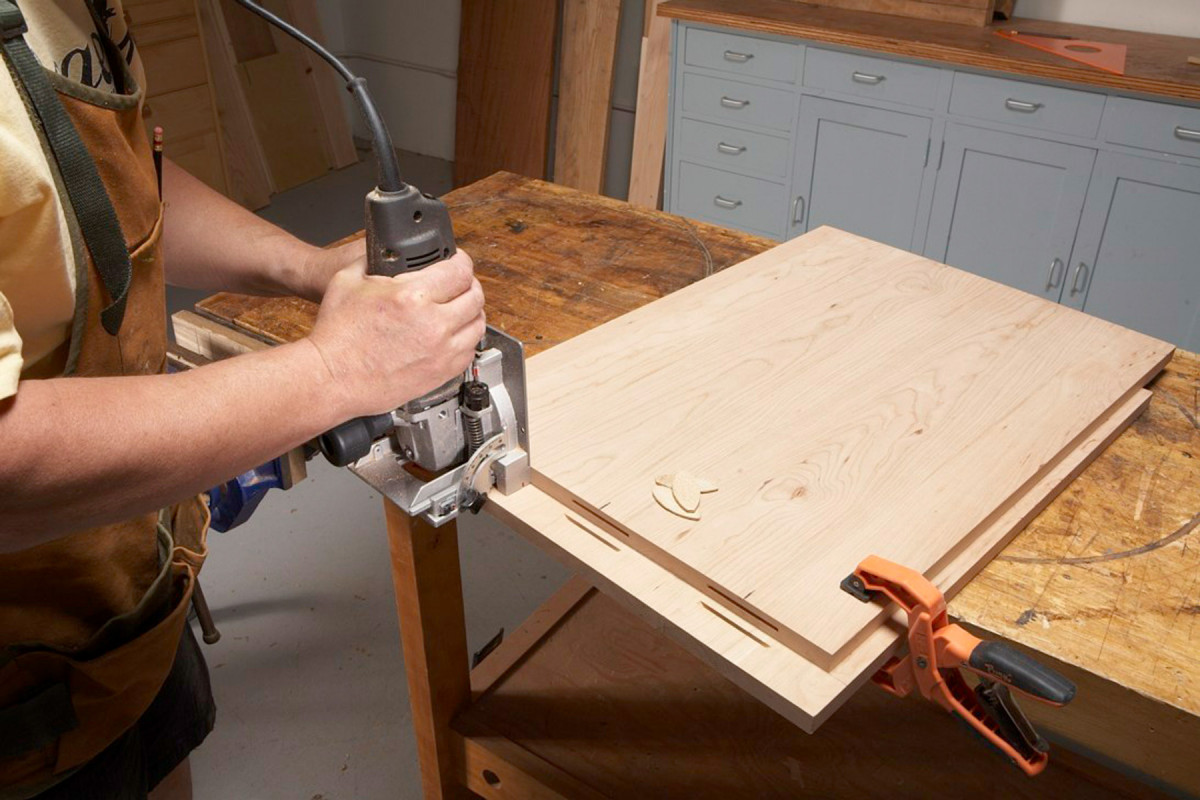
3. Cut biscuit slots in the top and sides. Then drill holes for pocket screws on the inside face of each side.
7. To locate the biscuit slots on the top and sides, clamp each side outside-face up to top’s bottom face (Photo 3). Align the side’s inside top edge with the layout line and make sure the back edges are flush. Cut the slots into the sides. Then stand the biscuit joiner on edge and butt it against the cabinet side to cut the slots into the top. Complete the other side in the same manner.
8. Drill pocket holes in the inside faces of each side, as shown in Fig A. The locations aren’t specific; center them between the slots and keep them at least an inch away from the outer edges. Drill pocket holes in the stretchers (C) at this time as well.
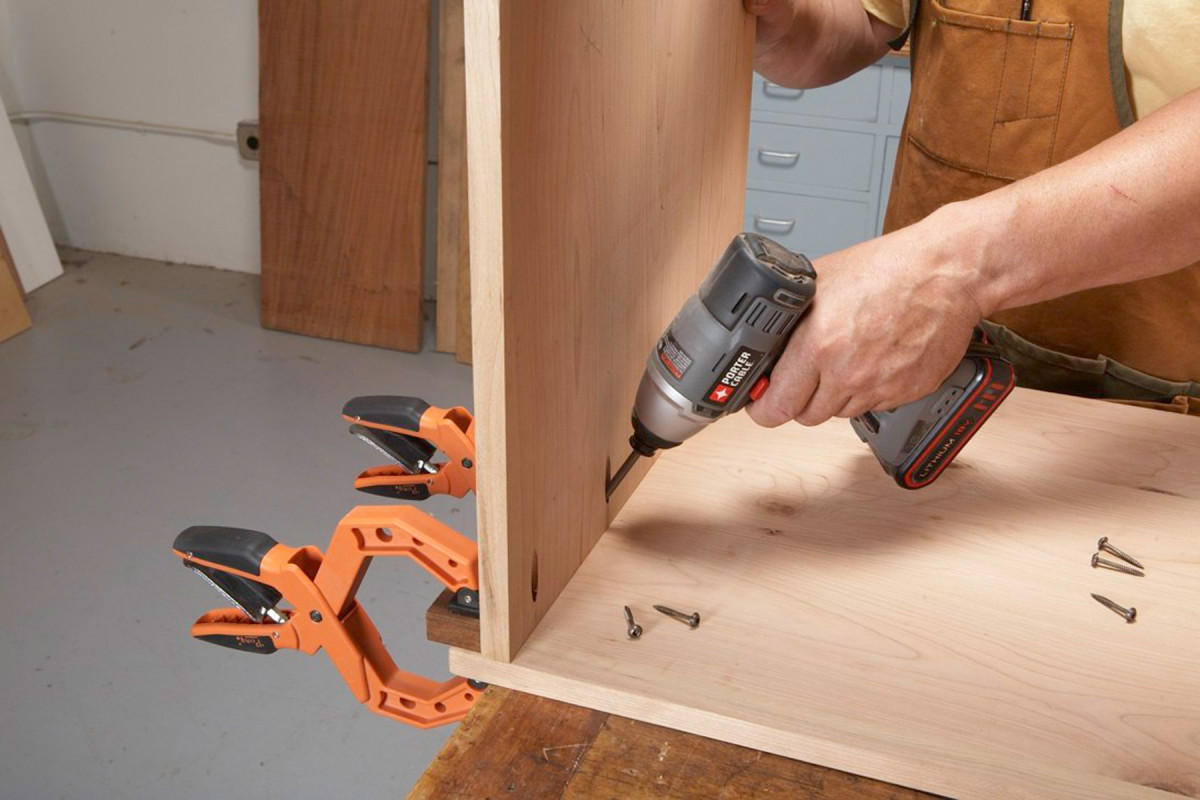
4. Fasten the sides to the top with glue, biscuits and screws. Clamp a fence to the outside edge of the top, to hold the side in position as you drive in the pocket screws.
9. To assemble each joint, glue biscuits in the slots in the top, spread glue into the slots in the side pieces, and screw the pocket screws through the sides into the top (Photo 4). Use a large square to make sure the sides remain square to the top as you drive the screws.
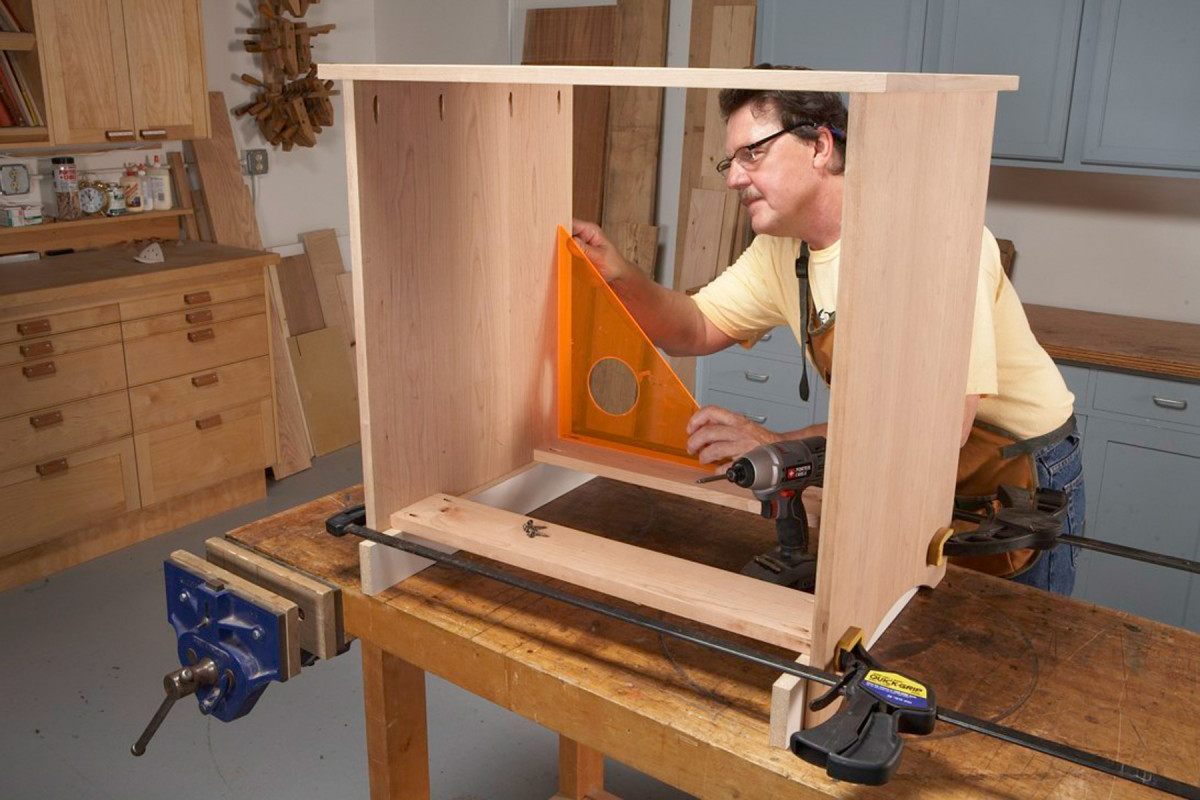
5. Use spacers and clamps to accurately position the stretchers, so you can drive the pocket screws. Frequently check the cabinet during assembly, to make sure it remains square.
10. Flip the cabinet over onto a flat surface and position 2-7/8″ wide spacers on the inside (Photo 5). Set the stretchers onto the spacers. Locate the front stretcher 1-1/8″ back from the front of the cabinet, and the back stretcher 1/4″ away from the back. Clamp the sides to the stretchers and then drive in the pocket screws.
Build the drawers
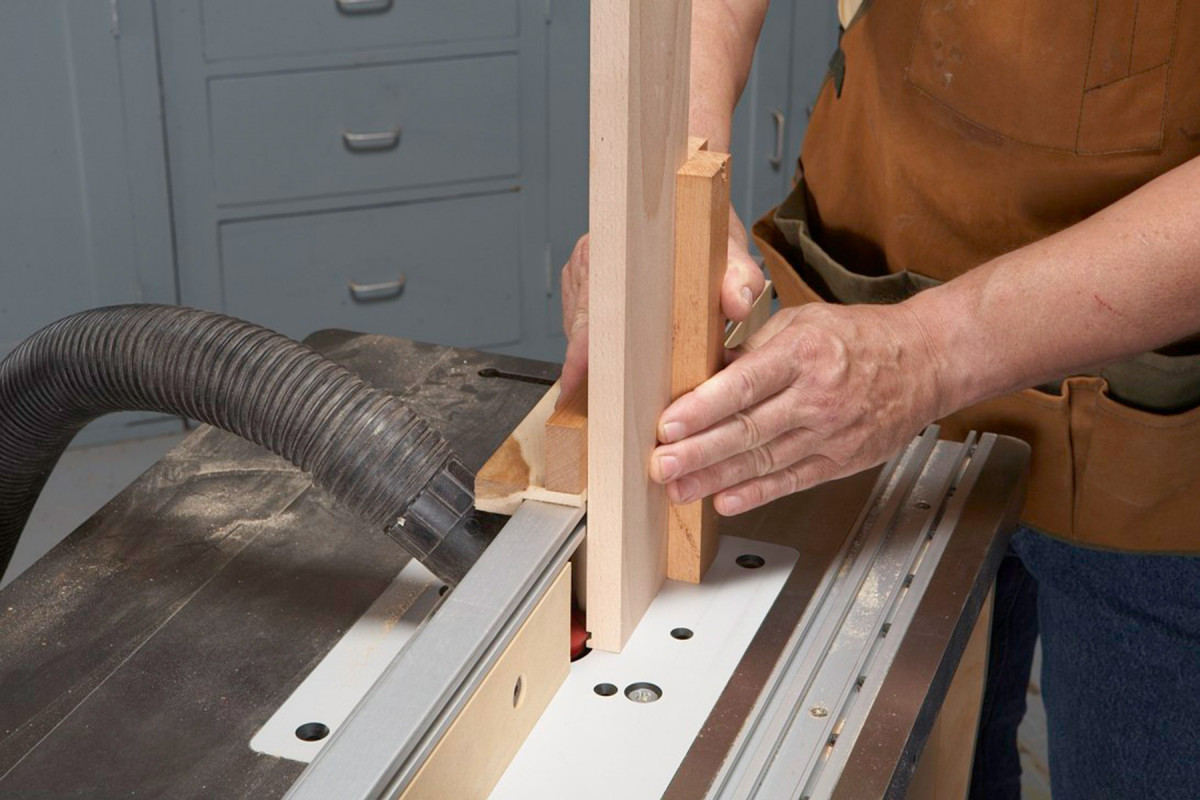
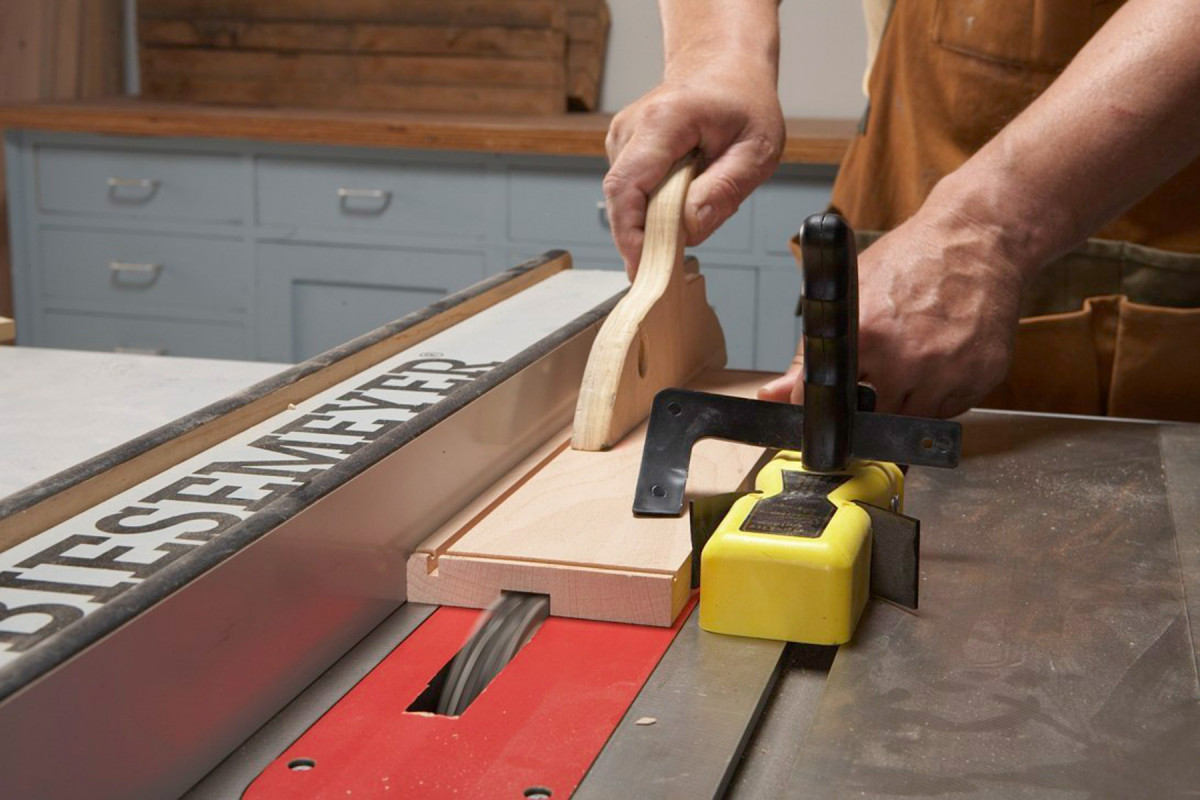
6. Use a drawer lock bit to create the drawer joints. First, rout both ends of each drawer side. A shopmade jig stabilizes the workpiece, holds it against the fence, and prevents blowout on the back edge.
11. Rip the drawer fronts, sides and backs (D through J) to width and then cut them to length.
7. Reposition the fence to shape the ends of drawer fronts and backs. Set the fence so the depth of the cut matches the thickness of the drawer sides.
12. Install a drawer lock bit in your router table and make test cuts in scrap stock to correctly adjust the bit’s height. (For complete how-to on using drawer lock router bits, visit www.AmericanWoodworker.com/DrawerLockBit or see “Lock Rabbet Drawer Joinery,” AW #92, Feb ‘02, page 60). Rout the ends of the drawer sides first (Photo 6). Then change the fence and rout the ends of the drawer fronts and backs (Photo 7).
13. Cut 1-1/8″ by 5-1/8″ hand grips in the drawer fronts and smooth the curves by sanding.
14. Cut a groove for the drawer bottom (K) in each drawer piece, starting 3/8″ from the bottom edge. These grooves always go on the routed face. Match the groove’s width to the thickness of your drawer bottom material. Cut six drawer bottoms to final size.
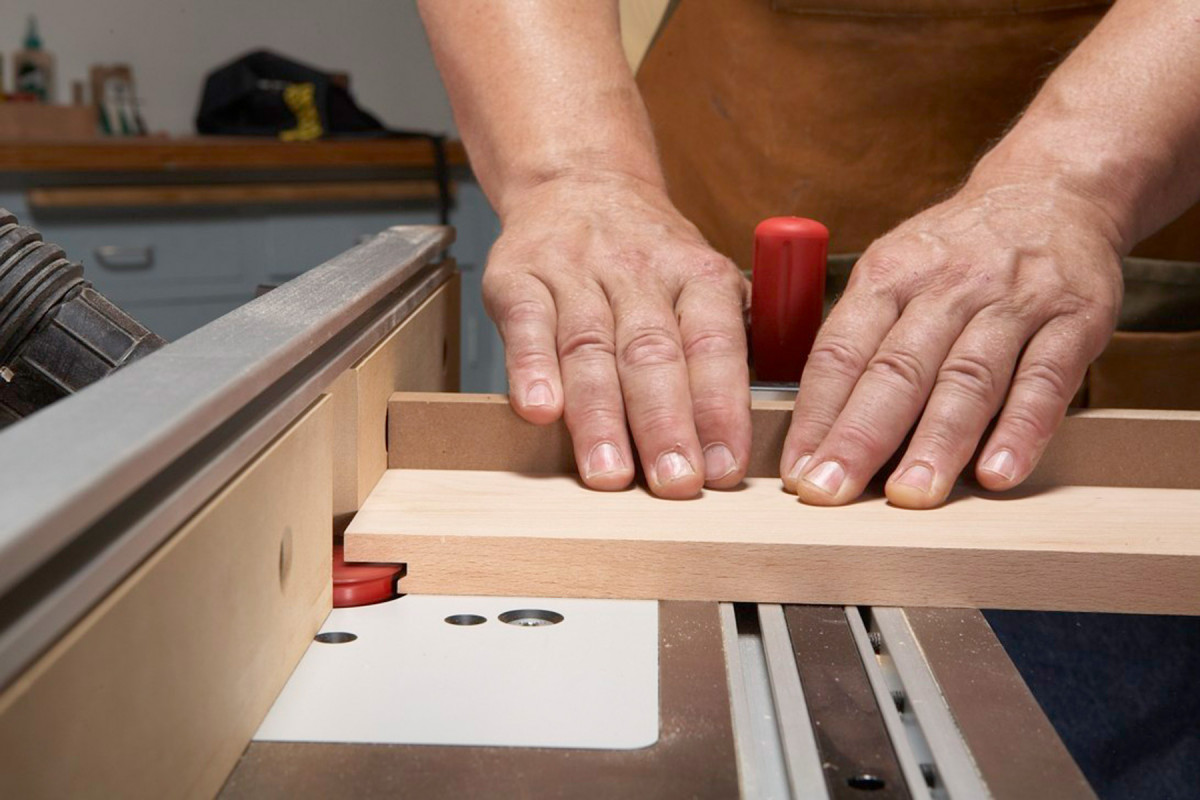
8. Saw the runner slot in the outside face of each drawer side. These slots will be used to mount the assembled drawer in the cabinet. Always orient the bottom edge of the workpiece against the fence.
15. Install a dado blade in your table saw and cut a 3/8″ deep by 3/4″ wide runner slot in the outside face of each drawer side, starting 1-1/2″ from the bottom edge (Photo 8).
Using the same setup, cut notches through the ends of all the drawer backs, so that the runner slots and notches align when the drawers are assembled. Install a tall auxilliary fence on your miter gauge to support the drawer backs when sawing these end grain notches. DO NOT cut notches in the drawer fronts.
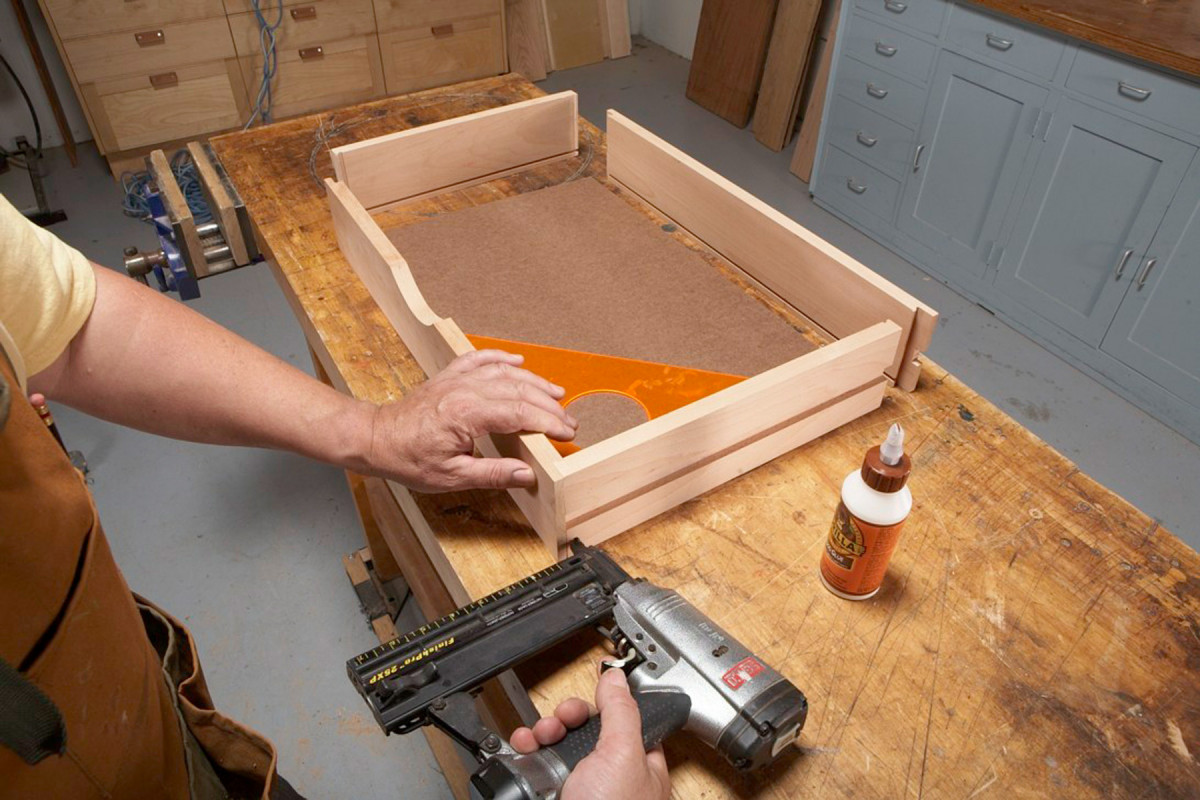
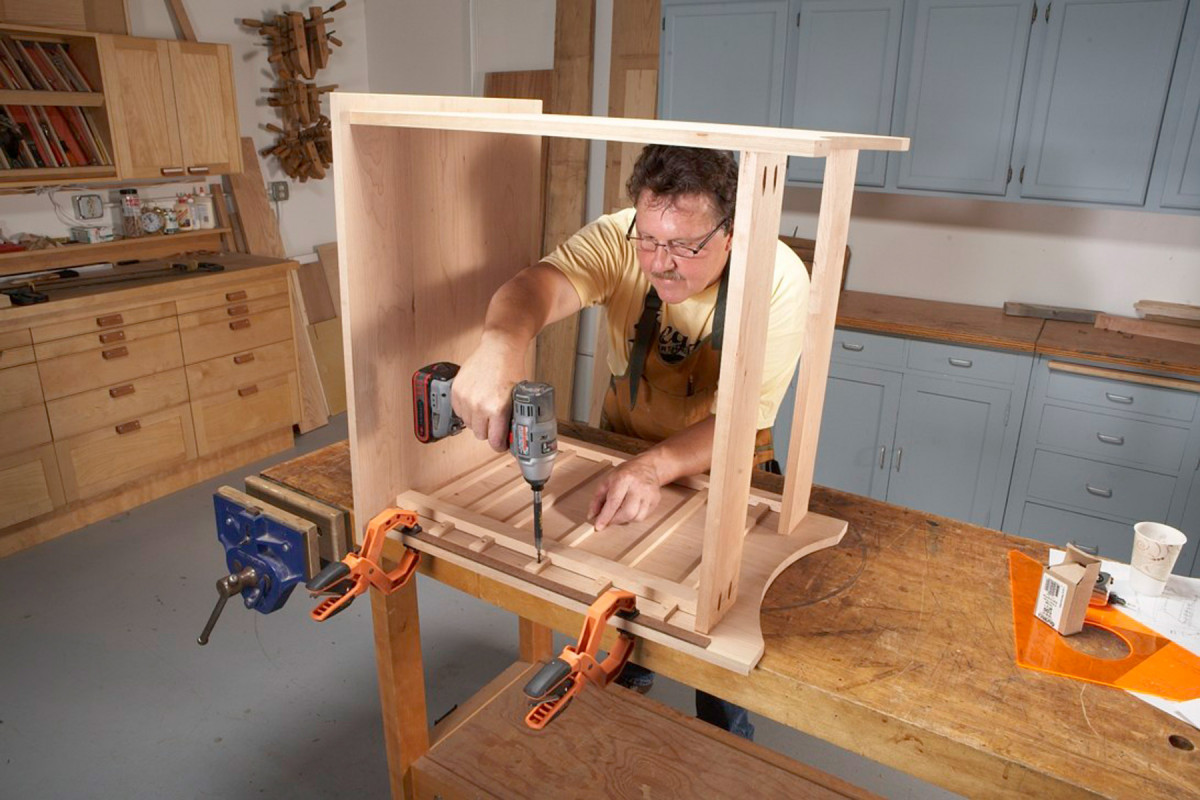
9. Assemble the drawers with glue and brad nails. Check each joint to make sure the drawer is square.
16. Assemble the drawers (Photo 9). Apply glue to each lock joint and run a bead of glue in the grooves to secure the bottom. Gluing in the bottom helps to keep the drawer solid and square. I find that it works best to glue and nail one joint, seat the drawer bottom into this corner assembly, and then add the remaining parts. I check to make sure the drawer is square, and then nail the remaining three joints. Brad nails effectively clamp the joints while the glue dries, but if you don’t have a brad nailer, simply clamp the drawers and make sure they’re square before setting them aside to dry.
Office Cabinet Cut List
Overall Dimensions: 27″ H x 28-1/4″ W x 19-3/4” D
|
Part |
Name |
Qty |
Material |
Th x W x L |
|
A |
Top |
1 |
Cherry |
3/4″ x 19-3/4″ x 28-1/4″ |
|
B |
Side |
2 |
Cherry |
3/4″ x 19″ x 26-1/4″ |
|
C |
Stretcher |
2 |
Cherry |
3/4” x 4” x 24-3/4” |
|
D |
Small drawer front |
3 |
Cherry |
3/4″ x 3-1/8″ x 24-5/8″ |
|
E |
Small drawer back |
3 |
Beech |
3/4″ x 3-1/8″ x 24-5/8″ |
|
F |
Small drawer side |
6 |
Beech |
3/4″ x 3-1/8″ x 16″ |
|
G |
Large drawer front |
3 |
Cherry |
3/4″ x 4-1/8″ x 24-5/8″ |
|
H |
Large drawer back |
3 |
Beech |
3/4″ x 4-1/8″ x 24-5/8″ |
|
J |
Large drawer side |
6 |
Beech |
3/4″ x 4-1/8″ x 16″ |
|
K |
Drawer bottom |
6 |
Hardboard |
1/4″ x 15-3/4″ x 23-5/8″ |
|
L |
Drawer runner |
12 |
Beech |
7/16″ x 23/32″ x 17-3/4″ |
|
M |
Runner support |
2 |
Beech |
3/4″ x 1-1/4″ x 22-5/8″ |
|
N |
Back |
1 |
Hardboard |
1/4″ x 24-3/4″ x 23-3/8″ |
|
P |
Apron |
1 |
Cherry |
3/4″ x 3-5/8″ x 24-3/4″ |
|
Q |
Top cleat |
1 |
Beech |
3/4″ 1-1/4″ x 23-1/4″ |
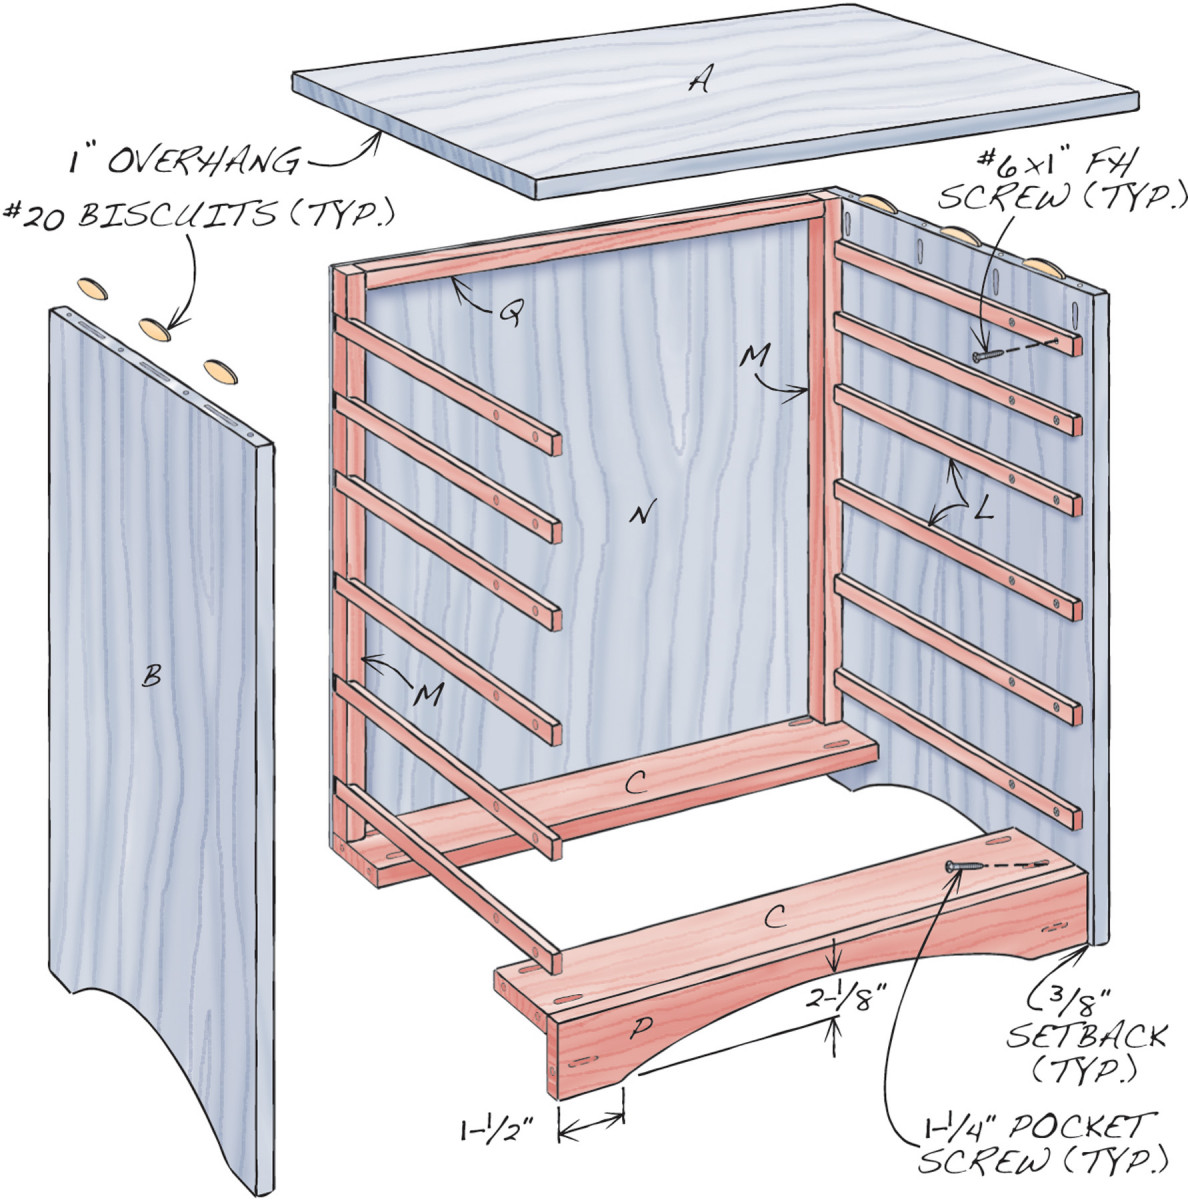
Fig. A) Exploded View
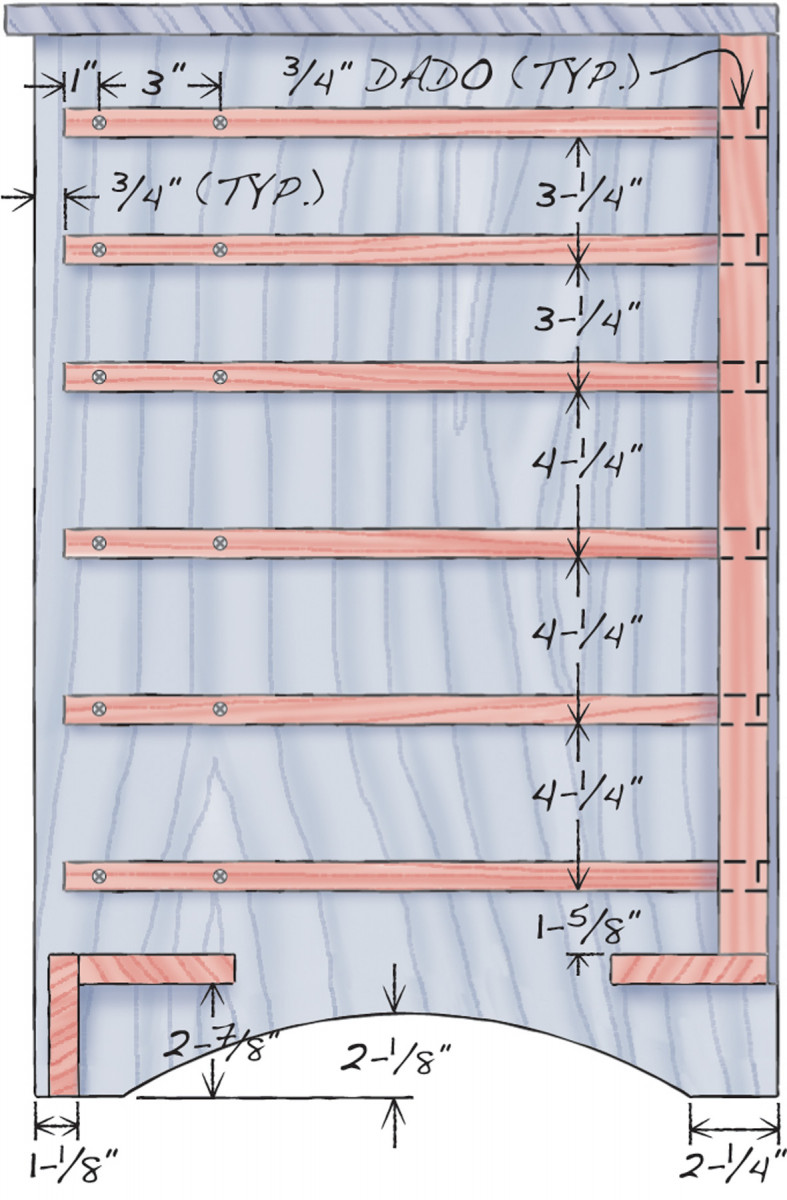
Fig. B) Drawer Runners and Supports
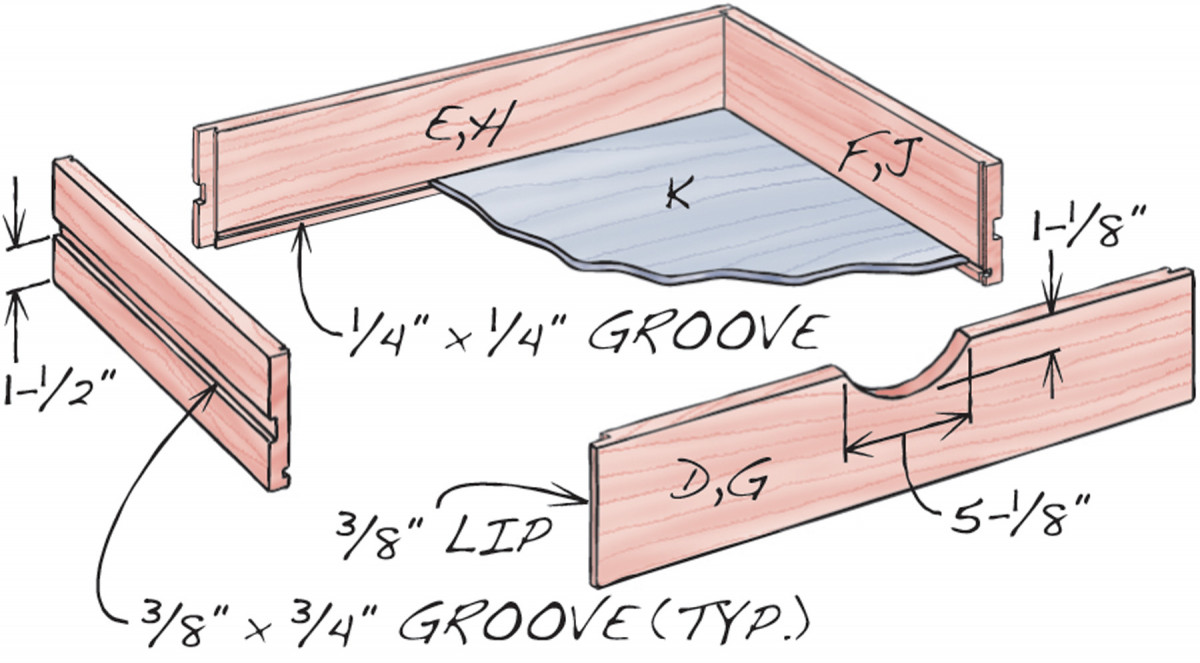
Fig. C) Drawer
Build and install the drawer runners
17. The drawers slide on runners (L) installed inside the cabinet. For the drawers to operate smoothly, these runners must be correctly located and precisely sized. The first step is to make supports (M) that will automatically position the runners. Two of these supports will be permanently installed inside the cabinet (one on each side, at the back), to allow for the solid wood’s seasonal movement. Start with a 6″ x 22-5/8″ board (it should fit snugly inside the cabinet, between the bottom stretcher and the top). Using the dimensions in Fig. B, and measuring from the bottom to the top, lay out the six 3/4″ dadoes that will house the runners. Raise the dado set to 13/32″ and cut the dadoes, using your miter gauge.
18. Rip the dadoed board into three or four 1-1/4″ wide pieces to create the runner supports. Mark the bottom end of each piece, for reference.
19. Mill the drawer runners and test their fit in the drawers’ runner slots—the runners must slide freely. If the fit is too tight, shave a bit from the runners’ width.
10. Use supports and a spacer to accurately position the drawer runners for fastening. Make the supports by cutting dadoes in a wide board and then ripping it. The spacer establishes the drawers’ setback at the front.
20. Tip the cabinet on its side and clamp a 3/4″ wide spacer flush with the front edge (Photo 10). This spacer positions the runners so the drawers will be slightly recessed inside the cabinet.
21. Position a pair of runner supports between the cabinet top and the stretchers. Fasten the rear support to the cabinet side, 1/4″ inside the back edge (flush with the stretcher), to allow room for the cabinet back (N). Slide the runners through the supports’ dadoes and butt them against the front spacer. Fasten the front end of each runner with two countersunk screws. Then remove the front runner support. The back ends of the runners are held in position by the permanently installed support. Tip the cabinet onto its other side and install the remaining runners.
22. Cut and fit the front apron (P). Drill pocket holes in the back and cut the arch at the bottom. Glue and clamp the apron to the front stretcher and install the pocket screws.
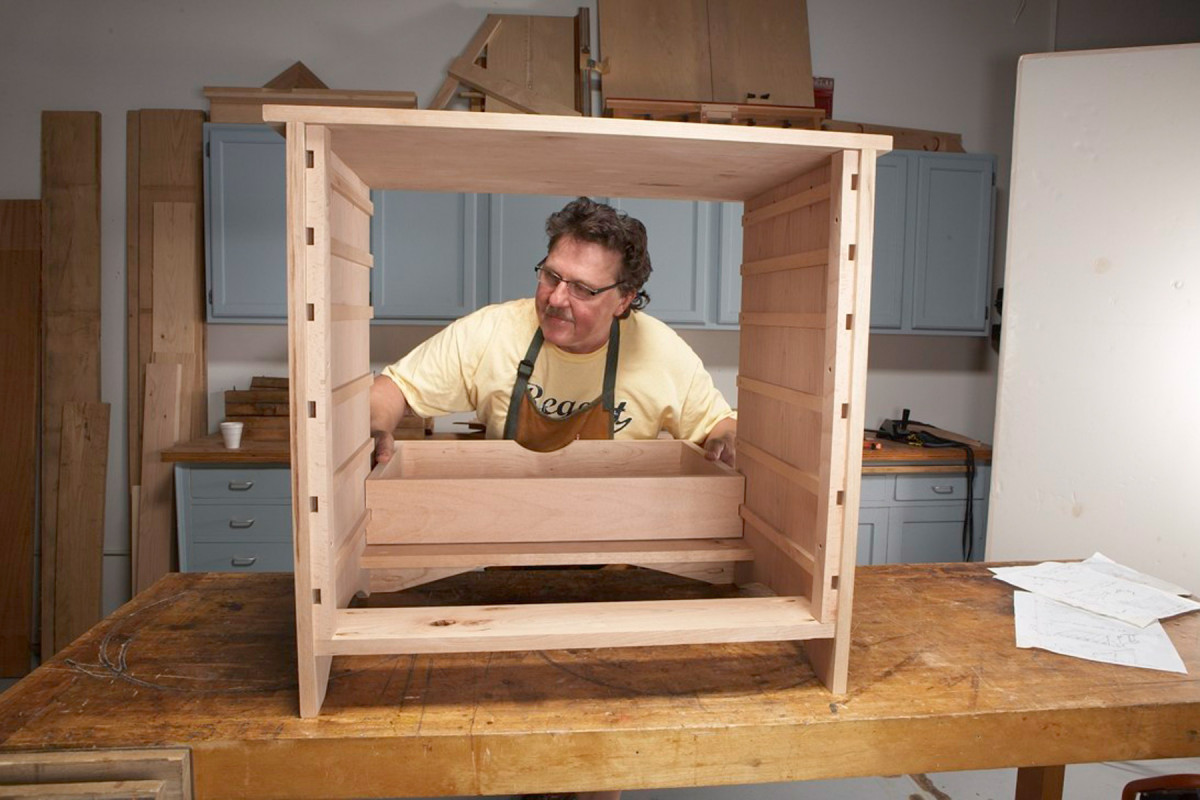
11. Check the fit. If the drawer is too tight, remove both runners and shave a bit of thickness from each one. Reinstall the runners and try again. Keep removing and shaving until the drawers slide freely.
23. Test fit the drawers (Photo 11). A tight fit is good, because it’s pretty easy to make the runners thinner. If the fit is too loose, you’ll have to make new runners or glue strips of veneer into the drawers’ runner slots.
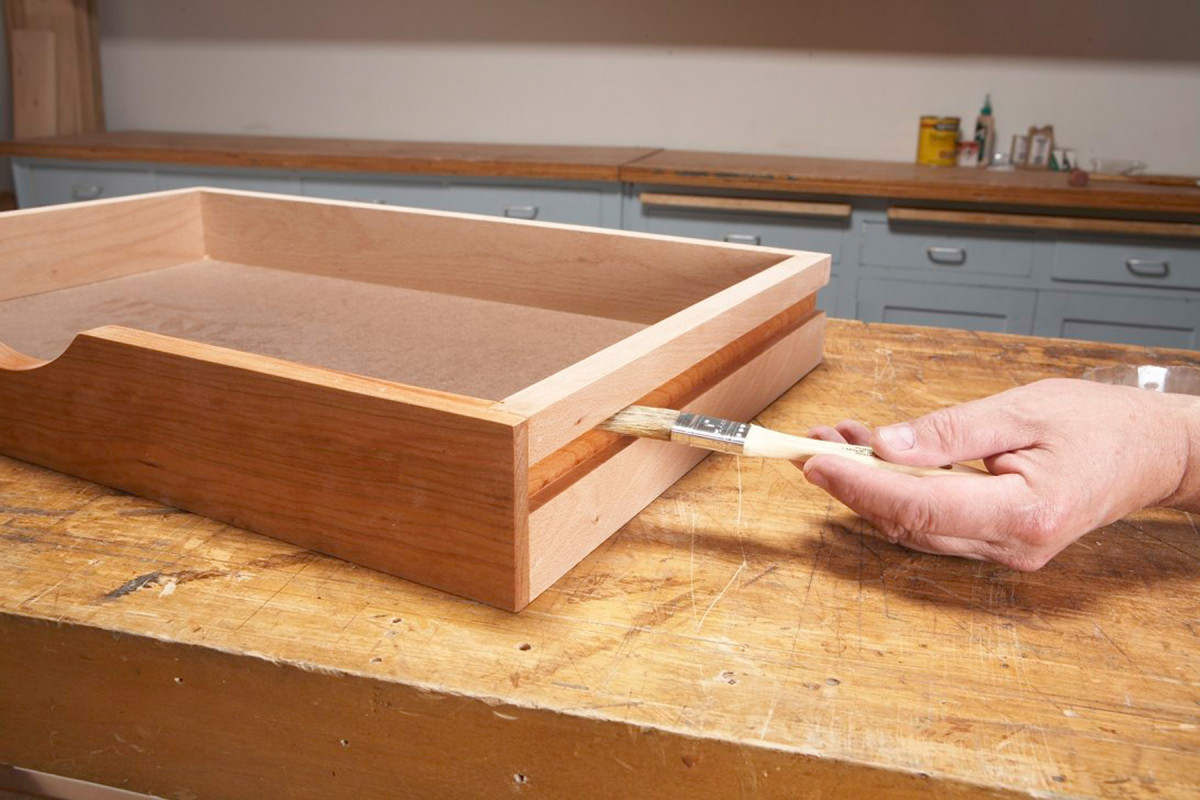
12. To make the drawers slide effortlessly, brush a coat of shellac into the runner slots and onto the runners. Let the shellac dry and then sand lightly.
24. Once you like the fit, it’s easy to make the drawers slide “like buttah” (Photo 12).
25. Install the top cleat (Q) 1/4″ inside the back edge, so it’s flush with the runner supports. Cut, fit and install the cabinet back.
26. Apply your favorite finish. I like an oil/varnish blend, such as MinWax Antique Oil.
Here are some supplies and tools we find essential in our everyday work around the shop. We may receive a commission from sales referred by our links; however, we have carefully selected these products for their usefulness and quality.